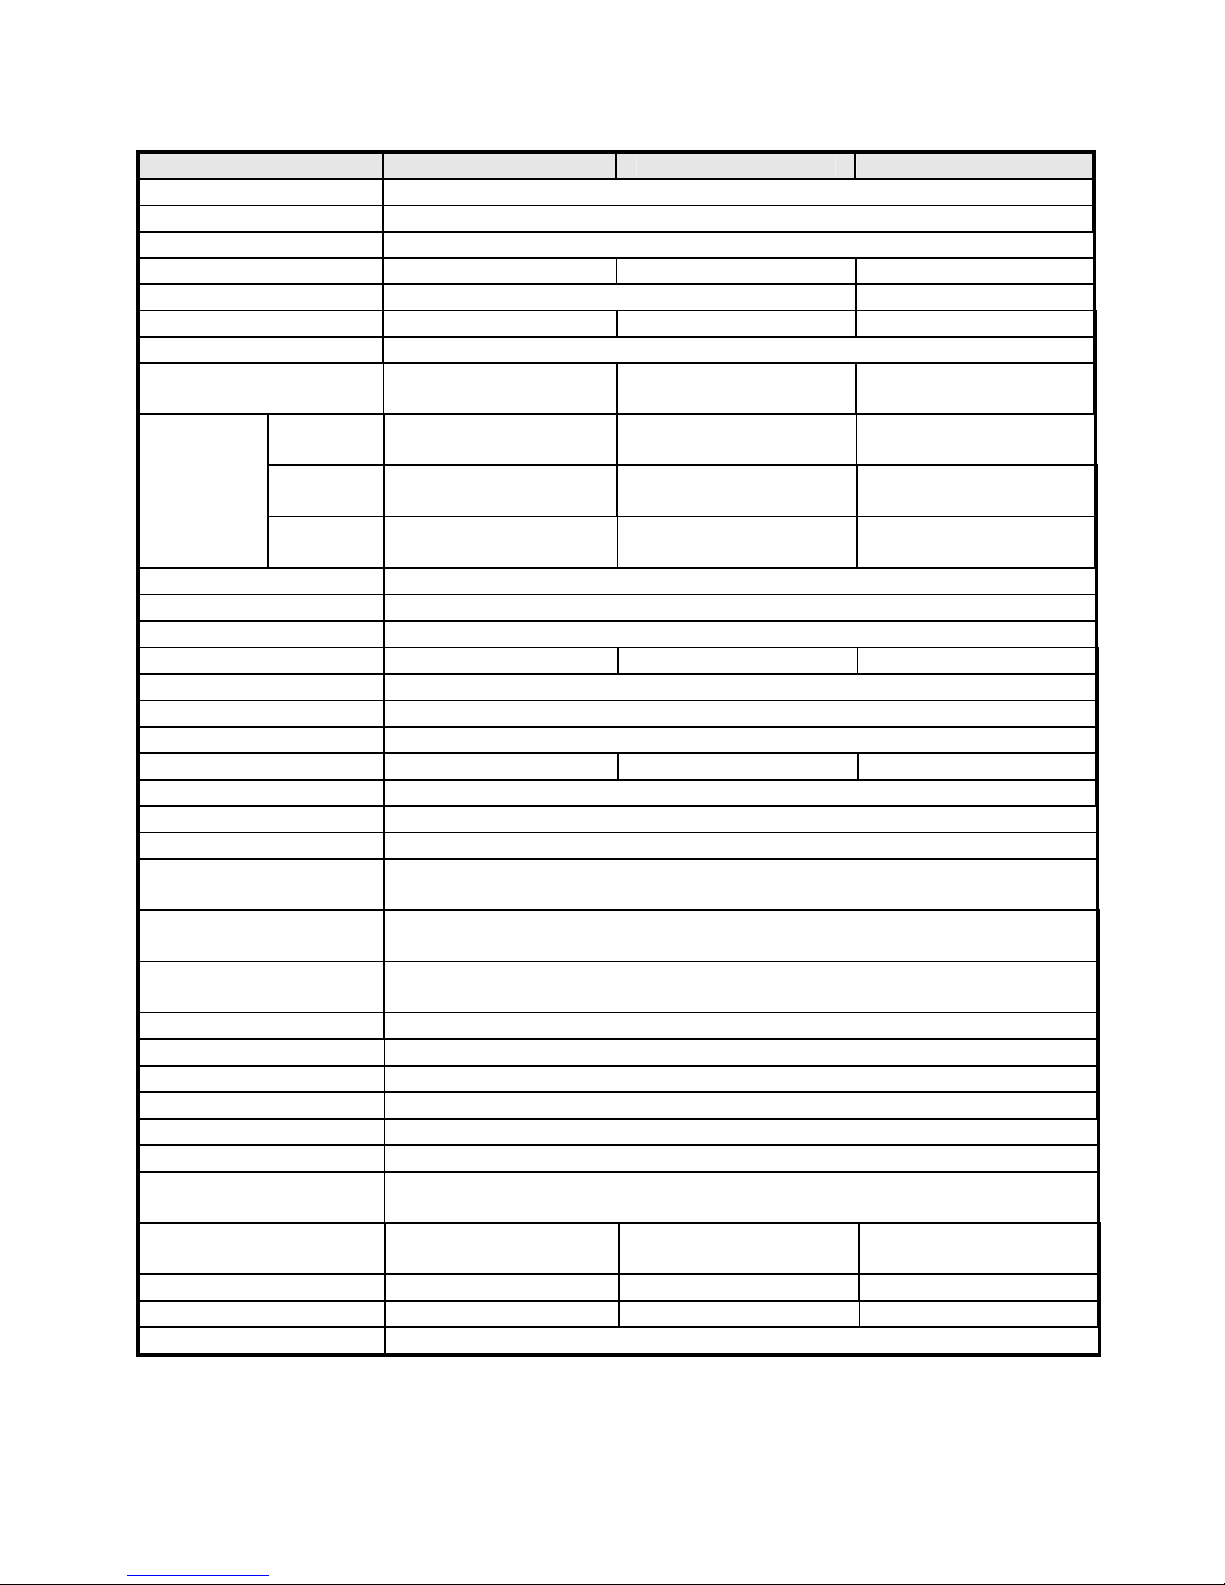
Lilin DVR216B User manual

MERIT LILIN ENT. CO., LTD
http://www.meritlilin.com
INSTRUCTION MANUAL
66-DVR204BCSE
DVR204B/208B/216B
4/8/16CH DIGITAL VIDEO RECORDER

WARNING
Do not expose the DVR under strong sunlight, heat or wet
environment while installing. As it may decrease the performance
of DVR and damage the machine.
Do not plug the power plug or touch the case with wet hands as
this may result in electric shock or fire.
Do not forcedly bend or put heavy object on power cable as this
may result in injury to personnel or damage to equipment.
Do not operate DVR with damaged power cord or loose electrical
outlet as this may result in electric shock or lead to accidents.
Please use individual power instead of shared electrical outlets
with other electrical equipment as this could result in damage or
accident.
Do not attempt to service this DVR by yourself as it may expose
you to dangerous voltage or other hazards. Please refer all
service to the qualified servicing distributor.
Do not open the covers or insert any object into DVR.
CAUTION
Do not place the machine on an uneven surface or it would
decrease the DVR efficacy or cause possible machine
malfunction.
Do not strike or shake the DVR while recording. Improper usage
may lead to damage on the system itself.
CAUTION
Make sure the voltage selector switch is set
to appropriate setting before plug in!

1. Specification
Model DVR204B DVR208B DVR216B
Video System NTSC/PAL
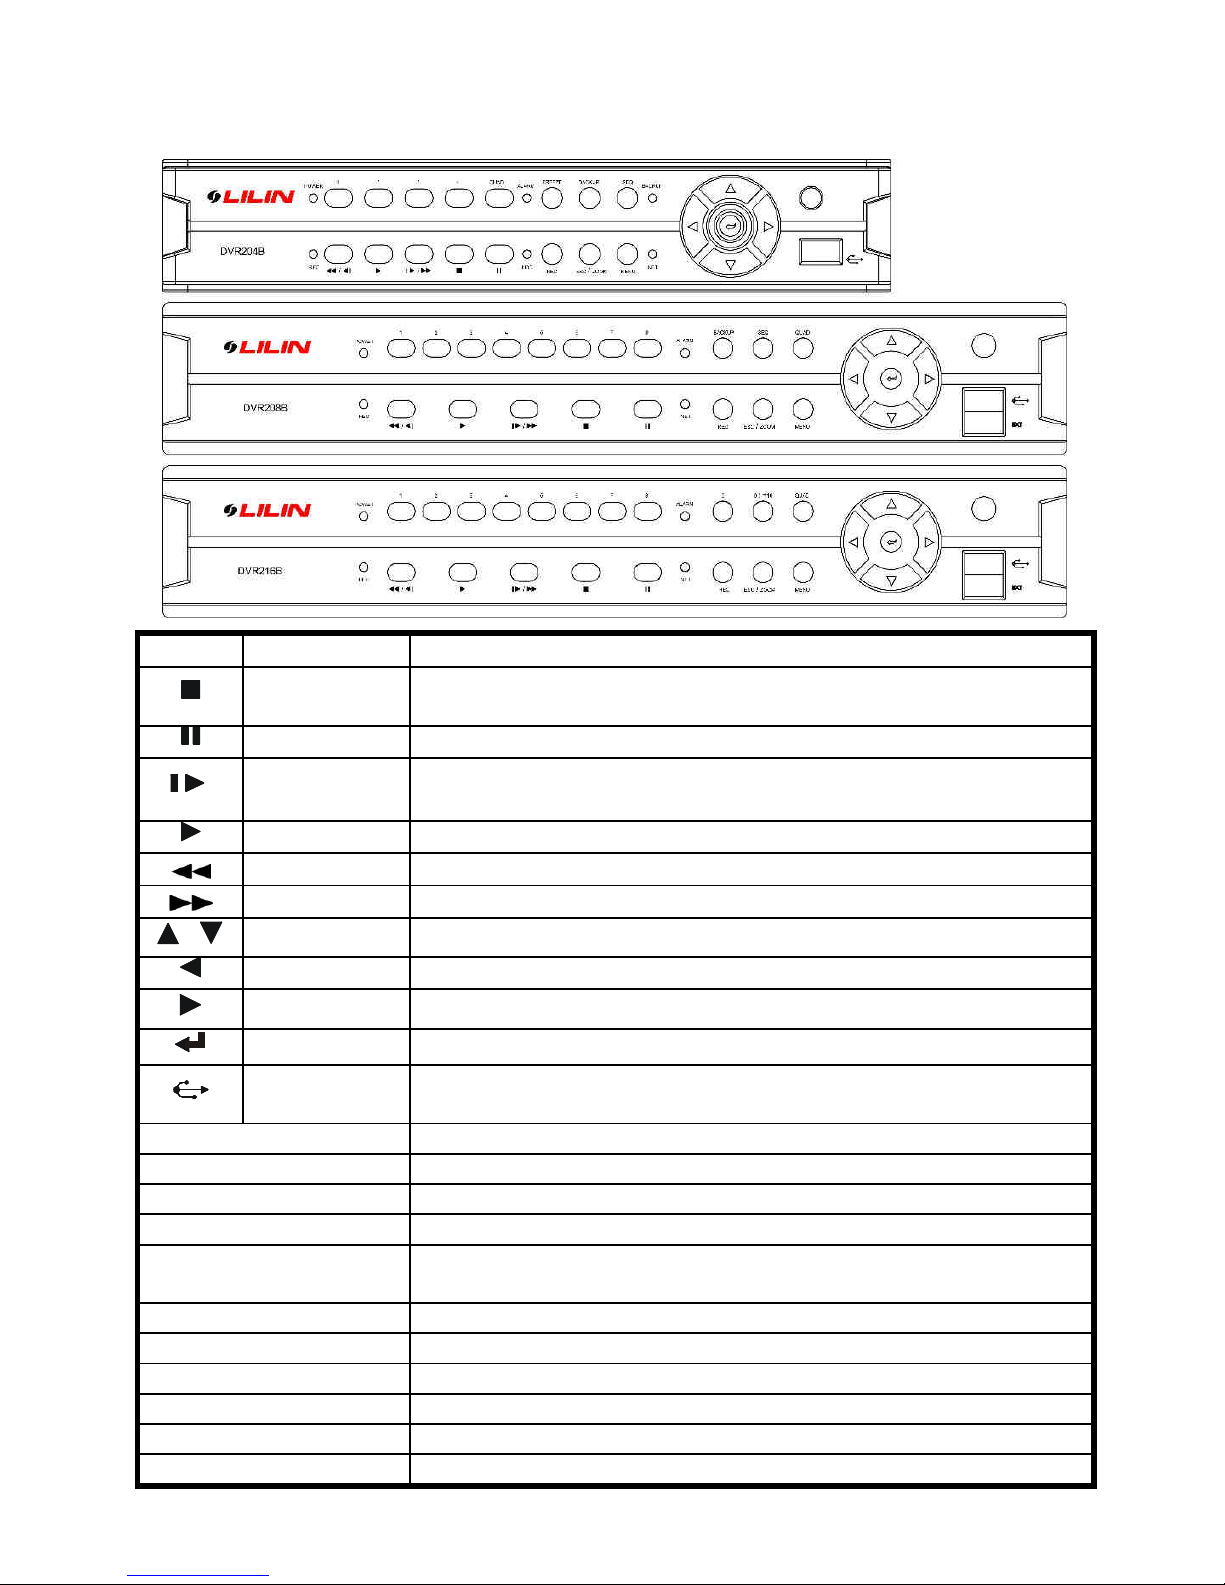
Control P nel Yes
Compression H.264
Video Input BNC x4(1 Vp-p,75
Ω
) BNC x8(1 Vp-p,75
Ω
) BNC x16(1 Vp-p,75
Ω
)
Video Output BNC x1/ VGA x1 BNC x2/ VGA x1
Audio Input/Output Input1/ Output1/ RCA Input1/ Output1/ RCA Input4/ Output1/ RCA
Audio B ckup Yes
Recording Fr me NTSC 120fps
PAL 100fps NTSC 240fps
PAL 200fps NTSC 480fps
PAL 400fps
D1 120fps(720x480)
100fps(720x576)
120fps(720x480)
100fps(720x576)
120fps(720x480)
100fps(720x576)
H lf D1 120fps(720x240)
100fps(720x288) 240fps(720x240)
200fps(720x288) 240fps(720x240)
200fps(720x288)
Recording
Resolution
CIF 120fps(352x240)
100fps(352x288) 240fps(352x240)
200fps(352x288) 480fps(352x240)
400fps(352x288)
Recording Im ge Qu lity
5 Levels (Lowest/ Low/ Norm l/ High/ Highest)
Recording Mode M nu l/ Event (Motion, Al rm)/ Filing
Displ y Mode Time/ Event (Motion, Al rm)
Se rch Mode 1,4 1,4,6,9 1,4,9,13,16
Mode Enl rge 8 times, PIP, Ch nge Ch nnel Cycle
L ngu ges Chinese, English, Multi-l ngu ge
Pl yb ck Speed Times 2,4,8,16,32,64
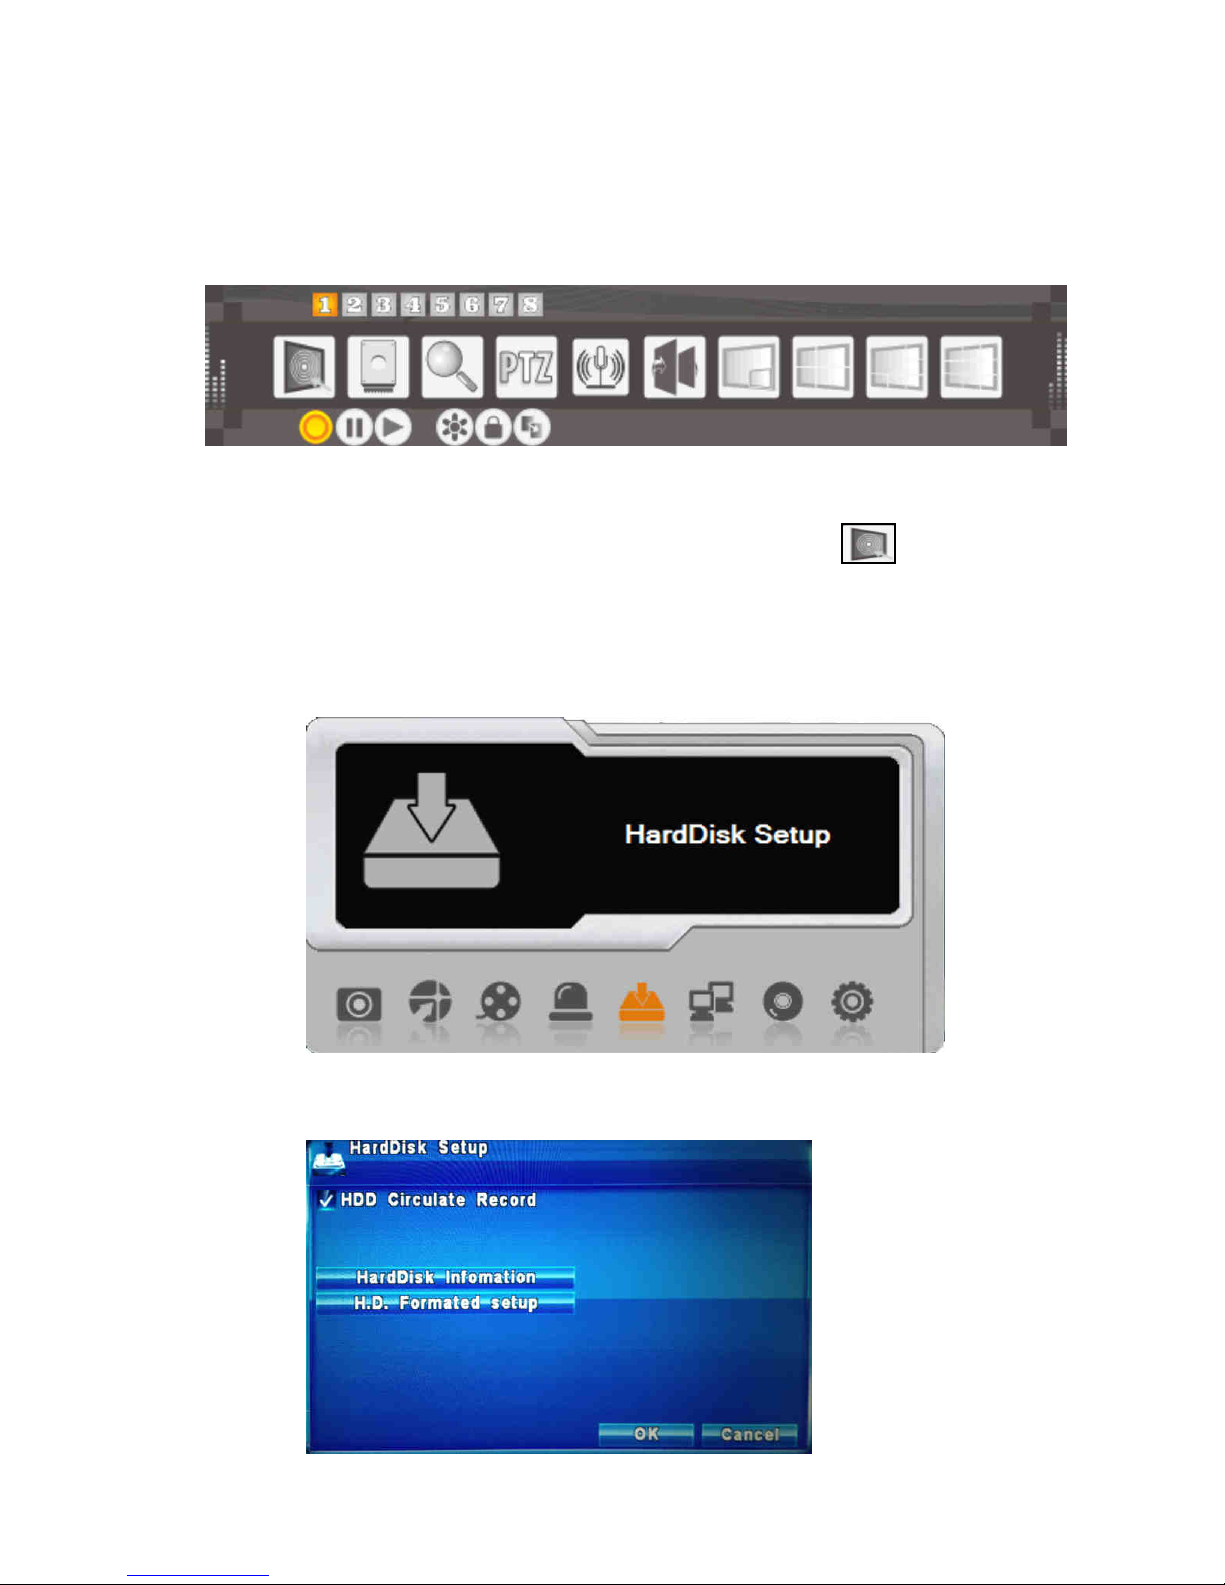
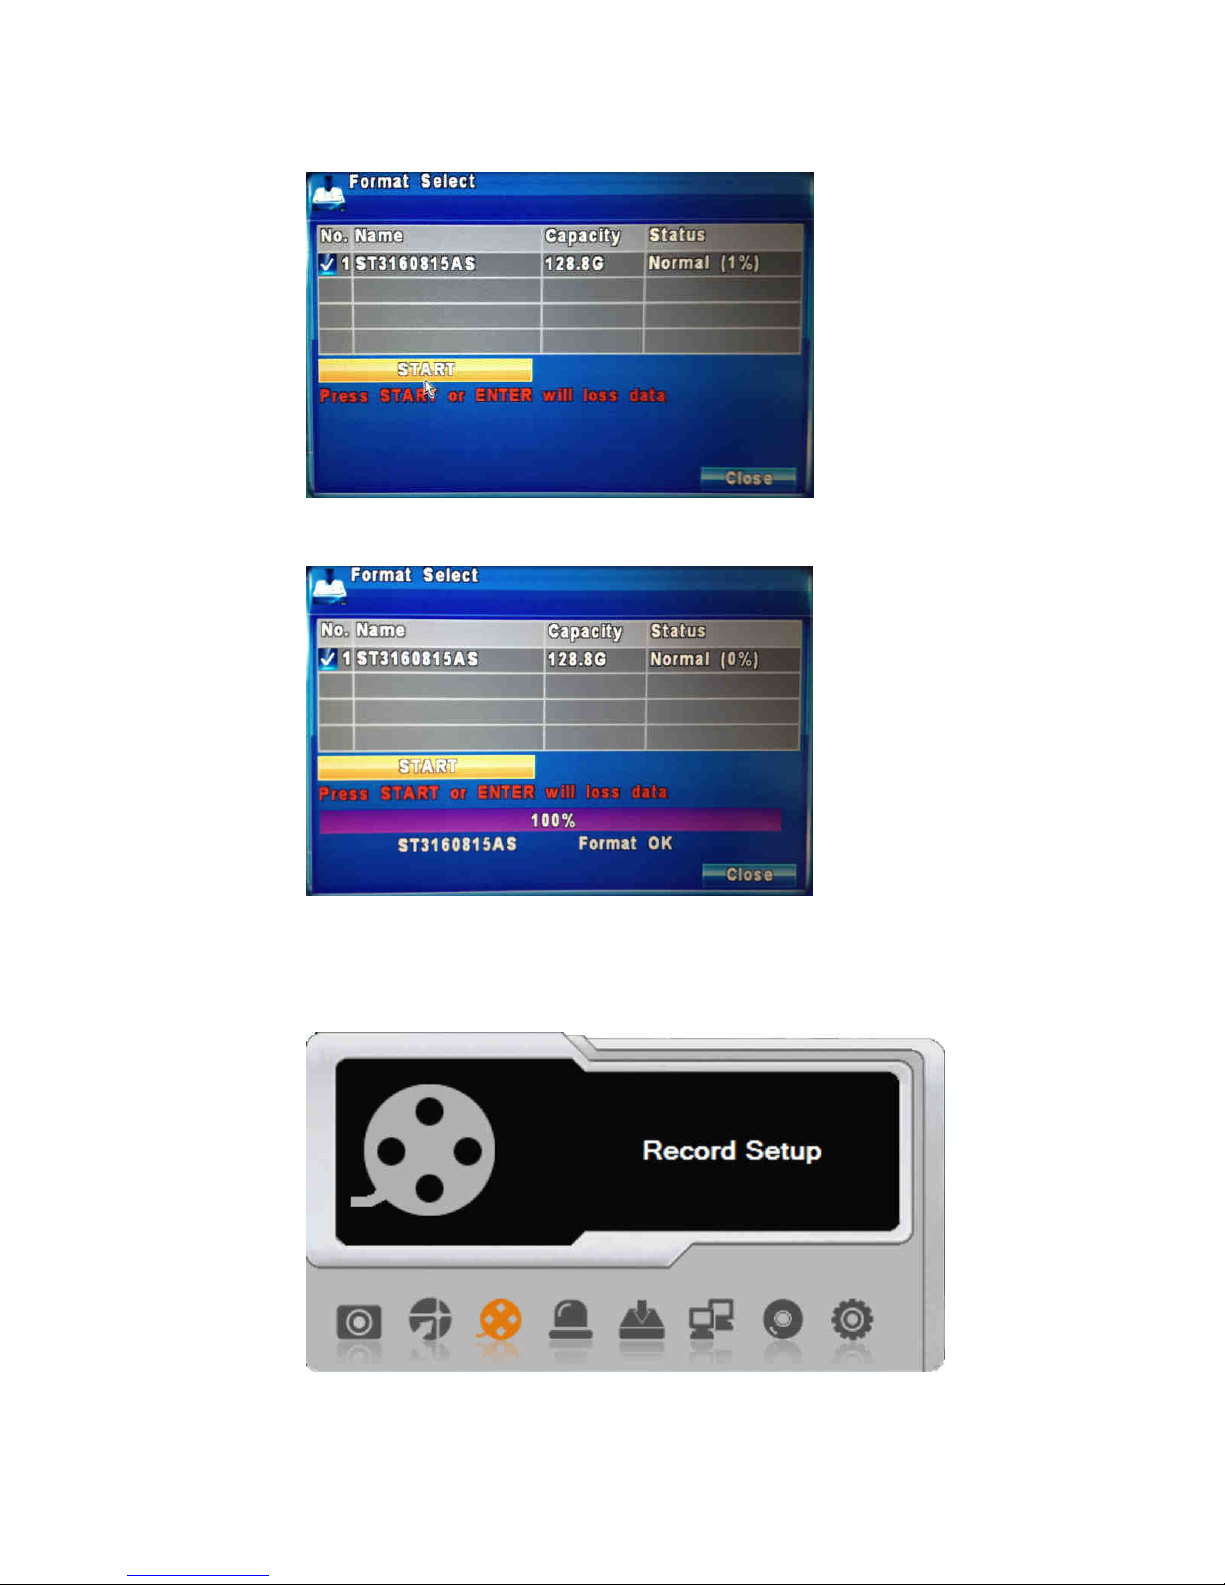
SATA/SATAⅡ HDD 1 x HDDs M x. (3TB) 2 x HDDs M x. (3TB) 2 x HDDs M x. (3TB)
USB B ckup USB2.0 Fl sh Memory Stick
Network B ckup Support
Network Connection TCP/IP,DHCP,LAN,3G,DDNS,PPPoE
Remote Monitoring
Softw re Yes (AP Progr m,IE,CMX)
Remote Al rm
Notific tion E-m il,SMS
Push Notific tion
(Mobile Security) Yes
Motion Detection NTSC:22x15/ PAL:22x18 (Grid)
Al rm Recording 1~60 Seconds Adjust ble
Video Loss Detection Yes
Mobile phone connection
Yes
Buzzer Yes
PTZ Control/ RS485 Yes
P ssword Control/
Keyp d Lock Yes
Power AC100~240V/in,
DC12V(4.17A/50W) AC100~240V/in,
DC12V(5A/60W) AC100~240V/in,
DC12V(5A/60W)
Dimension
290mm x260mm x52mm 360mm x308mm x60mm 360mm x308mm x60mm
Weight 1.7kg 2.5kg 2.7kg
Abnorm l Detection W tchdog Progr m

2. Front Panel
1~4/8/16
Ch nnel 1~4/8/16
Under the live viewing mode or pl yb ck mode, 1~4/8 Ch nnel displ y.
Stop
Under the pl yb ck mode, press the STOP button to stop the oper tion or go to
the upper menu.
P use
Under the pl yb ck mode, press the P use button to p use the pl yb ck.
Step Forw rd
Under the p use mode during the pl yb ck, press the button to pl yb ck fr me by
fr me in e ch time.
Pl y
Under the live viewing mode, press the Pl y button to enter the pl yb ck mode.
F st Rewind
Rewind speed: x2 / x4 / x8 / x16 / x32
F st Forw rd
Forw rd speed: x2 / x4 / x8 / x16 / x32
Up
/ Down To move up or down of the selection setting in the menu.
Left
To move left of the selection setting in the menu.
Right
To move right of the selection setting in the menu.
Enter
Press the Enter button to confirm the setup or go into sub-menu.
USB 2.0 Port
USB b ckup or firmw re upd te.
(There re front nd b ck USB th t c n be used one t time.)
Power Indic tor LED The LED will light on when power on.
REC Indic tor LED The LED will light on when recording.
Al rm Indic tor LED The LED will light on when Al rm Trigger or Motion Trigger.
Network Indic tor LED The LED will light on when network connected.
SEQ button Under the live viewing mode, press the button to st rt/stop the uto switching
function.
BACKUP button Video b ckup.
FREEZE button Turn on/off to p use the screen
MENU button Under the live viewing mode, press MENU to enter the m in menu.
ESC/ZOOM button Under the menu mode, press ESC/ZOOM to go to the upper menu.
REC button St rt/Stop recording under the live mode.
QUAD button 4/9/16 split screen displ y

3. Installation
1 USB Mouse Port 2.0 USB Mouse
2 Video In 4/8/16CH Video Input (BNC)
3 Video Out 1CH Video Output (BNC)
4 Audio Out 1CH Audio Output (RCA)
5 Audio In 4CH Audio Input
6 DC12V Power Input
7 VGA PC Monitor Output
8 LAN RJ-45 Network Connection
9 RS-485 For Speed Dome Use
4CH DVR
8CH DVR
16CH DVR

4. System Operation
There re 3 different types of DVR control modes: USB mouse, remote control
nd front p nel.
USB Mouse Oper tion
1. Quick Menu: Left click the mouse nd select “Quick Menu”
2. Left click the mouse button under the m in menu to click on sub-select
menu.
3. Left click the mouse under the select menu to click on sub-menu.
4. Utilize mouse to m ke ch nges on setting section.
5. Ple se refer to Displ y Setup for PTZ (P n-Tilt-Zoom) Setup.
Remote Control Oper tion
Remote Control nd front p nel oper tion re identic l in functions; ple se
refer to Front P nel nd the det iled reference t ble s shown below:
Record
Zoom
in/out
Auto P n
Left Selection/ F st Rewind
PTZ Control(PTZ)
Not used
0~9
Numeric l keys
DVR Control
Previous/Next single ch nnel
Setup Menu
Right Selection/ F st Forw rd
Esc pe/ exit/ stop buzzer
Zoom in
Screen frozen
Auto Switching
4/9/16 split screen displ y
Not used
Audio/ Mute
Stop/ Pl yb ck/ P use
Down Selection
Up Selection
Video
B ckup
Stop Record

ICON DESCRIPTION
AUDIO Live Audio is On/Off
PLAY Pl y the l test recording segment portion
0~9, +10 Switch to full screen or qu d displ y
FREEZE Turn on/off to p use the screen
MENU En ble/ Dis ble Setup Menu
PRESET PTZ (P n-Tilt-Zoom) mode
ZOOM Zoom in/out
ESC Return to the previous menu
ENTER Proceed into ction
FF F st Forw rd. E ch press incre ses the speed to the next level.
There re six speeds: 2x, 4X, 8X, 16X, 32X nd 64X.
STOP Stop pl yb ck.
RF Rewind F st. E ch press incre ses the speed to the next level.
There re six speeds: 2x, 4X, 8X, 16X, 32X nd 64X.
FREEZE Turn on/off to p use the screen
SPLIT Split into screens
SEQ Auto-Sequence
ZOOM IN Zoom in
ZOOM OUT Zoom out
DVR Switch DVR ID1~4

5. Quick Setup
Default setting:
Login ID: dmin
P ssword: 1111
IP ddress: 192.168.0.100
Def ult g tew y: 192.168.0.1
•
Enter m in menu
Live monitor mode nd right click your mouse, select to enter into
m in menu or click on “MENU”button to enter.
•
Form t h rddisk
(1) Select “H rdDisk Setup” under M in Menu mode
(2) Choose “H.D. Form ted setup”

(3) Select the h rd disk you would w nt to form t nd proceed form tting
by click “START” button
(4) Complete form tting
•
Record Setup (resolution r te, im ge qu lity, nd im ge qu ntity)
(1) Record Setup

(2) Setup on resolution r te, im ge qu lity, nd im ge qu ntity
•
Record Setup (Sequence Setup)
(1) Sequence recording schedule setup

(2) Select recording in full-time (24/7 nonstop) nd pply to ll c mer s
with the s me rule by select “All S me.”
(3) Setup w s being succefully completed. Screen centr l will show
“recording” red light indic tes recordings re currently in session

6. Toolbar management
In livetime survillence mode (LIVE mode), you re given choices to monitor
screen im ges cross ll c mer s, retrieve udio sources t the scene, nd
screen im ge lter tion control. Next, we re going to introduce the oper tion of
survillence mode s well s reminder icons.
Right-click the mouse, you m y enter into LIVE mode to m n ge different
fe tures.
ICON DESCRIPTION
M in Menu,Resting the cursor on this icon will bring up the following nine
menu icons
System Disk Inform tion – Version, IP, MAC, nd HDD c p city
Zoom In/Out = ”Zoom,” AUX1~8 (Sign l screen only)
PTZ Control = “PTZ,” (sign l screen only)
Sound Control
=「SEQ」sequence
PIP (Picture in Picture)
Qu d Displ y
9-Screen Displ y
16-Screen Displ y

Gr phic l icons will show on the screen fter right-clicked your mouse under
LIVE mode
ICON DESCRIPTION
~ CH1~CH16 Sign l Screen
Record=「REC」,St rt record
Stop record
Pl y=「PLAY」,pl yb ck
Freeze-screen is frozen
Lock=「LOCK」
B ckup- inform tion b ckup
Gr phic l icons will show on the screen fter right-clicked your mouse under
Remote mode
ICON DESCRIPTION
Remote Sn pshot. Pictures t ken on c mer nd im ge stor ge.
(Pre- rchived folder—My Documents Folder / DVRD t / Sn pshot)
Select Archive Folder-Select the folder to store the photo nd video
Switch off to full screen displ y
Im ge qu lity switch
HQ (High Qu lity); LQ (Low Qu lity)
Remote Recording- record nd store.
(Pre- rchived folder—My Documents Folder / DVRD t / Sn pshot)
Remote shortcut icon rrow

NOTE: M ke sure th t your Internet browser llows signed ActiveX plug-in
running on your PC.
Set “Downlo d Signed ActiveX plug-in controls” to “Prompt,” nd set “Run
ActiveX control nd plug-in” to “En ble” on your IE (Internet Explore)
Steps:
ExploreToolsOptionsSecurity SettingsAdding to trusted Website
Switch to the PLAYBACK Mode by pressing “PLAY” button under the LIVE
mode. The control p nel will ppe r on f r rigt down on the screen, the
control p nel c n be controlled vi mouse cursur.
ICON DESCRIPTION
Sn pshot- turn the current screen into the “Im ge “ nd store in USB
device.;the Im ge will be stored in computer on Remote mode
Rewind F st. E ch press incre ses the speed to the next level. There re
six speeds: 2x, 4X, 8X, 16X, 32X nd 64X.
P use/Sign l Screen pl yb ck

Norm l speed pl yb ck
Stop
Norm l speed pl y
P use/Sign l screen pl y
F st forw rd. E ch press incre ses the speed to the next level. There re
six speeds: 2x, 4X, 8X, 16X, 32X nd 64X
Gr phic l icons th t will displ y under Remote mode
ICON DESCRIPTION
USB device detected
HDD not being detected
Lock is on — need to enter code number in order to unlock
Network is connected
Recoding — in full screen the icon ppe rs when the one of the c mer s is
recording
Event occurred. Appe r on l rm, lost ch nnel, nd motion detected.
Recording. Icon color turned red represents c mer s re now recording.
Live udio is on
Live Audio is off
OSD (On-screen Displ y)
Rel y off
Rel y on
Showing how much the h rd disk sp ce is currently being occupied (in
percent ge).

Switch to PTZ (P n-Tilt-Zoom) mode by pressing “PTZ” button under the
LIVE mode. The PTZ icon will ppe r on upper left side of screen nd the
control p nel will ppe r on the right down corner of the screen.
ICON DESCRIPTION
Vi Set funtion, c mer s will point-by-point to p trol the environment fully.
Click on “SET” icon nd hit Enter button to proceed this ction.
Pre-set number N(1~255)
Move to Pre-set number N
Delete Pre-set number
Autom tic lly p trol
Zoom in
Zoom out
Iris on
Iris off
Focus on
Focus off
66-DVR204BCSE-1

MERIT LILIN ENT. CO., LTD
http://www.meritlilin.com
INSTRUCTION MANUAL
66-DVR204BCSE
DVR204B/208B/216B
4/8/16CH DIGITAL VIDEO RECORDER
This manual suits for next models
2
Table of contents
Other Lilin DVR manuals

Lilin
Lilin NDR104 User manual

Lilin
Lilin PDR-400 User manual

Lilin
Lilin PDR-6040 A User manual

Lilin
Lilin dvr2 series User manual

Lilin
Lilin DVR216C User manual

Lilin
Lilin PDR-3160 User manual

Lilin
Lilin DVR004S User manual

Lilin
Lilin PDR 6164 User manual

Lilin
Lilin nvr400L User manual

Lilin
Lilin DHD204A User manual