Lilin NVR404C User manual

4CH H.264 COMPACT NVR
INSTRUCTION MANUAL

4CH Compact NVR Manual 1
Introduction
The 4-channel compact Network Video Recorder offers a standalone solution for managing IP
cameras and systems. It uses high quality H.264 decoders to deliver 1080P/720P/D1/VGA IP
camera streams. Each channel can be individually configured to SD and/or HD resolution to
optimize storage space.
Embedded HD multimedia engines offer 3D intellectual motion adoptive refinement, providing
a maximum resolution of 1080P. The TV wall design allows the NVR to be cascaded via TCP/IP
network for easy cabling. The NVR has an IP scan facility, (WS Discovery) which locates all the
cameras on the network and imports a preview thumbnail of each channel. This is an
automated installation wizard that speeds up commissioning. The self-diagnostic feature
monitors the internal temperature, cooling fan, HDD I/O speed, network status and information
can be accessed via the health check report.
The NVR can be controlled via multiple input methods; remote control, keyboard with PTZ
joystick, touch screen monitor, or USB mouse. When connected to a touch screen monitor,
Smartphone style features like ‘pinch and zoom’ can be used to navigate the system.
The NVR provides various export methods including DVD/RW, USB DVD/RW, USB flash disk,
and HTTP download playable via Backup Manager. Extensive support for iPhone, iPad,
BlackBerry and Android allows for remote viewing of the connected cameras at high frame
rates. Browser based remote live monitoring and video playback features are also supported.
Features
• Standalone NVR
• Touch screen interface
• 1080P at 25FPS with up to 24MBPS network throughput.
• Full HD 1920*1080P HD multimedia output
• Can support one SATA 2.5-inch HDD or SSD HDD.
• HTTP browser based viewing including NVR configuration, PTZ control, playback, and
live monitoring
• IP scan utility
• Extensive support for iPhone, iPad, BlackBerry and Android devices
• CMX 3.6 software supported

4CH Compact NVR Manual 2
Trademarks and registered trademarks
• Microsoft, Windows 2000, Windows XP, Internet Explorer are registered trademarks of
Microsoft Corporation in the U.S and/or other countries.
• Adobe and Adobe PDF are registered trademarks of Adobe Systems Incorporated in
the U.S and/or other countries.
• JavaScript and all Java-based trademarks and logos are trademarks or registered
trademarks of Sun Microsystems, Inc. in the U.S and/or other countries.
• Linux, Macintosh, Mozilla, and Netscape Navigator are registered trademarks of the
respective holders.
• Pelco is a trademark of Pelco - Clovis, CA, and may be registered in certain
jurisdictions.
• Other names of companies and their products mentioned in this manual may be
trademarks or registered trademarks of their respective owners.
Caution
• Do not drop or strike the equipment
• Do not install the equipment near naked flames or heat sources
• Do not expose this unit to rain, moisture, smoke or dusty environments
• Do not cover the opening of the cabinet with cloth or plastic or install this unit in a
ventilated place. Allow 10cm between this unit and its surroundings
• Do not continue to operate the unit under abnormal conditions such as detection of
smoke, strange smell or no display on screen whilst power is turned on
• Do not touch the power connection with wet hands
• Do not damage the power cord or leave it under pressure
• To avoid unnecessary magnetic interference, do not operate this unit near magnets,
speaker system, etc.
• All connection cables must be grounded properly
CAUTION
RISK OF EXPLOSION IF BATTERY IS REPLACED
BY AN INCORRECT TYPE.
DISPOSE OF USED BATTERIES ACCORDING
TO THE INSTRUCTIONS

4CH Compact NVR Manual 3
Contents page
1. Basic Operation...........................................................................................................................................................5
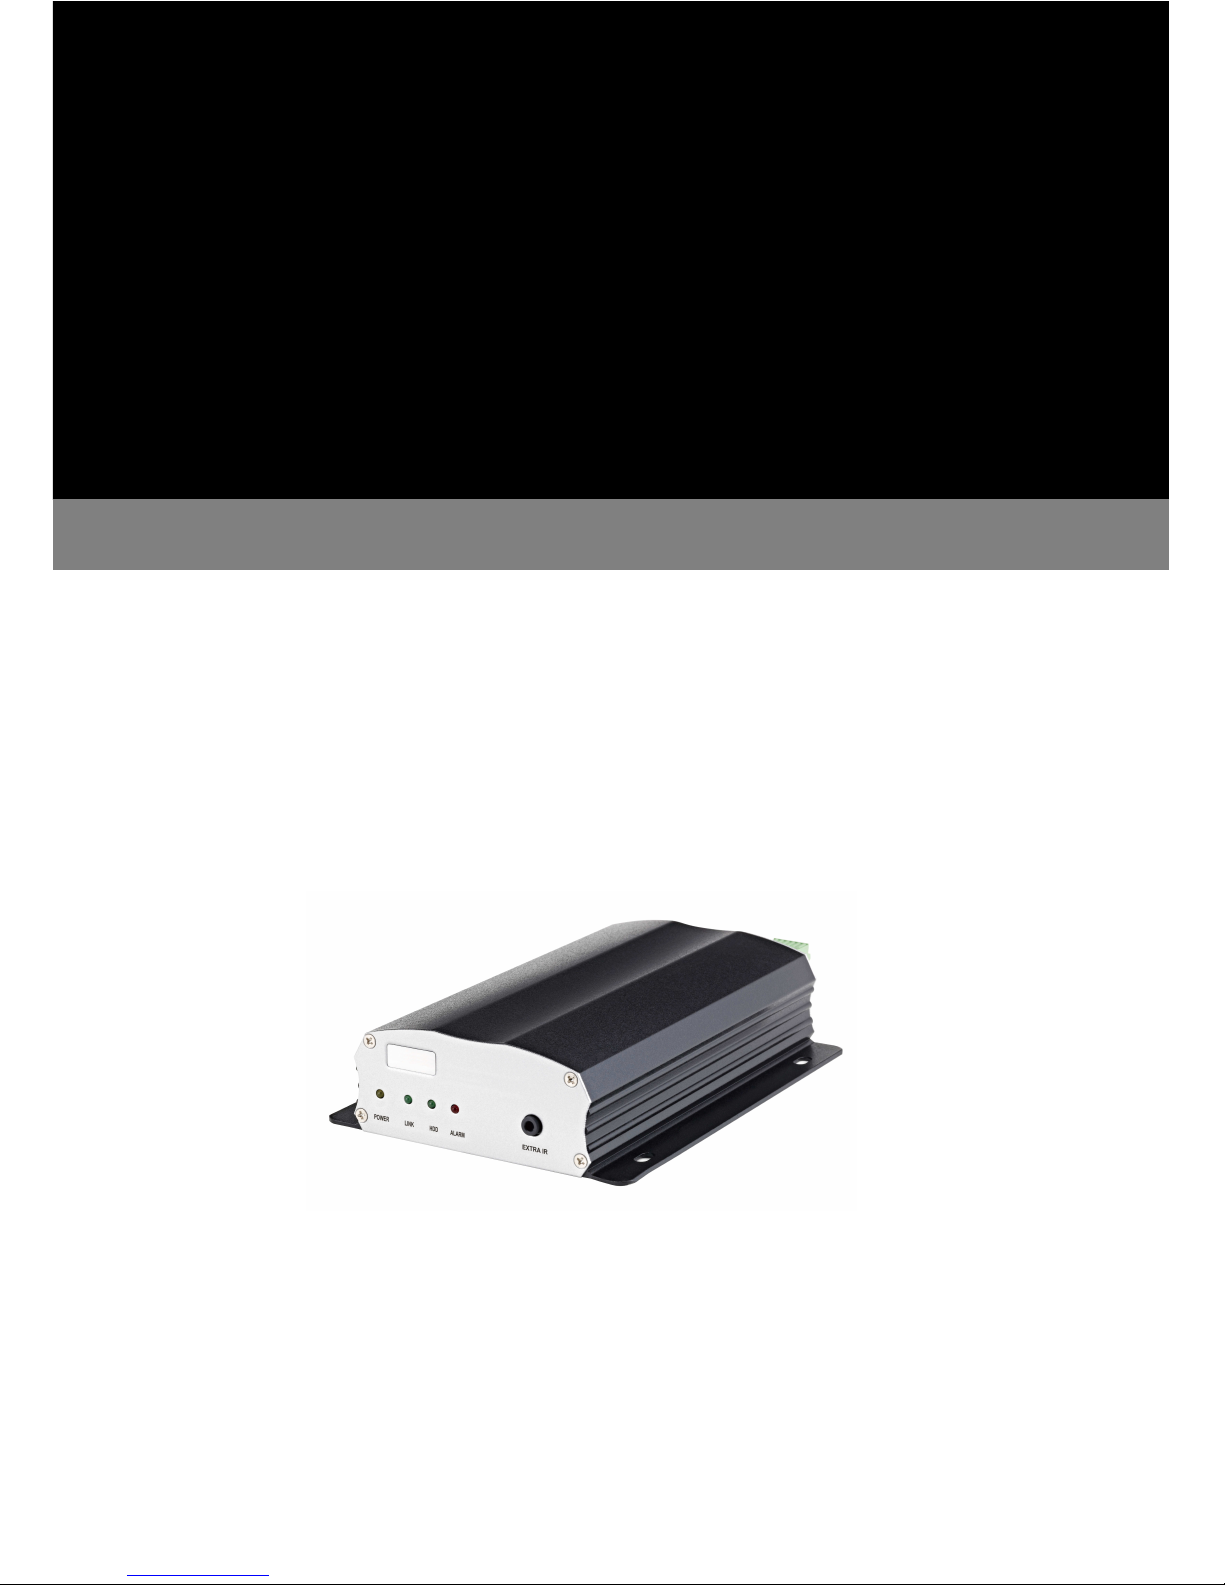
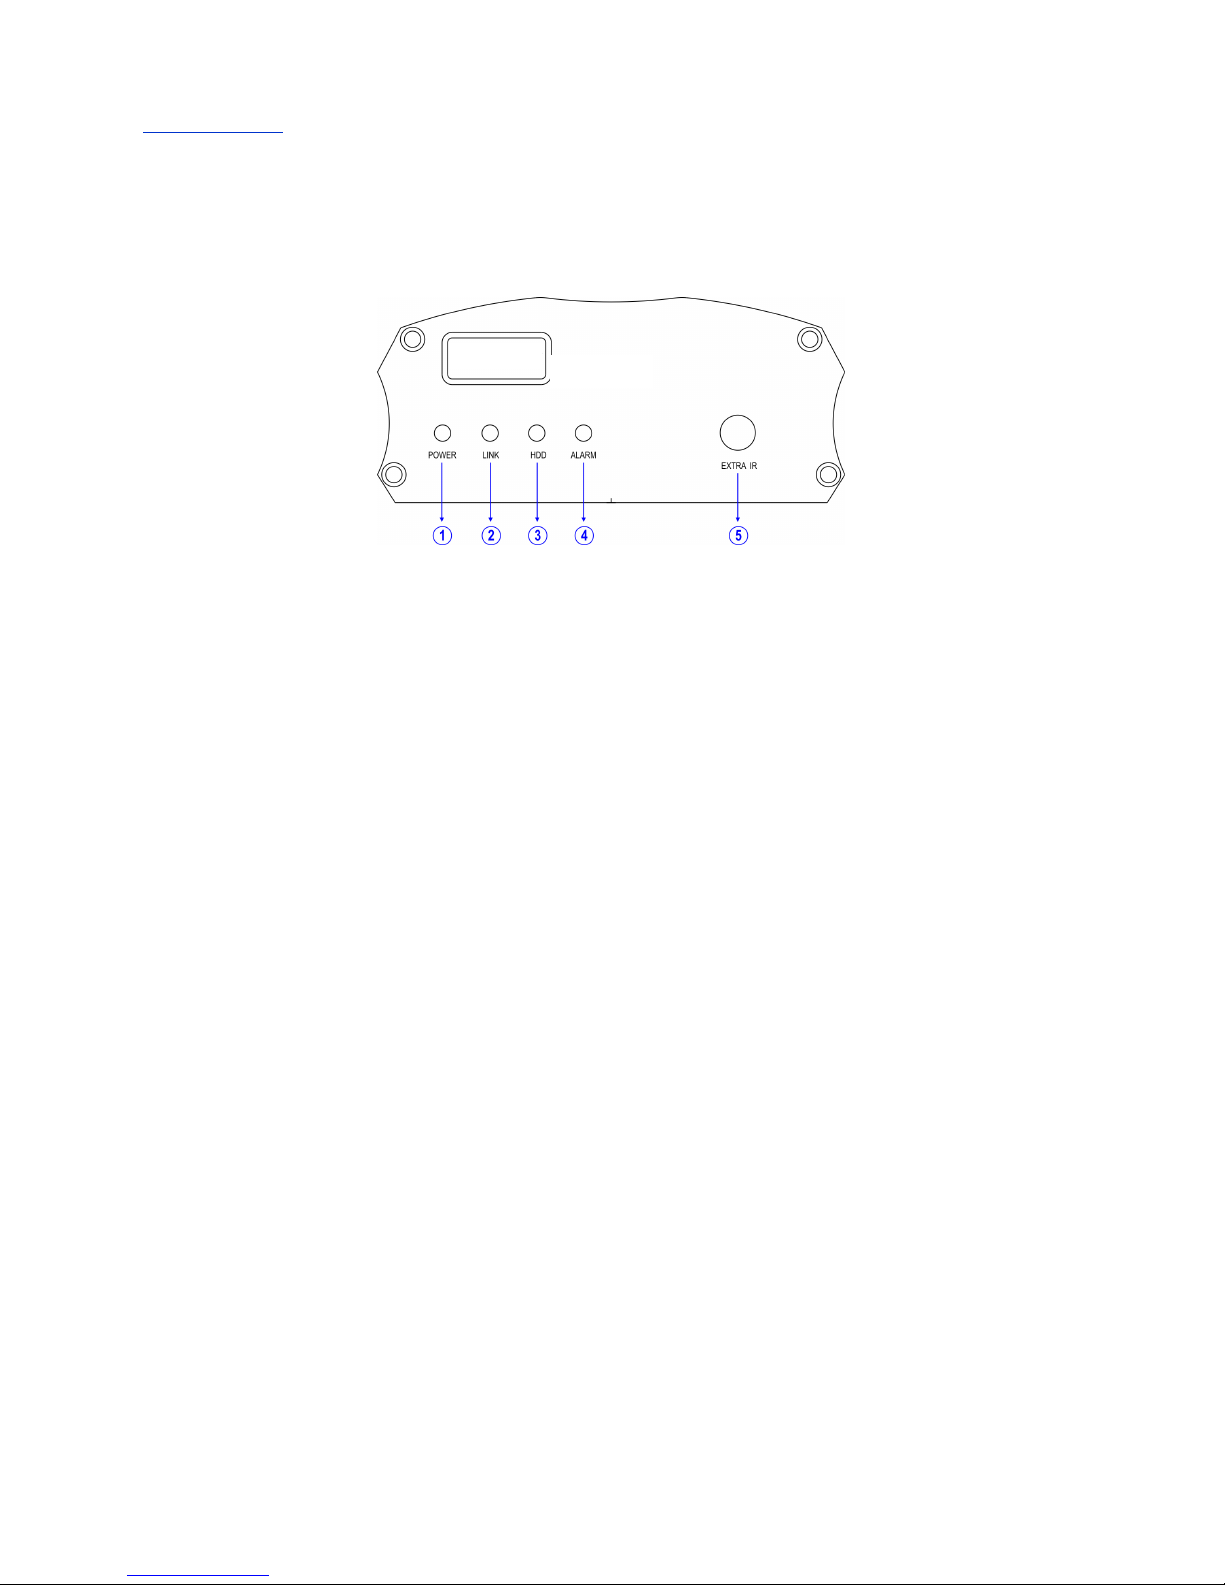
1.1 4CH-COMPACT NVR Front Panel........................................................................................................5
1.2 Remote control...........................................................................................................................................5
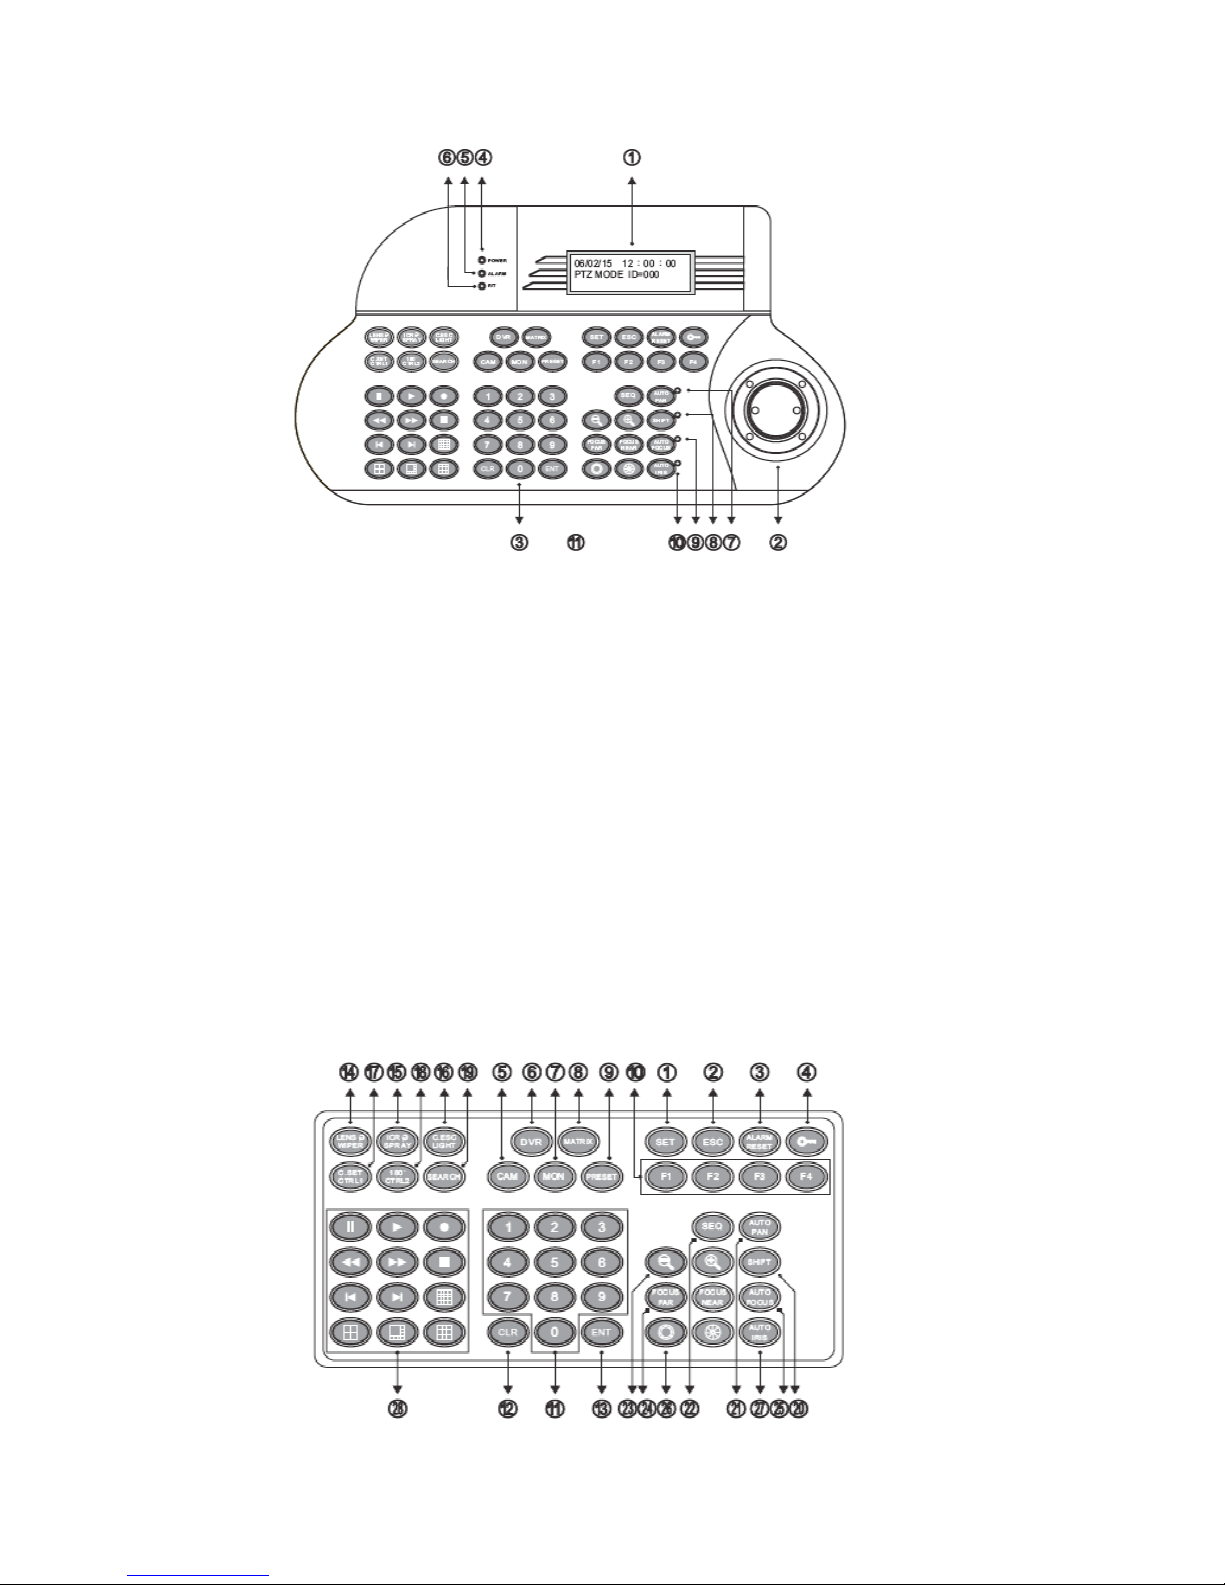
1.3 Keyboard .......................................................................................................................................................7
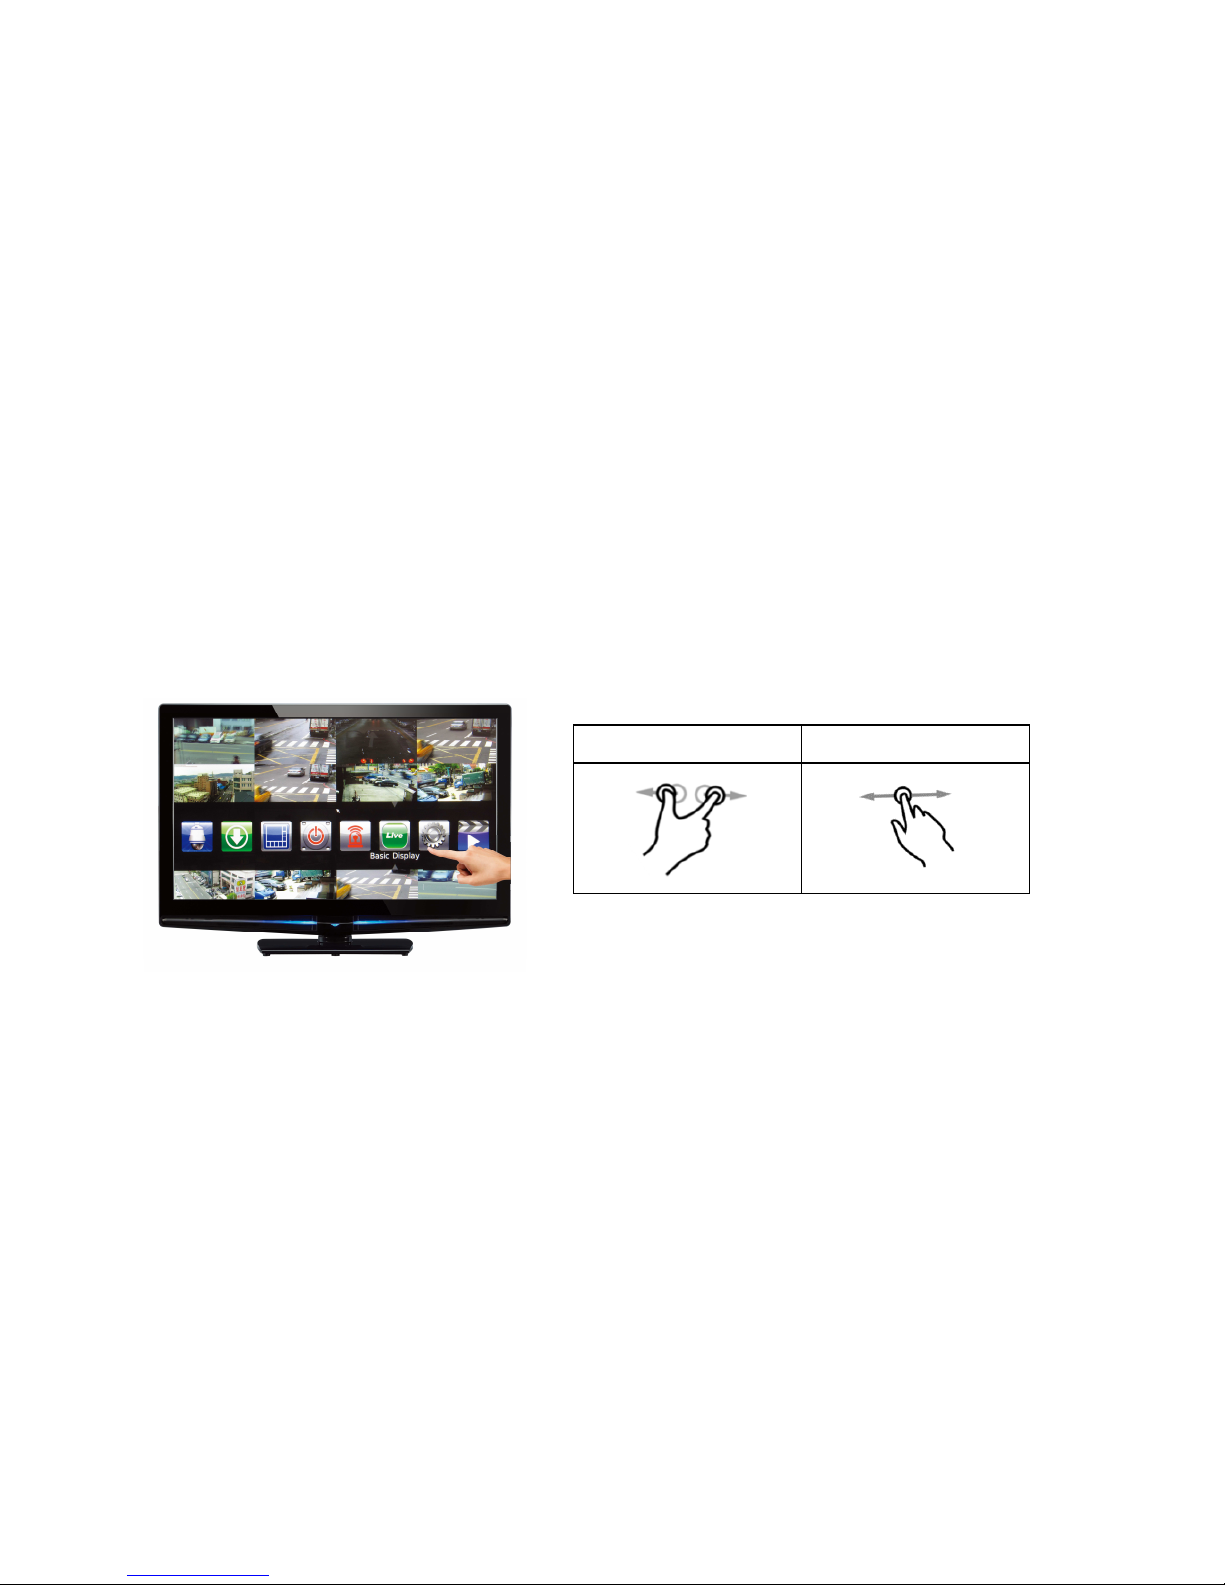
1.4 Touch Screen...............................................................................................................................................8
1.5 Mouse operations......................................................................................................................................8
1.6 Menu symbols.............................................................................................................................................9
2. Camera selection.................................................................................................................................................... 10
3. Digital zoom ............................................................................................................................................................ 10
4. Freeze......................................................................................................................................................................... 11
5. PTZ............................................................................................................................................................................... 11
6. Audio.......................................................................................................................................................................... 12
7. Playback..................................................................................................................................................................... 13
7.1 Accessing Playback................................................................................................................................. 13
7.2 Select time and date for playback................................................................................................... 13
7.3 Playback controls .................................................................................................................................... 14
8. Alarm management.............................................................................................................................................. 16
9. Backup / Export...................................................................................................................................................... 17
10. Event.......................................................................................................................................................................... 19
11. Basic web-based browser viewing................................................................................................................. 20
11.1 Web based browser playback ......................................................................................................... 20
11.2 Web based browser backup ............................................................................................................ 21
11.3 Web based browser export.............................................................................................................. 21
12. Backup Manager ................................................................................................................................................... 22
12.1 Playback exported files....................................................................................................................... 22
12.2 FTP download ........................................................................................................................................ 22
12.3 Convert already downloaded files ................................................................................................. 24
Quick Installation Guide ............................................................................................................................................ 25
1. Rear Panel................................................................................................................................................................. 25
2. Hard Drive(s)................................................................................................................................................ 25
2.1 Adding hard drives .................................................................................................................................. 25
2.2 Formatting hard drives........................................................................................................................... 26
3. Time and Date Settings .......................................................................................................................... 26
4. Network Settings....................................................................................................................................... 27
5. Adding Cameras......................................................................................................................................... 28

4CH Compact NVR Manual 4
Menu Configuration.................................................................................................................................................... 29
1. Setup Menu............................................................................................................................................................... 29
1.1 Camera setup............................................................................................................................................. 29
1.2 Monitor setup........................................................................................................................................... 32
1.3 Record setup............................................................................................................................................. 33
1.4 Alarm setup................................................................................................................................................. 35
1.5 Network setup ........................................................................................................................................... 37
1.6 System setup.............................................................................................................................................. 40
1.7 PTZ setup..................................................................................................................................................... 44
2. Web-based Viewing/Setup.................................................................................................................................. 47
2.1 Before using Internet browser............................................................................................................. 47
2.2 Logon ............................................................................................................................................................ 47
2.3 Configuring the NVR via web page .................................................................................................. 48
Appendix A ..................................................................................................................................................................... 54
1. Connections between a NVR and a RS-485 Keyboard................................................................ 54
2. Connections between NVR and IP PTZ cameras............................................................................ 54
3. Alarm I/Os and RS-485 for PTZ............................................................................................................. 54
Appendix B RS-485 Input and Output Pin Assignment.............................................................................. 55
Appendix C Hard Drive Support List .................................................................................................................. 55
Appendix D Support USB-DVD/RW and DVD Disk ...................................................................................... 55
Appendix E Supported USB Flash Disk ............................................................................................................. 56
Appendix F Hard Disk Recording Table............................................................................................................. 56
Appendix G Touch Screen Monitor Support List........................................................................................... 57
Appendix H Troubleshooting & FAQ ................................................................................................................. 57
Specification sheet....................................................................................................................................................... 59

4CH Compact NVR Manual 5
User Guide
Chapter 1: Basic Operation
1.1 4CH-COMPACT Front Panel
1. POWER LED (Yellow)
NVR power on/off indicator
4. Alarm LED (Red blinking)
Indicates motion or alarm triggers
2. LAN LED (Green)
LAN link light
5. IR receiver
3. HDD LED (Green blinking)
HDD recording indicator
1.2 Remote control
The remote control is a small wireless handheld device with an array of buttons for adjusting
settings. The buttons are separated in regions based on their features including NVR
operational keys, Pan, Tilt, and Zoom (PTZ) and numerical keys.

4CH Compact NVR Manual 6
NVR remote control operational keys
MENU Setup menu
ESC Escape/exit/stop
SHIFT Split and full screen switch
ZOOM Digital video zooming
REC Record/stop recording
FREEZE Live video freeze
Pause
Playback
Stop
Fast forward
Fast rewind
Next single channel
Previous single channel
4 split display
AUDIO Audio/mute
BACKUP Video backup
DVR/NVR Addressable NVR control
LANGUAGE Language selection
BACKSPACE Delete character
Auto Pan Perform auto pan feature Move up/tilt up
Zoom in Zoom in Move down/tilt down
Zoom out Zoom out Move left/pan left
Preset Call preset Move right/pan right
0 to 9 Numerical keys
Enter/set

4CH Compact NVR Manual 7
1.3 Keyboard
Keyboard controls
1. LCD display – display the keyboard system setup menu and operation information
2. Joystick – 3 axis (Pan/Tilt/Zoom) / 2 axis (Pan/Tilt)
3. Keypad panel – there are 54 keys which can control PTZ, matrix, DVR and telemetry
receivers
4. Power indicator
5. Alarm indicator
6. R/T indicator – data communication indication
7. Auto pan indicator
8. Shift indicator – shift key status indication
9. Auto focus indicator
10. Auto iris indicator
11. RJ-45 connector

4CH Compact NVR Manual 8
1. Set – enter setup menu mode
2. ESC – exit
3. Alarm reset – reset alarms and video
loss alarms
4. Keyboard lock – press for 2 seconds to
enter locking mode, press again to
unlock the keyboard
5. Cam – select a particular camera
6. DVR – select a DVR
7. Mon – select a monitor
8. Matrix –
press shift + matrix to switch to
matrix control mode
9. Present – recall and store preset options
10. Function keys
11. Numerical keys – 0-9 for entering
monitor, DVR, camera number
12. CLR – clear to setting data
13. ENT – enter or confirm data
programming
14. Wiper/lens
15. Spray
16. Light/C.ESC
17. CTRL 1 / C.SET
18. CTRL 2 / 180
19. Search
20. Shift
21. Auto pan
22. SEQ
23. Zoom in / zoom out
24. Focus far / focus near
25. Auto focus
26. Iris open / iris close
27. Auto iris
28. DVR control keys
1.4 Touch screen
Pinch and zoom:
Pinch the area on the touch screen where you want to zoom. To zoom in move your fingers
outwards, and to zoom out move your fingers inwards
Scroll screen: Swipe the screen left and right to navigate through the menus
Single tap: Tap icons to select
Double tap: Double tap in camera view to return to previous menu
1.6 Mouse operations
The NVR has a USB mouse interface
General mouse operations can be used to navigate the device
Pinch Zoom Out Swipe

4CH Compact NVR Manual 9
1.7 Menu symbols
Home short cut keys:
Menu
Pause
Alarm
Backup
Main menu keys:
PTZ
Export / backup
Screen view
Shut down
Alarm manager
Live display
Configuration menu
Playback
Event
Additional menu keys:
– Return to previous screen – Return to live mode
Right mouse click
Mouse scroll
Left mouse click
Note: The NVR Touch can be controlled via multiple methods; a) keyboard, b) IR remote control, c)
touch screen monitor or d) USB mouse. For the purpose of this manual, USB mouse and touch screen
will be referred to as one operation where applicable, “Touch screen monitor/mouse” hereinafter. For
specific operations, “Touch screen” or “Mouse” will be referred to separately.

4CH Compact NVR Manual 10
Chapter 2: Camera selection
a. Via remote control
To select multiple screen views press
To select a single full screen view, enter the numerical value of the camera, e.g. for camera 3,
press ‘03’.
b. Via keyboard
To select multiple screen views, press
To select a single full screen view, enter the numerical value followed by the cam button,
e.g. +
c. Via touch screen monitor / mouse
To select multiple screen views, press
Chose your required view by selecting or
Select
To revert back to multi screen view, click anywhere on the image screen
Chapter 3: Digital zoom
The NVR provides 64x digital zoom capability for live monitoring and video playback modes.
To digitally zoom, follow the steps below:
a. Via remote control
Select desired channel
To zoom in and out, press ‘zoom’ button to activate
Use directional keys to move around the screen
To return to live view, press depending on required view
b. Via keyboard
Use alternative method
Note: When the camera title is yellow, you have control over that camera.

4CH Compact NVR Manual 11
c. Via touch screen monitor
Select desired channel
To zoom in and out, use pinch and zoom technique
Swipe touch screen monitor to move around the screen
To return to live view, tap once anywhere on the image
d. Via mouse
Select desired channel
To zoom in and out use mouse wheel
To move around the screen press right or left mouse button, drag and release
To return to live view click once anywhere on the image
Chapter 4: Freeze
The NVR can freeze screen images in live and playback modes. Whilst frozen the NVR is still
recording.
a. Via remote control
Press ‘pause’ on the remote control.
Once paused, the pause icon at the top left hand side of the screen will be highlighted in blue.
To return to live mode press ‘pause’ again.
b. Via keyboard
Press the pause button on the keyboard.
Once paused, the pause icon at the top left hand side of the screen will be highlighted in blue.
To return to live mode press pause again.
c. Via touch screen monitor / mouse
Press the pause icon at the top left hand side of the screen
Once paused, the pause icon will be highlighted in blue
To return to live mode, press pause icon again
Chapter 5: PTZ
If the camera is a Pan, Tilt and Zoom (PTZ) camera, you can control it via the following
methods:
a. Via remote control
Select required channel.
Use direction arrows to pan and tilt around the image

4CH Compact NVR Manual 12
Use and keys to zoom around the image
To send a dome to a preset position, press ‘preset’, followed by the number required. For
example, for preset 3, press ‘preset’ followed by ‘003’.
Press auto button to start auto pan tour
To deactivate the tour, press ‘auto’ again
b. Via keyboard
Select required channel
Use joystick (left, right, up and down) to pan and tilt around the image
Twist the joystick to zoom around the image
To send dome to a preset position, press numerical key followed by ‘preset’ For example, 5
followed by ‘preset’.
Press ‘auto pan’ to start auto pan tour
To deactivate the tour, press ‘auto pan’ again
c. Via touch screen monitor/ mouse
Select required channel
Select menu button, press PTZ icon
Use the below controls to navigate the PTZ. The red joystick can be dragged to navigate the
image
Press ‘ESC’ to return to menu
Chapter 6: Audio
a. Via remote control
To enable audio, select the required channel
Press ‘audio’ on the remote control to enable live audio
Press ‘audio’ on remote control again to disable live audio
For all other methods, mute volume to disable audio

4CH Compact NVR Manual 13
Chapter 7: Playback
7.1 Accessing playback
a. Via remote control
To access playback press the play button
b. Via keyboard
To access playback press the play button
c. Via touch screen monitor / mouse
To access playback press then
7.2 Select time and date for playback
a. Via remote control
Use to navigate time frame (minute, hour, month, year)
Use to position unit selector
To start playback, press ‘enter’
or
Press ‘shift’ to move between recorded data and time search.
Use to select time and date, press ‘enter’
b. Via keyboard
Use joystick directions up and down to navigate time frame (minute, hour, month, year)
Use joystick left and right to position unit selector
To start playback twist zoom the joystick

4CH Compact NVR Manual 14
c. Via touch screen monitor
Navigate time frame via pressing desired period, select time by dragging unit selector
or
Use pinch zoom technique to change time frame
Select time by dragging unit selector
or
To start playback touch desired time within camera bar
d. Via mouse
Navigate time frame via pressing desired period
Select time by dragging unit selector
or
Use mouse to enter time and date in time search bar using the scroll wheel or up and down
arrows on screen
To start playback, hit the playback icon
7.3 Playback controls
Step rewind
Rewind
Play
Fast forward
Step fast forward
Pause
Stop
USB
Audio
Full screen view
Quad view
a. Via remote control
Use remote keypad to play, stop or pause
Use button to rewind
Use to fast forward. Press once for 2x and subsequent press to increase speed
For step rewind/ forward, press pause then use your controller keys to move
frames
To select individual cameras use
For grid screen view, follow camera selection process.
To turn audio on or off, press the audio key

4CH Compact NVR Manual 15
To activate WYSIWYG backup, press ‘backup’
The USB icon will light to show backup has commenced
To stop recording, press ‘backup’ again
To exit playback, press stop or escape
b. Via keyboard
Use keyboard keys to play, stop, or pause
Use button to rewind. Use to fast forward
Press once for 2x and subsequent press to increase speed
For step rewind/ step fast-forward press pause then use your controller keys to
move frames
c. Via touch screen monitor / mouse
Use on screen keys to play, stop or pause
Use button to rewind. Use to fast forward
Press once for 2x and subsequent press to increase speed
For step rewind/step fast-forward, use keys to move frames
To exit playback press stop or escape
To activate WYSIWYG backup, insert USB and press ‘backup’. The USB icon will light to show
backup has commenced. To stop recording, press ‘backup’ again.
Note: For all methods, with WYSIWYG backup, all channels will be exported regardless of on screen
camera selection. Once backup has been activated, playback will slow down. If fast-forward is selected,
when playing back the file, the speed will be normal however the frame rate will be reduced.

4CH Compact NVR Manual 16
Chapter 8: Alarm Management
Alarm events:
• Motion – created by movement
• Sensor – created by hardwired normally open / normally closed alarm input at the back
of the unit
• Manual – created every time the record button is pressed
a. Via remote control
To select alarm indicator press ‘menu’ and use left and right direction keys until correct icon is
reached
Press ‘enter’ to select
To scroll through alarm events use up and down direction keys
Choose alarm event and press enter
Use up and down direction keys to select recorded event
Use right and left direction keys to select action
b. Via keyboard
To select alarm indicator, press ‘search’
To scroll through alarm events use up and down direction on joystick
Choose alarm event and press enter
Use up and down direction on joystick to select recorded event
Use right and left direction on joystick to select action
c. Via touch screen monitor
To select alarm indicator touch alarm key at the top left hand side of the screen
Use touch screen interface to select alarm events
Use up and down scroll bar to select recorded event
Press USB, email, playback to select action
Note: See installation guide for information on how to set up alarms.

4CH Compact NVR Manual 17
Chapter 9: Backup / Export
Backup methods explained:
• DVD – compatible with DVD+RW, DVD+R, DVD-RW, DVD-R
• USB – USB flash drives are removable, rewritable data storage devices with a Universal
Serial Bus (USB) interface
• Temporary hard drive space – save a backup clip to an area on the NVR hard drive that
will not be overwritten (only one file at a time). To access saved backup clip, use Backup
Manager program or web-based browser viewing
Different actions will provide a different export result:
• Email will send a still image
• USB will save a still image
• Playback will take you to the selected event on screen
5. Recorded data 2. Time Frame 3. Unit selector
1. Channels 4. Backup bar
1. 16 bars represent 16 channels. 1 at the top – 16 at the bottom
Colour code:
Yellow = alarm record
Blue = constant record
Green = no record
2. Time frame = year, month, day, hour, minute
3. Unit selector = the down arrow indicates desired selection
4. Back up bar = this is the orange bar that shows the range of your backup
Highlights green when back up section has been chosen
5. All recorded data = start, end, now box
File formats
• MULTI-CHANNEL exports all attached cameras and includes backup manager
playback software

4CH Compact NVR Manual 18
• MULTI-CHANNEL SD AVI exports all attached cameras at standard definition in 1-
minute individual AVI files
• CH * HD AVI exports chosen channel in high definition 1080P in 1 minute individual
AVI files
a. Via remote control
Press ‘backup’ key to begin
Use shift key to toggle between record data, backup range or file format
Use shift key to select file format use
Press ‘enter’ to select your channel
Use shift key to select recorded data, use to navigate the time frame and
to navigate unit selector
For backup range, use to navigate, press ‘enter’ to create start point
Use to determine backup period.
Press ‘enter’ to complete
Once enter has been pressed, a backup start and backup end box will appear
If correct, press the backup key and select export method
Once backup has started, the display screen will revert to live mode, the backup icon will
illuminate and flash with percentage rate
Once complete, the illumination and flashing will stop
b. Via keyboard
Alternative method required
c. Via touch screen monitor / mouse
Press backup to begin
Select file format by press and scrolling toolbar
Navigate time frame via pressing desired period
Select time by dragging unit selector or use pinch zoom technique
For backup range, press orange bar and drag for required time period
Once drag is complete backup start and backup end box will appear
If correct press the backup from time frame bar and select export method
Once backup has started the display screen will revert to live mode, the backup icon will
illuminate and flash with percentage rate
Once complete the illumination and flashing will stop
Note: For all methods, when selecting backup period ensure file size is less than your backup device
capacity. Longer periods may take more time to calculate.

4CH Compact NVR Manual 19
Chapter 10: Event
Within the event menu, there are 2 options:
• System event – refers to the systems performance
• Operating event – refers to designated areas selected by the user
a. Via remote control
To access event manager press ‘menu’ key
Use to locate the event manager icon
Press ‘enter’ to select
b. Via keyboard
To access event manager press ‘set’
Use left and rights keys to locate the event manager icon
Press the ‘enter’ to select
c. Via touch screen/mouse
To access event manager press the menu icon
Scroll through the menu to locate the event manager icon
Press enter to select
Table of contents
Other Lilin DVR manuals

Lilin
Lilin PDR-2160A User manual

Lilin
Lilin DVR216C User manual

Lilin
Lilin DVR304 User manual

Lilin
Lilin PDR-400 User manual

Lilin
Lilin nvr400L User manual

Lilin
Lilin NDR104 User manual

Lilin
Lilin DVR708 User manual

Lilin
Lilin dvr2 series User manual

Lilin
Lilin PDR-3160 User manual

Lilin
Lilin DHD204 User manual