manuals.online logo
Brands
  1. Home
  2. •
  3. Brands
  4. •
  5. Linkskey
  6. •
  7. Switch
  8. •
  9. Linkskey LDV-DM222AUSK User manual

Linkskey LDV-DM222AUSK User manual

Quick Installation Guide Applicable models: LDV-DM222AUSK/LDV-DM22 AUSK 2/ -Port Dual Monitor Dual Link DVI KVM Switch w/ Audio&Mic
Rev. 1.1 Copyright© All rights reserved
True Transparent USB Emulation for Keyboard and Mouse
All-time Full DDC Emulation for Video Compatibility
Digital Video Resolution 2560x1600 Support
2 x USB 2.0 Hub Ports
Audio&Mic Switching Support
User-definable Hotkey Preceding Sequence
LDV-DM222AUSK/LDV-DM224AUSK
2/4-Port Dual Monitor Dual Link DVI KVM Switch
w/ Audio&Mic
True Transparent USB Emulation
Quick Installation Guide
Thank you for purchasing the LDV-DM222AUSK/LDV-DM224AUSK Dual Monitor Dual Link DVI KVM Switch w/ Audio&Mic!
W ith ou r hi ghly reli ab le a n d qual it y p roduct , us er ca n en joy cou nt le ss b e ne fi ts f rom u si ng thi s KVM S wi tc h .
LDV-DM222AUSK LDV-DM224AUSK
LDV-DM222AUSK – Back Panel LDV-DM224AUSK – Back Panel
Introduction
The LDV-DM222AUSK/LDV-DM224AUSK Dual Monitor Dual Link DVI KVM Switch is TMDS-compliant and designed specifically for
sharing two dual-link DVI monitors between 2/4 computers with two dual-link DVI display output. With
LDV-DM222AUSK/LDV-
DM224AUSK, you can fully control 2/4 computers using only one set keyboard, mouse and two dual-link DVI monitors. This dual
monitor dual-link DVI KVM Switch supports digital video resolution up to 2560 x 1600 (higher than 1080P HD) for your maximum
convenience in adapting to your display requirements.
With the True Transparent USB (TTU) Emulation Technology, which embodies itself within a new ASIC chip, the LDV-DM222AUSK /
LDV-DM224AUSK Dual Monitor Dual Link DVI KVM Switch is capable of a complete versatility in dealing with the functional
requirements of all types of advanced keyboards and mice. Its 2 extra USB 2.0 hub ports are for sharing high-speed USB 2.0 devices. It
features two channels stereo sound for theater audio experience and its audio and microphone switching function offers you
uninterrupted multimedia experience while performing KVM switching. Furthermore, the KVM Switch supports multi-platform for both
PC and Mac.
The LDV-DM222AUSK/LDV-DM224AUSK Dual Monitor Dual Link DVI KVM Switch features the Active Sync Replication™ (A.S.R.)
technology that offers a all-time full DDC emulation for best video compatibility with new type of Operating System that requires more
critical DDC communication.
Out-of-the-box Installation
Take the KVM Switch out of the box and begin installation….
Step 1. Power up your KVM Switch by connecting the external power adapter to it.
Step 2. Connect the shared USB keyboard, mouse, two DVI monitors, speaker, and microphone as well as other shared USB
devices
to its corresponding console port on the KVM Switch.
Step 3. Connect each of your computers to the KVM Switch Using provided DVI-D dual-link video cable, USB(Type A -to- Type B)
cable, audio, and Microphone cable shown in the picture below.
DVI - D Video USB Cable Audio&Mic
Cable
(Type A-to-Type B)
Cable
Step 4. (Now your KVM Switch should have been powered-up….) Power up the connected computers one by one. After your computers
are powered up, the keyboard and mouse will be recognized and you can begin operating the KVM Switch.
Connection Illustration
Easy Operation
There are two methods to control your dual monitor KVM Switch: using the front-panel push buttons and keyboard hotkey sequence.
Front-Panel Push Buttons
The front-panel push buttons let you have direct control over KVM Switch operation and channel switching. Simply press the PC
selection button for PC port switching, if binding is enabled the console USB hub ports and audio&mic ports, they will be jointly selected
at the same time. If you want to enable the binding feature use the hotkey sequence.
See Quick Reference Sheet
Keyboard Hotkeys
A keyboard hotkey sequence consists of at least three specific keystrokes:
See Quick Reference Sheet
Hotkey Sequence = [ScrLk]
*
+ [ScrLk]
*
+ [Command key]
* User-definable = SCROLL LOCK, CAPS LOCK, ESC, F12 or NUM LOCK
Hotkey preceding sequence configuration:
For users who want to use a hotkey preceding sequence other than the default two consecutive Scroll Lock, there is a convenient way to
configure it.
(1) Hit ScrollLock + ScrollLock + H, then two beeps sound will signal readiness for new hotkey preceding sequence selection or press
and hold down the last front-panel push button (Button 2/4) until you hear two beeps, then release the push button.
(2) Select and press the specific key that you would like to use as your hotkey preceding sequence (SCROLL LOCK, CAPS LOCK, ESC,
F12 or NUM LOCK keys are available for selection) then you’ll hear a beep sound for selection confirmation. Now you can use the
new hotkey preceding sequence to execute your hotkey command.
Each keystroke within a hotkey sequence should be pressed within two seconds. Otherwise, the hotkey sequence will not be validated.
For more details about keyboard hotkey sequence and their corresponding functional commands, please refer to the Quick Reference Sheet.
4 x Computer with dual displays
USB 2.0 Devices
Dual Monitor Console
Quick Installation Guide Applicable models: LDV-DM222AUSK/LDV-DM22 AUSK 2/ -Port Dual Monitor Dual Link DVI KVM Switch w/ Audio&Mic
Rev. 1.1 Copyright© All rights reserved
■
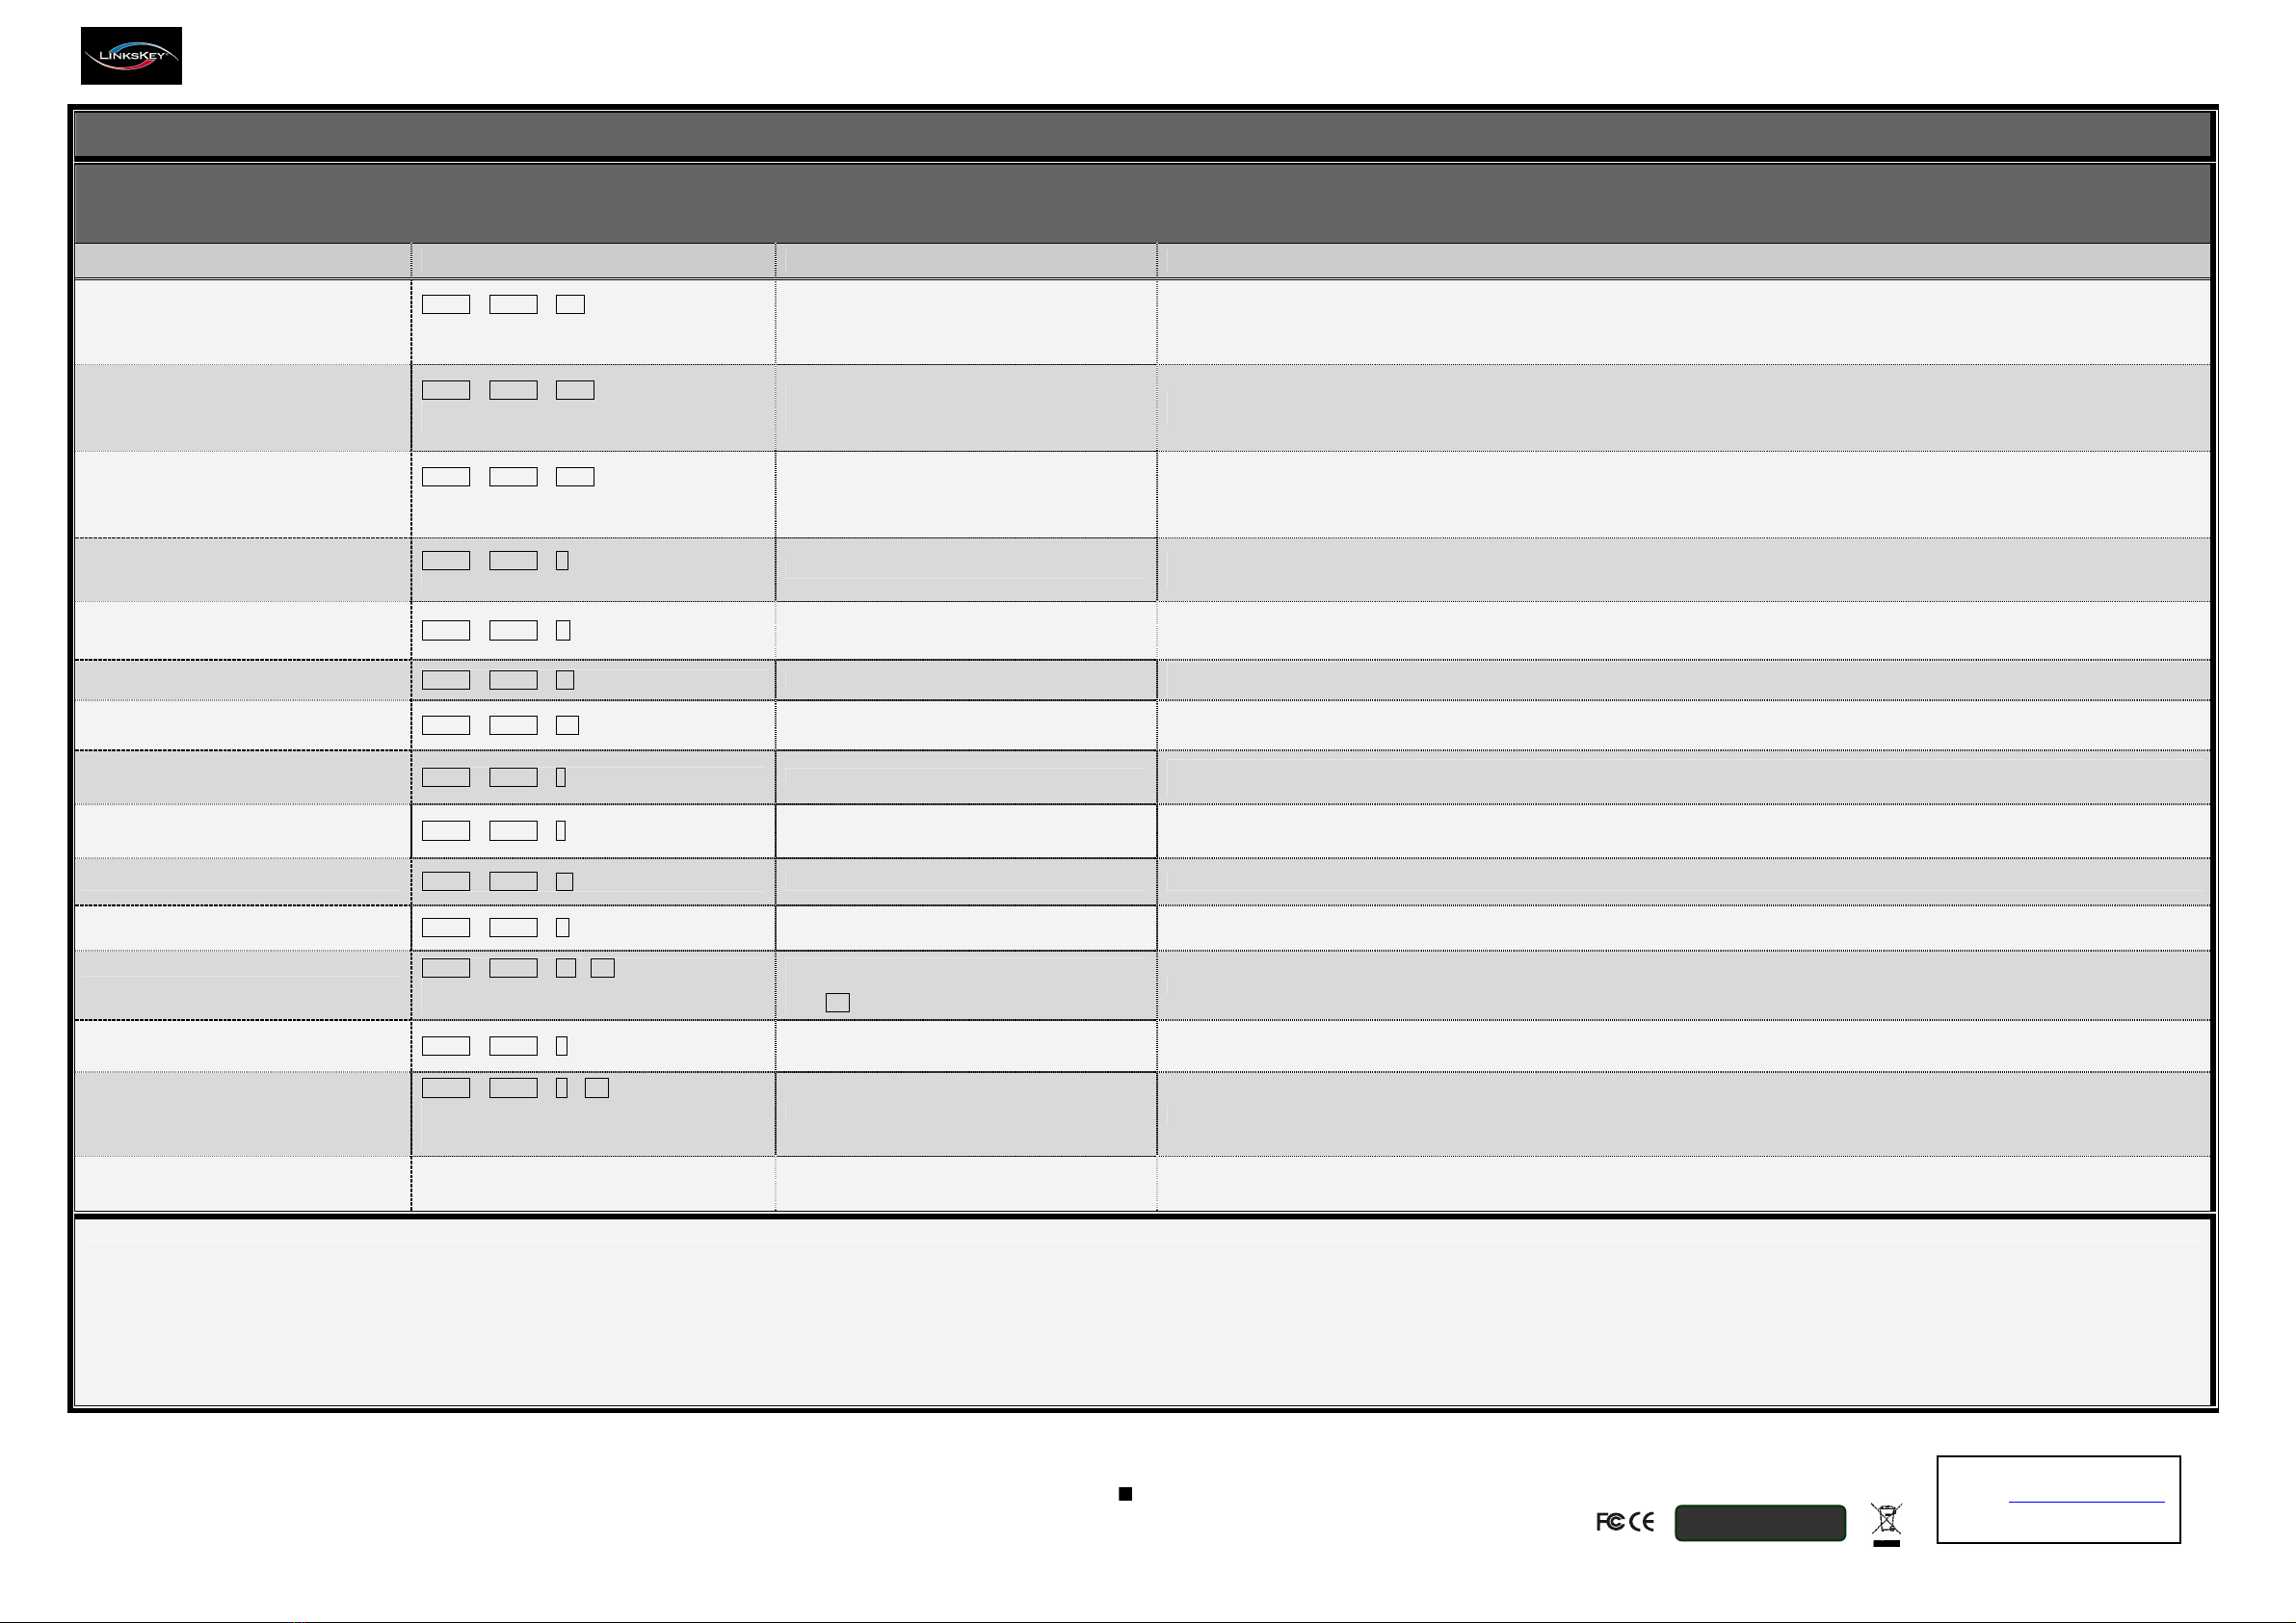
Q u i c k R e f e r e n c e S h e e t
2/4-Port Dual Mon tor Dual L nk DVI KVM Sw tch w/ Aud o & M c -- Operat on Commands for Hotkeys / Front-Panel Buttons
Hotkey Sequence = [ScrLk]
*
+ [ScrLk]
*
+ Command Key * ; User-definable Preceding Sequence = SCROLL LOCK, CAPS LOCK, ESC, F12 or NUM LOCK
Command Hotkey
1
Front-Panel Button Descr pt on
Select PC Channel
2
(Joint-select PC port, hub port, and
audio&mic, if binding is enabled)
ScrLk + ScrLk + (x)
(x is a top-row number ke )
x = 1~2 / x = 1~4 for PC channel no
Press the corresponding button to select the active
PC channel
Select the active PC channel
(Joint-select PC port, hub port, and audio&mic, if binding is enabled)
Select Hub Port Control
2
(Joint-select PC and hub port control, if
binding is enabled)
ScrLk + ScrLk + (Fx)
Fx = F1~F2 / Fx = F1~F4 ; Fx is a function ke ;
x = 1~2 / x = 1~4 for PC channel no
Press the corresponding button to select the specific
PC+USB hub port control --works onl if PC
port/hub port control binding is enabled
Select the PC channel that control all USB hub ports
(Joint-select PC and hub port control, if binding is enabled)
Select Aud o&M c Channel
4
(Joint-select PC port and audio&mic, if
binding is enabled)
ScrLk + ScrLk + (Fy)
F = F5~F6 / F = F5~F8 ; F is a function ke ;
= 1~2 / = 1~4 for audio channel no
-- Select the active Audio&Mic channel
(Joint-select PC & audio&mic channel, if binding is enabled)
Bind PC & Hub Port Control Switching
2
[Default]
ScrLk + ScrLk + Z
-- Enable the binding of PC port and hub port control switching.
(Once this feature is enabled, an PC and/or hub port control switching is bound together) (factory default
Unbind PC & Hub Port Control Switching
2
ScrLk + ScrLk + X -- Disable the binding of PC port and hub port control switching
B nd PC & Aud o/M c Sw tch ng
4
[
Default
]
ScrLk + ScrLk + Q -- Enable the binding of PC port and audio&mic switching.
(Once this feature is enabled, an PC and/or audio&mic switching is bound together) (factory default
Unb nd PC & Aud o/M c Sw tch ng
4
ScrLk + ScrLk + W -- Disable the binding of PC port and audio&mic switching
Next lower PC Channel
2
(Joint-select PC, hub port, and audio&mic, if
binding is enabled)
ScrLk + ScrLk + ↑(arrow up) -- Select the next lower connected PC channel
(Joint-select PC, hub port, and audio&mic, if binding is enabled)
Next higher PC Channel
2
(Joint-select PC, hub port, and audio&mic, if
binding is enabled)
ScrLk + ScrLk + ↓(arrow down)-- Select the next higher connected PC channel
(Joint-select PC, hub port, and audio&mic, if binding is enabled)
Previous PC Channel ScrLk + ScrLk + 

(Backspace) -- Toggle between the previous channel and current channel
Beep Sound On/Off ScrLk + ScrLk + B -- Toggle on/off the beep sound while autoscanning
Define Hotkey Preceding Sequence
ScrLk + ScrLk + H + (y)
y = SCROLL LOCK, CAPS LOCK, ESC, F12 or
NUM LOCK
Press and hold down the last button (Button 2/4) till
hear two beeps sound, then release the button and
press (y) ke
Select the hotke preceding sequence among 5 alternative ke s
Auto-scan ScrLk + ScrLk + S -- Auto-scan through ever connected channel for quick screen browsing of each channel (scan dela = 5 sec.).
Auto-scan with Programmable Delay Time
ScrLk + ScrLk + S + (z)
z = 0~9
1  10” ; 2  20” ; 3  30” ; 4  40” ; 5  50” ;
6  60” ; 7  70” ; 8  80” ; 9  90” ; 0  100”
-- Auto-scan with a user-defined dela time within a range of 10 ~ 100 seconds
Stop Auto-scan Press an ke on ke board Press an button Terminate Auto-scan activit
Notes:
1. The USB keyboard hotkeys allows you a faster and broader control for your KVM switching operation in addition to the front-panel buttons. If you have configured a hotkey preceding sequence other than two consecutive scroll locks, you should change your hotkey sequence accordingly.
(For preceding sequence key configuration, please refer to Quick Installation Guide)
2. When the binding of PC & USB hub port control switching is enabled by the hotkey sequence: ScrLk + ScrLk + Z, any PC and hub port control switching is bound together. To remove this binding, use the hotkey sequence: ScrLk + ScrLk + X.
3. When the binding of PC & Audio&Mic switching is enabled by the hotkey sequence: ScrLk + ScrLk + Q, any PC and audio&mic switching is bound together. To remove this binding, use the hotkey sequence: ScrLk + ScrLk + W.
LED Information: Green LED indicates PC port connection status between the KVM Switch and computer: solid green – established; flashing green – not connected; Red LED indicates KVM Switch USB hub port control status: solid red – PC has the control of all USB hub ports; off – PC has no control.
Important Note: The red LED, USB hub port control status, indicates which PC has the full control of all USB hub ports and their connected devices on the KVM Switch.
For example, when red LED 1 is lit, it means PC port 1 has the current full control of all USB hub ports and their connected USB devices on the KVM Switch.
Technical Support
E-mail: [email protected]
Website: www.linkskey.com
RoHS Compliant

This manual suits for next models

1

Other Linkskey Switch manuals

Linkskey LKS-SR16 User manual

Linkskey

Linkskey LKS-SR16 User manual

Linkskey LDV-DM02ESK User manual

Linkskey

Linkskey LDV-DM02ESK User manual

Linkskey LKU-S02SK User manual

Linkskey

Linkskey LKU-S02SK User manual

Linkskey LKU-S02ASK User manual

Linkskey

Linkskey LKU-S02ASK User manual

Linkskey LKS-SG16R User manual

Linkskey

Linkskey LKS-SG16R User manual

Linkskey LKV-7304 User manual

Linkskey

Linkskey LKV-7304 User manual

Linkskey LKS-SG5P User manual

Linkskey

Linkskey LKS-SG5P User manual

Linkskey LKS-SG5P User manual

Linkskey

Linkskey LKS-SG5P User manual

Linkskey LKV-DM02SK User manual

Linkskey

Linkskey LKV-DM02SK User manual

Linkskey LDV-002ESK User manual

Linkskey

Linkskey LDV-002ESK User manual

Linkskey LDV-002EASK User manual

Linkskey

Linkskey LDV-002EASK User manual

Linkskey LKV-S02SK User manual

Linkskey

Linkskey LKV-S02SK User manual

Linkskey LKV-DM02SK User manual

Linkskey

Linkskey LKV-DM02SK User manual

Linkskey LDV-DM712AUSK User manual

Linkskey

Linkskey LDV-DM712AUSK User manual

Linkskey LDV-DM202AUSK User manual

Linkskey

Linkskey LDV-DM202AUSK User manual

Linkskey LDV-DM202AU User manual

Linkskey

Linkskey LDV-DM202AU User manual

Linkskey LKV-M02 User manual

Linkskey

Linkskey LKV-M02 User manual

Linkskey LDV-342ARC User manual

Linkskey

Linkskey LDV-342ARC User manual

Linkskey LDV-DM202AUSK User manual

Linkskey

Linkskey LDV-DM202AUSK User manual

Linkskey LKS-SH5P User manual

Linkskey

Linkskey LKS-SH5P User manual

Linkskey LKV-T02 User manual

Linkskey

Linkskey LKV-T02 User manual

Linkskey LDV-DM02ESK User manual

Linkskey

Linkskey LDV-DM02ESK User manual

Linkskey Prima LKV-9304 User manual

Linkskey

Linkskey Prima LKV-9304 User manual

Linkskey LKV-T02 User manual

Linkskey

Linkskey LKV-T02 User manual

Popular Switch manuals by other brands

Neol ePowerSwitch 8M+R2 user guide

Neol

Neol ePowerSwitch 8M+R2 user guide

Dell PowerConnect B-DCX-4S Backbone Hardware reference manual

Dell

Dell PowerConnect B-DCX-4S Backbone Hardware reference manual

NETGEAR ProSafe GS700TP Software administration manual

NETGEAR

NETGEAR ProSafe GS700TP Software administration manual

H3C Magic BS200 GE Series installation guide

H3C

H3C Magic BS200 GE Series installation guide

sauermann SI-DPMS user manual

sauermann

sauermann SI-DPMS user manual

PTN SC51D user manual

PTN

PTN SC51D user manual

Altuscn KH1508 user manual

Altuscn

Altuscn KH1508 user manual

Linksys EF2S16 brochure

Linksys

Linksys EF2S16 brochure

APT WorldCast Equinox user manual

APT

APT WorldCast Equinox user manual

Weidmüller IE-SW-EL05-5GT Hardware installation guide

Weidmüller

Weidmüller IE-SW-EL05-5GT Hardware installation guide

Extreme Networks Summit X250e-24t Hardware installation guide

Extreme Networks

Extreme Networks Summit X250e-24t Hardware installation guide

Intel EXPRESS 330T quick start guide

Intel

Intel EXPRESS 330T quick start guide

enbrighten 58433 manual

enbrighten

enbrighten 58433 manual

Intel Express 530T user guide

Intel

Intel Express 530T user guide

Votek UT-N6228GS-M-SFP user manual

Votek

Votek UT-N6228GS-M-SFP user manual

Moxa Technologies ThinkCore DA-660-8/16-LX Quick installation guide

Moxa Technologies

Moxa Technologies ThinkCore DA-660-8/16-LX Quick installation guide

D-Link DGS-1005P Quick installation guide

D-Link

D-Link DGS-1005P Quick installation guide

Danfoss KPI 34 installation guide

Danfoss

Danfoss KPI 34 installation guide

manuals.online logo
manuals.online logoBrands
  • About & Mission
  • Contact us
  • Privacy Policy
  • Terms and Conditions

Copyright 2025 Manuals.Online. All Rights Reserved.