manuals.online logo
Brands
  1. Home
  2. •
  3. Brands
  4. •
  5. LogicMark
  6. •
  7. Emergency Phone
  8. •
  9. LogicMark GUARDIAN 911 ALERT PLUS User manual

LogicMark GUARDIAN 911 ALERT PLUS User manual

User’s
QuickStart Guide
Model 30711b
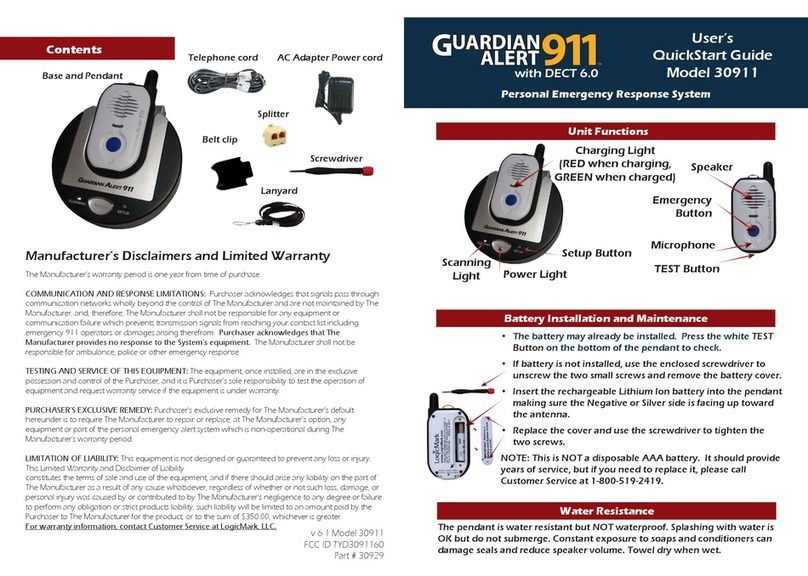
Pendant Functions
Speaker
Emergency
Button
TEST
Button
Microphone
The Manufacturer’s warranty period is one year from time of purchase.
COMMUNICATION AND RESPONSE LIMITATIONS: Purchaser acknowledges that signals pass through
communication networks wholly beyond the control of the Manufacturer and are not maintained by the
Manufacturer, and, therefore, the Manufacturer shall not be responsible for any equipment or
communication failure which prevents transmission signals from reaching your contact list including
emergency 911 operators or damages arising therefrom. Purchaser acknowledges that the Manufacturer
provides no response to the System’s equipment. The Manufacturer shall not be responsible for ambulance,
police or other emergency response.
TESTING AND SERVICE OF THIS EQUIPMENT: The equipment, once installed, are in the exclusive possession
and control of the Purchaser, and it is Purchaser’s sole responsibility to test the operation of equipment and
request warranty service if the equipment is under warranty.
PURCHASER’S EXCLUSIVE REMEDY: Purchaser’s exclusive remedy for the Manufacturer’s default hereunder
is to require the Manufacturer to repair or replace, at the Manufacturer’s option, any equipment or part of the
personal emergency alert system which is non-operational during the Manufacturer’s warranty period.
LIMITATION OF LIABILITY: This equipment is not designed or guaranteed to prevent any loss or injury. This
Limited Warranty and Disclaimer of Liability
constitutes the terms of sale and use of the equipment, and if there should arise any liability on the part of the
Manufacturer as a result of any cause whatsoever, regardless of whether or not such loss, damage, or personal
injury was caused by or contributed to by the Manufacturer’s negligence to any degree or failure to perform
any obligation or strict products liability, such liability will be limited to an amount paid by the Purchaser to the
Manufacturer for the product, or to the sum of $350.00, whichever is greater.
For warranty information, contact Customer Service at LogicMark, LLC.
v 8.1 Model 30711b
FCC ID TYD30711b
Part# 30530
RED Charging Light
Low Battery Warning:
Flashes when battery is at less than
25% capacity
GREEN Power Light
Battery Charging:
Green Light is Blinking.
Fully charged:
Green Light is Solid.
Light is OFF when
removed from charging
base
BLUE Call In Process Light
Solid when connected to a
cellular network
PLUS
G
UARDIAN
911
A
LERT
Mobile Personal Emergency Response System
Pendant
Charging Base
Pendant
Wrist Strap
Pendant
Beltclip USB Charger
Pendant Lanyard
Manufacturer’s Disclaimers and Limited Warranty
Included in Kit Attaching the Lanyard
12 3 4
To Adjust Length
Lead may be used in the manufacture of printed circuit boards.
WARNING: Cancer and Reproductive Harm www.P65Warnings.ca.gov
!
1. User Pushes the BLUE EMERGENCY button until the Blue light flashes (approx. 6-8 seconds):
a. A short musical chime is heard
b. A dial tone is heard as the Pendant calls 911
2. When 911 answers, the User talks to the emergency operator using the speakerphone in the pendant
**Immediately give the 911 operator your name and location
3. Call can be ended one of two ways:
a. Pendant detects 911 has hung up, automatically ends the call, and the Pendant returns to standby
b. User pushes the TEST button on the pendant to end the call and hang up
4. Pendant announces “Hanging Up” and returns to Standby
RED Light
Low battery Warning
GREEN Light
Battery Charging
BLUE Light
Call in Process
Before First Use:
Fully charge pendant prior to use by putting it in the charging
cradle. (Make sure the Charger is plugged in and the Power light is
Red.) It may take 3 to 4 hours to ensure a full charge. The Charging
Light on the pendant will blink Green when charging and turn solid
Green when fully charged. SEE ILLUSTRATION BELOW.
Press the TEST button for 4 seconds.
1. User pushes the TEST button for 4 seconds
2. Pendant announces “Power ON,” Pendant turns on
3. Pendant announces Version number
4. Pendant checks battery status and announces:
a. “Battery OK” if Battery greater than 25%“
b. “Recharge Battery Soon” if battery less than 25%
5. Pendant then checks for cellular service and announces:
a. “Service Coverage OK” – Good Cellular service coverage
b. “Low Signal Strength or No Service Coverage” – indicates low cellular
service or no cellular signal (If you hear this message, place a test call to
911 by pressing the Emergency Call Button for 1 second. If they answer,
tell them there is no emergency and that you are merely testing your unit.)
6. Pendant announces whether Battery Supervision feature is “On” or “Off”
7. Pendant announces “Return to Standby”, which returns the pendant to a low-
power STANDBY mode.
System Check
The Battery Supervision feature allows the
GuardianAlert 911 Plus to automatically check the
status of its battery every 24 hours.
If Battery Supervision is turned ON:
1. Estimated standby time between charges will be 2-3
months
2. It will check the status of the battery every day at the
same time, beginning 24 hours after the feature is turned
ON
3. When the battery reaches 25% capacity or less, the
pendant will announce “Recharge battery soon”. The
announcement will be made daily until the pendant is
recharged
If Battery Supervision is turned OFF:
1. Estimated standby time between charges will be 6-12
months
2. The user will have to manually perform a System Check
periodically to check the status of the battery
Turning Battery Supervision ON or OFF:
1. Perform a System Check – Push and HOLD the Gray TEST
button for 4 seconds
2. When you hear “Version Number” – Push and HOLD the
Gray TEST button again for 4 seconds. The Blue Light will
blink twice
3. The System Check voice prompt will then confirm the
Battery Supervision status – either Battery Supervision ON
or Battery Supervision OFF
Simply repeat steps 1-3 to toggle the Battery Supervision
feature ON or OFF
Placing an Emergency Call
3
Battery Supervision
4
2
Troubleshooting
5
If you are having problems using your pendant,
please call:
1-866-541-VETS (8387)
Plug Base into power and
charge pendant
1
911
PLUSPLUS
GUARDIANGUARDIAN
911
ALERTALERT
Test
Button
Emergency
Call Button
Charger
Input
Note: If you place a call to 911 accidently or to test, it is IMPORTANT that you stay on the phone and tell them you were testing your phone’s 911 feature.

This manual suits for next models

1

Other LogicMark Emergency Phone manuals

LogicMark 30911 User manual

LogicMark

LogicMark 30911 User manual

LogicMark 37911 Instructions for use

LogicMark

LogicMark 37911 Instructions for use

LogicMark Freedom Alert 35911 Installation instructions

LogicMark

LogicMark Freedom Alert 35911 Installation instructions

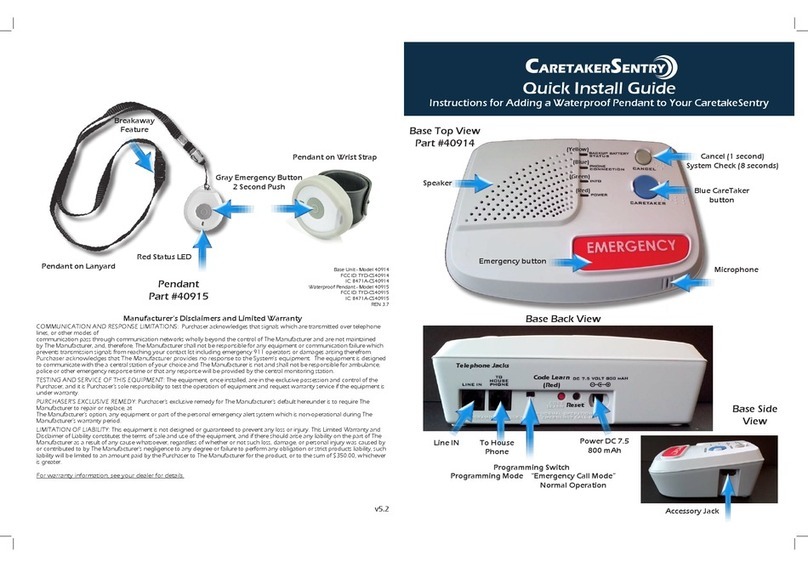
LogicMark CaretakeSentry 40914 User manual

LogicMark

LogicMark CaretakeSentry 40914 User manual

LogicMark FreedomAlert 35911 Installation instructions

LogicMark

LogicMark FreedomAlert 35911 Installation instructions

LogicMark CaretakerSentry 40914 User manual

LogicMark

LogicMark CaretakerSentry 40914 User manual

LogicMark 37911 Operating instructions

LogicMark

LogicMark 37911 Operating instructions

LogicMark CaretakerSentry 40911 Installation manual

LogicMark

LogicMark CaretakerSentry 40911 Installation manual

LogicMark FreedomAlert 35911 Installation instructions

LogicMark

LogicMark FreedomAlert 35911 Installation instructions

LogicMark Freedom Alert 35911 Installation instructions

LogicMark

LogicMark Freedom Alert 35911 Installation instructions

LogicMark GUARDIAN ALERT 911 User manual

LogicMark

LogicMark GUARDIAN ALERT 911 User manual

LogicMark CaretakerSentry User manual

LogicMark

LogicMark CaretakerSentry User manual

Popular Emergency Phone manuals by other brands

Talkaphone ETP-MT installation instructions

Talkaphone

Talkaphone ETP-MT installation instructions

Mytrex MXD user manual

Mytrex

Mytrex MXD user manual

Safeline 3000 installation manual

Safeline

Safeline 3000 installation manual

Viking E-1600-SS-IP product manual

Viking

Viking E-1600-SS-IP product manual

Safeline MX3+ manual

Safeline

Safeline MX3+ manual

Dosch&Amand DA1450 quick start guide

Dosch&Amand

Dosch&Amand DA1450 quick start guide

Viking E-1600A-GT-EWP Technical practice

Viking

Viking E-1600A-GT-EWP Technical practice

Rath 2100-EPV2 VoIP Installation & operation manual

Rath

Rath 2100-EPV2 VoIP Installation & operation manual

Tunstall Lifeline 4000 user guide

Tunstall

Tunstall Lifeline 4000 user guide

Viking VE-9 12 Series product manual

Viking

Viking VE-9 12 Series product manual

Alpha Communications AlphaRefuge 2400 Series Installatin & Operations Manual

Alpha Communications

Alpha Communications AlphaRefuge 2400 Series Installatin & Operations Manual

Visonic AmberLink user guide

Visonic

Visonic AmberLink user guide

Safeline SL3000 manual

Safeline

Safeline SL3000 manual

CruxCare C1 user manual

CruxCare

CruxCare C1 user manual

SkyLink ED-100 user manual

SkyLink

SkyLink ED-100 user manual

CEECO WPP-531-D-RP-ADA-STROBE Service manual

CEECO

CEECO WPP-531-D-RP-ADA-STROBE Service manual

Honeywell EVCS-CMPT9 Installation, commissioning and maintenance manual

Honeywell

Honeywell EVCS-CMPT9 Installation, commissioning and maintenance manual

Disty Notruf stationar operating instructions

Disty

Disty Notruf stationar operating instructions

manuals.online logo
manuals.online logoBrands
  • About & Mission
  • Contact us
  • Privacy Policy
  • Terms and Conditions

Copyright 2025 Manuals.Online. All Rights Reserved.