EnglishDeutsch
 logo
Brands
  1. Home
  2. •
  3. Brands
  4. •
  5. Rath
  6. •
  7. Emergency Phone
  8. •
  9. Rath SmartPhone VI Quick start guide

Rath SmartPhone VI Quick start guide

Other manuals for SmartPhone VI

3

Other Rath Emergency Phone manuals

Rath 2100-CSL User manual

Rath

Rath 2100-CSL User manual

Rath SmartRescue 5 User manual

Rath

Rath SmartRescue 5 User manual

Rath 2100-TLL Landline 12v Tower User manual

Rath

Rath 2100-TLL Landline 12v Tower User manual

Rath 2100-CPV User manual

Rath

Rath 2100-CPV User manual

Rath 2100-PLL Landline 12v Pedestal User manual

Rath

Rath 2100-PLL Landline 12v Pedestal User manual

Rath 2100-TPL Landline 120v Tower User manual

Rath

Rath 2100-TPL Landline 120v Tower User manual

Rath 2100-ELL2 User manual

Rath

Rath 2100-ELL2 User manual

Rath 2100-986DA User manual

Rath

Rath 2100-986DA User manual

Rath 2100-CDC User manual

Rath

Rath 2100-CDC User manual

Rath SmartRescue 5 User manual

Rath

Rath SmartRescue 5 User manual

Rath 2100-CL9 User manual

Rath

Rath 2100-CL9 User manual

Rath 2100-CD9 User manual

Rath

Rath 2100-CD9 User manual

Rath 2100-986VAI User manual

Rath

Rath 2100-986VAI User manual

Rath Dusk2Dawn 2100-CD9 Series User manual

Rath

Rath Dusk2Dawn 2100-CD9 Series User manual

Rath Multi-Line Command Center User manual

Rath

Rath Multi-Line Command Center User manual

Rath 2100-CPL User manual

Rath

Rath 2100-CPL User manual

Rath 2500-205D User manual

Rath

Rath 2500-205D User manual

Rath 2100-TL9 User manual

Rath

Rath 2100-TL9 User manual

Rath 2100-CLL User manual

Rath

Rath 2100-CLL User manual

Rath 2100-CS9 User manual

Rath

Rath 2100-CS9 User manual

Rath 2100-CPL User manual

Rath

Rath 2100-CPL User manual

Rath 2100-PPL User manual

Rath

Rath 2100-PPL User manual

Rath 2100-CP9 User manual

Rath

Rath 2100-CP9 User manual

Rath 2100-986GSM User manual

Rath

Rath 2100-986GSM User manual

Popular Emergency Phone manuals by other brands

Dosch&Amand DA1450 quick start guide

Dosch&Amand

Dosch&Amand DA1450 quick start guide

Viking E-1600A series Application note

Viking

Viking E-1600A series Application note

LogicMark GUARDIAN ALERT 911 User's quick start guide

LogicMark

LogicMark GUARDIAN ALERT 911 User's quick start guide

Wind n Go 7700 operating instructions

Wind n Go

Wind n Go 7700 operating instructions

Wind Crest ILO1 quick start guide

Wind Crest

Wind Crest ILO1 quick start guide

Bell System Master 200Plus Operator's manual

Bell System

Bell System Master 200Plus Operator's manual

Linear PERS-3600 Installation & operation instructions

Linear

Linear PERS-3600 Installation & operation instructions

ooma Safety Phone 700-0129-203 quick start guide

ooma

ooma Safety Phone 700-0129-203 quick start guide

CareTech Gina user guide

CareTech

CareTech Gina user guide

Paso PA8506-V Instructions for use

Paso

Paso PA8506-V Instructions for use

JNY Safetycare FDC user guide

JNY Safetycare

JNY Safetycare FDC user guide

Eldat Easywave Fon Alarm operating instructions

Eldat

Eldat Easywave Fon Alarm operating instructions

Merak MMk-656 instruction manual

Merak

Merak MMk-656 instruction manual

Assistive Technology Services TOUCH N TALK FD Advanced user's guide

Assistive Technology Services

Assistive Technology Services TOUCH N TALK FD Advanced user's guide

Great Arnoldi Just in Case owner's guide

Great Arnoldi

Great Arnoldi Just in Case owner's guide

Disty Notruf operating instructions

Disty

Disty Notruf operating instructions

Prime PR100 user manual

Prime

Prime PR100 user manual

Rocom EC II GSM SE user manual

Rocom

Rocom EC II GSM SE user manual

https://manuals.online logo
https://manuals.online logoBrands
  • About & Mission
  • Contact us
  • Privacy Policy
  • Terms and Conditions

Copyright 2026 Manuals.Online. All Rights Reserved.

Wiring Diagrams: 24vac/dc Models
Direct 24vac/dc Powered
120vac to 24vac/dc Powered
Black
Hot Green
Ground
White
Neutral
120vac
1. Connect your annunciator’s audio output to the TB1 connection
on this board.
2. When utilizing this board to drive a 24v LED, you must apply
power to the wire leads at the TB2 connection. You may tap into
a direct 24vdc supply that has battery backup. Connect the wire
leads at the J5 connection to your LED.
3. If you are not utilizing this board to drive a 24v LED, you need
to disconnect the LED harness from the SmartPhone board,
disconnect the LED harness from this board, connect it to the
SmartPhone board, and then wire to your standard LED.
4. If you want to activate Relay 2 in unison with Alarm Relay on
SmartPhone board, follow these programming steps (default
activates upon call out):
a. Press ENTER
b. Press 3, 0, ENTER, 4
c. Press STOP for 3 seconds
To 24vac/dc
Power Supply
To Phone Line:
Requires a twisted
shielded pair.
When used with
SmartRescue,
requires two
twisted shielded
pairs.
To Phone Line:
Requires a twisted
shielded pair.
When used with
SmartRescue,
requires two
twisted shielded
pairs.
Note:
If Elevator
Communications
Failure is required,
connect to our
Alarm Relay *
RP8200950
Ver. 9
09/19
Annunciator Interface,
Auxiliary Relay & 24v LED Board
To Speaker
Relay 1
Relay 2
To H1 on SP VI To Speaker connection
on SP VI Circuit Board
To Audio output
of Annunciator
To LED on SPVI
24v LED 24vdc Power for LED
TB2
J5
- + - +
- + J3
J4
J1
J2
TB1 AUX1
AUX2
COM
NC
NO
COM
NC
NO
Relay Alarm
LED Switch
MIC Speaker
Bat
24vac/dc
RJ11
1 2 3
4 5 6
7 8 9
0 #
Enter
Record
Play/Pause
Stop
*
RJ11
Relay Alarm
LED Switch
MIC Speaker
Bat
RJ11
1 2 3
4 5 6
7 8 9
0 #
Enter
Record
Play/Pause
Stop
*
RJ11
Note:
If Elevator
Communications
Failure is required,
connect to our
Alarm Relay *
24v
RP7300144-24/5VA
Troubleshooting & Diagrams
SmartPhone VI
N56W24720 N. Corporate Circle • Sussex, WI 53089
800-451-1460 • www.rathcommunications.com
MADE IN THE USA
3 YEAR WARRANTY
Initial Set-Up:
Troubleshooting:
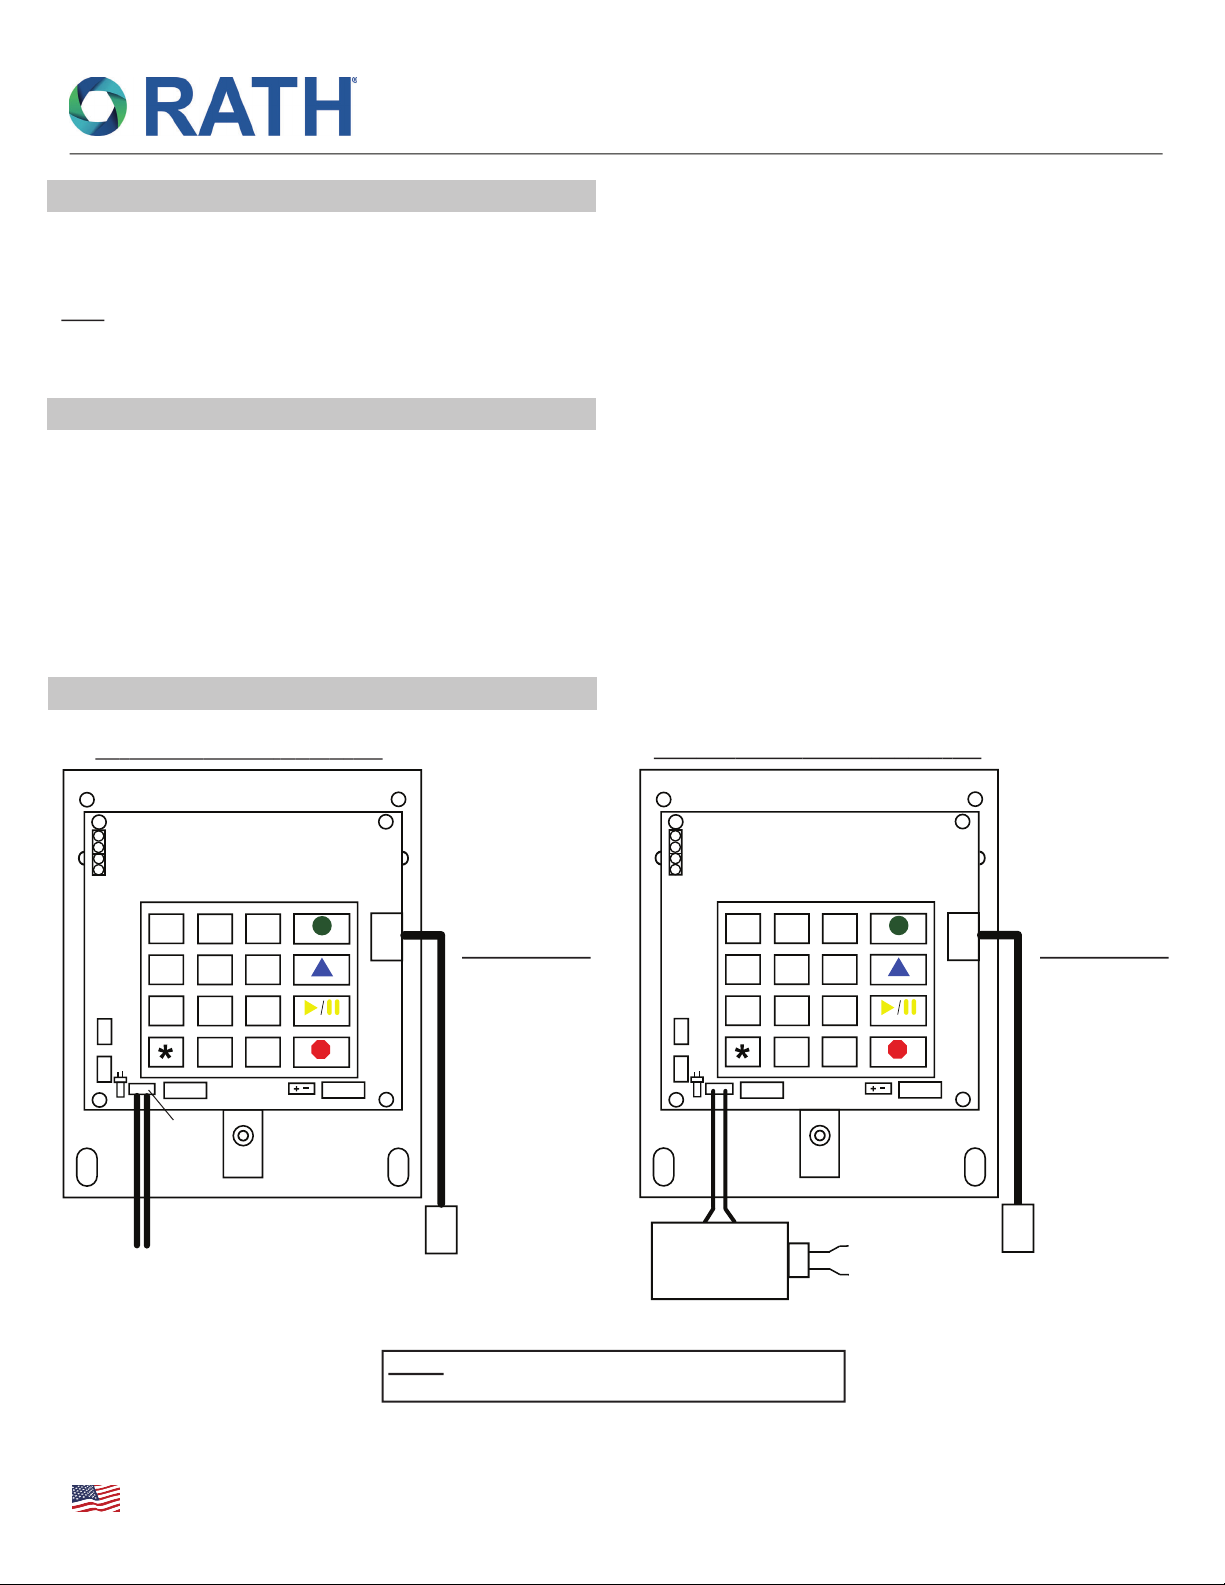
Wiring Diagrams: 12vac/dc Models:
Direct 12vac/dc Powered 120vac to 12vac/dc Powered
Note: If Elevator Communications Failure is
required, connect to our Alarm Relay.
To 12vac/dc
Power Supply
To Phone Line:
Requires a twisted
shielded pair.
When used with
SmartRescue,
requires two
twisted shielded
pairs.
*
To Phone Line:
Requires a twisted
shielded pair.
When used with
SmartRescue,
requires two
twisted shielded
pairs.
1. Diagnostic Test: Press Enter, 2, 6, Play/Pause phone will play back (5) Beeps (1st Beep=External Power Supply; 2nd
Beep=LED; 3rd Beep=Microphone; 4th Beep=Speaker; 5th Beep=Backup Battery). If any item fails during test you will hear
a Blat not a Beep. If you hear a Blat, contact RATH® Technical Support.
Note: If you receive a Blat for the LED, check the LED operation to be sure it is not working before contacting RATH® Technical Support.
2. Connect to standard RJ11 phone jack. If splicing connection, only hook up Red and Green Wires from the phone cable. If
connecting to a SmartRescue unit, you must connect all four wires (check for 24vdc or 48vdc supply at the splice).
1. If the phone dials only one digit and hangs up, there is another Auto-Dialer on the line. You need to re-wire the system so
that the RATH® unit is either in parallel or ahead of it.
2. If the phone dials a couple of digits and gets a busy signal, the unit is installed on a switchboard line and needs to be
programmed to dial the appropriate access code to get an outside line (usually an 8 or 9).
3. If the phone does not respond, make sure the green LED (D1) on the circuit board is lit. If not, check to be sure the power is
properly connected.
4. If the phone is making phantom calls, it is installed on a Ring Down Line. You must turn off the “Telephone Line Check”
feature (see Optional Programming Instructions).
RP8200950
Ver. 9
09/19
Relay Alarm
LED Switch
MIC Speaker
Bat
12vac/dc
RJ11
1 2 3
4 5 6
7 8 9
0 #
Enter
Record
Play/Pause
Stop
*
RJ11
Relay Alarm
LED Switch
MIC Speaker
Bat
RJ11
1 2 3
4 5 6
7 8 9
0 #
Enter
Record
Play/Pause
Stop
*
Transformer
12v
RJ11
White/Neutral
To 120vac
Black/Hot
Troubleshooting & Diagrams
SmartPhone VI
N56W24720 N. Corporate Circle • Sussex, WI 53089
800-451-1460 • www.rathcommunications.com
MADE IN THE USA
3 YEAR WARRANTY