LYSON Optima User manual

INSTRUKCJA OBSŁUGI
Urządzenie wielofunkcyjne do dozowania, kremowania
i pompowania miodu - Optima
Przedsiębiorstwo Pszczelarskie Tomasz Łysoń
Spółka z o.o. Spółka Komandytowa
34-125 Sułkowice, ul. Racławicka 162, Polska
www.lyson.com.pl, email; [email protected]
tel. 33/875-99-40, 33/870-64-02
Siedziba Firmy Klecza Dolna 148, 34-124 Klecza Górna
2019

1
Przed rozpoczęciem użytkowania urządzenia należy
dokładnie przeczytać instrukcję obsługi i postępować
według wskazówek w niej zawartych. Producent nie
odpowiada za szkody spowodowane użytkowaniem
urządzenia niezgodnie z jego przeznaczeniem lub
niewłaściwą jego obsługą.
PRZEZNACZENIE
Urządzenie przeznaczone do rozlewania,
przepompowywania i kremowania miodu.
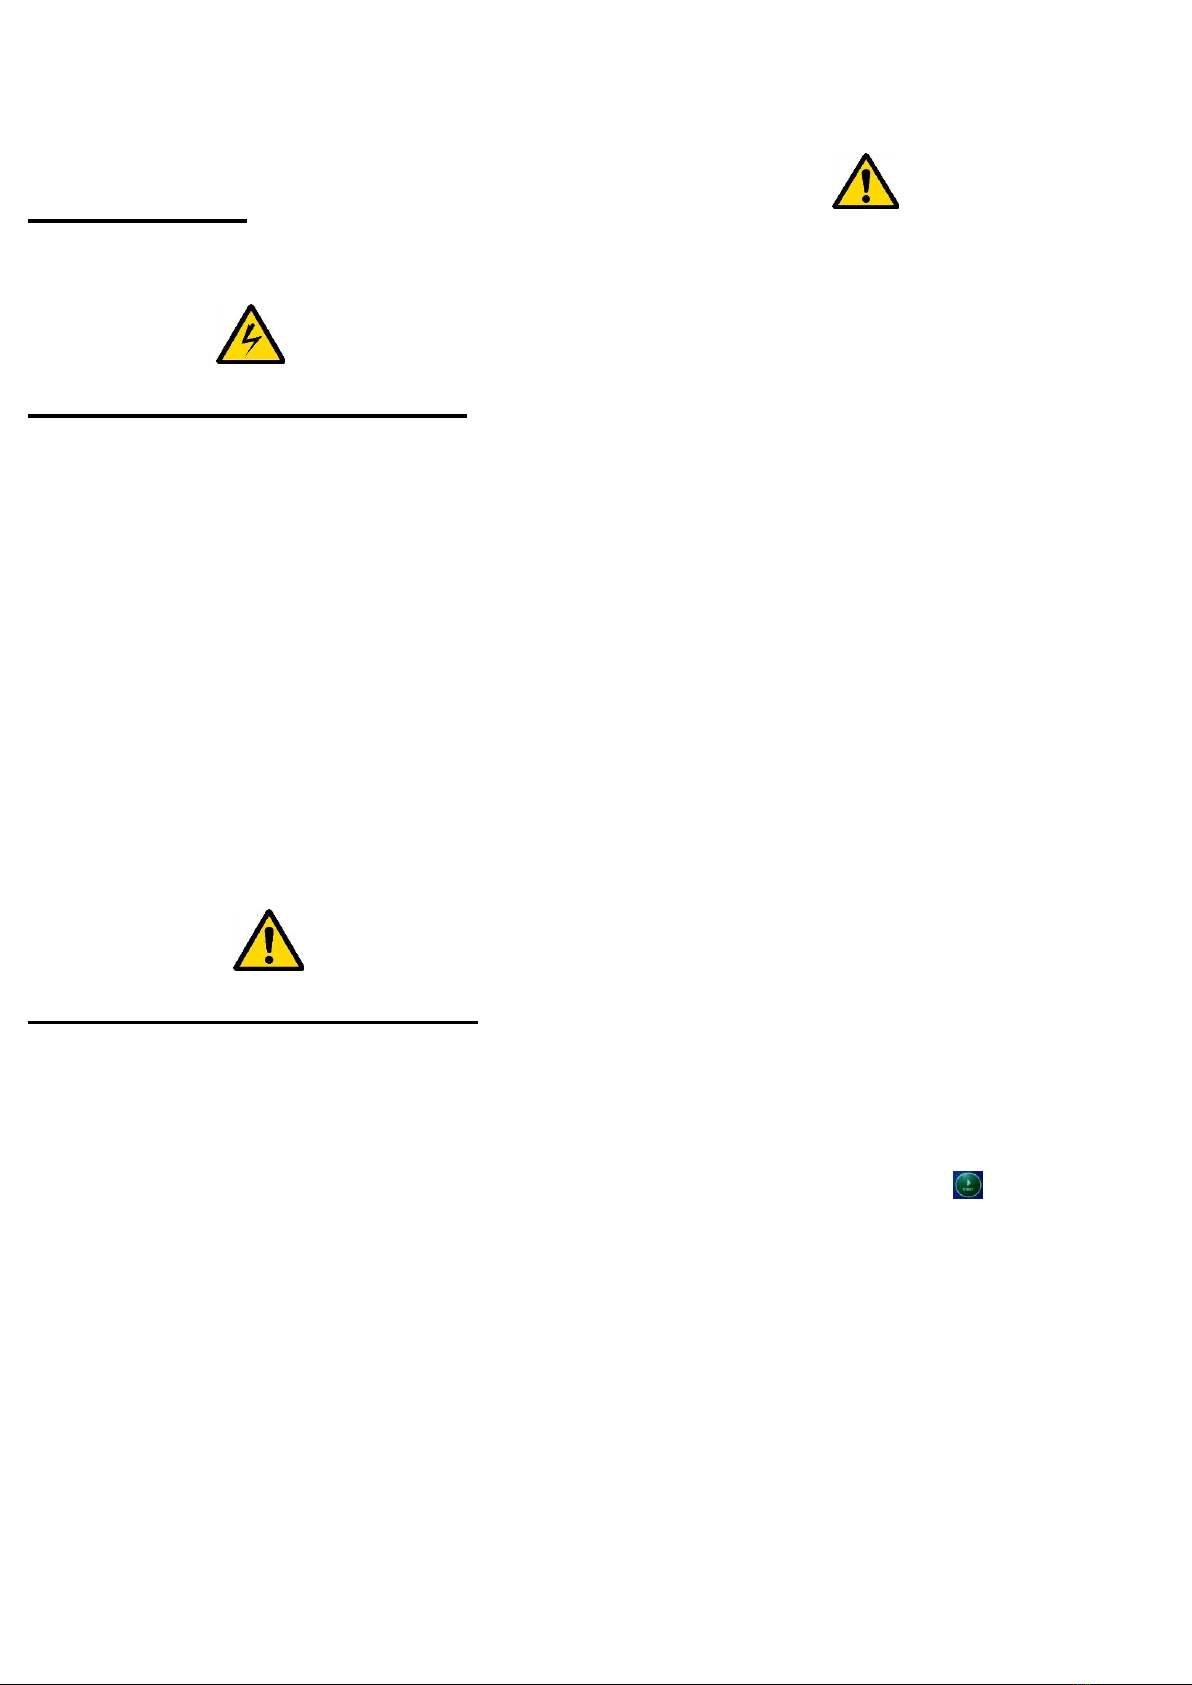
BEZPIECZEŃSTWO ELEKTRYCZNE
a)
Urządzenie należy podłączyć do gniazda z uziemieniem o
napięciu określonym na tabliczce znamionowej wyrobu.
b)
Instalacja elektryczna zasilająca musi być wyposażona w
wyłącznik różnicowo-prądowy o znamionowym prądzie
zadziałania nie wyższym niż 30mA. Okresowo należy
sprawdzać działanie wyłącznika różnicowo-prądowego.
c)
Okresowo sprawdzaj stan przewodów zasilających. Jeżeli
przewód zasilający nieodłączalny ulegnie uszkodzeniu i
trzeba go wymienić, to czynność ta powinna być
wykonana u gwaranta lub przez specjalistyczny zakład
naprawczy albo przez wykwalifikowaną osobę w celu
uniknięcia zagrożenia.
d)
Nie używać urządzenia, gdy przewód zasilający jest
uszkodzony.
e)
Okresowo sprawdzaj stan przewodu zasilającego. Jeżeli
przewód zasilający odłączalny ulegnie uszkodzeniu to
należy go wymienić na przewód tego samego typu. Nie
używać urządzenia, gdy przewód zasilający jest
uszkodzony.
BEZPIECZEŃSTWO UŻYTKOWANIA
a)
Niniejszy sprzęt nie jest przeznaczony do użytkowania
przez osoby (w tym dzieci) o ograniczonej zdolności
fizycznej, czuciowej lub psychicznej lub osoby nie mające
doświadczenia lub znajomości sprzętu, chyba, że odbywa
się to pod nadzorem lub zgodnie z instrukcją użytkowania
sprzętu, przekazanej przez osoby odpowiadające za ich
bezpieczeństwo. Należy zwracać uwagę na dzieci, aby
nie bawiły się urządzeniem.
b)
W przypadku uszkodzenia urządzenia, w celu uniknięcia
zagrożenia, naprawę może przeprowadzić tylko
specjalistyczny zakład naprawczy albo wykwalifikowana
osoba.
c)
Nie korzystaj z urządzenia w pobliżu materiałów
łatwopalnych.
d)
Zabrania się prowadzić jakichkolwiek prac
konserwacyjnych podczas pracy urządzenia.
e)
W przypadku jakiegokolwiek zagrożenia należy
bezzwłocznie wyłączyć urządzenie.
f)
Ponowne uruchomienie urządzenia może nastąpić po
wyeliminowaniu zagrożenia.
g)
Urządzenie może być uruchamiane tylko wewnątrz
pomieszczeń. Urządzenie nie jest przystosowane do
pracy na zewnątrz pomieszczeń.
h)
Należy chronić sterowanie przed wilgocią; (również
podczas przechowywania)
i)
Zabrania się ciągnąć za przewód zasilający.
j)
Przewód zasilający należy trzymać z dala od źródeł
ciepła, ostrych krawędzi oraz dbać o jego dobry stan.
UWAGA!
MIÓD PRZEZNACZONY DO DOZOWANIA NALEŻY
OGRZAĆ DO TEMPERATURY 30°C.
W CELU DOSZCZELNIENIA MODUŁU
DOZUJĄCEGO PRZED ROZPOCZĘCIEM PRACY Z
URZĄDZENIEM NALEŻY ZALAĆ GO MIODEM
Wymagane temperatury minimalne dla miodu:
•świeżo odwirowany, ciekły :20 - 25°C
•miód wrzosowy, kremowy lub z małą zawartością wody
ok <16% : 25-35°C
•maksymalna temperatura napełnianego miodu
wynosi MAX 40°C
Nie przestrzeganie zaleceń dot. temperatury miodu
może spowodować uszkodzenie maszyny, za co
producent nie ponosi odpowiedzialności. Produkt
uszkodzony w wyniku stosowanie niezgodnie z
przeznaczeniem nie podlega gwarancji.
Wskazówki:
1.
Podłączamy wąż do modułu dozującego za
pomocą klamry, uważając na poprawne osadzenie
uszczelki.
2.
Później do drugiego końca węża wlewamy około 1 kg
miodu (tj. słoik 0,95 kg.)
3.
Należy trzymać przewód do góry dotąd aż miód
spłynie do modułu zębatego (pompy).
Przewód jest przeźroczysty więc widać kiedy miód
dopłynie do pompy.
Przed naciśnięciem przycisku START należy
uruchomić funkcję KREMOWANIA
Gdy miód dopłynie do pompy należy
nacisnąć przycisk „START” Zielony
przycisk z prawej strony wyświetlacza
4.
Należy pamiętać aby pod pompę (dozownik) podłożyć
pojemnik lub słoik na miód.
5.
W momencie kiedy przepompuje się wlany wcześniej
do przewodu miód zatrzymujemy pracę pompy
naciskając ponownie przycisk „START”.
6.
Po wykonaniu powyższych czynności wkładamy
przewód od pompy do beczki z miodem i
rozpoczynamy dozowanie lub pompowanie.
7.
Należy przepuścić niewielką ilość miodu aby usunąć
powietrze, które pozostało w przewodzie.

2
8.
Tak przygotowany dozownik jest gotowy do pracy.
DANE TECHNICZNE:
•zasilanie –230 V · moc – 160W
•samozasysająca, wolnoobrotowa pompa z modułem
zębatym
•wszystkie części, z którymi styka się miód wykonane
ze stali nierdzewnej lub tworzywa dopuszczonego do
kontaktu z żywnością
•napełnia około 350 słoików 500g/h (w zależności od
gęstości miodu)
•zakres napełniania – od 50g do 45 kg
•wymiary: dł.420,szer.380, wys.480 mm
•waga –15 kg
Części składowe:
•urządzenie wielofunkcyjne
•króciec do węża
•złącze do łączenia węża z urządzeniem
•opaska zaciskowa do węża
•1,5 m węża
Dodatkowo można zakupić:
•Przycisk nożny
•Krańcówkę – uruchomienie poprzez dosunięcie słoika
pod dyszę dozującą
Wszystkie części, z którymi styka się miód są wykonane ze
stali nierdzewnej lub tworzywa dopuszczonego do kontaktu
z żywnością.
Małe wymiary umożliwiają różne ustawienie maszyny nawet
przy ograniczonej powierzchni.
Urządzenie posiada trzy tryby pracy
Tryb A- tryb pracy –do trybu wprowadzane są wartości
ustawione w trybie C
Tryb B- tryb pracy - do trybu wprowadzane są wartości
ustawione w trybie C
Tryb C –ręczne ustawienie żądanej ilości miodu .
Trybem C rozpoczynamy pracę z
dozownikiem. Służy on do precyzyjnego
określenia dozowanej ilości miodu
Obsługa i konfiguracja
Przystępując do pracy z urządzeniem należy:
•ustawić urządzenie na stabilnym, suchym i czystym
podłożu
•wyregulować wysokość dozownika względem
słoika, w tym celu należy podstawić słoik pod dyszę
dozującą i za pomocą śrub zamocowanych z tyłu,
na stelażu urządzenia podnieść lub opuścić
urządzenie do żądanej wysokości
•Podpiąć kabel zasilający (230V) dozownik do
gniazda NR 1, znajdującego się z tyłu urządzenia
•Włączamy urządzenie naciskając wyłącznik 0/1
znajdujący się na tylnej obudowie dozownika
Przygotowanie urządzenia do pracy
1. Przygotowujemy słoik żądanej pojemności,
który będziemy napełniać np. 900 g
2. Przygotowujemy wagę, którą ustawiamy pod
dyszą dozującą
3. Na wadze ustawiamy słoik 900g
4. Tarujemy wagę
5. Naciskając przycisk „O” przechodzimy do
TRYBU C, czyli ręcznego ustawiania
dozowanej ilości miodu
6. Naciskamy START- zielony przycisk z prawej
strony wyświetlacza i przytrzymujemy aż na
wadze pokaże się założona przez nas ilość
dozowanego miodu np.900g, wówczas
zwalniamy przycisk START
7. Na wyświetlaczu pojawi się zapis liczbowy,
określający czas napełniania danej ilości
np.8.46 przy 900g
8. Następnie naciskając przycisk „O”
przechodzimy do trybu dozowania A lub B
9. Na wyświetlaczu w dolnym rzędzie pokazuje się
ustawiony wcześniej (zapamiętany) zapis
liczbowy, określający czas dozowania 900g –
8.46s

3
10. Tą samą wartość ustawiamy w górnym rzędzie
naciskając przyciski „+” lub „-„
W Trybie „B” możemy ustawić napełnianie dla innego rodzaju
słoika np. 250g
W tym celu naciskając przycisk „O” należy przejść do Trybu
„C”, w którym będziemy ponownie ustawiać czas napełniania
się słoika, tym razem np. 250g.
Do trybu A i B wprowadzamy ręcznie ustawione w Trybie C
wartości.
Ustawienia wprowadzone do Trybu „A” i ”B” możemy zmienić
za pomocą przycisków „+” „-„.
Po napełnieniu kilku, kilkunastu słoików może okazać się, że
należy skorygować ustawienia w Trybie A i B. Robimy to
używając przycisków „+” i „-„
Dozowanie
Aby rozpocząć proces dozowania należy za pomocą
przycisku „O” przejść do żądanego trybu np. „.A”
•Pod dyszą dozującą ustawiamy słoik,
•Naciskamy przycisk” START”, który rozpoczyna
dozowanie, po napełnieniu słoika żądaną ilością
urządzenie przestaje dozować
•Podstawiamy kolejny słoik i naciskamy przycisk
START, czynność powtarzamy przy każdorazowym
napełnieniu słoika
Awaryjne zatrzymanie urządzenia jest
możliwe po naciśnięciu przycisku „O”
Strzałka pod wybranym Trybem np. „A” informuje, że
urządzenie jest w trakcie napełniania.
Urządzenie daje nam możliwość sprawdzenia liczby
napełnionych słoików należy za pomocą przycisku „O”
przejść do ekranu licznika, gdzie zostanie wyświetlony
aktualny status
Konfiguracja sterownika
Przytrzymując przycisk „O” do chwili wyświetlenia napisu
„MENU” a następnie puszczając go wchodzimy w tryb
konfiguracji sterownika dozownika.
W tym trybie ustawić można prędkość dozowania (wskazania
w %) oraz czas trwania ruchu wstecznego(wskazania w ms)
oraz prędkość ruchu wstecznego (wskazania w %).

4
Do modyfikacji ustawień należy użyć przycisków „+” i „-„ a do
wyboru modyfikowanego parametru przycisku „o”. Wyjście z
trybu konfiguracji nastąpi po przytrzymaniu przycisk „o” do
chwili wyświetlenia napisu „EXIT” a następnie puszczeniu go.
Parametr górny 100% (zdjęcie powyżej) - prędkość
dozowania, zmiana co 5%, do 50%
Parametr dolny 10ms (zdjęcie powyżej)- czas trwania ruchu
wstecznego min.10ms, zmiana co 10ms
Pomiędzy strzałkami góra- dół poruszamy się za pomocą
przycisku „O”
Parametr prędkości ruchu wstecznego min.20%, zmiana co
5%
Przytrzymując przycisk „O” o 7 sek. .dłużej po pojawieniu się
komunikatu MENU, wyświetli się parametr „T” a następnie
DYNAMICS LOW., DYNAMICS MEDIUM i DYNAMICS HIGH.
Wybierając określony parametr np. HIGH –puszczamy
przycisk „O”
Dostępne są trzy stopnie dynamiki dozowania – w zależności
od gęstości miodu: DYNAMICS LOW, DYNAMICS MEDIUM i
DYNAMICS HIGH. Zalecany jest stopień DYNAMICS HIGH.
W momencie zakończenia dozowania miodu i braku reakcji
operatora, na urządzeniu pojawia się napis STOP
Błędy sterownika
W momencie kiedy na ekranie urządzenia pojawi się
komunikat
Oznacza, to że urządzenie wykryło błędy:
E:1 –usterka wewnętrzna serownika – w celu
usunięcia usterki należy zgłosić się do
sprzedawcy/producenta
E:2 –wciśnięty / zablokowany przycisk „-” –należy
zwolnić zablokowany przycisk
E:3 –wciśnięty / zablokowany przycisk „+” – należy
zwolnić zablokowany przycisk
E:4 –wciśnięty / zablokowany przycisk „o” – należy
zwolnić zablokowany przycisk.
Funkcje dodatkowe
Urządzenie posiada funkcję kremowania, którą
uruchamiamy naciskając przycisk START.
Urządzenie będzie pracować aż do momentu
ponownego naciśnięcia przycisku START
Do funkcji kremowania przechodzimy naciskając
przycisk „O”.
UWAGA!
Przed rozpoczęciem procesu kremowania lub
przepompowywania niezwłocznie wyciągnąć
dyszę dozującą. Na jej miejsce wkręcamy złącze z
kołnierzem 5,4”
Konserwacja urządzenia
Ważne!
Po każdorazowym użyciu, urządzenie należy
dokładnie umyć, zdezynfekować i wysuszyć
Urządzenie myjemy na dwie fazy: wstępna i
końcowa (dezynfekująca) oraz płukanie
Faza wstępna - służy do wypłukania miodu z dyszy i
modułu dozującego, wykonuje się ją po każdym użyciu
urządzenia
•Po zakończonym rozlewie wykręcamy
końcówkę dozującą a na jej miejsce wkręcamy
złącze z kołnierzem 5/4”, które umożliwia
podłączenie drugiego węża (nie jest w
zestawie).
•Włączamy dozownik w trybie KREMOWANIA
(praca NON STOP).
•Bezpośrednio po pracy z urządzeniem
przekładamy węża ssącego do pojemnika z
ciepłą wodą i przepompowujemy w celu
wypłukania modułu dozownika.
•Proces ten chroni urządzenie przed
uszkodzeniami jakie może wywołać
skrystalizowany. Brudną wodę należy wylać, do
pojemnika ponownie nalać wodę ze środkiem
polecanym do mycia, dezynfekcji urządzeń
mających kontakt z żywnością. Postępować
zgodnie z instrukcjąumieszczoną na

5
opakowaniu.
Uszkodzenia wynikające z niewłaściwego
czyszczenia modułu nie podlegają gwarancji.
Celem dokładnego umycia i zdezynfekowania
urządzenia, konieczny jest demontaż modułu
dozującego. W tym celu należy odkręcić 4 śruby z
modułu dozującego (od czoła urządzenia)
i zdjąć przeźroczystą osłonę, a następnie wyciągnąć cały
element dozujący.
Następnie wyciągnąć koła zębate i wałki i dokładnie je
umyć. Pozostawić do wysuszenia i ponownie skręcić.
Do mycia można używać środków przeznaczonych
do dezynfekcji sprzętu, który jest przeznaczony do
kontaktu z żywnością, po czym obficie wypłukać,
osuszyć i ponownie skręcić. Producent zaleca
kilkukrotne zdemontowane elementu dozującego w
sezonie oraz jego dokładne mycie i dezynfekcję.
Utylizacja
Zużyty produkt podlega obowiązkowi usuwania jako
odpady wyłącznie w selektywnej zbiórce odpadów
organizowanych przez Sieć Gminnych Punktów Zbiórki
Odpadów Elektrycznych i Elektronicznych. Konsument ma
prawo do zwrotu zużytego sprzętu w sieci dystrybutora
sprzętu elektrycznego, co najmniej nieodpłatnie i
bezpośrednio, o ile zwracane urządzenie jest właściwego
rodzaju i pełni tę samą funkcję, co nowo zakupione
urządzenie.
Gwarancja
Produkty marki „Łysoń” objęte są gwarancją producenta.
Okres gwarancji wynosi 24 miesiące
Na zakupione produkty wystawiany jest paragon lub faktura
VAT.
Szczegóły gwarancji na www.lyson.com.pl

MANUAL
Multi-functional device for honey dozing, creaming and
pumping - Optima
Przedsiębiorstwo Pszczelarskie Tomasz Łysoń
Spółka z o.o. Spółka Komandytowa
34-125 Sułkowice, ul. Racławicka 162, Polska
www.lyson.com.pl, email; [email protected]
tel. 33/875-99-40, 33/870-64-02
based in: Klecza Dolna 148, 34-124 Klecza Górna
2019

2
Prior to device usage initiation, refer to the following
manual and act according the guidelines contained
therein. The manufacturer shall not be held
accountable for any damages caused by improper
usage of the device or its improper handling.
INTENDED USAGE
The device is intended for honey filling,
pumping and creaming.
ELECTRICAL SAFETY
a) The device shall be connected to a plug with grounding
with the voltage specified on the product nominal plate
b) Power supply electric installation must be equipped
with RCD with nominal tripping current below 30 mA.
Periodically check the RCD.
c) Periodically check the power supply cable. If non-
detachable power supply cable gets damaged and
must be replaced, it must be performed at a guarantor’s
or by a specialised repair centre or by a qualified
person in order to avoid any threat.
d) Do not operate the device when the power supply
cable is damaged.
e) Periodically check the power supply cable. If a
detachable power supply cable gets damaged, it must
be replaced with the cable of the same type. Do not
operate the device when the power supply cable is
damaged
OPERATING SAFETY
a)
The following equipment is not intended to be used by
persons with limited physical, sensory or mental
capabilities (including children) or persons
inexperienced or unfamiliar with that type of equipment
unless the usage occurs under supervision or in line
with the equipment operating manual provided by
safety supervising persons. Make sure that children do
not play with the device.
b)
If the device cable gets damaged, the repairs must be
performed solely by a specialised repair centre or by a
qualified person in order to avoid any threat
c)
Do not operate the device in the vicinity of
flammable materials.
d)
It is forbidden to perform any
maintenance works when the device is in
operation.
e)
In case of any danger, switch the device off
immediately.
f)
The device can be restarted once the threat has been
eliminated.
g)
The device can be activated indoors only. The device is
not adjusted to be operated outdoors.
h)
Protect the controller against humidity; (also
during the storage) It is forbidden to pull the
supply cable.
i)
It is forbidden to pull the supply cable.
j)
The supply cable ought to be kept away from the
sources of heat, sharp edges and its good state must
be taken care of.
ATTENTION!
Honey intended for dozing ought to be heated until
the temp. of approximately 30°C
IN ORDER TO SEAL THE DOZING MODULE, IT
MUST BE SUBMERGED IN HONEY PRIOR TO
OPERATION
Required minimal temperatures for honey:
•Freshly extracted honey, liquid :20 - 25°C
•Heather honey, cream honey or honey with little
water content, approx. <16% : 25-35°C
•Maximum temperature for filled honey is MAX
40°C
Failure to observe the honey temperature
recommendations may result in the device
damage, for which the manufacturer is not to be
held accountable. The product damaged due to
misuse is excluded from the guarantee provisions.
Guidelines:
1.
Connect the hose to the dozing module by
means of a clamp, watch the proper position
of the gasket. .
2.
Afterwards, pour approximately 1 kg of honey to the
other end of the hose (i.e. a jar of 0.95 kg).
3.
Keep the connection hose upwards until the honey
flows down to the (pump) rotor
The connection hose is transparent so it is
visible when honey has reached the pump.
.
Before pressing the START button,
CREAMING function must be activated.
When the honey has reached the pump
„START” button must be pressed .
the green button to the right of the display
4.
One must remember to put a honey jar under the
pump (dispenser)
5.
When the previously poured honey has been
pumped entirely, stop the pump by pressing the
STOP button
6.
Having completed the aforementioned activities, put
the dispenser connecting hose to a barrel of honey
and start dozing or pumping.
7.
A small quantity of honey must be pumped to
remove the air that stayed in the hose.
8.
The dispenser is then read for operations at this
stage.

3
TECHNICAL DATA:
•Power supply –230 V · power– 160W
•Low-speed, self-priming pump with the toothed
module
•All parts coming into contact with the honey are
made of stainless steel or plastic permissible to
come into contact with food
•Fills approximately 350 jars of 500 g/h (depending on
the honey density)
•Range of filling –from 50 g to 45 kg
•Dimensions: l.420, w.380, h.480 mm
•weight –15 kg
Components:
•Multi-functional device
•Stub pipe for the hose
•Connector to join the hose with the device
•Hose clamp
•1,5 m length of a hose
May be purchased additionally:
•Foot switch
•Limiting switch –activated when a jar is adjusted under
the dozing nozzle
All parts coming into contact with the honey are made of
stainless steel or plastic permissible to come into contact
with food
Small dimensions make it possible to place the machine
event within limited space
The device possesses three operating
modes
Mode A- operating mode –the values set for Mode C are
entered in this mode
Mode B- operating mode - the values set for Mode C are
entered in this mode
Mode C –the required honey quantity is set manually .
We start the operation of the dispenser from
Mode C. It serves to determine precisely the
honey quantity to be dispensed.
Handling and configuration
While starting to operate the device:
•Place the device on a firm, dry and clean floor
•Regulate the height of the dispenser with
regards to a jar, for this purpose place a jar under
the dozing nozzle and lift or lower the device to the
required height by means of the screws mounted at
the back
•Connect the dispenser power supply cable (230V)
to no 1 socket, placed at the back of the device
•Activate the device by pressing 0/1 switch on the
rear casing of the dispenser
Preparing the device for operation
1. Arrange for a jar with required capacity to be
filled, i.e. 900 g
2. Prepare the scales to be placed under the
dozing nozzle
3. Place the 900 g jar on the scales
4. Tare the weight
5. By pressing the O button switch to Mode C, i.e.
the manual setting of the honey quantity to be
dispensed
6. Press the START button –a green button to the
right side of the display and keep it pressed
until the required honey quantity has appeared,
e.g. 900 g. Then, release the START button
7. The display will show the numerical expression
determining the filling time for a given quantity,
e.g. 8.46 for 900 g.
8. Subsequently, by pressing the „O” button
switch to the dozing mode A or B.
9. The lower row of the display will show the
numerical expression preset (memorized)
before, determining the dozing time 900 g –
8.46 s.

4
10. The same value shall be set in the upper row by
pressing the “+” or “-“ buttons
In the B Mode, filling for another type of jar can be set, e.g.
250 g.
For this purpose, by pressing the „O” button switch to the C
Mode, in which we will set the jar filling time again, this time
e.g. 250 g
The values manually set in Mode C shall be entered to
Modes A and B.
The settings entered to Modes A and B can be changed by
means of „+” and „-„ buttons.
Having filled several jars, the settings for Modes A and B
may require corrections. This can be done by means of „+”
and „-„buttons.
Dozing
In order to start the dozing process (dispensing), switch to a
required mode (e.g. A) by means of pressing the “O” button.
•Place a jar under the dozing nozzle,
•Press the START button, which starts the dozing
process, having filled a jar with the required quantity
it stops dozing.
•Place another jar and press the START button,
repeat the steps after every jar filling
Emergency stop is possible after
pressing the „O” button
An arrow under the selected Mode, e.g. A, informs that the
device is being filled.
The device makes it possible to check the number of jars
filled. By means of the “O” button, switch to the counter
display, where the current status shall be shown.
CONTROLLER’S CONFIGURATION
By keeping the „O” button pressed until the MENU message
has appeared on the display and releasing it afterwards, we
can enter the dispenser controller’s configuration.
In this mode, the dozing speed (shown in %) as well as the
reverse movement duration (show in ms) and reverse
movement speed (shown in %) can be set .

5
In order to modify the settings, the „+” and „-„ buttons must be
used while in order to select the modified parameter use the
“o” button.
The configuration mode may be left by holding the “o” button
pressed until the EXIT message has been displayed and
subsequent releasing it.
The upper parameter 100% (the upper photo) –dozing
speed, change every 5% until 50%.
The lower parameter 10 ms (the upper photo) –reverse
movement duration min. 10 ms, change every 10 ms.
Switching between arrows up and down is possible by the “O”
button.
The reverse movement speed parameter min 20%, change
every 5%
By keeping the “O” button as pressed 7 seconds longer after
the MENU message has appeared, “T” parameter shall be
displayed, afterwards Dynamics Low, Dynamics Medium and
Dynamic High.
While selecting the required parameter, e.g. HIGH, release the
“O” button.
Three degrees of the dozing dynamics are available ,
depending on the honey density: DYNAMICS LOW,
DYNAMICS MEDIUM and DYNAMICS HIGH. The
DYNAMICS HIGH degree is recommended.
When the honey dozing is finished and there is no reaction
form an operator, STOP message appears on the device.
Controller’s errors
When the following message has appeared on the
device display
it means that the device has detected errors:
E:1 –internal failure of the controller –in order to
remove the failure, contact the seller/manufacturer
E:2 –the „-” button pressed/blocked–the button must
be released
E:3 –the „+” button pressed/blocked–the button must
be released
E:4 –the „o” button pressed/blocked–the button must
be released.
Additional functions
The device is equipped with the creaming
function, which is activated by pressing He
START button. The device will work until the
START button is pressed again.
We can shift to the creaming function by
pressing the „O” button.
ATTENTION!
Prior to starting the creaming process or pumping,
take out the dozing nozzle immediately. It must be
replaced by a connector with a 5.4” flange
Device maintenance
Important!
After each operations , the device must be washed,
disinfected and dried thoroughly.
The device shall be washed in two phases: preliminary one
and the final (disinfecting) one as well rinsing.
Preliminary phase - serves to rinse the honey from the
nozzle and dozing module, done after every device
usage
•When the filling terminates, unscrew the dozing
terminal and screw in a connector with a 5/4”
flange, which enables another hose to be
connected (not provided in a set).
•Activate the dispenser in the CREAMING
mode (NON STOP operations).
•Directly after work with the device the suction
hose is to be placed into a container with warm
water and warm water must be pumped in order to
rinse the module.
•The process prevents the device against damage
caused potentially by crystallized honey. Dirty

6
water must be removed, the container must be
filled with water containing a cleaning agent
recommended for washing, disinfection of
devices coming into contact with food. Proceed
in line with the manual placed on the packaging.
Damage resulting from improper module
cleaning is excluded from the guarantee terms.
In order to wash and disinfect the device thoroughly,
the dozing module must be dismantled. For this
purpose, unscrew 4 bolts of the dozing module (from the
front of the device)
and remove a transparent shield, subsequently pull out
the entire dozing element.
Next, pull out the toothed wheels and rollers and wash
them carefully. Leave them to dry out and assemble
again.
Use the washing agents intended to disinfect the
equipment that comes into contact with food, later rinse
with big quantities of water, dry and assemble again. The
manufacturer recommends to dismantle, wash thoroughly
and disinfect the dozing element several times per every
season.
Recycling
Worn-out product must be removed as waste only within
selective waste collection organised by the Network of
Communal Electric and Electronic Waste Collecting Points. A
customer is entitled to return the used equipment to the
electrical equipment distributor network, at least free of
charge and directly, if the device to be returned is of proper
type and serves the same purpose as the newly purchased
device
Guarantee
The products purchased in “Łysoń” company are
encompassed by the manufacturer’s guarantee.
The guarantee period equals 24 months
A receipt or a VAT invoice is issued for each product
purchased.
Guarantee terms details, see www.lyson.com.pl
Other manuals for Optima
1
Table of contents
Languages:
Other LYSON Industrial Equipment manuals

LYSON
LYSON C-01 User manual

LYSON
LYSON W20210S User manual

LYSON
LYSON Optima User manual

LYSON
LYSON PREMIUM PC-03 User manual

LYSON
LYSON 4043A User manual

LYSON
LYSON Premium FI 500 MM User manual

LYSON
LYSON C-05 Series User manual

LYSON
LYSON C-01 User manual

LYSON
LYSON Vap-Pro Diffusor 12V User manual

LYSON
LYSON W4099_SET User manual
Popular Industrial Equipment manuals by other brands

Danfoss
Danfoss DTW 300 SP Installation, service and user manual

JBM
JBM 53874 instruction manual

Rockwell Automation
Rockwell Automation Allen-Bradley Bulletin 2364E user manual

MachineryHouse
MachineryHouse S707 Instruction & parts manual

Hubbell
Hubbell DUAL LITE SPectron operating instructions

ABB
ABB HT564188 Operation manual