manuals.online logo
Brands
  1. Home
  2. •
  3. Brands
  4. •
  5. Makita
  6. •
  7. Batteries Charger
  8. •
  9. Makita DC9711 Manual

Makita DC9711 Manual

Other Makita Batteries Charger manuals

Makita DC18SH User manual

Makita

Makita DC18SH User manual

Makita DC18SE User manual

Makita

Makita DC18SE User manual

Makita DC10WA User manual

Makita

Makita DC10WA User manual

Makita MAKSTAR DC18RA User manual

Makita

Makita MAKSTAR DC18RA User manual

Makita DC24SA Manual

Makita

Makita DC24SA Manual

Makita DC1414 (MJ) User manual

Makita

Makita DC1414 (MJ) User manual

Makita DC10WA User manual

Makita

Makita DC10WA User manual

Makita MAKSTAR DC18RA User manual

Makita

Makita MAKSTAR DC18RA User manual

Makita Makstar DC18SD User manual

Makita

Makita Makstar DC18SD User manual

Makita DC18WA User manual

Makita

Makita DC18WA User manual

Makita DC18RD User manual

Makita

Makita DC18RD User manual

Makita DC1414 (MJ) User manual

Makita

Makita DC1414 (MJ) User manual

Makita DC24SA User manual

Makita

Makita DC24SA User manual

Makita DC24SC User manual

Makita

Makita DC24SC User manual

Makita DC18RC User manual

Makita

Makita DC18RC User manual

Makita DC18SF User manual

Makita

Makita DC18SF User manual

Makita DC10SA User manual

Makita

Makita DC10SA User manual

Makita DC40RA User manual

Makita

Makita DC40RA User manual

Makita MAKSTAR DC18RA User manual

Makita

Makita MAKSTAR DC18RA User manual

Makita DC1822 User manual

Makita

Makita DC1822 User manual

Makita DC18RE User manual

Makita

Makita DC18RE User manual

Makita DMR300 User manual

Makita

Makita DMR300 User manual

Makita DC40RA User manual

Makita

Makita DC40RA User manual

Makita DC18RD User manual

Makita

Makita DC18RD User manual

Popular Batteries Charger manuals by other brands

EVBox BusinessLine manual

EVBox

EVBox BusinessLine manual

Goobay 71808 user manual

Goobay

Goobay 71808 user manual

Kogan KACRDQIS4XA user manual

Kogan

Kogan KACRDQIS4XA user manual

Sealey WCB3 quick start guide

Sealey

Sealey WCB3 quick start guide

Vanner SP00143/181 owner's manual

Vanner

Vanner SP00143/181 owner's manual

KeyOuest KO037515 quick start guide

KeyOuest

KeyOuest KO037515 quick start guide

Enplus Silk Series user manual

Enplus

Enplus Silk Series user manual

Intermec SF51 user guide

Intermec

Intermec SF51 user guide

Colorovo PowerBox 6800 user guide

Colorovo

Colorovo PowerBox 6800 user guide

Smartech WBC-250 Operator's manual

Smartech

Smartech WBC-250 Operator's manual

PIXO C-USB instruction manual

PIXO

PIXO C-USB instruction manual

Gunson G4104 quick start guide

Gunson

Gunson G4104 quick start guide

Dometic NDS SCE320 Short Operating Manual

Dometic

Dometic NDS SCE320 Short Operating Manual

ABB HT572708 Operation manual

ABB

ABB HT572708 Operation manual

EVOline Square80 manual

EVOline

EVOline Square80 manual

Redarc SBC24025 Operating instructions and owner's manual

Redarc

Redarc SBC24025 Operating instructions and owner's manual

Absaar HV04 manual

Absaar

Absaar HV04 manual

DazeTechnology Cover Dazebox Home installation manual

DazeTechnology

DazeTechnology Cover Dazebox Home installation manual

manuals.online logo
manuals.online logoBrands
  • About & Mission
  • Contact us
  • Privacy Policy
  • Terms and Conditions

Copyright 2025 Manuals.Online. All Rights Reserved.

Continuous Rating (W)
Voltage (V) Cycle (Hz) Input Output Max. Output(W)
220 - 240
230 - 240
Models No.
Description
PRODUCT
Current (A)
TECHNICAL INFORMATION
CONCEPTION AND MAIN APPLICATIONS
Specification
DC9711
Charger
This charger can charge both Ni-Cd.and Ni-MH.batteries
of which powers are 7.2V and 9.6V.
Its brief benefits and features are as follows.
* The charging time is kept in the steady level by controlling the
out put current ( current for charging battery) in spite of the changeable
input voltage (power source voltage).
* The charger can switch into trickle charge (maintenance charge) mode
to keep the full charged condition for battery left in the charger.
50 / 60
50 / 60
35
35
Output voltage (D/C)
Output current (D/C)
Charging
time
7.2 V, 9.6 V,
1.5 A
approx. 60 min.
Net weight : Kg ( lbs ) 0.41 (0.9)
Cord length : m ( ft ) 2.0 (6.6)
Ni-Cd. battery 1.3Ah
Ni-Cd. battery 2.0Ah approx. 90 min.
Ni-MH.battery 2.2Ah approx. 100 min. approx. 100 min.
approx. 100 min.
Ni-MH.battery 2.6Ah approx. 115 min.
approx. 115 min.
Ni-MH.battery 3.0Ah approx. 130 min.
approx. 130 min.
The chargeable batteries
7.2 V
9.6 V
7000 (Ni-Cd. 1.3Ah)
7002 (Ni-Cd. 2.0Ah)
7033 (Ni-MH. 2.2Ah)
9000 (Ni-Cd. 1.3Ah)
9002 (Ni-Cd. 2.0Ah)
9033 (Ni-MH. 2.2Ah)
9133 (Ni-MH. 2.2Ah)
9134 (Ni-MH. 2.6Ah)
9135 (Ni-MH. 3.0Ah)
9100 (Ni-Cd. 1.3Ah)
9120 (Ni-Cd. 1.3Ah)
9122 (Ni-Cd. 2.0Ah)
9102 (Ni-Cd. 2.0Ah)
9102A (Ni-Cd. 2.0Ah)
Type No.
Voltage Charging time
approx. 60 min.
approx. 90 min.
approx. 60 min.
approx. 60 min.
approx. 60 min.
approx. 90 min.
approx. 90 min.
approx. 90 min.
approx. 90 min.
approx. 100 min.
Dimensions : mm ( " )
Width ( W )
Height ( H )
Length ( L )
80 (3-1/8)
63 (2-1/2)
145 (5-3/4)
P 1 / 2
H
L
W
Repair P 2/ 2
<1> The circuit board can not be repaired, because the circuit itself are molded on the board
with the urethane resin.
It has to be replaced completely with new one.
<2> In case of damaged varistor or fuse, they can be repaired according to the following procedure without
replacing the circuit board.
(1) How to find broken varistor
a. In case that the surface of varistor (ref. to the following illustration) has broken or has become black, and
fuse has been cut, the varistor has been damaged.
b. Varistor can be damaged easily, if the charger is plugged in a double voltage of the rating one.
c. It is considered that the varistor has been broken for other reasons, if the fuse is broken while the surface
of varistor is not damaged. In this case circuit board has to be replaced.
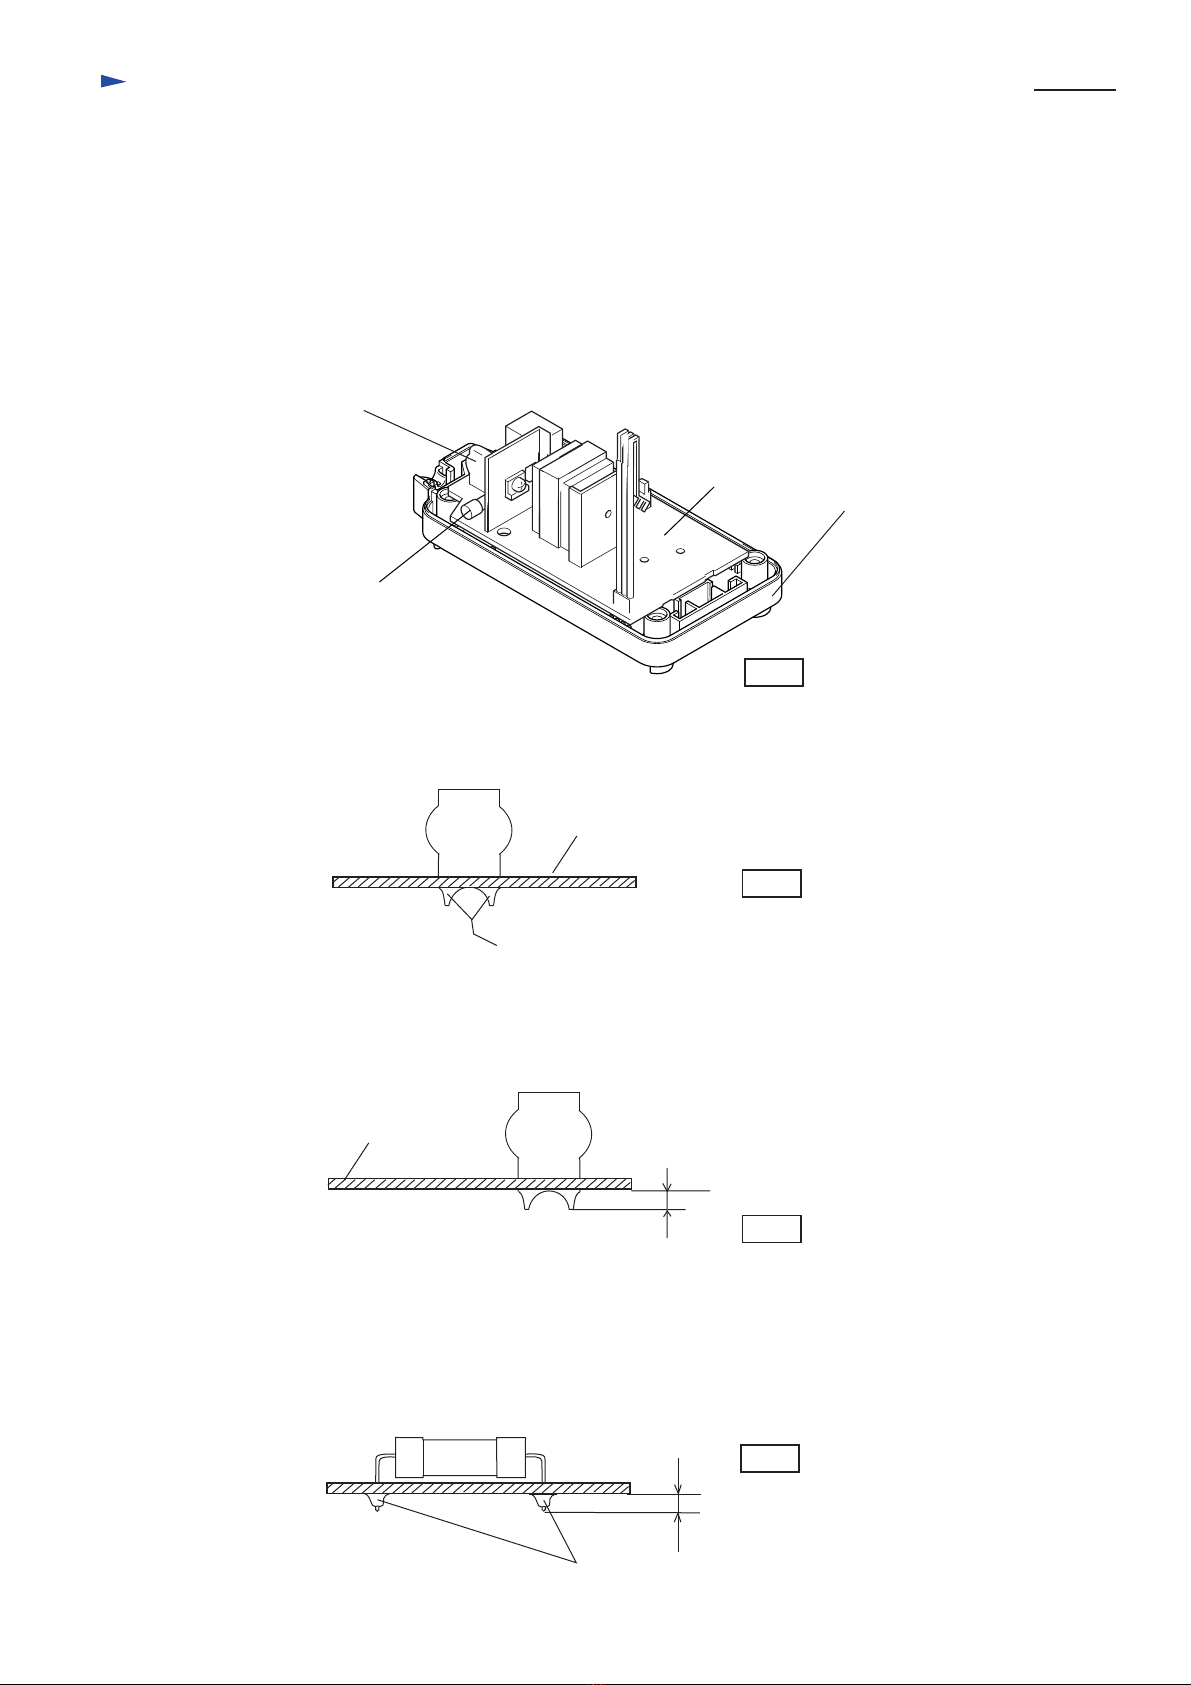
Fuse
Varistor
Circuit board
Charger case set
(2) Replacing damaged varistor
a. Varistor is assembled on circuit board with solder. Remove it from circuit board
with soldering iron.
(3) Replacing damaged fuse
a. Fuse is assembled on circuit board with solder. Remove it from circuit board with soldering iron.
b. Assemble new fuse to the circuit board by soldering.
c. Cut the surplus of fuse's wire with nipper.
b. Assemble new varistor to the circuit board by soldering.
c. Cut the surplus of varistor's wire with nipper.
Varistor Circuit board
When removing varistor, melt this part with soldering iron
and remove varistor.
Varistor
Circuit board
Less than 3mm
Fig.1
Fig.2
Fig.3
Fig.4
Fuse
When removing fuse, melt this part with soldering iron
and remove fuse.
Less than 3mm