Marcy ME-1018RE User manual

NOTE:
Please read all
instructions carefully
before using this product
Table of Contents
Safety Notice
Important Assembly
Information
Care and Maintenance
Parts List
Warranty
Ordering Parts
Model
ME-1018RE
Retain This
Manual for
Reference
180501
OWNER'S
MANUAL
MAGNETIC UPRIGHT BIKE
ME-1018RE
4
4
3
2
5R 5L
5L 5R
67
6
7
8
10
9
11
12
12 15
13
13
14L
21
12
13
12
13
15
14R
34
25
17
18
18
16 19
16
20
20
22
23
22 23
22 23
22
23
25
24
25
24
25
24
28
29
29
27
68
33
32
25
31
33 31
25
68
33
32
25
31
33 31
25
35
30
26
2
67
6
7
34
25
19
24
25
12
13
12
15
14R
21
NO.9 NO.14
NO.26
NO.1 NO.3
NO.17
NO.11
NO.28
3
36
37
38R
38L
39
42
43
44
46
46
47
25
48
50
49
51
52
69
31
31
5355
54
23
56
57 56
58 54
53
23
60
61 62
63
64
65
66
67
67
69
59
59
59
59
70
71 72
16
16
72
8
25
74 31
73
74
31
25
75
41
4140
40
59
20
20
45
31
42
39
76
77
7
45
12 15
13
14L
13
13
9
10
5L 5R
22
22
23
23
22
23
22
23
25 24
24 25
25 24
11
28
IMPORTANT: Please read this manual before commencing
assembly of this product.
IMPEX®INC.
2801 S. Towne Ave, Pomona, CA 91766
Tel: 800- 999-8899
www.marcypro.com
support@impex-fitness.com

1
© Impex Inc.
www.marcypro.com
TABLE OF CONTENTS
BEFORE YOU BEGIN
Thank you for selecting MARCY MAGNETIC ROWER ME-1018RE by
IMPEX®INC. For your safety and benefit, read this manual carefully
before using the equipment. As a manufacturer, we are committed to
providing you with complete customer satisfaction. If you have any
questions, or find there are missing or damaged parts, we guarantee you
complete satisfaction through direct assistance from our factory. To avoid
unnecessary delays, please call our TOLL-FREE customer service
number. Our Customer Service Agents will provide immediate assistance.
Toll-Free Customer Service Number
1-800-999-8899
Mon. –Fri. 9 a.m. –5 p.m. PST
www.marcypro.com
support@impex-fitness.com
BEFORE YOU BEGIN
1
IMPORTANT SAFETY NOTICES
2
CARE AND MAINTENANCE
2
WARNING LABEL PLACEMENT
3
HARDWARE PACK
4
COMPONENTS
5
ASSEMBLY INSTRUCTIONS
6
EXPLODED DIAGRAM
10
PARTS LIST
12
COMPUTER INSTRUCTIONS
13
EXERCISE GUIDELINES
15
WARRANTY
17
ORDERING PARTS
17

2
© Impex Inc.
www.marcypro.com
IMPORTANT SAFETY NOTICE
This exercise equipment is built for optimum safety. However, certain precautions apply
whenever you operate a piece of exercise equipment. Be sure to read the entire manual before
you assemble or operate your equipment. In particular, note the following safety precautions:
1. Read the warning notice and instruction prior to assembling and using the equipment.
2. This equipment is not intended for children under 12 years of age.
3. This equipment can be only used by hands or feet. Do not stand with full weight on the
pedals.
4. Do not leave children unattended with the equipment.
5. This equipment is intended for indoor use and for consumer use only.
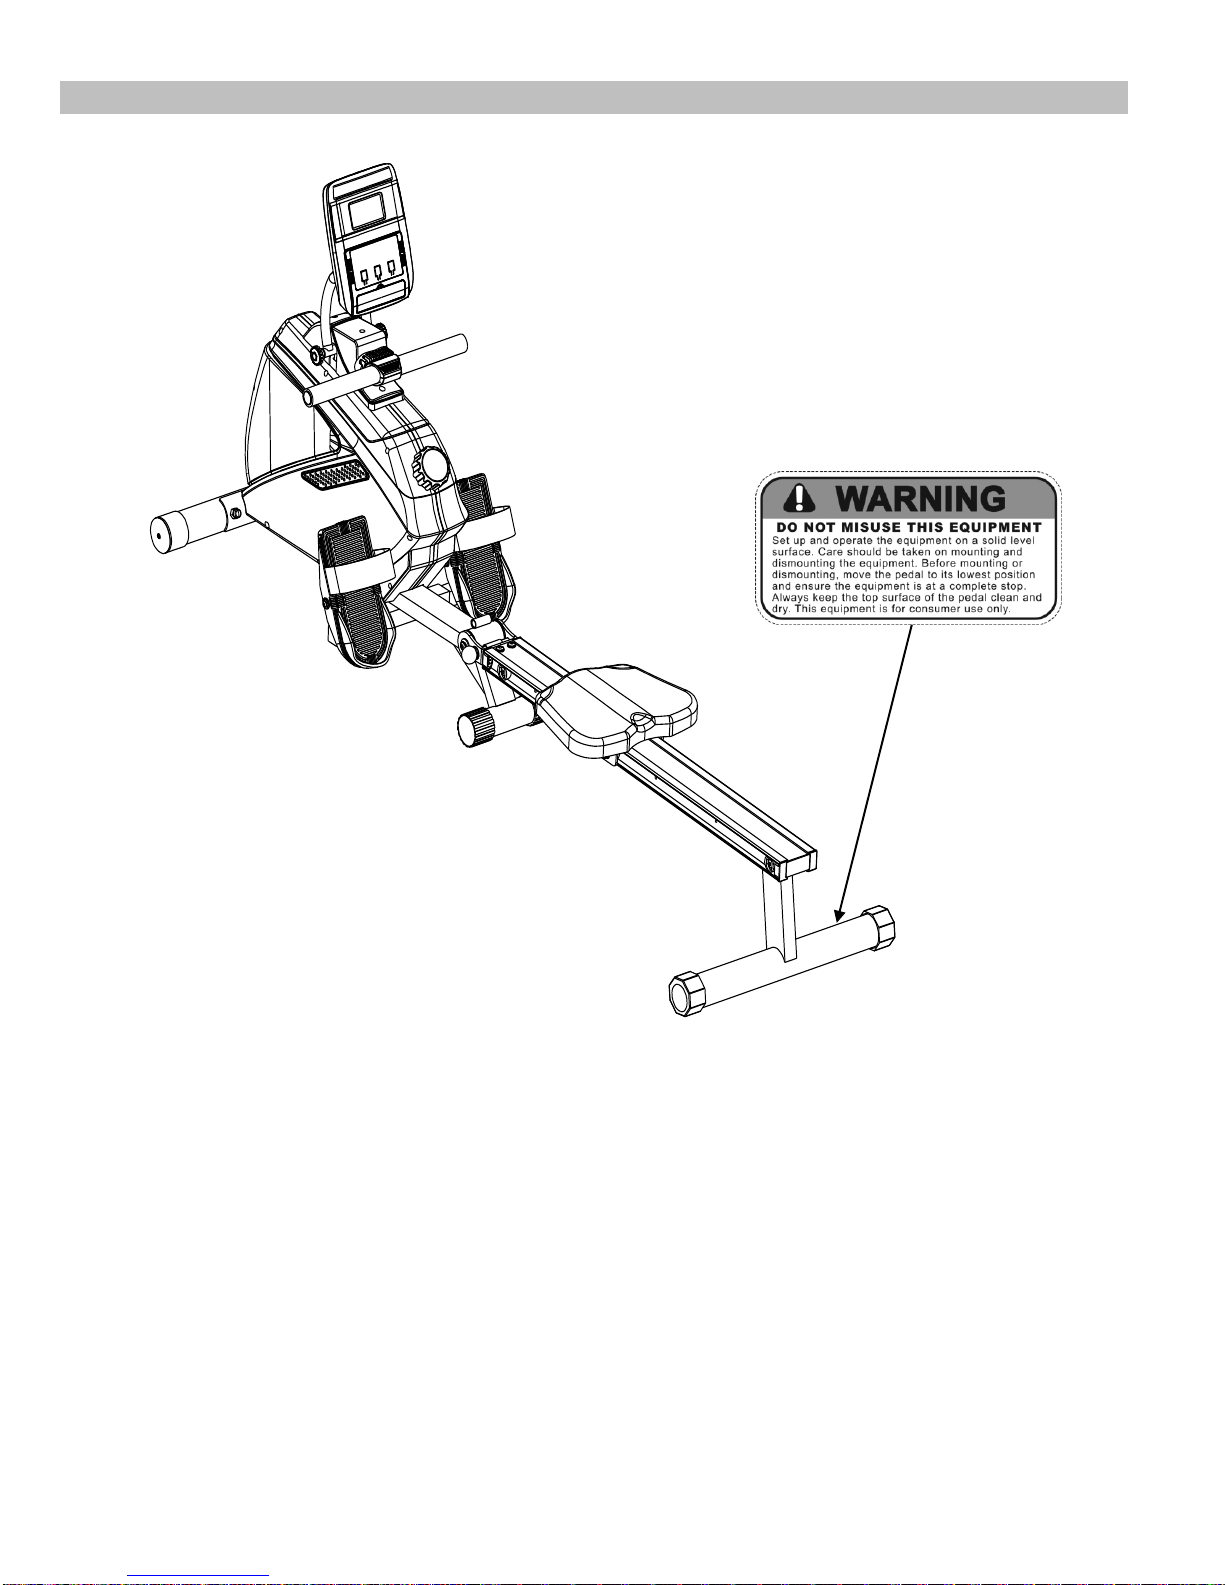
6. Position the equipment on a clear, leveled surface. Make sure the surface is free of objects that
may cause tipping. Keep objects which could interfere with the user away.
7. Inspect before use. Keep frame padding in place. Never use the equipment if it is not
functioning properly.
8. Always wear appropriate workout clothing when exercising.
9. Do not use the equipment when it is wet.
10.Use the equipment only with mature, knowledgeable supervision.
11.Do not use the equipment while under influence of alcohol or drugs.
12.While keeping the head erect, focus eyes on the equipment toward the perimeter.
13.Before exercising, always do stretching exercises to properly warm up.
14.If the user experience dizziness, nausea, chest pain, or any other abnormal symptoms,
STOP the workout at once. CONSULT A PHYSICIAN IMMEDIATELY.
Care and Maintenance
1. For equipment information, contact the manufacturer.
2. Periodically inspect all parts to ensure all parts are functioning properly.
3. Replace any worn and/or damaged parts immediately.
4. Always keep the top surface of the pedals clean and dry.
5. Use mild household spray cleaners and/or a damp rag to wipe clean. Do not use harsh
cleaning chemicals.
6. Sand rusted areas on tubular members and repaint using a non-lead-based paint meeting
the requirements of Title 16 CFR Part 1303.
7. Disposal Instructions –The equipment can be safely disassembled and disposed.. Call
your local recycle agency regarding details of recycling.
8. Assembled dimensions: 53”x24”x64”
9. Maximum User Weight Capacity: 250 lbs.
WARNING: BEFORE BEGINNING ANY EXERCISE PROGRAM, CONSULT YOUR PHYSICIAN. THIS IS
ESPECIALLY IMPORTANT FOR INDIVIDUALS OVER THE AGE OF 35 OR PERSONS WITH PRE-
EXISTING HEALTH PROBLEMS. READ ALL INSTRUCTIONS BEFORE USING ANY FITNESS
EQUIPMENT. IMPEX INC. ASSUMES NO RESPONSIBILITY FOR PERSONAL INJURY OR PROPERTY
DAMAGE SUSTAINED THROUGH THE USE OF THIS PRODUCT.
SAVE THESE INSTRUCTIONS.

3
© Impex Inc.
www.marcypro.com
WARNING LABEL PLACEMENT
4
4
3
2
5R 5L
5L 5R
67
6
7
8
10
9
11
12
12 15
13
13
14L
21
12
13
12
13
15
14R
34
25
17
18
18
16 19
16
20
20
22
23
22 23
22 23
22
23
25
24
25
24
25
24
28
29
29
27
68
33
32
25
31
33 31
25
68
33
32
25
31
33 31
25
35
30
26
2
67
6
7
34
25
19
24
25
12
13
12
15
14R
21
NO.9 NO.14
NO.26
NO.1 NO.3
NO.17
NO.11
NO.28
3
36
37
38R
38L
39
42
43
44
46
46
47
25
48
50
49
51
52
69
31
31
5355
54
23
56
57 56
58 54
53
23
60
61 62
63
64
65
66
67
67
69
59
59
59
59
70
71 72
16
16
72
8
25
74 31
73
74
31
25
75
41
4140
40
59
20
20
45
31
42
39
76
77
7
45
12 15
13
14L
13
13
9
10
5L 5R
22
22
23
23
22
23
22
23
25 24
24 25
25 24
11
28
The warning labels shown here have been placed on the Base Frame. If the labels are missing or illegible,
please call customer service at 1-800-999-8899 for replacements. Apply the labels in the location shown.

4
© Impex Inc.
www.marcypro.com
HARDWARE PACK
NOTE: The following parts are not drawn to scale. Please use your own ruler to measure the size.
Part NO
Description
Qty
Drawings
2
Carriage Bolt M10x3"
2
5L
End cap for Slide Rail (Left)
1
5R
End cap for Slide Rail (Right)
1
6
Curved Washer Φ¾"
2
7
Domed Nut M10
2
12
Allen Bolt M6x½ "
4
13
Washer Φ½"
4
15
Axle for Pedal
2
19
Carriage Bolt M8x1¾ "
2
22
Stopper
4
23
Allen Bolt M8x¾ "
4
24
Allen Bolt M8x⅝"
10
25
Washer Φ⅝"
12
34
Domed Nut M8
2
Allen Wrench
1
Allen Key L4
2
Allen Key L6
1

5
© Impex Inc.
www.marcypro.com
COMPONENTS FOR ASSEMBLY
4
4
3
2
5R 5L
5L 5R
67
6
7
8
10
9
11
12
12 15
13
13
14L
21
12
13
12
13
15
14R
34
25
17
18
18
16 19
16
20
20
22
23
22 23
22 23
22
23
25
24
25
24
25
24
28
29
29
27
68
33
32
25
31
33 31
25
68
33
32
25
31
33 31
25
35
30
26
2
67
6
7
34
25
19
24
25
12
13
12
15
14R
21
NO.9 NO.14
NO.26
NO.1 NO.3
NO.17
NO.11
NO.28
3
36
37
38R
38L
39
42
43
44
46
46
47
25
48
50
49
51
52
69
31
31
5355
54
23
56
57 56
58 54
53
23
60
61 62
63
64
65
66
67
67
69
59
59
59
59
70
71 72
16
16
72
8
25
74 31
73
74
31
25
75
41
4140
40
59
20
20
45
31
42
39
76
77
7
45
12 15
13
14L
13
13
9
10
5L 5R
22
22
23
23
22
23
22
23
25 24
24 25
25 24
11
28
PART NO.
DESCRIPTION
Q’TY
1
Main Frame
1
3
Front Stabilizer w/end caps
1
9
Computer
1
14
Pedal L/R
2
17
Pedal Support Tube
1
26
Slide Rail
1
28
Rear Stabilizer w/end caps
1
11
Seat
1

6
© Impex Inc.
www.marcypro.com
ASSEMBLY INSTRUCTION
Step 1
1. Attach the front stabilizer (#3) to the front of the main frame (#1). Secure using two carriage
bolts (#2), two curved washers (#6) and two domed nuts (#7).
2. Connect the computer sensor wire (#21) to the back of the computer (#9).
3. Attach computer (#9) to computer bracket (#62) and tighten with two screws (#10).
Note: Ensure that the wires are not pinched behind the computer.
2
67
6
7
21
3
9
10
1
62

7
© Impex Inc.
www.marcypro.com
Step 2
1. Attach the pedal support tube (#17) to back of the main frame (#1). Secure using two
carriage bolts (#19), two flat washers (#25) and two acorn nuts (#34).
2. Attach the left pedal (#14L) to the left bracket of the pedal support tube (#17). Slide the axle
(#15) through the left pedal (#14L). Secure using two Allen bolts (#12) and two washers
(#13).
3. Repeat the same procedure for right pedal (#14R).
2
67
6
7
34
25
19
12
13
12
15
14R
21
3
12 15
13
14L
13
13
9
10
5L 5R
22
22
23
23
22
23
22
23
25 24
24 25
25 24
11
28
1
1
17
58
26
1

8
© Impex Inc.
www.marcypro.com
Step 3
1. Insert the slide rail (#26) onto the U-type connect tube (#58). Secure using six Allen bolts
(#24) and six washers (#25).
2. Attach two stoppers (#22) to the front of the slide rail (#26). Secure using two Allen bolts
(#23).
3. Slide the seat (#11) onto the slide rail (#26).
4. Attach two stoppers (#22) to the back of the slide rail (#26). Secure using two Allen bolts
(#23).Attach the end caps (#5L & #5R) onto the back of the slide rail (#26).
5. Attach rear stabilizer (#28) to back of the slide rail (#26). Secure using four Allen bolts (#24)
and four washers (#25).
2
67
6
7
34
25
19
12
13
12
15
14R
21
3
12 15
13
14L
13
13
9
10
5L 5R
22
22
23
23
22
23
22
23
25 24
24 25
25 24
11
28
1
1
17
58
26
1

9
© Impex Inc.
www.marcypro.com
Step 4
1. Pull out the lock pin (#55) from the main frame (#1) and adjust it to the correct position,
insert the lock pin (#55) to the main frame (#1) to lock the slide rail into position.
1
55

10
© Impex Inc.
www.marcypro.com
EXPLODED DIAGRAM
4
4
3
2
5R 5L
5L 5R
67
6
7
8
10
9
11
12
12 15
13
13
14L
21
12
13
12
13
15
14R
34
25
17
18
18
16 19
16
20
20
22
23
22 23
22 23
22
23
25
24
25
24
25
24
28
29
29
27
68
33
32
25
31
33 31
25
68
33
32
25
31
33 31
25
35
30
26
2
67
6
7
34
25
19
24
25
12
13
12
15
14R
21
NO.9 NO.14
NO.26
NO.1 NO.3
NO.17
NO.11
NO.28
3
36
37
38R
38L
39
42
43
44
46
46
47
25
48
50
49
51
52
69
31
31
5355
54
23
56
57 56
58 54
53
23
60
61 62
63
64
65
66
67
67
69
59
59
59
59
70
71 72
16
16
72
8
25
74 31
73
74
31
25
75
41
4140
40
59
20
20
45
31
42
39
76
77
7
45
12 15
13
14L
13
13
9
10
5L 5R
22
22
23
23
22
23
22
23
25 24
24 25
25 24
11
28

11
© Impex Inc.
www.marcypro.com
36
37
38R
38L
39
42
43
44
46
46
47
25
48
50
49
51
52
69
31
31
53
55
54
23
56
57 56
58 54
53
23
60
61 62
63
64
65
66
67
67
69
59
59
59
59
70
71 72
16
16
72
8
25
74 31
73
74
31
25
75
41
4140
40
59
20
20
45
31
42
39
76
77
45

12
© Impex Inc.
www.marcypro.com
ME-10118RE PARTS LIST
PART
NO.
DESCRIPTION
Q’TY
PART
NO.
DESCRIPTION
Q’TY
1
Main Frame
1
39
Adjust Assembly
2
2
Carriage Bolt M10x3"
2
40
Clip
2
3
Front Stabilizer
1
41
Bearing
2
4
End Cap For Front
Stabilizer
2
42
Flange Nut
2
5L
End cap for Slide Rail
(Left)
2
43
Flywheel
1
5R
End cap for Slide Rail
(Right)
2
44
Hex Bolt M8x4"
1
6
Curved Washer Φ¾"
2
45
Self-Tapping Screw
ST5x½ "
8
7
Domed Nut M10
2
46
Small Bushing
6
8
Tension Control Knob
w/cable
1
47
Magnetic Assembly
1
9
Computer
1
48
Collar
1
10
Phillips Screw M5*x⅓"
2
49
Hex Bolt M6x1"
1
11
Seat
1
50
Hex Nut M6
2
12
Allen Bolt M6x½ "
4
51
Sensor bracket
1
13
Washer Φ½"
4
52
Computer Support Tube
Cover
1
14L
Left Pedal
1
53
Locking Washer
2
14R
Right Pedal
1
54
Washer Φ1"
2
15
Axle for Pedal
6
55
Lock knob
1
16
End Cap
4
56
Bushing
2
17
Pedal Support Tube
1
57
Axle For Slide Rail
1
18
Square End Cap
2
58
U-Type Connect Tube
1
19
Carriage Bolt M8x1¾ "
2
59
Self-Tapping Screw
ST5x½ "
7
20
End Cap
2
60
Spring
1
21
Computer Sensor Wire
1
61
Grommet
2
22
Stoppers
4
62
Computer Support Tube
1
23
Allen Bolt M8x¾ "
6
63
Handlebar
1
24
Allen Bolt M8x⅝"
10
64
Axle For Computer
Support Tube
1
25
Washer Φ⅝"
17
65
Idler Pulley
1
26
Slide Rail
1
66
Axle For Idler
1
27
Square End Cap For
Slide Rail
1
67
Adjust knob
2
28
Rear Stabilizer
1
68
Screw M5
4

13
© Impex Inc.
www.marcypro.com
29
End Cap For Rear
Stabilizer
2
69
Bracket for Rope Pulley
2
30
Hex Bolt M6x¾ "
2
70
Upper cover for
handlebar
1
31
Nylon Nut M8
9
71
Lower cover for
handlebar
1
32
Wheel
4
72
Self-tapping screw
ST4x½ "
4
33
Sleeve
4
73
Bearing
2
34
Domed Nut M8
2
74
Spacer
2
35
Seat Support
1
75
Bolt
1
36
Belt
1
76
Washer
1
37
Rope Pulley w/rope
1
77
Screw
1
38L
Chain Cover Left
1
38R
Chain Cover Right
1
COMPUTER
FUNCTIONAL BUTTONS:
MODE - Push down for selecting functions.
SET - To set the values of time、count and calories when not in scan mode.
RESET - Push down for resetting time、count and calories.
FUNCTION:
SCAN –Automatically scan functions of time、count、total count and calories each display will be
hold 6 seconds.
TIME –Automatically accumulates workout time when exercising.
COUNT –Automatically accumulates the number of Steps when exercising .
CALORIES –Automatically accumulates calories burnt when exercising .
TOTAL COUNT –Automatically accumulates the Total number of steps performed for different
exercise sessions.

14
© Impex Inc.
www.marcypro.com
NOTE:
1. If the display is faint or does not show any digits, please replace the batteries.
2. The monitor will automatically shut off after 4 minutes of inactivity.
3. The monitor will be auto powered on when starting to exercise push button signal in.
4. The monitor will automatically start calculating when you start to exercise and will stop
calculating when you stop exercising for 4 seconds .
SPECIFICATIONS:
FUNCTION
AUTO SCAN
Every 6 seconds
TIME
00:00’~99:59’
COUNT
0~9999TIMES
TOTAL COUNT
0~9999TIMES
CALORIES
0.1~999.9CAL
BATTERY TYPE
2pcs of SIZE –AA or UM –3
OPERATING TEMPERATURE
0°C ~ +40°C
STORAGE TEMPERATURE
-10°C ~ +60°C

15
© Impex Inc.
www.marcypro.com
EXERCISE GUIDELINES
Using your Magnetic Rower
will provide you with several benefits, it will improve your physical
fitness, tone muscle and in conjunction with calorie controlled diet help you lose weight.
1. The Warm Up Phase
This stage helps get the blood flowing around the body and the muscles working properly. It will
also reduce the risk of cramp and muscle injury. It is advisable to do a few stretching exercises as
shown below. Each stretch should be held for approximately 30 seconds, do not force or jerk your
muscles into a stretch - if it hurts, STOP.
2. The Exercise Phase
This is the stage where you put the effort in. After regular use, the muscles in your legs will become
more flexible. Work to your targeted heart rate but it is very important to maintain a steady tempo
throughout. The rate of work should be sufficient to raise your heartbeat into the target zone shown
on the graph below.
SIDE BENDS OUTER THIGH
INNER THIGH
FORWARD
BENDS
CALF / ACHILLES

16
© Impex Inc.
www.marcypro.com
This stage should last for a minimum of 12 minutes though most people start at about 15-20
minutes
3. The Cool Down Phase
This stage is to let your Cardio-vascular System and muscles wind down. This is a repeat of the
warm up exercise e.g. reduce your tempo, continue for approximately 5 minutes. The stretching
exercises should now be repeated, again remembering not to force or jerk your muscles into the
stretch.
As you get fitter you may need to train longer and harder. It is advisable to train at least three times
a week, and if possible space your workouts evenly throughout the week.
MUSCLE TONING
To tone muscle while on your Magnetic Rower you will need to have the resistance set quite
high. This will put more strain on your leg/arm/back muscles and may mean you cannot train for as
long as you would like. If you are also trying to improve your fitness you need to alter your training
program. You should train as normal during the warm up and cool down phases, but towards the
end of the exercise phase you should increase resistance making your legs work harder. You will
have to reduce your speed to keep your heart rate in the target zone.
WEIGHT LOSS
The important factor here is the amount of effort you put in. The harder and longer you work
the more calories you will burn. Effectively this is the same as if you were training to
improve your fitness, the difference is the goal.

17
© Impex Inc.
www.marcypro.com
IMPEX®INC.
LIMITED WARRANTY
IMPEX Inc. ("IMPEX®") warrants this product to be free from defects in workmanship and material, under normal use
and service conditions, for a period of two years on the Frame from the date of purchase. This warranty extends only
to the original purchaser. IMPEX's obligation under this Warranty is limited to replacing or repairing, at IMPEX's option.
All returns must be pre-authorized by IMPEX. Pre-authorization may be obtained by calling IMPEX Customer Service
Department at 1-800-999-8899. All freights for products return to IMPEX must be prepaid by the customer. This
warranty does not extend to any product or damage to a product caused by or attributable to freight damage, abuse,
misuse, improper or abnormal usage or repairs not provided by an IMPEX authorized service center or for products
used for commercial or rental purposes. No other warranty beyond that specifically set forth above is authorized by
IMPEX.
IMPEX is not responsible or liable for indirect, special or consequential damages arising out of or in connection with the
use or performance of the product or other damages with respect to any economic loss, loss of property, loss of
revenues or profits, loss of enjoyments or use, costs of removal, installation or other consequential damages or
whatsoever natures. Some states do not allow the exclusion or limitation of incidental or consequential damages.
Accordingly, the above limitation may not apply to you.
The warranty extended hereunder is in lieu of any and all other warranties and any implied warranties of
merchantability or fitness for a particular purpose is limited in its scope and duration to the terms set forth herein.
Some states do not allow limitations on how long an implied warranty lasts. Accordingly, the above limitation may not
apply to you.
This warranty gives you specific legal right. You may also have other rights which vary from state to state.
Register on-line www.marcypro.com
IMPEX®INC.
2801 S. Towne Ave.
Pomona, CA 91766
ORDERING REPLACEMENT PARTS
Replacement parts can be ordered by calling our Customer Service Department toll-free at 1-800-999-8899 during our
regular business hours: Monday through Friday, 9 am until 5 pm Pacific standard time.
support@impex-fitness.com
When ordering replacement part, always give the following information.
1. Model
2. Description of Parts
3. Part Number
4. Date of Purchase
Table of contents
Other Marcy Exercise Bike manuals

Marcy
Marcy 1201U User manual

Marcy
Marcy ME-706 User manual

Marcy
Marcy REVOLUTION CYCLE User manual

Marcy
Marcy CL103 User manual

Marcy
Marcy NS-652 User manual

Marcy
Marcy ME-706 User manual

Marcy
Marcy CL303 User manual

Marcy
Marcy ME-1019R User manual

Marcy
Marcy ME-702 User manual

Marcy
Marcy JX-7301 Installation and operating instructions
Popular Exercise Bike manuals by other brands

Decathlon
Decathlon VM ERGO operating instructions

Sunny Health & Fitness
Sunny Health & Fitness SF-B2883 user manual

Kettler
Kettler GIRO S3 Assembly instructions

Spirit
Spirit XBR55 owner's manual

Sunny Health & Fitness
Sunny Health & Fitness PERFORMANCE INTERACTIVE SF-B220030 user manual

essential
essential UT8 user manual