Maxon HCB-40WX User manual

HCB-40WX
Handheld 40 Channel
CB/Weather Radio
OWNER'S MANUAL
English/Spanish

TABLE OF CONTENTS
Product Description 1
FCC Regulations 1
Performance Features 2
Package Contents 3
Controls and Functions 4
Battery Installation 7
Battery Charging and External
Power Sources 8
Operating Instructions 9
Feature Button Operation 10
Using the Weather Channels 11
Antenna Information 13
Radio Communication Codes 15
CB Channel Frequency Chart 16
Troubleshooting Chart 17
Specifications 18
Optional/Replacement Accessories 19
Other Maxon Products 19
Warranty Service Instructions 20
Warranty Statement 21
Before operating your Maxon Citizens Band Radio,
read this Owner's Manual carefully. If you have a
problem, refer to the "Troubleshooting" section of
this manual before returning your radio for repairs.

TABLA DE CONTENIDO
Controles y Funciones 4
Descripción del Producto 22
Regulaciones de la FCC
(Comisión Federal de Comunicaciones) 22
Características de Funcionamiento 23
Contenido del Paquete 24
Instalación de la Batería 25
Carga de Baterías y Fuentes de
Alimentación Externas 26
Instrucciones de Operación 27
Cómo Usar los Botones de Funciones 28
Uso de los Canales Meteorológicos 29
Información Sobre la Antena 31
Tabla de Frecuencia del Canal
(Banda Ciudadana) 33
Tabla de Localización y Reparación
de Averías 34
Especificaciones 35
Accesorios Maxon 36
Otros Productos Maxon 36
Instrucciones Servicio de Garantía 37
Aclaración de la Garantía 38
Antes de hacer funcionar su radio de Banda
Ciudadana de Maxon lea detenidamente este Manual
del Propietario. Si tiene unproblema, refiérase a la
sección "Localización y Reparación de Averías" de este
manual antes de devolver su radio para la reparación.

1
PRODUCT DESCRIPTION
Thank you for choosing the Maxon
HCB-40WX CB/Weather Radio.
The HCB-40WX is a compact, portable Citizen's
Band radio designed to operate in the 26.965 to
27.405 MHz band. This lightweight unit features
10 weather channels, including 7 NOAA frequen-
cies and 3 international marine frequencies. The
HCB-40WX provides maximum RF output power
and can be battery or vehicle powered.
This model requires either 9 AA rechargeable
Ni-Cad batteries or 9 AA alkaline batteries, not
included. It can also be powered by the 12V DC
power cord included with the radio.
YOU DO NOT NEED AN FCC LICENSE TO
OPERATE THIS RADIO IN THE UNITED STATES.
However, you must know and be familiar with
Part 95 of the FCC Rules in regard to Subpart D
of the Citizens Band Radio Service. (A copy is
enclosed with the unit.)

2
PERFORMANCE FEATURES
•Maximum legal RF output power (4 W) with high
level modulation (in accordance with FCC Part
95 Rules)
•Compander circuitry eliminates background static
and improves audio quality
•Receives current National Weather Service
broadcasts on one or more of seven separate
frequencies and periodic marine weather
information on three separate frequencies
•Can be used as a portable CB radio (powered
by Ni-Cad or alkaline batteries) or used with
provided 12V DC power cord in a vehicle or
boat
•Direct access to Emergency Channel 9
•Accessory jacks allow "hands-free" operation
when used with an optional voice-operated/
push-to-talk mini-VOX headset with boom
microphone (WTA-13G)
•HI/LO power selector button conserves battery
power
•Phase Locked Loop synthesizer provides clear
voice transmission and reception on all CB
channels
•Built-in Automatic Gain Control (AGC)
and Automatic Noise Limiter (ANL) provide
constant sound level (from weak or strong
signals) and clear reception
•Automatic modulation control eliminates "peak"
and "valley" transmission signals
•Last channel memory recalls last channel
displayed
•Battery charging jack used with optional AC/DC
wall battery charger (DV-7210)

3
PACKAGE CONTENTS
Main CB unit with attached belt clip and
carrying strap
"Rubber Duck" antenna
12V DC power cord with cigarette lighter plug
Owner's manual
Copy of FCC Part 95, Subpart "D"
Copy of NOAA Weather Radio Network
frequency card

4
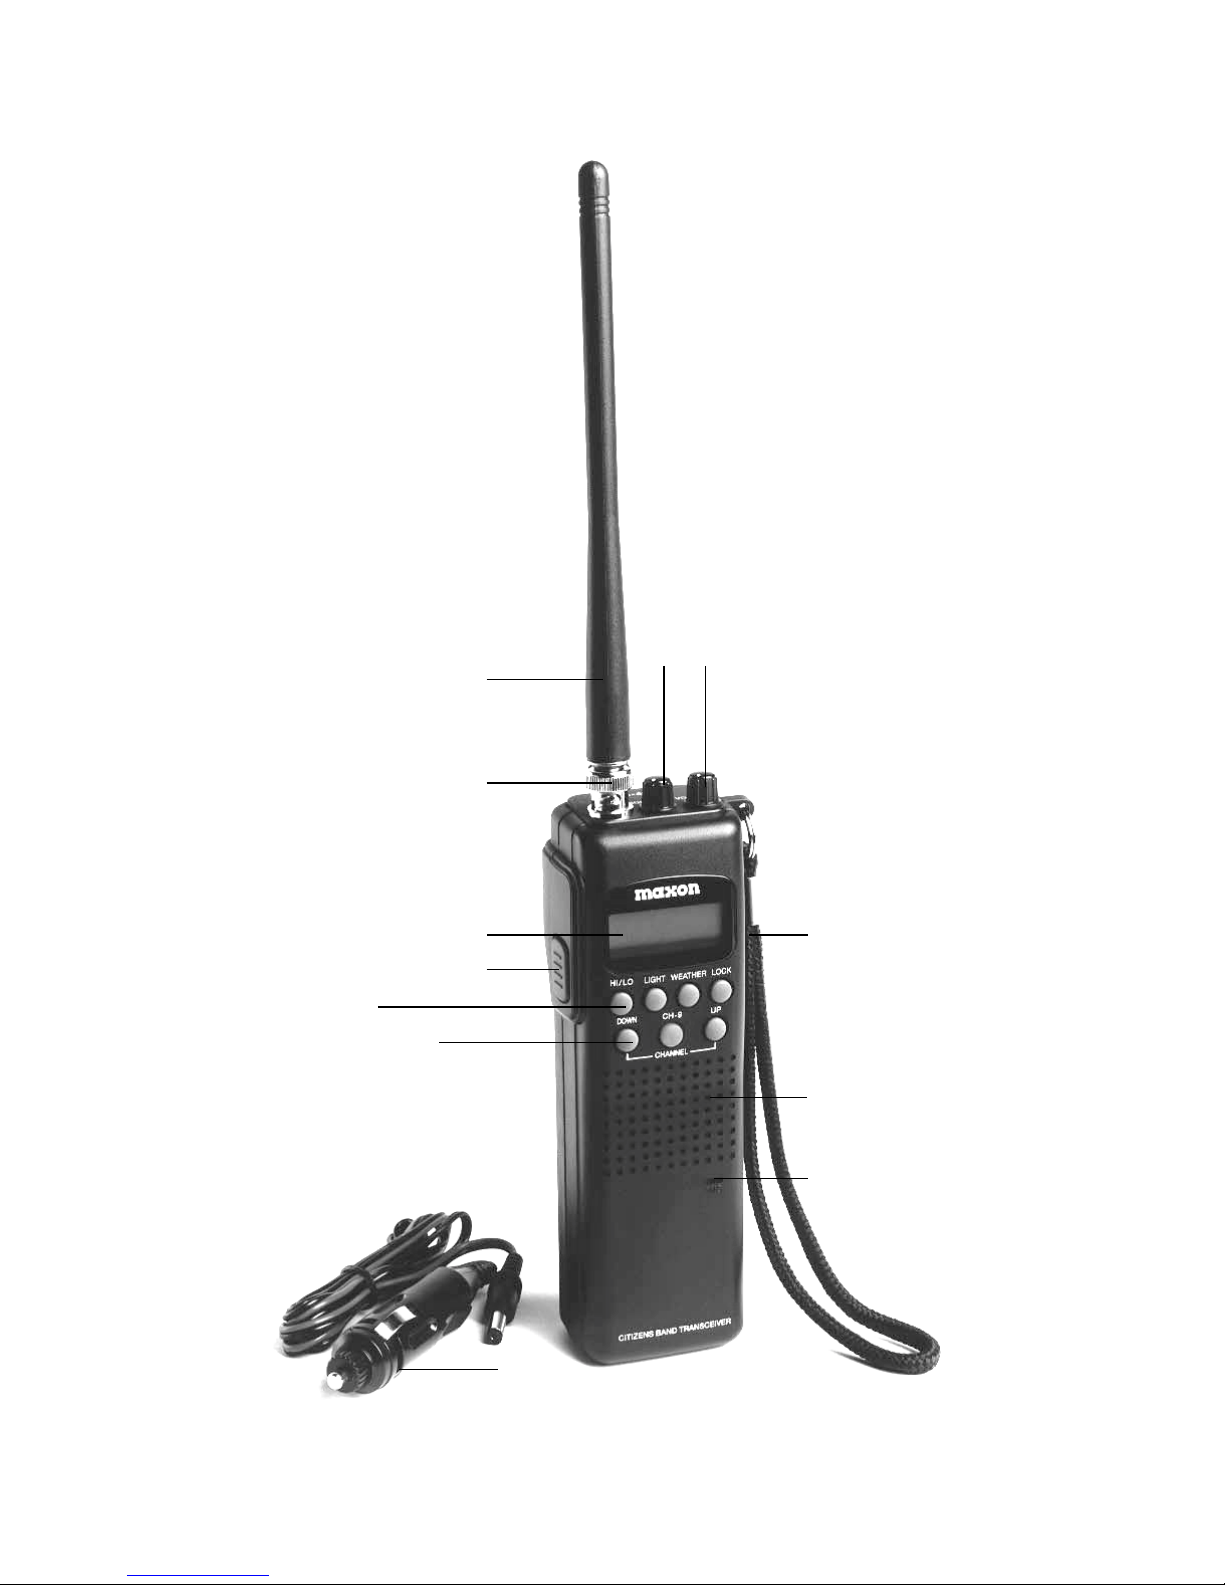
CONTROLS AND FUNCTIONS
CONTROLES Y FUNCIONES
A. Channel Up/Down Buttons -Selects any one of 40
channels available • Botones de Subida y Bajada de
Canales - Selecciona cualquiera de los 40 canales
disponibles
B. Emergency Channel 9 Button -Provides direct access
to Emergency Channel 9 (not active in weather mode)
• Botón del Canal 9 de Emergencia - Provee acceso
directo al Canal 9 de Emergencia (no está activo en
modalidad meteorológica)
C. HI/LO Power Selector Button -Controls output power level
• Botón de Potencia HI/LO (alta/baja) - Controla el nivel
de la potencia de salida
D. Light Button -Illuminates the display window • Botón de
Luz - Ilumina la pantalla de visualización
E. Weather Button - Selects CB or weather operation • Botón
del Tiempo - Selecciona la operación de CB o del tiempo
F. Lock Button -Locks the keypad from operation • Botón
de Traba - Traba el teclado para evitar su funcionamiento
G. Push-To-Talk Button -Permits radio transmissions • Botón
"Presione Para Hablar" (P-T-T) - Permite la transmisión por
radio
H. LCD Display - Identifies CB or weather channel number
selections, TX (transmit), WX (weather) mode, EMG (Ch. 9),
LOCK (keypad locked), BATT (battery low), LOW (power
level) and signal/power strength •Pantalla de LCD -
Identifica las selecciones de CB o los números de canales
del tiempo, TX (transmisión), modalidad de WX (tiempo),
EMG (canal 9), LOCK (teclado trabado), BATT (carga baja de
la batería, LOW (nivel de potencia) e intensidad de la señal/
potencia
I. Antenna Jack -Connects the unit's "Rubber Duck" antenna,
an optional telescopic antenna or any Citizen's Band/50
Ohm mobile or base antenna • Jack de Antena - Conecta
la antena de hule "Rubber Duck" de la unidad, a una antena
telescópica opcional o a cualquier antena móvil o de
base de banda ciudadana / 50 Ohmios

5
A B
C D E F
G
H
I
JK L
M
N
O
P

6
J. "Rubber Duck" Antenna with BNC Connector • Antena
de hule "Rubber Duck" con conector BNC
K. Squelch Control -Allows background noise to be eliminated
when no signal is present • Control de Silenciador - Permite
la eliminación de ruidos de fondo cuando no hay señal
L. Off/On-Volume Control -Used to turn the radio on or off
and to adjust the listening volume • Control de Volumen -
Se usa para encender o apagar el radio y para ajustar el
volumen
M. Carrying Strap • Asa de Transporte
N. Speaker -Broadcasts incoming signals
• Altavoz - Radiodifunde las señales entrantes
O. Built-in Electret Condenser Microphone - Transmits
voice signals during CB operation • Micrófono
Condensador con Electrodo Laminar Incorporado -
Transmite las señales de voz durante el funcionamiento
de CB
P. 12V DC Power Cord - Provides power to radio when
used in vehicle or boat • Cordón Eléctrico de 12 VCC -
Suministra potencia al radio cuando se usa en un vehículo
o bote
Accessory Jacks - Used with optional accessories (not
shown) • Jacks Auxiliares - Usados con accesorios
opcionales (no mostrados)
12V DC Power/Charge Jack -Provides external power to
radio or charges installed Ni-Cad batteries (not shown)
• Jack de Potencia /Carga de 12 VCC - Suministra potencia
externa al radio o carga las baterías de Ni-Cad instaladas (no
mostrado)
Belt Clip - Securely holds radio when beltworn (not
shown) • Grapa de Centurón - Se usa para llevar el radio
en el cinturón o en cualquier otra parte conveniente (no
mostrados)
Battery Compartment -Houses 9 AA alkaline or Ni-Cad
batteries (not shown) • Compartimiento de Baterías -
Guarda 9 baterías alcalinas AA o de Ni-Cad (no mostrados)

BATTERY INSTALLATION
1) Remove the battery compartment cover on
the back of the unit. Locate the battery charge
switch (inside the middle well of the radio's
battery compartment) and set the switch
to the "Al" (down) position for AA alkaline
batteries or the "Ni" (up)position for AA
Ni-Cad batteries. NOTE: Proper switch
setting protects from accidental charging
of non-rechargeable batteries.
2) Once the battery charge switch is in the correct
position, insert either 9 new AA alkaline or
Ni-Cad batteries. DO NOT mix battery types.
Follow the polarity diagrams embossed in the
battery compartment.
3) Check the battery condition by turning the
off/on-volume control clockwise. If the battery
low ("BATT") icon shows on the display, the
batteries need to be recharged or replaced
immediately.
NOTE: Ni-Cad batteries are typically in a "dis-
charge" condition when they are purchased. If
you are using nickel cadmium batteries, you will
need to charge them before operating your radio.
The best way to accomplish this is to use Maxon's
DV-7210 AC/DC Wall Charger and charge them all
at once while installed in the unit. Plug the AC/DC
wall charger into the radio's 12V DC power/charge
jack. The charging time will be 14-16 hours.
CAUTION: DO NOT operate the radio while
the batteries are being charged. DO NOT
attempt to recharge alkaline or carbon zinc
batteries.
7

8
BATTERY CHARGING AND
EXTERNAL POWER SOURCES
NOTE: The provided 12V DC power cord is
intended ONLY for DC operation, not for
charging batteries. The power jack located on
the radio enables you to use the 12V DC power
cord to power the radio directly from your
vehicle's electrical system.
Use Maxon's optional AC/DC Wall Battery
Charger (DV-7210) for recharging the nickel
cadmium batteries in the radio. NOTE: Recharge
nickel cadmium batteries only.
For maximum performance and to ensure maximum
range always keep fresh batteries in your radio. If
you do not wish to recharge the batteries periodi-
cally, use standard carbon zinc or alkaline batteries.
You can operate the HCB-40WX in your home
by using a standard 120V AC outlet. Contact your
local electronics retailer for a 120V AC to 12V DC
(1500 mA minimum current capacity) power
converter. It must be equipped with a coaxial
barrel-type plug having an inside barrel diameter
of 0.085 inch (2.1mm).
NOTE: If you choose to use nickel cadmium
batteries when operating your HCB-40WX radio,
please follow proper procedures for recycling/
disposal. Contact one of the following facilities
for more information:
West Coast - Kinsbursky Brothers Inc.
1-800-548-8797
East Coast - INMETCO
412/758-2802

9
OPERATING INSTRUCTIONS
Once you have properly installed the batteries
and the antenna is attached, you are ready to
adjust your radio for optimum reception and
voice transmission.
1) Turn the off/on-volume control clockwise.
Adjust to a comfortable volume level.
2) Set to the desired CB channel.
3) Adjust the squelch control knob to reduce any
undesirable background noise when no signal
is being received. To do this, select a channel
where no signals are present, or wait until
signals cease on your channel. Then, rotate
the squelch control knob clockwise to a point
where the background noise ceases.
NOTE: When the squelch is set properly, the
speaker will remain quiet until a signal is received.
In order to receive weak signals, do not set the
squelch too high.
To Transmit: Hold the radio 2-3 inches from your
mouth, press the push-to-talk button (P-T-T) located
on the side of the radio and speak into the micro-
phone area. For best results speak slowly and in a
normal tone of voice.
To Receive: Release the push-to-talk button.
NOTE: When using the HCB-40WX as a beltworn
radio (with a headset or speaker/microphone), the
user will experience a slightly shorter transmit and
receive range.

10
Feature button operation
HI/LO Power
Selector Button: In HI position, provides maxi-
mum output power (4 W when
powered by DC power cord); in
LO position, provides battery-
saving 1 W operation (for short
range transmissions). In LO
position, the "LOW" icon will
display.
Light Button: Illuminates the display for 6-8
seconds. Can be pressed any
time the radio is powered on.
Lock Button: Locks the keypad to prevent
accidental keypress. The "LOCK"
icon will display. To return the
keypad to "active" condition,
press the lock button.
Emergency
Channel 9: Provides direct access to
Emergency Channel 9. The
"EMG" icon will display along
with the channel number. To
return to normal CB channels,
press the CH-9 button again.
Channel
UP/DOWN
Buttons: Selects the next higher or lower
channel. Holding the channel
buttons down changes channels
more rapidly.

11
USING THE WEATHER CHANNELS
The National Weather Service uses several special
radio frequencies to provide continuous reports of
local weather conditions and forecasts throughout
the United States. Taped weather messages are
repeated every four to six minutes on a 24-hour
basis and are routinely revised every one to three
hours, or more frequently if needed.
During severe weather, the routine weather broad-
casts will be interrupted with special weather
warning messages.
The HCB-40WX is designed to receive all of these
special weather frequencies plus three international
marine frequencies. A NOAA Weather Radio
Network Frequency card is enclosed to identify
the frequencies specifically broadcast for your
geographical area.
The HCB-40WX receives CB, National Weather
Service and international marine weather broadcast
frequencies as listed below:
CB Channels 1-40 26.965 to 27.405 MHz
Weather Channel 01 WX 162.550 MHz
02 WX 162.400 MHz
03 WX 162.475 MHz
04 WX 162.425 MHz
05 WX 162.450 MHz
06 WX 162.500 MHz
07 WX 162.525 MHz
Int'l Marine 08 WX 161.650 MHz
09 WX 161.775 MHz
00 WX 163.275 MHz

To Operate: Turn the off/on-volume control
clockwise and press the weather button on the
front keypad. The "WX" icon will be displayed
along with the weather channel number.
Use the weather frequency card to select the proper
frequency for your area. Select the weather channel
by using the channel up/down buttons. Readjust the
volume if necessary.
To return to CB operation, simply press the weather
button again; the "WX" icon will disappear and the
unit will return to the last CB channel displayed.
12

ANTENNA INFORMATION
The maximum allowable CB transmitting power
output is limited by FCC regulations. The antenna
is a major component in the strength of the radio's
transmission signal and its reception range. The
radio requires a 50 Ohm mobile or base antenna.
For greater range and clarity, we recommend a
vertically polarized telescopic antenna (like
Maxon's optional WTA-1) or mobile magnetic
mount CB/weather antenna (Maxon's optional
WTA-4W).
The "Rubber Duck" antenna included with this
radio is suited for applications where maximum
range is not needed.
To convert the HCB-40WX portable to a base
radio: Disconnect the "Rubber Duck" or telescopic
antenna and connect your base station antenna.
The HCB-40WX has a female BNC connector,
therefore you will need to adapt your base station
antenna accordingly.
WARNING: When installing or removing a base
station antenna, do so with extreme caution. If the
antenna falls, LET IT GO. It could come in contact
with an overhead power line and cause severe
injury or death to anyone attempting to catch it.
If the antenna does come in contact with a power
line, DO NOT ATTEMPT TO REMOVE IT...CALL
YOUR LOCAL POWER COMPANY.
To convert the HCB-40WX portable to a mobile
radio: Disconnect the "Rubber Duck" or telescopic
antenna and connect your vehicle/ boat's mobile
13

CB antenna (or optional magnetic mount antenna
WTA-4W). NOTE: Mobile antennas utilize the
vehicle's metal body as the "ground" plane. When
mounted on the corner of the vehicle, this type of
antenna tends to become slightly directional by the
particular corner it is facing. (This slight directional
characteristic will only occur when transmitting/
receiving over an extreme distance).
14

RADIO COMMUNICATION CODES
Citizens Band radio operators have universally adopted
the "10" Code for standard questions and answers. It
enables them to communicate faster, easier and more
understandably in noisy surroundings.
The following are some of the most common codes and
their descriptions.
When using the code 10-1, you would say, "Ten one",
not "One zero dash one".
Code Description
10-1
10-2
10-3
10-4
10-5
10-6
10-7
10-8
10-9
10-10
10-11
10-12
10-13
10-16
10-17
10-18
10-19
10-20
10-21
10-22
10-23
10-24
10-25
10-26
10-27
10-28
10-29
10-30
10-32
10-33
10-34
Receiving poorly.
Receiving well.
Stop transmitting.
OK, message received.
Relay message.
Busy, stand by.
Out of service; leaving
the air.
In service, subject to call.
Repeat message.
Transmission completed,
standing by.
Talking too fast.
Visitors present.
Advise weather/
road conditions.
Make pickup at_______.
Urgent business.
Anything for us?
Nothing for you;
return to base.
My location is_______.
Call by telephone
Report in person to_____.
Stand by.
Completed last assignment.
Can you contact?
Disregard last information.
I am moving to channel_.
Identify your station.
Time is up for contact.
Does not conform
to FCC rules.
I will give you a radio check.
Emergency traffic.
Trouble at this station.
15
Code Description
10-35 Confidential information.
10-36 Correct time is________.
10-37 Wrecker needed at ____.
10-38 Ambulance needed at__.
10-39 Your message delivered.
10-41 Please turn to channel_.
10-42 Traffic accident at______.
10-43 Traffic tie-up at________.
10-44 I have a message for you.
10-45 All units within range
report.
10-50 Break channel.
10-60 What is next message
number?
10-62 Unable to copy; use phone.
10-63 Network directed to.
10-64 Network clear.
10-65 Awaiting your next
message/assignment.
10-67 All units comply.
10-70 Fire at _______________.
10-71 Proceed with transmission
in sequence.
10-77 Negative contact.
10-81 Reserve hotel room at___.
10-82 Reserve room for_______.
10-84 My telephone number is_.
10-85 My address is_________.
10-91 Talk closer to microphone.
10-93 Check my frequency on
this channel.
10-94 Please give me a long
count.
10-99 Mission completed; all
units secure.
10-200 Police needed at_______.

Channel:
16
CB CHANNEL FREQUENCY CHART
26.965 MHz
26.975 MHz
26.985 MHz
27.005 MHz
27.015 MHz
27.025 MHz
27.035 MHz
27.055 MHz
27.065 MHz Emergency Channel
27.075 MHz
27.085 MHz
27.105 MHz
27.115 MHz
27.125 MHz
27.135 MHz
27.155 MHz
27.165 MHz
27.175 MHz
27.185 MHz Highway Channel
27.205 MHz
27.215 MHz
27.225 MHz
27.255 MHz
27.235 MHz
27.245 MHz
27.265 MHz
27.275 MHz
27.285 MHz
27.295 MHz
27.305 MHz
27.315 MHz
27.325 MHz
27.335 MHz
27.345 MHz
27.355 MHz
27.365 MHz
27.375 MHz
27.385 MHz
27.395 MHz
27.405 MHz
1
2
3
4
5
6
7
8
9
10
11
12
13
14
15
16
17
18
19
20
21
22
23
24
25
26
27
28
29
30
31
32
33
34
35
36
37
38
39
40

No sound or LCD Display
LCD illuminated, but no sound
No voice reception
Poor reception
Unclear reception
Transmission problems
This portable Citizens Band radio has been manufac-
tured in accordance with Maxon's exacting quality
control standards. It should be handled with reason-
able care. Avoid exposing it to dirt or moisture.
If you experience
problems, please
refer to this
Troubleshooting Chart.
TROUBLESHOOTING CHART
WARNING: DO NOT ATTEMPT TO MAKE
ANY INTERNAL ADJUSTMENTS. Any internal
adjustments must be made only by qualified
technical personnel. Internal adjustments and/
or modifications can lead to illegal operation
as defined by FCC Rules and Regulations, Part
95. Illegal operation can result in serious conse-
quences.
17
POSSIBLE PROBLEMS:
POSSIBLE SOLUTIONS:
Check batteries for proper contact
Check battery condition
Check squelch adjustment
Check power off/on-volume control
Change to active channel
Check antenna connection
Fully depress push-to-talk button
Change physical location
Table of contents
Languages:
Other Maxon Radio manuals

Maxon
Maxon TM-4800 User manual

Maxon
Maxon PM200 User manual

Maxon
Maxon SD-171E Operator's manual

Maxon
Maxon MCB-30 User manual

Maxon
Maxon EM-4800 User manual

Maxon
Maxon SP-200 Series User manual

Maxon
Maxon SD-160 Series User manual

Maxon
Maxon HCB-30C User manual

Maxon
Maxon RSS-119 User manual

Maxon
Maxon SP-220 Series Operator's manual

Maxon
Maxon MCB-100 WXD User manual

Maxon
Maxon SM-3000 Enduro series Instruction Manual

Maxon
Maxon SD170EX Series User manual

Maxon
Maxon CM10 User manual

Maxon
Maxon CM10 User manual

Maxon
Maxon SL100K User manual

Maxon
Maxon SP-120 Series User manual

Maxon
Maxon MBR-400 User manual

Maxon
Maxon S1 PMR446 User manual

Maxon
Maxon CM10 User manual