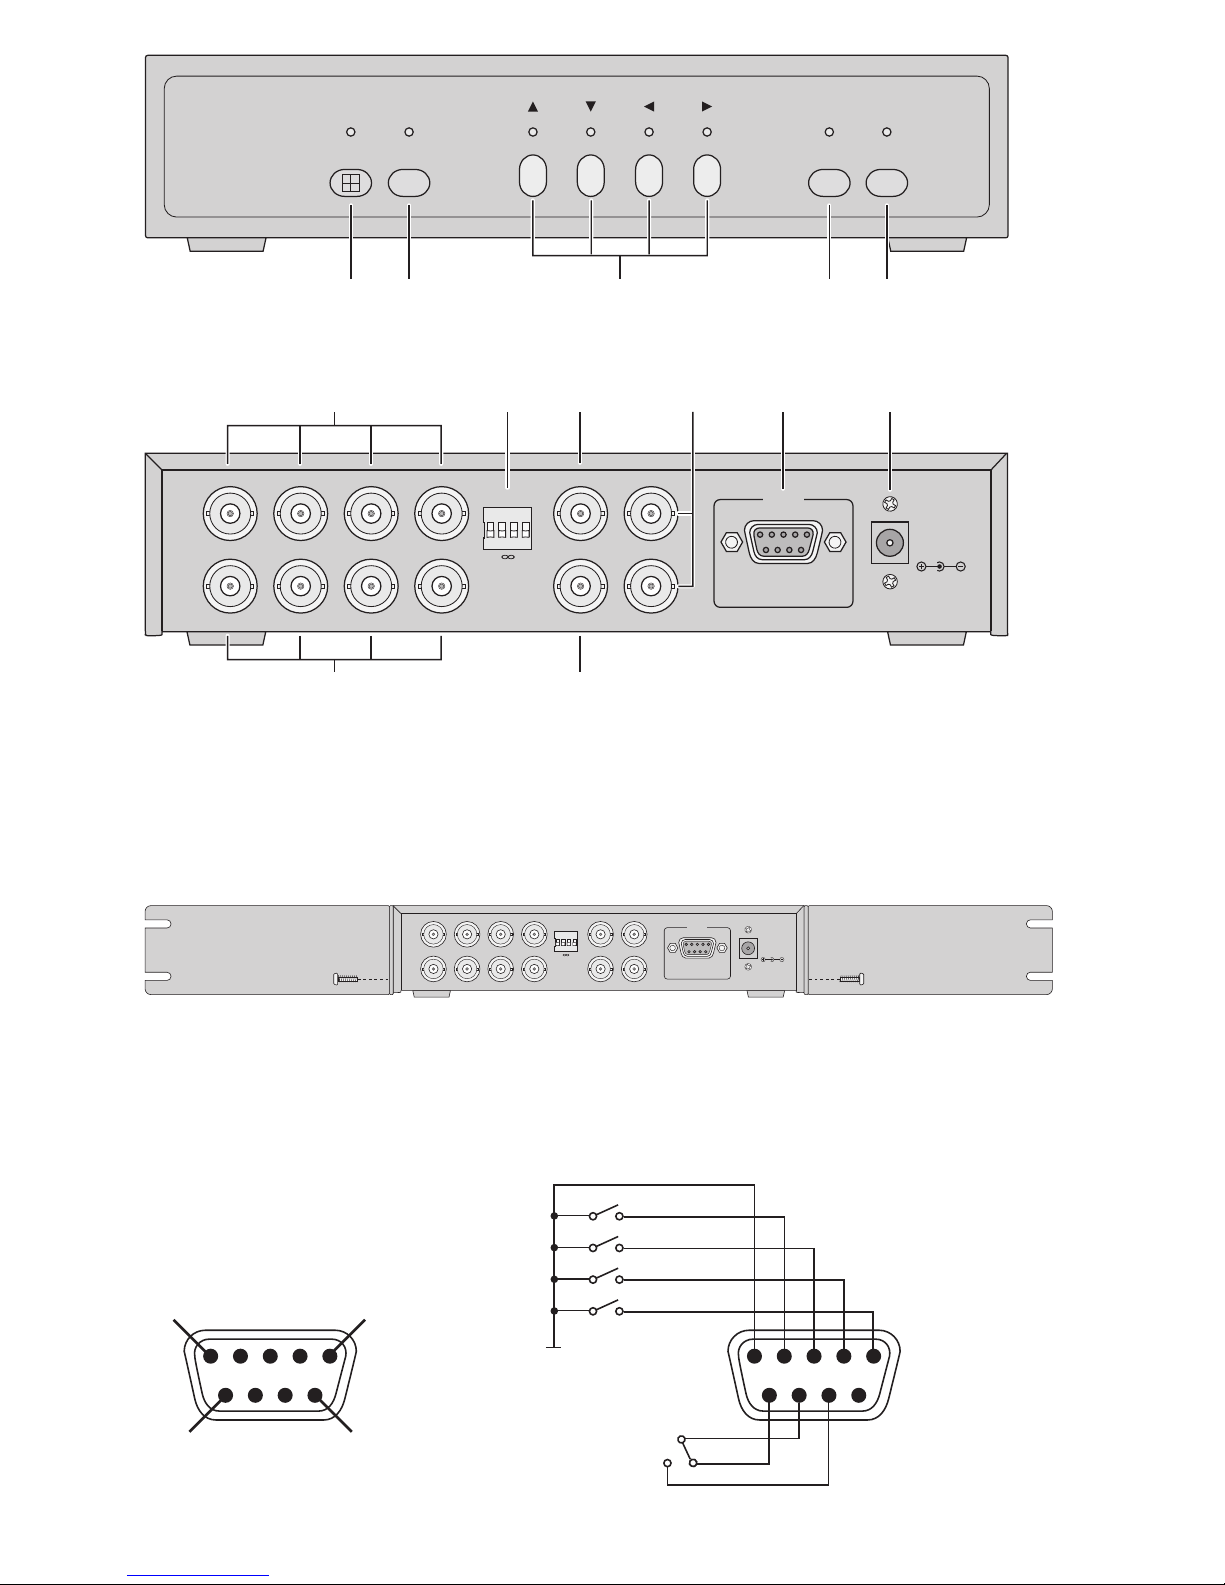
Monacor TVSP-44COL User manual

BEDIENUNGSANLEITUNG
INSTRUCTION MANUAL
MODE D’EMPLOI
ISTRUZIONI PER L’USO
VEILIGHEIDSVOORSCHRIFTEN
CONSEJOS DE SEGURIDAD
ŚRODKI BEZPIECZEŃSTWA
SIKKERHEDSOPLYSNINGER
SÄKERHETSFÖRESKRIFTER
TURVALLISUUDESTA
TVSP-44COL
Best.-Nr. 18.1040

LOOP1
VIDEO1
LOOP2
VIDEO2
LOOP3
VIDEO3
LOOP4
VIDEO4
VCR OUT
VCR IN
MON2
MON1
1234
ON DIP
75
Ω
ALARM
DC 12V 1A
2x 2x
LOOP1
VIDEO1
LOOP2
VIDEO2
LOOP3
VIDEO3
LOOP4
VIDEO4
VCR OUT
VCR IN
MON2
MON1
1234
ON DIP
75
Ω
ALARM
DC 12V 1A
12 13
TVSP-44COL
COLOUR VIDEO
QUAD PROCESSOR
Seq Fz Set
1234
ZOOM PIP VCR PLAY
FREEZE AUTO
12 3 45
67891011
15
9 6
SENSOR 1
SENSOR 2
SENSOR 3
SENSOR 4
GROUND
NC NOCOM

1 Operating Elements and Connections
→see figures on page 2
1.1 Front panel
1Button “ /ZOOM” for the quad mode and the
zoom function
aTo switch to the quad picture, shortly press the
button, the LED above the button lights up in the
quad mode
bTo switch the zoom function on and off (only pos-
sible in the full screen mode), keep the button
pressed for 2 seconds; with the function
switched on, “(Z)” is inserted. More information
about the adjustment of this function →see
chapter 7.2.1.
2Button “Seq /PIP” for the sequential switching and
the display format “picture in picture”
aTo switch the sequential switching on and off,
shortly press the button, with the function
switched on, the LED above the button lights up.
bTo call/exit the display format “picture in picture”,
keep the button pressed for 2 seconds. More
information about the adjustment of the chan-
nels for this format →see chapter 7.4.
3Numerical keys or cursor keys
aFor channel selection for the full screen display
bTo navigate in the on-screen menu (buttons
and ) or to change adjustments in the on-
screen menu (buttons and )
4Button “Fz/VCR PLAY” for the freeze function and
the reproduction mode of the video recorder
aTo switch the freeze function on and off (only
possible in the full screen mode), shortly press
the button, with the function switched on, the
LED above the button lights up and “(F)” is in-
serted.
bTo switch the reproduction mode of the video
recorder on and off, keep the button pressed for
2 seconds; with the function switched on, the
LED above the button lights up and “VCR PLAY-
BACK” is inserted.
5Button “Set/AUTO” for the on-screen menu
aTo call the main menu or a submenu, shortly
press the button, with the on-screen menu
called, the LED above the button lights up.
bTo exit the main menu or a submenu, keep the
button pressed for 2 seconds.
1.2 Rear panel
6BNC input jacks “VIDEO 1” to “VIDEO 4” for con-
nection of the cameras
7Impedance selector switch 1 to 4 for the video
inputs “VIDEO 1” to “VIDEO 4” (6):
upper switch position 75 Ω
The input is terminated with 75 Ω; required if no
unit is connected to the respective fed-through
output “LOOP” (12).
lower switch position ∞
The input is of high impedance; required if an-
other unit is connected to the respective fed-
through output “LOOP”.
8Reproduction input “VCR IN” for the reproduction
of the video recorder: connection to the video out-
put of the recorder
9Video outputs “MON 1” and “MON 2” for connection
of two monitors
10 9-pole Sub D jack “ALARM” for the alarm connec-
tions (→fig. 4)
pin 1: alarm input 1
pin 2: alarm input 2
pin 3: alarm input 3
pin 4: alarm input 4
pin 5: ground
pin 6: ground
pin 7: alarm output: NO contact of the relay
pin 8: alarm output: common contact of the relay
pin 9: alarm output: NC contact of the relay
11 Power supply jack “DC 12V 1A” for connection of
the supplied power supply unit
12 BNC output jacks “LOOP 1” to “LOOP 4” for routing
out the fed-through signals of the inputs “VIDEO 1”
to “VIDEO 4” (6)
13 BNC output jack “VCR OUT” for the recording of
the quad picture of the video recorder: connection
to the video input of the recorder
2 Safety Notes
The units (quad processor and plug-in power supply
unit) correspond to all required directives of the EU
and are therefore marked with .
It is essential to observe the following items:
GThe units are suitable for indoor use only. Protect
them against dripping water and splash water, high
air humidity, and heat (admissible ambient tempera-
ture range 0 – 40 °C).
GDo not place any vessels filled with liquid, e. g. drink-
ing glasses, on the quad processor.
GDo not set the quad processor into operation, or
immediately disconnect the power supply unit from
the mains socket if
1. there is visible damage to the units,
2. a defect might have occurred after a drop or simi-
lar accident,
3. malfunctions occur.
The units must in any case be repaired by skilled
personnel.
WARNING The power supply unit is supplied with
hazardous mains voltage. Leave servic-
ing to skilled personnel only. Inexpert
handling or modification of the unit may
cause an electric shock hazard.

GFor cleaning only use a dry, soft cloth, never use
chemicals or water.
GNo guarantee claims for the units and no liability for
any resulting personal damage or material damage
will be accepted if the units are used for other pur-
poses than originally intended, if they are not cor-
rectly connected, operated, or not repaired in an
expert way.
3 Applications
This colour video quad processor is designed for appli-
cations in video surveillance systems. The unit allows
a live surveillance in different display formats (full
screen, quad picture, picture-in-picture, digital zoom).
Furthermore, a video recorder may be connected for
recording and subsequent reproduction. The recording
of the pictures is exclusively made in the quad format,
independent of the monitor display selected for the live
surveillance.
The unit has an internal video motion detector, the
motion recognition can separately be adjusted for each
channel. An alarm input is furthermore assigned to
each channel for the evaluation of an external alarm. A
relay with change-over contact NO/NC offers the pos-
sibility to process an alarm with an external unit. All
alarm events are recorded and can be regarded via the
on-screen menu.
4 Rack Mounting
The unit can be placed as a table top unit or be in-
stalled into a rack (482 mm/19") via the two supplied
mounting brackets. For the rack installation unscrew
the screws on the right side and left side and screw the
mounting brackets with the supplied screws according
to fig. 3. One rack space (= 44.45 mm) is required in
the rack.
5 Video and Alarm Connections
5.1 Camera signals
Up to four cameras may be connected to the input
jacks “VIDEO 1” to “VIDEO 4” (6).
If a camera signal is to be evaluated on another
video system, it can be picked up at the fed-through out-
put “LOOP” (12) located below and passed on. The
impedance is matched via the respective DIP switch
(7). It has to be adjusted in this case in the lower posi-
tion to “∞” (high impedance). If no unit is connected to
the fed-through output, set the respective switch to the
upper position “75 Ω” for the correct termination of the
cable.
5.2 Monitors
Up to two monitors can be connected to the jacks
“MON 1” and “MON 2” (9). Via both monitors the same
display formats and the on-screen menu can be called.
5.3 Video recorder
To record camera pictures, connect the video input of
a video recorder to the jack “VCR OUT” (13). The
recording signal at the output “VCR OUT” is always the
quad picture, independent of the selected monitor dis-
play for the live surveillance.
For the reproduction of recordings connect the
video output of the video recorder to the jack “VCR IN”
(8).
5.4 Alarm connections (fig. 4)
Via the 9-pole Sub D jack “ALARM” (10) four alarm
inputs and an alarm output are available.
As alarm sensors e. g. motion detectors or light bar-
riers can be used which are equipped with a closing
contact (NO = normally open). Connect the sensors
respectively to ground (pin 5 or 6) and to the following
contacts:
sensor for channel 1 to pin 1
sensor for channel 2 to pin 2
sensor for channel 3 to pin 3
sensor for channel 4 to pin 4
As a floating alarm output a relay with change-over
contact is available. At the alarm output e. g. an acous-
tic or visual alarm device may be connected or the
alarm input of a video recorder. In normal condition the
NC contact (pin 9) is closed against the common con-
tact COM (pin 8) and the NO contact (pin 7) is open. In
case of alarm the NC contact is open and the NO con-
tact closes against the common contact COM.
6 Setting into Operation
Connect the supplied power supply unit to the jack
“DC 12V 1A” (11) and to a socket (100 – 240 V~,
50/60 Hz): Thus, the unit is switched on. After setting
into operation, a short signal can be heard and the unit
switches to the quad picture.
First adjust the colour standard the units connected
use. For this purpose press the following three buttons
at the same time:
PAL: “Fz” (4) + “Set” (5) + “2” (3)
NTSC: “Fz” (4) + “Set” (5) + “3” (3)
Via the on-screen menu the quad processor can be
adjusted to the requirements of the respective applica-
tion →see chapter 9.
If the units are to be put out of operation de-
finitively, take them to a local recycling plant
for a disposal which is not harmful to the envi-
ronment.

7 Live Surveillance
7.1 Quad picture (quadruple picture)
To switch to the quad picture, shortly press the button
“ /ZOOM” (1), the LED above it lights up: In the quad
mode the screen is subdivided into four quarters for
the simultaneous display of up to four camera chan-
nels. If no camera is connected to a camera input, the
assigned quadrant is displayed in dark and “NO
VIDEO” is inserted into it.
7.2 Full screen
To switch to the full screen display of a camera chan-
nel, press the corresponding numerical key (3). The
LED above the respective button lights up.
7.2.1 Zoom function
In the full screen display a picture cutout can be
zoomed in; displayed in twofold magnification.
1) To switch to the zoom mode, keep the button
“ /ZOOM” (1) pressed for 2 seconds. In the pic-
ture the insertion “(Z)” appears and on the top left a
frame which limits the picture cutout to be displayed
in a magnified way.
2) Displace the frame with the buttons , , , and
(3) according to the desired picture cutout.
3) To display the selected picture cutout in a magnified
way, shortly press the button “ /ZOOM”. To switch
back to the selection mode for the picture cutout,
shortly press the button again.
4) To exit the zoom mode completely, keep the button
“ /ZOOM” pressed for 2 seconds. Then the unit
changes to the quad picture.
7.2.2 Freeze function (still picture)
For the full screen display the present picture can be
“frozen”, i. e. shown as a still picture. To switch on the
freeze function, shortly press the button “Fz/VCR
PLAY” (4): The LED above the button lights up and
“(F)” is inserted in the picture. To switch off the func-
tion, shortly press the button again.
7.3 Sequential switching
To switch on this operating mode, shortly press the
button “Seq/PIP” (2): The automatic sequential switch-
ing of the camera channels and the quad picture starts.
The LED above the button lights up. Additionally, the
LED lights up in each case with the presently shown
display. Camera channels without valid video signal
are automatically skipped during the sequential
switching of pictures. In the menu AUTO SEQUENCE
(chapter 9.6) the desired picture sequence and the pic-
ture dwell time can be adjusted.
To terminate the sequential switching, shortly press
the button “Seq/PIP” again or actuate another button
on the unit.
7.4 Picture-in-picture (PIP)
To switch to “picture-in-picture”, keep the button
“Seq/PIP” (2) pressed for 2 seconds: The full screen of
channel 1 is displayed in which in the lower right cor-
ner the picture of channel 2 is inserted in 1/4size.
1) As long as the name for the channel flashes in the
full screen, the channel for the full screen display
can be selected with the button or (3). After
the selection of the channel, press the button
“Seq/PIP” to confirm: The channel appears as a full
screen picture, the corresponding LED of the chan-
nel lights up.
2) After confirming the channel selection for the full
screen picture, the name for the channel flashes in
the reduced picture. As long as it flashes, the chan-
nel for the picture insertion can be selected with the
button or . After the selection of the channel
press the button “Seq/PIP” to confirm: The channel
appears as a picture insertion, the corresponding
LED of the channel lights up.
3) To exit this display format, keep the button
“Seq/PIP” pressed again for 2 seconds.
8 Reproduction of a Recording
Keep the button “Fz/VCR PLAY” (4) pressed for
2 seconds; the LED above it lights up. The recorded
camera pictures appear in the quad format and the in-
sertion “VCR PLAYBACK” appears on the screen.
– To view the picture of a channel more precisely,
press the numerical key (3) of the channel: The cor-
responding quadrant of the quad picture is magnified
to full screen reproduction and the insertion “(Z)” for
“zoom” appears in the picture. To switch back to the
quad picture, press the button “ /ZOOM” (1).
– To “freeze” the picture during reproduction, shortly
press the button “Fz/VCR PLAY” (4). “(F)” for “freeze”
is inserted in the picture. To switch off the freeze
function, shortly press the button again.
To switch off the reproduction mode of the video re-
corder, keep the button “Fz/VCR PLAY” pressed for
2 seconds.
Notes:
a During the reproduction mode of the video recorder
no alarm triggering via the internal video motion
detector is possible.
b The names for the camera channels defined in the
menu TITLE SETUP (chapter 9.1) are only inserted
in the recorded pictures if the quad format has been
selected at the time of the recording for the live sur-
veillance.
c The alarm displays “L1234” (in case of loss of a
video signal, see chapter 10.1) and “M1234” (if the
internal video motion detector responds, see chap-
ter 10.2) are only inserted in the recorded pictures
if the quad format or the PIP format has been
selected at the time of the recording for the live sur-
veillance.

9 Adjustments via the On-Screen Menu
To match the unit to the surveillance system in an opti-
mum way, many operating parameters can be adjust-
ed via an on-screen menu. For the operation of the
menu the following buttons are required:
Button “Set/AUTO” (5):
to call (shortly press button) and to exit (keep button
pressed for 2 seconds) the menu pages
buttons , , , and (3):
and to navigate in the menu,
and to change the adjustments
To call the menu (not possible in the reproduction
mode of the video recorder), shortly press the button
“Set/AUTO”: The unit switches to the quad mode and
the page of the main menu is inserted:
Select the desired submenu with the button or .
The presently selected submenu flashes.
For exiting the main menu, keep the button
“Set/AUTO” pressed for 2 seconds. If no button is
actuated for 15 seconds with the on-screen menu
called, the menu is automatically extinguished.
9.1 TITLE SETUP (defining channel names)
If the submenu “TITLE SETUP” is selected, shortly
press the button “Set/AUTO” to call it.
In this menu a name which is inserted in the picture
can be defined for each channel [for the live surveil-
lance, the insertion is made in any display format, for
the pictures recorded via the jack “VCR OUT” (13) see
note b in chapter 8].
Note:
With the on-screen menu called the camera
names are extinguished.
Select the respective place with the button or and
the desired character with the button or .
To exit the submenu and to return to the main menu,
keep the button “Set/AUTO” pressed for 2 seconds.
9.2 DATE/TIME
If the submenu “DATE/TIME” is selected, shortly press
the button “Set/AUTO” to call it.
In this menu it is possible to adjust:
– the present date in the line “DATE”
(day – month – year)
– the present time in the line “TIME”
(hours: minutes: seconds)
– in the line “SHOW”
“YES” (date and time inserted) or
“NO” (date and time extinguished)
Select the respective position with the button or
and make the adjustment with the button or .
To exit the submenu and to return to the main menu,
keep the button “Set/AUTO” pressed for 2 seconds.
9.3 DECODER SETUP (picture adjustments)
If the submenu “DECODER SETUP” is selected, short-
ly press the button “Set/AUTO” to call it.
In this menu the video signals of the four camera chan-
nels can be matched regarding brightness, contrast,
sharpness, colour saturation (“SAT_U” and “SAT_V”),
and hue.
Select the respective line with the button or and
adjust the value (adjusting range : 0 – 63) with the but-
ton or .
To exit the submenu and to return to the main menu,
keep the button “Set/AUTO” pressed for 2 seconds.
9.4 SENSITIVITY (adjusting the motion detector)
If the submenu “SENSITIVITY” is selected, shortly
press the button “Set/AUTO” to call it.
In this menu the sensitivity for the internal video motion
detector can be adjusted [“1” (min.) to “7” (max.)] for
each channel or the motion recognition can be com-
pletely switched OFF.
Select the respective line with the button or and
make the adjustment with the button or .
To exit the submenu and to return to the main menu,
keep the button “Set/AUTO” pressed for 2 seconds.
SENSITIVITY:
CH1 : OFF
CH2 : OFF
CH3 : OFF
CH4 : OFF
BRIGHTNESS:33 BRIGHTNESS:33
CONTRAST:33 CONTRAST:33
SHARPNESS:33 SHARPNESS:33
SAT_U:33 SAT_U:33
SAT_V:33 SAT_V:33
HUE:33 HUE:33
BRIGHTNESS:33 BRIGHTNESS:33
CONTRAST:33 CONTRAST:33
SHARPNESS:33 SHARPNESS:33
SAT_U:33 SAT_U:33
SAT_V:33 SAT_V:33
HUE:33 HUE:33
DATE/TIME:
DATE : 24-01-07
TIME : 22:30:13
SHOW : YES
TITLE SETUP:
CH1 : CHANNEL1
CH2 : CHANNEL2
CH3 : CHANNEL3
CH4 : CHANNEL4
MENU:
TITLE SETUP
DATE/TIME
DECODER SETUP
SENSITIVITY
EVENT LIST
AUTO SEQUENCE
OTHER
KEY LOCK : OFF

9.5 EVENT LIST (alarm protocol)
If the submenu “EVENT LIST” is selected, shortly
press the button “Set/AUTO” to call it.
In this menu the last 20 alarm events are listed on two
menu pages, consecutively numbered and arranged
according to the time they occurred. It is possible to
change between the pages with the buttons , , ,
and .
After the respective list number (column “NO”) the fol-
lowing items are indicated:
– the channel concerned by the alarm (column “CH”)
– the type of alarm (column “A/L/M”):
A = external alarm
L = loss of the video signal
M = alarm by the internal motion detector
– the date of the alarm (column “DD-MM-YY”)
– the time of the alarm (column “HH:MM:SS”)
To exit the submenu and to return to the main menu,
keep the button “Set/AUTO” pressed for 2 seconds.
9.6 AUTO SEQUENCE
(adjustments for the sequential switching)
If the submenu “AUTO SEQUENCE” is selected,
shortly press the button “Set/AUTO” to call it.
In this menu each camera channel and the quad pic-
ture for the sequential switching (→chapter 7.3) can
be switched ON or OFF. In the line “TIME” the picture
dwell time (1 – 99 seconds) can be adjusted.
Select the respective line with the button or and
make the adjustment with the button or .
To exit the submenu and to return to the main menu,
keep the button “Set/AUTO” pressed for 2 seconds.
9.7 OTHER
(alarm adjustments, adjustments for mirror-inverted
display of the picture and for reproduction of the
quad picture)
If the submenu “OTHER” is selected, shortly press the
button “Set/AUTO” to call it.
Via the first menu item “BUZZER” it is possible to
adjust separately for the three alarm types how the
quad processor responds to an alarm triggering (also
see chapter 10 “Alarm functions”):
– line “LOSS”
For an alarm signal to sound in case of signal loss at
one of the camera inputs (6), adjust the time of the
alarm sound (1 – 99 seconds) in the line.
If no alarm signal is to sound in case of loss of a
video signal, set the line to “OFF”.
– line “MOTION”
For an alarm signal to sound in case of alarm trigger-
ing by the internal motion detector and the alarm
relay to respond, adjust the alarm time (1 – 99
seconds) in this line. After the alarm time has ex-
pired, the alarm buzzer is switched off and the alarm
relay is reset.
If neither the buzzer nor the relay is to respond in
case of alarm triggering by the internal motion detec-
tor, set the line to “OFF”.
– line “ALARM”
For an alarm signal to sound in case of alarm trigger-
ing by a connected alarm sensor and the alarm relay
to respond, adjust the alarm time (1 – 99 seconds) in
this line. After the alarm time has expired, the alarm
buzzer is switched off and the alarm relay is reset.
If neither the buzzer nor the relay is to respond in
case of external alarm, set the line to “OFF”.
Via the second menu item “MIRROR” a mirror-inverted
display of the picture can be switched ON for each
camera channel.
Via the third menu item “BORDER” it can be selected
how the quad picture appears on the screen:
– “WHITE”: white separating lines between the four
camera pictures
– “BLACK”: black separating lines between the four
camera pictures
– “OFF”: no separating lines between the four camera
pictures
Select the respective line with the button or and
make the adjustment with the button or .
To exit the submenu and to return to the main menu,
keep the button “Set/AUTO” pressed for 2 seconds.
OTHER:
1.BUZZER: LOSS : 05 SEC
MOTION : 05 SEC
ALARM : 05 SEC
2.MIRROR: CH1 : OFF
CH2 : OFF
CH3 : OFF
CH4 : OFF
3.BORDER : WHITE
AUTO SEQUENCE:
CH1 : ON
CH2 : ON
CH3 : ON
CH4 : ON
QUAD : ON
TIME : 05 SEC
EVENT LIST:
(PAGE1)
NO CH A/L/M DD-MM-YY HH:MM:SS
01 1 A 22-01-07 20:15:13
02 4 L 19-01-07 15:21:40
03 3 A 06-01-07 03:39:28
04 4 M 05-01-07 01:03:34

9.8 KEY LOCK
Select the line “KEY LOCK” with the button or
and switch the key lock ON or OFF with the button
or .
If the adjustment “ON” has been selected, the but-
tons (1) – (4) are locked with the on-screen menu not
called so that it is not possible any more to change the
display formats for the live surveillance. However, the
menu can still be called and operated with the keys
“Set/AUTO” and , , , and .
10 Alarm Functions
An alarm can be triggered by:
– the loss of the signal at one of the camera inputs (6),
e. g. in case of a camera defect
– the internal video motion detector
– an alarm sensor connected to the jack ALARM (10)
[external alarm]
Each alarm triggering will be recorded with date and
time in an event list (chapter 9.5).
10.1 Loss of a video signal
If the unit records the loss of a video signal, the inser-
tion “L1234” appears in the quad and PIP formats and
the number corresponding to the channel concerned
flashes.
If an alarm time has been adjusted in the menu
“OTHER” (chapter 9.7) in the line “LOSS”, an alarm
signal sounds for the time of the alarm (to switch off the
alarm buzzer
before
the alarm time has expired, press
any button). However, if the adjustment “OFF” has
been selected in the line “LOSS”, no alarm sound will
be emitted.
As soon as a video signal is present at the input, the
alarm is automatically switched off.
10.2 Alarm triggering by the internal motion
detector
In case of a movement recognition “M1234” is shortly
inserted in the quad format and PIP format. The number
which corresponds to the channel concerned flashes.
If an alarm time has been adjusted in the menu
“OTHER” (chapter 9.7) in the line “MOTION”, an alarm
signal sounds and the alarm relay responds. After the
alarm time has been expired, the alarm buzzer is
switched off and the alarm relay is reset (to switch off
the buzzer and to reset the relay
before
the alarm time
has expired, press any button). However, if in the line
“MOTION” the adjustment “OFF” has been selected,
no alarm sound is emitted and the alarm relay is de-
activated.
Note:
The motion recognition must be switched on for
the respective channel (→chapter 9.4, menu “SENSI-
TIVITY”), otherwise no alarm will be triggered.
10.3 External alarm
When the unit records an external alarm at an alarm
input and an alarm time has been adjusted in the menu
“OTHER” (chapter 9.7) in the line “ALARM”:
– the unit switches for live surveillance to the full
screen picture of the channel concerned
(If an external alarm is triggered for several channels
at the same time, the unit switches every 2 seconds
between the full screen pictures of the channels con-
cerned.)
– an alarm signal sounds
– the alarm relay responds
After the alarm time has expired, the alarm buzzer is
switched off, the alarm relay is reset, and the unit
changes to the quad mode (to terminate all alarm pro-
ceedings
before
the alarm time has expired, press any
button).
However, if the adjustment “OFF” has been select-
ed in the menu “OTHER” in the line “ALARM”, the unit
switches to quad picture. No alarm sound will be emit-
ted and the alarm relay is deactivated.
11 Specifications
Synchronization: . . . . . CCIR, horizontal 15 625 Hz,
vertical 50 Hz
Colour standard: . . . . . PAL, NTSC
Resolution: . . . . . . . . . 720 ×576 pixels (hor. ×vert.)
Picture frequency: . . . 50 fields/s
Video level: . . . . . . . . . 1 Vpp/75 Ω
Alarm
4 alarm inputs: . . . . . closing contact (NO) with
common ground
1 alarm output: . . . . . relay with change-over con-
tact (NO/NC),
max. switching load:
12 V /1 A, 24 V~/1 A
Ambient temperature: . 0 – 40 °C
Power supply: . . . . . . . 12 V /1 A
(via supplied power supply
unit connected to
100 – 240 V~, 50/60 Hz)
Dimensions: . . . . . . . . 210 ×50 ×215 mm
Weight: . . . . . . . . . . . . 1.7 kg
Connections
video connections: . . BNC jacks
alarm connection: . . 9-pole Sub D jack
power supply: . . . . . low voltage jack for a plug
with the dimensions
5.5/2.1 mm (∅outside/inside)
centre contact = positive pole
Subject to technical modification.
Table of contents
Other Monacor DVR manuals

Monacor
Monacor DMR-425A User manual

Monacor
Monacor AXZ-204BVM User manual

Monacor
Monacor DQR-408A User manual

Monacor
Monacor DMR-1608A User manual

Monacor
Monacor HDVR-184 User manual

Monacor
Monacor AXR-202SSD User manual

Monacor
Monacor TVR-80 User manual

Monacor
Monacor DMR - 450 User manual

Monacor
Monacor DMR1908LCD User manual

Monacor
Monacor DMR-520NT User manual