3
KIBBE BI LABAN (Boulettes de kibbé au yaourt)
6 personnes – Préparation : 1 h
Repos : 1 h au réfrigérateur
Ingrédients pour la pâte à kibbé :
600g de viande – 300g de boulgour
(blé concassé) – Sel
Ingrédients pour la sauce :
1 kg de yaourt – 1 bouquet de coriandre
– 4 gousses d’ail – 3 cuillères à soupe
de maïzena – Sel et poivre
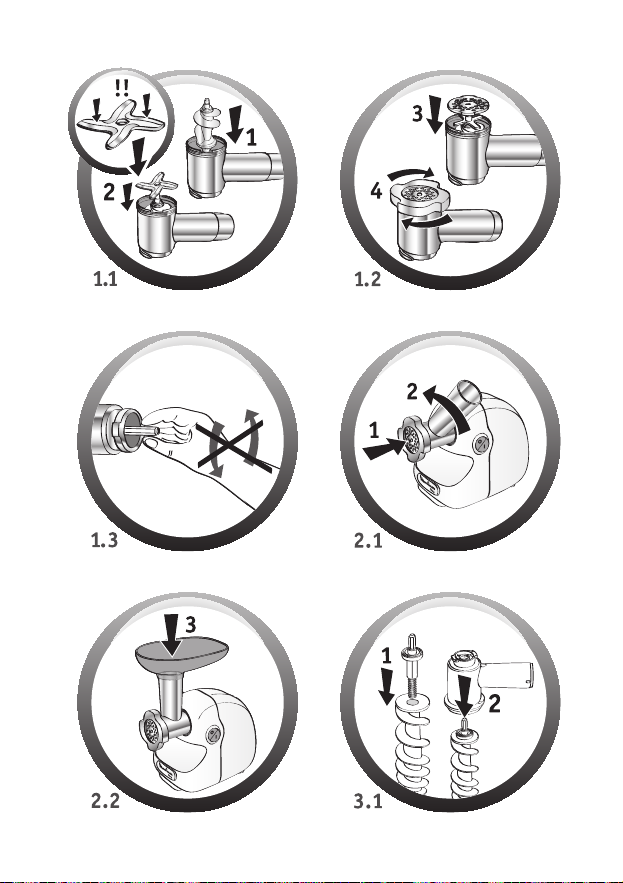
1.Coupez la viande en morceaux.
Installez la grille 4,7 mm sur votre
hachoir. Hachez la viande tout en
incorporant le boulgour. Passez au
moins 2 fois le mélange dans le
hachoir pour avoir un mélange ho-
mogène. Salez puis laissez reposer
la pâte au frais pendant 1 heure.
2.Formez des boulettes avec la pâte.
3.Pour préparer la sauce : lavez le
bouquet de coriandre, épongez-le
dans du papier absorbant et déta-
chez les feuilles. Epluchez l’ail et
écrasez-le. Faites revenir l’ail et la
coriandre dans une poêlependant
1 à 2 minutes à feu doux. ettez de
côté.
4.Battez le yaourt et la maïzena en-
semble, puis salez et poivrez. Versez
le tout dans une casserole à travers
une fine passoire. Portez le mélange
à ébullition puis baissez le feu. Sur-
veillez la cuisson tout en remuant
pour que le yaourt n’accroche pas.
5.Ajoutez l’ail et la coriandre. Pochez
les boulettes de kibbé pendant
10 minutes.
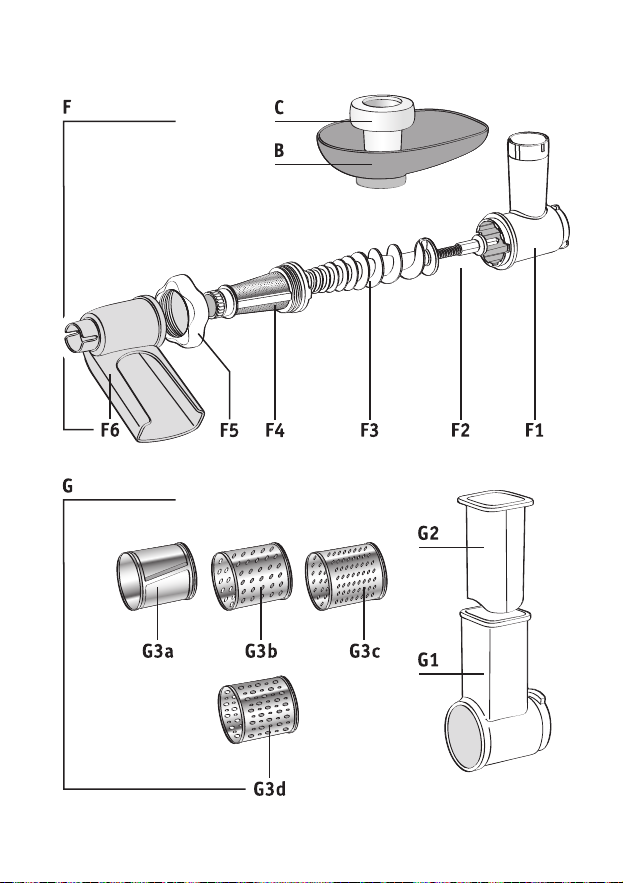
ACCESSOIRE COULIS (F)
ontage de l’accessoire coulis (schémas 3.1 et 3.2)
Prenez la vis F3 (hexagone vers le
haut) et placez-y l’entraîneur F2
(ressort en direction de la vis).
Prenez le corps F1 par la cheminée
en plaçant l’ouverture la plus large
vers le bas. Introduisez-y ensuite
l’ensemble entraineur (F2) – vis (F3).
Placez le filtre F4 en faisant corres-
pondre les 2 ergots avec les 2 en-
coches du corps F1.
Positionnez l’écrou F5 et vissez à fond.
ise en place de l’accessoire coulis
Face au bloc moteur E débranché,
présentez la tête de l’accessoire cou-
lis cheminée inclinée vers la droite.
Faites correspondre les 2 baïonnettes
de la tête avec les 2 encoches du
bloc moteur.
Engagez à fond la tête dans le bloc
moteur E et ramenez ensuite la chemi-
née vers la gauche jusqu’à rencontrer
une butée (la cheminée devra être
alors verticale).
Engagez le réceptacle amovible F6
sur le filtre et venir en butée. Vous
pouvez régler le positionnement du
réceptacle F6 (sortie plus ou moins
haute). Vérifiez que la cheminée est
toujours bien verticale sinon reposi-
tionnez-la.
Engagez le plateau amovible B sur
les ergots de la cheminée de la tête
hachoir.
Branchez l’appareil, il est prêt à l’emploi.
sur l’appareil (schémas 3.3 et 3.4)
1520000783_NOTICE_HACHBOLOGNESE_moulinex_Mise en page 1 29/08/14 13:55 Page3