MSA Gallet F2XR Maintenance manual

Care and Maintenance Manual
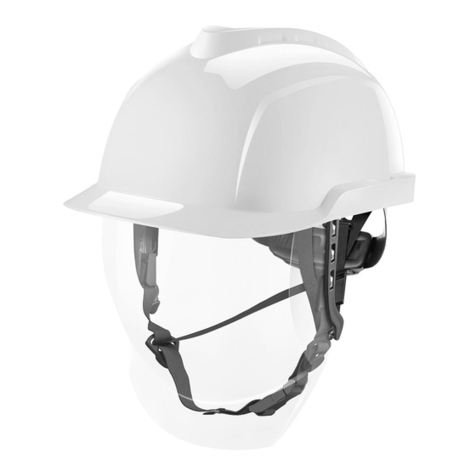
GALLET F2XR
Multi-Purpose Helmet
Order No.: PQ120202/01
MSAsafety.com

© MSA 2022. All rights reserved
MSA is a registered trademark of MSA Technology, LLC in the US, Europe and other Countries. For all other
trademarks visit https://us.msasafety.com/Trademarks.
MSA Europe GmbH
Schlüsselstrasse 12
8645 Rapperswil-Jona
Switzerland
For your local MSA contacts, please go to our website www.MSAsafety.com

Contents
1 Introduction 4
2 Preventive Care 5
2.1 Routine Inspection 5
2.2 Cleaning After Use 6
2.3 Transportation and Storage 6
3 Recommended Service and Maintenance Schedule 8
4 Advanced Inspection and Conformity Criteria 9
4.1 Helmet Shell 9
4.2 Suspension / Headband Assembly 10
4.3 Chinstrap 10
4.4 Ocular Visor (Option) 11
4.5 Neck Curtain (Option) 12
5 Replacement Instructions for Spare Parts 13
5.1 Helmet Shell 13
5.2 Suspension and Headband Assembly 15
5.3 Chinstrap 16
5.4 Rear Plate 17
5.5 Front Plate 18
5.6 Neck Pad 19
5.7 Suspension Padding 20
5.8 Nape Strap with Ratchet Knob 22
5.9 Goggle Mask Elastic Band Adapters (Pair) 24
6 Replacement Instructions for Accessories 26
6.1 Ocular visor (Option) 26
6.2 Nape neck curtain (Option) 28
3 GALLET F2XR
GB

1 Introduction
This document details care and maintenance instructions for the GALLET F2XR helmet. It contains information on
the following aspects:
• Preventive Care of the helmet (by individual user, including routine inspection, cleaning and storage)
• Recommended Service and Maintenance schedule
• Helmet advanced inspection instruction and individual conformity criteria for each component of the helmet
• Replacement instruction for each component of the helmet and associated spare part
• Helmet control check list template for inspections
GALLET F2XR 4
1 Introduction GB

2 Preventive Care
These actions are described in the operating manual supplied with each helmet and must be performed by the
helmet user at the prescribed frequency.
2.1 Routine Inspection
WARNING!
• Helmet absorbs the energy of a blow by partial destruction of, or damage to, the helmet. Even though such
damage may not be readily apparent, any helmet subjected to a severe impact should be replaced.
• Do not drop the helmet. Avoid unnecessary impacts to the helmet which could damage the face shield and/or
optional visor (cracks/scratches).
• In case of visible damage identified during the daily check (before or after use), such as impacts, significant
scratches, coating removal on the shell or visors, melted parts, broken parts, torn straps or paddings, missing
components, non-operational moving parts (such as visors or ratchet), etc., the helmet should be taken to the
trained maintenance technician or an MSA approved maintenance center for complete control processing.
• Do not use a helmet that has damage.
• Do not attempt to test the helmet. The performance properties of the helmet and its components cannot be
properly tested by a user in the field.
• Do not apply paint, adhesives or self-adhesives labels, cleaning products with a hydrocarbon base or solvents
to the helmet or visors to prevent damaging the materials of your helmet.
• Inspection and Maintenance operation listed in this manual must be performed only by personnel who have
been trained and certified by MSA.
• Use only MSA-approved parts. Do not alter, modify or substitute parts without the approval of MSA. Do not
deviate from the maintenance and repair procedures contained herein unless approved in writing by MSA.
• Failure to follow the recommended inspection procedures can reduce helmet performance and result in
serious personal injury, disease, illness, or death.
Failure to follow these warnings can result in serious personal injury or death.
Before each use, inspect the helmet for visible damages such as:
• Cracks, breakages, major plastic distorsion (bumps) on shell, visors and all solid elements.
• Damaged straps or fabric elements (holes, torn areas, missing stitches, etc.).
• Proper attachment of the helmet’s components (chinstrap, suspension, interfaces) to the shell.
Check proper operation of adjustment and safety elements such as the headband ratchet knob, chinstrap buckle,
straps adjusters, etc.
If in doubt, do not use the helmet and request an advanced inspection or replacement of the damaged components.
5 GALLET F2XR
GB 2 Preventive Care
2.2 Cleaning After Use
WARNING!
• Helmets that are dirty or soiled from firefighting activities may be contaminated with toxins that are poisonous,
pathogenic, toxic or carcinogenic. Failure to properly clean the helmet after each use per the recommended
cleaning procedures may result in injuries, illness, disease and/or death.
• Do not use cleaning solvents, oils, varnishes, or polishes other than those recommended in this manual to
clean or decontaminate helmets or helmet components.
• Do not use abrasives, solvents, paint removers, acetone, paint or lacquer thinner, or any chlorinated organic
solvents to clean the helmet shell. Use of these substances can degrade the protective properties of the
helmet shell.
• Do not use equipment that produces mechanical action such as tumbling or agitation to machine-wash or dry
complete helmets.
• Do not use forced hot air or put the helmet directly on a heat source to dry it.
• Do not apply paint, stickers, cleaning products with a hydrocarbon base or solvents to the helmet or visors to
prevent damaging the materials of your helmet.
Failure to follow these warnings can result in serious personal injury or death.
Cleaning the helmet helps extending its lifetime and improves hygienic conditions of use.
Clean the helmet after each use as dirt / fumes are easier to remove immediately than after a long storage period (as
they can migrate into the upper paint/varnish layer).
Detailed cleaning instructions are available in the GALLET F2XR Cleaning, decontamination and disinfection
guidelines. It includes:
• Manual cleaning procedures
• Mechanical cleaning procedures with fixed-basket washing machine and Ozone cabinet
2.3 Transportation and Storage
Proper helmet storage eliminates risk of pollution created by the environment (vehicle fumes, extended sun
exposure, moisture, etc.)
After cleaning, inspect your helmet for visible damages before storing it. In case of doubt, check with a trained
maintenance technician.
• Store the helmet in an area where it is not exposed to the following hazards / elements:
○ Exhaust fumes
○ High temperature variation (e.g. next to a window exposed to the sun)
• Store the helmet in a closed cabinet, and/or, if supplied with the helmet, in the storage bag.
• Let the textile helmet components (padding, neck curtain) dry before putting the helmet in a closed area /
storage bag
• Do not hang / carry the helmet by the chinstrap.
GALLET F2XR 6
2 Preventive Care GB

• For long duration storage, fold the nape strap inside the helmet (→Figure 1 ) to prevent distortion of the plastic
headband.
Figure 1 Nape Strap Storage
• Helmet with ocular visor: Ocular visor must be stored inside the helmet (out of use position). Ocular visors and
face shields bought separately from helmet should be kept in their original packaging until they are mounted on
the helmet.
7 GALLET F2XR
GB 2 Preventive Care
3 Recommended Service and Maintenance Schedule
GALLET F2XR helmets are Category III Personal Protective Equipment according to regulation (EU) 2016/425.
Regular inspection and adapted maintenance must be performed to ensure the proper condition of the equipment for
its intended use and protection levels.
For normal use (regular with non-impacting exposure to fire conditions), MSA recommends that the helmet be
inspected at least every 2 years.
This inspection schedule can be adapted in the following cases:
• Helmets not used on a daily basis and are never exposed to hazardous operational conditions – inspection can
be performed every 4 years.
• Helmets used on a daily basis with very frequent exposure to real fire conditions (trainers for instance) –
inspection intervals must be reduced to 1 year.
• Local regulations may contain requirements on inspection frequency. If local regulations require more frequent
inspections, follow that frequency. Otherwise, follow the MSA recommended frequencies.
Systematically perform an advanced inspection before the next use if the helmet is exposed to the following
conditions:
• Severe mechanical impact
• Direct, severe exposure to flames
• Direct, severe exposure to chemical products
• Any visible damage that may reduce protection level (distorsion of some parts, significant visible melting, etc.)
Cosmetic damages (e.g. superficial scratches, slight colour changes, limited paint peeling, etc.) do not
affect the level of protection and do not require an advanced inspection.
Some of the control and maintenance work requires in-depth knowledge of the products.
WARNING!
Inspection and Maintenance operation listed in this manual must be performed only by personnel who have been
trained and certified by MSA.
Failure to follow this warning can result in serious personal injury or death.
Advanced inspection includes verification of individual components to verify their conformity.
Components that are not directly visible from the outside must be disassembled. Detailed disassembling /
reassembling procedures for all components are described in section 5and 6of this document.
GALLET F2XR 8
3 Recommended Service and
Maintenance Schedule GB

4 Advanced Inspection and Conformity Criteria
WARNING!
• Inspection and Maintenance operation listed in this manual must be performed only by personnel who have
been trained and certified by MSA.
• Use only genuine MSA replacement parts. Using non MSA parts will not only void warranty on the helmet, but
also may reduce the protection level provided by the helmet.
• Use only MSA-approved parts. Do not alter, modify or substitute parts without the approval of MSA. Do not
deviate from the maintenance and repair procedures contained herein unless approved in writing by MSA.
• Failure to follow the recommended inspection and maintenance procedures can reduce helmet performance
and result in serious personal injury, disease, illness, or death.
Failure to follow these warnings can result in serious personal injury or death.
The following sections detail the instructions to:
• Perform inspection of safety related components of the helmet.
• Check conformity to detect damaged parts requiring immediate replacement.
• Replace the damaged part with a new one.
4.1 Helmet Shell
Component Helmet Shell, vented or unvented
Inspection
zones
All, including accessory interface (pair).
Discarding
criteria
Major impact
Visible inside the helmet shell after disassembling the helmet. Such impacts
show that the mechanical structure of the shell may be altered and that it
should be replaced with a new one.
Breakage
Visible cracks or holes that reduce the mechanical structure. Carefully check
areas of connection with other elements (with suspension assembly, ocular
visor).
Accessory
Interface Damage interface, does not hold tight on the shell.
Views of
possible
damages
Superficial scratch
(no discard)
Suggested
replacement
schedule
Not required unless damaged.
9 GALLET F2XR
GB 4 Advanced Inspection and Conformity
Criteria

NOTE: Paint removal from the shell does not impact helmet compliance to protection performance requirements. It
only alters the aspect of the helmet (cosmetic damage).
4.2 Suspension / Headband Assembly
Component Suspension and Headband Assembly
Inspection
zones
Ratchet knob , rotative nape strap , all plastic components
Discarding
criteria
Ratchet knob Broken or damaged (blocked or loose).
Clips / Fixation points Damaged fixation points or clips, risk of losing the components.
Plastic headband Visible cracks or broken.
Nape strap Major distortion which prevents the normal use of the ratchet knob.
Views of
possible
damages
Broken headband
Suggested
replacement
schedule
Not required unless damaged.
4.3 Chinstrap
Component Chinstrap
Inspection
zones
Check all straps , clips , buckle , adjusters
Discarding
criteria
Locking Buckle Buckle is not operating any more (blocked, not closing properly, opening
without pressing).
Straps, chinstrap
cushion Damaged strap/cushion (torn, burned, stiff, missing stitches, etc.).
Clips and adjusters Broken clip (preventing secured attachment to the helmet), broken
GALLET F2XR 10
4 Advanced Inspection and Conformity
Criteria GB

Component Chinstrap
adjusters (blocked or loose).
Views of
possible
damages
Broken locking buckle
Torn strap
Torn chinstrap cushion
Suggested
replacement
schedule
Recommended every 3 to 5 years minimum for hygienic reasons.
4.4 Ocular Visor (Option)
Accessory Ocular visor (option)
Inspection
zones
Vision Area , non-vision area , attachment module
Discarding
criteria
Vision area Loss of varnish coating, cracks, visible impacts, major scratches
(> 10 mm) in the field of vision.
Non vision area Visible cracks, holes that could impact mechanical structure of
the visor.
Attachment module Mechanism not operating (too loose or blocked), broken clip.
Views of
possible
damages Impacts and scratches on the
Visor ocular area
11 GALLET F2XR
GB 4 Advanced Inspection and Conformity
Criteria

Accessory Ocular visor (option)
Broken attachment module
Suggested
replacement
schedule
Not required unless damaged.
4.5 Neck Curtain (Option)
Accessory Nape neck curtain (option)
Inspection
zones
Clip fasteners , fabric
Discarding
criteria
Clip fasteners Fabric Missing clips or broken
Fabric
• Holes through all layers
• Foreign object in between the layers > 2
cm2on the upper part of the neck curtain
and > 4 cm2on the lower part of the neck
curtain
Views of
possible
damages
Broken clip
Hole on the fabric
Suggested
replacement
schedule
Not required unless damaged
GALLET F2XR 12
4 Advanced Inspection and Conformity
Criteria GB

5 Replacement Instructions for Spare Parts
5.1 Helmet Shell
Replacement Parts
Part No.
GA3712-XX
Vented Shell
GA3712-BA (White)
GA3712-JD (Yellow)
GA3712-RE (Red)
GA3712-VF (Photoluminescent - PL)
GA3712-NA (Black)
GA3712-YP (Hi-Viz Yellow PL)
GA3712-OP (Hi-Viz Orange PL)
GA3712-IM (Blue)
GA3712-VA (Green)
GA3712-NM (Grey)
GA3713-XX
Unvented Shell
GA3713-BA (White)
GA3713-JD (Yellow)
GA3713-RE (Red)
GA3713-VF (Photoluminescent PL)
GA3713-NA (Black)
GA3713-YP (Hi-Viz Yellow PL)
GA3713-OP (Hi-Viz Orange PL)
GA3713-IM (Blue)
GA3713-VA (Green)
GA3713-NM (Grey)
Unit of Sale x 1
Specifications Includes suspension holders (Lateral and rear) GA3718 and accessory interface (pair) GA3717
Weight 520 g
13 GALLET F2XR
GB 5 Replacement Instructions for Spare
Parts

Replacement Instructions
Tools required: None
Removal
Disassemble the components as shown in the following paragraphs:
STEP 1: Ocular visor (optional device) → 6.1 Ocular visor (Option)
STEP 2: Suspension and headband → 5.2 Suspension and Headband Assembly
STEP 3: Chinstrap → 5.3 Chinstrap
STEP 4: Front plate → 5.5 Front Plate
STEP 5: Rear plate → 5.4 Rear Plate
Installation
Mount the components as shown in the following paragraphs:
STEP 1:Rear plate → 5.4 Rear Plate
STEP 2:Front plate → 5.5 Front Plate
STEP 3: Chinstrap → 5.3 Chinstrap
STEP 4:Suspension & headband → 5.2 Suspension and Headband Assembly
STEP 5:Ocular visor (optional device) →6.1 Ocular visor (Option)
GALLET F2XR 14
5 Replacement Instructions for Spare
Parts GB

5.2 Suspension and Headband Assembly
Replacement Parts
Part No. GA3714
Colour Black
Unit of Sale x 1
Specifications Includes Neck Pad (GA3716)
Weight 128 g
Replacement Instructions
Tools required: None
Removal
1. Press with your thumb the yellow tabs,
(starting with the sides tabs and ending
with the rear tab).
2. Release the suspension and headband
from the slide, as shown.
Installation
1. Mount the suspension on the slide
(starting with the rear) and move it down
up to the clip of the yellow tab.
2. Follow the same instruction for the left and
right parts.
15 GALLET F2XR
GB 5 Replacement Instructions for Spare
Parts

5.3 Chinstrap
Replacement Parts
Part No. GA3711
Colour Black
Unit of Sale x 5
Specifications
Includes chin and rear straps with textile paddings
Includes connection buckle
Textile made of flame retardant Protex
Weight 65 g / piece
Replacement Instructions
Tools required: None
Removal 1. Press on the black tab located by the clip to release it
2. Follow the same instruction for the 2 other tabs.
Installation
1. On each side: insert the clip in its slot and fully push it
inside the slot until it clicks
2. On the rear: Insert first the straps in between the
rotative nape strap and the neck pad. Then follow the
same instruction than on the sides
GALLET F2XR 16
5 Replacement Instructions for Spare
Parts GB

5.4 Rear Plate
Replacement Parts
Part No. GA3706
Colour Black with MSA printed logo
Unit of Sale x 5
Weight 19 g / piece
Replacement Instructions
Tools required: None
Removal
1. Place the helmet upside down.
2. Press both black locking tabs simultaneously with
your 2 thumbs as shown, to release the rear plate.
Installation 1. Slide the rear plate with your thumbs until you hear
the “click” sound.
17 GALLET F2XR
GB 5 Replacement Instructions for Spare
Parts

5.5 Front Plate
Replacement Parts
Part No.
GA3707 (black plate)
Specific part number for pad printed versions
Colour Black
Unit of Sale x 5
Weight 13 g / piece
Replacement Instructions
Tools required: None
Removal
1. Place the helmet upside down.
2. Push both black locking tabs simultaneously with your
fingers, as shown, to release the front plate.
Installation 1. Slide the front plate with your thumbs until you hear
the “click“sound.
GALLET F2XR 18
5 Replacement Instructions for Spare
Parts GB

5.6 Neck Pad
Replacement Parts
Part No. GA3716
Colour Black
Unit of Sale x 10
Specifications Comfort neck pad made of soft elastomer
Weight 2 g / piece
Replacement Instructions
Tools required: None
Removal
1. Gently twist the neck pad from the nape strap to
release it.
2. Follow the same instruction on the other side.
Installation 1. Insert the neck pad on the nape strap notch.
2. Follow the same instruction on the other side.
19 GALLET F2XR
GB 5 Replacement Instructions for Spare
Parts

5.7 Suspension Padding
Replacement Parts
Part No. GA3715
Colour Black
Unit of Sale x 5
Specifications 1 piece padding
Weight 25 g / piece
Replacement Instructions
Tools required: None
Removal
1. Pull the 2 Velcro straps located on the front part of the
headband and suspension assembly.
2. Pull the suspension padding towards you to release it
from the headband and suspension assembly.
GALLET F2XR 20
5 Replacement Instructions for Spare
Parts GB
Other manuals for Gallet F2XR
1
Table of contents
Other MSA Motorcycle Accessories manuals

MSA
MSA LH 050 User manual

MSA
MSA F2 X-TREM User manual

MSA
MSA Gallet F1 XF User manual

MSA
MSA V-Gard Series User manual

MSA
MSA Gallet F1 XF Installation and user guide

MSA
MSA F2 X-TREM User manual

MSA
MSA GAA Series User manual

MSA
MSA V-Gard H1 User manual

MSA
MSA GAG Series User manual

MSA
MSA Cairns 1010 User manual

MSA
MSA Gallet F1 XF User manual

MSA
MSA F1S Operating instructions

MSA
MSA Cairns XF1 User manual

MSA
MSA AUER 3S-Basis Plus User manual

MSA
MSA Cairns 1010 User manual

MSA
MSA F2 X-TREM User manual

MSA
MSA V-Gard Series User manual

MSA
MSA V-GARD 900 Series User manual

MSA
MSA Cairns XF1 Guide

MSA
MSA V-Gard H1 User manual