NEC MultiSync LT245 User manual

1
2
3
4
5
6
NEC Projector
Image Express Utility 2 for Mac OS
User’s Guide
For Mac OS X 10.2.8 and higher
PCCARD
COMPONENTIN
USBLAN
AUDIOIN
COMPUTER3IN
COMPUTER1INCOMPUTER2IN
PCCONTROL
MONITOROUT
AUDIOOUT
S-VIDEOINVIDEOIN
AUDIO
Cb/Pb
L/MONOR
Cr/Pr
ACIN
PCCARD
LAMP
STATUS
POWER
ON/STANDBY
SOURCE
AUTOADJUST
3DREFORM
SELECT
7
1. What You Can Do with
Image Express Utility 2
2. Operating Environment
3. SettingtheLANSettingsfor
the Projector
4. SettingtheLANSettingsfor
Macintosh
5. Installing Image Express
Utility 2
6. Using Image Express
Utility 2
7. Reference: Setting the
Connectionby EnteringIP
Address and Other Con-
figurations
Supported Projector
LT380/LT280/LT265/LT245/WT615/WT610
1

Introduction
Thank you for purchasing the NEC projector.
This user’s guide explains the basic LAN settings to use “Image Express Utility 2 for Mac
OS”and how to operate it. For details, consult the help page for “Image Express Utility 2 for
Mac OS”.
“Image Express Utility 2 for Mac OS”is a software program to send images on the Macintosh
screen to a projector via wireless/wired LAN to project them on the screen.
“Image Express Utility 2 for Mac OS”runs on Mac OS X 10.2.8 or higher.
Hereafter “Image Express Utility 2 for Mac OS”is referred to as “Image Express Utility 2”in
this guide. The operations in this guide are explained based on Mac OS X 10.3.6.
•Macintosh, Mac OS X,AirPort,AirPort Extreme are registered trademarks ofApple Com-
puter Inc.
•PowerPC is a registered trademark of International Business Machines Corporation.
•Other manufacturer names and product names in this document are registered trade-
marks or trademarks of the respective companies.
NOTES
(1) The contents of this guide may not be reprinted in part or whole without permission.
(2) The contents of this guide are subject to change without notice.
(3) Great care has been taken in the preparation of this guide; however, should you notice
any questionable points, errors or omissions, please contact us.
(4) Notwithstanding article (3), NEC will not be responsible for any claims on loss of profit
or other matters deemed to result from using the Projector.
2

3
Contents
Contents
Introduction .............................................................................. Inside cover
Contents.....................................................................................................3
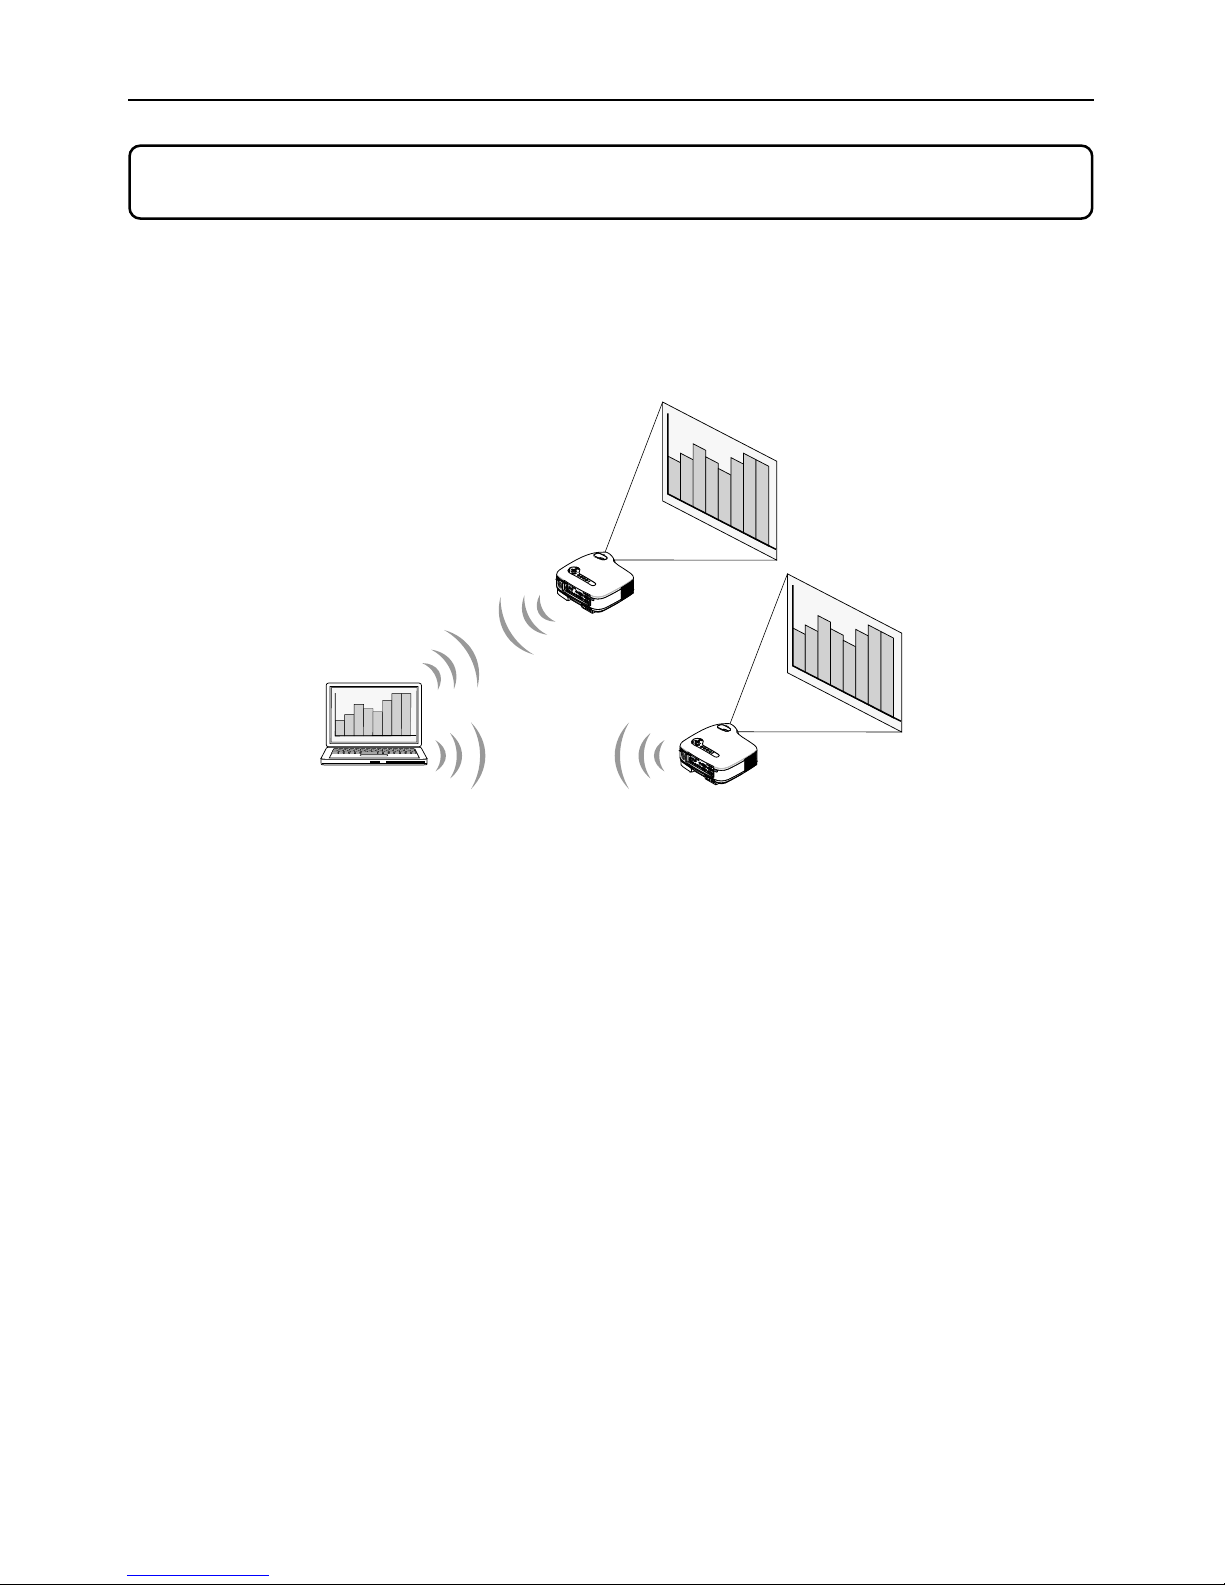
1. What You Can Do with Image Express Utility 2 ................................4
2. Operating Environment .......................................................................5
2-1. Supported Projector ............................................................................5
2-2. Operating Environment .......................................................................5
3. Setting the LAN Settings for the Projector........................................ 6
4. Setting the LAN Settings for Macintosh ............................................ 8
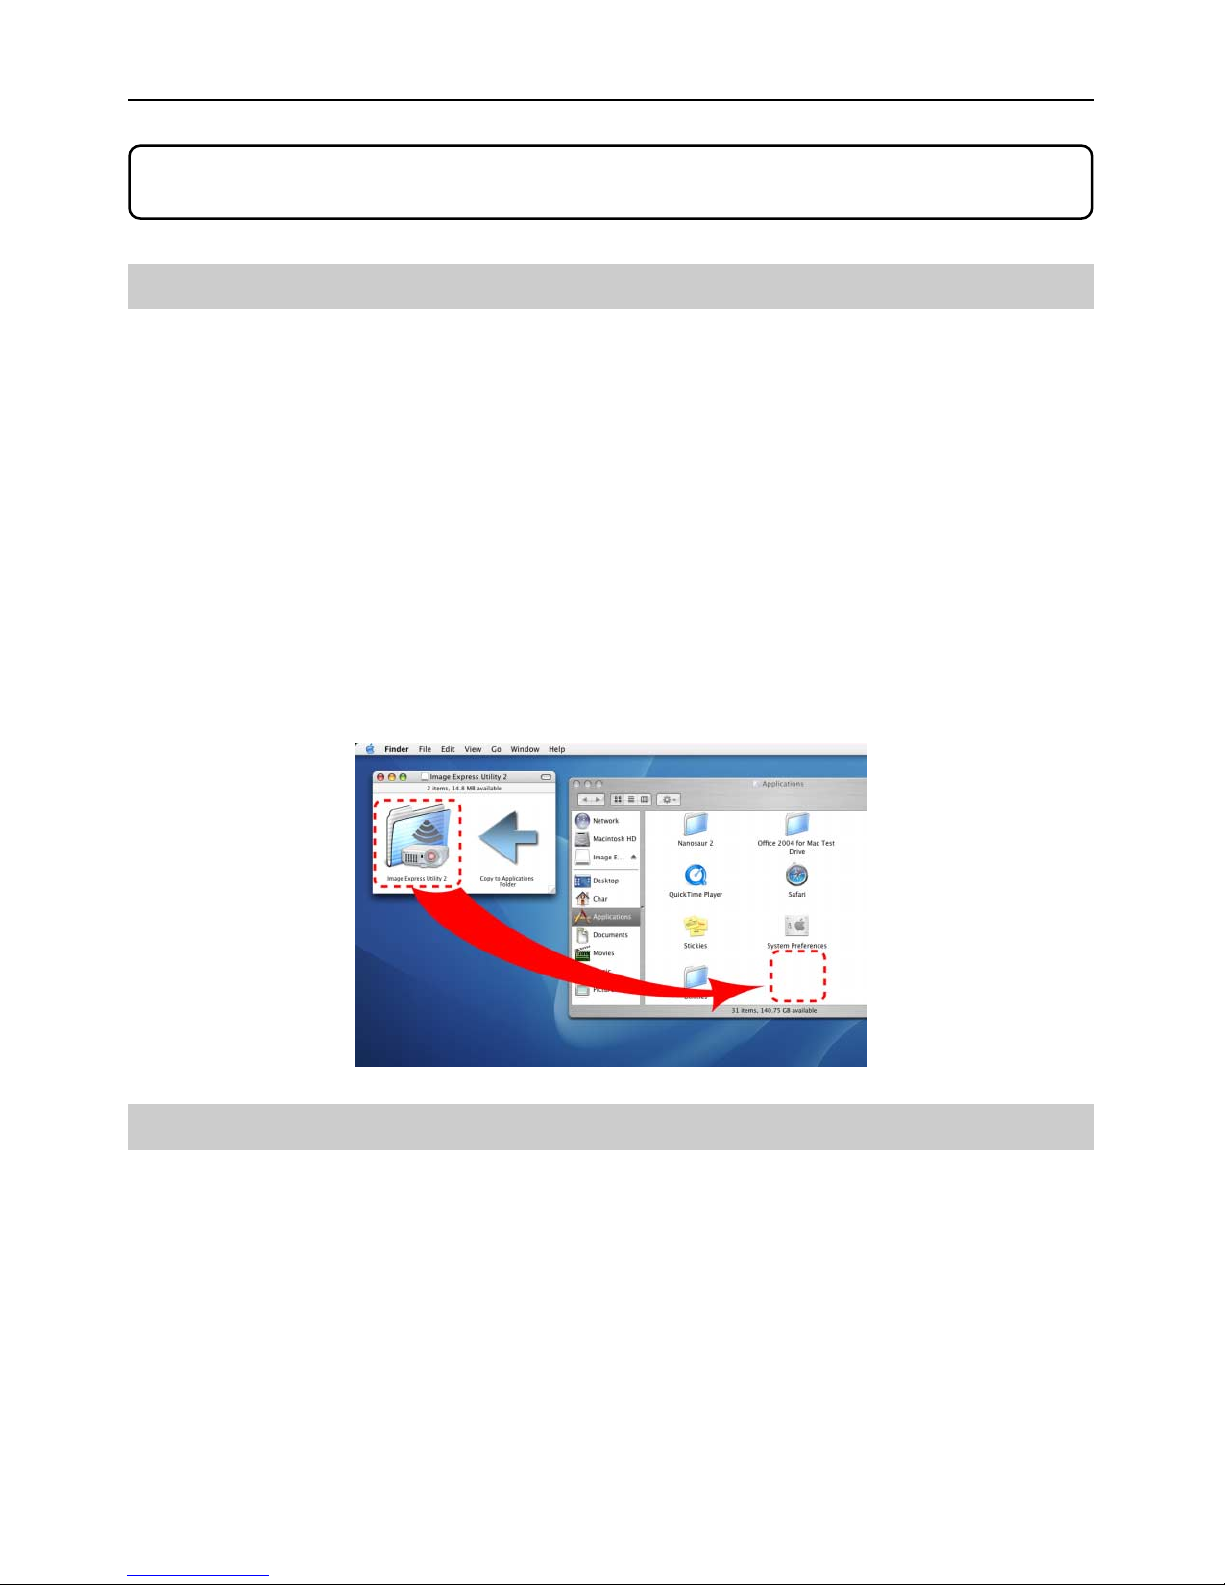
5. Installing Image Express Utility 2.....................................................10
5-1. Installation .........................................................................................10
5-2. Uninstallation.....................................................................................10
6. Using Image Express Utility 2 .......................................................... 11
6-1. Connecting to a projector .................................................................. 11
6-2. Stopping/Restarting Image Transmission .........................................14
6-3. Exiting Image Express Utility 2 .........................................................14
7.
Reference: Setting the Connection by Entering IP Address and Other Configurations .........
15
7-1. Setting the LAN Settings for the Projector ........................................15
7-2. Setting the LAN Settings for Macintosh ............................................15
About the Downloading Service...............................................................18
For Information.........................................................................................18

4
1.What You Can Do with Image Express Utility 2
1. What You Can Do with Image Express Utility 2
•Via the network images on the screen of your personal computer can be sent to the
projector and projected on the screen.Wireless LAN enables you to use the projector
without cables.
•One personal computer can send images to more than one projector.
PCCARD
COMPONENTIN
USBLAN
AUDIOIN
COMPUTER3IN
COMPUTER1INCOMPUTER2IN
PCCONTROL
MONITOROUT
AUDIOOUT
S-VIDEOINVIDEOIN
AUDIO
Cb/Pb
L/MONOR
Cr/Pr
ACIN
PCCARD
LAMP
STATUS
POWER
ON/STANDBY
SOURCE
AUTOADJUST
3DREFORM
SELECT
PCCARD
COMPONENTIN
USBLAN
AUDIOIN
COMPUTER3IN
COMPUTER1INCOMPUTER2IN
PCCONTROL
MONITOROUT
AUDIOOUT
S-VIDEOINVIDEOIN
AUDIO
Cb/Pb
L/MONOR
Cr/Pr
ACIN
PCCARD
LAMP
STATUS
POWER
ON/STANDBY
SOURCE
AUTOADJUST
3DREFORM
SELECT

5
2
2.Operating Environment
2. Operating Environment
2-1. Supported Projector
Image Express Utility 2 supports the following NEC projector (as of October 2005)
LT Series
WT Series
LT380 / LT280
LT265 / LT245
WT615 / WT610
2-2. Operating Environment
Supported OS
Processor (CPU)
Memory
Network Environment
Supported Resolution
Supported Screen Colors
Mac OS X 10.2.8 or higher required
Mac OS X 10.3.0 or higher recommended
PowerPC G3 600 MHz processor required
PowerPC G4 800 MHz or higher recommended
128 MB or higher required
256 MB or higher recommended
Wired or wireless LAN required that supports TCP/IP
Only the AirPort and AirPort Extreme wireless LAN cards are
guaranteed to work with Image Express Utility 2 for Mac OS.
“Easy Connection”supports only AirPort and AirPort Extreme.
VGA (640 x 480) required
XGA (1024 x 768) recommended
Thousands of colors, millions of colors required
•256 or fewer colors are not supported.

6
3.Setting the LAN Settings for the Projector
3. Setting the LAN Settings for the Projector
This section explains about “Easy Connection” using wireless LAN.
Refer to the manual attached to the projector to enable “Easy Connection”.
•For LT265/LT245, refer to “User’s Manual (PDF)”
•For LT380/LT280/WT615/WT610, refer to “Wired and Wireless Network Setup Guide”.
“Easy Connection” is
A unique communication mode that allows you to omit irksome configurations such
as IP address, subnet mask and etc. when connecting your personal computer to a
projector via wireless LAN.
1Turn off the projector and insert the wireless LAN card into the projector.
2Turn on the projector and press the <MENU> button to display the on-screen
menu.
3Select [Setup] →[Installation] tab →[LAN Mode] from the on-screen menu.
The [LAN Mode] window will be displayed.
LT380/LT280/LT265/LT245 WT615/WT610

7
3
3.Setting the LAN Settings for the Projector
4Set “Easy Connection”.
•LT380/LT280/LT265/LT245
(1) Select the [PC Card] tab, and confirm that “Easy Connection”has been set in Profiles.
(2) Highlight [Reconnect], and press the <ENTER> button.
An hourglass icon is displayed on the screen.
(3) When the hourglass icon disappears, highlight [OK] and press the <ENTER> button.
(4) Press the <EXIT> button several times to close the on-screen menu.
•WT615/WT610
(1) Confirm that [Easy Connection] has been set in Profiles.
(2) Highlight [Reconnect], and press the <ENTER> button.
An hourglass icon is displayed on the screen.
(3) When the hourglass icon disappears, highlight [OK] and press the <ENTER> button.
(4) Press the <EXIT> button several times to close the on-screen menu.

8
4.Setting the LAN Settings for Macintosh
4. Setting the LAN Settings for Macintosh
This section explains the configurations for “Easy Connection”with the projector.
1Click Apple Menu ( ) and [System Preferences...].
The “System Preferences”window will be displayed.
2Click [Network].
The Network configuration window will be displayed.
3Click [Location] and then [New Location...].
2Click
7Click
5Click
3Click
6Click

9
4
4.Setting the LAN Settings for Macintosh
4Enter a new location name and click the [OK] button.
Enter “IEU2”as an example.
5Click [Show] and [AirPort].
•For wired LAN connection, click [Built-in Ethernet].
After change to [Built-in Ethernet], set “Manually”in [Configure IPv4] to specify the
IP address and other configurations ( page 15 ) or set “Using DHCP”.
Note
If neitherAirport card norAirport extreme card has been inserted in the Macintosh
computer, [AirPort] cannot be chosen.
6Click the [Apply Now] button.
7Click the [ ] button at the upper left on the Network configuration window.
The Network configuration window will be closed.

10
5.Installing Image Express Utility 2
5. Installing Image Express Utility 2
5-1. Installation
1Insert the User Supportware 3 CD-ROM into the CD-ROM drive.
The CD-ROM icon will be displayed on Desktop.
2Double-click the “CD-ROM” icon.
3Double-click the “Mac OS X” icon.
4Double-click the “Image Express Utility 2.dmg” icon.
“Image Express Utility 2” icon will be displayed on Desktop.
5Dragand dropthe “ImageExpress Utility2”folder into the “Applications”folder.
5-2. Uninstallation
1Move the “Image Express Utility 2”folder to the Trash icon.
2Move the “Preferences”file from the “Image Express Utility 2”folder to the
Trash icon.
The Preferences file in the “Image Express Utility 2”is located in “/Users/Your user
name/Library/Preferences/jp.co.nec.nevt.ImageExpressUtility.plist”.

11
6
6.Using Image Express Utility 2
6. Using Image Express Utility 2
6-1. Connecting to a projector
1Confirm that the projector has been turned on.
2Click the AirPort status ( ) on the Macintosh menu bar, and click “Turn
AirPort On”.
The AirPort status is changed to “”or “”.
•AirPort status types and meanings
...AirPort : Off
...AirPort : On ( in infrastructure connection )
...AirPort : On ( in adhoc connection )
When the AirPort status ( / / ) is not displayed on the menu bar:
(1) Click Apple Menu ( ) and [System Preferences...].
The “System Preferences”window will be displayed.
(2) Click [Network].
The Network configuration window will be displayed.
(3) Select [AirPort] in [Show].
continued on the following page.

12
6.Using Image Express Utility 2
(4) Click [AirPort] tab.
The AirPort configuration item will be displayed.
(5) Check the “Show AirPort status in menu bar”check box at the bottom con-
figuration item.
The AirPort status ( / / ) will be displayed on the menu bar.
(6) Click the [ ] button at the upper left on the Network configuration win-
dow.
The Network configuration window will be closed.
3Double-click the “Image Express Utility 2”icon in the “Image Express Utility 2”
folder.
•At the initial start, the “License Agreement”window is displayed.
Thoroughly read the agreement shown on the screen, and click “I accept the terms
in the license agreement”and the [OK] button.
Next, the “Authenticate”window will be displayed.

13
6
6.Using Image Express Utility 2
4Enter the administrator name and password of your Macintosh computer, and
click the [OK] button.
The [Projector Selection] window will be displayed.
5Check the ( ) check box to the left of the projector name to connect and click
[Connect].
The Macintosh computer and the projector are connected via wireless LAN, and im-
ages on the Macintosh screen are projected from the projector.
PCCARD
COMPONENTIN
USBLAN
AUDIOIN
COMPUTER3IN
COMPUTER1INCOMPUTER2IN
PCCONTROL
MONITOROUT
AUDIOOUT
S-VIDEOINVIDEOIN
AUDIO
Cb/Pb
L/MONOR
Cr/Pr
ACIN
PCCARD
LAMP
STATUS
POWER
ON/STANDBY
SOURCE
AUTOADJUST
3DREFORM
SELECT

14
6.Using Image Express Utility 2
6-2. Stopping/Restarting Image Transmission
■Stopping image transmission
1Click [Tools] on the menu bar, and click [Stop Sending].
Image transmission is temporarily stopped.
■Restarting image transmission
1Click [Tools] on the menu bar, and click [Start Sending].
Image transmission is started again.
6-3. Exiting Image Express Utility 2
1Click [Image Express Utility 2] on the menu bar, and click [Quit Image Express
Utility 2].
Image Express Utility 2 is exited.

15
7.Reference: Setting the Connection by Entering IP Address and Other Configurations
7
7. Reference: Setting the Connection by Entering IP Address and Other Configurations
7-1. Setting the LAN Settings for the Projector
For how to set IP address, subnet mask, and other configurations without using “Easy Con-
nection”, see “User’s Manual (PDF)”(LT265/LT245) or “Wired and Wireless Network Setup
Guide”(LT380/LT280/WT615/WT610).
The explanation below is given assuming that the following configurations have been set.
Select a wireless LAN.
IP Address “192.168.100.010”
Subnet Mask “255.255.255.0”
Projector Name “LT265 Series”(default for LT265/LT245)
SSID “NECPJ”(default)
Mode “802.11 Ad Hoc”
WEP “Disable”(default)
(Note) If [LAN Mode] configuration has been changed, click [Reconnect] on the
LAN Mode configuration screen, and press the <OK> button.
7-2. Setting the LAN Settings for Macintosh
To connect to the projector without using “Easy Connection”, set IP address, subnet mask,
and other configurations as follows:
1Click Apple Menu ( ) and [System Preferences...].
The “System Preferences”window will be displayed.
2Click

16
7.Reference: Setting the Connection by Entering IP Address and Other Configurations
2Click [Network].
The Network configuration window will be displayed.
3Click [Location]→“New Location...”, enter a new location name, and click the
[OK] button.
4Select “AirPort”in [Show].
•For wired LAN connection, click “Built-in Ethernet”.
SSID and WEP configurations are unnecessary for wired LAN.
5Click the [TCP/IP] tab.
6Select “Manually”in [Configure IPv4].
Entry fields for IP address, subnet mask and other configurations will be displayed.
7Enter the IP address and subnet mask appropriate for the projector LAN.
As an example, set the IP address “192.168.100.20”and subnet mask “255.255.255.0”.
8Click the [Apply Now] button.
Attempt to connect to the network set in [System Preference ...]→[Network]→[AirPort]
tab→[By default, join].
9Click the [ ] button at the upper left on the Network configuration window.
The Network configuration window will be closed.
9Click
5Click
4Click
3Click
6Click
7Enter
8Click

17
7.Reference: Setting the Connection by Entering IP Address and Other Configurations
7
0Click theAirPort status ( / ) on the menu bar, and SSID of the projec-
tor to connect.
•Click “NECPJ”in this example.
The Macintosh computer is connected to the projector via wireless LAN.
If WEP has been set in the projector, the [Enter Password] window is displayed.
Type the same character string that has been typed for WEP in the projector,
and click [OK].
For the following, operate in the same way as “6-1. Connecting to a projector”( page 11 ).

18
About the Downloading Service
For update information on Image Express Utility 2 for Mac OS refer to the NEC Projector’s
support page (http://www.nec-pj.com).
For Information
Visit: http://www.nec-pj.com
About the Downloading Service

©NEC Viewtechnology, Ltd. 2005 Second edition October 2005
Reproduction, modification, and other uses are prohibited without the permission of NEC Viewtechnology, Ltd.
19

Image Express Utility 2 for Mac OS User’s Guide
20
Other manuals for MultiSync LT245
1
This manual suits for next models
5
Table of contents
Other NEC Projector Accessories manuals
Popular Projector Accessories manuals by other brands

Sony
Sony VID-P50 operating instructions

Navitar
Navitar 570MCL070 installation instructions

Panasonic
Panasonic ET-LAEF100 operating instructions

AllSportSystems
AllSportSystems SUPERBAY installation guide

Sharp
Sharp AN-PH818EZ Operation manual

Premier Mounts
Premier Mounts CPD10WALLARM installation instructions