NEC U250X Guide

ENG-1
Wall Mount Unit
NP01WK/NP01WK1 Installation and Adjustment Manual
Thank you for your purchase of this NEC wall mount unit.
Please read this installation and adjustment manual carefully to ensure proper use.
The Wall Mount Unit NP01WK/NP01WK1 is exclusively for Projector U300X/U250X/
U310W/U260W and cannot be used for other projectors.
Special skills are required to install the projector. This work
should never be performed by the customer.
To the Dealer and Installer
To ensure customer safety, we ask that the installation work
be started after careful attention is paid to the strength of the
mounting location to ensure it will withstand the weight of the
projector and mounting hardware.
CONTENTS
Please heed the following ...................................................ENG-2
Preparation.........................................................................ENG-4
Packaged Parts ........................................................ENG-4
Names of Parts.........................................................ENG-5
Dimensions of Parts..................................................ENG-6
Mounting the Projector .......................................................ENG-7
Adjusting the Projection Position.......................................ENG-12
Specifications ...................................................................ENG-16
Using the wall plate ..........................................................ENG-16

ENG-2
ENG-3
Please heed the following
Symbol
In this “Installation and Adjustment Manual”, to ensure the safe and proper use of the product,
prevent harm to yourself and others and damage to property, various symbols are used. The
symbols and meanings are as follows. Please read this manual after ensuring the contents are well
understood.
Improper handling and ignoring this indication may result in
bodily harm such as death, serious injury and so on.
Improper handling and ignoring this indication may result in
bodily injury and damage to surrounding contents.
Warning
Warning
Caution
Examples of symbols:
Symbol alerts you to cautions (including warnings)
Concrete cautions are specified in figures.
Symbol expresses prohibited actions
Concrete prohibitions are specified in figures.
Symbol expresses compulsory actions.
Concrete instructions are specified in figures.
• Wheninstallingtheprojectorandadjustingtheprojectionposition,besuretodoso
as explained in this manual. The projector may fall and cause injury if installed and ad-
justed improperly.
• Topreventtheprojectorfromfalling,installitinalocationandfastenitsoastoensure
sufficient strength to support the combined weight (about 12.7kg) of the projector (about
6.5kg), the wall mount unit (about 6.2kg) and so on for an extended period as well as
to withstand earthquakes. Insufficient strength or fastening may result in the projector
falling and causing injury.
Be sure to observe the following precautions:
* Use M6 (1/4 inch) for the wall fixation bolts and screws for the wall adapter.
* Use an outlet for the power source of the projector. Do not directly connect to the
lamp line because this is dangerous.Also, use an accessible outlet so that you can
connect and disconnect the power plug.
• Mountingonawoodenwall
Ensure the load is mounted on a pillar or robust constructional material. If the strength
of the constructional material and so on is insufficient, please reinforce it. Do not mount
on wall finishing material, furring strip and so on.
• Mounting on a concrete wall
Use a commercial anchor bolt M6 (1/4 inch), anchor nuts and similar, which will bear
the load of the projector.

ENG-2
ENG-3
Warning
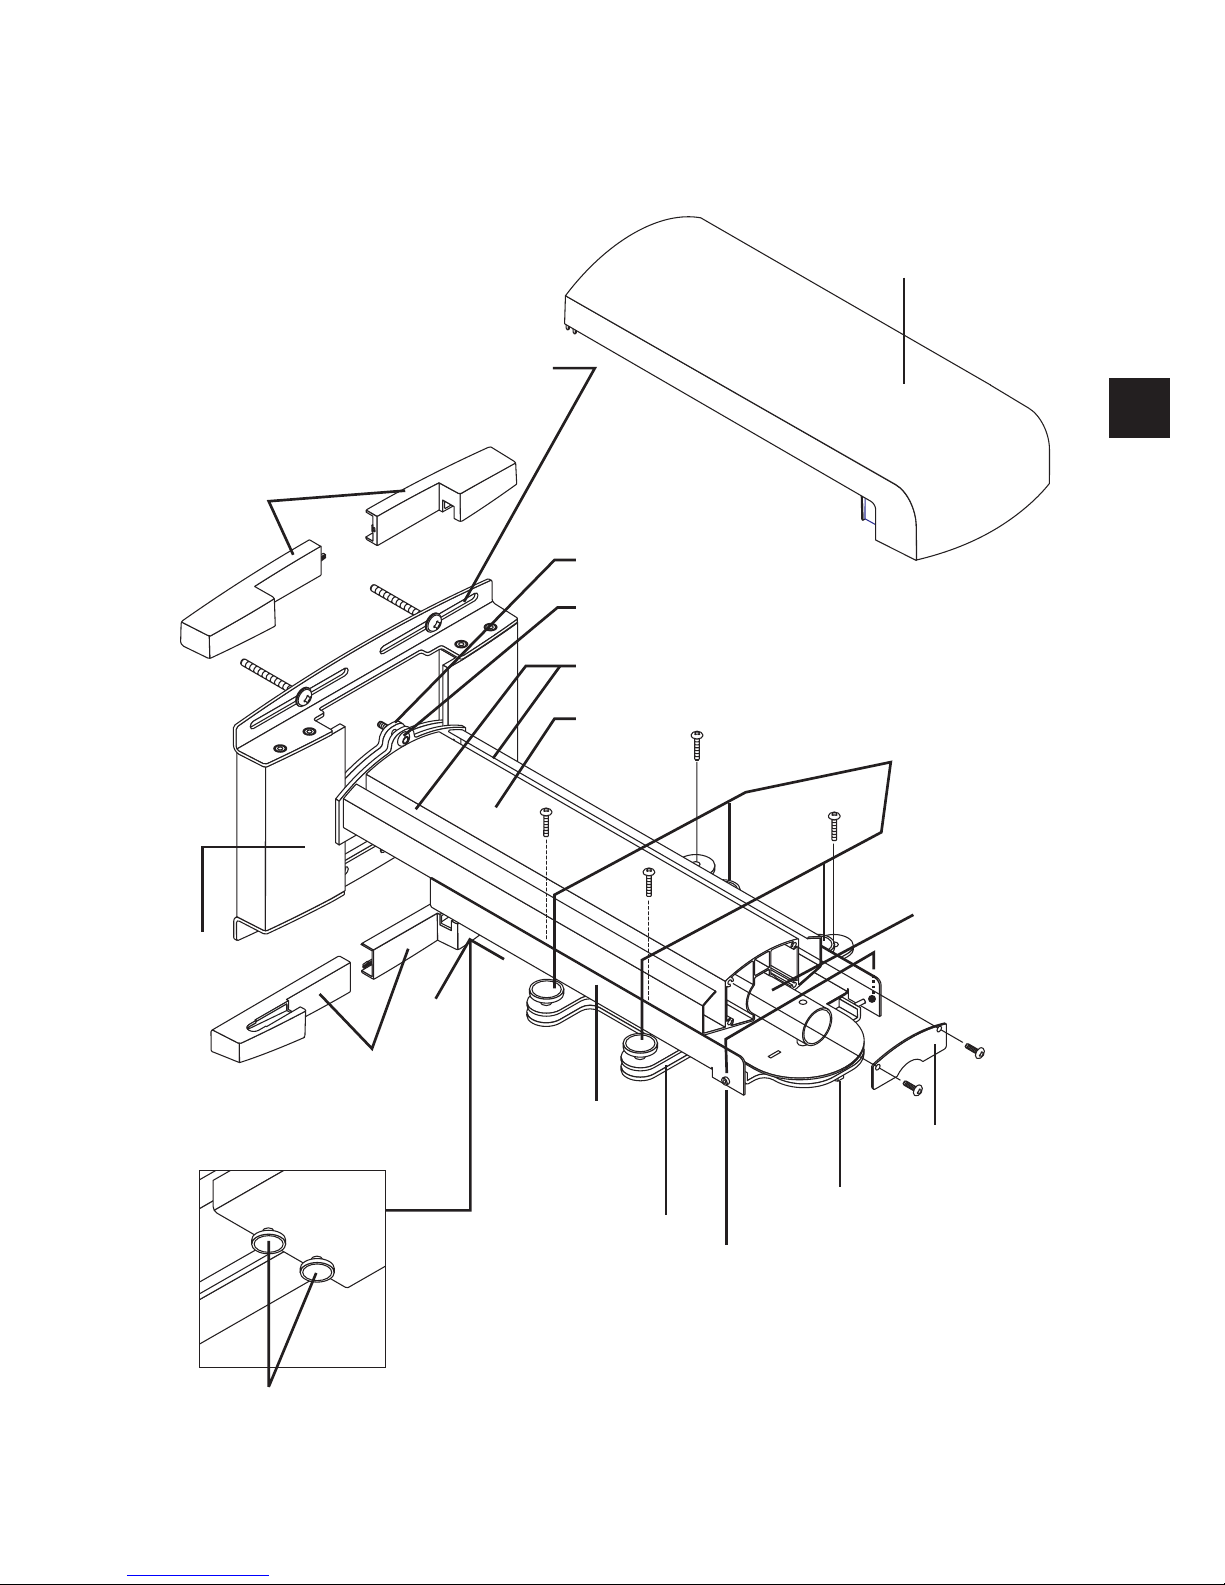
• Donotinstallinplacessubjecttoconstantvibration.Extendedvibrationmaycause
loosening of the screws and result in the Wall Mount Unit and projector falling and
causing injury. Also, it may cause breakdown of the projector.
• Toensuresafety,besuretotightenthebolts,screwsandadjustingknobssecurely.
Failure to do so may result in the projector falling and causing injury.
• Donotmodifyanyparts.DoingsomayresultintheprojectorandtheWallMountUnit
falling and causing injury.
• Donotusebrokenparts.DoingsomayresultintheprojectorandtheWallMountUnit
falling and causing injury. If a part should break, consult your dealer.
• Donotlookintothemirrorwhentheprojectoristurnedon.Doingsocoulddamage
your eyesight.
• DonothangfromtheprojectorandtheWallMountUnit.Doingsomayresultinthe
projector and the Wall Mount Unit falling and causing injury. Be especially careful of
children.
• Donotuseadhesiveforthelockingscrews,lubricantagent,oilandsoonforthewall
adapter. Doing so may cause the material of the wall adapter to deteriorate and result
in the projector falling and causing injury.
Caution
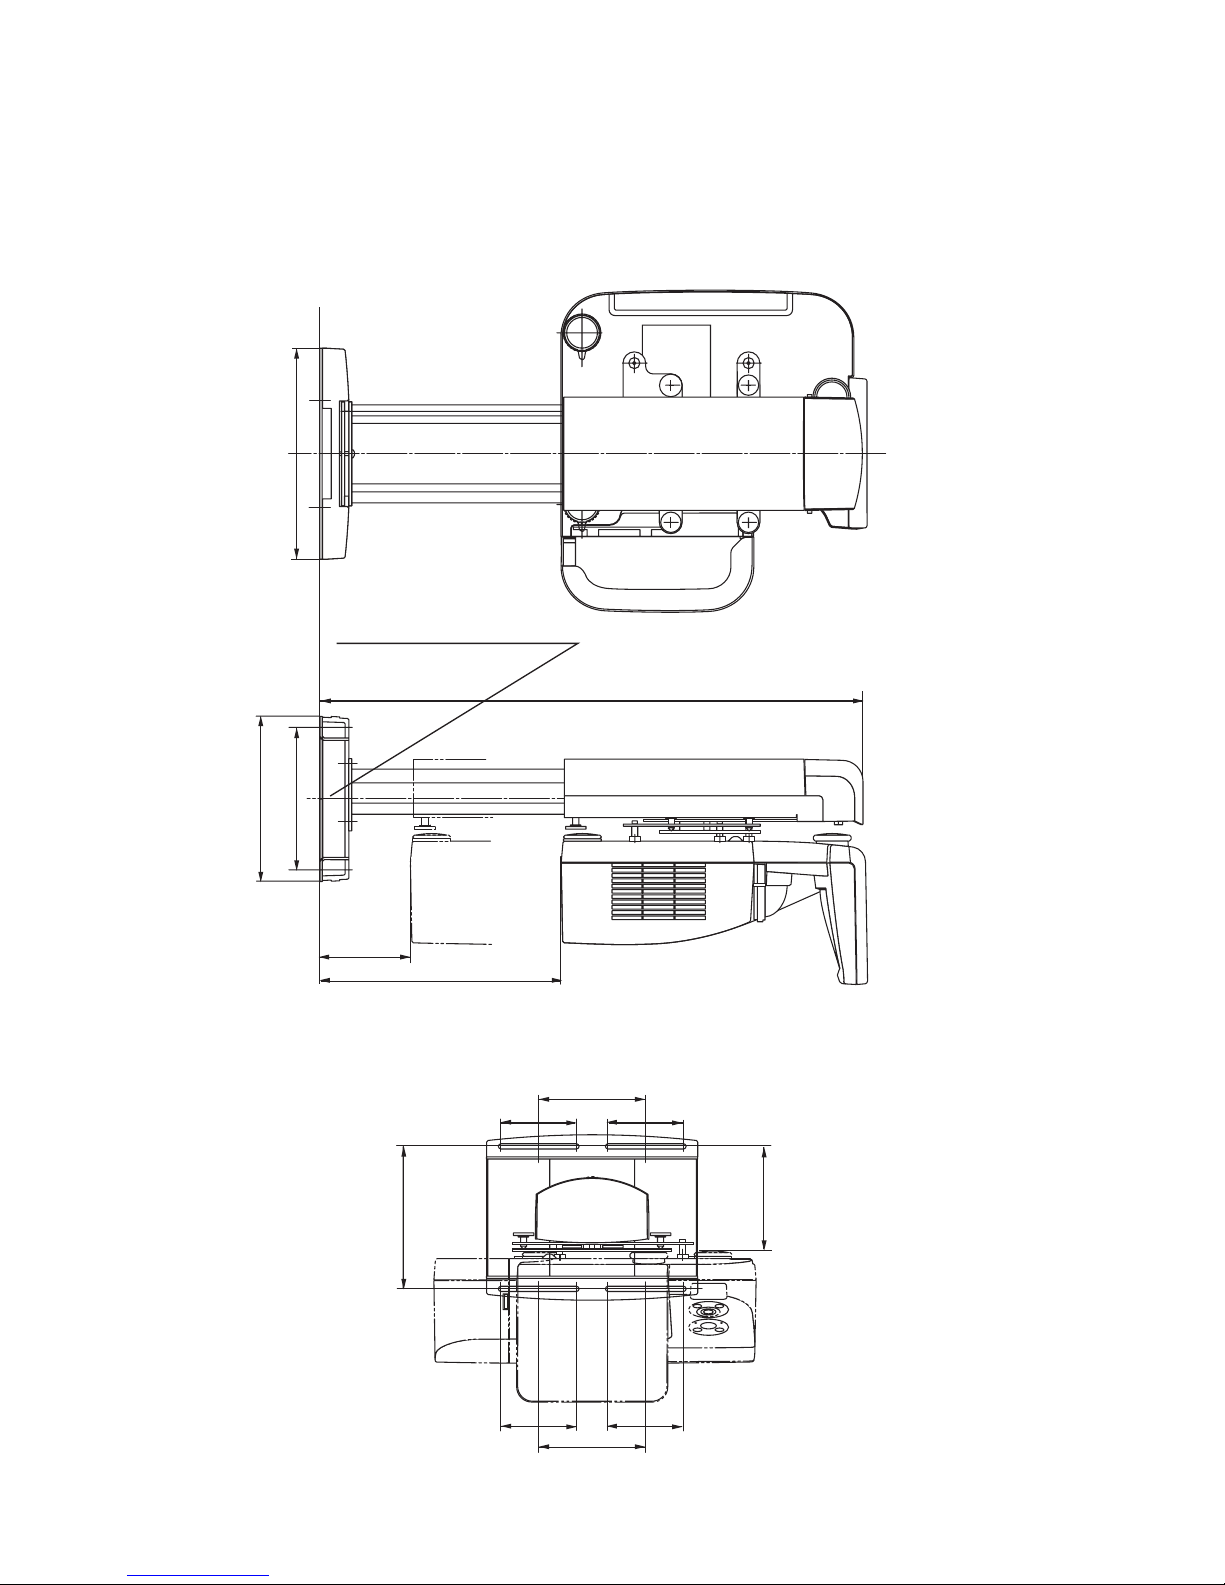
• Donotobstructtheprojector’sventilationholes.Doingsowillpreventthedissipation
of heat and may result in fire. In particular, do not use the projector in the following
ways:
installing the projector in a place such as wall and so on where ventilation is poor,
covering it, etc.
• Donotinstalltheprojectorinfrontoftheoutletsofanairconditionerorheaterorina
place exposed to significant vibrations. Doing so may result in fires and electric shock.
• Do notinstalltheprojectorinhumidordustyplacesorthose exposedtogreasy
smoke or steam (such as near cooking equipment or humidifiers). Doing so may result
in fires.
• Wheninstallingtheprojector,leavesufficientspacebetweenitandsurrounding
objects. Failure to do so will prevent the dissipation of heat and may result in fires.
Please:
• Avoidroomswithsignicantdust,humidity,greasysmoke,ortobaccosmoke.
Dirt will adhere to the optical parts such as mirrors, which will cause image quality to
deteriorate.
• Avoidplacesinwhichthescreenisexposedtodirectsunlightorilluminatedlight.
When surrounding light directly hits the screen, the image appears washed out and is difficult to
view.
• Avoidlocationsexposedtoparticularlyhighorlowtemperatures.
Doingsomayresultinbreakdown.(Fortheambientoperatingtemperature,seetheuser’s
manual included with the projector.)

ENG-4
ENG-5
Preparation
Packaged Parts
Please check the packaged items.
Wall adapter:1
Arm:1
Projector adapter:1
Wall plate:1 *1
M5 screws:4 *2
*1, *2:To be used when mounting the wall adapter in the North America region.
Cover (A, B):2 pairs
Arm cover:1
Plate (B):1
M4 screws:4
M3.5 screws:2
Hex wrench:1
Installation and Adjustment
Manual:1
Plate (A)

ENG-4
ENG-5
Vertical adjust/
Arm fixation knobs
Arm cover
Elongate hole for screw (or bolt)
(4 parts)
Covers (A, B)
Plate (A)
Arm fixation screw
Grooves for wiring
Arm
Tilt adjust knobs (4 parts)
Central axis
Wall adapter
Cover (B, A)
Projector
adapter
Projector fixation
plate Horizontal adjust screws
Horizontal fixation nut
Plate (B)
•
•
•
••
•
•
•
•
•
••
•
•
•
•
•
•
•
•••
Names of Parts

ENG-6
ENG-7
Dimensions of Parts: (unit: mm)
The dimensions of the positions of the wall fixation screws (bolts) of the wall adapter are
described.
142
100 100
142
100 100
189
90-190
189
219
120
320
280
Projector bottom surface
(including the feet)
533 (minimum) -733 (maximum)
The center of the wall adapter
(central axis)
Central axis
Projector posterior surface

ENG-6
ENG-7
Mounting the Projector
Preparations
1. Determine the installation location of the screen, and accordingly decide the
installation position of the wall mount unit.
Refertothesection"Installation"in the user’s manual included with the projectorfor more
information.
•Installationforslantedprojectionisnotpossible.Determinethepositionforfrontprojection.
2. Make sure that all conditions described in the section "Heed the Following"
on page ENG-2 of this manual are met.
•BecausetheU300X/U250X/U310W/U260Whavealargeopticalaxiselevationangle,a
slight shift in projection distance will have a large effect on the screen size and position. If
the projector angle is off, image distortion will increase.
1. Attach the projector adapter to the projector.
a
Remove the projector from its box and take off the plastic wrap.
b
Reattach the foam packing spacers to the projector and then turn the projector over.
Note: There are four screw holes on the bottom of the projector marked "MAX.M4x10". This
indication does not apply to the project adapter of this product.
b
(Note)

ENG-8
ENG-9
c
Align the projector adapter with the holes on the bottom of the projector and securely attach
the adapter with the four supplied screws (M4x20).
d
Loosen the vertical adjust/arm fixation knobs of the projector adapter.
Caution Do not try to attach the projector adapter without the foam packing spacers in
place. Otherwise the mirror section may be subject to excessive force, which can
lead to a shift in the projected image and cause serious damage.
Vertical adjust/arm fixation knobs
c
d
Warning
If screws other than the supplied ones
are used, the projector may be seriously
damaged, or the projector may fall and
cause injury. Be sure to use only the
supplied screws.
2.
Attach the wall adapter to the structural material of the wall.
To ensure a projected image without distortion, the center of the wall adapter and the center of
the screen should be aligned on a straight axis.
• Thewalladapterhasatop/bottomorientation.Besuretoattachitwithcorrectorientation.
Caution If the wall adapter is mounted with reversed top/bottom orientation, correct
installation is not possible.
• Thewalladaptercanbeadjustedhorizontallyoverarangeof±50mm.
Side with cutouts facing up
Side without cutouts facing down
Warning
Use only M6 (1/4 inch) screws or bolts (4 locations) to fix the wall adapter. If screws
or bolts other than M6 are used, the projector may fall and cause injury.

ENG-8
ENG-9
ba
3. Attach the arm to the wall adapter.
a Loosen the arm fixation screws (top and bottom) with the supplied hex wrench.
b Insert the arm plate (A) into the wall adapter from the top and tighten the screws (top and
bottom) near the center of the elongated hole.
* The covers (A) and (B) are to be attached after installation and adjustment are completed.
4.
Mount the projector assembled in step 1 on the arm.
Caution To do this, first remove the packing spacers from the projector. Then hold the
projector body with the help of a second person and insert it carefully into the arm.
Do not hold the projector by the cable cover or the mirror section, and do not touch
the mirror or lens.
a Insert the central axis of the projector adapter into the arm.
Cable cover
Mirror section
a
Plate(A)

ENG-10
ENG-11
b Use the two supplied M5.5x9.5 screws to securely attach the supplied plate (B) to the arm.
c Remove the cable cover of the projector.
b
c
Plate (B)
Warning
If plate (B) is not installed, the
projector may slide out of the
arm and fall off, which may
cause injury.

ENG-10
ENG-11
5. Cabling
a
The power cord and signal cables can be passed through the grooves for wiring on the left
and right side of the arm. This should be done before attaching the arm cover.
Take care not to squeeze the cables with the horizontal adjust screws.
This concludes the projector installation.

ENG-12
ENG-13
Adjusting the Projection Position
Preparations
Before adjusting
•Projectanimagefromtheprojector,thenrstusethefocusleveroftheprojectortoroughly
adjust the focus of the projected image.
Forinformationonhowtoprojectanimage,see“Installation”intheuser’smanualincluded
with the projector.
• Fromtheon-screenmenu,select"CeilingFront"for"Orientation"asthemethodofprojection.
1. Check the tilt adjust knobs.
Verify that the four tilt adjust knobs are all set to the same
adjustment height.
If the projector fixation plate is slanted, correct vertical
adjustment and horizontal adjustment cannot be performed.
Projector fixation plate
Knob adjustment height
2. Adjust the size of the projected image and the left/right tilt.
* The illustrations in this manual show the adjustment for an image with a 4:3 aspect ratio.
Connecting cables for screen and projector are omitted.
Adjust the size of the projected image and, if necessary, the tilt in clockwise or anticlockwise
direction.
aLoosen the vertical adjust/arm fixation knobs.
- Loosen the two knobs shown in black in the illustration.
bMove the projector back and forth to match the size of
the projected image to the screen.
To do this, grasp the projector firmly on both sides and
move it carefully.
Caution Do not grasp the mirror section. Otherwise
the mirror may come off or become
damaged.
- To adjust tilt in the left/right direction, proceed to step
c.
- If only size adjustment is to be performed, tighten the
two knobs shown in black in the illustration.
b
a

ENG-12
ENG-13
d
c
c Turn the left or right knob to adjust projector tilt in the
left or right direction.
- When the knob shown in black in the illustration
is tightened, the projector is rotated in the
counterclockwise direction.
d When the adjustment is complete, tighten the opposite
knob that is still loosened.
3. Adjust the horizontal tilt of the projector.
Theprojectoradapterallowsadjustmentoverarangeofapproximately±3degrees.
a Loosen the horizontal fixation nut (double nut) with a wrench.
b Loosen the horizontal adjust screws (left and right) with the supplied hex wrench.
- Loosen the two screws shown in black in the illustration.
c Make the adjustment by tightening the left or right screw until the top edge and bottom edge
of the image are parallel.
d When the adjustment is complete, tighten the opposite screw that is still loosened.
e
Tighten the horizontal fixation nut (double nut) with a wrench.
ae
d
b
c

ENG-14
ENG-15
4. Adjust the tilt.
Tilt adjustment is performed with the four adjustment knobs.
Front/rear tilt adjustment
Adjust together
Rotation axis
Adjust together
Rotation axis
Left/right tilt adjustment
Fine adjustment in same direction as for vertical adjustment
•Iftiltadjustmentachievedwiththeseknobsisnotsufcient,repeattheadjustmentprocessfrom
step 2 on page ENG-12.
•Duringadjustment,thepositionoftheprojectedimagemayshift.Insuchacase,loosenthewall
adapter and arm fixation screws and adjust the position.
This completes the adjustment.
Securely tighten all screws and adjustment knobs.

ENG-14
ENG-15
5.
Attach the covers to the projector adapter and the wall adapter.
a
Attach cover (A) (with hook) and cover (B) (with notch) to the upper side of the wall adapter.
Slide the two covers towards the center while pushing them down, as shown in the
illustration. The bottom of each cover will then engage with the screw heads of the wall
adapter. At the same time, the hook of cover (A) will enter the notch of cover (B), thereby
locking the covers.
b
On the bottom side of the wall adapter, reverse the positions of covers (A) and (B) and attach
them in the same way as described in a.
c
Attach the arm cover.
The cover is fixed when the left and right tabs engage with the notches on the projector
adapter.
d
Attach the cable cover of the projector.
Turn the knobs on both sides to fasten the cover.
a
d
b
c
a
b
Cover (A)
Cover (B)
Cover (A) should be at right
Cover (B) should be at left
Arm cover

ENG-16
Specifications
Product name: Wall mount unit
Model: NP01WK/NP01WK1
Adjustmentangle: Up-downangle±3°,left-rightangle±3°,inclinationangle±10°
Adjustmentwidth: Front-rear±100mm,left-right±50mm,up-down±50mm
External dimensions: 280 (W) x 541(D) x 219 (H) mm
Weight: Approx. 6.2kg
•Specicationsanddesignaresubjecttochangewithoutnotice.
Using the wall plate (NP01WK1 only)
The NP01WK1 is distributed in North America only.
Screw position dimensional drawing (unit: mm)
a Mount the supplied wall plate to the vertical frame of the wall.
bSecurely fasten the wall adapter to the wall plate using the four supplied screws. Be sure to
observe all precautions listed on page ENG-8.
404
202
140
90
55
160
Wall adapter fixation screw hole
4, dia. 5
Wall fixation screw hole
12, dia. 7
Cable pass-through hole
a
b

GER-1
Wandhalterung
NP01WK Installations- und Einstellungshandbuch
Vielen Dank, dass Sie sich für den Kauf dieser NEC Wandhalterung entschieden haben.
Bitte lesen dieses Installations- und Einstellungshandbuch sorgfältig durch, um den
korrekten Gebrauch zu gewährleisten.
Die Wandhalterung NP01WK ist ausschließlich für Projektor U300X/U250X/U310W/
U260W konzipiert und kann nicht für andere Projektoren verwendet werden.
Um den Projektor zu installieren, sind spezielle Fertigkeiten erforderlich.
Diese Arbeit sollte niemals durch den Kunden durchgeführt werden.
An den Händler und Installateur
Zur Gewährleistung der Sicherheit des Kunden bitten wir Sie, die
Tragfähigkeit des Montageortes mit äußerster Sorgfalt zu überprüfen,
um sicherzustellen, dass er dem Gewicht des Projektors und der
Montageelemente standhält.
INHALTSVERZEICHNIS
Bitte beachten Sie das Folgende ........................................GER-2
Vorbereitung.......................................................................GER-4
Packungsinhalt .........................................................GER-4
Bezeichnungen der Teile ...........................................GER-5
Abmessungen der Teile.............................................GER-6
Montage des Projektors......................................................GER-7
Einstellen der Position des Projektors ...............................GER-12
Technische Daten .............................................................GER-16

GER-2
GER-3
Bitte beachten Sie das Folgende
Symbol
Um einen sicheren und sachgemäßen Gebrauch des Produktes zu gewährleisten und Verletzungen
für Sie selbst und Andere sowie Sachschäden zu verhüten, werden in diesem „Installations- und
Einstellungshandbuch“ verschiedene Symbole verwendet. Die Symbole und Bedeutungen sind
wie folgt. Bitte lesen Sie dieses Handbuch, nachdem Sie sichergestellt haben, dass Sie die Inhalte
vollständig verstanden haben.
Unsachgemäße Handhabung und Nichtbeachtung dieses Zeichens kann
körperliche Schäden wie Tod, schwere Verletzungen usw. zur Folge haben.
Unsachgemäße Handhabung und Nichtbeachtung dieses Zeichens kann körperliche
Schäden und Beschädigung der Umgebungseinrichtung zur Folge haben.
Warnung
Warnung
Vorsicht
Symbolbeispiele:
Dieses Symbol ruft Sie zur Vorsicht auf (einschließlich Warnungen)
Konkrete Vorsichtshinweise werden in den Abbildungen näher angegeben.
Dieses Symbol drückt verbotene Handlungen aus
Konkrete Verbote werden in den Abbildungen näher angegeben.
Dieses Symbol drückt vorgeschriebene Handlungen aus
Konkrete Anweisungen werden in den Abbildungen näher angegeben.
• Stellen Sie sicher, dass Sie den Projektor so installieren und die Projektionsposition so
einstellen, wie es in diesem Handbuch erklärt ist. Der Projektor könnte sonst, wenn er
falsch installiert und eingestellt wird, herunterfallen und Verletzungen zur Folge haben.
• Installieren Sie den Projektor an einem Ort bzw. befestigen Sie ihn so, dass eine aus-
reichende Tragfähigkeit für das gemeinsame Gewicht (etwa 12,7 kg) des Projektors
(etwa 6,5 kg), die Wandhalterung (etwa 6,2 kg) usw. über einen ausgedehnten Zei-
traum gewährleistet ist, damit der Projektor nicht herunterfallen sowie auch Erdbeben
standhalten kann. Durch eine unzureichende Tragfähigkeit bzw. Befestigung könnte
der Projektor herunterfallen und Verletzungen verursachen.
Stellen Sie sicher, dass Sie die folgenden Sicherheitsmaßnahmen einhalten:
* Verwenden Sie M6 (1/4 Zoll) für die Wandbefestigungsbolzen und die Schrauben für
den Wandadapter.
* Verwenden Sie eine Steckdose für die Stromversorgung des Projektors. Schließen
Sie die Lampenleitung nicht direkt an, da dies gefährlich ist. Verwenden Sie außer-
dem eine leicht zugängliche Steckdose, damit Sie den Netzstecker anschließen und
trennen können.
• Montage an einer Holzwand
Stellen Sie sicher, dass die Last an einem Stützpfeiler oder an robustem Baumaterial
montiert wird. Falls die Tragfähigkeit des Baumaterials usw. unzureichend ist, verstärken
Sie es bitte. Montieren Sie nicht an Wandoberflächenmaterialien, Futterholzleisten usw.
• Montage an einer Betonwand
Verwenden Sie einen im Handel erhältlichen Dübel M6 (1/4 Zoll), Einschraubmuttern
und Ähnliches, die die Last des Projektors tragen können.

GER-2
GER-3
Warnung
• Installieren Sie nicht an Orten, die ständiger Erschütterung ausgesetzt sind.
Ausgedehnte Erschütterungen können dazu führen, dass sich die Schrauben lösen
und dadurch die Wandhalterung und der Projektor herunterfallen und Verletzungen
verursachen. Außerdem kann es zur Beschädigung des Projektors führen.
• Sorgen Sie dafür, die Bolzen, Schrauben und Einstellknöpfe sicher anzuziehen, um die
Sicherheit zu gewährleisten. Bei Nichtbeachtung könnte der Projektor herunterfallen
und Verletzungen verursachen.
• Modifizieren Sie keinerlei Teile. Dadurch könnten der Projektor und die Wandhalterung
herunterfallen und Verletzungen verursachen.
• Verwenden Sie keine defekten Teile. Dadurch könnten der Projektor und die
Wandhalterung herunterfallen und Verletzungen verursachen. Falls ein Teil beschädigt
werden sollte, wenden Sie sich bitte an Ihren Händler.
• Blicken Sie nicht in den Spiegel, wenn der Projektor eingeschaltet wird. Dadurch
könnte Ihr Augenlicht geschädigt werden.
• Hängen Sie sich nicht an den Projektor und die Wandhalterung. Dadurch könnten der
Projektor und die Wandhalterung herunterfallen und Verletzungen verursachen. Geben
Sie besonders auf Kinder Acht.
• Verwenden Sie keinen Klebstoff für die Feststellschrauben und kein Schmiermittel, Öl
usw. für den Wandadapter. Dadurch könnte das Material des Wandadapters verfallen,
was dazu führen kann, dass der Projektor und die Wandhalterung herunterfallen und
Verletzungen verursachen.
Vorsicht
•Verstellen Sie die Belüftungsöffnungen des Projektors nicht. Dadurch wird die
Wärmeableitung behindert, was zu einem Feuer führen könnte. Verwenden Sie den
Projektor vor allem nicht auf die folgende Weise:
Installieren des Projektors an einem Platz, wie z. B. an einer Wand usw., wo die
Belüftung mangelhaft ist, der Projektor bedeckt wird usw.
• Installieren Sie den Projektor nicht vor den Auslässen einer Klimaanlage oder einer
Heizung oder an einem Platz, der erheblichen Erschütterungen ausgesetzt ist. Dies
könnte zu Feuer und Stromschlag führen.
• Installieren Sie den Projektor nicht an feuchten oder staubigen Plätzen oder solchen,
die fettigem Rauch oder Dampf ausgesetzt sind (wie beispielsweise in der Nähe von
Kochgeräten oder Luftbefeuchtern). Dadurch könnten Brände herbeigeführt werden.
• Wenn Sie den Projektor installieren, lassen Sie ausreichend Raum zwischen ihm und
umgebenden Gegenständen. Anderenfalls wird die Wärmeableitung behindert, was
zu Bränden führen könnte.
Bitte:
• Vermeiden Sie Räume mit erheblichem Staub, Luftfeuchtigkeit, fettigem Rauch oder Tabakrauch.
Der Schmutz haftet an den optischen Teilen, wie z. B. den Spiegeln, was zur Verschlechterung der
Bildqualität führt.
•
Vermeiden Sie Plätze, an denen der Bildschirm direktem Sonnenlicht oder Lichteinstrahlung ausgesetzt ist.
Wenn das Umgebungslicht direkt auf den Bildschirm trifft, erscheint das Bild ausgewaschen und ist
schwer zu sehen.
• Vermeiden Sie Orte, die besonders hohen oder niedrigen Temperaturen ausgesetzt sind.
Dies könnte zu Betriebsausfällen führen. (Weitere Informationen zur Betriebsumgebungstemperatur finden
Sie im dem Projektor beiliegenden Benutzerhandbuch.)

GER-4
GER-5
Vorbereitung
Packungsinhalt
Bitte überprüfen Sie die in der Verpackung enthaltenen Teile.
Wandadapter: 1
Arm: 1
Projektoradapter: 1
Abdeckung (A, B): 2 Paar
Armabdeckung: 1
Platte (B): 1
M4-Schrauben: 4
M3,5-Schrauben: 2
Sechskantschlüssel: 1
Installations- und
Einstellungshandbuch: 1
Platte (A)
This manual suits for next models
5
Table of contents
Languages:
Other NEC Projector Accessories manuals