NEO ION 740Z User manual

P. 1
- Neo ION 740Z
USER MANUAL / MANUAL DE USUARIO
PLEASE READ THE INSTRUCTIONS CAREFULLY BEFORE USE
POR FAVOR LEA LAS INSTRUCCIÓNES ANTES DE USAR
ION 740Z
Moving head powered by 7 x 4-in-1
OSRAM® 40W LEDs

P. 2
Neo ION 740Z -
1. OVERVIEW
English version
ION 740z
Moving head powered by 7 x 4-in-1 OSRAM® 40W LEDs
ION 740z is a versatile moving head powered by 7
x 4-in-1 OSRAM® 40W LEDs with a variable zoom that
goes from 4º to 36º. Versatility and power output get
new meanings thanks to the enormous action ca-
pacity brought by its beam angle variation, the pixel
by pixel control and it’s outstanding lighting perfor-
mance, with 43,000 lux @ 15 . (4º). This moving head
is equipped with quad-color LEDs, enabling a smooth
RGBW mix with no multicolor shadows and assuring a
real long life performance. Ion 740Z comes also with
preset programs on 2700K, 3200K, 4200K, 5600K and
8000K color temperatures and it’s RDM-compatible
allowing the user to monitor and address the unit re-
motely.
Source & Optics
• Light Source: 7 x 4-in-1 OSRAM® 40W LEDs
• LEDs life: 60,000 hours
• Beam angle: 4° to 36°
Photometric data
• Luminous ux: 7000 lumen
• 4º beam angle: 43000 lux @ 3m (10 .)
• 36º beam angle: 2400 lux @ 3m (10 .)
Effects & Functions
• Pixel by Pixel control
• Dimmer: Full range 0-100%
• Strobe eect
• Quad-color LED technology: Smooth RGBW mix
with no multi colored shadows
• Vivid, saturated and uniform colors
• Color temperature presets: 2700K, 3200K, 4200K,
5600K & 8000K
Control
• DMX Channels: 19/21/22/51
• Advanced RDM Function
• Indicated temperature for base, arm & lamp
• IC backup communication
• RDM read voltage, current power consump-
tion of the lamp
• Soware update vía DMX
• Fan speed based on temperature
Movement
• Pan: 540° / 630º
• Tilt: 265°
• 3-phase motor
• 16-bit resolution
• Auto repositioning
Electrical
• Input voltage range: 100–240V, 50-60Hz
• Power Supply: Automatic range
• Max. power consumption: 265W
Physical
• DMX Connectors: 2 XLR connectors (XLR-3 In/
Out) & 2 RJ45 connectors (Ethernet In/Out)
• Power supply connectors: PowerCON® In/Out
• 2.4 inches LCD graphi
• c display
• Dimensions: 324x250x456 mm. / 12.7x9.8x17.9
in.
• Weight: 12 Kg. / 26.4 Lbs
• Dimensions: 264.5x168x368 mm. /
10.4x6.6x14.4 in.
• Weight: 5.1 Kg. / 11 Lbs.

P. 3
- Neo ION 740Z
English version
For your own safety, please read this user manu-
al carefully before you initially start-up.
SAFETY WARNING
• All maintenance must be carried out by a quali-
ed electrician.
• A minimum distance of 0.5m must be main-
tained between the equipment and a combus-
tible surface.
• The product must always be operated in a well
ventilated area.
• DO NOT stare directly into the light source.
• Always disconnect the power before carrying
out any maintenance.
• The earth must always be connected to the
ground.
• Ensure that all parts of the equipment are kept
clean and free of dust.
IMPORTANT
Every person involved with the installation,
operation and maintenance of this device has to
be qualied.
• Follow the instructions of this manual.
• Consider this manual to be part of the total
product.
• Keep this manual for the entire service life of
the product.
• Pass this manual on to every further owner or
user of the product
• Download the latest version of the user manual
from the Internet.
OPERATING DETERMINATIONS
• This product is only allowed to be operated
with an alternating voltage of 100-240 V, 50/60
Hz.
• This device is designed for professional use, e.g.
on stages, in clubs, bars, theatres etc.
• Do not shake the device. Avoid brute force
when installing or operating the device.
• When choosing the installation-spot, please
make sure that the device is not exposed to
extreme heat, moisture or dust. There should
not be any cables lying around. Please make
sure that the unit cannot be touched or
bumped.
• When using smoke machines, make sure
that the device is never exposed to the direct
smoke jet and is installed in a distance of 0.5
meters between smoke machine and device.
• The ambient temperature must always be
between -15° C and +45° C. Keep away from
direct insulation (particularly in cars) and
heaters.
• Never use the device during thunderstorms.
Over voltage could destroy the device. Always
disconnect the device during thunderstorms.
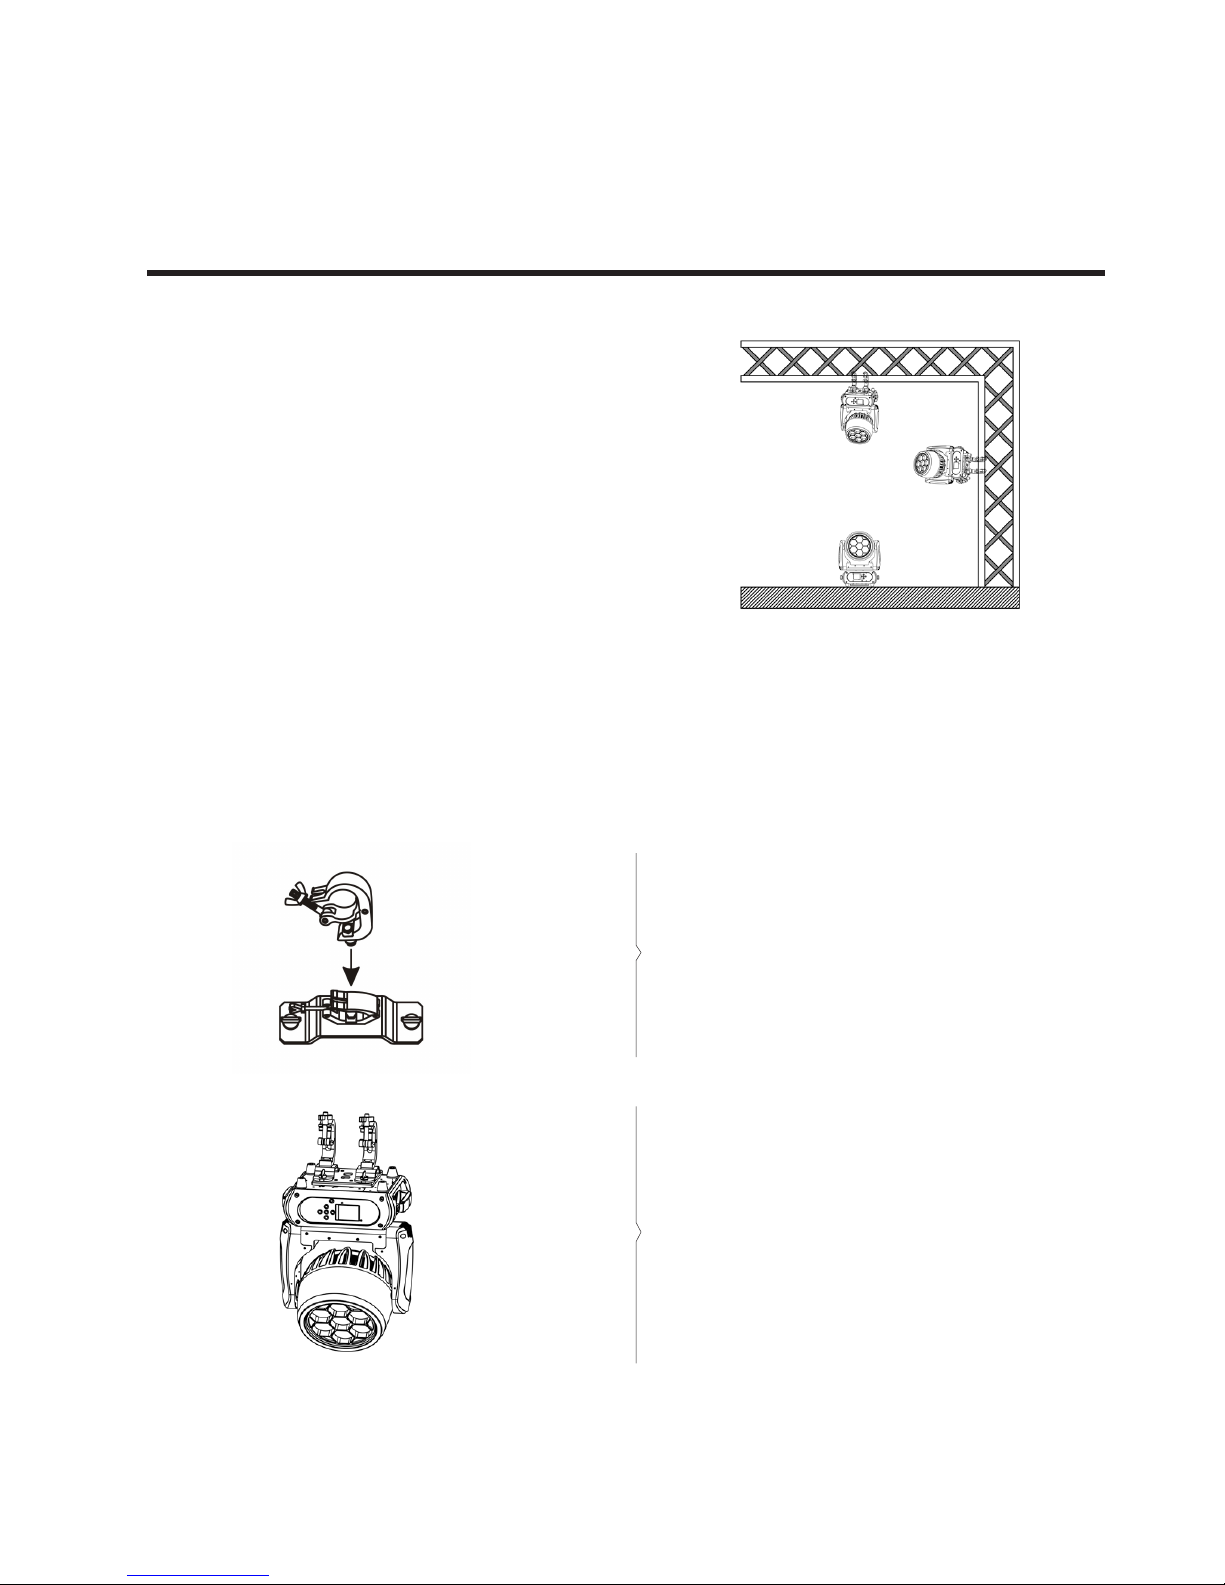
• The device must only be installed on a
non-ammable surface. In order to safeguard
suicient ventilation, leave 50 cm of free
space around the device.
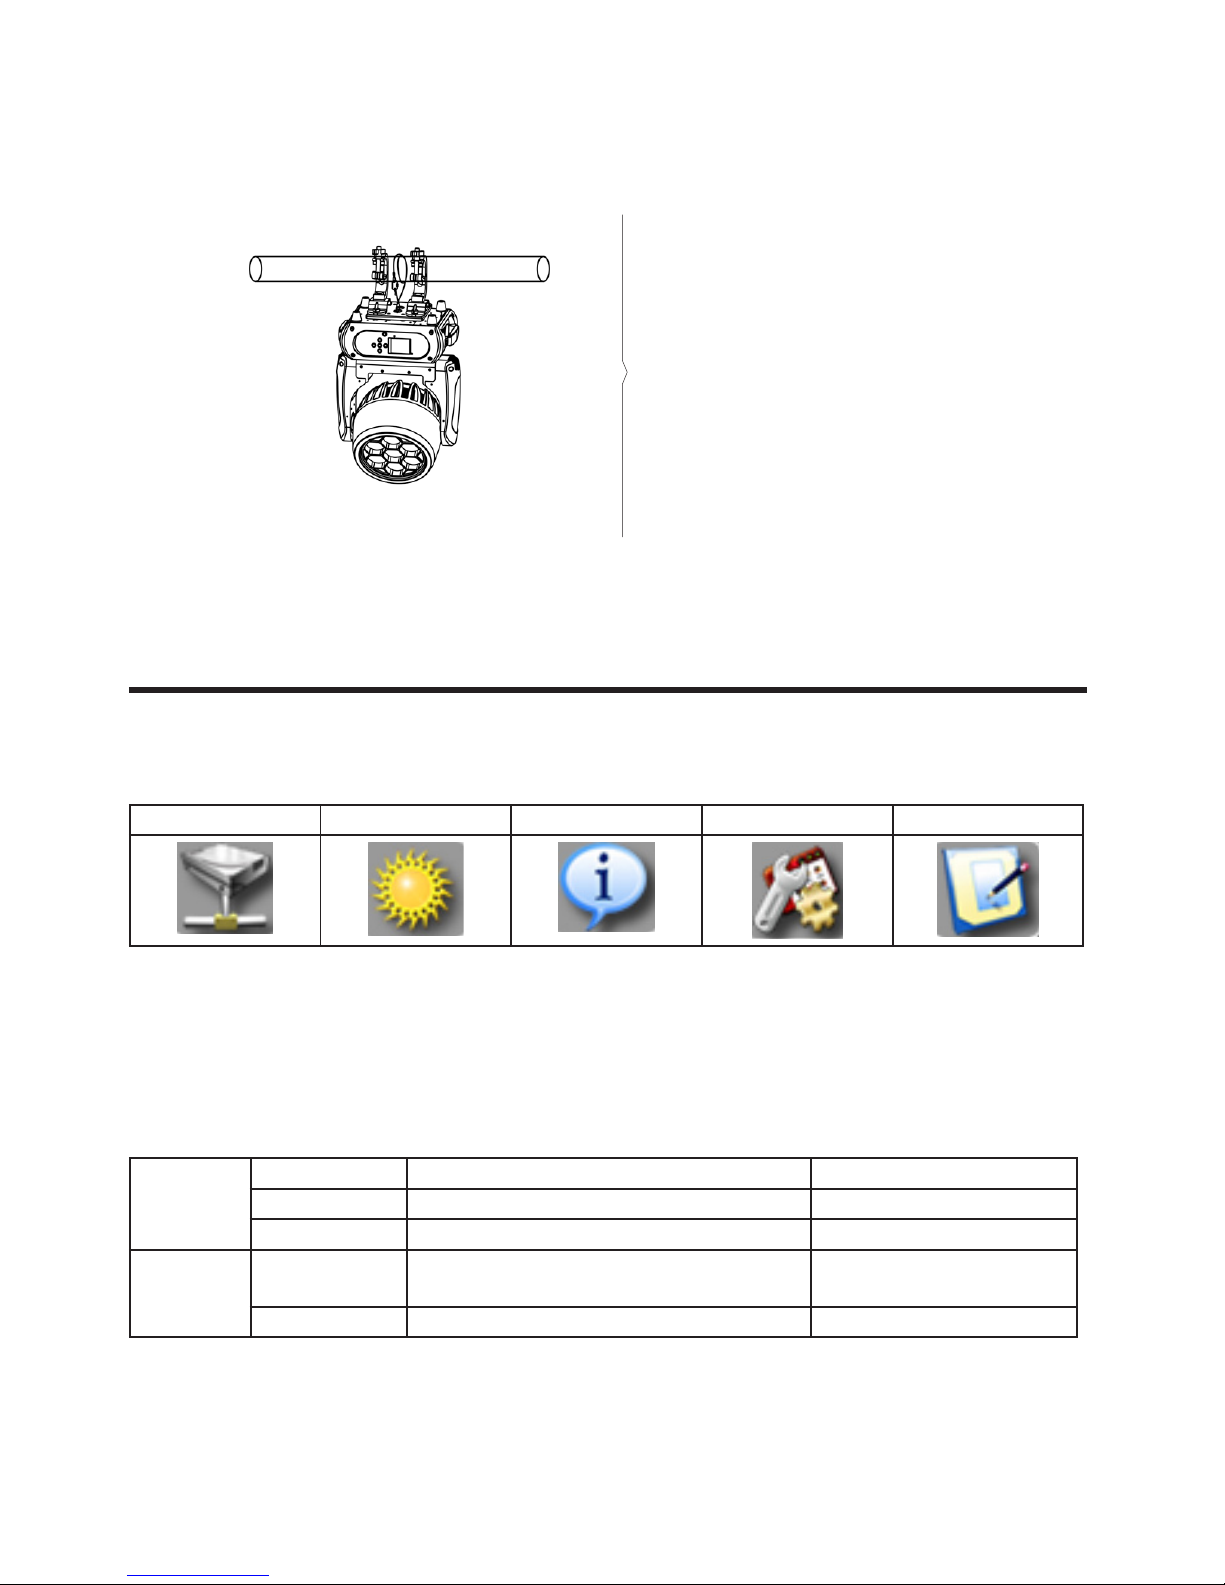
• For overhead use (mounting height >100 cm),
always x the xture with an appropriate
safety-rope. Fix the safety-rope at the correct
xation points only. The safety-rope must
never be xed at the transport handles!
• Only operate the xture aer having checked
that the housing is rmly closed and all
screws are tightly fastened.
• Operate the device only aer having become
familiarized with its functions. Do not permit
operation by persons not qualied for operat-
ing the device. Most damages are the result of
unprofessional operation!
• Please consider that unauthorized modi-
cations on the device are forbidden due to
safety reasons!
• Never remove the serial barcode from the
device as this would make the guarantee void.

P. 4
Neo ION 740Z -
English version
Description of the Device
1. Project lens
2. Head
3. Arm
4. Base
5. Display
6. Foot stand
7. Operation button
8. Handel
1
2
3
4
5
6
7
8
9. Wireless indicator
10. Mic
11. Le button
12. Battery indicator
13. Up button
14. Down button
15. Enter button
16. Right button
17. Ethernet out
18. 5-pin DMX in
19. Ethernet in
20. 5-pin DMX out
21. Powercon in
22. Fuse
910 11 12
17
13
18
14
19
15
20
16
21 22
Before unpack the xture, pls make sure that the
packing is in good condition, following items will be
found in the box:
• The xture
• This users guide
• 3m DMX cable
• 1.5m power cable with powercon
• Omega bracket for hanging installation
• Safety chain

P. 5
- Neo ION 740Z
English version
Before operate this unit, please carefully read this users guide and keep if needed in
future. It’s necessary to respect following rules.
The disposal of the device aer lifecycle could damage the environment, need to take
it to special company for recycling or return to authorized dealer.
The products referred to in this manual conform to the Eur opean Community Direc-
tives and are therefore marked with CE logo.
Keep this device away from children and unauthorized users, the manufacturer will
not take responsibility for the damage due to any disregard of the information provid-
ed in this manual and wrong operation.
Before operate the device, pls make sure the xture is in good housing, ensure pan
and tilt can rotate in its complete range.
Pls make sure minimal 0.5m distance need to kept between the xture to any am-
mable material.
The device can only run with 100-240v voltage, 50/60Hz power, don’t connect to any
other wrong power. Disconnect the device from main power before open the shield or
maintenance.
The device is designed only for indoor usage, pls keep it away from moisture. Do not
expose the device under the sun or directly to any other lighting source.
Never look directly into the projecting lens when the xture is power on, the light may
trigger epileptic seizures in photosensitive persons or persons with epilepsy. Espe-
cially at beam eect, extreme caution and observance of these safety instructions is
mandatory.
Don’t put or install the device on a surface that subject to vibration
or bumps.
2. SAFETY AND MAINTENANCE INFORMATION
Safety info
--0.5m

P. 6
Neo ION 740Z -
Maintenance
Ta=45°C The device is supposed to work in the temperate range -15° C and +45° C, do not use
the device when the temperate exceed this range.
The lens, shield need to be replaced when obviously broken, never use the device
when the shield is not completed closed.
Safety I class device, need to be earth connected.
When the xture is hanged overhead, the safety rope must be xed to the bottom of
the device to the appropriate xing point.
Always carry the device by the handles, do not take the head or arm directly for trans-
portation.
• Operation only allowed to qualied person,
damages due to unprofessional operation or re-
move of any parts inside will not be considered
in warranty service. There are no serviceable
parts inside the device or package, service only
leaves to authorized dealers.
• Never allow the optical components contact
with oil, fat or any other liquid.
• A regular clearance of the device is needed for
long-term usage, this is very helpful to maintain
the lifetime and brightness need to use a so
and lint-free cloth to clean the optical system,
fan and air owing tunnel.
English version

P. 7
- Neo ION 740Z
English version
Replacement of the fuse
Trouble Shooting
Need to replace with same type and rating, which
originally installed in the device.
Step One: Unplug power cable from main power.
Step Two: Unscrew the fuse holder out of the hous-
ing with a screwdriver.
Step Three: Remove the broken fuse and replace
with an exact same type of new fuse.
Step Four: Insert the fuse holder back to the hous-
ing and screw tight and reconnect power.
Problems Possible reasons Checking or solutions
Device not
power up
Powercon or power cable damaged Change a good power cable to try
Faulty power supply Replace new power supply
Pan/Tilt error
or vibrate
Faulty Pan/Tilt PCB Replace PT001 PCB
Faulty opto sensor Replace opto sensor OP001
Cable loosen Check the cable connect to OP001
LED o
Temperature protection Check the temperature from menu
Fan not working Check the fan speed info from menu
Faulty LED Replace new LED
Dimmer and strobe set at 0 Set dimmer and strobe channel at 255
Faulty power supply Replace new power supply
Device not response
to DMX
Faulty communication IC Replace the IC with back-up one in the
display PCB
Faulty display PCB Replace new display PCB
Wrong DMX addressing Check the address and setting
Faulty DMX cable Change to a good DMX cable

P. 8
Neo ION 740Z -
3. INSTALLATION
The device could be either put on a solid and even
Surface, or mounted upside down or sideways like
le picture.
The mounting place must be suicient stable and
be able to support a weight of 10 times of the unit’s
weight. When the xture is hanged, always addi-
tionally secure the device with the safety chain,
fasten the safety rope at a suitable position so that
the maximum fall of the projector will be 20 cm.
How to do mounting installation.
Step two: Install the clamp and bracket on the
bottom of panel, fasten the quick-locks;
Step one: Installation the clamp onto the
omega bracket;
English version

P. 9
- Neo ION 740Z
English version
4. CONTROL MENU
Meaning of the icon in menu
Default setting shadowed. mark with 1 can be basic
reloaded, 2 be program reloaded, 3 can be private
reloaded.
Step three: Install the whole device onto
appropriate truss and fasten the clamps, tight
the safety rope with the truss or other xing
point at a suitable position that drop down
distance not exceed 20 cm.
Connect Light Infomation Set Program
Menu tree
Connect
DMX Address 1XXX DMX address setting
Wireless 1(Wireless Module) Wireless Enabled
Artnet 1(Only Artnet Module) Artnet Enabled
Light
Max
Temperature 1
80~139°C /176~282°F Lamp o if temperature con-
tinuously over for 2minutes
Lamp Adjust 1PAN Adjust value of channel

P. 1 0
Neo ION 740Z -
English version
Info
Time Info.
Current XXXX (Hours)
Fixture Life XXXX (Hours)
Lamp Life XXXX (Hours)
Fixture boot time
Fixture total run time
Lamp total run time
Lamp Info.
Voltage
Current
Power
HID Lamp Information
Temperature Near Lamp Temp (depends on xture) Temperature Sensors
Fans Speed Near Lamp Fan (depends on xture) Fan speed Sensors
Channel Value PAN Display value of channel
Error Message Pan, Tilt Error channels
Fixture Model xxxxxxxxxxxx Display model brand and
model
Soware Ver 1U01 V1.0.00 Version of each IC
Set
Reset All
Pan&Tilt
:
Reset all
Reset Pan&Tilt
:
Movment
Pan Reverse 1
Tilt Reverse 1
Pan Degree 1
Encoders 1
Pan/Tilt Mode 1
ON/OFF
ON/OFF
630/540
ON/OFF
Stand/Smooth
Pan Reverse
Tilt Reverse
Choose Pan Degree
Encoder wheel on/o
Choose pan/tilt mode
UI Set
Mic Sens. 3
No Signal 1
Temperature.
C/F 1
Fans Mode 1
Hibernation 1
Backlight 1
Flip Display 1
Display Bright 3
Brand Show 1
Key Lock 1
Language 3
0~99%,60%
Close/Hold/Auto/Music
Fahrenheit /Celsius
Auto Speed /High Speed
OFF, 01M~99M, 15M
OFF, 01M~99M, 15M
02~60m 02m
ON/OFF
00~31 10
ON/OFF
ON/OFF
En/Fr/Sp/
Sensitivity of Mic
Mode when no signal
Temperature at °C/°F
Fans mode
Sleeping mode
Show backlight time
Display 180°reverse
Display 180°reverse
Display Brightness
Show brand or not
Key lock on/o
Language Select
Fixture Set Theater Mode ON/OFF Theater Mode
Users
User Mode 1Standard
Extended
:
User
Standard mode
Extended mode
:
User program mode
Edit User 3Max Channel = XX
PAN = CH01
:
Edit users mode

P. 11
- Neo ION 740Z
English version
Calibration 3
-Password-
Pan
:
=XXX
=XXX
:
Password: 050
Calibrate channel value
Fixture ID 3
Name
-Password-
PID Code
Name
Password: 050
Set PID of RDM
Wireless Set 1
(Wireless
Module)
DMX On Cable
Reset Connect
ON/OFF
ON/OFF
DMX Send Out
Reset Connect
Ethernet Set 3
(Only Artnet
Module)
IP Address
IP Mask
Universe
DMX On Cable
2.x.x.x
255.0.0.0
0
ON/OFF
Ethernet Set
(Only Artnet Module)
Reload Default
Basic Reload(1)
Program Reload(2)
---Password---
Private Reload(3)
All Reload
Update Fixture
ON/OFF
ON/OFF
XXX
ON/OFF
ON/OFF
ON/OFF
Basic Reload
Program Reload
Password: 050
Private Reload
All Reload
Soware upgrade
Program
Play 1
DMX Receive
Slave Receive
Sequence
Music
Slave Receive 1,2,3
Master / Alone
Master / Alone
DMX Receive
Choose slave position
Run Sequence
Music mode
Select Chase 2
Chase Part 1
Chase Part 2
Chase Part 3
Chase 1 ~ 8 Chase 1
Chase 1 ~ 8 Chase 2
Chase 1 ~ 8 Chase 3
Select and run auto program
Edit Chase 2
Chase 1
:
Chase 8
Chase Test
Step 01
Step 64
=SCxxx
=SCxxx
Test
Beginning scene
Ending scene
Edit Scenes 2
Edit Scene 001
~ Edit Scene 250
Pan,Tilt,……
--Fade Time--
--Secne Time--
D
=xxx
=xxx
=xxx
Input manual scene
Modify manually fading time
Modify manually scene time
Input scene from exterior
controller
Scenes Record ScXX=>ScXX Auto Input scenes

P. 12
Neo ION 740Z -
5. DMX CONNECTION AND DMX PROTOCOL
The device is controlled by universal DMX 512 pro-
tocol, DMX address is the start channel used to re-
ceive instructions from the external controller. For
independent control, each xture must be assigned
its unique address control channels. For example,
this device has four channel modes: 22/51/19/21,
if we set the mode at standard 22 channels mode,
and there are several models need to be inde-
pendently controlled, we just simply address rst
xture at 1, and second xture at 23, third one at
45, etc. If the devices have the same address, they
will behave synchronically.
DMX addressing is limited, don’t set the address so
high that without enough control channels for the
xtures. Display is ashing when no DMX signal is
received.
This device is equipped with 3-pins DMX in and
out sockets only. Pin1: GND, Pin2: SIG (-), PIN3: SIG
(+), Pin4: N.A., Pin5: N.A.
The termination is prepared by soldering a 120Ω
resistor between pins 2 and 3
DMX addressing
Connection: use DMX cable with 5 pin XLR-plugs
to connect the controller with the xture or one
xture with another.
English version

P. 13
- Neo ION 740Z
DMX chart
English version
Channel Name Function Min DMX Max DMX
St Ex1 Ba1 Ba2
1 1 1 1 Pan Pan Coarse 0255
2 2 2 Pan ne Pan Fine 0 255
3 3 2 3 Tilt Tilt Coarse 0255
4 4 4 Tilt ne Tilt Fine 0255
5 5 3 5 Movment Speed Fastest to Slowest 0255
6 Movment
Function
Normal 015
Movement With Backout 16 31
TBD 32 255
6 7 Shutter Function
Normal Shutter Functions 0 15
Pulse-eect Forward 16 31
Pulse-eect Reverse 32 47
Random Strobe 48 63
TBD 64 255
7 8 Shutter
Normal Shutter Functions
Close 031
Strobe Rate (slow to fast) 32 223
Open 224 255
Pulse-eect Forward
Close 031
Strobe Rate (slow to fast) 32 223
Open 224 255
Pulse-eect Reverse
Close 031
Strobe Rate (slow to fast) 32 223
Open 224 255
Random Strobe
Close 031
Strobe Rate (slow to fast) 32 223
Open 224 255
4 6 Shutter Shutter closed 031
No function (shutter open) 32 63
Strobe eect slow to fast 64 95
No function (shutter open) 96 127
Pulse-eect in sequences 128 159

P. 14
Neo ION 740Z -
No function (shutter open) 160 191
Random strobe eect slow to fast 192 223
No function (shutter open) 224 255
8 9 5 7 Dimmer Dimmer (0->100%) 0255
910 6 8 Virtual Color
Function
On Function 0 15
CTC Function 16 31
Forward Spin 32 47
Reverse Spin 48 63
Continuous 64 79
Color Bounce 80 111
TBD 112 255
811 7 9 Virtual Color1
CTC Function
Colour Temperature Correction
2000K->2700K
0223
White 3200K 224 231
White 4200K 232 239
White 5600K 240 247
White 8000K 248 255
Forward Spin
Rainbow Eect (Slow->Fast) 0255
Reverse Spin
Rainbow Eect (Slow->Fast) 0255
Continuous & Color Bounce
Black 0 0
Red 1 1
Green 2 2
Blue 3 3
White 4 4
Red=0, Green->up,Blue=full,White=0 546
Red=0, Green=full,-
Blue->down,White=0
47 88
Red->up, Green=full,Blue=0,White=0 89 130
Red=full, Green->down,-
Blue=0,White=0
131 172
Red=full, Green=0,Blue->up,White=0 173 214
Red->down, Green=0,Blue=-
full,White=0
215 255
English version

P. 15
- Neo ION 740Z
11 12 810 Virtual Color 2
(Only On Color
Bounce)
Color Bounce
Black 0 0
Red 1 1
Green 2 2
Blue 3 3
White 4 4
Red=0, Green->up,Blue=full,White=0 546
Red=0, Green=full,-
Blue->down,White=0
47 88
Red->up, Green=full,Blue=0,White=0 89 130
Red=full, Green->down,-
Blue=0,White=0
131 172
Red=full, Green=0,Blue->up,White=0 173 214
Red->down, Green=0,Blue=-
full,White=0
215 255
10 13 911 Red-All Red 0->100% 0255
11 14 10 12 Green-All Green 0->100% 0255
12 15 11 13 Blue-All Blue 0->100% 0255
13 16 12 14 White-All White 0->100% 0255
14 17 13 15 Zoom Big angle -> small angle 0255
15 18 14 16 Foreground No Function 0 15
Foreground Color 16 255
16 19 15 17 Background No Function 0 15
Background color 16 255
17 20 16 18 Pattern
On Pattern 0 15
Pattern control 16 31
Pattern Eect 1~14 32 255
18 21 17 19 Pattern Speed
Pattern control
Picture Eect 1-250 3252
Pattern Eect
Slow-> Fast 0255
21 22 18 20 Dimmer Fade 0->100% 0255
23 Red 1 Red 0->100% 0255
24 Green 1 Green 0->100% 0255
25 Blue 1 Blue 0->100% 0255
26 White 1 White 0->100% 0255
47 Red 7 Red 0->100% 0255
English version

P. 1 6
Neo ION 740Z -
English version
48 Green 7 Green 0->100% 0255
49 Blue 7 Blue 0->100% 0255
50 White 7 White 0->100% 0255
22 51 19 21 Control
Normal 0 7
Reset All 815
Pan&Tilt Reset 16 23
TBD 24 47
Other Reset 48 55
Display O 56 63
Display On 64 71
TBD 72 79
TBD 80 87
Hibernation 88 95
TBD 96 255

P. 17
- Neo ION 740Z
6. UNIQUE FEATURES
• RDM, stand for “Remote Device Management”,
with this function, users can realize remote
control of the device, such as remotely chang-
ing DMX address, reverse pan/tilt setting, check
a lot of useful information such as temperature,
power consumption, fan speed. Etc. Every
single device has a unique RDM code before le
factory to distinguish from each other, usually
not suggest users change this code freely.
• Soware upgrade function via DMX cable, if
there is any new rmware for this device come
out, it can be upgraded simply via a soware
upgrade box, no need to change any mechan-
ical parts. The upgrade box is not included in
the package, if need any further assistance pls
just contact authorized dealers.
• Hibernation, the device will enter sleeping
mode if activated aer a period of disconnect-
ing DMX signal to save the power consump-
tion, and will return immediately as soon as
the DMX signal is sent again.
• Display back-up communication IC, there is
a back-up communication IC installed in the
display PCB, so users could replace at once
if the working one is broken, no need to wait
long time from service.
• Display ip, by press up and down button for
more than 3 seconds, the display will ip auto-
matically, this function is useful to read menu
conveniently when device is hanged.
7. DIMENSIONS DRAWING
English version

P. 18
Neo ION 740Z -
Versión Español
1. DESCRIPCIÓN
ION 740z
Cabezal móvil que tiene 7 LEDs OSRAM® 4-en-1 de 40W
ION 740z es un compacto y versátil cabezal móvil que
tiene 7 LEDs OSRAM® 4-en-1 de 40W con un ángulo de
zoom variable de 4º a 36º. Con la capacidad de acción
que le da su amplia variación del haz, su control pixel
por pixel y un ujo luminoso de 43.000 lux a 3M (4º),
este cabezal llegó para redenir la versatilidad y
potencia de los equipos de su tipo. Con su tecnología
LED de cuatro colores, por otra parte, el equipo
habilita una mezcla RGBW suave sin sombras multi-
color, garantizando una larga durabilidad y una repro-
ducción del color óptima. Ion 740Z cuenta, además,
con programas preestablecidos en temperaturas de
color de 2700K, 3200K, 4200K, 5600K y 8000K y posee
función RDM, haciendo posible su monitoreo y direc-
cionamiento remoto.
Fuente & Ópticas
• Fuente de luz: 7 LEDs 4-en-1 OSRAM® de 40W
• Vida útil promedio: 60,000 horas
• Ángulo de haz: 4° a 36°
Información fotométrica
• Flujo luminoso: 7000 lumen
• 4º Ángulo de haz: 43000 lux @ 3m (10 pies)
• 36º Ángulo de haz: 2400 lux @ 3m (10 pies)
Efectos y Funciones
• Control pixel por pixel
• Dimmer: Rango completo 0-100%
• Efecto estrobo
• Tecnología LED 4-en-1: Mezcla RGBW suave sin
sombras
• Colores vividos, saturados e uniformes
• Preseteos de temperatura de color: 2700K,
3200K, 4200K, 5600K & 8000K
Control
• Canales DMX: 19/21/22/51
• Función RDM avanzada
• Indica temperatura de la base, brazo & lámpara.
• Comunicación de respaldo IC
• Lectura de voltaje RDM, consumo de corriente
actual de la lámpara
• Actualización soware vía DMX
• Velocidad del ventilador acorde a la
temperatura
Movimiento
• Pan: 540° / 630º
• Tilt: 265°
• Motor de 3 fases
• Resolución de 16-bit
• Reposicionamiento automático
Eléctrico
• Rango de voltaje de entrada: 100–240V, 50-60Hz
• Alimentación: Rango automático
• Consumo máximo de potencia: 265W
Físico
• Conectores DMX: 2 conectores XLR (XLR-3 de
entrada & salida) y 2 conectores RJ45 (Ethernet
de entrada & salida)
• Conectores de alimentación: PowerCON® Entra-
da/Salida
• Display LCD de 2.4 pulg.
• Dimensiones: 324x250x456 mm. / 12,7x9,8x17,9
pulg.
• Peso: 12 Kg. / 26,4 Lbs.

P. 1 9
- Neo ION 740Z
Versión Español
Por su propia seguridad, por favor lea atenta-
mente el manual antes de utilizar el equipo.
ADVERTENCIA DE SEGURIDAD
• Este producto debe ser instalado por un profe-
sional calicado.
• Toda mantención debe ser llevada a cabo por
un electricista calicado.
• Una distancia mínima de 0.5m debe ser man-
tenida entre el equipo y cualquier supercie
combustible.
• El producto debe ser siempre operado en áreas
ventiladas.
• NO mire de forma directa hacia la fuente de luz.
• Siempre desconecte el equipo antes de realizar
cualquier tipo de mantención.
• El neutro debe estar siempre conectado a
tierra.
• Asegúrese que todas las partes del equipo se
mantengan limpias y libres de polvo.
IMPORTANTE
• Toda persona involucrada con las instalación,
operación y mantenimiento del equipamiento
debe estar calicada para ello.
• Seguir las instrucciones de este manual.
• Considerar este manual parte del producto.
• Mantener este manual durante toda la vida útil
del producto.
• Pasar el presente manual a cada uno de los
futuros dueños de la unidad.
• Descargar la última versión disponible del sitio
de internet de la empresa.
DETERMINACIONES DE OPERACIÓN
• Este producto solamente puede ser operado en
un voltaje de 100-240 V, 50/60 Hz.
• Este equipamiento está diseñado para uso pro-
fesional. Por ejemplo: escenarios, clubs, bares
y teatros.
• No agite el equipo. Evite la fuerza bruta al insta-
lar o hacer funcionar el dispositivo.
• Al elegir el lugar de la instalación, por favor
asegúrese de que el dispositivo no está ex-
puesto a calor extremo, humedad o polvo. No
debe haber ningún cable por ahí. Por favor,
asegúrese de que la unidad no puede ser
tocada ni golpeada.
• Al usar máquinas de humo, asegúrese de que
el dispositivo no está expuesto al chorro de
directo de la máquina y de que sea instalado
a una distancia mínima de 0,5 metros entre la
máquina de humo y el dispositivo.
• La temperatura ambiente debe estar siem-
pre entre -15 ° C y + 45 ° C. Mantener alejado
del sol directo (especialmente en el coche) y
calentadores.
• Nunca utilice este dispositivo durante tormen-
tas eléctricas. El Sobre-voltaje podría destruir
el dispositivo. Siempre desconecte el aparato
durante tormentas eléctricas.
• El equipo sólo se debe instalar sobre una
supercie no inamable. Con el n de sal-
vaguardar la ventilación suciente, deje 50 cm
de espacio libre alrededor del aparato.
• Por instalar el equipo encima de la cabeza
(altura de montaje> 100 cm), siempre je el
aparato con una cuerda de seguridad apropi-
ada. Fijar la cuerda de seguridad sólo en los
puntos de jación correctos. La seguridad
de la cuerda no debe jarse en las asas de
transporte.
• Opere el equipo solamente luego de haber
comprobado que el recinto del mismo está
bien cerrado y con todos los tornillos bien
apretados.
• Haga funcionar el aparato sólo después de fa-
miliarizarse con sus funciones. No permitir la
utilización por parte de personas no calica-
das para operar el dispositivo. La mayoría de
los daños son el resultado de una operación
poco profesional.
• Por favor, considere que las modicaciones no
autorizadas del aparato están prohibidas por
razones de seguridad. • Nunca quite el código
de barras de serie del dispositivo ya que esto
haría que la garantía pierda vigencia.

P. 2 0
Neo ION 740Z -
Descripción del equipo
Versión Español
1. Lente
2. Cabezal
3. Brazo
4. Base
5. Pantalla LCD
6. Soporte
7. Teclas de operación
8. Manija
1
2
3
4
5
6
7
8
9. Indicador inalámbrico
10. Micrófono
11. Tecla de desplazamiento hacia la izquierda
12. Indicador de batería
13. Tecla de desplazamiento hacia arriba
14. Tecla de desplazamiento hacia abajo
15. Tecla Enter
16. Tecla de desplazamiento hacia la derecha
17. Salida Ethernet
18. Entrada DMX de 5 pines
19. Entrada Ethernet
20. Salida DMX de 5 pines
21. Conector Powercon de entrada
22. Fusible
910 11 12 13 14 15 16
Antes de abrir el embalaje, revise que se encuentre
en buen estado. La caja contiene:
• 1 equipo.
• 1 manual del usuario.
• 1 cable DMX de 3m.
• 1 cable de suministro eléctrico, conector
powerCON de 1.5m.
• Soporte Omega para instalación.
• Cable de seguridad.
Table of contents
Languages:
Other NEO Dj Equipment manuals

NEO
NEO ELIPSOLED 3100 MAX User manual

NEO
NEO PROTON IP 12 QA User manual

NEO
NEO Moving Torch User manual

NEO
NEO Proton 12 HEX USB User manual

NEO
NEO FOLLOWER 400 LED User manual

NEO
NEO Sion User manual

NEO
NEO Mini Panel User manual

NEO
NEO NEO FLEX TRUSS User manual

NEO
NEO ZOOM PANEL User manual

NEO
NEO ELIPSOLED LITE 50 User manual