Nic RA-7000A+SANPRA 5 User manual

FULLY-AUTOMATIC REDUCING VAPORIZATION
MERCURY ANALYZER
RA-7000A+SANPRATM5
Quick Start Guide
COMTEMTS
SAFETY PRECAUTIONS··················· 1
PRINCIPLE OF MEASUREMENT ········ 3
BEFORE MEASUREMENT ················· 4
Articles Required for Measurement
·4
Procedure for Preparation of
Standard Mercury Solution
············4
Preparations of Reagents
··············6
MEASUREMENT ····························· 8
Flow of Measurement
····················8
Startup of System
························9
Self Check
·································· 10
Reagent Filling
··························· 13
Procedure for Setting Method
······ 14
Setting Procedure for Measurement
Condition
··································· 15
Setting of Table Condition
············ 16
Registration & Setting of Standard
Mercury Solution
························ 17
Registration & Setting of Unknown
Sample(ENVIRONMENTAL
WATER)
··································· 19
Start of Measurement
················· 20
Checking of Measurement Result
·21
Printing of Measurement Result
··· 23
Reagent Discharge
······················ 24
Shutdown of System
··················· 25
Cleaning of Apparatus················· 26

Introduction
The “Quick Start Guide” is aim at help to understand the basic measurement
procedures.
Read the separate “instruction Manual” for detailed measurement methods and
equipment handling.
Please read this manual in conjunction with the "Instruction Manual" to ensure correct and safe use.
Be sure to read the "Safety Precautions" section of the instruction manual for precautions regarding
installation, preparation, and maintenance.
After read it, please keep it in a safe place so that you can view it at any time.
1
SAFETY PRECAUTIONS
To use this product safely, be sure to observe the following precautions:
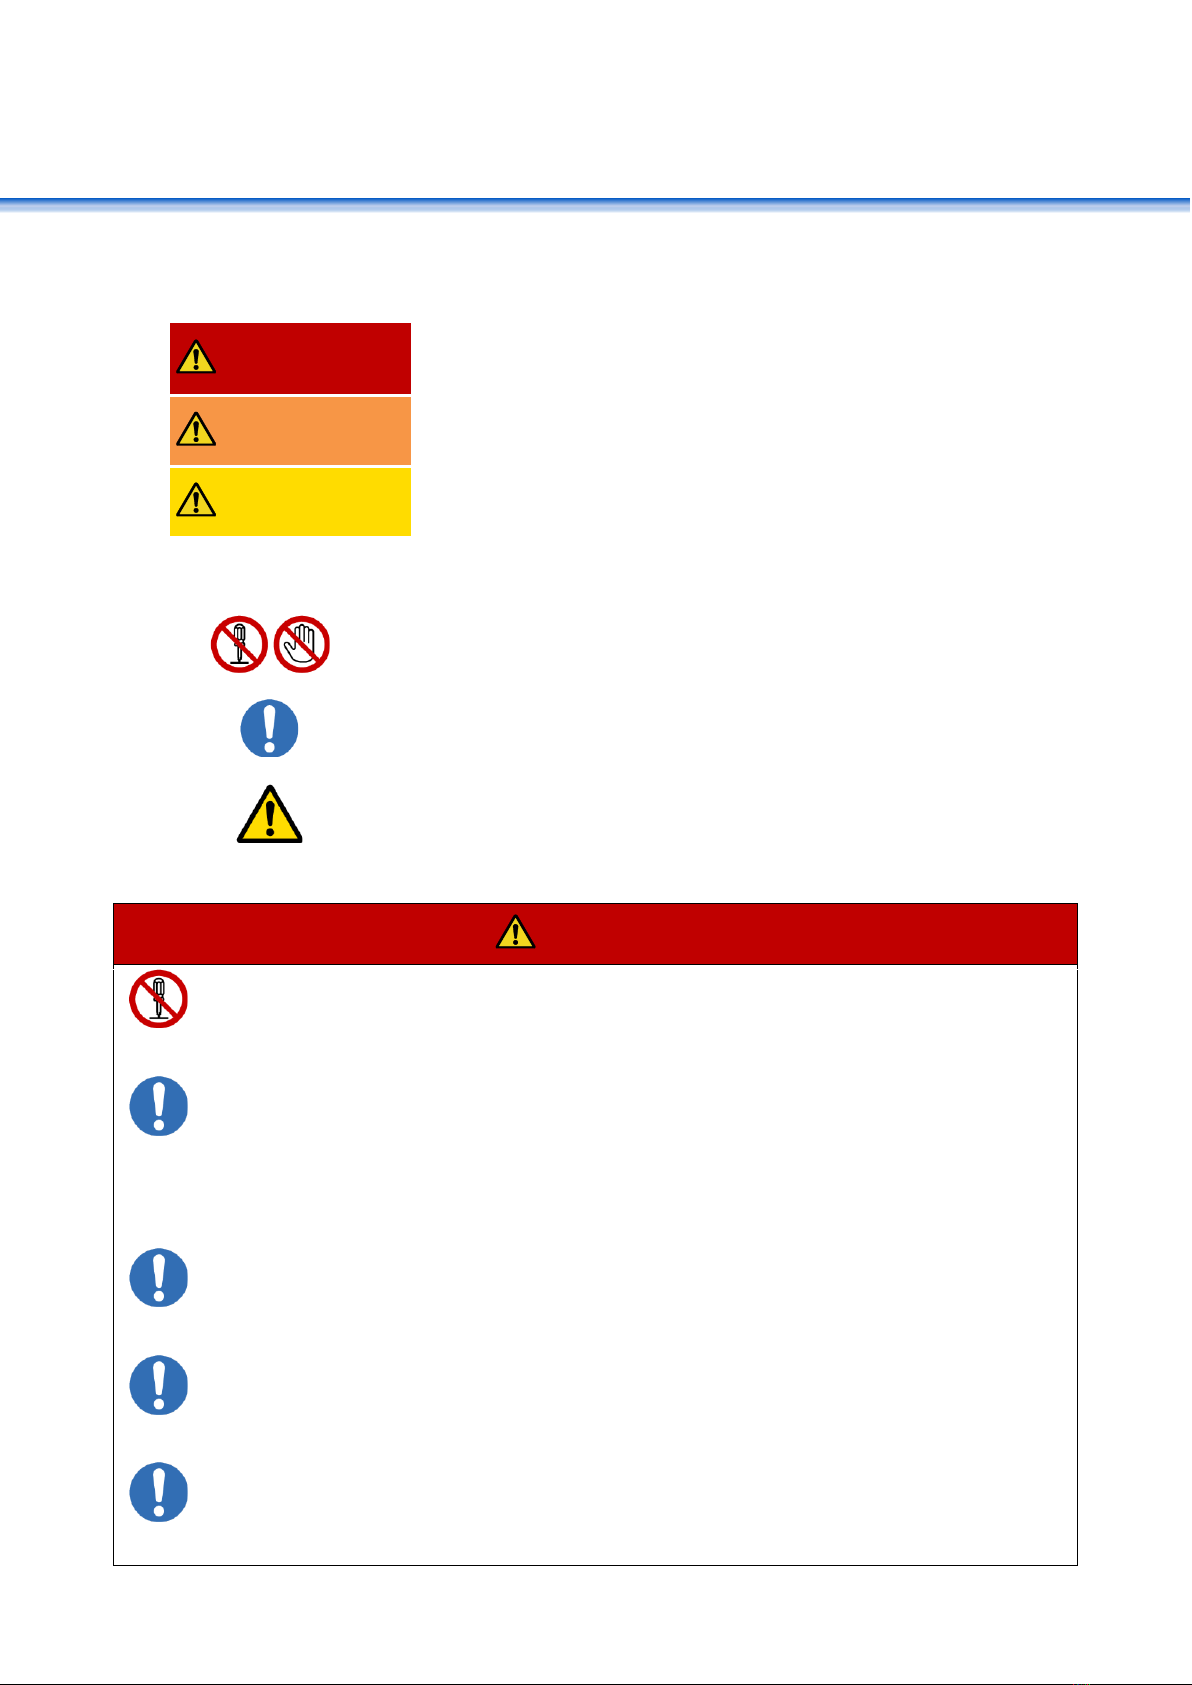
Classification
Danger
In the case of mishandling, a death or a serious injury may
result immediately.
Warning
In the case of mishandling, a death or a serious injury may
result.
Caution
In the case of mishandling, a slight injury or property
damage may result.
Graphic Symbols
Indicate the contents that must not be carried out.
Indicate the contents that must be carried out.
Indicates the contents that require care.
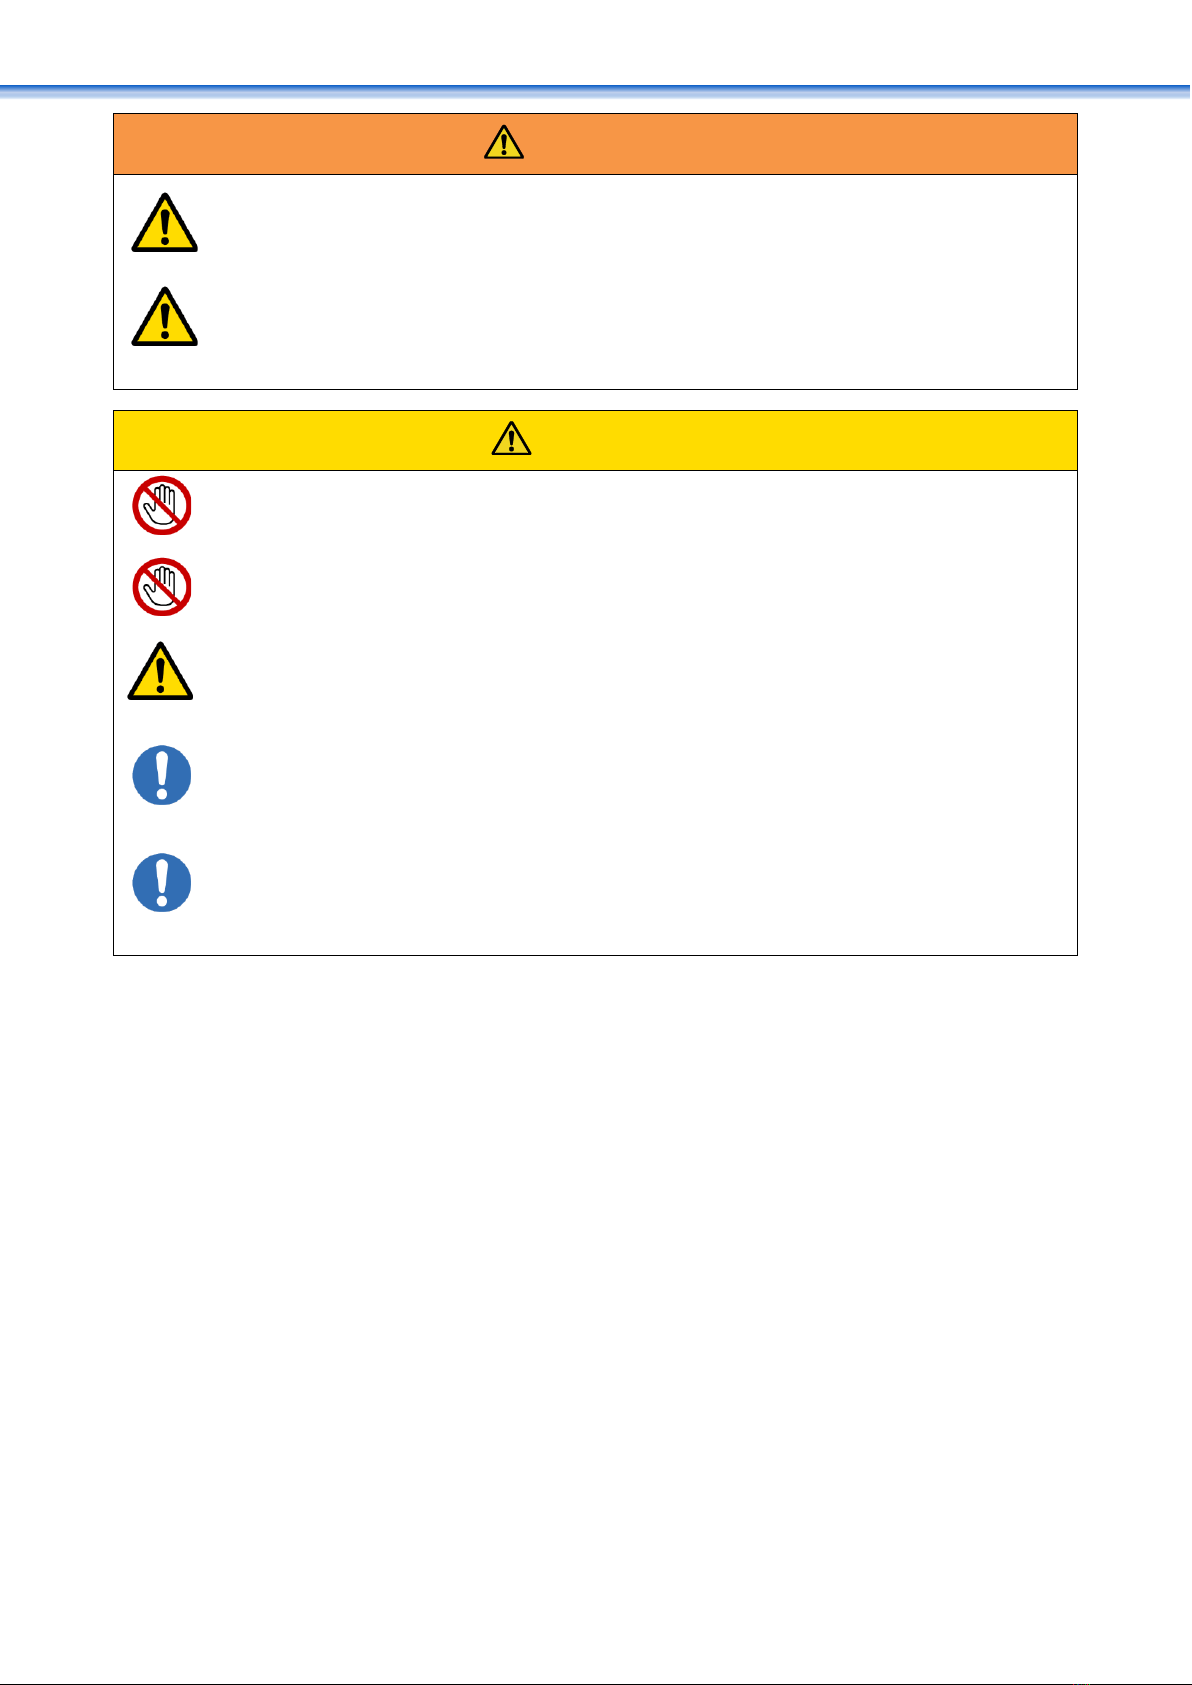
Danger
Do not carry out disassembling or remodeling that is not
described in this document.
Otherwise, a serious accident may occur.
Be sure to carry out ventilation.
There is a risk of volatilization from hazardous samples or generation of toxic gases
when heated.
Do not use SANPRATM in an enclosed space.
Install the equipment so that the air inside SANPRATM5 is locally exhausted.
Wear protective equipment.
Reagents to be used contain acute toxic and corrosive substances. Before using the
instrument, wear protective equipment.
Use the instrument according to this document.
If the instrument is operated or handled erroneously, a serious accident or failure
may occur.
When using the instrument, observe the specification range.
If the instrument is used out of the specification range, a serious accident or failure
may occur.
2
Warning
Take care when handling a reagent.
Acquire, supervise and read carefully the SDS (safety data sheet) of a reagent, and
take care when handling it.
Care about the contents of the caution labels of the instrument.
Read carefully the contents of the caution labels, and take care when using the
instrument.
Caution
Do not operate the instrument with a wet hand.
An accident or failure may occur.
Do not use the sample tube that has been cracked or chipped.
An injury may result. Also, Measurement cannot be performed properly.
Take care when handling a glass component.
If a glass component is broken by mistake, an injury may result.
Take care not to drop or hit any glass component.
Keep reagents and standard mercury solutions appropriately.
If any reagent or standard mercury solution is not kept appropriately, it will be
impossible to guarantee the performance of the instrument.
Process effluents appropriately.
When discarding effluents, do so appropriately according to the regulations of each
local government.

3
PRINCIPLE OF MEASUREMENT
Sulfuric acid, nitric acid and potassium permanganate solution are added to a sample, a vermilion
residue of permanganic acid ion is checked, and then potassium peroxodisulfate is added. When
this solution is heated, the oxidative decomposition of a mercury compound in the solution occurs
and bivalent mercury ions (Hg2+) are produced.
After cooling, hydroxylammonium chloride solution is added to reduce excessive potassium
permanganate. When stannous chloride solution is added to the sample after this wet
pretreatment, bivalent mercury ions (Hg2+) are reduced to zero valent metal mercury (Hg0) and
changed to mercury gas by bubbling.
Hg2+ + Sn2+ → Hg0↑ + Sn4+
After acid mist and steam generated by the bubbling are removed by the dehumidifier and the
membrane filter, the absorbance is measured at 253.7 nm, which is the first absorption
wavelength band of mercury.
Using the absorbance, the quantity of mercury is calculated from a calibration curve prepared by
measuring known quantities of mercury.
V2
Flow
Adjustment
Valve
Air Pump
V1
Flow Sensor
Membrane Filter
Dehumidifier
Inlet Activated
Carbon Filter
Outlet Activated
Carbon Filter
Bubbler
Sample
Cap
Light
Absorption
Cell
Detector
(REF)
Detector
(SIG)
Drain
Pump
Mercury
Lamp
Effluent
Tank
Rinse
Tank
Sample
Tank
Rinse
Bottle
P8
P7
P1
P2
P3
P4
P5
P6
HONH3Cl
KMnO4
H2SO4
HNO3
K2S2O8
SnCl2
Dispensing
Cap

4
BEFORE MEASUREMENT
Articles Required for Measurement
Pure Water
Pour water of A3 or A4 defined
by JIS K0557 into a washing
bottle.
Standard Mercury Solution
Examples: 1 ppm, 0.1 ppm,
0.01 ppm
Measurement Reagent
Prepare sulfuric acid and
stannous chloride solution.
Cleaned Sample tube*
Cleaned Stirrer*
Micropipette (up to 200 μL)
Used for the measurement of liquid sample
such as standard solution.
Micropipette (up to 1000 μL)
Used to add a sample or pure water.
Micropipette (up to 5000 μL)
Used to add a sample or pure water.
Procedure for Preparation of
Standard Mercury Solution
The concentration of standard mercury solution changes greatly after preparation, and calibration
curves may disperse and reproducibility may lower.
Therefore, we add L-cysteine to diluted standard mercury solution to suppress the change of the
concentration.
Caution
Before using the reagents, wear protective equipment.
1Preparation of L-Cysteine Solution (10 mg/L)
Pour 10 mg of L-Cysteine
(HSCH2CH(NH2)COOH) in a 1000 mL
measuring flask.
Caution
Use L-cysteine.
Note that this is not cystine or L-cysteine
hydrochloride.
After adding approximately 600 mL of pure
water, add 2 mL of nitric acid and shake the
flask.
Caution
Always add concentrated nitric acid after adding
a large amount of pure water.
If nitric acid is added directly to L-cysteine or
there is not enough water, decomposition will
occur and the effect will be lost.
L-Cysteine
10 mg
Pure Water
Approx. 600 mL
Nitric Acid
2 mL
1)
2)

5
Add pure water to make the whole volume
1000 mL.
2Preparation of Standard Mercury Solution (10 mg/L)
Take 1 mL of standard mercury solution (1000
ppm) for the atomic absorption, and add L-cysteine
solution (10 mg/L) to make the whole volume 100
mL.
Reference
No problem will arise even if pure water is used
for strict measuring near the marked line.
3Preparation of Standard Mercury Solution (0.1 mg/L)
Take 1 mL of standard mercury solution (10 mg/L),
and add L-cysteine solution (10 mg/L) to make the
whole volume 100 mL.
Reference
No problem will arise even if pure water is used
for strict measuring near the marked line.
*When you want to prepare standard mercury solution of less than 0.1 mg/L, carry out dilution in the
same way.
Caution
When repreparing standard mercury solution, use the same measuring flask if possible.
Before using a new measuring flask, wash it sufficiently using 1:10 nitric acid.
Especially before preparing standard solution of 1 ppm or less, carry out acid cleaning
carefully and also wash the plug part sufficiently to prevent contamination from the
measuring flask.
Custody
It is possible to use L-cysteine solution and prepared standard mercury solution for six months
when they are stored in a cool, dark place.
Since stability worsens when standard mercury liquid has become old or has been left in a warm
place, we recommend storing it in a cool, dark place and managing the date of preparation.
Pure
water
Whole
Volume
1000 mL
3)
Standard
Mercury
Solution for
Atomic
Absorption
1mL
L-Cysteine
Solution
Whole
Volume
100 mL
Standard
Mercury
Solution
1mL
L-Cysteine
Solution
Whole
Volume
100 mL

6
Preparations of Reagents
Referring to the following, prepare reagents and pour them into supplied reagent containers.
Items in [] are reagents used by us.
Caution
Before using the reagents, wear protective equipment.
Use reagents that contain little mercury, such as ones for mercury analyses, for precise
analyses or for toxic metal measurements.
The amount of reagents should be around 30 mL more than the [Amount of reagents
specified in the Measurement Condition] x [Number of measurements].
Note that an additional amount of reagents may be used for potassium permanganate
solution, by the number of times the color check is carried out.
Reagent
Bottle
Reagent
Preparation Procedure
P1
Potassium Permanganate Solution
(5% w/v)
KMnO4
Dissolve 50 grams of potassium permanganate
in pure water. Then filter the solution with the
glass filter and adjust it to 1 liter.
【Potassium permanganate solution (50 g/L)
for mercury analyses manufactured by Kanto
Chemical 500 mL: 31540-08】
P2
Sulfuric Acid (1+1) or 50% v/v
Sulfuric Acid
H2SO4
Pour 50 mL of distilled water into a beaker and
add 50 mL of sulfuric acid slowly while cooling
and stirring the solution.
Caution
Be sure to add sulfuric acid to water little by
little. Pouring water into sulfuric acid is very
dangerous because bumping occurs.
When adding sulfuric acid, be sure to pour
little by little while cooling the solution.
Otherwise, you may get burned.
(
The sulfuric acid is diluted two-fold for
protection of the tube pump.)
【
[Sulfuric acid 1:1 for mercury analyses
manufactured by Kanto Chemical 500 mL:
37928-08]
[64% sulfuric acid manufactured by FUJIFILM
Wako Pure Chemical 500mL: 198-11565]
P3
Nitric Acid (1+3) or 25% v/v HNO3
HNO3
Take 3 parts pure water in a beaker, and add 1
part nitric acid (1.38) while stirring.
Caution
Be sure to add nitric acid to water little by
little. Pouring water into nitric acid is
dangerous because heating occurs.
(
The nitric acid is diluted four-fold for
protection of the tube pump.
)
【Nitric acid (1.38) for toxic metal
measurements manufactured by FUJIFILM
Wako Pure Chemical 500 mL: 140-04016】

7
P4
Potassium Peroxodisulfate Solution
(3% w/v, 4 % w/v, 5 % w/v)
K2S2O8
Dissolve 30, 40 or 50 grams of potassium
peroxodisulfate in distilled water, and adjust it
to 1 liter.
(3% w/v, 4 % w/v; The concentration is
reduced to prevent crystallization)
【Potassium peroxodisulfate solution for toxic
metal measurements manufactured by
FUJIFILM Wako Pure Chemical 500 g: 164-
09175】
P5
10% Stannous Chloride Solution
SnCl2
Add 60 mL of sulfuric acid (1:20) to 10 g of
stannous chloride dihydrate, melt it while
heating and stirring, leave the solution until it
is cooled and add water to make the volume
100 mL. (Preparation before use)
or
[Stannous chloride solution for mercury
analyses manufactured by Kanto Chemical 500
mL: 36522-08]
P6
Hydroxylammonium Chloride Solution
(0.8% w/v, 1.0% w/v, 1.2% w/v, 1.5% w/v)
HONH3Cl
Dissolve 8, 10, 12 or 15 grams of
hydroxylammonium chloride in distilled water,
and adjust it to 1 liter.
(The concentration is adjusted so that the
amount to be added becomes 2.5 to 3 mL.)
【Hydroxylammonium chloride for toxic metal
measurements manufactured by FUJIFILM
Wako Pure Chemical 100 g: 085-03451】
Sodium chloride (1.2% w/v, 1.4 %
w/v) – hydroxylamine hydrochloride
(1.2% w/v)
NaCl - HONH3Cl
Dissolve 12 or 14 grams of sodium chloride
and 12 grams of hydroxylammonium chloride
in distilled water, and adjust it to 1 liter.
P7
Pure Water for rinsing
1L

8
MEASUREMENT
To help you understand the basic measurement method of this instrument, the following
explanation uses the measurement of Method3 as an example.
For details on setting conditions for actual measurement, please refer to the instruction manual.
Flow of Measurement
Measurement Operation Start
Start up the system.(p. 9)
Reagent filling(p. 13)
Reagent discharge(p. 24)
Putting away the samples
Shut down the system.(p. 25)
Is the check result OK?
Register a sample.(p. 17 and p. 19)
Make a measurement.(p. 20)
Measurement Operation End
All OK
NG
Issued

9
Startup of System
1Turning On of Instrument
Turn on the personal computer to start
Windows.
Turn on the power switches on the RA-7000A
and the SANPRATM5.
The status display lamps blinks.
2Startup of Control and Analysis Software
Start the control and analysis software
RA7000AWin.
When the system has started up normally, the
status display lamp lights light blue and
[Ready] is displayed on the status bar.
The SANPRATM5 initialization screen will appear.
Click "OK" to initialize the instrument.
The setup screen appears.
Click “Yes” to perform the self check.(P. 10)
2)

10
Self Check
1Startup of Self Check
Click [Run] on the “Self Check” tab.
Reference
When the "STANDBY" message is displayed in
the upper right corner of the screen, the optical
system is being stabilized, so it is recommended
to execute the check after the display disappears.
If an equipment check is executed while the
"STANDBY" message is displayed, accurate
voltages will not be recorded.
A self check message appears.
Click [Run].
2Checking of GLP Counter
The checking results of the GLP counter appear on
the self check screen.
Make sure whether all checking results are “PASS”
or not.
If any item in the GLP counter exceeds the
threshold, “FAIL” will be displayed. Replace the
component.
Reference
Refer to the instruction manual for the measures
to be replace the parts.
GLP Counter
Threshold Value
Lamp
5000 hours
Membrane Filter
2000 hours or 1 year after replacement
Air Pump Usage
2000 hours or 2 years after replacement
Drain Pump Tube
700 hours or 1 year after replacement
Activated Carbon Filter
1000 mg
P1 pump tube
700 hours or 1 year after replacement
P2 pump tube
700 hours or 1 year after replacement
P3 pump tube
700 hours or 1 year after replacement
P4 pump tube
700 hours or 1 year after replacement
P5 pump tube
700 hours or 1 year after replacement
P6 pump tube
700 hours or 1 year after replacement
P7 pump tube
700 hours or 1 year after replacement
P8 pump tube
700 hours or 1 year after replacement
Heater
2000 hours
1)

11
3Checking of Cooling Fan Operation
A confirmation message for the cooling fan
operation appears.
Make sure that the cooling fan in the back of
the sample table blows air.
After the checking, click [OK].
4Checking of Operation of Duct Fan
A confirmation message for the operation of
the duct fan appears.
Make sure that the operation sound of the duct
fan is heard.
After the checking, click [OK].
5Setting of Sample tube
A message appears to prompt you to set a
sample tube for the flow rate adjustment.
Set an empty sample tube at No. 81 on the
sample table.
After the completion of the setting, close the
front door of the SANPRATM5 with both hands
and click [Next].
Caution
If [Next] is clicked without closing the door, a
confirmation message will appear.
After closing the door, click [Next].
1)
1)
1)

12
6Checking of Self Check Result
After the setting of a sample tube, the self check automatically proceeds and the checking
results appear on the self check screen.
If any checking result is “FAIL”, a message will appear.
Take measures for that checking item.
When all checking results are “PASS”, a normal
completion message appears.
Click [Exit].
Reference
When you want to carry out the self check again,
click [Restart].
A message appears to register the self check
results.
When [Yes] is clicked, the self check results
appear on the self check screen.
Reference
A result with “PASS” is displayed in green, and
one with “FAIL” in red.
Judgment Criterion for Self Check and Measures
Checking Item
Judgment Criterion
Flow Rate Adjustment
A flow rate of 0.20 L/min. is kept for five seconds.
Radiation Thermometer Test
A positive value is output from the thermometer.
Heating Test
The heater temperature rises by 4℃ within five minutes
after the heating check starts.
Color Sensor Test
Of the signals (R, G, B) from the color sensor, at least
one nonzero number is output.
Container Sensor Test
No. 81 on the table is detected and the presence or
absence of a sample tube is judged correctly.
SIG/REF Test
The voltages of SIG and REF are 3.5-4.5 V.
Drift Test
The quantity of the drift is 0.0005 ABS or less in 30
seconds.
2)
Normal
Abnormal

13
Reagent Filling
The reagent tubes must be filled with reagent before starting measurement.
Caution
Before using the reagents, wear protective equipment.
Working while the arms or sample table is in operation may cause an entrapment accident
and risk of equipment failure.
Do not work inside the device while it is in operation.
Click [Filling] on the “Measurement” tab.
From this point on, follow the message.
Click [START].
Insert the rinse tube (P8) into the rinse tank.
Insert the rinse tube into the effluent tank.
Insert the luer fittings at the ends of the
reagent bottle tubes into the tubes of the
reagent bottles and twist clockwise to connect
them to the reagent bottles.
Caution
Before the connection, check carefully the labels
of each bottle and each tube.
Click [Next], and the reagents will be supplied.
Caution
Make sure that the reagents are instilled from the
end of the tube into the rinse bottle.
A completion message appears.
Click [Exit] to terminate the reagent filling.
3)
5)
1)
7)
14
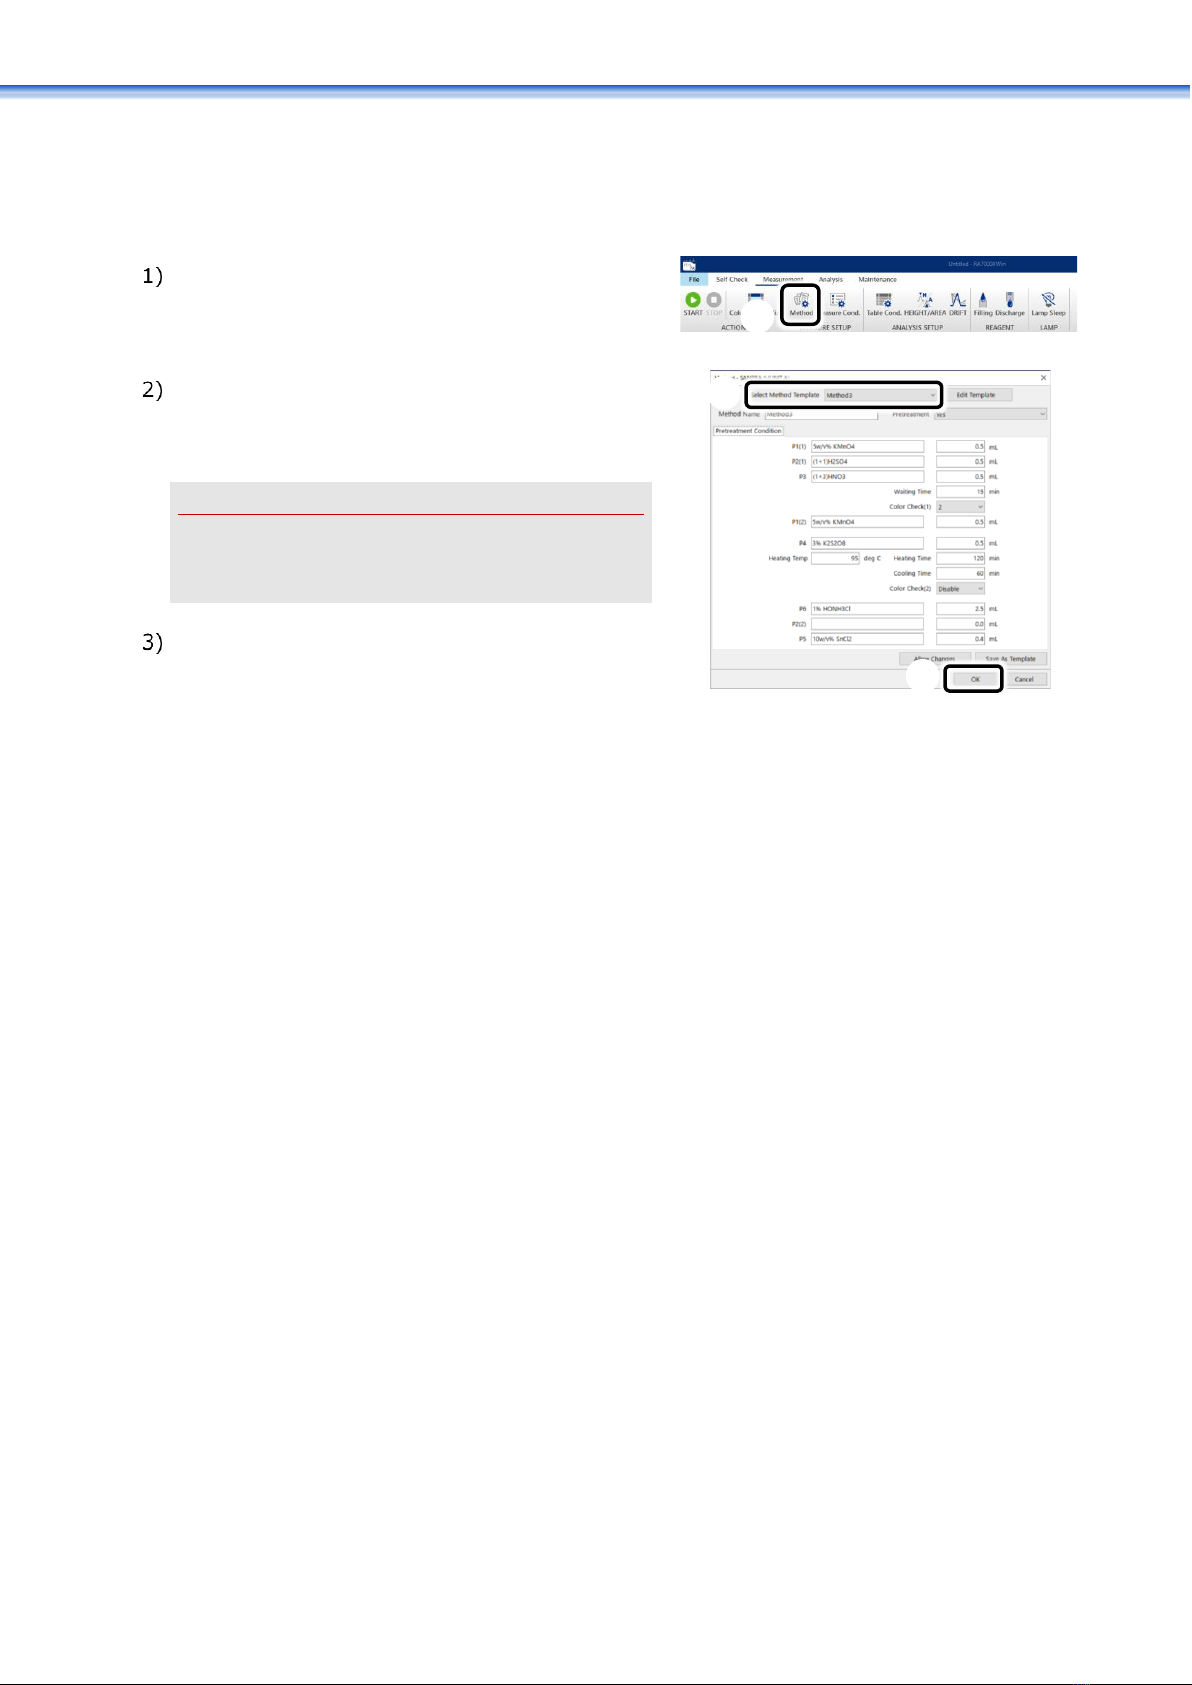
Procedure for Setting Method
Default methods have been registered as methods to measure samples.
Click [Method] on the “Measurement” tab.
Set a method.
Select a method name to be used for a
measurement at “Select Method Template”.
Caution
It is impossible to change a method after the
start of a measurement. When you want to
change a method, make a measurement newly.
After the selection, click [OK].
Default Measurement Methods
EPA M245.1, 7470a_ASTM D3223(5mL)
EPA M245.1, 7470a_ASTM D3223(4mL)
APHA 3112B
Method1 – 5 ; for Japanese
Method TEST
1)
2)
3)

15
Setting Procedure for
Measurement Condition
A measurement condition is set.
Caution
It is impossible to change a measurement condition after the start of a measurement.
When you want to change a measurement condition, make a measurement newly.
Click [Measure Cond.] on the “Measurement”
tab.
The “Measurement Condition” screen appears.
Set an instrument control condition.
Set each item for control.
Caution
The item for the liquid level auto adjustment is
displayed only when the dilution rate has been
selected using [SMP]-[Unit] in the table
condition.
Reference
Usually, use a default value for a measurement
time.
When a special measurement method is used, it
is possible to change a measurement time.
When automatic liquid level adjustment is
enabled, a sample of 5 mL or more can be placed
in the sample tube and set in the instrument.
The excess volume is automatically drained out
to adjust the sample volume to 5 mL before
measurement is performed.
Click the tab for checking and set the threshold
value of each checking item and operation after
the checking.
After the setup, click [OK].
2)
3)
4)
1)

16
Setting of Table Condition
Click [Table Cond.] on the “Measurement” tab.
Or click [Table Cond.] on the “Analysis” tab.
The “Table Condition” screen appears.
Set a common table condition.
Click the “Common” tab and set information for
the analysis mode and drift correction.
Reference
Usually, set the analysis mode to “AREA”.
Usually, set the drift correction to “ON”.
Click the “STD” tab and set the type of a
calibration curve and the unit of standard
samples.
Reference
Usually select “y = ax + Blank”. Change the
calibration curve according to the official
methods.
In the case of the measurement of 0.05 ppb or
less, select the HIGHT analysis.
When mercury is measured beyond 40 ppb (200
ng/5 mL), select the cubic formula.
Click the “SMP” tab and set a type, unit and
other items for unknown samples.
After the setup, click [OK].
1)
2)
3)
4)
5)

17
Registration & Setting of Standard
Mercury Solution
Measurements for Calibration Curve of 0.05 ppb, 0.10 ppb and 0.15 ppb.
1Registration Procedure for Calibration Curve
Click [STD] on the “Measurement” tab.
Enter information on standard mercury
solution.
STD
[ppb]
SVOL
[mL]
CVOL
[mL]
DVOL
[mL]
0.000
5.000
5.000
5.000
0.050
5.000
5.000
5.000
0.100
5.000
5.000
5.000
0.150
5.000
5.000
5.000
Reference
A STD [ng] value is automatically calculated
Blanks should be set an arbitrary number of
times to confirm the measurement results.
Click check boxes for samples to be measured.
Reference
When you want to place two or more check
marks simultaneously, put the cursor in a
position other than a check box and drag the
mouse.
Input Item
Input Contents
STD
Enter the concentration of standard mercury solution to be used.
SVOL
Enter the sample volume of the standard mercury solution
extracted to the pretreatment container.
CVOL
Enter the volume measured after pretreatment.
DVOL
Enter the volume dispensed from the pretreated sample to the
sample tube.
1)
2)
3)
18
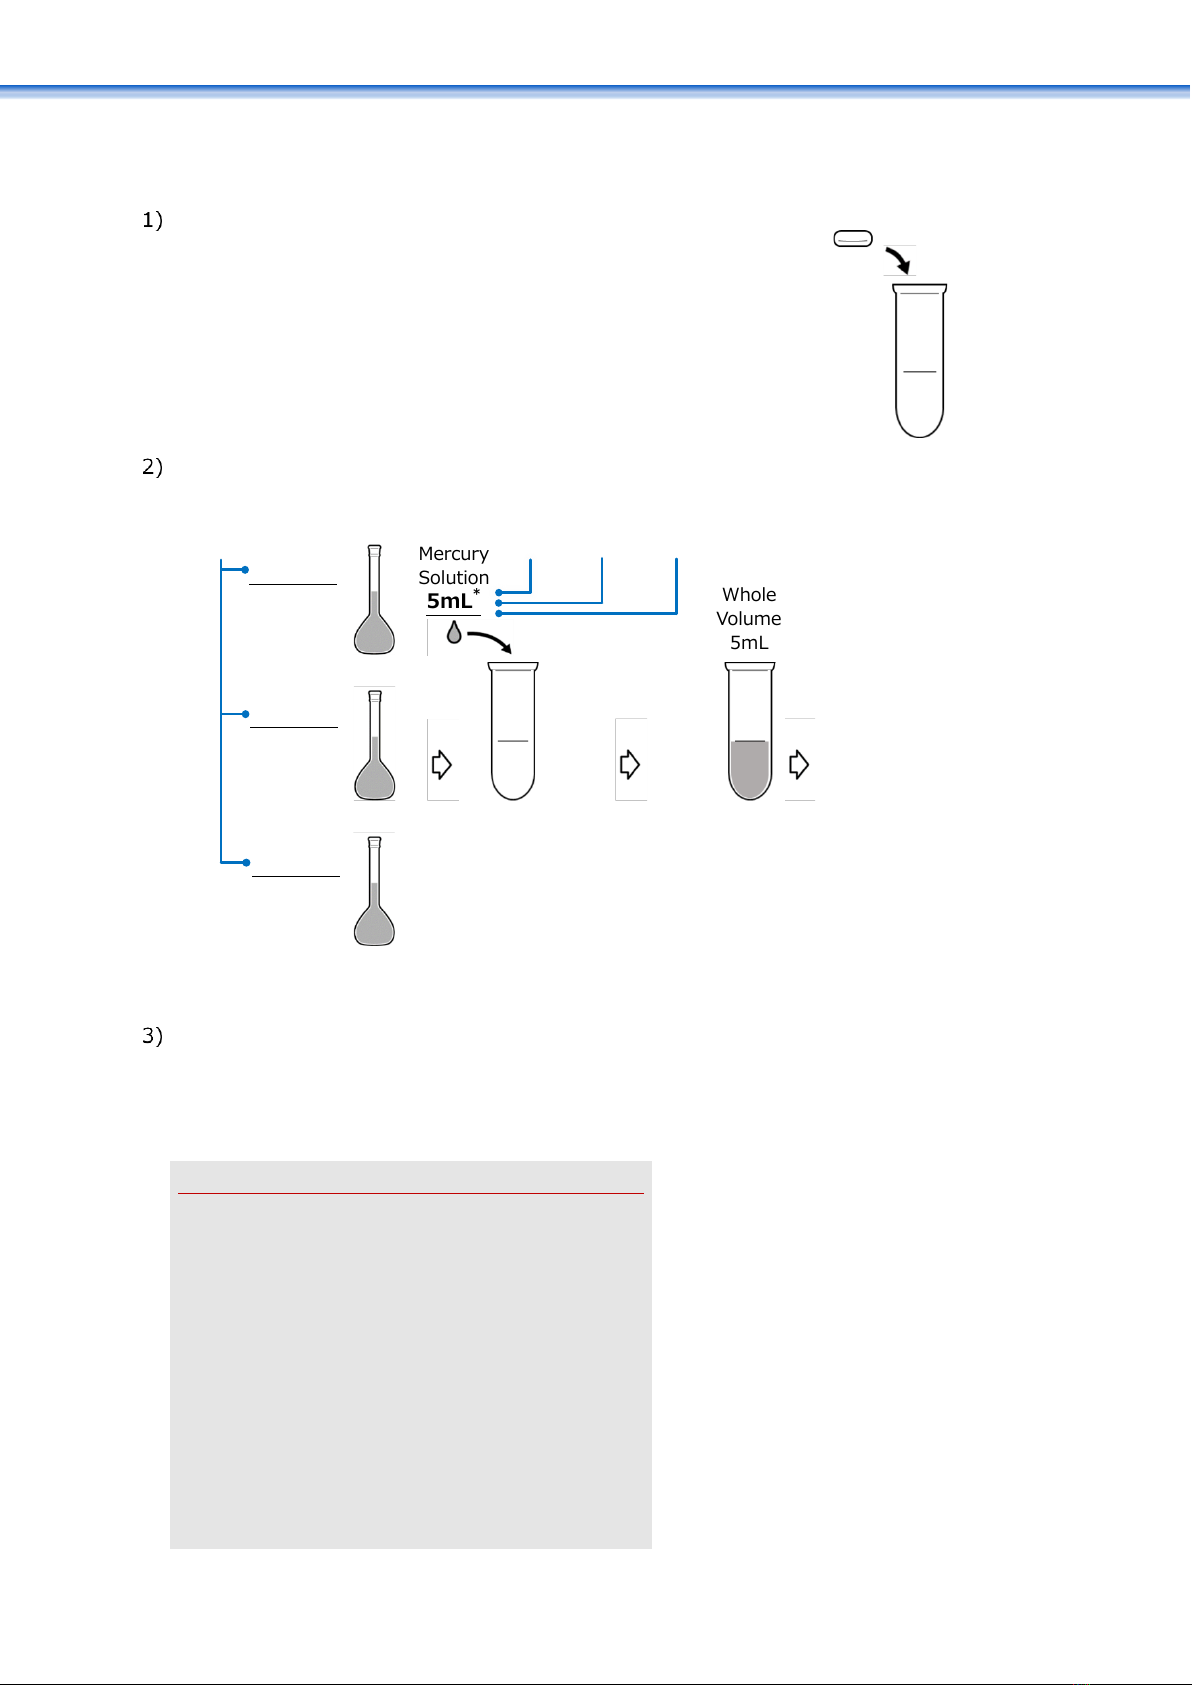
2Setting of Standard Mercury Solution
Put a stirrer beforehand into a sample tube.
Pour 5 mL the mercury standard solution into a sample tube.
*For the blank measurement, take a 5 mL pure water.
*When you want to carry out the liquid level auto adjustment, dispense an arbitrary volume of 5 mL
or more of standard mercury solution in a sample tube.
Open the front door of the instrument.
Set sample tubes at the numbers on the
sample table that have been registered on the
table screen.
Caution
No. 81 is for the self check. It cannot be used for
measurements.
Set samples sequentially without skipping any
number.
Otherwise, the heating temperature may vary.
Take care not to drop a sample tube when
setting it on the table.
Otherwise, the liquid sample in the sample tube
may splash.
Do not touch the arm.
Otherwise, the arm may get out of adjustment.
Do not remove the sample table to set sample
tubes. Otherwise, you may drop the table and
get injured.
Stirrer
0.05ppb
Standard
Mercury
Solution
0.10ppb
Standard
Mercury
Solution
0.15ppb
Standard
Mercury
Solution
Standard
Mercury
Solution
5mL*
Whole
Volume
5mL
Set in the instrument
STD
DVOL
CVOL
SVOL
Table of contents
Other Nic Measuring Instrument manuals


