manuals.online logo
Brands
  1. Home
  2. •
  3. Brands
  4. •
  5. Nidec
  6. •
  7. Measuring Instrument
  8. •
  9. Nidec ST-1100 User manual

Nidec ST-1100 User manual

z
The Shimpo Series ST-1100 is a Stroboscope-Tachometer with
LED flash technology. This velocity analyzing and measuring de-
vice is ideal for rotational machine inspection. The stroboscope
is capable of flashing the light in a synchronous frequency to the
operating machinery, creating the illusion of viewing stopped or
slowed images. Utilizing this phenomenon of slowing or stopping
the motion with the adjusted rate of the ST-1100’s flashing light,
machine parts and processes may be inspected for defects. Plus,
the rotational speed of the machinery and systems may be re-
corded for further performance analysis.
The ST-1100 is adjustable in either coarse or fine step flash-rate
tuning. The backlit display shows the current flash rate, 10 us-
er-stored pre-set flash rates, as well as a low battery warning. The
backlit feature can be switched off to save battery life if desired.
The ergonomic, hand held device is made of sturdy ABS plastic
and comes with batteries and protective carrying case. The LED
technology extends operation due to the low energy requirement
of the light diodes compared with xenon stroboscopes. Typical
applications for using the ST-1100 is to inspect rotors, meshing
gears, vibration diagnostic equipment, textile equipment, printing
production lines, power tools, speaker acoustical analysis, fan
balancing and many more.
ST-1100 Stroboscope Tachometer
Operation Manual
To Avoid Injury, do not point the light beam of the in-
strument or have it reflected into the eyes of people
or animals.
Do not leave the device close to water or any other
liquid to avoid damage.
-If not using this instrument for extended periods of
time, remove the batteries to prevent potential battery
leakage from causing product damage.
SPECIFICATIONS
Range: 60-40,000 Flash Rate Per Minute (RPM)
Accuracy: +/-0.05% FS
Lux Rating: 950 Lux @ 3000 FPM & 3.9 in (10 cm), 600 Lux @
3000 FPM & 7.9 (20 cm), 370 Lux @ 3000 FPM & 11.8 (30 cm)
Display: 5 digits with backlight.
Resolution: <40,000: 1 RPM; <4000: 0.1 RPM; <400: 0.01 RPM
Rate Storage: 10 stored user-defined flash rates.
Factory Defaults: (RPM): 200,400, 1000, 2000, 3000, 4000, 10000,
20000, 30000, 40000.
Power Supply: 4 x 3.7V (14500) AA Lithium ion rechargeable bat-
teries
Battery Life: Approximately 20 hrs.
Housing: ABS Plastic
Dimensions: 7.7 x 2.9 x 1.5” (195 x 73 x 38 mm)
Product Weight: Approx. 7.8 oz. (220 g)
Package Weight: Approx. 2.1 lb (952 g)
Warranty: 1 Year
Included Accessories: Case, 4 Lithium Batteries, Battery Char-
ger
PRODUCT DIAGRAM
A. LED Flash Switch
B. Flash Rate Value Increase Button
C. Flash Rate Value Decrease Button
D. Coarse/Fine Tuning Button
E. Power/Stored Rate Retrieval Button
F. Flash Rate Storage Button
G. Battery Compartment Cover
H. Backlight ON/OFF Switch
1. Fine tuning symbol.
2. Pre Set flash rate indication.
Press “E” Rate Retrieval Button to Scroll
through saved Presets.
3. Light activation symbol.
4. Flash per minute value.
5. RPM unit symbol
6. Low battery indication.
www.GlobalTestSupply.com
Find Quality Products Online at: sales@GlobalTestSupply.com
OPERATION
Power ON/OFF: Open the battery compartment cover on the back
of the unit and place the batteries in the battery holder properly.
Then press and hold the Power Switch . The display will turn
on and show the initial lowest factory default flash rate of 4000
RPM. If a Pre-Stored rate has been stored during a previous use,
the last Pre-Stored rate will be shown. Coarse tuning is the de-
fault. Press and hold again to turn the instrument off.
Turn on the LED’s with the LED Flash Switch (A). The LED’s will
remain flashing at the rate set on the display for as long as the
button is held. Once released, the LED’s will turn off.
To alter between Coarse and Fine tuning, select the (D) FINE AD-
JUST button to change from Coarse to Fine adjustment.
Press again to switch back to Coarse. When in Fine adjustment
mode, “FINE” icon will appear on the display. Adjust the flash
speed with the & buttons (B & C). In tuning each single
press of the & buttons the value of the flash speed will
increase/decrease by the following: <400 RPM, Coarse tuning:
1 RPM, Fine tuning: 0.01 RPM <4000 RPM, Coarse turning: 10
RPM, Fine tuning: 0.1 RPM <40000 RPM, Coarse tuning: 100
RPM, Fine turning: 1 RPM. Hold the or buttons to contin-
ue to increment continuously. Note: Once the maximum of 40000
or minimum of 60 RPM is met while adjusting the rate, the device
will automatically stop at those thresholds.
To retrieve and utilize the 10 Pre-Set flash rates (RPM’s), push the
Power/READ button . Each press of the button will cycle to
the next successive Pre-Set value.
To save new Pre-Set Flash Rates into storage, adjust the speed
to the desired setting, then press the Pre-Set rate storage button
(F) in the center of the button panel. That rate setting will now be
stored into position 1 (4000) of the factory presets. To store values
in locations 2-10, press the button to view a factory Pre-Set
rate. Adjust to a new desired rate with the & adjustment
buttons. Then, press the Flash Rate storage button (F) to override
the selected Pre-Set Storage rate position. Repeat to adjust the
remaining Pre-Set rate storage locations. The next time the unit
is turned on, the last rate stored will be displayed and ready for
use.
To measure rotation speed, direct the light source onto the rotat-
ing surface of an object, observe the light spot and adjust the
flash rate. If the flashing frequency is adjusted to the same rota-
tion speed of the object, the target object will appear to be static
or motionless when in actuality the equipment is still moving.
With a slight adjustment of the flash rate, movement can also be
viewed in an apparent slow motion. The operator can study the
process in action in either a slowed or static state to review for
proper performance.
If the surface being viewed is uneven or contains asymmetric
texts, images or marks, the persistence of a pattern will become
obvious when the texts, images etc begin to slow down and be-
come static. When the image or device moving appears static,
view the RPM on the display. This is the speed to record of the
system being viewed.
To utilize the ST-1100 as a Tachometer and measure the true rev-
olutions per minute (RPM):
1. Mark the object to be measured by either visually noting an
inherent distinguishing character, such as a label, scratch,
etc., or physically mark the object with a pen, tape or similar.
2. Turn on Power
3. Adjust RPM on display to highest setting
4. Push LED Flash Switch
5. Adjust the Flash Rate Value (RPM) downward
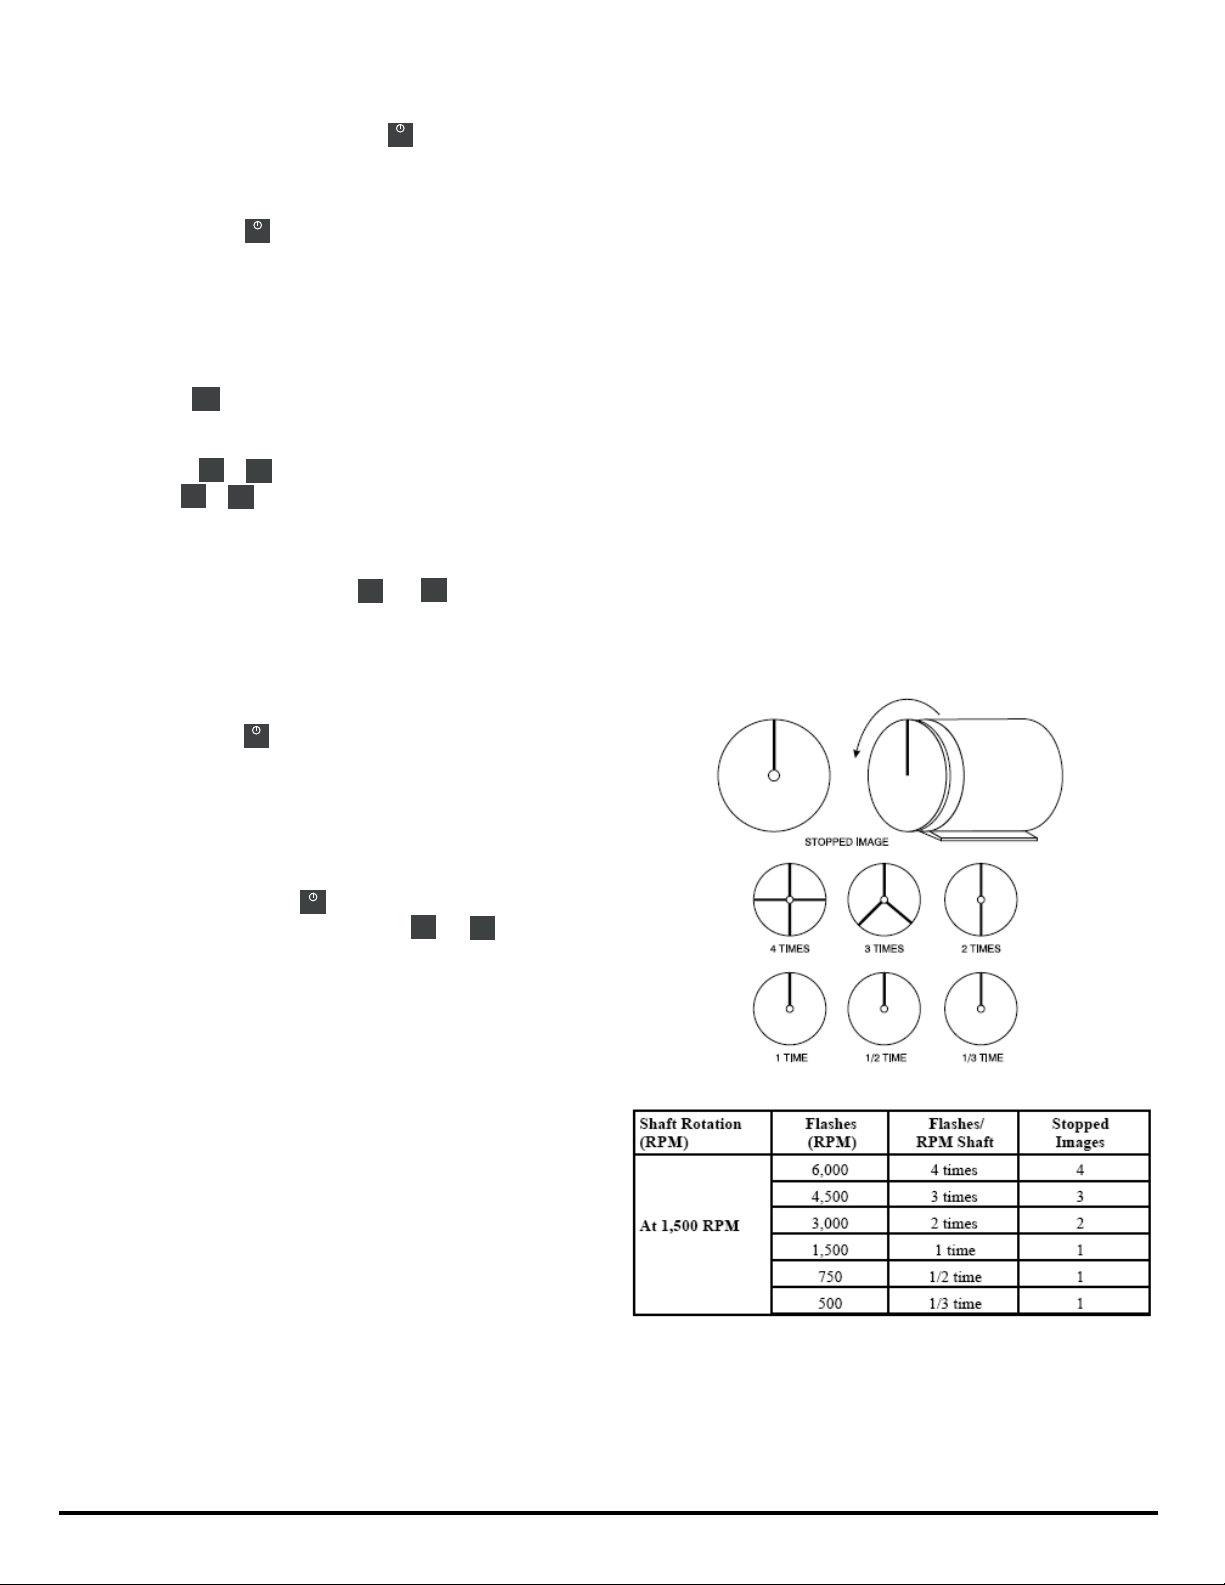
6. The true revolutions per minute (RPM) can be noted once the
action appears frozen and the first single image of the mark
appears (see chart and diagram below for further explanation)
7. To verify the revolution (RPM) reading, adjust the rate to half
the rate found in #6. If the image is again static after dividing
the rate in half, the RPM found in #6 is confirmed.
READ
READ
UP DOWN
FINE
ADJUST
UP DOWN
UP DOWN
UP DOWN
READ
READ
www.GlobalTestSupply.com
Find Quality Products Online at: sales@GlobalTestSupply.com

Other Nidec Measuring Instrument manuals

Nidec Shimpo FG-L1 User manual

Nidec

Nidec Shimpo FG-L1 User manual

Nidec FG-7000T User manual

Nidec

Nidec FG-7000T User manual

Nidec TNP Series User manual

Nidec

Nidec TNP Series User manual

Nidec FG-3000R-S User manual

Nidec

Nidec FG-3000R-S User manual

Nidec ST-1100 User manual

Nidec

Nidec ST-1100 User manual

Nidec TNP Series User manual

Nidec

Nidec TNP Series User manual

Nidec TNP-0.5 User manual

Nidec

Nidec TNP-0.5 User manual

Nidec SHIMPO DT-5TXR User manual

Nidec

Nidec SHIMPO DT-5TXR User manual

Nidec DT-105A Installation manual

Nidec

Nidec DT-105A Installation manual

Nidec ST-1000 Installation manual

Nidec

Nidec ST-1000 Installation manual

Nidec Kato Engineering KRM2000 User manual

Nidec

Nidec Kato Engineering KRM2000 User manual

Nidec DT-361 User manual

Nidec

Nidec DT-361 User manual

Nidec DT-200LR-S12 User manual

Nidec

Nidec DT-200LR-S12 User manual

Nidec PG-100N Series User manual

Nidec

Nidec PG-100N Series User manual

Nidec SHIMPO G-7000L-S-2 User manual

Nidec

Nidec SHIMPO G-7000L-S-2 User manual

Nidec PT-120 User manual

Nidec

Nidec PT-120 User manual

Nidec PG-100 User manual

Nidec

Nidec PG-100 User manual

Nidec Shimpo DT-5TS User manual

Nidec

Nidec Shimpo DT-5TS User manual

Nidec TNX Series User manual

Nidec

Nidec TNX Series User manual

Nidec ST-1100 User manual

Nidec

Nidec ST-1100 User manual

Nidec PG-100B Series User manual

Nidec

Nidec PG-100B Series User manual

Nidec FG-7000TA User manual

Nidec

Nidec FG-7000TA User manual

Nidec ST-1100 User manual

Nidec

Nidec ST-1100 User manual

Nidec MF-2 User manual

Nidec

Nidec MF-2 User manual

Popular Measuring Instrument manuals by other brands

Shinwa 72730 instruction manual

Shinwa

Shinwa 72730 instruction manual

SatKing SK-3500 user manual

SatKing

SatKing SK-3500 user manual

Badger Meter DN15 user manual

Badger Meter

Badger Meter DN15 user manual

Tyco F3200 Operator's manual

Tyco

Tyco F3200 Operator's manual

ATAGO PAL-Easy ACID1 instruction manual

ATAGO

ATAGO PAL-Easy ACID1 instruction manual

MAGSYS IGM11 operating instructions

MAGSYS

MAGSYS IGM11 operating instructions

wilks InfraRan instruction manual

wilks

wilks InfraRan instruction manual

Conrad 81 67 61 operating instructions

Conrad

Conrad 81 67 61 operating instructions

Orion 2030 Reference manual

Orion

Orion 2030 Reference manual

Dräger PIR 3000 Instructions for use

Dräger

Dräger PIR 3000 Instructions for use

Kanomax 3800 Operation manual

Kanomax

Kanomax 3800 Operation manual

Tequipment PH-222 operating manual

Tequipment

Tequipment PH-222 operating manual

Tektronix VM700T user manual

Tektronix

Tektronix VM700T user manual

Fluidwell E112-P manual

Fluidwell

Fluidwell E112-P manual

Datum VoidMate manual

Datum

Datum VoidMate manual

Vessel SRC-01 instruction manual

Vessel

Vessel SRC-01 instruction manual

Keysight PNA-X N5241A Configuration guide

Keysight

Keysight PNA-X N5241A Configuration guide

ATAGO PAL-61S instruction manual

ATAGO

ATAGO PAL-61S instruction manual

manuals.online logo
manuals.online logoBrands
  • About & Mission
  • Contact us
  • Privacy Policy
  • Terms and Conditions

Copyright 2025 Manuals.Online. All Rights Reserved.