manuals.online logo
Brands
  1. Home
  2. •
  3. Brands
  4. •
  5. Niigata seiki
  6. •
  7. Measuring Instrument
  8. •
  9. Niigata seiki DP-180 User manual

Niigata seiki DP-180 User manual

- 2 -- 1 -
- 4 -- 3 -
000.00
REL
Deg°
006.00
ABS
Deg
°
006.00
ABS
Deg
°
035.00
ABS
Deg°
000.74
ABS
Deg
°
000.74
ABS
Deg
°
安全上のご注意 必ずお守りください
お使いになる人や他の人への危害、財産への損害を
未然に防止するため、必ずお守りいただくことを右
記のように説明しています。
使用前の準備 ご使用前に、下記の準備を行ってください
お守りいただかないと『傷害を負う、または物的損害が発生するおそれがある内容』です。
注意
してはいけない内容
『禁止事項』で す 。
必ず実行していただく
内 容『 強制事項』で す 。
●測定面、使用場所のゴミや汚れなどを除去する。
そのまま測定を行うと、測定面や被測定物に傷がつく原因となります。
誤差の原因にもなりますので、使用前に取り除いてください。
電源のON / OFF
電源ボタンを長押しすると、電源がONになり、測定画面が表示されます。
もう一度長押しすると電源がOFFになり、画面が消灯します。
用途・特長
●機械・金型・治具工具等の角度測定や、組み立て、加工基準として使用する精密角度測定器です。
●測定面はマグネット付。  ●任意の角度で0設定ができます。
●付属のUSB接続ケーブルを使用してパソコンにデータを転送することが可能です。
各部の名称
製品仕様
使用方法
取扱説明書をよく読み、指示に従う。
・取扱説明書に記載された内容以外での使用は、事故の原因となります。
測定作業にのみ使用する。
・指定用途以外へのご使用は、製品の破損や磨耗、予測できない事故の原因となります。
大切に取り扱う。
・ぶつける、落とすなどの衝撃を与えたり、重量物を上に乗せたりしないでください。
 精度不良や破損の原因となります。
・測定面は機能上重要な部分ですので、打痕などの変形には注意してください。
下記の条件を満たす環境で使用・保管する。
●雨や水、油などがかからない、乾燥した場所
●直射日光や炎天下の車内、火のそばなどを避けた、高温にならない場所
●子どもや、使用者以外が近づかない場所
・上記に反する場所での使用は製品の破損、事故やけがの原因となります。
設置場所の振動に注意する。
・機械の振動などによって本体は滑りやすくなりますのでご注意ください。
マグネットを精密機器に近づけない。
・測定面のマグネットを、コンピュータ・時計・精密機器・方向コンパスなどに近づけないでくだ
さい。故障の原因になります。
分解・改造を行わない。
・製品の破損や事故の原因となります。
 正常に作動しない場合はお買い上げの販売店、または発売元までご連絡ください。
この度は「デジタル角度計レベルニック」をお買上げいただきありがとうございます。
この商品は、機械・金型・治具工具等の角度測定や、組み立て、加工基準として使用する精密角度測定器です。
●正しく安全にお使いいただくため、ご使用の前に本取扱説明書を必ず読み、記載の手順に従ってご使用ください。
お読みになった後は、お使いになる方がいつでも見ることができる場所に大切に保管してください。
●第三者に譲渡・貸与される場合も、この説明書を必ず添付してください。
●当商品に関するお問い合わせは、お買い求めの販売店もしくは当社にご連絡ください。
デジタル角 度 計レ ベ ルニック
2111I432-K1
DP-180
品番
取扱説明書
精密角度測定器
品番
測定範囲
最小読取値
使用温度範囲
読取精度
繰返し精度
電源
連続使用時間
外形寸法
<付属品>
DP-180
±180°
0.01°
0〜40℃
±0.05°(20℃の時)
±0.03°
リチウムイオン電池
約6時間 ※測定条件により多少異なります。
約L83 ×W19.2 ×H53 mm
ボーレート
パリティ
データビット
ストップビット
9600bps
None
8
1
使用後のお手入れ・保管方法
●測定面・外観などの汚れやゴミを除去する
●付属のケースに入れ、乾燥した冷暗所に保管する
直射日光や湿気は避け、管理者以外が触れない状態で保管してください。
通信仕様
ACアダプタ
リセットスイッチ穴 電 源 ボタン
HOLDボタン
ZEROボタン
ZEROボタン
USBケーブルUSB接続口
ACアダプタ
充電インジケータ
充電インジケータ
USB接続口
LCD表示部
測定面
( マ グ ネ ット 付 )
[LCD表示部(測定画面)]
[本体 ]
①
①HOLD表示
②単位記号
③充電残量
④角度メータ
⑤測定値
⑥ABS / REL モード表示
⑤
⑥
USBケーブル
●取扱説明書
電源ボタンや各メニュー操作が効かなくなったなどの非常時に、細い棒をリセットスイッチ穴に差し込
んで、押してください。電源が切れ、全ての機能がリセットされます。
各種機能
■リセットスイッチ 穴
■角度メータ
本器は充電池が内蔵されています。充電残量
が少なくなったら、下記の手順で充電を行っ
てください。
①付属のUSBケーブルを、本体とACアダプ
タのUSB接続口に差し込んでください。
②ACアダプタの差し込みプラグを、電源
(AC100〜240V)に差し込んでください。
③充電が開始されると充電インジケータが点
灯します。充電が完了すると充電インジ
ケータが消灯します。
付属のUSBケーブルを本器のUSB接続口に接続し、パソコンへデータ出力可能です。
パソコンが本器を認識しない場合、下記URLよりドライバーをインストールしてください。
●SK-LOG Lite版ソフトウェアダウンロード :https://www.niigataseiki.co.jp/software_sklog.html
0点に対して傾いている方向へ角度
メータの表示が切り替わります。
角度メータは±0.50°以 上 の 傾 き か ら
表示され、角度メータ内の目盛は傾き
の大きさに応じて増減します。
※押すと表示値が固
定され、再度押す
と固定が解除され
ます。
※長押しで電源のON/
OFFを行います。
◎通信仕様
◎表示値について
データ出力
◎出力データ
最 初 の バ イ ト「 00」「 01」は正の角度を表し、「10」「 11」は負の角度を表します。
2番目のバイトは角度値の整数ビットで、3番目のバイトは角度の小数ビットです。
※角度値は圧縮されたBCDコードです。
充電方法
ZEROボタンを押すとモードが切り替わり、LCD表示部の『ABS』『REL』の表示が切り替わります。
【ABSモード】被測定物の角度を水平からの絶対値で表します。
【RELモード】被測定物の角度を基準面との差で表します。
絶対測定モードは、原点を記録させることができます。
この原点は、電源をOFFにしても記憶されますので、毎回設定し直す必要はありません。
<原点の設定>
①電源ボタンを長押しして、電源を入れます。
他の水準器などで水平出しされた面に、本器を置いてください。
②電源ボタンを再度長押ししてください。
LCD表示部の画面表示が消えたら、電源ボタンを押した状態の
ままZEROボタンを押してください。
③LCD表示部に(図1)の画面が表示された後、「ピッ」と音が
したら原点の設定が開始されます。
※(図1)と異なる画面が表示された場合は一度再起動し、やり
直してください。
再び「ピッ」と音がしたら(図2)の画面に表示が切り替わり
ますので、本器を水平に180°回転させてください。
回転後、「ピッ」と音がして原点の設定が再開します。
④「ピーッ」と音が鳴り、通常の測定画面に切り替わります。
これで原点が設定されました。
<使用方法>
①被測定物に本器底面の測定面を当ててください。
②表示が安定するまで待ち、測定値を読み取ってください。
※必ず本器底面の測定面をご使用ください。
※上記の使用方法以外での測定は保証対象外となります。
■ABS / RELモードの切り替え
絶対測定(ABS)モ ー ド で 使 用 す る
比較測定(REL)モ ー ド で 使 用 す る
(図1)
(図2)
例)+00.12
1
68 0D 00 80 00 00 12 00 00 00 00 00 00 9F
1 1
固定文字 表示値 予約 チェック
サム
1 1 2 6 1
④
④
② ③
差し込む
差し込 む
比較測定モードは、任意の角度を0°に設定することができます。
<0点の設定>
①電源ボタンを長押しして電源を入れます。
②基準とする平らな面に本器の測定面を当て、LCD表示部に“ABS”
と表示されている状態で、ZEROボタン を 押 してくだ さ い 。
③LCD表示部が“000.00°”になり、“REL”が表示されます。
<使用方法>
①被測定物に本器の0点を設定した測定面を当ててください。
②表示が安定するまで待ち、測定値を読み取ってください。
※必ず0点を設定した測定面で測定を行ってください。
※上記の使用方法以外での測定は保証対象外となります。
【水平面より右に傾いているとき】 【水平面より左に傾いているとき】
製造元
〒955-0055
新潟県三条市塚野目5丁目3番14号
(0256)33-5502
(代)
FAX(0256)33-5528
URL http://www.niigataseiki.co.jp
000.00
REL
Deg°
RemoveanddustorgrimefromMeasurementSurfaces
andexteriorofinstrument.
Placeinprovidedcaseandstoreinlocationprotected
fromdirectsunlightorhumidity.Keepoutofreachfrom
unauthorizedpersonnel.
●Dry and protected from rain, water, and oils.
●Not in direct sunlight, and avoid excessive heat such as in a car or near a heat source.
●Location protected from use by children and unauthorized users.
- 2 -- 1 -
- 4 -- 3 -
006.00
ABS
Deg°
006.00
ABS
Deg°
035.00
ABS
Deg°
000.74
ABS
Deg
°
000.74
ABS
Deg
°
SAFETY NOTICES
Topreventharmtoyourselforothers,andto
preventdamagetoproperty,alwaysfollowthe
proceduresmarkedwiththefollowingsymbols.
PREPARATION Make sure surfaces are prepared before use
WARNING:
Indicatesriskofpersonalinjuryorpropertydamageifnotfollowed.
Denotesaprohibition
‒YouMUSTNOTdo
Denotesarequirement
‒YouMUSTdo
CleantheMeasuringSurfacesandtheworkpiecesurfacestheywillcontactbeforeuse.
DustorchipscandamagetheMeasuringSurfacesandworkpiece,andcauseinaccuratereadingsso
pleaseinsurethatallsurfacesareproperlypreparedbeforeuse.
POWER ON / OFF
PressandholdthePowerButtontoturninstrumentONandtheMeasurementScreenwilldisplay.
PressandholdagaintoturnoffthepowerOFF.
APPLICATIONS・FEATURES
Precisionanglemeasuringinstrumentforuseinmeasuring,aswellasasreferencestandardduring
assembly,fixturing,equipmentinstallation,andfabricationoperations.
Magneticmeasuringsurfaces.  0Pointcanbesetatanyangle.
USBcableincludedfortransferringmeasurementstoPC.
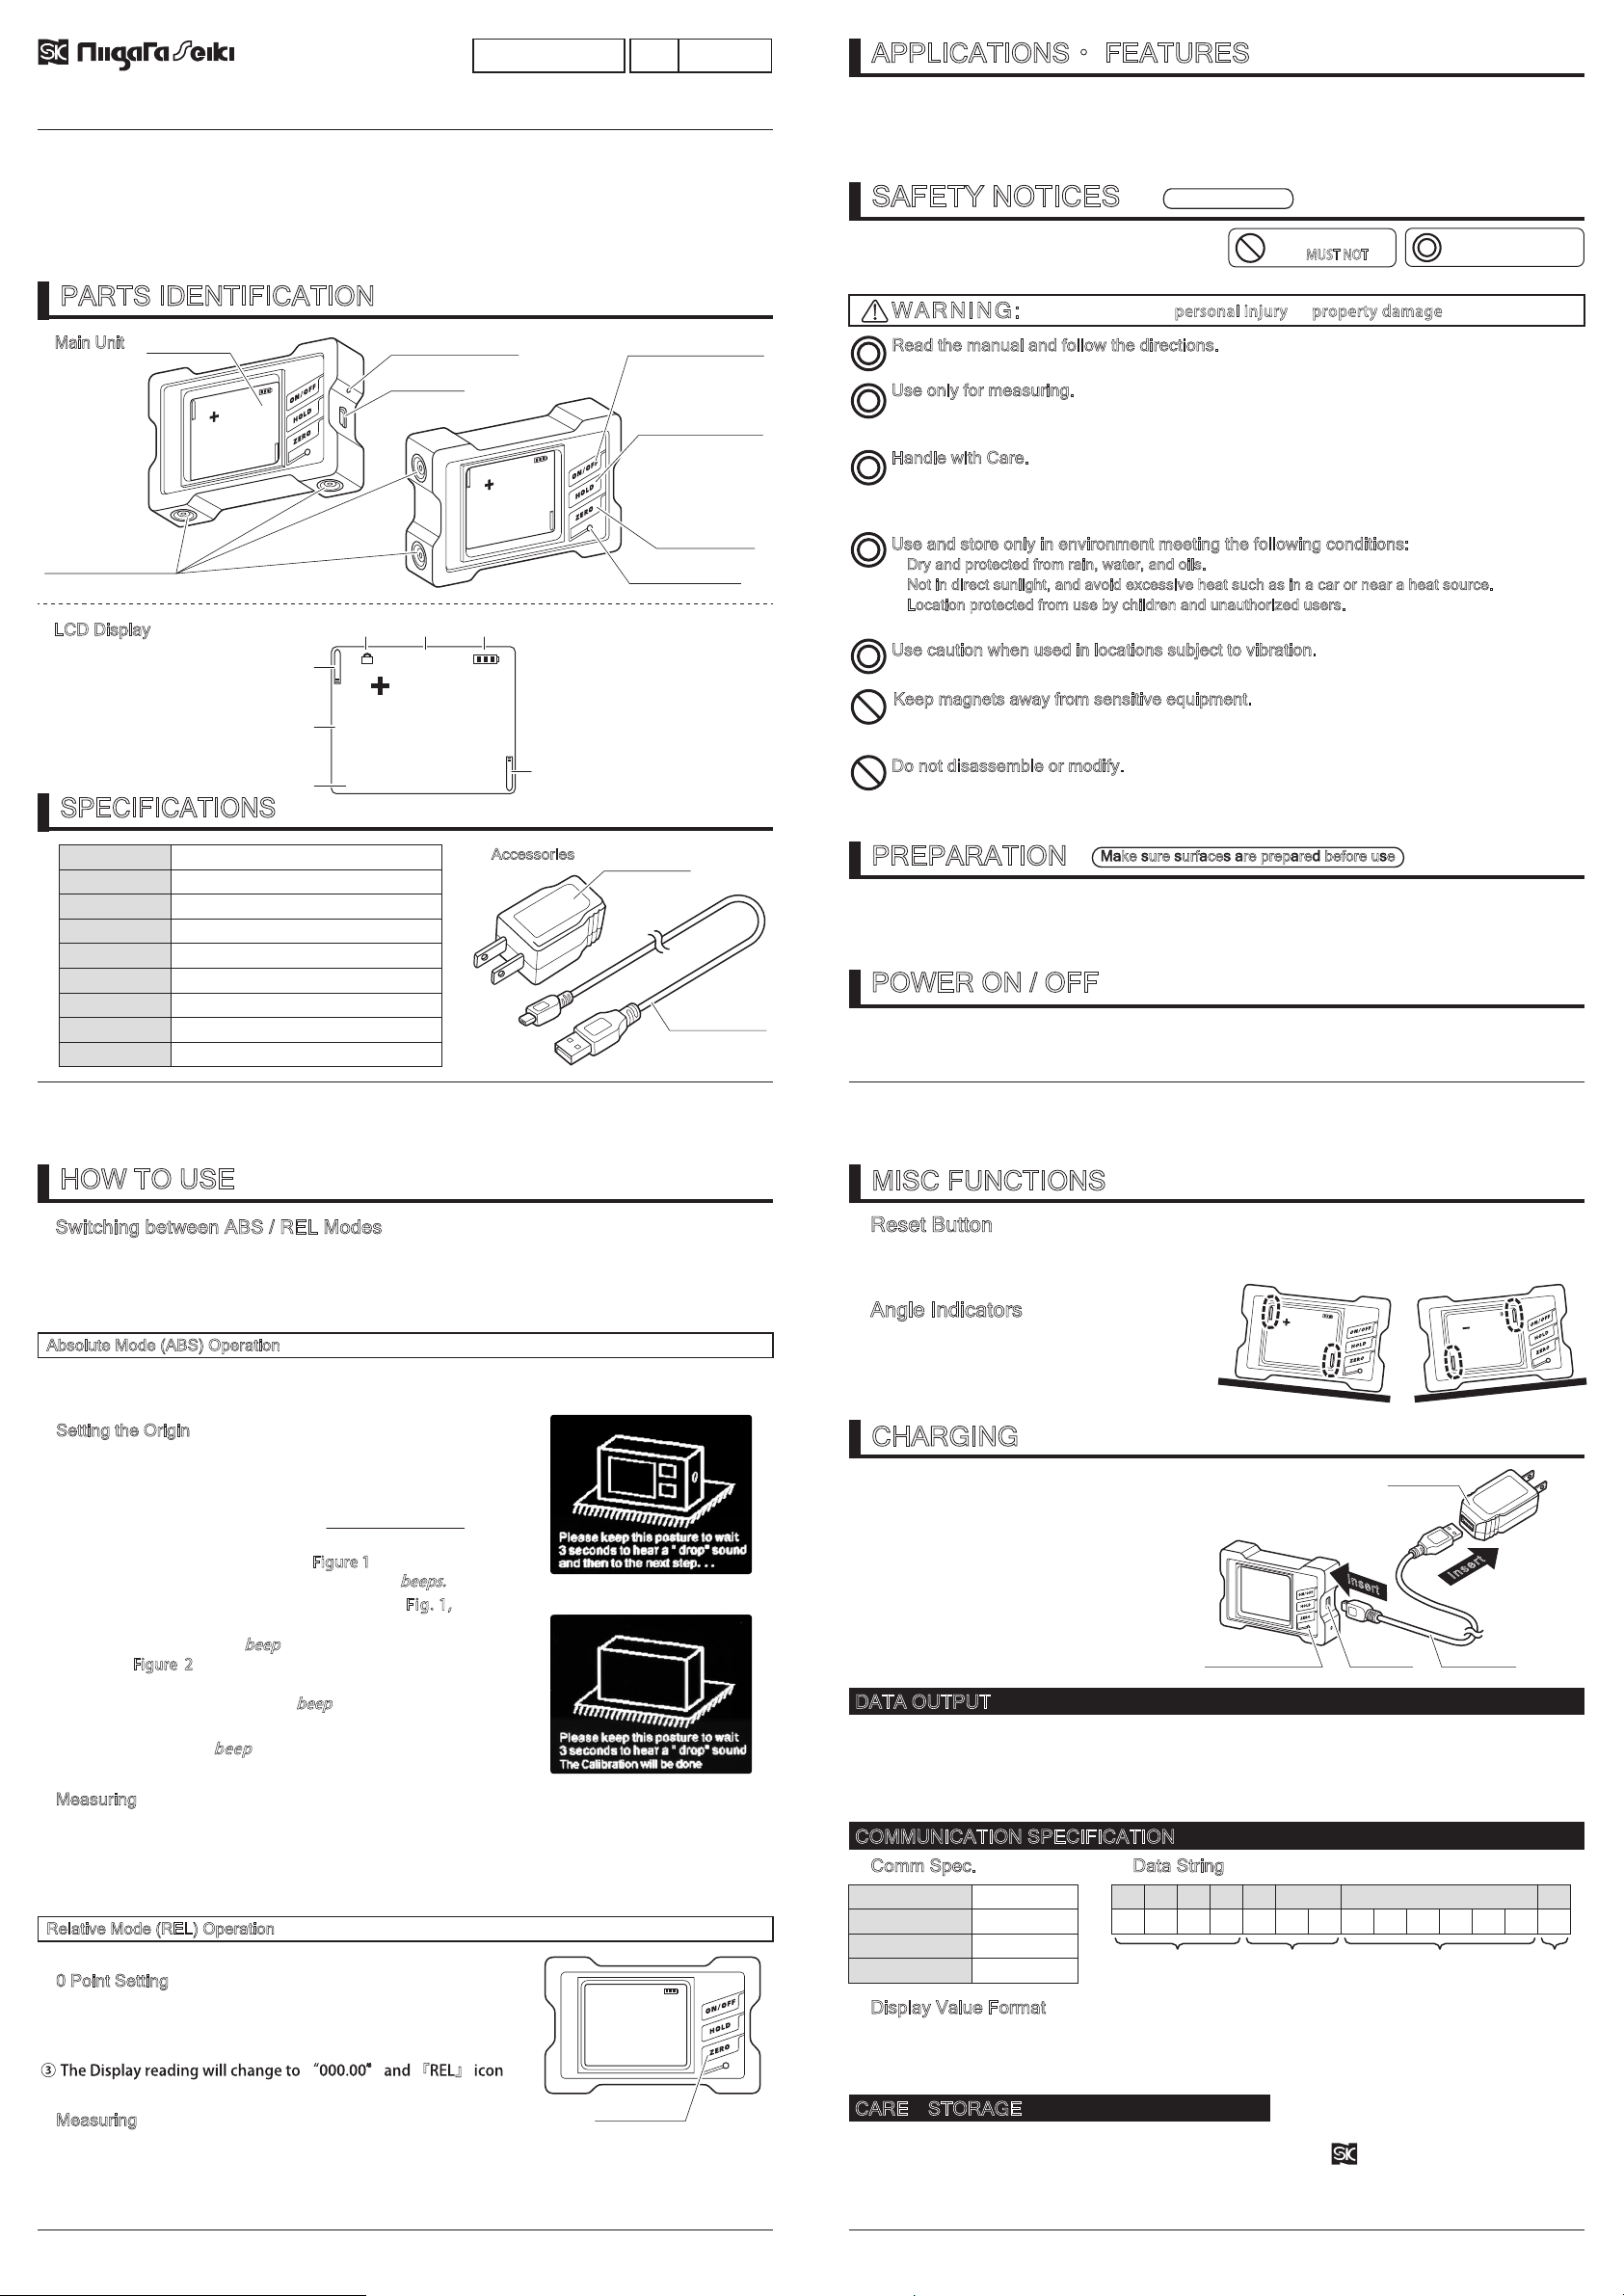
PARTS IDENTIFICATION
SPECIFICATIONS
HOW TO USE
Read the manual and follow the directions.
・Useofproductotherthanasdescribedinthismanualmaycauseaccident.
Use only for measuring.
・Useforanypurposeotherthanmeasuringmaydamageorweartheinstrument.Improperuse
mayalsocauseaccident.
Handle with Care.
・Donotdroporsubjectinstrumenttoexcessiveshock.Donotplaceunderheavyobjects.
Improperhandlingmaycausedamageorpooraccuracy.
・Usecaretopreventdamagetomeasuringsurfaces,suchasscratchesordents.
Use and store only in environment meeting the following conditions:
・Useinplacescontrarytotheabovemaycausedamagetotheproductleadingtoaccidentorinjury.
Use caution when used in locations subject to vibration.
・MovingandvibratingsurfacesmaycauseMainUnittofall.
Keep magnets away from sensitive equipment.
・Themagneticmeasurementsurfacesmayaffectinstrumentssuchascomputers,watches,
compasses,etc.
Do not disassemble or modify.
・Disassemblymaydamageproductorcauseaccident.
Forrepair,pleasecontactdistributororplaceofpurchase.
ThankyouforpurchasingNiigataSeikiDigitalProtractor.Thisprecisionanglemeterissuitedforuse
inmeasuring, as well as as reference standard during assembly, fixturing, equipment installation,
andfabricationoperations.
●Forsafeandproperuse,pleasereadthisinstructionmanualbeforeuseandfollowtheprocedures
described.Pleasekeepmanualwhereitisaccessibletouserforfuturereference.
●Keepthismanualwiththeinstrumentiftransferredorleasedtoathirdparty.
●Forinquiriesaboutthisproduct,pleasecontactthedealerwherepurchased,orNiigataSeiki.
DIGITAL PROTRACTOR
DP-180
Model
No.
InstructionManual
Precision
AngleMeter
Model
Range
Resolution
Op.Temp.Range
Accuracy
Repeatability
Power
BatteryLife
Dimensions
<Accessories>
DP-180
±180°
0.01°
0〜40℃
±0.05°(@ 20℃)
±0.03°
LithiumIonBattery
~6Hr.Cont.use.
※Typical,willvarywithconditions.
~L83 ×W19.2 ×H53 mm
CARE・STORAGE
ACAdapter
PowerButton
[ZERO]Button
ResetButtonHole
USB Port
LCDDisplay
Measuring Surface
(Magnets)
[LCD Display
]
(Measurement Screen)
[
Main Unit
]
①
① HoldIcon
② Units
③ ChargeStatus
④ AngleIndicators
⑤ Measurement
⑥ Mode (ABS / REL)
⑤
⑥
USBCable
●
InstructionManual
MISC FUNCTIONS
■Reset Button
Ifresetisneeded,suchasifPowerButtonorMenusdonotwork,thesystemcanberesetbyusinga
thintoolintheResetButtonhole.Duringreset,thepowerwillbeturnedoffandallfunctionswillbe
settofactorydefault.
■Angle Indicators
TheAngleIndicatorschangewithangleanddirection.
Whentheinstrumentistilted±0.50°or
morefrom
horizontal,theAngleIndicators
willshowthe
directionoftilt,aswellasthemagnitude.
※Pressandholdto
turnpowerON/OFF
■Switching between ABS / REL Modes
Pressthe[ZERO]Buttontoswitchmodes.Thedisplaywillindicatethecurrentmodewiththe『ABS』,
『REL』icons.
【ABSMode】Angledisplayedisreferencedtotruehorizontal.
【RELMode】Angledisplayedisrelativetoreferenceplane
Relative Mode (REL) Operation
④
④
② ③
InRelativeMode,The0°Pointcanbesetatanyangle.
<0 Point Setting>
① PressandHoldPowerButtontoturnON.
② Placetheinstrumentonthesurfacetobeusedasareference.
With『ABS』icondisplayed,pressthe[ZERO]Button.
willappear.The0Pointisset.
<Measuring>
① PlacetheinstrumentMeasurementSurfacewhichhasbeenzeroedontothesurfacetobemeasured.
②
※UseonlytheMeasurementSurfacewhichhasbeensettozerointheabovestep.
※Measurementaccuracycannotbeguaranteedforothermethodsofuse.
Waitforthedisplayvaluetostabilizeandreadtheanglemeasurement.
【Whentiltedrightofhorizontal】【Whentiltedleftofhorizontal】
Niigata Seiki Co., Ltd.
5-3-14, Tsukanome, Sanjo, Niigata, Japan, 955-0055
Tel. : +81-256-33-5522 Fax. : +81-256-33-5518
MAIL intl.sales@niigataseiki.co.jp
URL http://www.niigataseiki.co.jp
[HOLD]Button
※Presstohold
displayedreading;
pressagainto
release.
[ZERO]Button

ChargingLight
●
●
●
●
PleaseObserve
●
●
●
DATA OUTPUT
USBCable
ACAdapter
ChargingLight
Instrumenthas a builtinrechargeable
battery.Whenthechargeislow,followthe
procedurebelowtochargethebattery.
①ConnecttheUnittotheACAdapterusing
theincludedUSBCable.
② PlugintheACAdapter(AC100〜240V).
③TheChargingLightwillgoONwhen
charging.WhenfullychargedtheCharging
LightwillturnOFF.
CHARGING
Insert
Insert
USBPort
Data can be sent to a PC from the instrument USB port using the included USB cable.
If your computer does not automatically recognize this device, please install the driver at the URL below.
●SK-LOG Lite Edition Software Download:
http://www.niigataseiki.net/official/english/support/software_sklog.html
BaudRate
Parity
DataBits
StopBits
9600bps
None
8
1
COMMUNICATION SPECIFICATION
◎Comm Spec. ◎Data String
◎Display Value Format
Thefirstbyteisthesign「00」「01」arepositive,「10」「11」arenegative.
Thenexttwobytesaretheanglevalue;thesecondbyteistheintegerandthethirdisthedecimalvalue.
※AnglereadingisencodedusingBCDformat.
Ex.)+00.12
1
68 0D 00 80 00 00 12 00 00 00 00 00 00 9F
1 1
Fixed
Character
Display
Value
Reserved Check-
sum
1 1 2 6 1
InAbsoluteMode,theoriginisstoredinmemory.
Evenafterpoweristurnedoffthereisnoneedtoresetwitheachuse.
<Setting the Origin>
① PressandHoldPowerButtontoturnON.
PlacetheInstrumentonasurfacewhichhasbeenleveledwith
abubblelevelorsimilardevice.
② PressandholdthePowerButton.Continueholdingafter
Displayturnsoffandpressthe[ZERO]Buttonatsametime.
③ TheDisplaywillshowtheimageinFigure1.TheOriginsetting
willbeginwhentheimageappearsandtheunit
beeps.
※ IftheDisplaydoesnotshowtheimagefromFig.1,please
restartandtryagain.
When there is a second
beep
. the Display will switch to the
image in Figure 2. Rotate the instrument 180° in the same
locationonthesurface.
After rotating, there will be a
beep
 and the Origin setting
procedurewillcontinue.
④Therewillbeafinal
beep
andtheDisplaywillswitchtothe
normalmeasurementscreen.TheOriginisnowset.
<Measuring>
① PlacetheinstrumentbottomMeasurementSurfaceontothesurfacetobemeasured.
② Waitforthedisplayvaluetostabilizeandreadtheanglemeasurement.
Absolute Mode (ABS) Operation
(Fig.1)
(Fig.2)
※UseonlythebottomMeasurementSurfaceoftheinstrument.
※Measurementaccuracycannotbeguaranteedforothermethodsofuse.

Other Niigata seiki Measuring Instrument manuals

Niigata seiki GDCP-200AA User manual

Niigata seiki

Niigata seiki GDCP-200AA User manual

Niigata seiki WCDI-50D User manual

Niigata seiki

Niigata seiki WCDI-50D User manual

Niigata seiki GDCS-150DCD User manual

Niigata seiki

Niigata seiki GDCS-150DCD User manual

Niigata seiki GDCS-150D User manual

Niigata seiki

Niigata seiki GDCS-150D User manual

Niigata seiki EOM133 Series User manual

Niigata seiki

Niigata seiki EOM133 Series User manual

Niigata seiki TVC-60 User manual

Niigata seiki

Niigata seiki TVC-60 User manual

Niigata seiki GDCS Series User manual

Niigata seiki

Niigata seiki GDCS Series User manual

Niigata seiki GDCS-150D User manual

Niigata seiki

Niigata seiki GDCS-150D User manual

Niigata seiki DT Series User manual

Niigata seiki

Niigata seiki DT Series User manual

Niigata seiki GDCS-100WR User manual

Niigata seiki

Niigata seiki GDCS-100WR User manual

Niigata seiki KAIDAN GVC-10 User manual

Niigata seiki

Niigata seiki KAIDAN GVC-10 User manual

Niigata seiki QEM394 Series User manual

Niigata seiki

Niigata seiki QEM394 Series User manual

Niigata seiki WTI Series User manual

Niigata seiki

Niigata seiki WTI Series User manual

Niigata seiki DT Series User manual

Niigata seiki

Niigata seiki DT Series User manual

Niigata seiki GDCS-150DR User manual

Niigata seiki

Niigata seiki GDCS-150DR User manual

Niigata seiki TVC-60 User manual

Niigata seiki

Niigata seiki TVC-60 User manual

Niigata seiki LEVELNIC User manual

Niigata seiki

Niigata seiki LEVELNIC User manual

Niigata seiki CJU BKD Series User manual

Niigata seiki

Niigata seiki CJU BKD Series User manual

Niigata seiki VH-30D User manual

Niigata seiki

Niigata seiki VH-30D User manual

Niigata seiki SCG Series User manual

Niigata seiki

Niigata seiki SCG Series User manual

Niigata seiki WR-100 User manual

Niigata seiki

Niigata seiki WR-100 User manual

Niigata seiki GVC Series User manual

Niigata seiki

Niigata seiki GVC Series User manual

Niigata seiki MCD130-25 User manual

Niigata seiki

Niigata seiki MCD130-25 User manual

Niigata seiki GDCS-100WR User manual

Niigata seiki

Niigata seiki GDCS-100WR User manual

Popular Measuring Instrument manuals by other brands

Armada Pro871 operating instructions

Armada

Armada Pro871 operating instructions

GHM G 1410 operating manual

GHM

GHM G 1410 operating manual

Omicron Bode 100 user manual

Omicron

Omicron Bode 100 user manual

Cameron NuFlo MC-II user manual

Cameron

Cameron NuFlo MC-II user manual

KROHNE Altosonic III Installation and operating instructions

KROHNE

KROHNE Altosonic III Installation and operating instructions

Hameg HM8115-2 manual

Hameg

Hameg HM8115-2 manual

YOKOGAWA FLXA21 user manual

YOKOGAWA

YOKOGAWA FLXA21 user manual

VOLTCRAFT DO-100 operating instructions

VOLTCRAFT

VOLTCRAFT DO-100 operating instructions

Kane KANE458s manual

Kane

Kane KANE458s manual

IFM DI5029 installation instructions

IFM

IFM DI5029 installation instructions

OfiTE 4005 instruction manual

OfiTE

OfiTE 4005 instruction manual

HBK PAD4001A operating manual

HBK

HBK PAD4001A operating manual

emitor EasySplicer OTDR owner's manual

emitor

emitor EasySplicer OTDR owner's manual

Shineway Tech SLS-50 user manual

Shineway Tech

Shineway Tech SLS-50 user manual

Clipper ECHO SOUNDER manual

Clipper

Clipper ECHO SOUNDER manual

GAGEMAKER MIC TRAC MT-3000 Operation manual

GAGEMAKER

GAGEMAKER MIC TRAC MT-3000 Operation manual

Extech Instruments ExStik FL700 user guide

Extech Instruments

Extech Instruments ExStik FL700 user guide

PCB Piezotronics 356B07 Installation and operating manual

PCB Piezotronics

PCB Piezotronics 356B07 Installation and operating manual

manuals.online logo
manuals.online logoBrands
  • About & Mission
  • Contact us
  • Privacy Policy
  • Terms and Conditions

Copyright 2025 Manuals.Online. All Rights Reserved.