manuals.online logo
Brands
  1. Home
  2. •
  3. Brands
  4. •
  5. Oase
  6. •
  7. Water Pump
  8. •
  9. Oase Neptun 2600 User manual

Oase Neptun 2600 User manual

Questions, problems, missing parts?
Before returning to your retailer, call us at 1-866-627-3435, 8 a.m.-6 p.m., EST, Monday-Friday, or email
us at customercare@oase-livingwater.com. Or visit our website at www.oase-livingwater.com
- English -- English -
3
2
REMINDER
CALL 1-866-627-3435
BEFORE RETURNING TO STORE.
Part Description
A Motor casing
B Pressure socket
C Flow regulator/ suction unit
DPre-lter
E Pump foot
Information about these operating instructions
Welcome to OASE Living Water. You made a great choice with the purchase of this product Neptun 1600/2600. Prior
to operating the unit, please read the instructions of use carefully and fully familiarize yourself with the unit. Ensure that
all work on and with this unit is only carried out in accordance with these instructions. Please strictly follow the enclosed
instructions to ensure safe and correct handling of the product. Keep these instructions in a safe place. Please also hand
over the instructions when passing the unit on to a new owner.
WARNINGS AND CAUTIONS SYMBOLS
Symbols used in these instructions
The symbols used in this operating manual have the following meanings:
Risk of injury to persons due to dangerous electrical voltage.
This symbol indicates an imminent danger, which can lead to death or severe injuries if the appropriate measures are
not taken.
Risk of personal injury caused by a general source of danger.
This symbol indicates an imminent danger, which can lead to death or severe injuries if the appropriate measures are
not taken.
Important information for trouble-free operation.
!
Intended use
Neptun 1600/2600, referred to in the following as “unit”, may only be used as specied in the following:
• For pumping clear water used for indoor and outdoor fountain pumps, table fountain pumps and statues.
• For operation with clean water.
• Operation under observance of the technical data.
The following restrictions apply to the unit:
• Do not use in swimming ponds.
• Never use the unit to convey uids other than water.
• Never run the unit without water.
• Do not use in conjunction with chemicals, foodstuff, easily ammable or explosive substances.
• Do not connect to the domestic water supply.
Use other than that intended
This unit can be dangerous and cause harm if not used in accordance with these instructions. Any use not in accordance
with these instructions or modication(s) to the unit will void the limited warranty.
A
B
C
D
E
Installation
Important:
●The unit can be placed submerged or inline.
●Always place the unit below water level.
General preparatory work
1. Bolt on the suction unit and t the pressure
socket.
2. Connect the desired hose for the water
feature to the pressure socket.
●Adapt stepped hose connectors to the
water supply and return in accordance
with the hose diameter.
3. Remove the pump foot, if necessary. For
this purpose, press the pump foot to the
rear, as illustrated.
3.
Attention! Dangerous electrical voltage.
Possible consequences: Death or serious injuries.
Protective measures:
• Prior to reaching into the water, disconnect the power supply to all units used in the water.
• Disconnect the power plug prior to carrying out work on the unit.
Questions, problems, missing parts?
Before returning to your retailer, call us at 1-866-627-3435, 8 a.m.-6 p.m., EST, Monday-Friday, or email
us at customercare@oase-livingwater.com. Or visit our website at www.oase-livingwater.com
- English -- English -
5
4
Start-up
Attention! Dangerous electrical voltage.
Possible consequences: Death or serious injuries.
Protective measures:
• Isolate the units and installations (switch off and disconnect from the power supply) before reaching into the
water.
Attention! The pump must never run dry.
Possible consequence: The pump will be destroyed.
Protective measure: Check the water level at regular intervals. Always place the unit below water level.
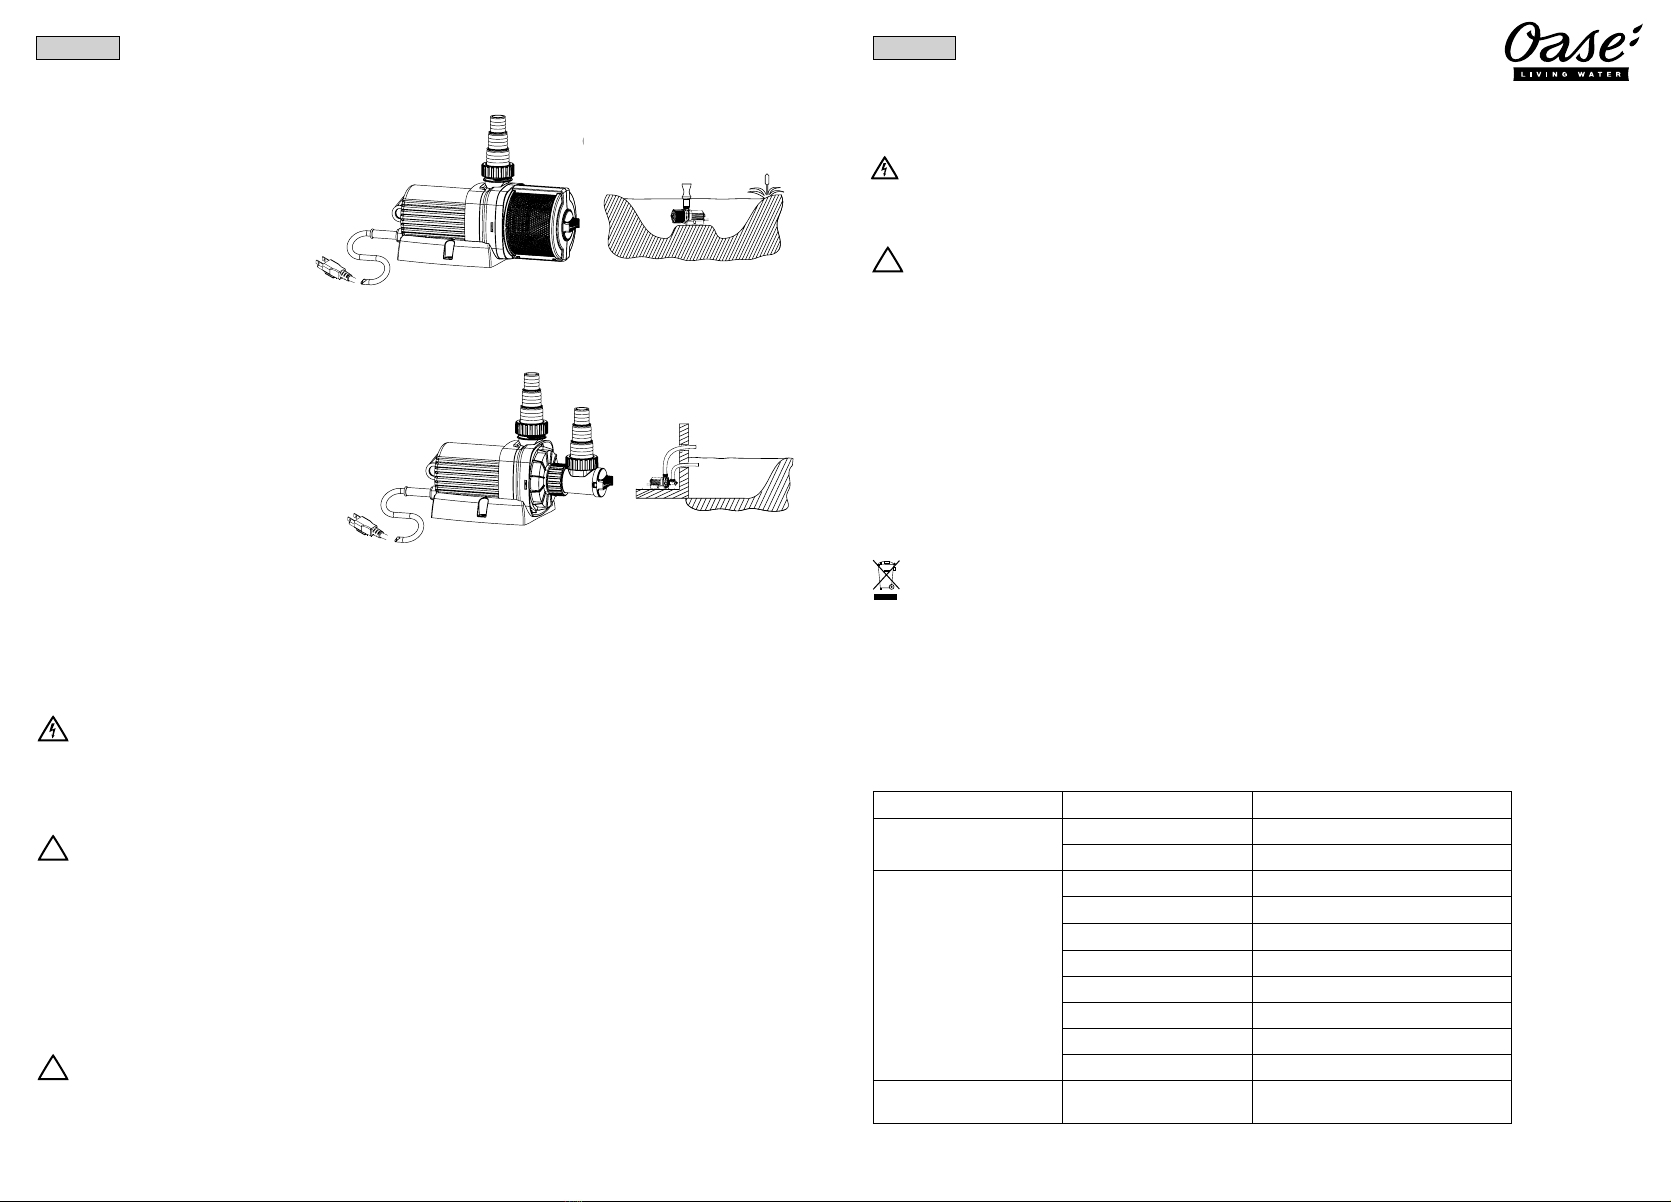
Submerged installation
● Operation with the pre-lter tted.
1. Push the pre-lter over the suction unit and
fasten the lter using the bayonet closure.
2. Place the unit in the water at the desired
position.
● Ensure that the unit is fully submerged.
Maximum installation depth:13.3 ft.
!
!
Dry installation
1. Bolt the suction unit on and turn the priming opening
to an optimum position for priming and connecting
the suction hose.
2. Connect the suction hose to the suction unit.
● Always position the unit below the water line to
prevent dry running and the intake of air when
switching on and operating the unit. Risk of
damage!
● Never connect the unit to a water line.
● Install the unit so that it is not exposed to direct sun
radiation (max. 104 ºF - 40 ºC).
Important:
● The unit turns on automatically when power connection is established.
1. Turning on: Connect the unit to the outlet.
2. Switching off: Unplug the unit from the outlet.
● The amount of water owing through is adjustable by the ow through regulator
Attention! The installed temperature sensor automatically turns the pump off, if it is overloaded. The
pump automatically switches on again once the motor has cooled down. Risk of accident!
Maintenance and cleaning
Attention! Dangerous electrical voltage.
Possible consequences: Death or serious injuries.
Protective measures:
• Prior to reaching into the water, disconnect the power supply to all units used in the water.
• Disconnect the power plug prior to carrying out work on the unit.
Cleaning the unit
If necessary, clean the unit with clear water using a soft brush.
• In the event of stubborn furring (calcium deposits), a common household cleaner free from vinegar and chlorine can be
used. Subsequently, clean the pump thoroughly using clear water.
• Never use aggressive cleaning agents or chemical solutions. These could attack the housing surface or impair the
function.
Important! This units housing can not be opened for inspection. Opening the housing voids
warranty and can cause Death or severe injury. Follow cleaning instructions for routine cleaning.
!
Storage/Winterization
The unit is frost resistant to -4°F (- 20 °C). Should you store the unit outside of the pond, clean it thoroughly with a soft
brush and water, check it for damage, then store completely submerged in a container of water. . Do not submerge the
power plug in water!
Disposal
Do not dispose of this unit with domestic waste! Disable the unit beforehand by cutting off the cables. Further
information about the recycling of this product can be obtained from your local municipal authority.
Issue Cause Solution
Unit does not run No mains voltage check mains voltage
Rotor blocked rinse the vane from the front
Insufcient fountain height regulator closed too far set regulator
lter housing soiled clean lter housing
air in the hose vent hoses
rotor soiled clean
hose blocked or defective clean hose or replace
hose kinked check hose and replace if necessary
rotor worn replace rotor
lter clogged clean lter
Unit switches off after a
short period of operation
Water temperature too high Note maximum water temperature of
95°F (+35°C)
Troubleshooting
Spare parts
The use of original parts from OASE ensures continued safe and reliable operation of the unit. Please visit our website for
spare parts drawings and spare parts. www.oase-livingwater.com
Never open the housing! Only allow a qualied electrician to replace the power cable!
A damaged unit cannot be repaired and must be put out of operation. Dispose of the unit in accordance with the
regulations.

This manual suits for next models

1

Other Oase Water Pump manuals

Oase IceFree 4 Seasons User manual

Oase

Oase IceFree 4 Seasons User manual

Oase Neptun 3000 User manual

Oase

Oase Neptun 3000 User manual

Oase FP 1500 User manual

Oase

Oase FP 1500 User manual

Oase AquaMax Eco 5000 User manual

Oase

Oase AquaMax Eco 5000 User manual

Oase Aquarius Eco Expert 28000 User manual

Oase

Oase Aquarius Eco Expert 28000 User manual

Oase ProMax Pressure Automatic 5500/5 User manual

Oase

Oase ProMax Pressure Automatic 5500/5 User manual

Oase Aquamax Dry 6000 User manual

Oase

Oase Aquamax Dry 6000 User manual

Oase ProfiClear Premium Fleece 500 User manual

Oase

Oase ProfiClear Premium Fleece 500 User manual

Oase promax 30000 User manual

Oase

Oase promax 30000 User manual

Oase 90 User manual

Oase

Oase 90 User manual

Oase AquaMax Eco Premium 4000 User manual

Oase

Oase AquaMax Eco Premium 4000 User manual

Oase AquaMax Eco Twin 20000 User manual

Oase

Oase AquaMax Eco Twin 20000 User manual

Oase Proficlear Module 5 User manual

Oase

Oase Proficlear Module 5 User manual

Oase OxyMax 100 User manual

Oase

Oase OxyMax 100 User manual

Oase Aquarius Universal Expert 21000 User manual

Oase

Oase Aquarius Universal Expert 21000 User manual

Oase biOrb AIR 30 User manual

Oase

Oase biOrb AIR 30 User manual

Oase AquaOxy 2500 User manual

Oase

Oase AquaOxy 2500 User manual

Oase AquaMax Eco Twin 20000 User manual

Oase

Oase AquaMax Eco Twin 20000 User manual

Oase promax cleardrain 7000 User manual

Oase

Oase promax cleardrain 7000 User manual

Oase Aquarius Universal Classic 440 User manual

Oase

Oase Aquarius Universal Classic 440 User manual

Oase ProMax MudDrain 7000 User manual

Oase

Oase ProMax MudDrain 7000 User manual

Oase promax 20000 User manual

Oase

Oase promax 20000 User manual

Oase Aquarius Eco Expert 22000 User manual

Oase

Oase Aquarius Eco Expert 22000 User manual

Oase Varionaut 1 Maintenance and service guide

Oase

Oase Varionaut 1 Maintenance and service guide

Popular Water Pump manuals by other brands

Pentair PTS Jung Multicut 08/2 ME instruction manual

Pentair

Pentair PTS Jung Multicut 08/2 ME instruction manual

LUBE EGH-2C Operation manual

LUBE

LUBE EGH-2C Operation manual

Espa TIPER instruction manual

Espa

Espa TIPER instruction manual

Watson-Marlow MasoSine EC 25 manual

Watson-Marlow

Watson-Marlow MasoSine EC 25 manual

IWAKI MX-70 instruction manual

IWAKI

IWAKI MX-70 instruction manual

Crown G6 Installation and operation manual

Crown

Crown G6 Installation and operation manual

WIKA 6 Series operating instructions

WIKA

WIKA 6 Series operating instructions

Nippon Oil Pump Cyclone Filter Pump User instruction manual

Nippon Oil Pump

Nippon Oil Pump Cyclone Filter Pump User instruction manual

GORMAN-RUPP PUMPS ULTRA V V3C60SC-B Series Installation, operation, and maintenance manual with parts list

GORMAN-RUPP PUMPS

GORMAN-RUPP PUMPS ULTRA V V3C60SC-B Series Installation, operation, and maintenance manual with parts list

Orion 21205 user manual

Orion

Orion 21205 user manual

GORMAN-RUPP PA Series Installation, operation and maintenance manual

GORMAN-RUPP

GORMAN-RUPP PA Series Installation, operation and maintenance manual

Zoeller 2701 manual

Zoeller

Zoeller 2701 manual

Varian TV 301 Navigator 969-8918 instruction manual

Varian

Varian TV 301 Navigator 969-8918 instruction manual

Xylem Lowara Micro PRESFIX Operating, installation and maintenance instructions

Xylem

Xylem Lowara Micro PRESFIX Operating, installation and maintenance instructions

Watson Marlow Pumps 501CC user manual

Watson Marlow Pumps

Watson Marlow Pumps 501CC user manual

Pentair AURORA Edwards 20 Maintenance manual

Pentair

Pentair AURORA Edwards 20 Maintenance manual

Stuart RE3022C instruction manual

Stuart

Stuart RE3022C instruction manual

ProMinent Sigma 1 Series Supplementary operating instructions

ProMinent

ProMinent Sigma 1 Series Supplementary operating instructions

manuals.online logo
manuals.online logoBrands
  • About & Mission
  • Contact us
  • Privacy Policy
  • Terms and Conditions

Copyright 2025 Manuals.Online. All Rights Reserved.