manuals.online logo
Brands
  1. Home
  2. •
  3. Brands
  4. •
  5. OHAUS
  6. •
  7. Measuring Instrument
  8. •
  9. OHAUS T51XW User manual

OHAUS T51XW User manual

Quick Start Guide T51 Indicators
Ohaus Corporation www.ohaus.com iT51 Indicators Quick Start Guide
ASSEMBLY
Both the T51P and T51XW connect to a base scale through a Load Cell Cable that connects to
the Indicator’s Main Printed Circuit Board (PCB). Each model has a mounting bracket that can
be attached to a column mount bracket or a wall mount. To remove the mounting bracket,
remove the threaded knobs, holding the Indicator by hand.
CAUTION:
ELECTRICAL SHOCK HAZARD. REMOVE ALL POWER CONNECTIONS TO THE
INDICATOR BEFORE MAKING INTERNAL CONNECTIONS.
The process of opening the Housing varies slightly for each model:
T51P:
1. Remove the four Phillips head screws
from the rear housing.
2. Open the housing; disconnect the
ribbon cable from the top of the PCB.
T51XW:
1. Remove the four hex head screws from
the rear housing.
2. Open the housing by carefully pulling
the top of the front housing forward.
The T51’s Main PCB, with connectors, jumpers, terminals and switches is shown below.
Printed Circuit Board (PCB), T51 Indicator.
Jumper Connections:
For a 4-wire load cell with no sense wires, short Jumpers W1 and W2.
For a 6-wire load cell that includes sense wires, open Jumpers W1 and W2.
For load cells with an extra ground shield wire, connect the shield to the center position (GND).
+EXC +SIG -SIG -EXC
+SENS GND -SENS
Load Cell wiring.
Pin Connection
J4-1 +Excitation
J4-2 +Sense
J4-3 +Signal
J4-4 GND
J4-5 –Signal
J4-6 –Sense
J4-7 –Excitation
Open/shorted jumpers.
Power Supply
connector
Battery
connector J2
(T51P only)
Alternate
Load Cell
Terminal J4
Sense
Jumper W1
Sense
Jumper W2
Security Switch
SW2
RS232
Terminal J7
(T51XW only)
External Input
Terminal Block
COM2
Connector J8
(Optional:
RS232 or
RS422/485
)
RS232 Pin Connector
(T51P only)
Recharge
option-T51P
(opposite side)
Load Cell
Connector Plug
T51 Indicators Quick Start Guide
T51 Indicators Quick Start Guide ii Ohaus Corporation www.ohaus.com
SAFETY PRECAUTIONS
For safe and dependable operation of this product, please comply with the following
safety precautions:
•Verify that the input voltage printed on the power Adapter and the plug type matches
the local power supply.
•Make sure that the power cord does not pose an obstacle or tripping hazard.
•Disconnect the product from the power supply when cleaning.
•Do not operate this product in hazardous or unstable environments.
•Do not drop loads on the pan.
•Use only approved accessories and peripherals, as available.
•Operate the product only under ambient conditions specified in the Instruction Manual.
•Service should be performed by authorized personnel only.
CONTROLS
Button
Primary Function
(Short Press) ON/ZERO
Turns the Indicator on
If Indicator is on,
sets zero.
PRINT
Sends the current value to
the COM port if AUTOPRINT
is set to Off.
FUNCTION
Initiates an application mode.
Temporarily displays the
active mode’s reference data.
TARE
Performs a tare
operation.
Secondary
Function
(Long Press)
Off
Turns the Indicator off. Units
Changes the weighing unit. Mode
Allows changing the
application mode.
Press and hold allows
scrolling through modes.
Menu
Enter the User menu.
Menu Function
(Short Press) Yes
Accepts the current
setting on the display.
No
Advances to the next menu
or menu item.
Rejects the current setting on
the display and advances to
the next available setting.
Increments the value.
Back
Moves back
to previous menu item.
Decrements the value.
Exit
Exits the User menu.
Aborts a calibration in
progress.
Center of Zero
symbol
Preset Tare,
Tare, Brutto,
Gross symbols
Kilogram, Gram,
Percent, Pound,
Ounce, Pound:
Ounce, Tonne,
Pieces symbols
Capacity label
windo
w
Under, Accept
& Over LEDs
Range symbol
Scale symbol
(
not used
)
Dynamic weighing
symbol
Battery charge
symbol
Stability symbol
Net symbol
Quick Start Guide T51 Indicators
Ohaus Corporation www.ohaus.com iii T51 Indicators Quick Start Guide
OPERATION
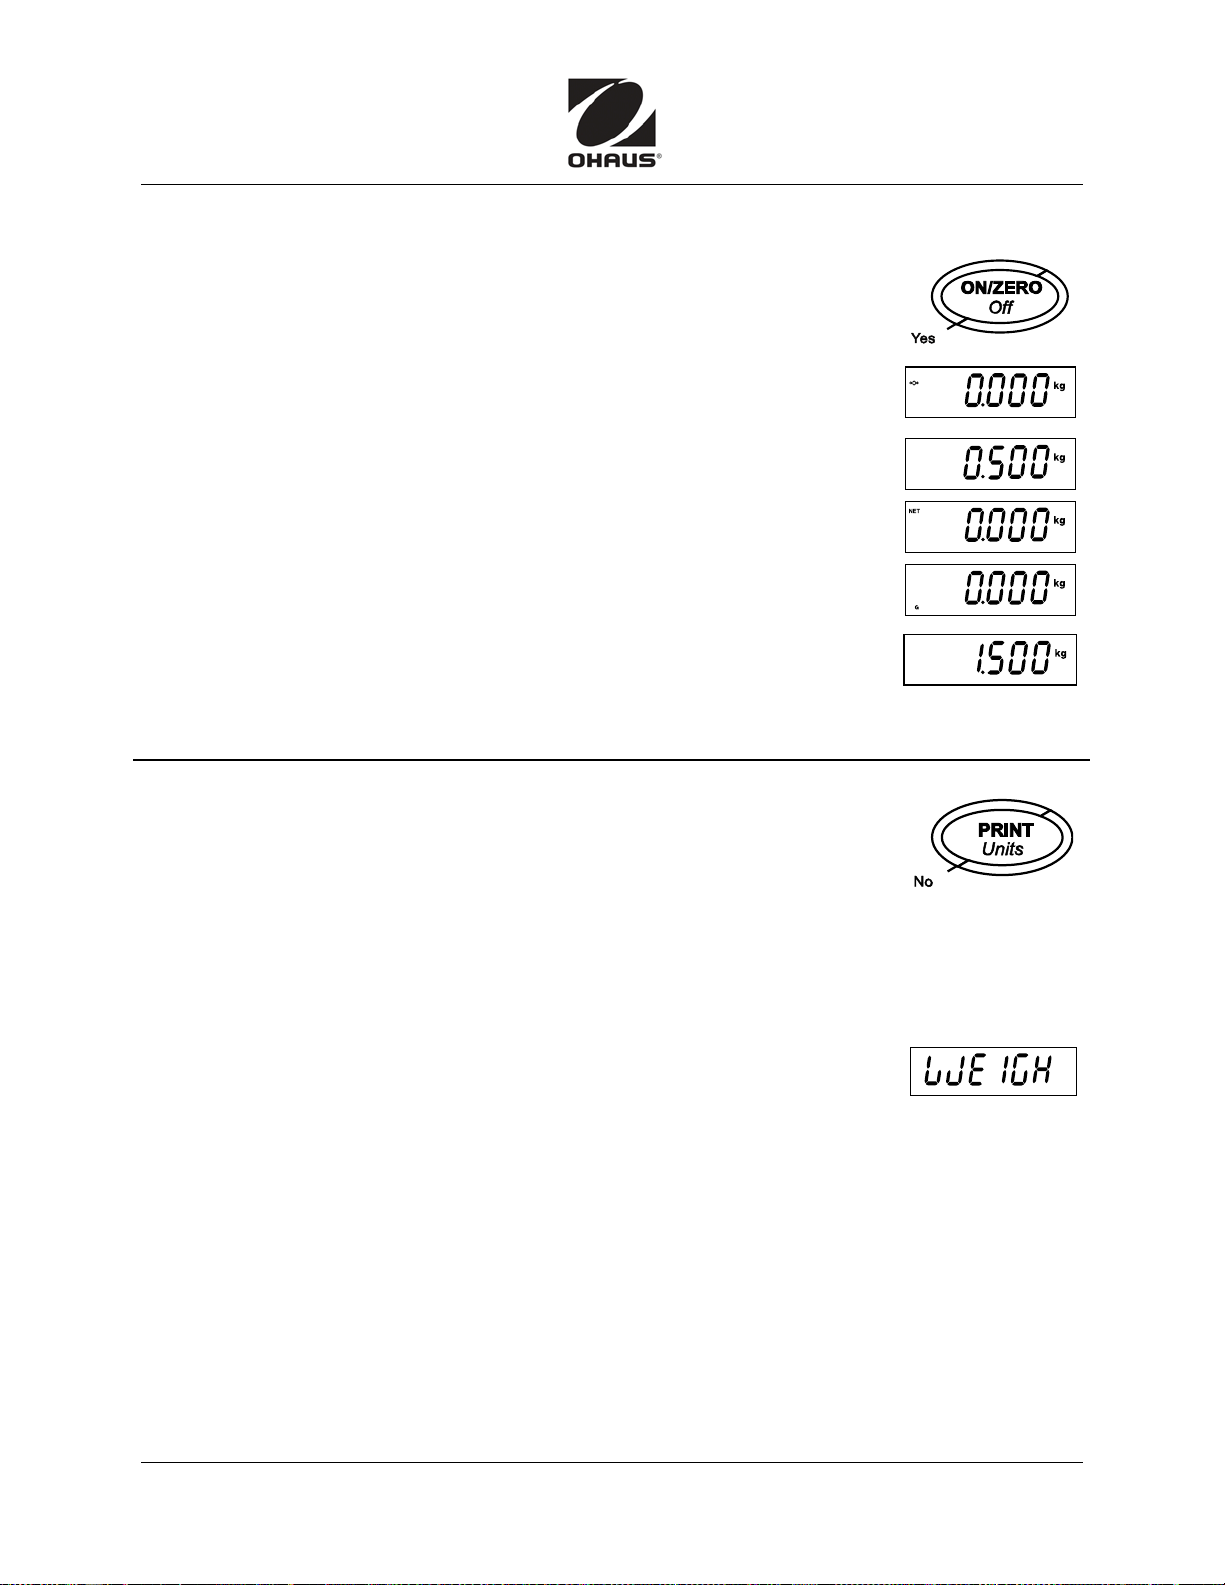
On/Off: To turn Indicator on, press ON. Indicator runs a display test,
shows a series of informational displays, and enters active weighing mode.
To turn Indicator off, press and hold Off until OFF appears.
Press ZERO to zero the weight display. Scale must be stable.
Scale zeros automatically at Power On.
Manual Tare: If weighing an item in a container, place empty container on
the scale. Before taring, container’s weight is shown (example 0.5 kg).
Press TARE. Display shows zero, with NET top-left.
(If container is removed, display shows container’s weight as negative.)
To clear the Tare value, empty the scale and press TARE.
The display shows gross weight (zero if empty) with Gbottom-right.
Weighing: Place the item to be weighed on the scale.
(Sample shown: 1.5 kg, Gross weight.)
Verify the indicator: place a known mass on the scale and check if the reading is accurate.
If not, calibrate, using the Calibration Guide.
ADDITIONAL OPERATIONS
Changing Units of Measure: Press and hold Units until the desired
measuring unit appears. Only measuring units enabled in the Unit Menu are
displayed. (See back page.)
Printing Data: Press PRINT to send displayed data to the communication port.
(Auto-Print Mode must be Off).
Communication parameters in the Print and Communication Menu must be set.
(See Instruction Manual).
Application Modes: Press and hold the Mode button until the desired
application mode appears. WEIGH is default mode.
To have other modes accessible through Mode button, first turn
them On in the MODE menu. (See back page.)
When modes are On, choose by toggling through available options
by pressing Mode.
For details on various application modes, see Instruction Manual.
Weigh
Count
Percent
Dynamic
Checkweigh
Off, On
Off, On
Off, On
Off, Manual
Off, On
T51 Indicators Quick Start Guide
T51 Indicators Quick Start Guide iv Ohaus Corporation www.ohaus.com
MENU NAVIGATION
Press and hold the Menu button until MENU appears on the display.
Use Yes, No, Back,and Exit to navigate in Menu Mode:
– Yes Allows entry / Accepts displayed setting and advances to next menu item.
– No Skips displayed menu / Rejects setting or item, advances to next available item.
– Back Moves backwards through menus.
– Exit Exits directly to active weighing mode.
MENU STRUCTURE (For more details, see Instruction Manual.)
CALIBRATION SETUP READOUT MODE UNIT GMP PRINT-1
Zero
Span
Linearity
CAL Test
GEO
End CAL
Reset
Range
Capacity
Graduation
Power on Unit
Zero Range
Auto Tare
Retain Weight
Legal For Trade
Beeper Volume
Beeper Signal
Button Beeper
End Setup
Reset
Stable Range
Filter
Auto Zero
Backlight
Auto Off Timer
Gross Indicator
End Readout
Reset
Weigh
Count
Percent
Dynamic
Check Weigh
End Mode
Reset
Kilgram
Pound
Gram
Ounce
Pound Ounce
Tonne
Custom
End Unit
Reset
Date
Time
User ID
Project ID
Scale ID
End GMP
Reset
Stable Print
Auto Print
Content
Layout
End Print-1
PRINT-2 COM1 COM2 I-O LOCK MENU LOCK KEY END
Reset
Stable Print
Auto Print
Content
Layout
End Print-2
Reset
Baud
Parity
Stop
Handshake
Alt. Command
End COM1
Reset
Baud
Parity
Stop
Address
Handshake
Alt. Command
End COM2
Reset
External Input
Input Beep
Relay Output
Stable
End I-O
Reset
Lock Cal
Lock Setup
Lock Readout
Lock Mode
Lock Unit
Lock Print1
Lock Print2
Lock COM1
Lock COM2
Lock GMP
Lock I-O
End Lock Menu
Reset
Lock All
Lock Off
Lock Zero
Lock Print
Lock Unit
Lock Function
Lock Mode
Lock Tare
Lock Menu
End Lock Key
Note: For Relay Option and RS 485/422 Option Kits, see instruction manuals at www.Ohaus.com.
*80253034* P/N 80253034

This manual suits for next models

2

Other OHAUS Measuring Instrument manuals

OHAUS MB95 User manual

OHAUS

OHAUS MB95 User manual

OHAUS MB45 User manual

OHAUS

OHAUS MB45 User manual

OHAUS ST300-B User manual

OHAUS

OHAUS ST300-B User manual

OHAUS 7000 Series User manual

OHAUS

OHAUS 7000 Series User manual

OHAUS STARTER 5000 User manual

OHAUS

OHAUS STARTER 5000 User manual

OHAUS MB35 User manual

OHAUS

OHAUS MB35 User manual

OHAUS MB23 User manual

OHAUS

OHAUS MB23 User manual

OHAUS Ranger 3000 Series User manual

OHAUS

OHAUS Ranger 3000 Series User manual

OHAUS TD52P User manual

OHAUS

OHAUS TD52P User manual

OHAUS ST400 User manual

OHAUS

OHAUS ST400 User manual

OHAUS ST400D-B User manual

OHAUS

OHAUS ST400D-B User manual

OHAUS MB90 User manual

OHAUS

OHAUS MB90 User manual

OHAUS MB35 User manual

OHAUS

OHAUS MB35 User manual

OHAUS MB35 User manual

OHAUS

OHAUS MB35 User manual

OHAUS Defender 2000 Series User manual

OHAUS

OHAUS Defender 2000 Series User manual

OHAUS a-AP30TUR User manual

OHAUS

OHAUS a-AP30TUR User manual

OHAUS ST20D User manual

OHAUS

OHAUS ST20D User manual

OHAUS i-DT33P User manual

OHAUS

OHAUS i-DT33P User manual

OHAUS STARTER 2100 User manual

OHAUS

OHAUS STARTER 2100 User manual

OHAUS MB23 User manual

OHAUS

OHAUS MB23 User manual

OHAUS starter 3100 User manual

OHAUS

OHAUS starter 3100 User manual

OHAUS TD52 User manual

OHAUS

OHAUS TD52 User manual

OHAUS ST300 User manual

OHAUS

OHAUS ST300 User manual

OHAUS T31P User manual

OHAUS

OHAUS T31P User manual

Popular Measuring Instrument manuals by other brands

Wet Labs ECO FL user guide

Wet Labs

Wet Labs ECO FL user guide

Bosch LR 24 Professional Original instructions

Bosch

Bosch LR 24 Professional Original instructions

HP 8711B Service guide

HP

HP 8711B Service guide

MIR Spirobank II user manual

MIR

MIR Spirobank II user manual

General MM7 user manual

General

General MM7 user manual

Sealey DBG507 instructions

Sealey

Sealey DBG507 instructions

NatComm RI-SIP user guide

NatComm

NatComm RI-SIP user guide

ATAGO RX-5000i manual

ATAGO

ATAGO RX-5000i manual

Computech 3072 instructions

Computech

Computech 3072 instructions

Triplett PR600 user manual

Triplett

Triplett PR600 user manual

Endress+Hauser Liquiphant FTL51B Safety instruction

Endress+Hauser

Endress+Hauser Liquiphant FTL51B Safety instruction

Drawell DU-8800DS Series user manual

Drawell

Drawell DU-8800DS Series user manual

Meriam M2004 quick start guide

Meriam

Meriam M2004 quick start guide

Meters EM737 CT user manual

Meters

Meters EM737 CT user manual

ancnoble FMP-Solar manual

ancnoble

ancnoble FMP-Solar manual

Altera timequest quick start guide

Altera

Altera timequest quick start guide

Halma Alicat Scientific L quick start guide

Halma

Halma Alicat Scientific L quick start guide

SGM LEKTRA Transit Time SGM-200H Technical documentation

SGM LEKTRA

SGM LEKTRA Transit Time SGM-200H Technical documentation

manuals.online logo
manuals.online logoBrands
  • About & Mission
  • Contact us
  • Privacy Policy
  • Terms and Conditions

Copyright 2025 Manuals.Online. All Rights Reserved.