Oki MPS480mb User manual

Setup and Reference Guide
Guide d’installation et de référence
59408901 my.okidata.com
RT322
MPS480mb

2
Software. . . . . . . . . . . . . . . . . . . . . . . . . 3
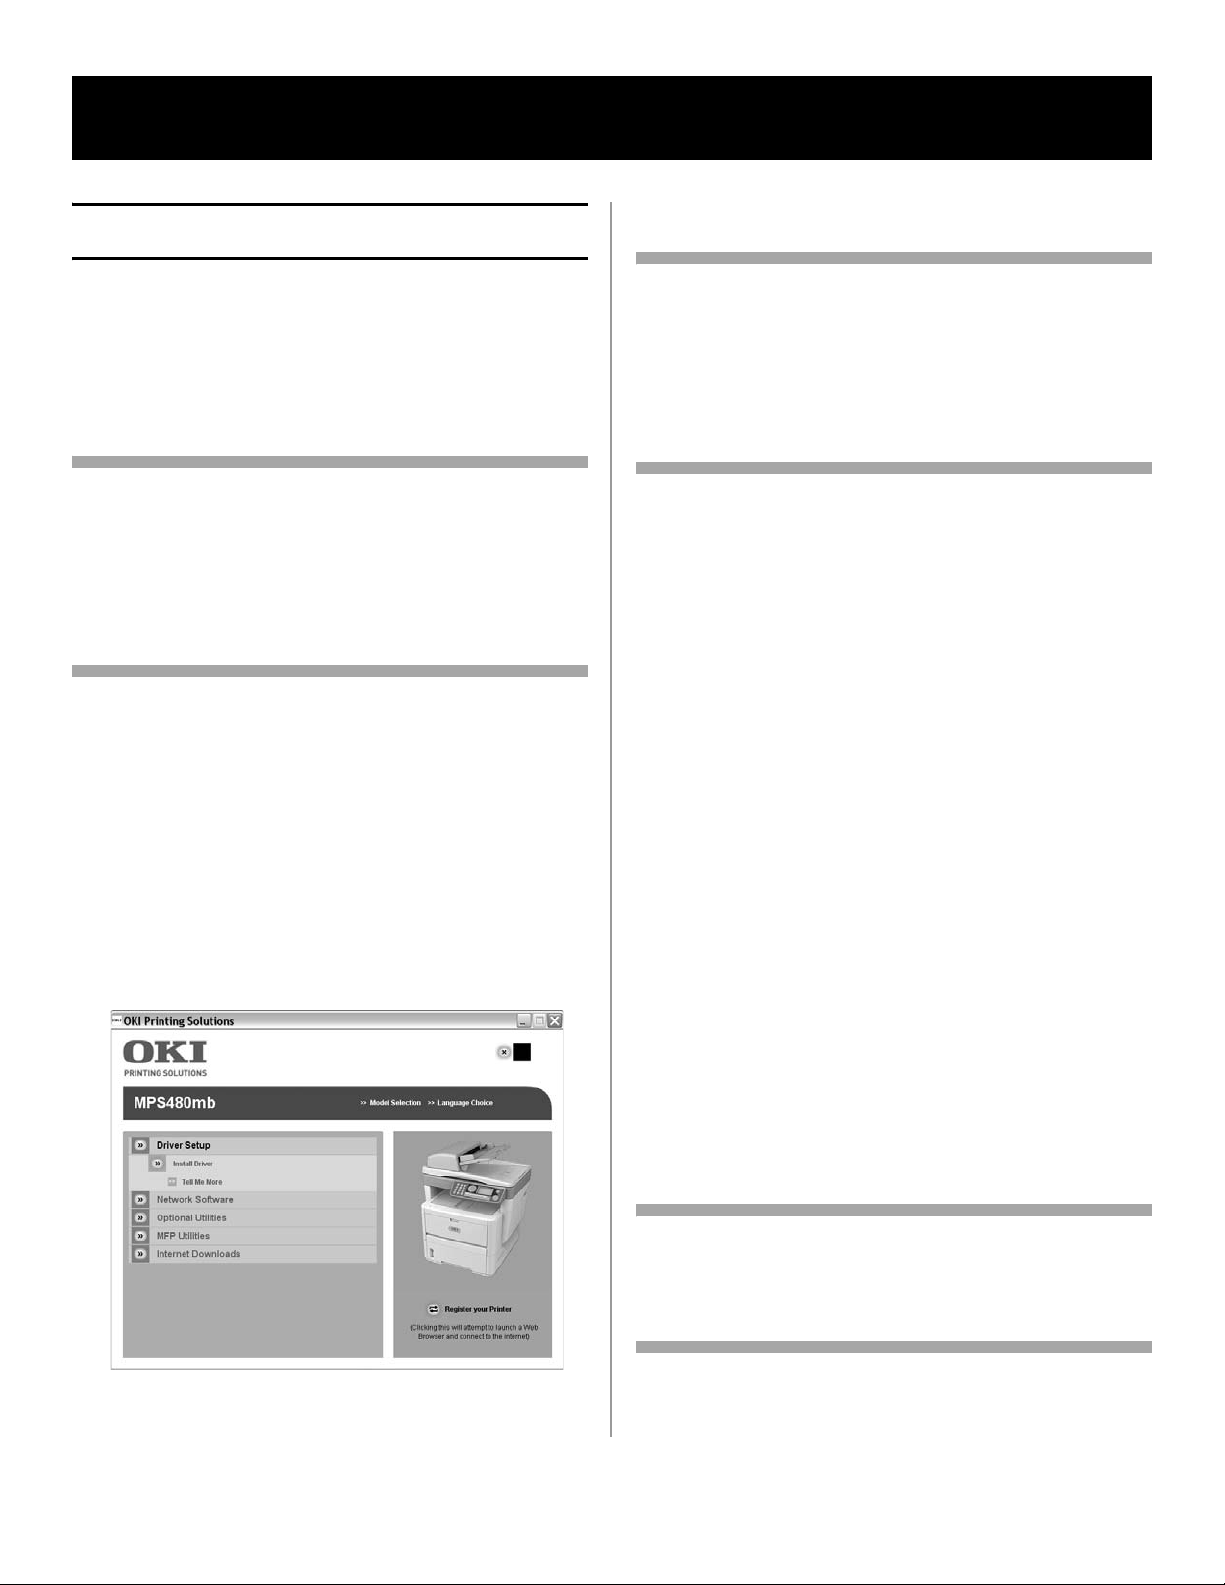
Installing Drivers and Utilities . . . . . . . . . . . 3
Installing Printer Drivers: Local . . . . . . . . . . .3
Installing Printer Drivers: Network . . . . . . . . .3
Installing Network Software (Optional) . . . . . .4
Installing Optional Utilities . . . . . . . . . . . . . . .4
Installing MFP Utilities . . . . . . . . . . . . . . . . . .4
The MFP Configuration Tool
(Windows only). . . . . . . . . . . . . . . . . . . . . . 4
MFP Settings . . . . . . . . . . . . . . . . . . . . . . . .4
Address Book Manager . . . . . . . . . . . . . . . . .5
Phone Book Manager . . . . . . . . . . . . . . . . . .5
Profile Manager . . . . . . . . . . . . . . . . . . . . . .5
PIN Manager . . . . . . . . . . . . . . . . . . . . . . . .5
Actkey Utility (Windows only, USB only) . . . 5
ScanSoft PaperPort. . . . . . . . . . . . . . . . . . . . 5
ScanSoft OmniPage SE . . . . . . . . . . . . . . . . . 5
Configuring the MPS480mb MFP Unit . . 6
Default Passwords/PIN . . . . . . . . . . . . . . . . 6
Fax Receiving . . . . . . . . . . . . . . . . . . . . . . . . 6
Setting Fax Parameters . . . . . . . . . . . . . . . . .6
Setting the Ring Response . . . . . . . . . . . . . . .6
Setting Access Control . . . . . . . . . . . . . . . . .7
Enable/Disable Access Control . . . . . . . . . . . .7
Entering PIN ID . . . . . . . . . . . . . . . . . . . . . .7
Logout operation . . . . . . . . . . . . . . . . . . . . .7
Operation Time-out . . . . . . . . . . . . . . . . . . .7
Minimum Configuration Requirements . . . . . 7
Internet Communication Features . . . . . . . . 8
Pre-Installation Information . . . . . . . . . . . . . .8
Scan to E-mail . . . . . . . . . . . . . . . . . . . . . . .8
Setting up an SMTP Server . . . . . . . . . . . . . .8
Operating the MPS480mb . . . . . . . . . . . 9
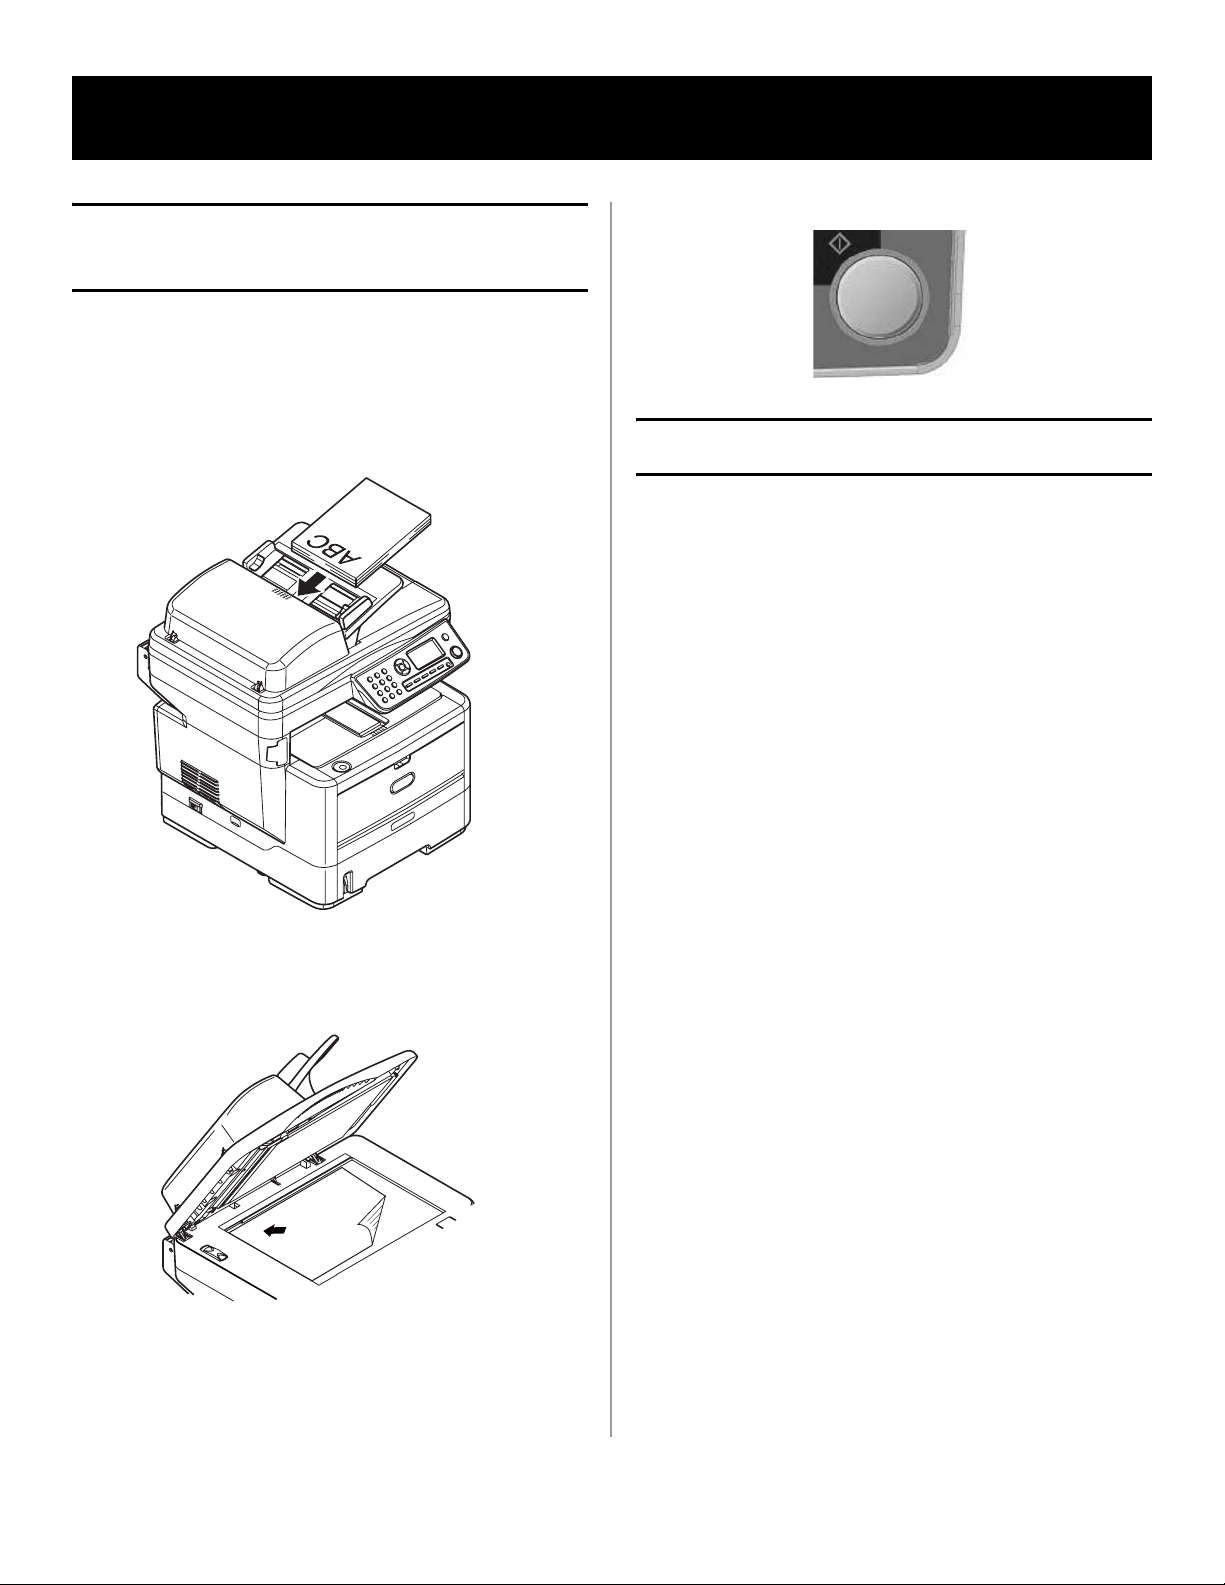
Scanning and Copying Documents . . . . . . . . 9
Printing Documents . . . . . . . . . . . . . . . . . . . 9
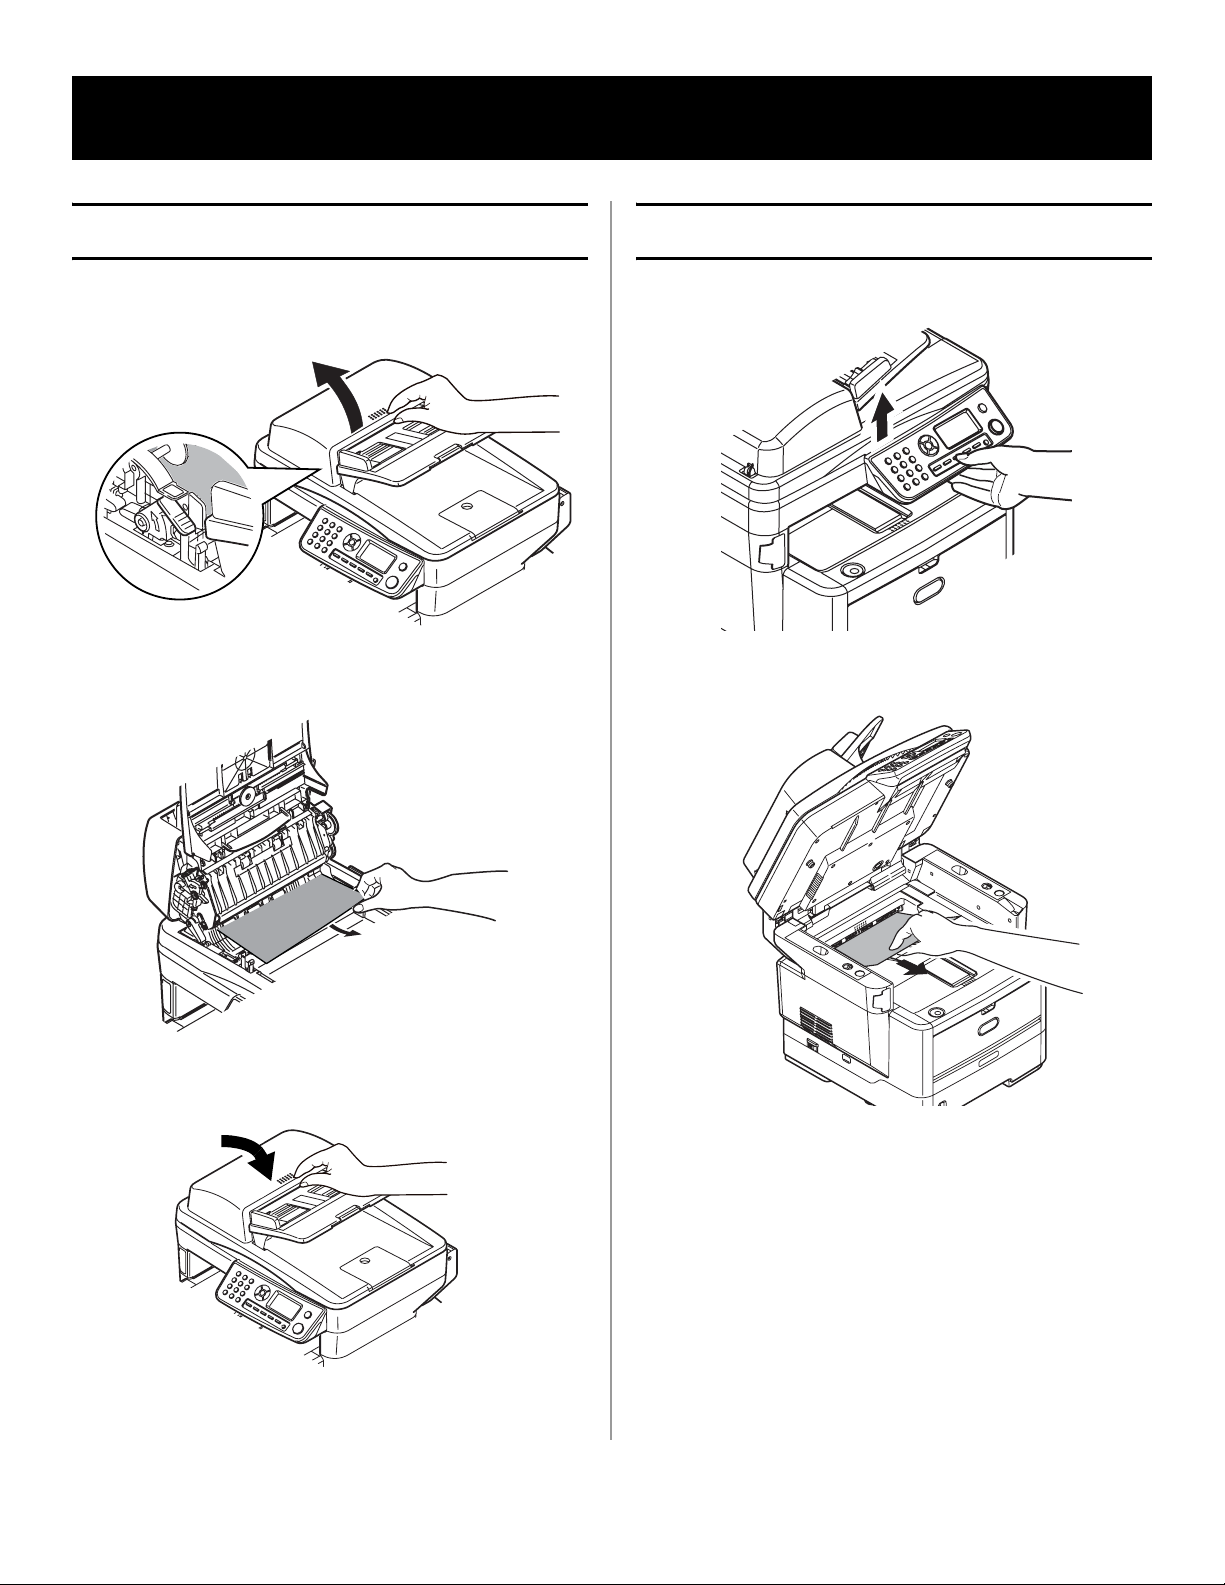
Clearing Media Jams . . . . . . . . . . . . . . 10
ADF Document Jam. . . . . . . . . . . . . . . . . . . 10
Printer Jams . . . . . . . . . . . . . . . . . . . . . . . . 10
Maintenance. . . . . . . . . . . . . . . . . . . . . 14
Replacement Toner Cartridge &
Image Drum . . . . . . . . . . . . . . . . . . . . . . . 14
Logiciels. . . . . . . . . . . . . . . . . . . . . . . . .15
Installation des pilotes et utilitaires . . . . . . 15
Installation des pilotes d'imprimante :
locale . . . . . . . . . . . . . . . . . . . . . . . . . . . 15
Installation des pilotes d'imprimante :
réseau . . . . . . . . . . . . . . . . . . . . . . . . . . . 16
Installation des logiciels réseau
(optionnel) . . . . . . . . . . . . . . . . . . . . . . . 16
Installation des utilitaires en option . . . . . . . 16
Installation des utilitaires MFP . . . . . . . . . . . 16
Outil de configuration du MFP (Windows
uniquement) . . . . . . . . . . . . . . . . . . . . . . . 17
MFP Settings (Paramétrage MFP) . . . . . . . . . 17
Address Book Manager (Gestionnaire
de carnet d'adresses) . . . . . . . . . . . . . . . . 17
Phone Book Manager (Gestionnaire
de répertoire téeléphonique) . . . . . . . . . . . 17
Profile Manager (Gestionnaire de profils) . . . . 18
PIN Manager (Gestionnaire
d’identificateurs PIN) . . . . . . . . . . . . . . . . 18
Utilitaire Actkey (Windows uniquement,
USB uniquement). . . . . . . . . . . . . . . . . . . . 18
Utilitaire ScanSoft PaperPort . . . . . . . . . . . 18
Utilitaire ScanSoft OmniPage SE . . . . . . . . . 18
Configuration du MPS480mb MF . . . . . .19
Mots de passe/code PIN . . . . . . . . . . . . . . . 19
Réception de fax . . . . . . . . . . . . . . . . . . . . . 19
Configuration des paramètres de fax . . . . . . 19
Délai de prise de ligne . . . . . . . . . . . . . . . . 20
Contrôle d'accès . . . . . . . . . . . . . . . . . . . . . 20
Activation/Désactivation du contrôle
d'accès . . . . . . . . . . . . . . . . . . . . . . . . . . 20
Saisie de l’identificateur PIN . . . . . . . . . . . . 20
Déconnexion . . . . . . . . . . . . . . . . . . . . . . . 21
Expiration de délai pour une opération . . . . . 21
Configuration minimale requise . . . . . . . . . 21
Fonctionnalités de communication internet 21
Informations de préinstallation . . . . . . . . . . 21
Configuration d'un serveur SMTP . . . . . . . . . 22
Utilisation du MPS480mb. . . . . . . . . . . .23
Numérisation et copie des documents . . . . 23
Impression des documents . . . . . . . . . . . . . 23
Dégagement des bourrages. . . . . . . . . .24
Bourrage de document dans ADF . . . . . . . . 24
Bourrages dans l’imprimante . . . . . . . . . . . 24
Maintenance. . . . . . . . . . . . . . . . . . . . . .28
Cartouche de toner et tambour
d'impression de remplacement . . . . . . . . . 28
Contents Table des matières

3 - English
Installing Drivers and Utilities
The DVD supplied with your MPS480mb MFP unit
includes the printer drivers, utilities, and a network
connection for downloading additional utilities from
the Oki Data web site.
Additional information on the utilities is provided
on the DVD to help you make your selections.
Note
You must be logged on as an administrator or a
member of the Administrators group in order to
complete this procedure.
If your computer is connected to a network,
network policy settings may also prevent you from
completing this procedure.
1. Turn the printer OFF.
2. Insert the DVD supplied with your printer in the
DVD drive on the computer. The DVD will
autorun. If it does not, browse to the main
directory on the DVD and double click
[setup.exe] .
3. Select your language. Click [Next].
4. Click the name of your printer. Click [Next].
5. Accept the license agreement.
The main install screen appears:
Installing Printer Drivers: Local
Note
USB only: Install the printer driver before
connecting the USB cable (Version 2.0 or above)
to the printer.
Parallel: You must connect the printer to the
computer with a suitable bi-directional, IEEE-1284
parallel cable before installing the driver(s).
1. Under [Driver Setup], click [Install Driver].
2. Select [Local printer]. Click [Next].
3. Select the port you want your printer to use:
-USB
-FILE:
- LPT1:, LPT2: or LPT3:
4. Click [Next].
5. Select one or more printer emulations to
install:
-PCL
-PS(Postscript)
- FAX: The fax printer driver allows you to send
faxes directly from your computer without
printing the document first. With Oki’s fax
driver you are sending the fax data from your
computer to the MFP, and then the MFP auto-
matically sends the document.
6. Follow the on-screen instructions.
7. When prompted, connect the appropriate cable
and turn the printer on.
Installing Printer Drivers:
Network
Note
You must connect your MFP to a network with a
suitable Ethernet cable before installing the printer
driver.
1. Under [Driver Setup], click [Install Driver].
2. Select [Network printer]. Click [Next].
Software

4 - English
3. Select how your printer is connected to the
network:
- Directly using TCP/IP
- Indirectly via another PC
4. Enter the IP address of the printer. Click [Next].
5. When prompted, select one or more printer
emulations:
-PCL
- PS (Postscript)
- FAX: The fax printer driver allows you to send
faxes directly from your computer without
printing the document first. With Oki’s fax
driver you are sending the fax data from your
computer to the MFP, and then the MFP auto-
matically sends the document.
6. Follow the on-screen instructions.
7. Turn the printer on.
Note
For additional information on these utilities, to help
you make your selections, click
on the DVD screen.
Installing Network Software
(Optional)
From the DVD main screen
1. Click [Network Software].
2. Select the utility you wish to install:
• Network Card Setup Utility
• Direct Network Printing Utility (LPR)
• Network Extension.
Installing Optional Utilities
From the DVD main screen:
1. Click [Optional Utilities].
2. Select the utility you wish to install:
• Change the Printer Display Language
• PS Gamma Adjuster.
Installing MFP Utilities
From the DVD main screen:
1. Click [MFP Utilities].
2. Select the utility you wish to install:
• Configuration Tool (see page 4 for more
information)
•ActKey
• ScanSoft PaperPort
• ScanSoft OmniPage
Installing Utilities through Internet
Download (Optional)
From the DVD main screen:
1. Click [Internet Downloads].
2. Click [Internet Downloads for MPS480mb].
This opens your internet browser and takes you to
the Oki site where you can select and download the
internet utilities you want.
Installing the On-line User Guide
From the DVD main screen:
1. Click [User Guides].
2. Click [Install User Guide] and follow the on-
screen instructions.
The MFP Configuration Tool
(Windows only)
The MFP Configuration Tool can discover devices
over USB or network connections.
The setup program does not automatically place an
icon on your desktop. If you wish, you can drag
and drop the icon on to your desktop for ease of
future use.
There are 5 main functions included in this
software:
•MFPSettings
• Address Book Manager
• Phone Book Manager
• Profile Manager
•PINManager
MFP Settings
Allows you to change most of the same settings as
you'd see on the MFP's operator panel, on a locally
connected PC.
The settings include an Admin. menu. This is
password protected and hidden by default. To
enable the Admin menu, select: Setting>MFP
Setting>Display > Administrator menu and enter
the MFP's password.

5 - English
Address Book Manager
Adds names, e-mail addresses, assign them to IDs
(for scan to e-mail feature of MFP).
• Arrange people into groups.
• Import and export settings to CSV files.
• Import settings from other Oki MFP devices.
Phone Book Manager
For managing people and fax numbers (for “scan to
fax” feature of MFP). Add names, fax numbers,
assign them to speed dial numbers.
• Arrange people into groups.
• Import and export settings to CSV files.
• Import settings from other Oki MFP devices.
Profile Manager
A profile is a set of saved settings for scanning to a
networked PC. A profile consists of the following:
• Details for connecting to the networked PC
(protocol, port, user name, password etc)
•Papersize
• File format to scan to (PDF, TIFF, JPEG) and
format settings such as resolution, compression
• Import and export settings to CSV files
• Import settings from other Oki MFP devices
PIN Manager
The MFP can have access control switched on the
front panel. If this is the case, a PIN (Personal
Identification Number) is required to use the MFP.
The PIN Manager creates PIN numbers and assigns
them rights such as whether they can copy, print,
scan to email, scan to network PC or fax.
• Import and export settings to CSV files.
• Import settings from other Oki MFP devices.
Actkey Utility (Windows only,
USB only)
The Actkey utility is a tool for performing common
scan actions. It enables the unit to receive one-key
touch commands from a locally connected
computer.
ScanSoft PaperPort
PaperPort is a paper management application to
organize, access, share, and manage documents
and image files on your personal computer. Key
features include:
• Scan documents and photos directly to the
desktop in popular file formats, such as PDF,
JPEG, and TIFF.
• Use the Explorer-like folder system to organize
all your documents and photos on your
computer or on the network. You can color-code
your folders and add any existing folder to
PaperPort without moving it within your file
system.
• View large, clear thumbnail images of your
scanned image files.
ScanSoft OmniPage SE
ScanSoft OmniPage SE converts paper and Adobe
PDF files into editable digital documents. Using
OCR (optical character recognition) and page
layout preservation capabilities, OmniPage
eliminates re-typing of static documents and
unlocks content in PDF files. Key features include:
• Set up custom workflows, such as a template to
automatically recognize a 20 page PDF file,
convert it into a Word document, e-mail it, and
save a copy to your local hard drive.
• OmniPage Pro 14 Office lets you automate the
conversion of paper and PDF documents into
industry-standard XML documents.

6 - English
Default Passwords/PIN
Before using this MFP, a few basic settings have to
be carried out.
Ensure that you have the relevant permission/PIN
numbers before starting.
The Factory set default passwords/PIN are:
Administrator aaaaaa
PIN 000000
Network (web page) aaaaaa
Fax Receiving
Important!
In the United States, as required by FCC
regulations, a heading must be included on all
FAX messages. The heading must include
• the date and time it is sent
• an identification of the business or other
entity, or other individual sending the
message
• the telephone number of the sending
machine or such business, other entity, or
individual.
This MFP’s fax will automatically answer the
telephone after the Ring Response delay. For
information on setting this, see “Setting the Ring
Response” on page 6.
Setting Fax Parameters
Follow these instructions to set the Date and Time
(clock adjustment), Country Code, Local Phone
No., and Sender ID.
1. Using the Down arrow key, scroll to Menu and
press Enter.
2. Using the Down arrow key, scroll to Admin
Setup and press Enter.
3. Using the arrow keys and on-screen keypad,
enter the Administrator password. Highlight
Done and press Enter.
4. Using the Down arrow key, scroll to Fax Setup
and press Enter.
5. Press Enter to select the Clock Adjustment
menu.
6. Using the arrow keys and keypad, enter the
time and date.
7. Press Enter to confirm.
8. Using the Down arrow key, scroll to Basic Setup
and press Enter.
9. Using the Down arrow key, scroll to Country
Code and press Enter.
10.Using the arrow keys, scroll to the country in
which the MFP is situated and press Enter to
confirm.
11.Using the Down arrow key, scroll to Local Phone
No. and press Enter
12.Using the keypad or arrow keys, type in the
local phone number press Enter to confirm.
13.Using the Down arrow key, scroll to Sender ID
and press Enter.
14.Using the keypad or arrow keys and the on-
screen keypad, type in the sender ID.
15.Highlight Done and press Enter.
Setting the Ring Response
The fax facility of this MFP will automatically
answer the incoming ringtone after the delay
period set by the ring response.
The factory default for ring response is 1 ring. This
can be set up to 20 seconds in the Admin Menu as
follows (you need to have administrator rights to
alter this setting):
1. In the top level screen, scroll down to Menu and
select using the Enter key.
2. In the drop down menu, scroll down to the
Admin Menu and select using the Enter key.
Enter the password.
3. In the drop down menu, scroll down to Fax
Setup and select using the Enter key.
4. In the drop down menu, scroll down to Basic
Setup and select using the Enter key.
5. In the drop down menu, scroll down to the Ring
Response and select using the Enter key.
Configuring the MPS480mb MFP Unit

7 - English
6. In the drop down menu, scroll down to the
response time required and select using the
Enter key.
7. Using the Left arrow key, return to the top level
menu.
Setting Access Control
The operation and functionality of this machine can
be limited only to authorized personnel by the
simple introduction of a 4-9 digit PIN (Personal
Identification Number). This is known as Access
Control. The greater the number of digits in the
PIN, the more secure it is.
Enable/Disable Access Control
To enable Access Control, use the menu to go to:
Menu > Admin Setup > System Setup > Access
Control and select Enable.
• With Access Control set to Enable, the display
reverts to the System Setup screen immediately
following the setting change. If one of the
functions such as Print, Fax Send or PC Scan is
running however, the display will only revert to
the System Setup screen when the task has
been completed.
Entering PIN ID
• With Access Control Enabled, entering a PIN ID
is required to enable setting up various utilities.
• Enter the PIN ID via the Ten Key pad.
• A valid PIN ID consists of 4 to 9 digits.
• The numbers entered are not displayed on the
Enter PIN ID screen, being replaced by '*'.
• The MFP supports the following 2 kinds of PIN
ID:
Administrator PIN ID — This is the PIN ID for
the system administrator(s). If a PIN ID is
registered as an administrator, the Admin
password entry screen is displayed, and, when an
Admin password is entered, it will be authenticated
as an administrator.
User PIN ID — This is PIN ID for general users. If
a PIN ID is registered as a general user, the
function selection screen is displayed, also after
PIN ID entry the function selection screen is
displayed.
• Invalid PIN ID: If the PIN number entered is
invalid, Incorrect Password is displayed for 3
seconds and the display reverts to the Enter PIN
ID screen.
Logout operation
If Logout is selected or an Operation Time-out
occurs, the display reverts to the Enter PIN ID
screen.
Logout by user
With Access Control enabled, Logout options are
displayed in the Menu on the Mode Selection
screen.
When the cursor is moved to Logout and the Enter
key is pressed, the display reverts to the Confirm
Logout screen.
If Yes is selected with the Enter key on the Confirm
Logout screen, the display reverts to the Enter PIN
ID screen.
Operation Time-out
• When the MFP operation panel is left inactive for
a prescribed length of time (Operation Time-
out), the display automatically reverts to the
Idle screen if Access Control is disabled.
• If an error state occurs, Operation Time-out is
disabled.
• After Operation Time-out, the display
automatically reverts to the Enter PIN ID screen
if Access Control is enabled.
• The length of the Operation Time-out depends
on the setting in Menu Mode > Admin Setup >
System Setup > Return to Stand-by Time.
Minimum Configuration
Requirements
To make the best of this MFP, the following
configuration is required:
To send Faxes:
• A PSTN telephone line connection.
To send e-mail:
•TCP/IPnetwork.
• A SMTP and an optional POP3 server.
• Default “From” Address (this MFP’s Address).
To file document(s) via intranet:
• FTP, or CIFS Protocol environment.
• Windows 2000, Windows XP, Windows Vista,
Mac OS X, Linux (PS3 only), or FTP server.

8 - English
Internet Communication
Features
Pre-Installation Information
The MFP has to be set up properly on your network
to perform scan to e-mail and other functions. In
order for other network devices to find the MFP on
the network, the following network parameters
have to be set:
1. IP Address Set:
2. IP Address: . . .
3. Subnet mask: . . .
4. Gateway IP: . . .
5. DNS server: . . .
6. SMTP server: . . .
7. SMTP port: 25
8. POP3 server: . . .
9. POP3 Port: 110
For an Explanation of these settings, see the online
User’s Guide on the DVD.
Scan to E-mail
The MFP allows you to deliver your scanned
document to e-mail addresses on the network. The
document is first scanned and converted to a
standard PDF, JPEG, or TIFF file format and then
transmitted to remote recipients simultaneously as
an e-mail attachment.
When you send an e-mail to someone using this
MFP it uses Simple Mail Transfer Protocol (SMTP) to
transfer your outgoing e-mails to your SMTP mail
server, and then send these e-mails to your
recipients via the internet.
Setting up an SMTP Server
This section explains setting up an SMTP server.
1. Using the Down arrow keys, scroll to the Menu
function and press Enter.
2. Using the Down arrow key, scroll to Admin
Setup and press Enter.
3. Using the arrow keys and on-screen keypad,
enter the Administrator password. Highlight
Done and press Enter.
4. Using the Down arrow key, scroll to Network
Setup and press Enter.
5. Using the Down arrow key, scroll to Mail Server
Setup and press Enter.
6. Press Enter to select SMTP server and then
press Enter again.
7. Enter your IP address.
Numbers are entered using the Ten Key pad.
When a number is entered from the Ten Key
pad, the number currently displayed is cleared
and the number just entered is displayed as the
first digit. When another number is entered, the
number in the first digit moves to the next, and
so on.
8. To confirm, press the Enter key. To cancel the
IP address, move the cursor to the first field
and then press the Left arrow key.

9 - English
Scanning and Copying
Documents
The MFP can scan/copy/send document(s) using
either the ADF (Automatic Document Feeder) or
manually on the glass.
If you want to scan/copy/send multiple pages, use
the ADF. The ADF can hold up to 50 pages at one
time.
If you want to scan/copy/send pages from books,
newspaper clippings, or paper with wrinkles or
curls, use the glass.
To make an instant copy, press the START button.
Printing Documents
Your MFP will handle a variety of print media
including a range of paper weights and sizes.
See the User’s Guide on the DVD supplied with
your printer for general advice on choice of media,
and an explanation of how to use each type.
Operating the MPS480mb

10 - English
ADF Document Jam
1. Open the ADF.
2. Remove any jammed sheets.
3. Close the ADF.
Printer Jams
1. Open the scanner cover,
2. Remove any jammed sheets.
Clearing Media Jams

11 - English
3. Open the top cover.
Caution!
The fuser may be hot! It is clearly labelled. Do
not touch.
4. Remove the image drum/toner.
Caution!
Do not touch the green image drum surface or
expose it to light for more than 5 minutes.
5. Remove any jammed sheets.
6. Replace the image drum/toner.

12 - English
7. Open the rear exit. Remove any jammed
sheets.
8. Close the rear exit.
9. Remove the duplexer. Remove any jammed
sheets.
10.Replace the duplexer.
11.Open the MP Tray. Remove any jammed
sheets.
12.Close the MP Tray.

13 - English
13.Remove the paper tray. Remove any
jammed sheets.
14.Replace the paper tray.
15.Close and latch the top cover. Gently close
the scanner.

14 - English
Replacement Toner Cartridge
& Image Drum
Only use genuine original consumables to ensure
the best quality and performance from your MFP.
Non original products may adversely affect your
printer's performance.
Where to Purchase
Consult the dealer where you purchased your
system.
Maintenance
Item Life Order No.
Toner 12,000 A4@ ISO/
IEC 19752 43979222
Image Drum 25,000 A4 pages 43979009

15 - Français
Installation des pilotes et
utilitaires
Le DVD fourni avec votre MPS480mb MFP
comprend les pilotes d'imprimante, des utilitaires
et une connexion réseau pour le téléchargement
d'autres utilitaires du site Web d'Oki Data.
Des renseignements supplémentaires au sujet des
utilitaires sont fournis sur le CD afin de vous aider
à faire votre choix.
Note
Vous devez être connecté en tant
qu’administrateur ou appartenir au groupe des
administrateurs pour exécuter cette procédure.
Si votre ordinateur est connecté à un réseau, les
paramètres de règle du réseau peuvent également
vous empêcher d’effectuer cette procédure
1. Éteignez l’imprimante.
2. Insérez le DVD fourni avec votre imprimante
dans l’unité de DVD de l'ordinateur. Le DVD est
lancé automatiquement. Dans la négative,
accédez à l'unité de DVD et double-cliquez sur
[setup.exe] .
3. Sélectionnez la langue d’installation. Cliquez
sur [Next] (Suivant).
4. Cliquez sur le nom du votre MFP. Cliquez sur
[Next] (Suivant).
5. Acceptez le contrat de license.
La fenêtre principale du Menu d'installation
s'affiche.:
Installation des pilotes
d'imprimante : locale
Note
USB uniquement: Installez le logiciel avant de
connecter le câble USB version 2.0 ou supérieur à
l’imprimante.
Parallel: L'imprimante doit être raccordée à
l'ordinateur avec un câble parallèle bidirectionnel
IEEE-1284 adéquat avant d'installer les pilotes.
1. Dans [Driver Setup] (Paramétrage du pilote),
cliquez sur [Install Driver] (Installer le pilote
d’impression).
2. Sélectionnez [Local printer] (imprimante
locale). Clique sur [Next] (Suivant).
3. Sélectionnez le port à utiliser avec l'imprimante
:
-USB
- FILE: (FICHIER:)
- LPT1:, LPT2: ou LPT3:
4. Clique sur [Next] (Suivant).
Logiciels

16 - Français
5. Sélectionnez une ou les deux émulations de
l'imprimante :
-PCL
- PS (Postscript)
- FAX: Le pilote d'imprimante télécopieur per-
met d’envoyer des fax directement à partir de
l’ordinateur sans imprimer les documents au
préalable. Avec le pilote de télécopieur d’OKI,
vous envoyez des données de fax directement
à partir de l’ordinateur vers le MFP et ce dern-
ier envoie automatiquement le document.
6. Observez les directives à l’écran.
7. USB : À l'invite, branchez le câble USB et
mettez sous tension l'imprimante.
Installation des pilotes
d'imprimante : réseau
Note
Vous devez connecter votre appareil à un réseau
équipé d’un câble Ethernet compatible avant
d’installer le pilote de l’imprimante.
1. Dans [Driver Setup] (Paramétrage du pilote),
cliquez sur [Install Driver] (Installer le pilote
d’impression).
2. Sélectionnez [Network printer] (imprimante
rèseau). Cliquez sur [Next] (Suivant).
3. Sélectionnez ensuite la méthode de
raccordement de l'imprimante au réseau :
- [Directly to the Network using TCP/IP]
(Utilisant directement TCP/IP)
- [Indirectly via another PC] (Indirectement par
l'intermédiaire d'un autre ordinateur)
4. Entrez l'adresse IP de l'imprimante. Cliquez sur
[Next] (Suivant).
5. À l'invite, sélectionnez une ou les deux
émulations de l'imprimante :
-PCL
- PS (Postscript)
- FAX: Le pilote d'imprimante télécopieur per-
met d’envoyer des fax directement à partir de
l’ordinateur sans imprimer les documents au
préalable. Avec le pilote de télécopieur d’OKI,
vous envoyez des données de fax directement
à partir de l’ordinateur vers le MFP et ce dern-
ier envoie automatiquement le document.
6. Observez les directives à l’écran.
7. Mettez sous tension l'imprimante.
Note
Des renseignements supplémentaires au sujet des
utilitaires sont fournis sur le DVD afin de vous aider
à faire votre choix, clique sur
dans l’écran principal de DVD.
Installation des logiciels réseau
(optionnel)
Dans l'écran principal de DVD
1. Clique sur [Network Software] (Logiciels
réseau).
2. Choisissez parmi ces utilitaires:
• Network Card Setup Utility (Utilitaire de
configuration de la carte réseau)
• Direct Network Printing Utility (LPR)
(Utilitaire d'impression réseau directe)
• Network Extension (Extension réseau).
Installation des utilitaires en
option
Dans l'écran principal de DVD
1. Clique sur [Optional Utilities] (utilitaires en
option).
2. Choisissez parmi ces utilitaires:
• Change the Printer Display Language
(Modifier la langue d'affichage de
l'imprimante)
• PS Gamma Adjuster Install (Installer le
correcteur gamma PS).
Installation des utilitaires MFP
Dans l'écran principal de DVD
1. Clique sur [MFP Utilities] (Utilitaires MFP).
2. Choisissez parmi ces utilitaires:
• Configuration Tool (Outil de configuration)
(consultez la page 17 pour d’autres
informations)
•ActKey
• ScanSoft PaperPort
• ScanSoft OmniPage

17 - Français
Installation Téléchargements Internet
(optionnel)
Dans l'écran principal de DVD
1. Clique sur [Internet Downloads]
(Téléchargements Internet).
2. Clique sur [Internet Downloads for MPS480mb]
(Téléchargements de logiciels pour
MPS480mb).
Cela ouvre votre navigateur Internet et vous
amène au site d'Oki où vous pouvez
sélectionner et télécharger les utilitaires
Internet que vous voulez.
Installation de guide de l'utilisateur
en ligne
Dans l'écran principal de DVD
1. Clique sur [User Guides] (Guide de
l'utilisateur).
2. Clique sur [Install User Guide] (Installer guide
de l’utilisateur). Observez les directives à
l’écran.
Outil de configuration du MFP
(Windows uniquement)
L’outil de configuration du MFP peut repérer des
périphériques via des connexions USB ou réseau.
Comme le programme de configuration ne place
pas automatiquement d’icône sur le bureau, y
accéder via si vous le souhaitez, vous pouvez faire
glisser cette icône sur le bureau pour faciliter toute
utilisation ultérieure.
Ce logiciel comprend 5 fonctions principales :
• MFP Settings (Paramètres MFP)
• Address Book Manager (Gestionnaire de carnet
d'adresses)
• Phone Book Manager (Gestionnaire de répertoire
téléphonique)
• Profile Manager (Gestionnaire de profils)
• PIN Manager (Gestionnaire d’identificateurs PIN)
MFP Settings (Paramétrage MFP)
Permet de modifier la plupart des paramètres que
vous pourriez voir sur le panneau de commande du
MFP sur un PC connecté en local.
Les paramètres comprennent un menu
d’administration. Celui-ci est protégé par un mot
de passe et masqué par défaut. Pour activer le
menu d’administration, sélectionnez : Setting
(Paramétrage) > MFP Setting (Paramétrage MFP) >
Display (Affichage) > Administrator Menu (Menu
administrateur) et entrez le mot de passe du MFP
Address Book Manager
(Gestionnaire de carnet
d'adresses)
Ajoute des noms et des adresses électroniques et
les affecte à des identificateurs (pour la fonction de
numérisation vers la messagerie électronique du
MFP).
• Répartit les personnes en groupes.
• Importe et exporte des paramètres vers des
fichiers CSV.
• Importe des paramètres à partir d'autres
périphériques MFP Oki.
Phone Book Manager
(Gestionnaire de répertoire
téeléphonique)
Permet de géerer des personnes et des numéros
de fax (pour la fonction de numérisation vers un
télécopieur de MFP). Ajoute des noms et des
numéros de fax et les affecte à des numéros de
composition abrégée.
• Répartit les personnes en groupes.
• Importe et exporte des paramètre vers des
fichiers CSV.
• Importe des paramètre à partir d’autres
périphériques MFP Oki.

18 - Français
Profile Manager (Gestionnaire de
profils)
Un profil est un ensemble de paramètres
enregistrés pour la numérisation vers un PC en
réseau. Il est constitué par les éléments suivantes
:
• Informations permettant la connexion au PC en
réseau (protocole, port, nom d’utilisateur, mot
de passe, etc.)
• Format de papier
• Format de fichier vers lequel effectuer la
numérisation (PDF, TIFF, JPEG) et paramètres de
format, tels que la résolution et la compression
• Importation et exportation de paramètres vers
des fichiers CSV
• Importation de paramètres à partir d'autres
périphériques MFP Oki
PIN Manager (Gestionnaire
d’identificateurs PIN)
Le contrôle d’accès au MFP peut être activé sur le
panneau avant. Dans ce cas, un numéro
d’identification personnel (PIN - Personal
Identification Number) est requis pour utiliser le
MFP. PIN Manager crée des codes PIN et leur
affecte des droits indiquant si les personnes
correspondantes peuvent copier, imprimer ou
numériser vers une messagerie électronique, vers
un PC du réseau ou vers un télécopieur.
• Importe et exporte des paramètres vers des
fichiers CSV.
• Importe des paramètres à partir d'autres
périphériques MFP Oki.
Utilitaire Actkey (Windows
uniquement, USB
uniquement)
Cet utilitaire est un outil permettant d'effectuer des
opérations de numérisation courantes. Grâce à lui,
l'appareil peut recevoir des commandes à une
touche de l'ordinateur raccordé à l'appareil.
Utilitaire ScanSoft PaperPort
PaperPort est une application de gestion des
documents utilisée pour organiser, accéder,
partager et gérer les fichiers de documents et
d'images sur votre ordinateur personnel. Voici
quelques caractéristiques clés de cette application
:
• Numérisez des documents et des photos
directement depuis le bureau et sauvegardez les
fichiers de numérisation dans les formats
populaires, notamment PDF, JPEG et TIFF.
• Utilisez le système de dossiers semblable à
l'Explorateur pour organiser tous vos documents
et toutes vos photos sur votre ordinateur ou le
réseau. Vous pouvez coder vos dossiers par
couleur et ajouter tout dossier existant à
PaperPort sans le déplacer au sein de votre
système de fichiers.
• Visualisez de grosses images miniatures nettes
de vos fichiers d'images numérisées.
Utilitaire ScanSoft OmniPage
SE
OmniPage SE de Scansoft convertit les documents
papier et les fichiers PDF d'Adobe en documents
numériques modifiables. En utilisant les fonctions
de ROC (reconnaissance optique des caractères) et
de conservation de la disposition des pages,
OmniPage élimine le besoin de retaper le texte des
documents statiques et déverrouille le contenu des
fichiers PDF. Voici quelques caractéristiques clés de
cette application :
• Créez des flux de travail personnalisés, comme
un modèle pour traiter automatiquement un
fichier PDF de 20 pages, le convertir en
document Word, l'envoyer par courriel et en
sauvegarder une copie sur votre disque dur
local.
• OmniPage Pro 14 Office permet d'automatiser la
conversion des documents papier et PDF en
documents XML aux normes de l'industrie.

19 - Français
Mots de passe/code PIN
Avant d’utiliser ce MFP, vous devez définir quelques
paramètres de base.
Assurez-vous que vous disposez des droits/codes
PIN appropriés avant de commencer.
Les mots de passe/code PIN par défaut définis en
usine sont les suivants :
Administrateur aaaaaa
Code PIN 000000
Réseau (page Web) aaaaaa
Réception de fax
Importante!
Aux États-Unis, conformément aux
règlements de la FCC, une en-tête doit étre
incluse avec tous les messages par fax. L'en-
tête doit comprendre
• la date et l'heure auxquelles la télécopie
est envoyée
• ainsi qu'une identification de l'entreprise
ou de l'entité ou de toute personne
envoyant la télécopie
• ainsi que le numéro de téléphone du
télécopieur, de l'entreprise, de l'entité ou
de la personne envoyant la télécopie.
Le télécopieur du MFP répond automatiquement au
téléphone à l’issue du délai de prise de ligne. Pour
plus d'informations sur ce paramètre, reportez-
vous à la section “Délai de prise de ligne” sur la
page 19.
Configuration des paramètres de
fax
Suivez les directives suivantes pour régler la date
et l'heure (réglage de l'horloge), le code de pays, le
numéro de téléphone local et l'ID de l'expéditeur.
1. Utilisez la flèche vers le bas et faites défiler
l'affichage jusqu'à Menu et appuyez sur
Entrée.
2. Utilisez la flèche vers le bas et faites défiler
l'affichage jusqu'à Configuration admin. et
appuyez Enter (Entrée).
3. Utilisez les touches fléchées et le clavier à
l'écran pour entrer le mot de passe de
l'administrateur. Mettez en surbrillance Terminé
et appuyez sur Enter (Entrée).
4. Utilisez la flèche vers le bas et faites défiler
l'affichage jusqu'à Paramétrage fax et appuyez
sur Entrée.
5. Appuyez sur Entrée pour sélectionner le menu
Réglage horloge.
6. Utilisez les touches fléchées et le clavier pour
entrer la date et l'heure.
7. Appuyez sur Entrée pour confirmer.
8. Utilisez la flèche vers le bas et faites défiler
l'affichage jusqu'à Réglages de base et appuyez
sur Entrée.
9. Utilisez la flèche vers le bas et faites défiler
l'affichage jusqu'à Code de pays et appuyez sur
Entrée.
10.Utilisez les touches fléchées pour faire défiler
l'écran jusqu'au pays où se situe l'appareil MFP
et appuyez sur Entrée pour confirmer.
11.Utilisez la flèche vers le bas et faites défiler
l'affichage jusqu'à N° de téléphone local et
appuyez sur Entrée.
12.Utilisez le clavier ou les touches fléchées pour
entrer le numéro de téléphone local et appuyez
sur Entrée pour confirmer.
13.Utilisez la flèche vers le bas et faites défiler
l'affichage jusqu'à ID expéditeur et appuyez sur
Entrée.
14.Utilisez le clavier, les touches fléchées ou le
clavier en ligne pour entrer l'ID de l'expéditeur.
15.Mettez en surbrillance Terminé et appuyez sur
Entrée.
Configuration du MPS480mb MF

20 - Français
Délai de prise de ligne
La fonction télécopieur de ce MFP répond
automatiquement à la sonnerie à l’issue de la
période définie pour le délai de prise de ligne.
La valeur par défaut définie par le fabricant pour le
délai de prise de ligne est d’une sonnerie. Ce délai
peut être porté à 20 secondes dans le menu
d’administration en procédant comme suit (vous
devez disposer des droits d’administrateur pour
modifier ce paramètre) :
1. Dans l’écran de niveau supérieur, faites défiler
l’affichage jusqu’à Menu et sélectionnez à l’aide
de la touche Enter (Entrée).
2. Dans le menu déroulant, faites défiler
l’affichage jusqu’à Admin Menu (Menu Admin.)
et sélectionnez à l’aide de la touche Enter
(Entrée). Entrez le mot de passe.
3. Dans le menu déroulant, faites défiler
l’affichage jusqu’à Paramétrage fax et
sélectionnez à l’aide de la touche Enter
(Entrée).
4. Dans le menu déroulant, faites défiler
l’affichage jusqu’à Réglages de base et
sélectionnez à l’aide de la touche Enter
(Entrée).
5. Dans le menu déroulant, faites défiler
l’affichage jusqu’à Délais prise de ligne et
sélectionnez à l’aide de la touche Enter
(Entrée).
6. Dans le menu déroulant, faites défiler
l’affichage jusqu’au temps de réponse requis et
sélectionnez à l’aide de la touche Enter
(Entrée).
7. Utilisez la flèche vers la gauche pour revenir au
menu de niveau supérieur.
Contrôle d'accès
L’exploitation et les fonctionnalités de cet appareil
peuvent être limitées au personnel autorisé. Il
suffit pour cela de saisir un code PIN de 4 à 9
chiffres (Personal Identification Number – numéro
d’identification personnel). Cette fonction est
appelée Contrôle d’accès. Plus les chiffres du code
PIN sont nombreux, mieux l’appareil est protégé.
Activation/Désactivation du
contrôle d'accès
Pour activer le contrôle d'accès, utilisez le menu
pour accéder à : Menu > Admin Setup
(Configuration admin.) > Systwm Setup (Réglages
système) > Access Control (Contrôle d'accès) et
sélectionnez Enable (Activer).
• Lorsque le contrôle d'accès a pour valeur Activer,
l’écran Réglages système réapparaît
immédiatement après la modification du
paramètre. Toutefois, si l’une des fonctions telles
que l’impression, l’envoi d’un fax ou la
numérisation PC s’exécute, l’écran Réglages
système réapparaît qu’une fois la tâche
terminée.
Saisie de l’identificateur PIN
• Lorsque le contrôle d'accès a pour valeur Activer,
la saisie d’un identificateur PIN est requise pour
permettre la configuration de différents
utilitaires.
• Entrez l’identificateur PIN à l’aide du clavier à dix
touches.
• Un identificateur PIN correct comprend 4 à 9
chiffres.
• Les chiffres entrés ne s’affichent pas sur l’écran
Entrer code PIN ; ils sont remplacés par des
astérisques (*).
• Le MFP prend en charge deux types
d’identificateur PIN
Administrator PIN ID (Identificateur PIN
administrateur) — Il s’agit de l’identificateur PIN
de l’administrateur ou des administrateurs
système. Si un identificateur PIN est enregistré
comme étant celui d’un administrateur, l’écran de
saisie du mot de passe administrateur s’affiche.
Lorsqu’un mot de passe administrateur est entré,
l’utilisateur est authentifié comme étant un
administrateur.
User PIN ID (Identificateur PIN utilisateur) —
Il s’agit de l’identificateur PIN des utilisateurs
quelconques. Si un identificateur PIN est enregistré
comme étant celui d’un utilisateur quelconque,
l’écran de sélection de fonction s’affiche. Après la
saisie de l’identificateur PIN, c’est également cet
écran qui apparaît.
• Identificateur PIN incorrect : Si le code PIN entré
est incorrect, le message Incorrect Password
(Mot de passe incorrect) s’affiche pendant trois
secondes et l’écran Entrer code PIN réapparaît.
Other manuals for MPS480mb
3
Table of contents
Languages:
Other Oki All In One Printer manuals
Popular All In One Printer manuals by other brands

Konica Minolta
Konica Minolta AccurioPress C2070 Safety information

Muratec
Muratec MFX-2030 Specifications

Samsung
Samsung SCX-4623 Series Quick install guide

Brother
Brother MFC-J4310DW manual

Xerox
Xerox Phaser 6115 MFP Quick use guide

Brother
Brother MFC 990cw - Color Inkjet - All-in-One Guía de configuración Rápida