Oki Microline 8480 FB User manual


Microline 8480 FB User’s Guide
2
Every effort has been made to ensure that the information in this
document is complete, accurate, and up-to-date. The manufacturer
assumes no responsibility for the results of errors beyond its control.
The manufacturer also cannot guarantee that changes in software
and equipment made by other manufacturers and referred to in this
guide will not affect the applicability of the information in it. Mention
of software products manufactured by other companies does not
necessarily constitute endorsement by the manufacturer .
While all reasonable efforts have been made to make this document
as accurate and helpful as possible, we make no warranty of any
kind, expressed or implied, as to the accuracy or completeness of the
information contained herein.
Copyright © 2009by Oki Data. All Rights Reserved
Microsoft, MS-DOS and Windows are either registered trademarks or
trademarks of MIcrosoft Corporation in the United States and/or other
countries.
Other product names and brand names are registered trademarks or
trademarks of their proprietors.
Microline 8480FB User’s Guide, P/N 59380401, Rev. 1.2

Microline 8480FB User’s Guide
Contents • 3
Contents
Introduction . . . . . . . . . . . . . . . . . . . . . . . . . . . . . . . . . . . . . . 5
Features . . . . . . . . . . . . . . . . . . . . . . . . . . . . . . . . . . . . . . . . . . . . . 5
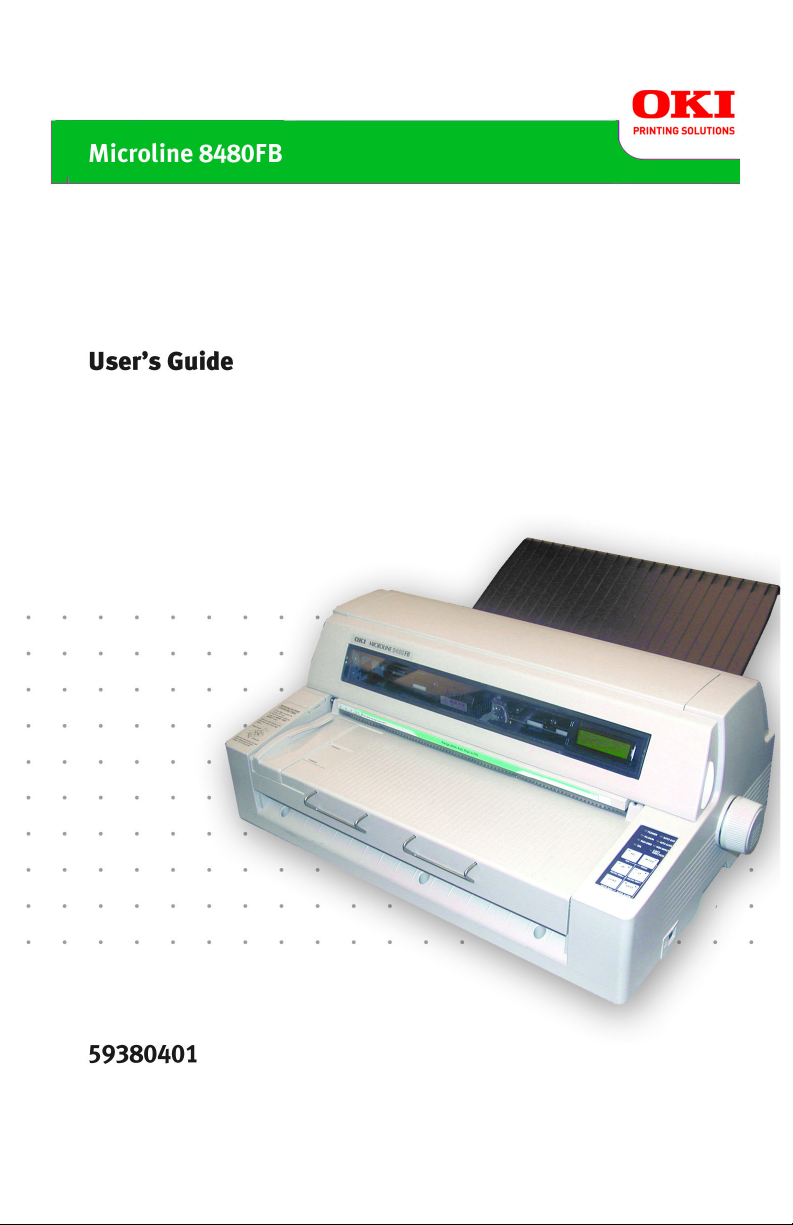
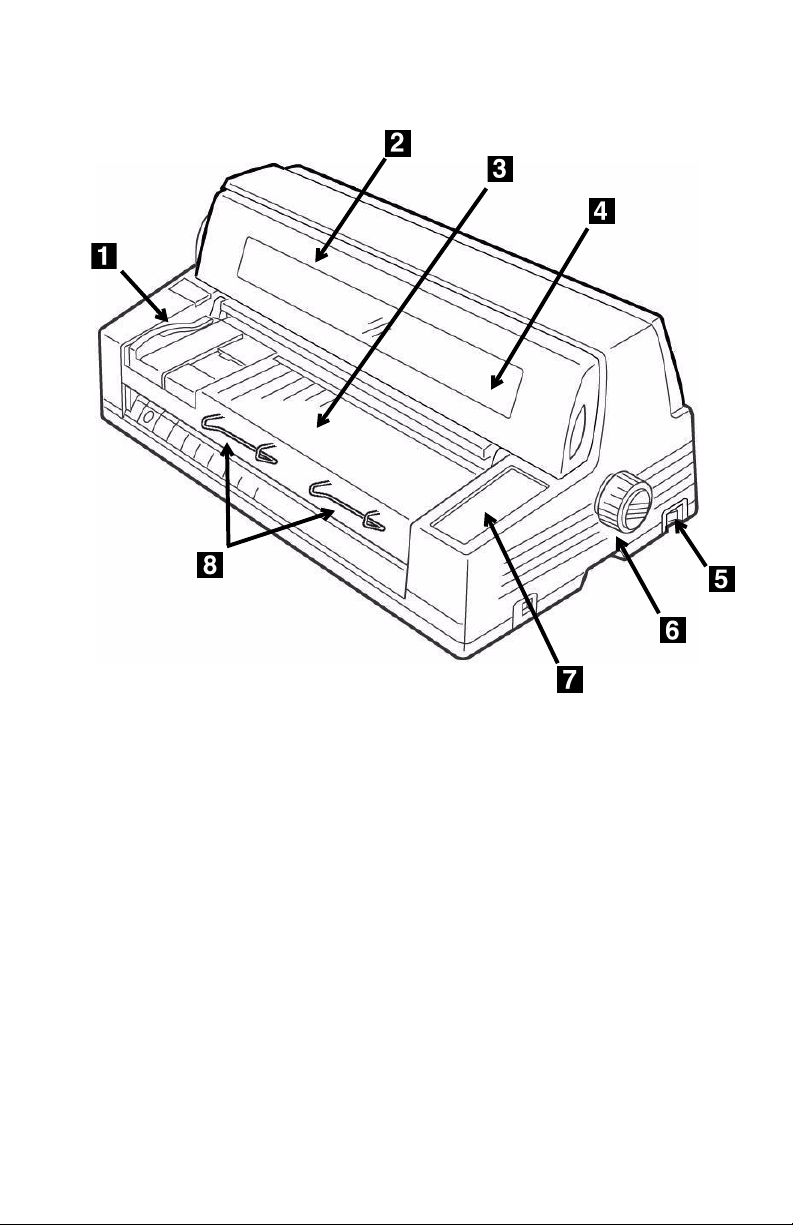
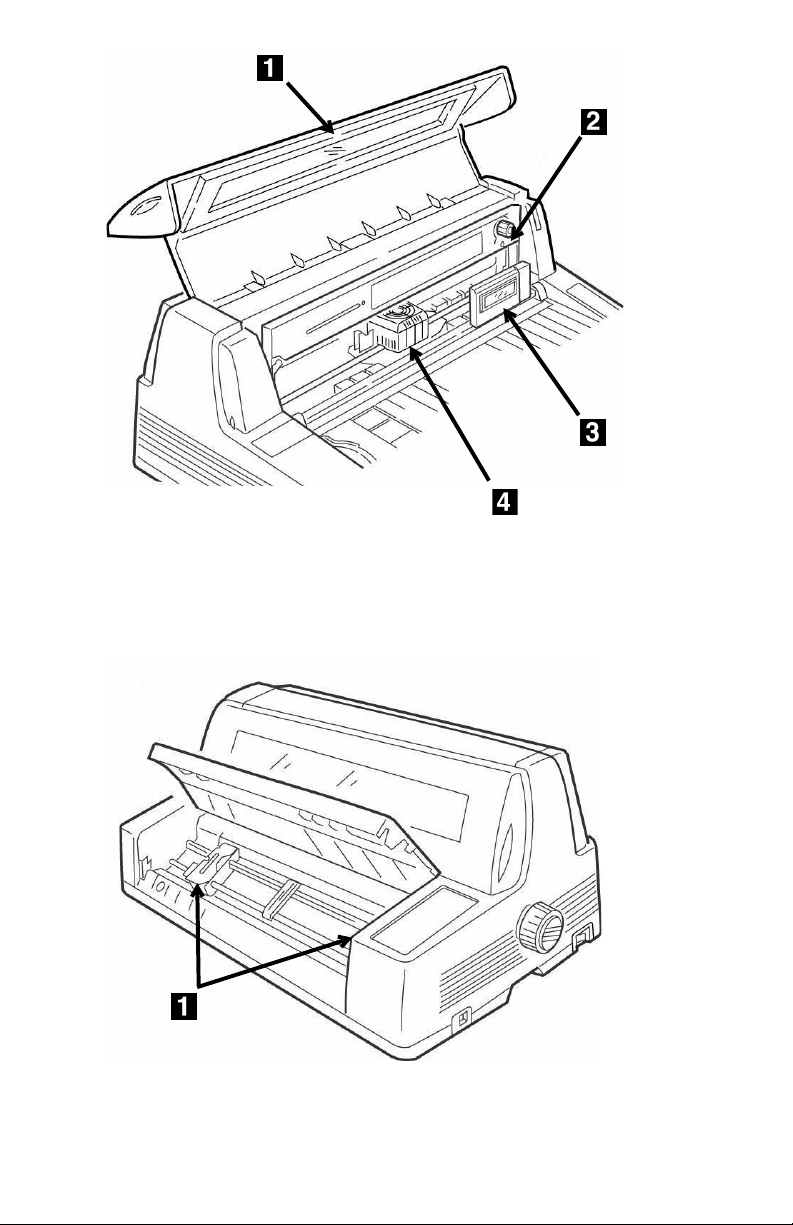
Front View . . . . . . . . . . . . . . . . . . . . . . . . . . . . . . . . . . . . . . . . . . . 6
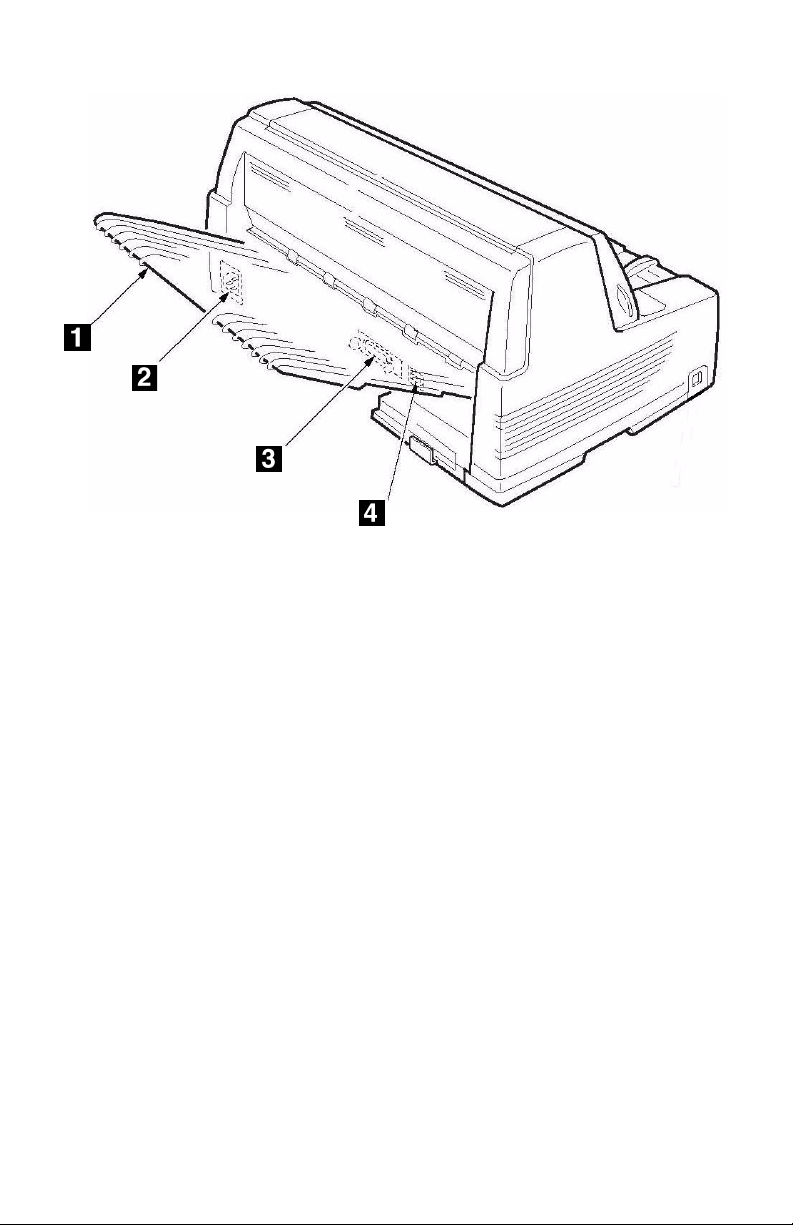
Rear View . . . . . . . . . . . . . . . . . . . . . . . . . . . . . . . . . . . . . . . . . . . 8
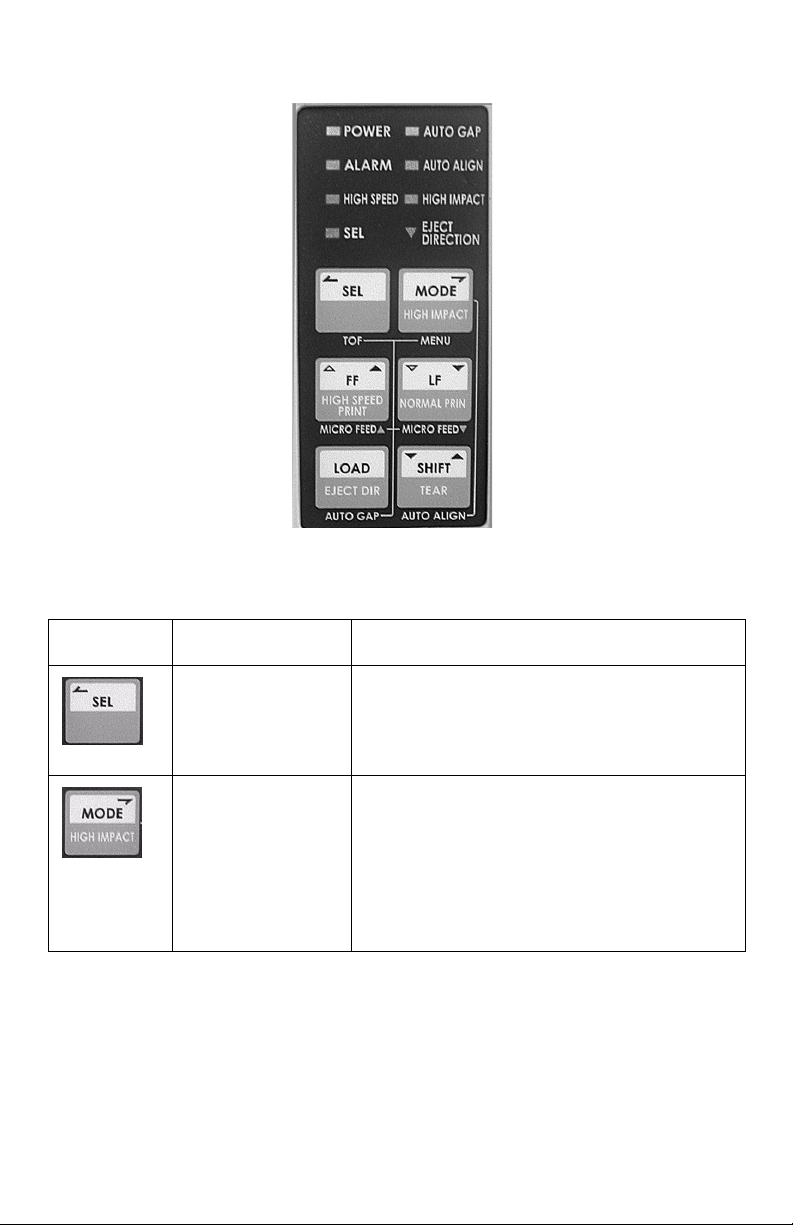
Control Panel . . . . . . . . . . . . . . . . . . . . . . . . . . . . . . . . . . . . . 9
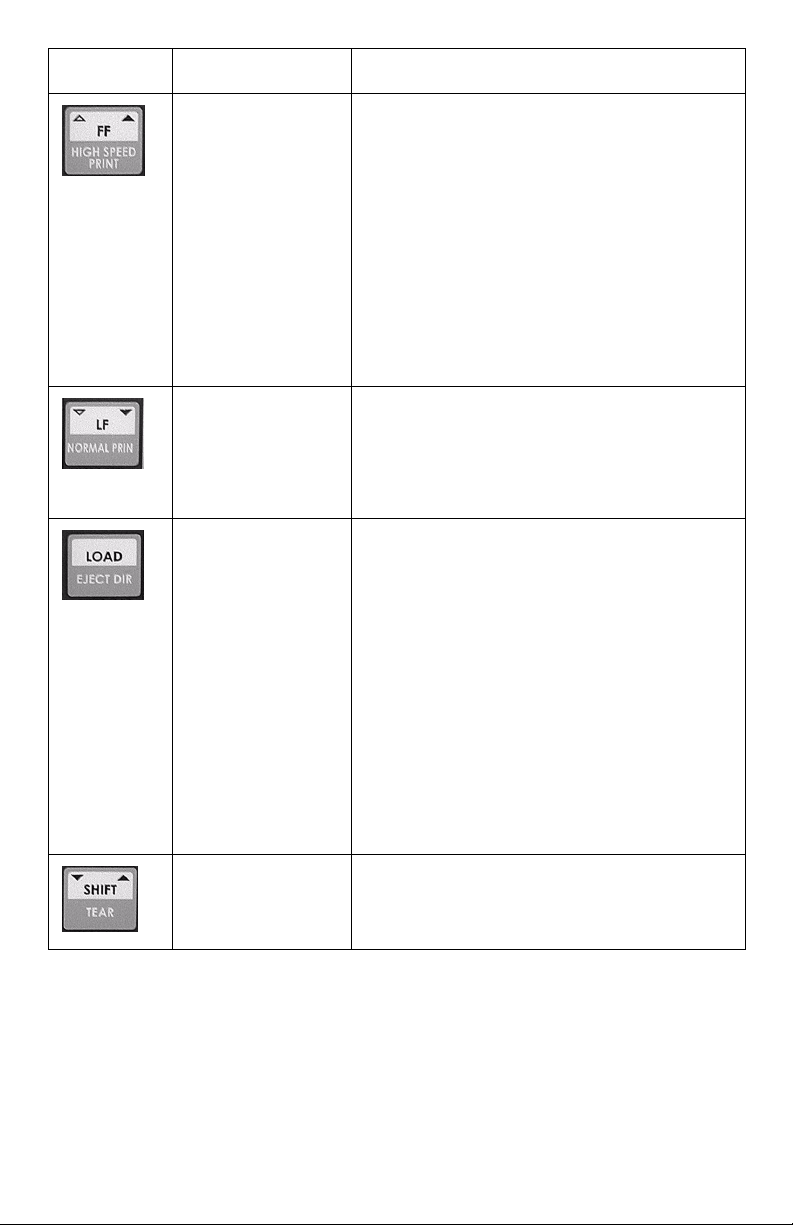
Individual Switches . . . . . . . . . . . . . . . . . . . . . . . . . . . . . . . . . . . . . 9
Combined Switches . . . . . . . . . . . . . . . . . . . . . . . . . . . . . . . . . . . . 11
Control Panel Lights . . . . . . . . . . . . . . . . . . . . . . . . . . . . . . . . . . . 12
Quick Reference: Control Panel Functions . . . . . . . . . . . . . . . . . . . . . 14
Print Modes. . . . . . . . . . . . . . . . . . . . . . . . . . . . . . . . . . . . . . 15
Normal Print Mode . . . . . . . . . . . . . . . . . . . . . . . . . . . . . . . . . . . . . 15
High Speed Print Mode . . . . . . . . . . . . . . . . . . . . . . . . . . . . . . . . . . 15
High Impact Print Mode . . . . . . . . . . . . . . . . . . . . . . . . . . . . . . . . . 15
Changing Print Modes. . . . . . . . . . . . . . . . . . . . . . . . . . . . . . . . . . . 16
Loading Print Media . . . . . . . . . . . . . . . . . . . . . . . . . . . . . . . 17
Individual Sheets/Forms (“MANUAL”) . . . . . . . . . . . . . . . . . . . . . . . . 17
Continuous Forms (“FRONT”) . . . . . . . . . . . . . . . . . . . . . . . . . . . . . 20
Switching Between Normal and High Impact Mode. . . . . . . . . . . . . . . 23
The Function Setting Menu . . . . . . . . . . . . . . . . . . . . . . . . . . 26
Navigating the Function Setting Menu . . . . . . . . . . . . . . . . . . . . . . . 27
Resetting to the Factory Defaults. . . . . . . . . . . . . . . . . . . . . . . . . . . 30
Print the Function Settings Menu . . . . . . . . . . . . . . . . . . . . . . . . . . . 31
Function Setting Menu Summary . . . . . . . . . . . . . . . . . . . . . . . . . . . 35
Explanation of Function Setting Menu Items . . . . . . . . . . . . 41
Setting the Top of Form (TOF) . . . . . . . . . . . . . . . . . . . . . . . 55
Setting TOF Using the Printer Menu . . . . . . . . . . . . . . . . . . . . . . . . . 55
Setting TOF Using 1Chr Set Pos. . . . . . . . . . . . . . . . . . . . . . . . . . . . 57
Setting a Temporary TOF Using the Control Panel . . . . . . . . . . . . . . . 59
Form Tear Off . . . . . . . . . . . . . . . . . . . . . . . . . . . . . . . . . . . . 60
Running Tests . . . . . . . . . . . . . . . . . . . . . . . . . . . . . . . . . . . . 62
Rolling ASCII Test . . . . . . . . . . . . . . . . . . . . . . . . . . . . . . . . . . . . . 62
Font Sample Test. . . . . . . . . . . . . . . . . . . . . . . . . . . . . . . . . . . . . . 62
Hex Dump Mode . . . . . . . . . . . . . . . . . . . . . . . . . . . . . . . . . . . . . . 62

Microline 8480FB User’s Guide
Contents • 4
Setting the Printhead Gap . . . . . . . . . . . . . . . . . . . . . . . . . . 64
Printhead Gap Settings. . . . . . . . . . . . . . . . . . . . . . . . . . . . . . . . . . 65
Changing to a Manual Printhead Gap Setting. . . . . . . . . . . . . . . . . . . 66
Troubleshooting . . . . . . . . . . . . . . . . . . . . . . . . . . . . . . . . . . 69
Paper Jams . . . . . . . . . . . . . . . . . . . . . . . . . . . . . . . . . . . . . . . . . . 69
Error Messages . . . . . . . . . . . . . . . . . . . . . . . . . . . . . . . . . . . . . . . 74
Maintenance . . . . . . . . . . . . . . . . . . . . . . . . . . . . . . . . . . . . . 76
Replacing the Ribbon Cartridge . . . . . . . . . . . . . . . . . . . . . . . . . . . . 76
Cleaning the Housing . . . . . . . . . . . . . . . . . . . . . . . . . . . . . . . . . . . 81
Control Codes . . . . . . . . . . . . . . . . . . . . . . . . . . . . . . . . . . . . 83
In Sequence by ASCII Code . . . . . . . . . . . . . . . . . . . . . . . . . . . . . . 83
In Sequence by Function . . . . . . . . . . . . . . . . . . . . . . . . . . . . . . . . 90
Specifications . . . . . . . . . . . . . . . . . . . . . . . . . . . . . . . . . . . . 97

Microline 8480FB User’s Guide
Introduction • 5
Introduction
Features
• Precise registration control for printing complicated forms
• Flexible handling of multi-part forms
– Individual or continuous feed
– Maximum = original + 7
– Up to 0.02-inch (0.48 mm) thick
• Automatic alignment when feeding individual forms/sheets.
• Fast through-put
• Reliable, durable operation
• Automatic adjustment for paper thickness
•PaperPark
•FormTearOff
• Choice of Print Modes: Normal, High Speed (for printing drafts), or
High Impact (for use with thick multi-part forms)

Microline 8480FB User’s Guide
Introduction • 6
Front View
1Sheet Guide
2Cover
3Platform for Manual Feed
4Display Panel
5On/Off Switch
6Platen Knob
7Control Panel
8Sheet Supports

Microline 8480FB User’s Guide
Introduction • 7
1Cover
2Ribbon Cartridge
3LCD Display Panel
4Printhead
1Tractors

Microline 8480FB User’s Guide
Introduction • 8
Rear View
•1Stacker
•2Power Cord Connector
•3Parallel Port
•4USB Port

Microline 8480FB User’s Guide
Control Panel • 9
Control Panel
Individual Switches
Switch Printer On Line Printer Off Line (Deselected)
Press to place the
printer off line.
Press to place the printer on line.
Function Setting Menu Mode
• Scrolls backwards through available
settings for an item.
Engages the High
Impact print mode.
Used to switch back and forth between
Manual Feed (single forms fed from the
platform) and Front Feed (continuous
forms). See page 24.
Function Setting Menu Mode
• Scrolls forward through available settings
for an item.

Microline 8480FB User’s Guide
Control Panel • 10
Engages the High
Speed Print mode.
Continuous Forms
• In the print position: form feeds to next
TOF position.
• Loaded on the tractors, but not in the
print position: the paper advances to the
print position.
Single Forms
• If a form is loaded into the printer, it is
ejected.
Function Setting Menu Mode
• Scrolls forward through available items
within a group.
Engages the
Normal Print mode.
Advances forms one line at a time. Press
and hold for repetitive line feeds.
Function Setting Menu Mode
• Scrolls backward through available items
within a group.
Toggles the eject
direction for single
sheets between
the front and back
of the printer.
Continuous Forms
• In the print position: parks the paper
(moves it out of the print path, back to
the tractors).
• Loaded on the tractors, but not in the
print position: the paper advances to the
print position.
Single Forms
• If a form is loaded into the printer, it is
ejected.
Function Setting Menu Mode
• Saves any changes made in the menu
and exits the Menu Mode, placing the
printer back on line.
Moves continuous
forms forward to
the tear position.
Used with other switches to change their
function (see table below).
Switch Printer On Line Printer Off Line (Deselected)

Microline 8480FB User’s Guide
Control Panel • 11
Combined Switches
With the Printer Powered Up and Off Line
Switches Task Performed
+
Memory Auto ALign Cross Ref
Select Align 1, Align 2, Align 3, or Align 4:
Press and hold the MODE switch,
then press the
SHIFT switch
repeatedly to select Align 1, Align 2,
Align 3, or Align 4 as the setting for Auto Align (see
page 42).
• Auto Align (POW) [see page 43] must be set to
SelectAutoALign (the default).
• The setting made using these switches is stored
in Memory Auto Align (see page 48) unless it has
been changed to Invalid.
Enter the Function Setting Menu:
Press
both
the MODE and the SHIFT switches
simultaneously
to place the printer in the Function
Settings Menu mode.
+
Simultaneously press and hold the SHIFT and SEL
switches to move continuous forms up to the tear
off position (see page 60).
Note: Form Tear Off must be engaged. The
factory default is Off.
+
Press and hold SHIFT, then press FF repeatedly to
move loaded paper (single sheets or continuous
forms) forward 1/180-inch at a time.
If you press and hold SHIFT, then press and hold
LF, the paper will advance in rapid-fire 1/180-inch
increments.
+
Press and hold SHIFT, then press LF repeatedly to
move loaded paper (single sheets or continuous
forms) backward 1/180-inch at a time. Maximum
allowed backward movement is 1/3-inch (8.5 mm).
If you press and hold SHIFT, then press and hold
LF, the paper will advance backward in rapid-fire
1/180-inch increments.

Microline 8480FB User’s Guide
Control Panel • 12
Control Panel Lights
+
Press and hold both the LOAD and the SHIFT
switches to change the printhead gap setting. The
factory default is Auto Gap in which the required
printhead gap is sensed automatically by the
printer. Use these switches to change the setting to
a manual head gap setting if you are not getting
good print results with AutoGap. See “Gap Control”
on page 46 for more information.
Light On Off Blinking
a
POWER Printer is turned
on.
Printer is turned
off.
N.A.
AUTO GAP Auto Gap mode is
selected (the
default).
A Manual Gap
setting is engaged.
Manual Gap setting
alarm.
ALARM • Paper is out.
• A paper jam has
occurred.
See
“Troubleshooting”
on page 69 for
more information
Printer operation is
normal.
• Awaiting removal of
single sheet/form.
• Media switch is
taking place.
• If both the ALARM
and SEL lights are
blinking, the cover
is open.
• If both the ALARM
and AUTO ALIGN
lights are blinking,
there is an
unrecoverable
error. Try turning
the printer off, then
on again. IF this
doesn‘t clear the
problem call your
service dealer
With the Printer Powered Up and Off Line
Switches Task Performed

Microline 8480FB User’s Guide
Control Panel • 13
AUTO ALIGN The printer is set
to automatically
align single
sheets/ forms.
Auto Align is
disabled
If both AUTO ALIGN
and ALARM are
blinking, it indicates
an unrecoverable
error. Try shutting the
printer off and turning
it on again. If this
doesn’t work, call your
service dealer.
HIGH SPEED The printer is in
the High Speed
(draft) print mode.
The printer is not
in the High Speed
(draft) print mode.
N.A.
HIGH IMPACT The printer is in
the High Impact
print mode.
The printer is not
in the High Impact
mode.
N.A.
SEL The printer is on
line.
The printer is off
line.
• Menu Mode:
indicates the menu
is being set up.
• With ALARM light:
cover open alarm.
EJECT
DIRECTION
Paper is being
ejected to the
platform.
Paper is being
ejected to the
stacker.
N.A.
a. N.A. = Not Applicable.
Light On Off Blinking
a

Microline 8480FB User’s Guide
Control Panel • 14
Quick Reference: Control Panel Functions
Note
Unless otherwise specified, these instructions assume that the
printer is selected (on line).
Enter the Function Setting
Menu
1.
Press SEL.
2.
Press both the MODE and the
SHIFT switches simultaneously.
Print the Function Setting
Menu
1.
With the printer in the Manual
Mode, turn it off.
2.
Press and hold SELECT and
MODE while turning the printer
on.
3.
When prompted, load a sheet
of paper (minimum letter or
A4) on the platform.
Change Print Modes
With the printer on line:
1.
Press LF to engage the Normal
Print Mode.
2.
Press MODE to engage the High
Impact Print Mode.
3.
Press FF to engage the High
Speed (Draft) Print Mode.
Change the Printhead Gap
1.
Press SEL.
2.
Press and hold the SHIFT
switch, then press the LOAD
switch repeatedly to scroll
through the various settings for
the printhead gap.
3.
Press SEL
Switch Paper Paths
1.
Press SEL.
2.
Press MODE repeatedly to
change the paper path.
The printer automatically
reinitializes in the new path.
Move Continuous Forms to the
Print Position
1.
Press SEL.
2.
Press FF.
Park Continuous Forms
1.
Press SEL.
2.
Press LOAD.
Move Continuous Forms to the
Tear Off Position
Note
Form Tear Off must be
activated (see page 60).
1.
Press SEL.
2.
Press and hold the SHIFT and
SEL switches to move
continuous forms up to the tear
off position.
Change Align x Setting
1.
Press SEL.
2.
Press and hold the MODE
switch, then press the SHIFT
switch repeatedly to select
Align 1, Align 2, Align 3, or
Align 4.

Microline 8480FB User’s Guide
Print Modes • 15
Print Modes
Your printer has three print modes:
•Normal: for letter-quality printing
•High Speed: for printing drafts
•High Impact: for printing multipart forms
Normal Print Mode
Use for every day, letter-quality printing.
High Speed Print Mode
Use for high speed draft printing.
When this mode is selected, the print appears lighter than in the
Normal print mode.
High Impact Print Mode
In High Impact print mode, each character is printed twice.
This mode is used to print thick multi-part forms or multipart forms
with a thick first page and thin second (or more) pages.
Caution!
High Impact print mode can cause the paper to tear:
• if the paper is too thin
• if you print horizontal lines
High Impact Print Mode reduces ribbon life expectancy.
• If you consistently use High Impact Print Mode, ribbon life can
be cut in half.
If you have a new ribbon and use High Impact Print Mode to
print high-density characters or graphics, the paper may be
smudged.

Microline 8480FB User’s Guide
Print Modes • 16
Changing Print Modes
Note If you change the print mode while printing, the printer
immediately switches to the new print mode.
Make sure the printer is turned on and that the SEL light is on.
To change to Normal print mode, press:
The HIGH SPEED or HIGH IMPACT light goes out.
To change to High Speed print mode, press
The HIGH SPEED light goes on.
To change to High Impact print mode, press
The HIGH IMPACT light goes on.

Microline 8480FB User’s Guide
Loading Print Media • 17
Loading Print Media
Individual Sheets/Forms (“MANUAL”)
The printer is set at the factory for
•singlesheets/forms
• Auto Align mode
• Normal print mode
• automatic printhead gap
Specifications: Individual Sheets/Forms,
for Use with Auto Align Mode
Note Printing envelopes requires use of the sheet guide (1) instead
of the Auto Align mode. See page 49 for information on
disabling Auto Align.
Minimum Print Margins
• 1/4-inch (6.4 mm) on all sides
Individual Sheets
Size
• Minimum Width x Length: 3.9” (100 mm) x 2.75” (70 mm)
• Maximum Width x Length: 14.3” (364 mm) x 16.5” (420 mm)
Weight Range
• 14 lb. to 56 lb. US Bond (52 to 210 g/m2)
Individual Multipart Forms
Size
• Minimum Width x Length: 3.9” (100 mm) x 2.75” (70 mm)

Microline 8480FB User’s Guide
Loading Print Media • 18
• Maximum Width x Length: 14.3” (364 mm) x 14.3” (364 mm)
Normal Print Mode (the factory default)
• Up to 6-part forms (original + 5)
• Maximum Thickness: 0.0142” (0.36 mm)
High Impact Mode
• Up to 8-part forms (original + 7)
• Maximum Thickness: 0.0189” (0.48 mm)
Load Individual Sheets/Forms
1. If you are using longer paper, pull out the sheet supports (1).
2. Move the sheet guide (2) to the right as far as it will go. This
ensures that the single sheet/form is within the “Paper range
when Auto Align is ON” area on the platform.
3. Place a letter size or larger sheet of paper on the platform
anywhere within the “Paper range when Auto Align is ON” area

Microline 8480FB User’s Guide
Loading Print Media • 19
The sheet loads in to the print position, automatically aligning so
that it is square with the print path.

Microline 8480FB User’s Guide
Loading Print Media • 20
Continuous Forms (“FRONT”)
Continuous Forms Specifications
Width
• Minimum: 4” (102 mm)
• Maximum: 16” (406 mm)
Single Thickness Forms
• Weight range: 14 to 34 lb. US Bond (52 to 128 g/m2)
Multi-part Forms
Normal Print Mode (the printer default)
• up to 6-part forms (original + 5)
• Maximum Thickness: 0.0142” (0.36 mm)
High Impact Mode
• up to 8-part forms (original + 7)
• Maximum Thickness: 0.0189” (0.48 mm)
Note To switch between Normal and High Impact mode, see
page 23.
Loading Continuous Forms
1. Push the sheet supports in and lift the sheet feed platform
Other manuals for Microline 8480 FB
2
Table of contents
Other Oki Printer manuals

Oki
Oki C 9650dn Original instructions

Oki
Oki B410D How to use

Oki
Oki B2200 User manual

Oki
Oki ML 186 User manual

Oki
Oki Microline 320 Flatbed Programming manual

Oki
Oki 1624N User manual

Oki
Oki LP441s Original instructions

Oki
Oki OKIPAGE6w User manual

Oki
Oki ML320 Turbo User manual

Oki
Oki ES9160 MFP User manual