Oki ML380 User manual

Chapter 0
Front Cover
Microline
380
Printer Handbook
ML 380 ( 96-02-03 )

%Introduction
Introduction
Your ML380 is a 24-pin, dot matrix printer which will give you years of high-quality printing service. It
features six resident letter quality (LQ) fonts, a direct access control panel, automatic paper feed, paper
park, no-waste paper tear-off, and a quick-change cartridge ribbon.
With six resident LQ fonts, its easy to give your manuscript the polished, professional appearance of a
typeset document.
With all the controls in the front at your fingertips, you dont have to go poking around looking for the
switch you need.
With automatic paper feed, all you have to do is position the paper on the tractor pins (for
continuous-form paper) or on the paper separator (single sheet feed) and then pull the bail lever
forward_the printer will automatically feed the paper around the bail and into position for printing!
With paper park, all you need to do to change from continuous-form paper to single sheet feed is press a
button_the printer will park the continuous-form paper out of the way and be ready for you to insert single
sheets.
With no-waste paper tear-off, you can have the printer automatically advance continuous-form paper so
that you can tear off the last printed page without losing the next blank page_the printer will then move
the paper back down into position for printing the next page. This eliminates paper waste.
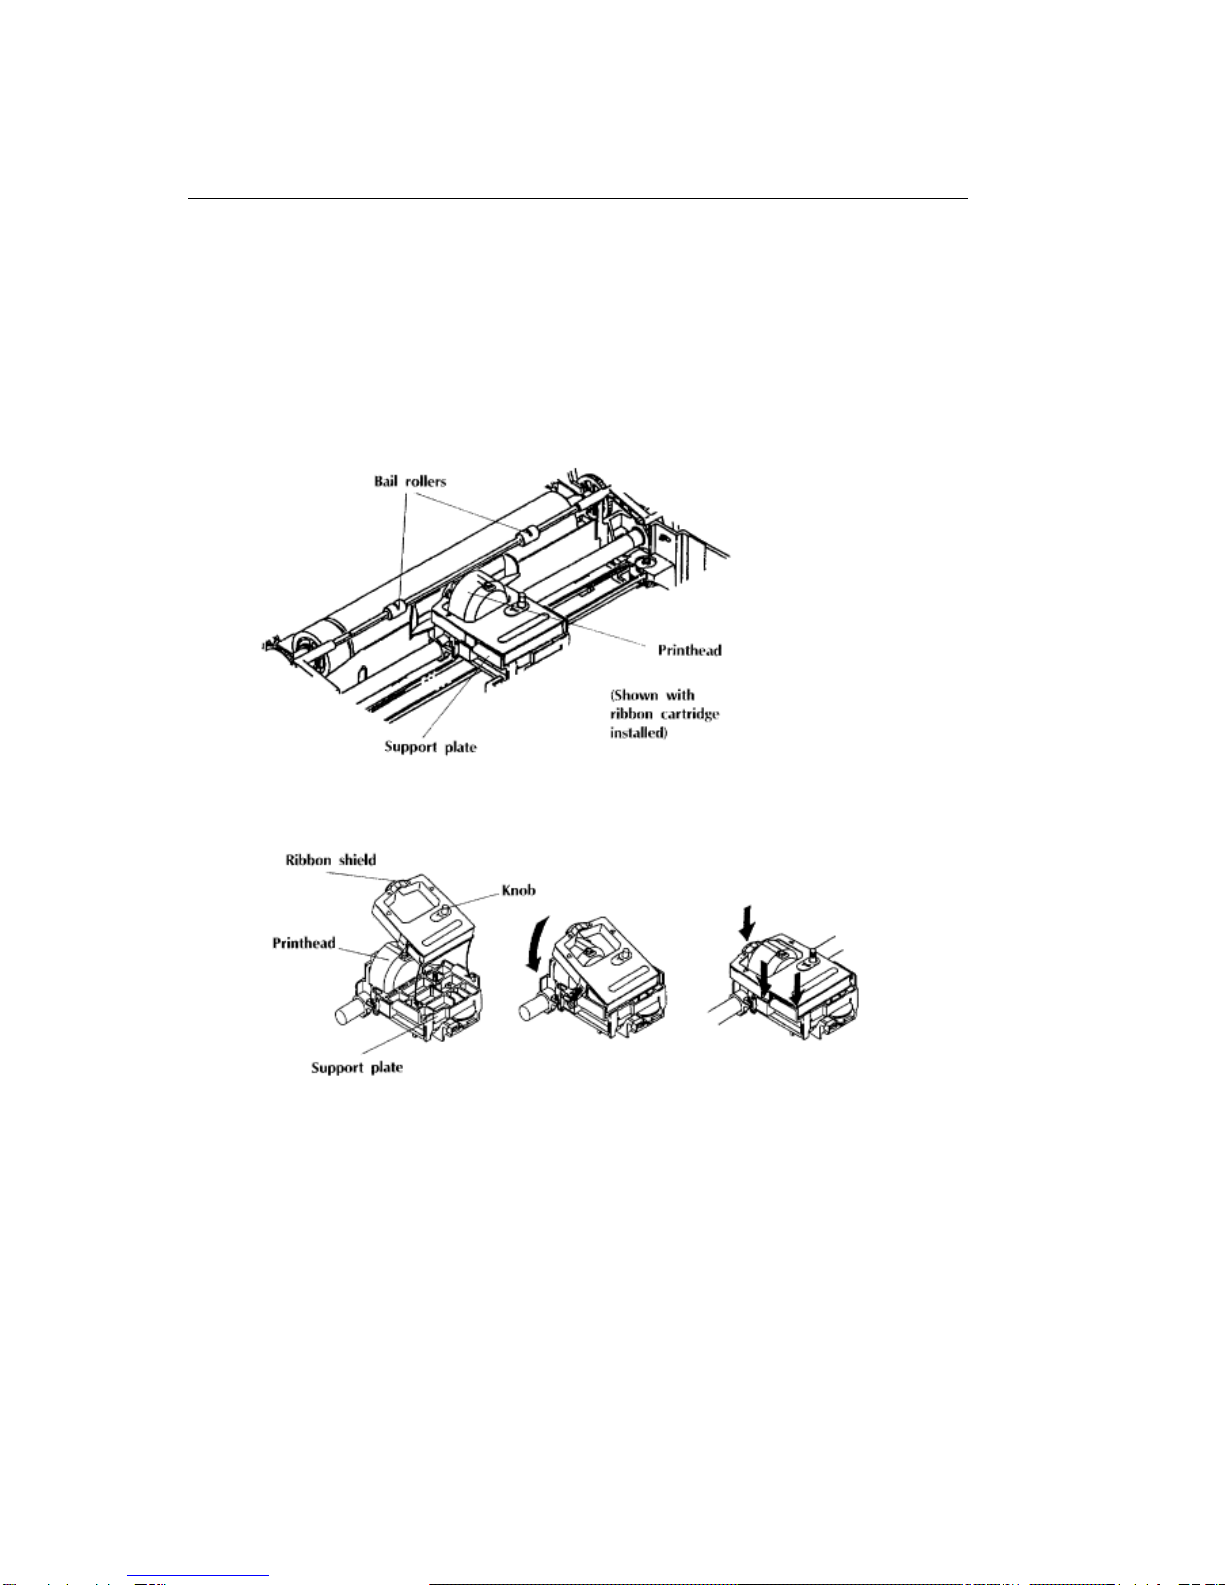
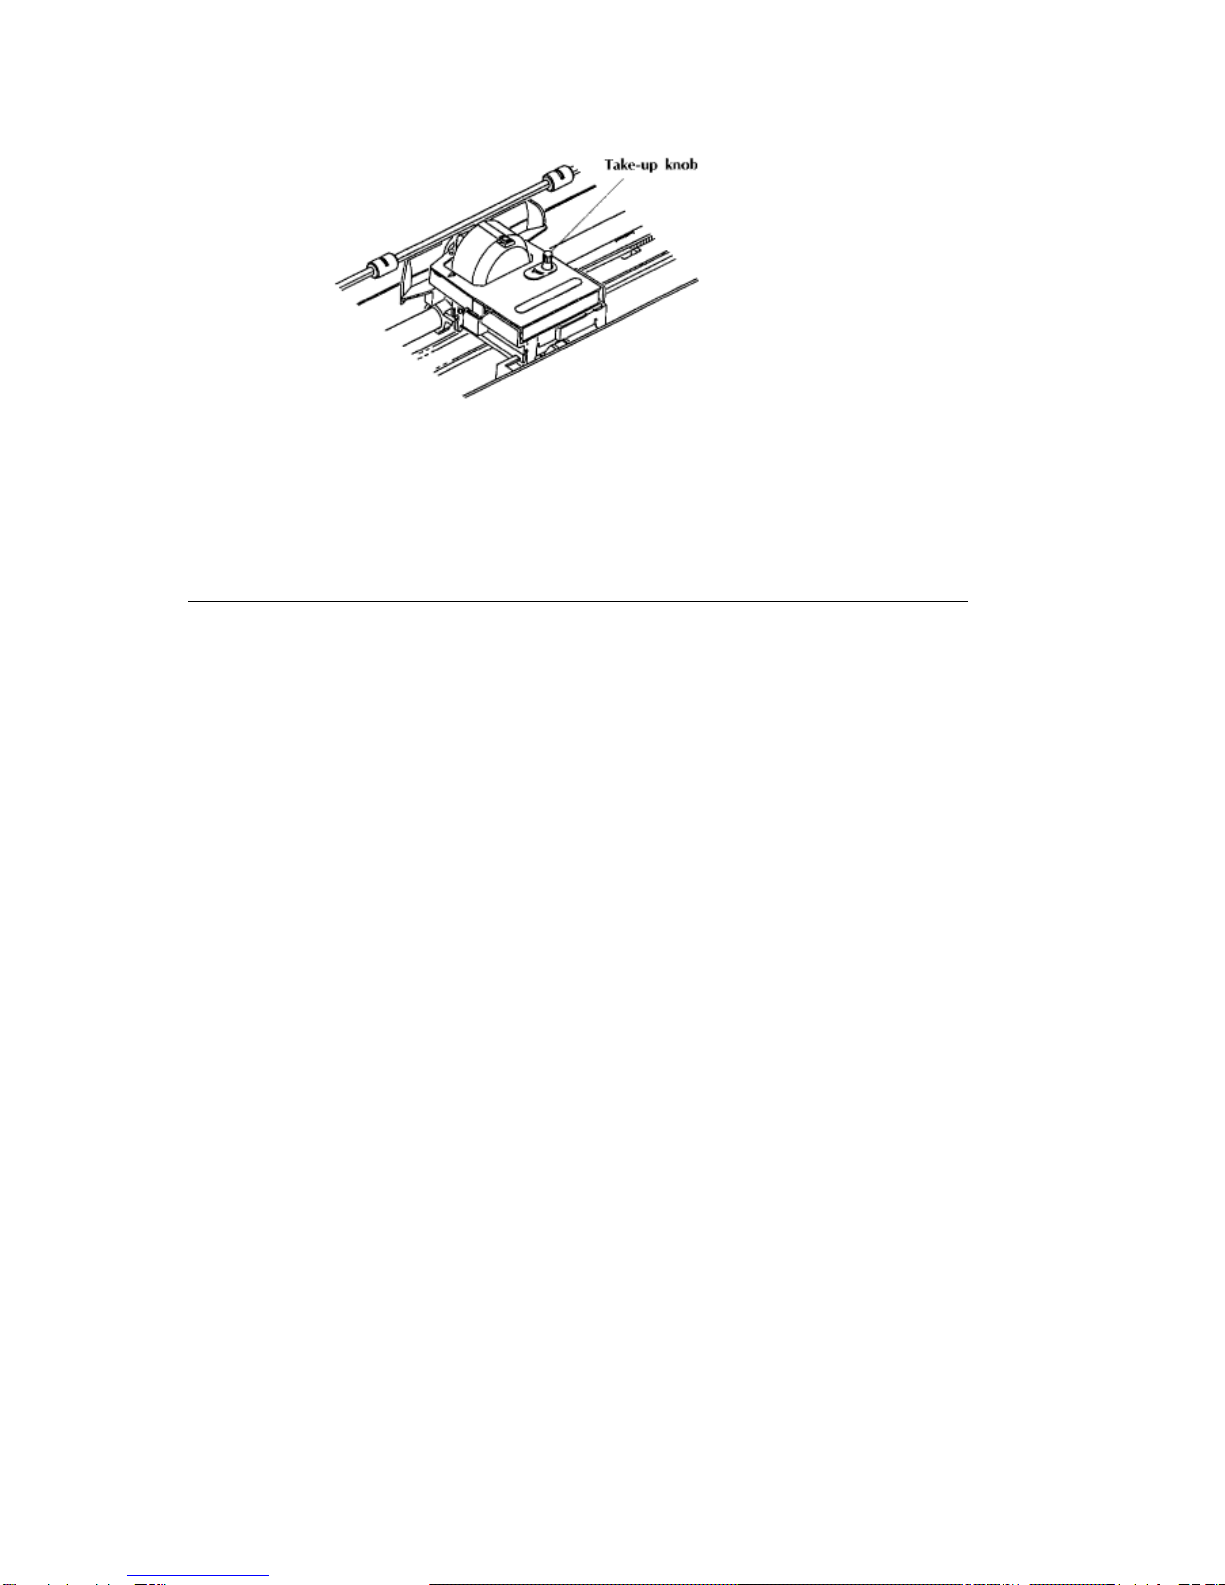
With a cartridge ribbon, you just pop it in and out in seconds_no need to fuss with the messy job of
threading ribbon through a printhead. What could be easier?
This Handbook will help you to get your ML380 printer set up and running. It also explains the printers
control codes and how to use them.
Heres how its organized:
Chapter 1: Setup gives you the basics: how to get your printer ready to operate, how to make the
connections, and how to load paper.
Chapter 2: Features, Self Tests and Options describes your ML380's features and how to use them. It
also explains how to run the self tests and how to install the pull tractor and serial interface options.
Chapter 3: Control Panel shows you how to use the front panel controls on your printer.
Chapter 4: Software discusses how to use your ML380 with software. It explains how to choose the
correct printer driver, gives examples of how to set printer parameters with your software, and illustrates
how to employ your software to produce graphics on your ML380.
Chapter 5: Control Codes defines the various commands you can use to control your printer, either by
placing them within your software or by using them in your own computer program.
Chapter 6: Cleaning and Problem Solving explains how to clean your printer and poses a series of what
if...? questions to help you with the most common problems people run into when operating a printer.
The Appendices provide you with a variety of useful information, including the ASCII character sets, a
summary of the control codes, and a discussion of computer interfacing, in addition to a listing of your
ML380's specifications.
To top it all off, youll find a Glossary on page 143 to help you with the jargon.
In addition to this Handbook, youll also find a Customer Service Guide included with your printer. It
explains how to get help in the unlikely event that you have a problem not covered in this handbook; youll
also find there a list of replacement parts, the warranty statement and your printer registration card.
ML 380 ( 96-02-03 )

Chapter 1
%What's Included
What's Included
When you remove your ML380 Printer from the carton, place it on a sturdy surface such as a printer
stand, desk, or table. As you proceed to unpack the printer, it's a good idea to save the packing materials
and carton in case you ever need to ship the printer.
Along with this manual, your printer carton should contain the following items:
1) Printer
2) Paper Separator
3) Platen Knob
4) Ribbon
5) Grounding Screw
Note:You must purchase a computer interface cable and paper separately.
If you are missing any of these items, or if any are damaged, please notify your dealer immediately for a
replacement.
Note:Some interface cables have a separate grounding wire. If you have this type of cable, use the
grounding screw to attach the grounding wire to the printer. The grounding screw is also needed if you
are installing the optional serial interface adapter.
ML 380 ( 96-02-03 )

%Choosing the Interface
Choosing the Interface
How you connect your ML380 to your computer depends on whether you are using a parallel or a serial
interface. The printer has a parallel interface; for serial interfacing you need a serial interface adapter,
sold separately. If you already know which type you will use, skip down to the appropriate
heading:"Installing the Parallel Interface Cable" on the next page or "Installing the Serial Interface
Adapter" on page 36.
Generally, a parallel interface is used for a printer operated with an individual PC or computer, while a
serial interface is used for networks in which more than one computer will be operated with a single
printer. A serial interface is also required if the printer is to be placed more than 10 feet from the
computer. The following table summarizes the difference between the two types of interface.
Parallel Interface Serial Interface
Data is transferred 8 bits (one byte) at a time,
in parallel, over 8 wires. Data is transferred serially, 1 bit at a time over
1 wire.
Data transmission rate is faster. Data transmission rate is slower.
On IBM PCs and compatibles, the port
connected to printer is referred to as LPT1,
LPT2, or LPT3 (maximum of three ports
allowed).
On IBM PCs and compatibles, the port
connected to printer is referred to as COM1,
COM2, etc. (no maximum number of ports).
Cable length is limited to 10 feet (3 meters). Cable can be virtually any length.
Requires Centronics 36-pin parallel interface
connector. Requires RS-232, DB-25 serial interface
connector.
ML 380 ( 96-02-03 )

%Installing the Parallel Interface Cable
Installing the Parallel Interface Cable
You'll need a shielded parallel interface cable not more than 10 feet (3 meters) long, with a Centronics
36-pin male connector for attachment to your printer.
1.If you have not already done so, remove the styrofoam end pieces and the plastic wrapping from
the printer.
2.Make sure the printer is unplugged and the computer is turned off.
3.Turn the printer over and place it gently on a sturdy, flat surface.
4.Locate the parallel interface connector and push the wire clips out to the side.
5.Plug your parallel interface cable into the port on the bottom of the printer.
6.Fasten the wire clips to the cable.
7.Snap the interface cable into the cable channel.
8.Turn the printer back over.
9.Connect the other end of the cable with the parallel connector on your PC.
ML 380 ( 96-02-03 )

%Setting Up
Setting Up
Note:Don't plug in the printer until it is set up and ready to operate!
1.Open the access cover and remove the shipping retainer. The printhead won't move freely until
you do so.
2.Hold the paper separator at an angle of about 30ñ to the printer housing and slide the slots at
either end onto the pins at the back of the printer. When properly installed, the paper separator
will swing up and rest in the top well on the printer for use in single sheet feed, and will swing
down and rest in the bottom well for use with continuous-form paper.
3.Insert the platen knob in the right side of the printer, aligning the flat side of the knob shaft with
the flat side on the platen shaft.
4.Make sure the printer power switch is OFF. Plug the power cord into a grounded outlet.
Note:Use only a properly grounded outlet. Do not use an ungrounded outlet with an adapter to
ML 380 ( 96-02-03 )

%Installing the Ribbon Cartridge
Installing the Ribbon Cartridge
Your printer ribbon is a cartridge type which pops in and out.
Note:When you open the bag containing the ribbon cartridge, do not remove the clear plastic shield
mounted over the ribbon.
1.Lift the access cover.
2.Make sure that the bail is positioned against the platen (bail lever back). Grasp the black plastic
support plate in front of the printhead and slide the printhead to a position between the bail
rollers.
Note:The printhead gets HOT during extended printing. Be sure to let it cool before you touch it!
3.Hold the ribbon cartridge with the knob facing up and the ribbon/shield facing away from you.
4.Insert the flat side of the cartridge (side closest to you) into the front of the support plate. The
slots on either side of the cartridge will engage the pins on the plate.
5.Swing the ribbon cartridge down over the printhead and press until it snaps into place.
6.Turn the knob in the direction of the arrow to take up any slack in the ribbon.
To remove the ribbon cartridge, simply squeeze the tabs on either side and lift it out.
ML 380 ( 96-02-03 )

Note:Use only ribbons specifically made for MICROLINE 380, 390, or 391 printers. The use of
ribbon not designed for the MICROLINE 380/380/391 printers could damage the printhead.
Please also note that while ribbon cartridges for other MICROLINE printers look similar, they will
either not fit the ML380 or they will give poor print quality because the ribbon and ink don't meet
the requirements of 24-pin printers.
For best results, use genuine OKIDATA ribbons, part number 52104001.
ML 380 ( 96-02-03 )

%Adjusting the Printhead Gap
Adjusting the Printhead Gap
Your ML380 comes preset for single-sheet paper. If you'll be using multiple sheets, envelopes or very
thick paper, you'll need to adjust the gap between the printhead and the platen.
1.Make sure the printer is turned off.
2.Open the access cover.
3.If necessary, grasp the ribbon support plate and move the printhead away from the left end of the
platen.
Note:The printhead gets HOT during extended printing. Be sure to let it cool before you touch it!
4.Pull the bail lever forward to raise the bail off the platen.
5.The printhead gap lever is located on the left side of the housing at the end of the platen. Push
the lever toward the printer housing, then pull it toward you to change the setting: use settings 2,
3, or 4 for multiple sheets or forms, equivalent to the number of sheets of paper; use setting 5 for
envelopes and extra-thick paper.
ML 380 ( 96-02-03 )

%Loading Paper
Loading Paper
Your ML380 Printer takes standard paper, weight 14 to 22 lbs., with a maximum thickness of 0.01 inches
(0.25 mm). It can be used with single sheets, forms, continuous-form paper, and envelopes. It can also
be used to print labels, but the labels must be fed in from the bottom, requiring the optional pull tractor
(see page 33). Bottom feed is also recommended for heavier papers such as card stock. (See Appendix
E for additional information on paper specifications.)
ML 380 ( 96-02-03 )

%Loading Single Sheets
Loading Single Sheets
Note:If you have continuous-form paper in the printer and wish to switch to single sheets, use the
paper park feature described on page 27 to move the continuous-form paper out of the paper
path.
1.Make sure the paper lever is toward the back, in the single sheet feed position.
2.Swing the paper separator up into the single sheet feed position and lock it in place by pressing
down gently until the pins slide down into the wells on the printer.
3.Reach behind the left paper guide, grasp the paper support arm and swing it up into place.
4.Place a sheet of paper in the separator and slide the paper guides to adjust them for the sheet
size you will be using. The guides should just barely touch the edges of the paper. Be sure you
tuck the bottom edges of the paper under the feed tabs on the guides.
Note:The movement of the left guide is restricted. It should be positioned so that the paper covers
the groove in the left side of the platen. If it doesn't, the printer will signal paper out (SELECT light
flashing) even with paper installed.
ML 380 ( 96-02-03 )

5.Pull the bail lever forward. Your ML380 will automatically load the sheet of paper into the printer,
and the select light will go out.
6.Push the bail lever back. The SELECT light will automatically come back on and glow
continuously to indicate that the printer is selected.
7.Set the top of form, following the instructions below.
ML 380 ( 96-02-03 )

%Setting Top of Form for Single Sheets
Setting Top of Form for Single Sheets
When setting the position on the page where you want the first line of printing to appear, use the
lower red line on the paper shield as a guideline_it shows the baseline of the current printing
position.
1.Press the SELECT button to deselect the printer (SELECT light goes out).
2.To move the paper up, hold down the TOF/PARK button and press FEED. To move the paper
down, hold down the TOF/PARK button and press FONT. This moves the paper in very fine
increments
(1/180-inch), so you can position the location of your first line of print precisely. The amount you
can move the paper using this method is limited to avoid potential paper jams.
3.Press the TOF/PARK button to store your chosen setting permanently in ML380's memory. The
setting will be retained, even when the printer is off, until you reset it.
4.Press the SELECT button to select the printer. The SELECT light will come on.
ML 380 ( 96-02-03 )

%Loading Rear Feed Paper
Loading Rear Feed Paper
The tractor feed mechanism for use with continuous-form paper is located at the rear of the printer.
If you wish to load continuous-form paper from the bottom of the printer, you will need to
purchase and install the optional pull tractor: see page 33.
1.Although it's not necessary to do so, it's easier to install continuous-form paper from the rear if
you first remove the paper separator.
2.Make sure the paper selection lever is forward.
3.Release the tractor lock levers by pulling up on them. Slide the tractors to position them for your
paper width. The movement of the left tractor is limited, so you'll need to use the right tractor for
any large adjustments in width.
4.Open the tractor covers and place the sprocket holes on either side of the paper over the tractor
pins. Close the tractor covers.
ML 380 ( 96-02-03 )

5.Readjust the tractors as necessary to ensure that the left edge of the paper will cover the groove
in the left side of the platen. If it doesn't, the printer will signal paper out (SELECT light flashes).
6.Press the lock levers back to lock the tractors in place.
7.If you removed the paper separator, reinstall it. Make sure the paper support arm is swung down
out of the way.
8.Swing the paper separator back to the continuous-form position and slide the paper guides out as
far as they'll go.
9.Press the TOF/PARK button to position the paper properly for automatic feed.
10.Pull the bail lever forward. ML380 will automatically advance the continuous-form paper into
position.
Note: In the illustration above, the access cover is shown open to provide a clearer picture of the
interior. It is not necessary to open the access cover while installing rear feed paper.
11.Push the bail lever back.
12.Set the top of form, following the instructions below.
ML 380 ( 96-02-03 )

%Setting Top of Form for Rear Feed Paper
Setting Top of Form for Rear Feed Paper
When setting the position on the page where you want the first line of printing to appear, use the lower
red line on the paper shield as a guideline_it shows the baseline of the current printing position.
1.Press the SELECT button to deselect the printer (SELECT light goes out).
2.To move the paper up, hold down the TOF/PARK button and press FEED. To move the paper
down, hold down the TOF/PARK button and press FONT. This moves the paper in very fine
increments (1/180- inch), so you can position the location of your first line of print precisely. The
amount you can move the paper using this method is limited to avoid potential paper jams.
3.Press the TOF/PARK button to store your chosen setting permanently in ML380's memory. The
setting will be retained, even when the printer is off, until you reset it.
4.Press the SELECT button to select the printer. The SELECT light will come on.
ML 380 ( 96-02-03 )

%Loading Rear Feed Paper w/ Optional Pull Tractor
Loading Rear Feed Paper with Optional Pull Tractor Installed
The superior paper control provided by using both tractors for rear paper feed is especially good when
you're printing on multi-part forms. See page 33 for instructions on how to install the optional pull tractor.
Don't use the Paper Park feature when the pull tractor is installed_the paper will disengage from the pull
tractor if you do.
Be sure the Form Tear-Off feature is set to OFF (the factory default) when you are using the optional pull
tractor. It doesn't work with the pull tractor installed.
Labels should only be fed into the printer from the bottom. This prevents the labels from peeling off and
jamming the printer.
1.Follow steps 1 through 10 above for loading rear feed paper with the built-in tractor.
2.Open the pull tractor access cover.
3.Release the lock levers and open the tractor covers on the pull tractors.
4.Adjust the position of the pull tractors to align their pins with the holes in the paper.
5.Press the SELECT button to deselect the printer.
6.Rotate the platen knob to bring the paper up to the pull tractors.
7.Push the paper lever back to disengage the built-in tractor from the platen so that you can install
the paper on the optional pull tractor.
8.Place the paper holes on the sprocket pins of the pull tractor. You may have to pull the paper up a
bit to align the holes with the pins.
ML 380 ( 96-02-03 )

9.Close the pull tractor covers and make any necessary final adjustments to the position of the
tractors. Push the lock levers back to lock the tractors in place.
10.Pull the paper selection lever forward to the continuous-form position to re-engage the built-in
tractor.
11.Push the bail lever back to place the bail against the platen.
12.Close the access cover and press the SELECT button to select the printer.
13.Press and hold the FEED button to form feed the paper. Then adjust the top of form following
the instructions below.
ML 380 ( 96-02-03 )

%Setting Top of Form for Rear Feed with Pull Tractor
Setting Top of Form for Rear Feed with Pull Tractor
1. Press the SELECT button to deselect the printer (SELECT light goes out).
2. Use the platen knob to move the paper to the position you want for top of form. The lower red line
on the paper shield serves as a guideline_it shows the baseline of the current printing position.
3. Press the TOF/PARK button.
4. Press the SELECT button to reselect the printer. The SELECT light will come on.
ML 380 ( 96-02-03 )

%Loading Bottom Feed Paper
Loading Bottom Feed Paper
You must have the optional pull tractor installed in order to feed continuous-form paper into the
printer through the bottom. See page 33 for instructions on how to install the pull tractor. Bottom
feed is required for printing labels. The straighter paper path also makes it more convenient for
heavier papers, such as card stock, which may have trouble wrapping around the platen roller.
1.Place the printer on a stand with a slot for bottom paper feed. Put the paper in a stack underneath
the slot.
2.Turn the printer OFF.
3.Make sure the paper selection lever is forward (continuous-form
position).
4.Open the access cover and pull the bail lever forward.
5.Feed the paper into the printer through the slot in the bottom of the printer.
6.Release the lock levers and open the tractor covers on the pull tractors.
7.Position the left edge of the paper no further than 1/ÿ inch from the left end of the platen.
Note: The paper must cover the groove in the left side of the platen. If it doesn't, the printer will
signal paper out (flashing the SELECT light).
8.Adjust the position of the pull tractors to align their pins with the holes in the paper.
9.Place the paper holes on the sprocket pins of the pull tractor and close the tractor covers.
ML 380 ( 96-02-03 )
Other manuals for ML380
2
Table of contents
Other Oki Printer manuals