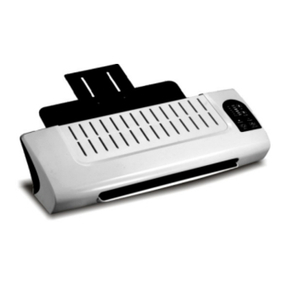
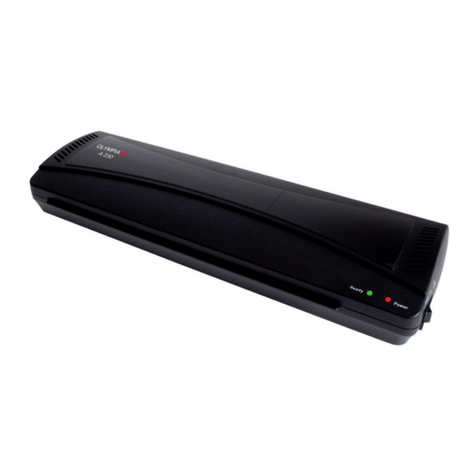
Olympia A 180 User manual

Olympia Business Systems Vertriebs GmbH
Weg zum Wasserwerk 10 D-45525 Hattingen
http://www.olympia-vertrieb.de
(28.02.2009)
OLYMPIA A 180
Laminiergerät A 180
# Laminator A 180
Machine à plastifier A 180
Aparato laminador A 180
Lamineerapparaat A 180
Plastificatrice A 180
Laminovací přístroj A 180

2

3
Deutsch
Wichtige Sicherheitshinweise ...........................................................................6
Haftungsausschluss...........................................................................................7
Bestimmungsgemäße Verwendung ..................................................................7
Leistungsmerkmale ............................................................................................7
Heißlaminieren ....................................................................................................8
Kaltlaminieren .....................................................................................................8
Folienstau beheben ............................................................................................9
Pflege und Reinigung.........................................................................................9
Fehlerbehebung ................................................................................................10
Entsorgungshinweis ........................................................................................11
Garantie ...........................................................................................................11
English #
Important Safety Information ...........................................................................12
Exemption From Liability .................................................................................13
Intended Use .....................................................................................................13
Features ...........................................................................................................13
Hot Laminating..................................................................................................14
Cold Laminating................................................................................................14
Clearing Foil Jams ............................................................................................15
Cleaning and Servicing ....................................................................................15
Troubleshooting................................................................................................16
Disposal ...........................................................................................................17
Guarantee ..........................................................................................................17
Français
Consignes de sécurité importantes ................................................................18
Exclusion de la garantie...................................................................................19
Utilisation conforme aux prescriptions ..........................................................19
Caractéristiques de performance ....................................................................19

4
Plastification à chaud .......................................................................................20
Plastification à froid..........................................................................................21
Elimination de bourrage...................................................................................21
Entretien et nettoyage ......................................................................................22
Elimination d'erreurs ........................................................................................22
Remarque concernant l'élimination ................................................................23
Garantie ...........................................................................................................23
Español
Advertencias de seguridad importantes.........................................................24
Exclusión de responsabilidad .........................................................................25
Uso previsto ......................................................................................................25
Características prestacionales ........................................................................25
Laminación en caliente ....................................................................................26
Laminación en frío ............................................................................................27
Eliminar un atasco de pelíula transparente....................................................27
Cuidado y limpieza ...........................................................................................28
Eliminación de fallos ........................................................................................28
Indicaciones de eliminación ............................................................................29
Garantía ...........................................................................................................29
Nederlands
Belangrijke veiligheidsinformatie....................................................................30
Uitsluiting van aansprakelijkheid ....................................................................31
Bedoeld gebruik................................................................................................31
Kenmerken ........................................................................................................31
Heetlamineren ...................................................................................................32
Koudlamineren..................................................................................................32
Klem zitttende folie losmaken..........................................................................33
Verzorgen en reinigen ......................................................................................33
Storingen verhelpen .........................................................................................34
Milieuverantwoord afvoeren ............................................................................35
Garantie ...........................................................................................................35

5
Italiano
Importanti indicazioni di sicurezza..................................................................36
Esclusione di responsabilità ...........................................................................37
Impiego conforme alle disposizioni ................................................................37
Caratteristiche di prestazione..........................................................................37
Plastificazione a caldo......................................................................................38
Plastificazione a freddo....................................................................................38
Rimuovere l'intasamento da pellicola .............................................................39
Cura e pulizia.....................................................................................................40
Eliminazione di guasti ......................................................................................40
Nota sullo smaltimento ....................................................................................41
Garanzia ...........................................................................................................41
Česky
Důležité bezpečnostní pokyny.........................................................................42
Vyloučení záruky...............................................................................................43
Používání pro daný účel...................................................................................43
Výkonové znaky ................................................................................................43
Laminování za horka ........................................................................................44
Laminování za studena.....................................................................................44
Odstranění uvízlých fólií ..................................................................................45
Péče a čištění ....................................................................................................45
Odstraňování závad ..........................................................................................46
Upozornění k likvidaci ......................................................................................47
Záruka ...........................................................................................................47

6
Wichtige Sicherheitshinweise
Um ein zuverlässiges Arbeiten mit dem Laminiergerät zu gewährleisten,
beachten Sie bitte Folgendes:
1 Lesen Sie diese Anweisungen bitte sorgfältig durch und beachten
Sie sie bei der Handhabung Ihres Geräts.
2 Bedienungsanleitung für zukünftige Benutzung aufbewahren.
3 Beschädigung des Netzsteckers oder Netzkabels vermeiden. Netz-
kabel nie verdrillen. Das Gerät bei beschädigtem Netzkabel oder
Netzstecker nicht in Betrieb nehmen.
4 Verwenden Sie das Gerät nicht in der Nähe von heißen Oberflä-
chen oder in feuchter Umgebung und schützen Sie es vor direkter
Sonneneinstrahlung und starker Staubeinwirkung.
5 Vor dem Reinigen des Geräts immer den Netzstecker ziehen. Ver-
wenden Sie keine Lösungsmittel oder aggressive Reinigungsmittel.
6 Metallische Gegenstände können nicht laminiert werden.
7 Kindern ist der Aufenthalt im Arbeitsbereich der betriebsbereiten
Maschine nicht gestattet.
8 Bei Nichtbenutzung des Geräts Netzstecker ziehen.
9 Das Gerät immer sofort ausschalten, wenn ein strenger Geruch
entsteht oder das Gerät nicht in Betrieb ist.
10 Netzstecker nicht mit feuchter Hand berühren.
11 Stellen Sie sicher, dass der Ein-/Aus-Schalter in Stellung „OFF“ ist,
bevor das Laminiergerät an das Stromnetz angeschlossen wird.
12 Nur dafür vorgesehene Folientaschen, wie unter Punkt Leistungs-
merkmale angegeben, in das Gerät einführen. Zu groß gewählte
Folientaschen können Folienstaus verursachen.
13 Laminieren Sie keine hitzeempfindlichen Materialien mit diesem
Gerät, wie z. B. Thermopapier.
14 Beim Laminieren von feuchten Dokumenten erzielen Sie schlechte
Laminierergebnisse.
15 Verwenden Sie keine Folientaschen, die für die Kaltlaminierung
vorgesehen sind, beim Heißlaminieren. Die Maschine, die Folien-
tasche und das Dokument werden dabei beschädigt.
16 Schneiden Sie keine Folientaschen zu. Die entstehenden Schnitt-
kanten können Folienstaus verursachen.
17 Lose Teile von Bekleidung, Krawatten, Schmuck, langes Haar oder
andere lose Gegenstände von der Einlassöffnung fernhalten. Ver-
letzungsgefahr!
18 Das Gerät darf nur in trockenen, geschlossenen Räumen benutzt
werden.
7
Haftungsausschluss
Wir übernehmen keine Garantie für die Richtigkeit der Informationen, die
sich auf technische Eigenschaften sowie die hier vorliegende Dokumentati-
on beziehen. Das in dieser Dokumentation beschriebene Produkt und ggf.
dessen Zubehör unterliegen einer ständigen Verbesserung und Weiterent-
wicklung. Aus diesem Grund behalten wir uns das Recht vor, Komponenten,
Zubehör, technische Spezifikationen sowie die hier vorliegende Dokumenta-
tion des Produkts ohne vorherige Ankündigung jederzeit zu ändern.
Bestimmungsgemäße Verwendung
Mit diesem Laminiergerät können Heiß- und Kaltlaminierfolien bearbeitet
werden. Es können Bilder, Karten, Dokumente, Papier usw. bis zu einer Ge-
samtdicke von 0,5 mm laminiert werden. Jede andere Verwendung gilt als
nicht bestimmungsgemäß. Eigenmächtige Veränderungen oder Umbauten
sind nicht zulässig.
Sicherheitshinweis:
Die Steckdose muss in der Nähe des Geräts angebracht und leicht zugäng-
lich sein. Sie können somit im Notfall das Gerät schnell vom Netz trennen.
Leistungsmerkmale
Schutz und Veredelung für Ihre Dokumente.
Laminiert Fotos, Dokumente, Grafiken, Ausweise usw. bis Größe DIN A4.
Das Gerät arbeitet mit 2 Heizwalzen, hat eine schnelle Aufwärmzeit und la-
miniert ohne Träger.
•1 LED-Lampe im Einschalter zeigt die Betriebszustände „Gerät ein-
geschaltet“ und „Betriebsbereit“ an
•Automatische Abschaltung bei Überhitzung
•Hochwertiges Heizsystem verhindert Schlieren- und Blasenbildung
•Aufwärmzeit ca. 3-5 Minuten
•Abkühlzeit auf Zimmertemperatur ca. 30 Minuten.
•Folienstärke von mindestens 75 μm und maximal 125 μm
Laminiersystem: Hot-Roller-Technik
Arbeitsbreite: 230 mm (A4)
Maximale Folienstärke: 75 – 125 micron
Laminiergeschwindigkeit: 230 mm/min
Spannungsversorgung: 220 - 240 Volt, 50/60 Hz, 1,1 A
Leistungsaufnahme: 270 W
Abmessungen (LxBxH): 358 x 110 x 66 mm
Gewicht: ca. 950 g

8
Heißlaminieren
1 Schließen Sie das Stromkabel an eine gut zugängliche Standard-
steckdose an.
Achtung: Prüfen Sie, ob die Spannungsangabe des Geräts mit der
Ihres Stromnetzes übereinstimmt (220 - 240 V, 50/60 Hz).
2 Schalten Sie den Ein-/Aus-Schalter an der rechten Geräteseite ein:
HOT. Die Kontrolllampe im Schiebeschalter leuchtet rot.
3 Der Antriebsmotor für die Transportrollen läuft an. Nach etwa 4 Minu-
ten ist die korrekte Betriebstemperatur erreicht und die rote Anzeige-
leuchte leuchtet nun blau.
4 Legen Sie das Laminiergut in die Folientasche so ein, dass allseitig
etwa 3 bis 5 mm Abstand vom Folienrand vorhanden ist.
Achtung: Verwenden Sie ausschließlich Heißlaminierfolien.
5 Führen Sie die Folie zusammen mit dem Laminiergut in den Einführ-
schlitz des Laminiergeräts ein. Die geschlossene Seite der Folie ist
hierbei zuerst einzuführen.
Hinweis: Um ein Falten der Laminierfolie zu vermeiden, darf nie die
offene Seite der Laminierfolie zuerst in den Einführschlitz des Lami-
niergeräts eingeführt werden. Beim Einführen der Folie bitte die An-
weisungen am Einführschlitz beachten. Der Laminiervorgang erfolgt
automatisch.
Achtung: Die austretende Folie ist nach dem Laminieren sehr heiß
und weich. Daher mit dem laminierten Produkt vorsichtig umgehen.
Hinweis: Zum Ebnen kann das laminierte Produkt mit einem Buch
oder einem anderen schweren, ebenen Gegenstand gepresst werden.
Kaltlaminieren
1 Schließen Sie das Stromkabel an eine gut zugängliche Standard-
steckdose an.
Achtung: Prüfen Sie, ob die Spannungsangabe des Gerätes mit der
Ihres Stromnetzes übereinstimmt (220 - 240 V, 50/60 Hz).
2 Schalten Sie den Ein/Aus-Schalter an der rechten Geräteseite ein:
COLD.
3 Der Antriebsmotor für die Transportrollen läuft an, die rote Anzeige-
leuchte im Schiebeschalter leuchtet.
Achtung: Haben Sie das Laminiergerät kurz vorher zum Heißlaminie-
ren eingesetzt, müssen Sie das Laminiergerät abkühlen lassen. Die
Abkühlzeit dauert bis zu 30 Minuten.

9
4 Entfernen Sie die Schutzfolie von der Folientasche.
5 Legen Sie das Laminiergut in die Folientasche so ein, dass allseitig
etwa 3 bis 5 mm Abstand vom Folienrand vorhanden ist.
6 Führen Sie die Folie zusammen mit dem Laminiergut in den Einführ-
schlitz des Laminiergerätes ein. Die geschlossene Seite der Folie ist
hierbei zuerst einzuführen.
Hinweis: Um ein Falten der Laminierfolie zu vermeiden darf nie die
offene Seite der Laminierfolie zuerst in den Einführschlitz des Lami-
niergerätes einführt werden. Beim Einführen der Folie bitte die Anwei-
sungen am Einführschlitz beachten. Der Laminiervorgang erfolgt
automatisch.
Folienstau beheben
Dieses Laminiergerät ist mit der Funktion „Jam Release“ ausgerüstet, um
Folienstaus schnell wieder beheben zu können.
7 Beim Blockieren der Folie das Gerät ausschalten und den Stau-
entriegelungsschalter an der rechten Geräterückseite nach innen drü-
cken.
8 Halten Sie das Laminiergerät fest und ziehen Sie die Folie zusammen
mit dem Laminiergut aus dem Einführschlitz des Laminiergeräts.
9 Danach muss das Gerät wahrscheinlich mehrmals, wie unter Punkt
„Pflege und Reinigung“ beschrieben, gereinigt werden.
10 Falls sich Folienstaus ständig wiederholen oder sich gestaute Folie
nicht mehr aus dem Laminiergerät ziehen lässt, wenden Sie sich bitte
an unsere Hotline (siehe Garantie).
Pflege und Reinigung
Ablagerungen und Klebereste an den Transportwalzen können das Lami-
nierergebnis beeinflussen. Darum müssen die Transportwalzen periodisch
nach der Benutzung gereinigt werden:
Hierzu ein gefaltetes Blatt Papier in den Einführschlitz einführen. Klebereste
werden vom austretenden Papier mitgenommen. Den Vorgang mehrmals
wiederholen.
Vor dem feuchten Reinigen des Geräts immer den Netzstecker ziehen. Falls
erforderlich, kann das Gehäuse mit einem in milder Seife und klarem Was-
ser getränkten Tuch gereinigt werden. Verwenden Sie keine Lösungsmittel
oder aggressive Reinigungsmittel.

10
Fehlerbehebung
Fehler Lösungen
•LED leuchtet nicht
•Gerät reagiert nicht
•Prüfen Sie, ob das Stromkabel korrekt
in die Standardsteckdose eingesteckt
wurde.
•Falls der Fehler nicht behoben wurde,
wenden Sie sich an unsere Hotline.
•Folienstau •Prüfen Sie die Größe der verwendeten
Folientasche.
•Benutzen Sie nur Folientaschen in den
angegebenen Größen.
•Stellen Sie sicher, dass die Folienta-
sche gerade in das Gerät eingeführt
wurde.
•Um den Stau zu beheben, folgen Sie
den Anweisungen unter Punkt „Folien-
stau beheben“.
•laminierte Folie ist nicht vollständig
durchsichtig
•Laminieren Sie dieselbe Folie erneut,
um das Laminierergebnis zu verbes-
sern.
Die Konformität mit den
EU-Richtlinien wird durch das
CE-Zeichen bestätigt.

11
Entsorgungshinweis
Dieses Symbol (die durchgestrichene Abfalltonne) bedeutet,
dass dieses Produkt nach der Lebenszeit zu einem für den
Endanwender verfügbaren Rücknahme- oder getrenntem
Sammelsystem zurückgebracht werden soll. Dieses Symbol gilt
nur in den Staaten der EWR. EWR = Europäischer Wirt-
schaftsraum, welcher die EU-Mitgliedstaaten plus den Staaten
Norwegen, Island und Liechtenstein umfasst.
Garantie
Bitte unbedingt aufbewahren!
Lieber Kunde,
wir freuen uns, dass Sie sich für das Olympia Laminiergerät A 180 entschie-
den haben. Sollte sich an Ihrem Gerät wider Erwarten ein technisches Prob-
lem ergeben, beachten Sie bitte folgende Punkte:
•Die Garantiezeit für Ihr Gerät beträgt 24 Monate.
•Bewahren Sie unbedingt den Kaufbeleg und die Originalverpackung auf.
•Sollte ein Problem auftreten, rufen Sie bitte zuerst unsere Hotline an:
0180 5 007514 (0,14 pro Minute aus dem dt. Festnetz)
Oft kann unser Fachpersonal telefonisch helfen.
•Kann jedoch der Fehler telefonisch nicht beseitigt werden, bitten wir Sie,
das Gerät in der Originalverpackung an folgende Anschrift zu senden:
Service-Center Hattingen
Weg zum Wasserwerk 10
D-45525 Hattingen
Garantiereparaturen können nur mit beigefügtem Kaufbeleg erfolgen.
Herzlichen Dank für Ihr Verständnis.
Mit freundlichen Grüßen
Ihre Olympia Business Systems
Vertriebs GmbH

12
Important Safety Information
Please observe the following information to ensure reliable operation of
the laminator:
1 Read this manual thoroughly and observe the instructions and in-
formation in it when operating the unit.
2 Keep the operating instruction manual available for future refer-
ence.
3 Prevent damage to the power plug and power cable. Never twist
the power cable. Do not operate the unit if the power cable or
power plug is damaged.
4 Do not use the unit in the vicinity of hot surfaces or in damp
environments and protect it from direct sunlight and dusty condi-
tions.
5 Disconnect the power plug before starting to clean the unit. Never
use any solvents or aggressive cleaning agents.
6 Metallic objects cannot be laminated.
7 Children must not be allowed in the vicinity of the equipment when
it is ready to operate.
8 Disconnect the power plug when the unit is not in use.
9 Always switch the unit off immediately if it emits a strong smell or it
is not in operation.
10 Do not touch the power plug with moist hands.
11 Ensure that the On/Off switch is in the "OFF" position before connect-
ing the laminator to the mains power supply.
12 Only insert foil pockets which comply with the specifications in the
unit; refer to Section "Features". Using foil pockets which are too
large could lead to the unit jamming.
13 Do not laminate heat sensitive materials, such as thermal paper, in
the unit.
14 Lamination of moist documents produces poor results.
15 Do not use foil pockets intended for cold lamination for hot lamina-
tion. This could damage the machine, foil pockets and document.
16 Do not cut foil pockets to size. The resulting cut edges could cause
the foil pockets to jam.
17 Keep loose clothing, ties, jewellery, long hair and other loose
objects away from the insertion slot. Risk of injury!
18 The unit may only be used in dry, indoor rooms.

13
Exemption From Liability
We cannot guarantee that the information which relates to the technical
properties of the product or to the product itself contained in this document is
correct. The product and, where applicable, its accessories, described in this
document are subject to constant improvement and further development.
For this reason, we reserve the right to modify components, accessories,
technical specifications and related documentation of the product described
herein at any time without notice.
Intended Use
This laminator has been conceived for use processing hot and cold laminat-
ing foil. It is possible to laminate pictures, maps, documents, paper etc. up to
a total thickness of 0.5 mm. Any other use is considered unintended use.
Unauthorised modifications or reconstructions are not permitted.
Safety note:
The power socket must be in the immediate vicinity of the unit and easily ac-
cessible. This enables you to disconnect the unit from the power supply
quickly in an emergency.
Features
It provides protection and refinement of your documents.
The laminator can be used to laminate photos, documents, graphics, ID
cards etc. up to A4 size. The unit operates with 2 heating rollers, has a short
warm-up phase and laminates without carriers.
•1 LED lamp in the power switch indicates the operational states
"power on" and "ready to operate"
•Automatic switch-off in the event of overheating
•High quality heating system prevents smudging and blistering
•Warm-up phase approx. 3-5 minutes
•Cool down phase to room temperature, approx. 30 minutes
•Foil thickness, minimum 75 μm and maximal 125 μm
Laminating system: Hot roller technology
Working width: 230 mm (A4)
Maximum foil thickness: 75 – 125 micron
Laminating speed: 230 mm/min
Power supply: 220 - 240 Volt, 50/60 Hz, 1.1 A
Power consumption: 270 W
Dimensions (LxWxH): 358 x 110 x 66 mm
Weight: Approx. 950 g

14
Hot Laminating
1 Connect the power cable to an easily accessible, standard electrical
socket.
Attention: Check that the voltage specifications of the unit corre-
spond to that of your power supply network (220 - 240 V, 50/60 Hz).
2 Switch on the On/Off switch on the right-hand side of the unit: HOT.
The control lamp on the sliding switch lights up red.
3 The drive motor for the transport rollers starts up. The correct operat-
ing temperature is reached after about 4 minutes and the red indicator
lamp turns blue.
4 Insert the document to be laminated in the foil pocket so that there is a
margin of approx. 3 - 5 mm to the edge of the foil on all sides.
Attention: Only use hot laminating pockets.
5 Insert the foil pocket containing the document in the laminator's inser-
tion slot. Insert the ready closed side of the pocket in first.
Note: To prevent the laminating foil from creasing, never feed the
open side of the laminating pocket first in the insertion slot of the lami-
nator. When inserting the foil, observe the instructions on the insertion
slot. The laminating process occurs automatically.
Attention: The foil is very hot and soft when ejected following lamina-
tion. Therefore, handle the laminated product with extreme care.
Note: To flatten the laminated product, place a book or similar heavy,
flat object, on it.
Cold Laminating
1 Connect the power cable to an easily accessible, standard electrical
socket.
Attention: Check that the voltage specifications of the unit corre-
spond to that of your power supply network (220 - 240 V, 50/60 Hz).
2 Switch on the On/Off switch on the right-hand side of the unit: COLD.
3 The drive motor for the transport rollers starts up, the red indicator
lamp in the sliding switch lights up.
Attention: If you have just finished using the laminator for hot laminat-
ing, you must let the laminator cool down. The equipment takes about
30 minutes to cool down.

15
4 Remove the protective foil from the foil pocket.
5 Insert the document to be laminated in the foil pocket so that there is a
margin of approx. 3 - 5 mm to the edge of the foil on all sides.
6 Insert the foil pocket containing the document in the laminator's inser-
tion slot. Insert the ready closed side of the foil in first.
Note: To prevent the laminating foil from creasing, never feed the
open side of the laminating pocket first in the insertion slot of the lami-
nator. When inserting the foil pocket, observe the instructions on the
insertion slot. The laminating process occurs automatically.
Clearing Foil Jams
The laminator is provided with the "Jam Release" function in order to clear
foil jams quickly.
1 If the foil jams, switch the unit off and actuate the Release switch on
the rear of the unit, to the right.
2 Hold the laminator firmly and pull the foil pocket together with the
document to be laminated out of the laminator's insertion slot.
3 It will probably be necessary to then clean the unit several times as
described in the Section "Cleaning and Servicing".
4 If foil jams occur repeatedly or jammed foil cannot be removed from
the laminator, please contact our hotline (refer to Guarantee).
Cleaning and Servicing
Deposits and residual adhesive on the transport rollers can influence the re-
sults of the laminating process. Therefore, the transport rollers must be
cleaned periodically after use:
To do this, insert a folded piece of paper in the insertion slot. Residual adhe-
sive is removed and taken up by the paper when ejected. Repeat the proc-
ess several times.
Disconnect the power plug before starting to clean the unit with a damp
cloth. If necessary, the housing can be cleaned using a cloth moistened with
clean water with a little mild soap applied. Never use any solvents or ag-
gressive cleaning agents.

16
Troubleshooting
Fault Corrective measures
•LED does not light up
•Unit does not respond
•Check that the power plug has been
properly connected to the power
socket.
•If the fault cannot be cleared, contact
our hotline.
•Foil jam •Check the foil pockets being used are
the correct size.
•Only use foil pockets of the sizes pre-
scribed.
•Ensure that the foil pocket has been
inserted correctly in the unit.
•To clear the fault, follow the instruc-
tions in the Section "Clearing Foil
Jams".
•Laminated foil is not completely
transparent
•Laminate the same foil again to im-
prove the lamination result.
Conformity of the equipment to the EU
directives is confirmed by the CE sym-
bol.

17
Disposal
This symbol (crossed-out bin) indicates that the product should
be returned to a collection point or recycling centre provided by
the local authorities when it has reached the end of its service
life. The icon is only applicable for states within the EEA. EEA
= European Economic Area, which comprises the EU member
states plus Norway, Island and Liechtenstein.
Guarantee
It is essential to retain this guarantee!
Dear Customers,
We are pleased that you have chosen the A 180 laminator from Olympia.
Should a technical problem arise with regard to the equipment, please ob-
serve the following points:
•The period of guarantee for the equipment is 24 months.
•It is essential to keep the purchase receipt and original packing.
•The first line of action if a problem occurs is to contact our hotline.
+49 180 5 007514
Our expert personnel can frequently provide help over the phone.
•However, if the problem cannot be solved via telephone, please sent the
equipment to the following address in its original packing:
Service-Center Hattingen
Weg zum Wasserwerk 10
D-45525 Hattingen
Repairs under the terms of guarantee can only be completed when the pur-
chase receipt is enclosed.
We are sorry for any inconvenience.
Yours faithfully
Olympia Business Systems
Vertriebs GmbH

18
Consignes de sécurité importantes
Afin de garantir un travail fiable avec la plastifieuse, veuillez tenir compte
des points suivants :
1 Veuillez lire attentivement ces instructions et tenez-en compte lorsque
vous manipulez votre plastifieuse.
2 Conservez le mode d'emploi pour une utilisation future.
3 Evitez tout endommagement de la fiche de secteur ou du câble de
réseau. Ne jamais torsader le câble de réseau. Ne mettez jamais la
plastifieuse en service si le câble de réseau ou la fiche de secteur
sont endommagés.
4 N'utilisez jamais la plastifieuse dans les environs de surfaces très
chaudes ou dans un environnement humide et ne la soumettez pas à
un ensoleillement direct et à une poussière importante.
5 Retirez toujours la fiche de secteur avant de nettoyer la plastifieuse.
N'utilisez jamais de solvants ou de produits d'entretien agressifs.
6 Des objets métalliques ne peuvent pas être plastifiés.
7 Il est interdit aux enfants de séjourner dans la zone de travail quand la
plastifieuse est prête à fonctionner.
8 Retirez la fiche de secteur quand vous ne vous servez pas de la
plastifieuse.
9 Débranchez toujours immédiatement la plastifieuse quand une forte
odeur se fait sentir ou quand elle ne fonctionne pas.
10 Ne touchez pas la fiche de secteur avec des mains humides.
11 Assurez-vous que l'interrupteur Marche/Arrêt est en position „OFF“ avant
de brancher la plastifieuse sur le réseau.
12 N'introduisez dans la plastifieuse que des pochettes prévues à cet
effet comme indiqué au point Caractéristiques. Le choix de pochettes
trop grandes peut provoquer un bourrage.
13 Ne plastifiez pas avec cet appareil des matériaux sensibles à la
chaleur comme par ex. le papier photosensible.
14 Vous obtiendrez de mauvais résultats si vous plastifiez des
documents humides.
15 N'utilisez pas, pour la plastification à chaud, des pochettes prévues
pour la plastification à froid. La plastifieuse, la pochette et le document
en seraient endommagés.
16 Ne coupez pas les pochettes sur mesure. Les arêtes de coupe
formées peuvent provoquer un bourrage.
17 Eloignez de l'ouverture d'insertion des parties de vêtement volantes,
cravates, bijoux, cheveux longs ou autres objets non fixés. Risque de
blessures !
18 L'appareil ne doit être utilisé que dans des pièces fermées et sèches.

19
Exclusion de la garantie
Nous n'assurons pas de garantie en ce qui concerne l'exactitude des
informations qui se rapportent aux propriétés techniques ainsi qu'à la
présente documentation. Le produit décrit dans cette documentation et, le
cas échéant, ses accessoires sont soumis à une amélioration et à un
perfectionnement technique constants. C'est pourquoi nous nous réservons
le droit de modifier, en tout temps et sans avertissement préalable, des
composants, des accessoires, des spécifications techniques ainsi que la
présente documentation du produit.
Utilisation conforme aux prescriptions
Cette plastifieuse permet de traiter des pochettes à plastifier à chaud et des
pochettes à plastifier à froid. Des images, des cartes, des documents, du
papier etc. d'une épaisseur totale de 0,5 mm max. peuvent être plastifiés.
Tout autre utilisation est considérée comme non conforme à son usage. Il
n'est pas permis d'apporter des modifications et des transformations sans
concertation préalable.
La prise de courant doit se trouver à proximité de l'appareil et être facile
d'accès. En cas d'urgence, vous pouvez ainsi séparer rapidement
l'appareil du réseau.
Caractéristiques de performance
Protection et façonnage de vos documents.
Plastifie photos, documents, graphiques, pièces d'identité etc. jusqu'au
format DIN A4. L'appareil fonctionne avec 2 rouleaux chauffants, a un temps
de chauffe rapide et plastifie sans support.
•1 lampe LED placée dans l'interrupteur indique les états de service
„Appareil branché“ et „prêt à fonctionner“
•Coupure automatique en cas de surchauffe
•Un système de chauffage de grande qualité empêche la formation de
vague et de bulles
•Temps de chauffe d'env. 3 - 5 minutes
•Temps de refroidissement à température ambiante d'env. 30 minutes.
•Épaisseur du film d'au moins 75 μm et de 125 μm maximum
Système de plastification : Technique à Hot-Roller
Largeur de passage : 230 mm (A4)
Épaisseur maximale du film: 75 – 125 microns
Vitesse de plastification : 230 mm/min
Alimentation en courant : 220 - 240 Volt, 50/60 Hz, 1,1 A
Consommation électrique : 270 W
Mesures (L x l x H) : 358 x 110 x 66 mm
Poids : env. 950 g

20
Plastification à chaud
1 Branchez le câble électrique dans une prise de courant standard
facile d'accès.
Attention : Contrôlez si les données relatives à la tension de
l'appareil correspondent bien à celles de votre réseau (220 - 240 V,
50 60 Hz).
2 Branchez l'interrupteur Marche/Arrêt situé sur le côté droit de
l'appareil : HOT. Le voyant de contrôle dans l'interrupteur à coulisse
s'allume rouge.
3 Le moteur d'entraînement des rouleaux de transport démarre. Au bout
d'env. 4 minutes, la température de service correcte est atteinte et le
voyant lumineux rouge devient maintenant bleu.
4 Introduisez le produit à plastifier dans la pochette de manière à ce
que, de tous les côtés, il y ait une marge d'env. 3 à 5 mm par rapport
au bord de la pochette.
Attention : Utilisez exclusivement des pochettes de plastification à
chaud.
5 Introduisez la pochette avec le produit à plastifier dans la fente
d'insertion de la plastifieuse. Introduire ici en premier le côté fermé de
la pochette.
Remarque : Afin d'éviter que la pochette ne forme un pli, n'introduisez
jamais le côté ouvert de celle-ci dans la fente d'insertion de la
plastifieuse. Tenez compte des instructions données au niveau de la
fente d'insertion quand vous introduisez la pochette. L'opération de
plastification se fait automatiquement.
Attention : La pochette sortante est très chaude et molle après la
plastification. C'est pourquoi il faut manier prudemment le produit
plastifié.
Remarque : Afin d'aplanir le produit plastifié, on peut presser celui-ci
sous un livre ou sous un autre objet plat et lourd.
Table of contents
Languages:
Other Olympia Laminator manuals

Olympia
Olympia A 350 Combo User manual

Olympia
Olympia A 396 User manual

Olympia
Olympia A 210 User manual

Olympia
Olympia A296 Plus User manual

Olympia
Olympia A 245 Combo User manual

Olympia
Olympia A 8250 C User manual

Olympia
Olympia A 230 User manual

Olympia
Olympia A 235 Plus User manual

Olympia
Olympia A 330 User manual

Olympia
Olympia A 240 Combo User manual

Olympia
Olympia A 2024 User manual

Olympia
Olympia A-260 User manual

Olympia
Olympia A 370 User manual

Olympia
Olympia A 390 User manual

Olympia
Olympia A 296 User manual

Olympia
Olympia A 280 User manual

Olympia
Olympia A 230 Plus User manual

Olympia
Olympia A 235 User manual

Olympia
Olympia A 8250 User manual

Olympia
Olympia A 4040 User manual