OmniPod PDM CAT45E User manual

1
RYAN OMNIPOD®WEARER
Caregiver Guide
WITH THE OMNIPOD®SYSTEM

2
>The Pod.........................................................................2
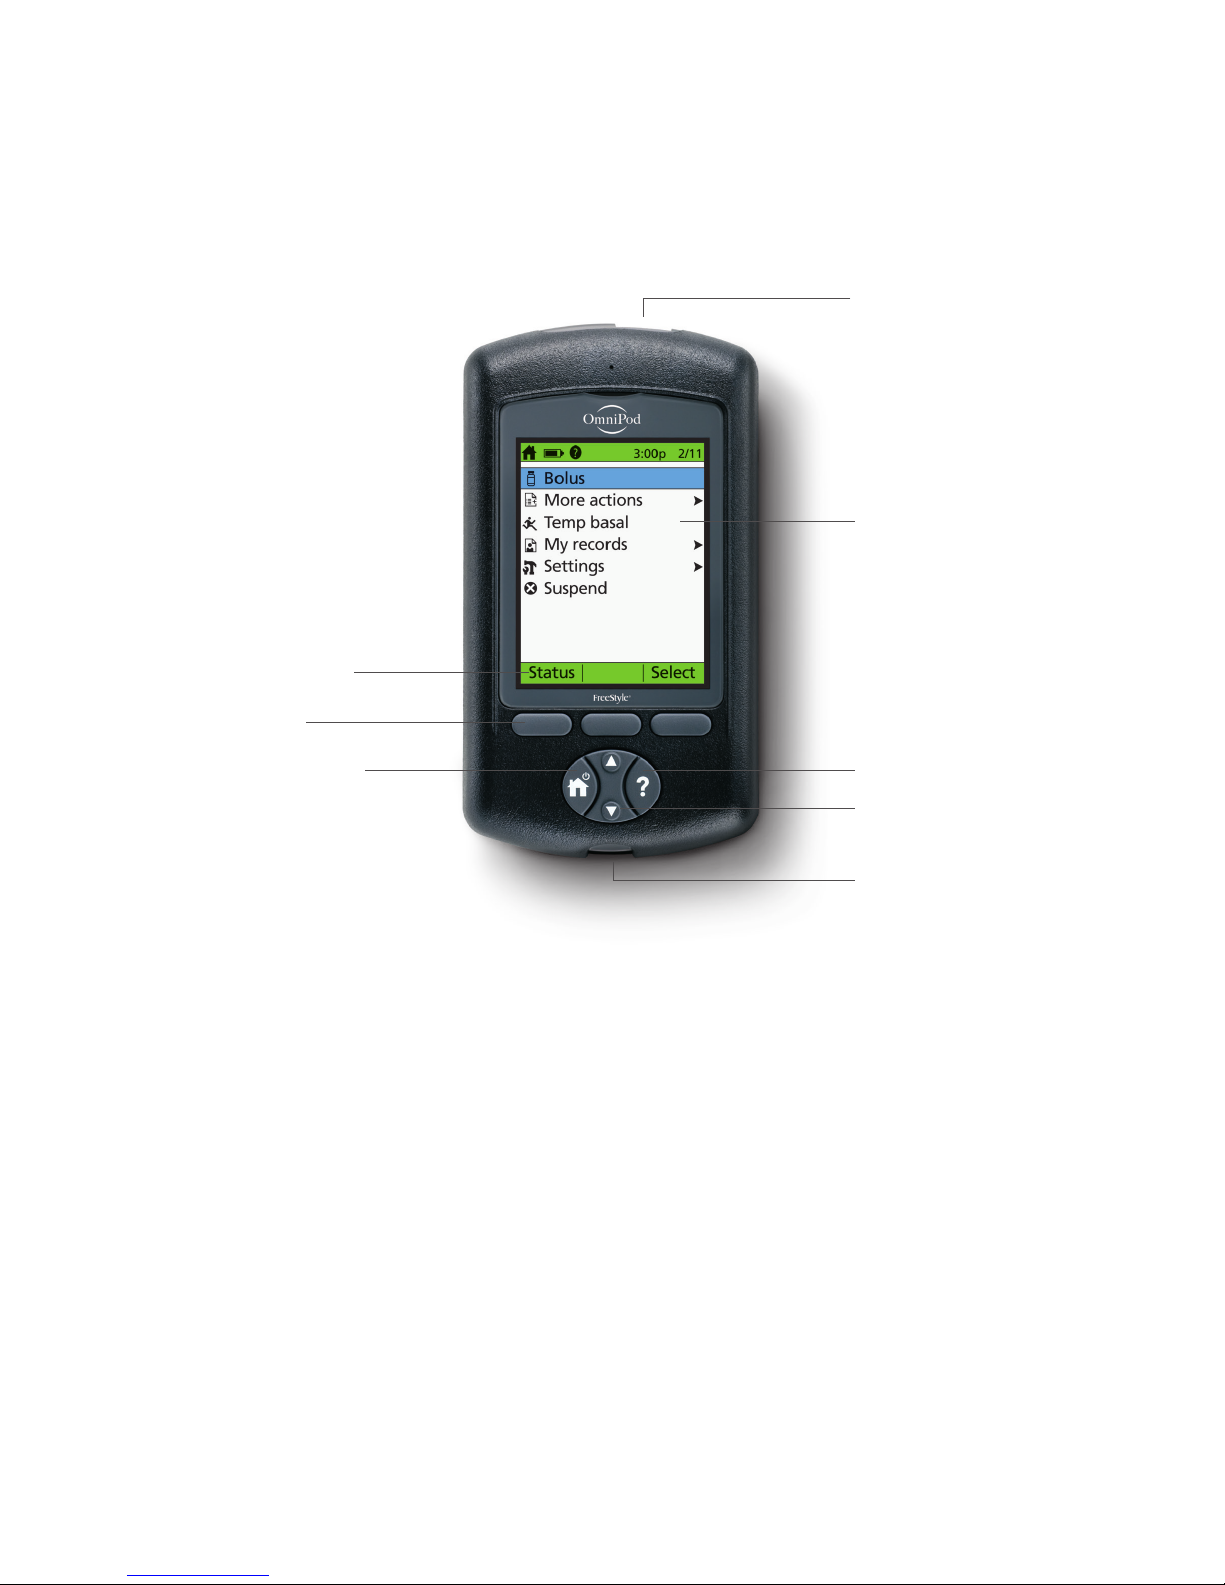
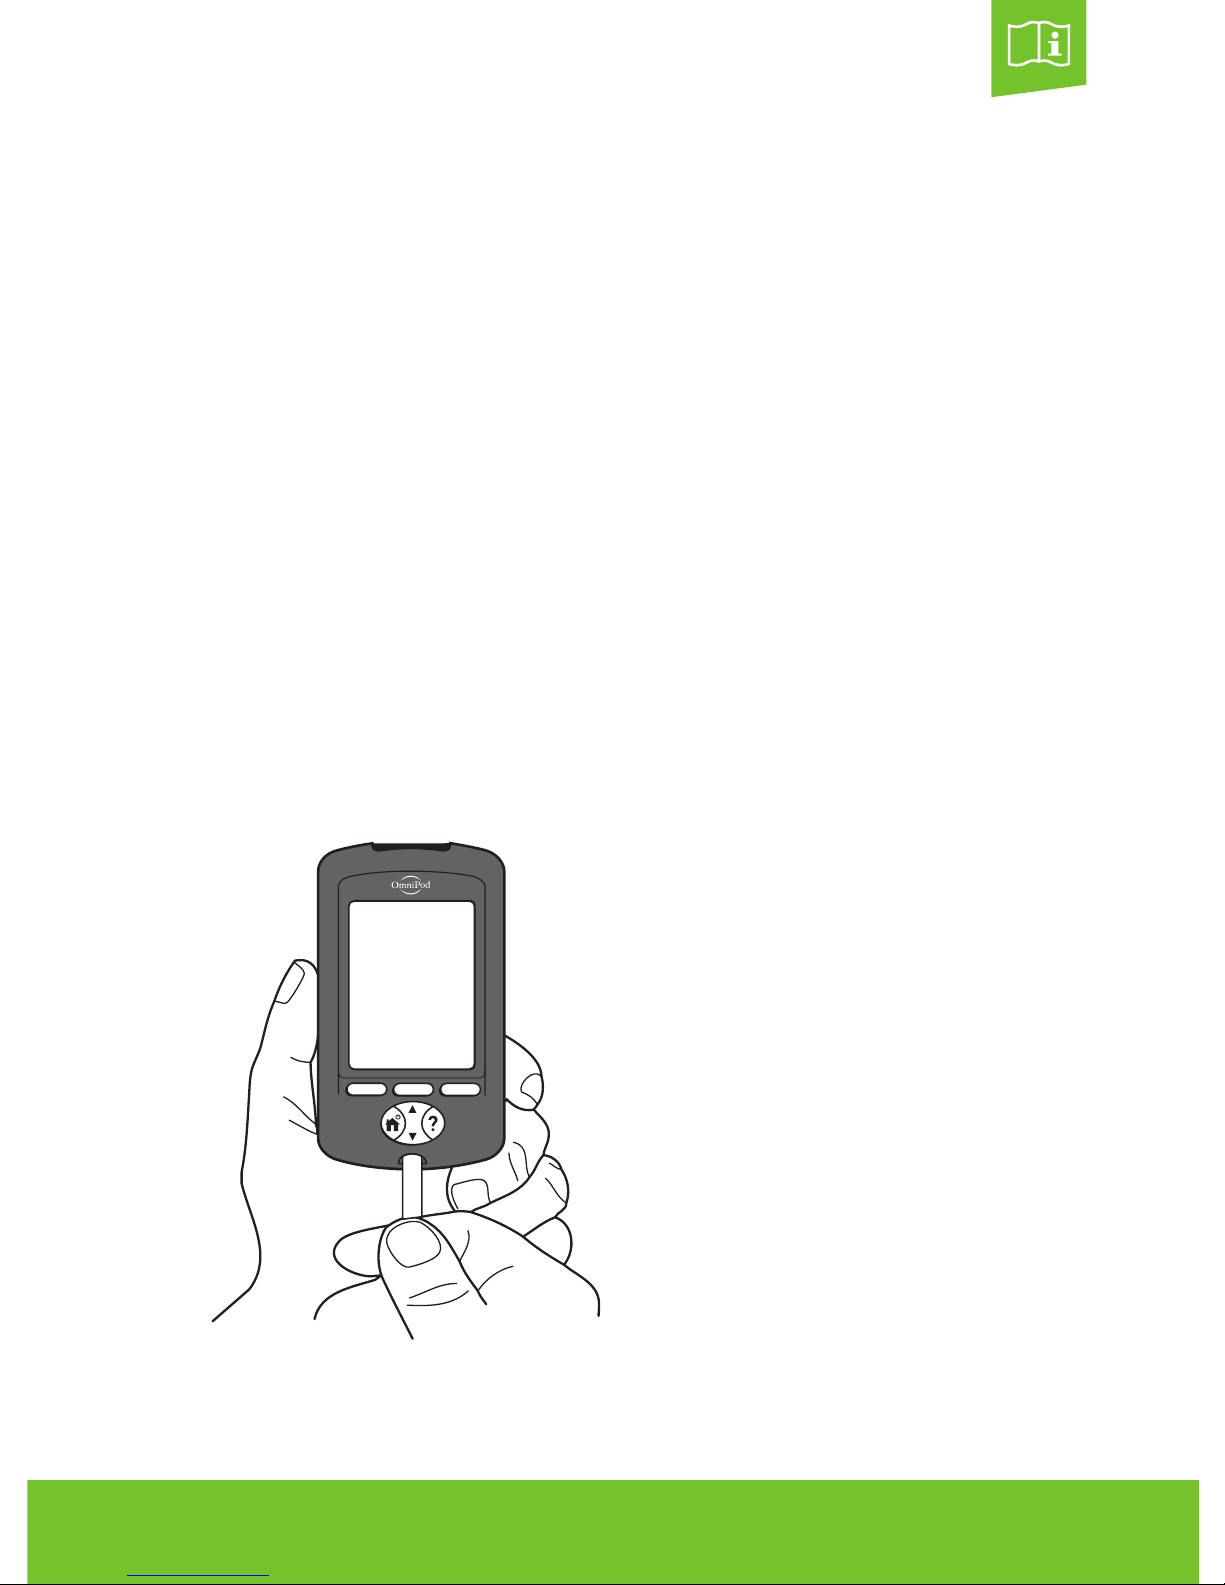
>The PDM (Personal Diabetes Manager)..........................................3
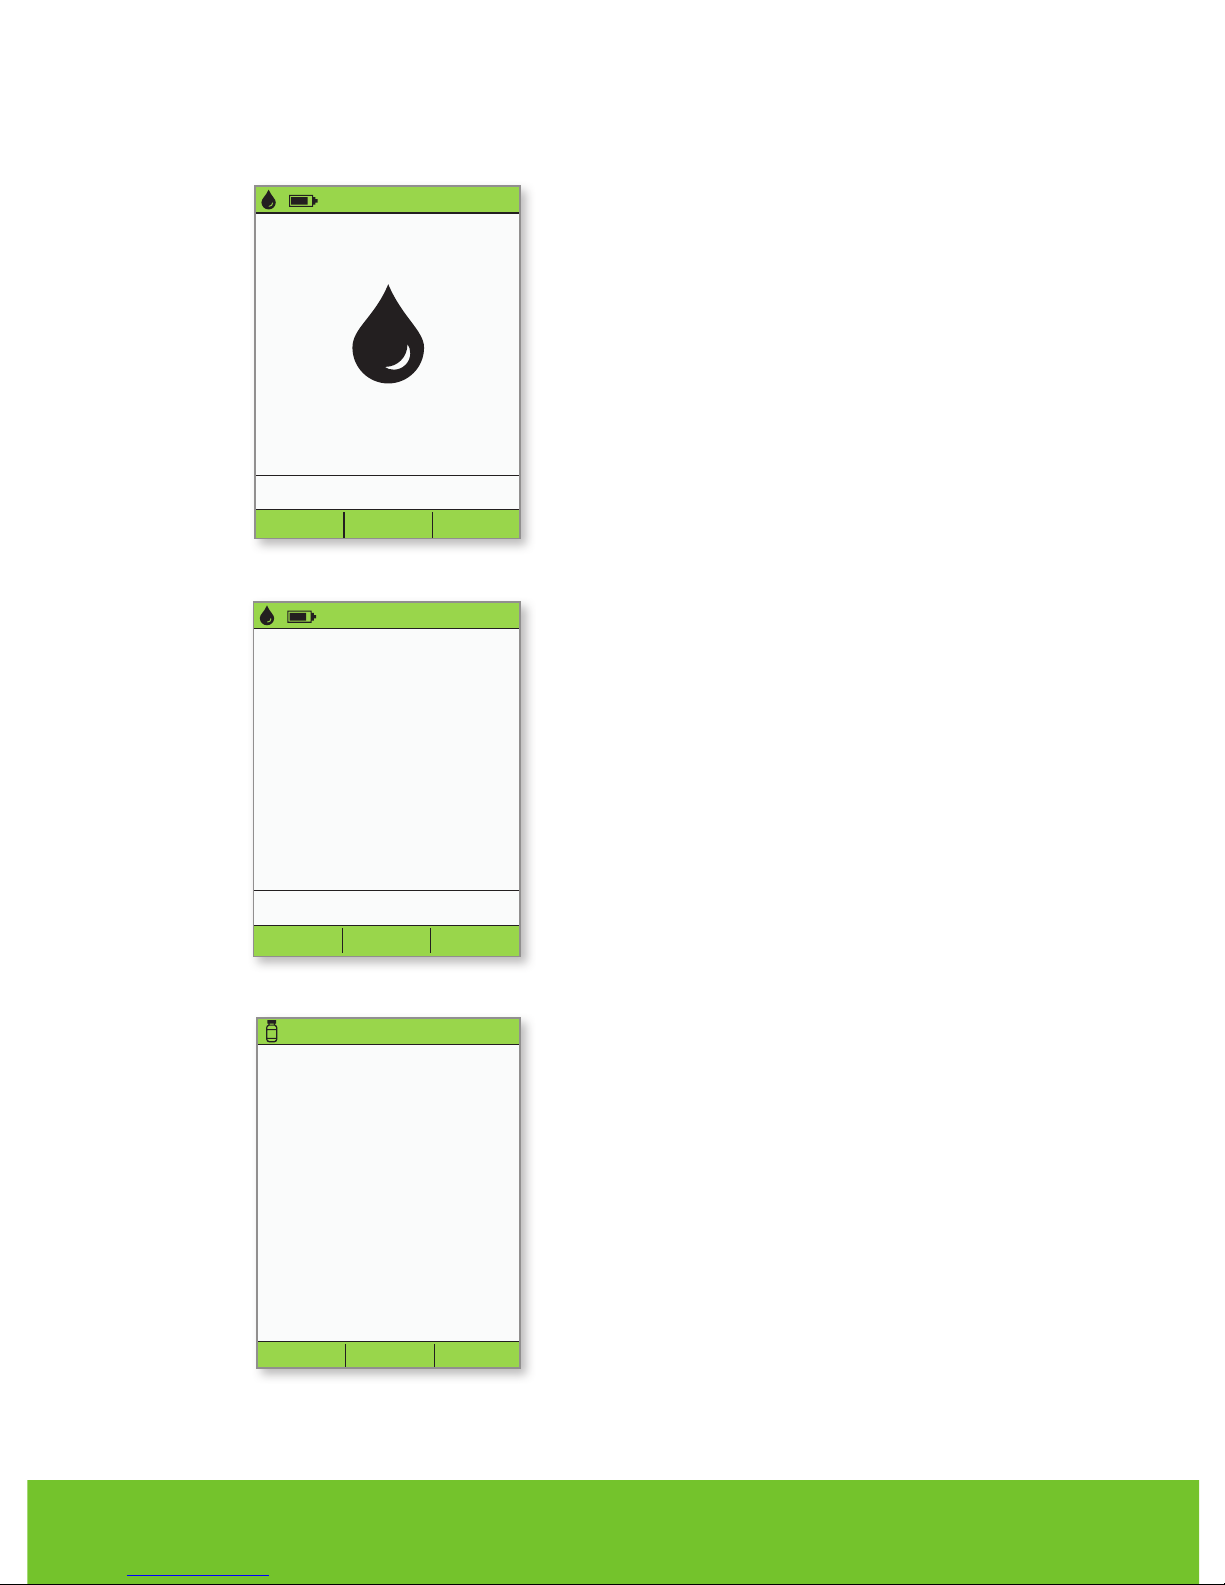
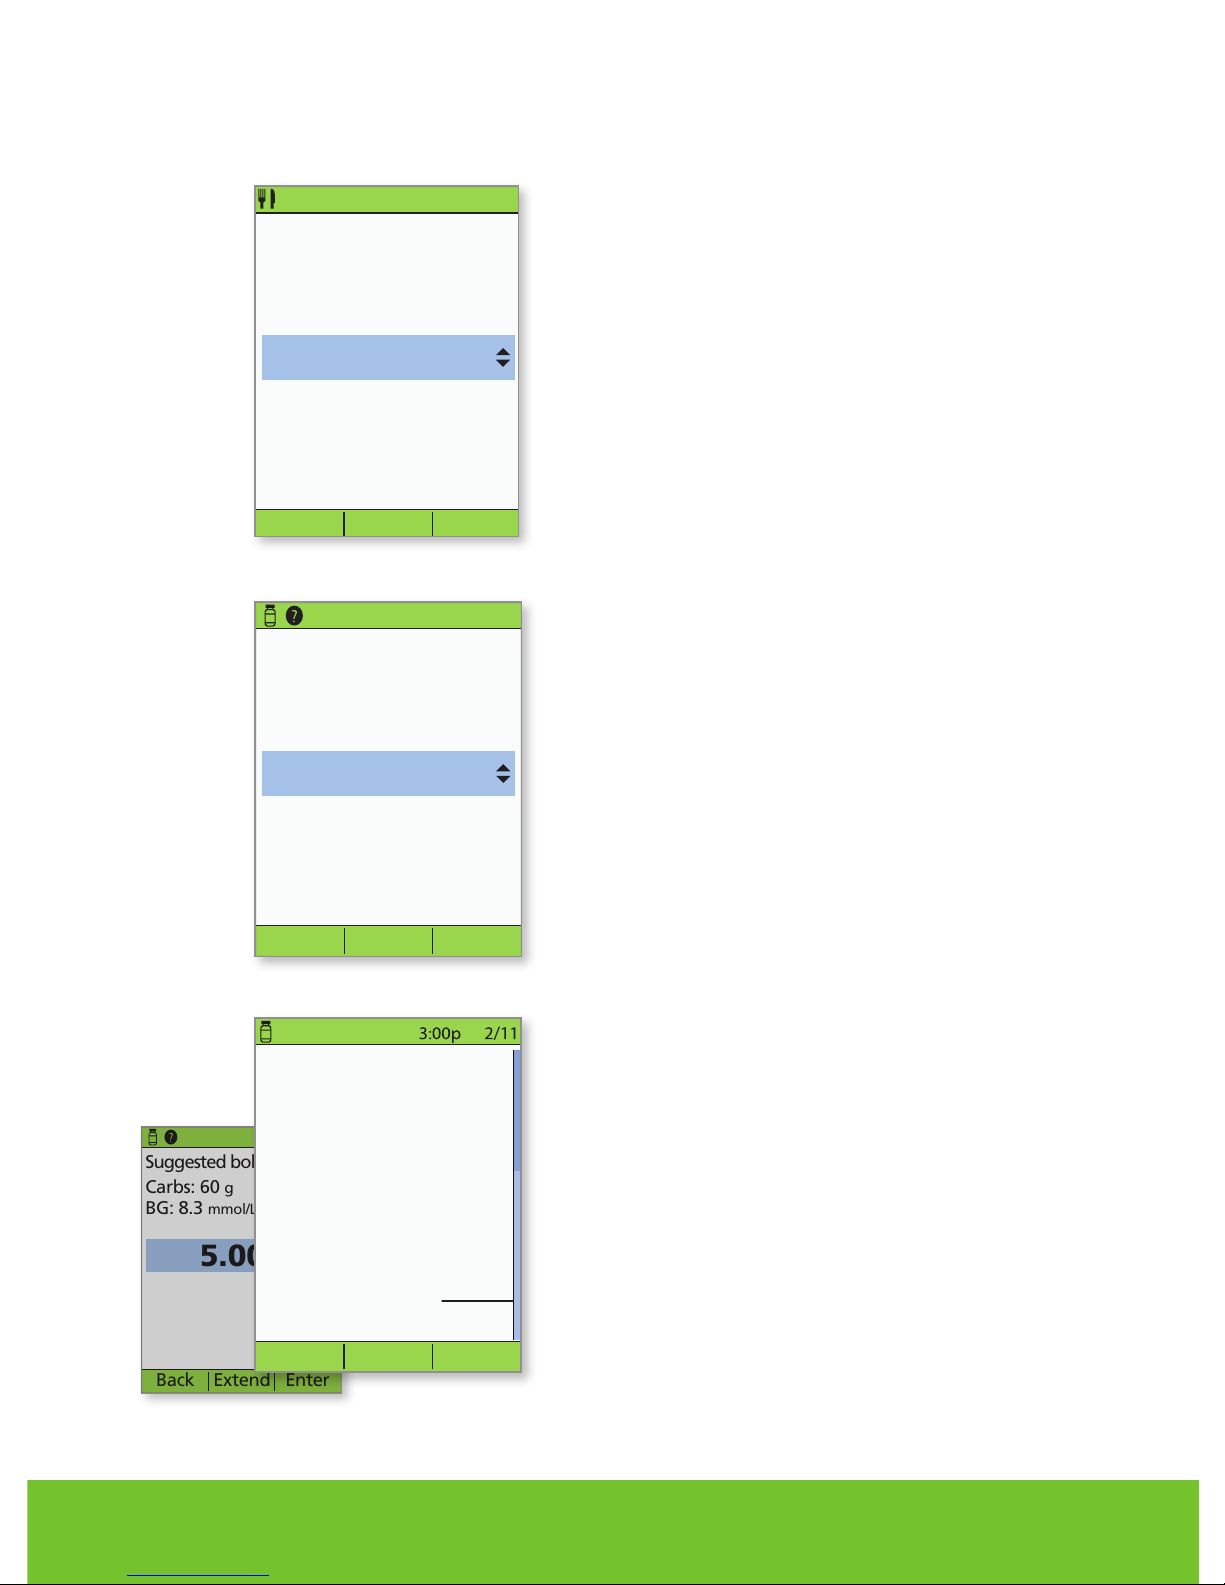
>How to check blood glucose and deliver a bolus ..................................4
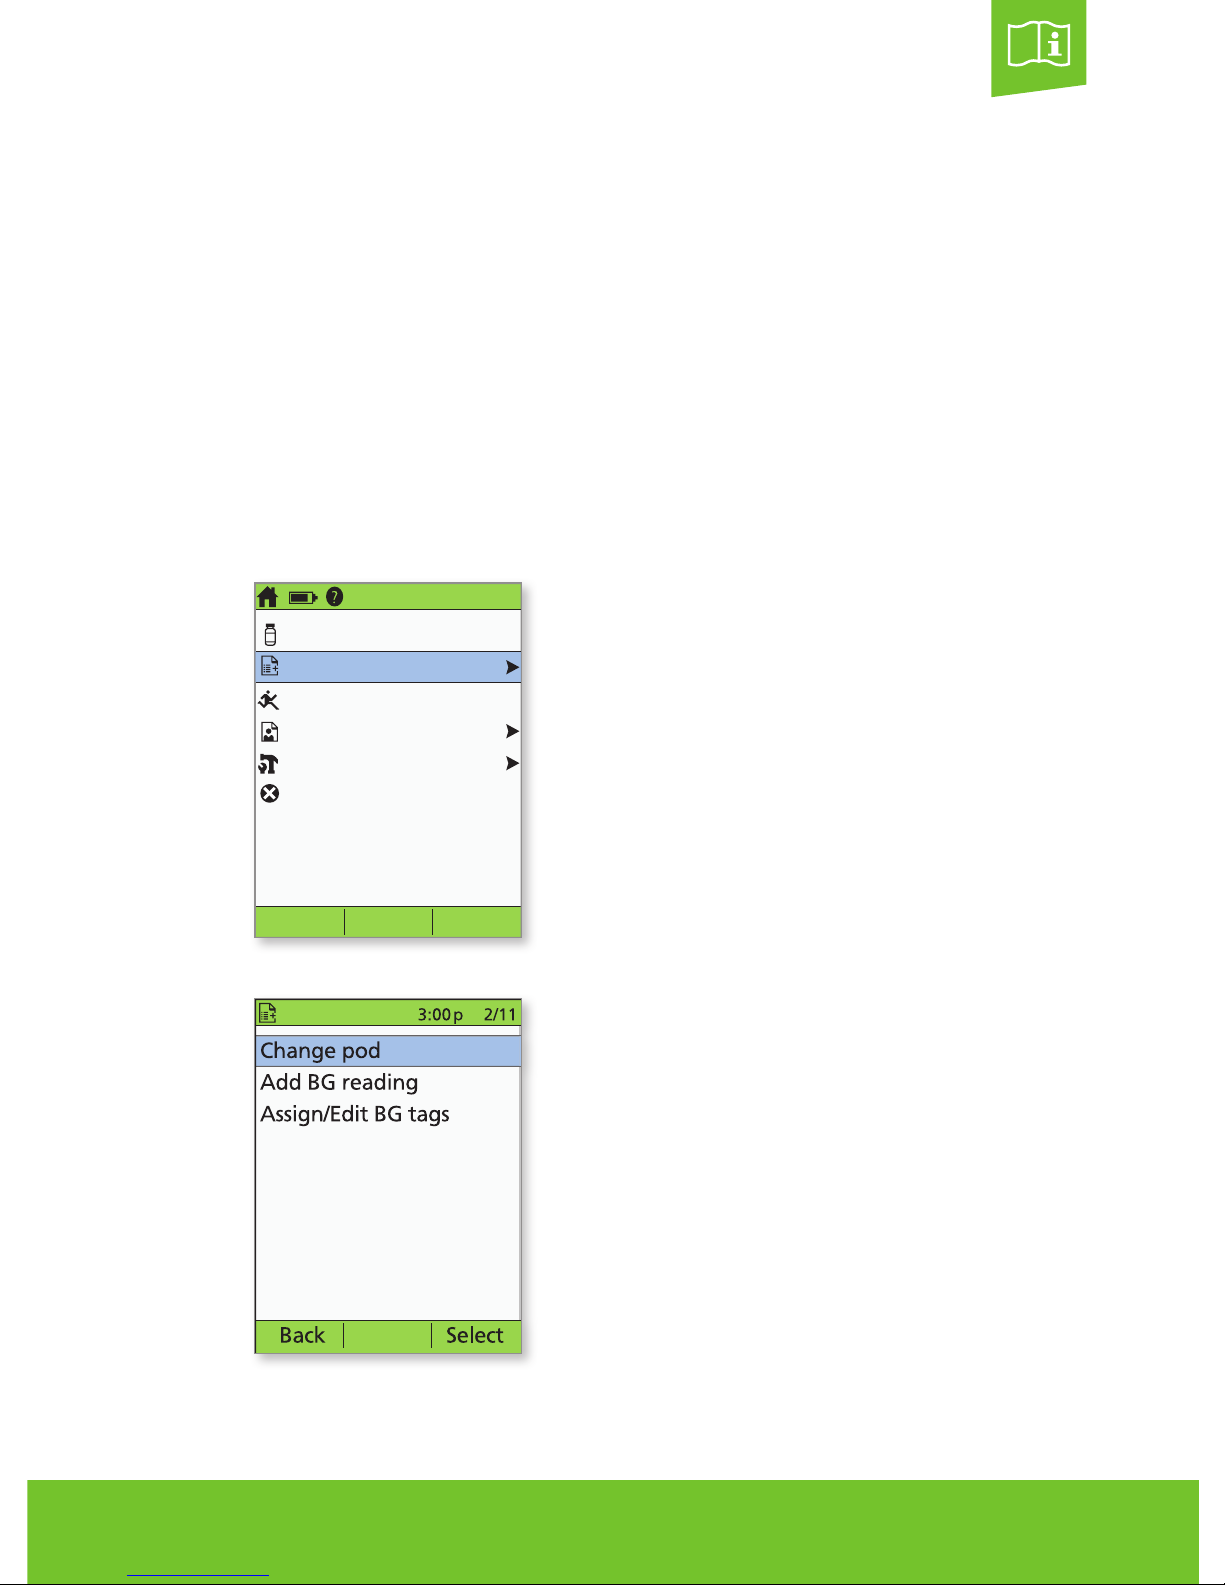
>How to change the Pod ..........................................................8
Pod Placement Options .....................................................10
Activate a New Pod ..........................................................11
Step 1: Fill the Pod............................................................11
Step 2: Apply the Pod ....................................................... 13
Step 3: Press Start ........................................................... 15
> How to enter a temporary basal rate ............................................16
>How to suspend insulin delivery................................................. 18
>Supplies........................................................................20
>PDM Settings .................................................................. 21
Get to know the
OmniPod®System.
This guide is intended to be used in conjunction with an individual’s Diabetes
Management Plan, input from their caregivers and/or healthcare provider and the
OmniPod®Insulin Management System User Guide. PDM imagery is for illustrative
purposes only and should not be considered suggestions for user settings.
Refer to the OmniPod®System User Guide for complete information on how to
use the System, and for all related warnings and cautions. The User Guide is
available online at MyOmniPod.ca or by calling OmniPod®Customer Care at
1-855-POD-INFO (1-855-763-4636).
This symbol will remind you to refer to the User Guide.
This guide is for PDM model CAT45E. The PDM model number is written on the
back of each PDM.

1
With the OmniPod®System,
you can help make managing
diabetes easier.
As a caregiver for an individual with diabetes, you want to feel confident in providing
proper care. With the OmniPod®System you can.
The OmniPod®System is an easy-to-use, two-part insulin delivery system designed to
help simplify diabetes management. With a small, tubing-free Pod that’s worn directly on
the body, and a wireless Personal Diabetes Manager (PDM), you can help make managing
and living with diabetes easier for the individual in your care. You can also feel confident
knowing that the OmniPod®is trusted by tens of thousands of wearers worldwide, along
with caregivers like you. And, you can count on us to be there for you whenever you need
us with 24/7 comprehensive customer support.
Whether you’re a school nurse, daycare provider, parent, child, spouse, grandparent, or
other secondary caregiver for an individual using the OmniPod®, this guide will lead you
through some of the key functions that you may need to perform.
In an emergency you should call the individual’s healthcare provider or another
emergency contact.
Customer Care: 1-855-POD-INFO (1-855-763-4636)
From outside Canada: 647-788-3132
MyOmniPod.ca
Healthcare provider name Healthcare provider number
Parent name Parent number
Emergency contact name Emergency contact number

2
The Pod
TOP
Viewing Window
BOTTOM
Adhesive Backing
Needle Cap
Fill port
A small, lightweight Pod that’s easy to apply and wear.

3
USB Port
Soft key labels
Soft keys
Home/power
Colour LCD Screen
User info/support
Up/down controller
Test strip port with light
MAIN MENU ITEMS
Bolus: Deliver bolus doses to cover carbohydrates
or correct high blood glucose (BG) levels.
More actions:
>Change the Pod
>Add BG readings
>Assign/Edit BG tags
Temp basal: Adjust insulin delivery for exercise
or illness according to the individual’s Diabetes
Management Plan. This menu item is present only if
the Temp basal option is turned on.
My records: Review insulin delivery, blood glucose
history, alarm history, carbohydrate history, and
personal user information.
Settings:
>Enter, edit and name basal programs
>Program temp basal, carbohydrate and bolus
presets
>Customize system settings
Suspend: Temporarily suspend insulin delivery.
The PDM
A wireless Personal Diabetes Manager (PDM) that’s easy to use.

4OmniPod®Caregiver Guide
How to check blood glucose
and deliver a bolus.
A bolus is an extra dose of insulin that helps manage the rapid natural rise in blood
glucose (also known as blood sugar) that results when you eat carbohydrates. Follow
the steps below to check the individual’s blood glucose level, determine the appropriate
bolus and deliver the bolus. These steps assume that the suggested bolus calculator has
been turned on as part of the individual’s Diabetes Management Plan.
Because an individual’s food intake may be unpredictable, consult the individual’s
Diabetes Management Plan or healthcare provider to determine the appropriate timing
of insulin delivery.
Check the individual’s blood glucose frequently. Notify their healthcare provider if the
blood glucose test results are outside the goals that the healthcare provider has set or if
you observe symptoms that are not consistent with their blood glucose test results.
>Insert FreeStyle®test strip into strip port.
>Check that the code on the vial of test strips
matches the code on the PDM screen.
>If the codes do not match, use the Up/down
controller button to match the code on the PDM
to the code on the vial.
1.

5
3:00p 2/11
Light
Calibration code: 16
Apply a blood sample to
the strip.
mmol/L
3:00p 2/11
Done NextTag
Calibration code: 16
8.3
Are you going to eat
now?
Cancel YesNo
3:00p
2/11
>When blood glucose reading appears,
press Next to continue.
>If eating now, press Yes.
OR
>If not eating, press No.
>Wash the finger with soap and water or an alcohol
wipe and dry it completely.
>Prick finger with the lancing device.
>Press Light to illuminate the test strip in low-light
situations.
>Apply blood sample to test strip.
2.
3.
4.

6OmniPod®Caregiver Guide
Enter carbs.
Back Enter
0g
3:00p
2/11
5.
Suggested bolus: 5.00U
Carbs: 60g
BG: 150mg/dL
Back Enter
5.00 U
3:00p 2/11
Extend
Suggested bolus: 5.00U
Carbs: 60 g
BG: 8.3 mmol/L
Back EnterExtend
5.00 U
3:00p 2/11
>Review the BG and carb values to make sure they
are correct.
6.
>If eating, press the Up/down controller button
to enter the correct number of carbs, then press
Enter.
How to check blood glucose and deliver a bolus
Suggested bolus: 5.00U
Carbs: 60g
BG: 150mg/dL
Back Enter
5.00 U
3:00p 2/11
Extend
Suggested bolus: 5.00U
Carbs: 60 g
BG: 8.3 mmol/L
Back EnterExtend
5.00 U
3:00p 2/11
Close
Suggested bolus:
Meal: (60/15) = 4.00 U
5.00 U
Correction:
(8.3 - 5.5)/2.8 = 1.00 U
Meal IOB:
(0.00 U) = -0.00 U
Correction IOB:
(0.00 U) = -0.00 U
Total = 5.00 U
>Press the User info/support button to view how
the suggested bolus is calculated. Then press
Close.
7.

7
Suggested bolus: 5.00U
Carbs: 60g
BG: 150mg/dL
Back Enter
5.00 U
3:00p 2/11
Extend
Suggested bolus: 5.00U
Carbs: 60 g
BG: 8.3 mmol/L
Back EnterExtend
5.00 U
3:00p 2/11
>Press Enter to accept the suggested bolus.
OR
>Press Extend and follow on-screen instructions
to deliver a portion/percentage of the bolus
immediately and the rest over a set period of time.
Only use the Extend option when required by the
individual’s Diabetes Management Plan.
>If extended boluses are not part of the individual’s
Diabetes Management Plan, the Extend option
will not appear on the screen.
8.
Start bolus?
Now:
Ext:
(0.0 hr)
Total:
Back Confirm
5.00 U
0.00 U
5.00 U
3:00p 2/11
Cancel
Delivering bolus
5.00 U
3:00p 2/11
>The PDM screen will indicate when bolus delivery
has begun. If necessary, you may press Cancel to
stop a bolus while it is being delivered.
>The individual does not need to remain near the
PDM during delivery. Delivery time varies based on
the size of the bolus dose.
>Once bolus delivery begins, you may press and
hold the Home/power button to turn o the PDM
screen, or wait for it to automatically turn o.
>Press Confirm to start the bolus.
9.
10.

8OmniPod®Caregiver Guide
Status Select
3:00p 2/11
Bolus
More actions
Temp basal
My records
Settings
Suspend
How to change the Pod.
You will need to change the Pod:
>When the reservoir is low or empty, or the Pod is nearing expiration
>In response to an alarm
>If the Pod has become dislodged
>If the individual has a blood glucose reading of 13.9 mmol/L or more and has moderate
to high ketones
>If unsure please consult with the individual’s healthcare provider
>Turn on the PDM.
>Press the Home/power button,
then select More actions.
>Select Change pod.
2.
1.

9
3:00p 2/11
Press “Confirm” to
begin the pod change
process.
This will deactivate your
current pod.
Back Confirm
3:00p 2/11
Last BG 8.3 mmol/L
2:51p today
Last bolus 1.00U
2:01p today
No active pod.
Would you like to
activate a pod now?
No Yes
>Press Confirm to deactivate Pod.
>Gently remove the deactivated Pod by slowly
peeling back the adhesive. Use soap and water to
remove any adhesive that remains on the skin or, if
necessary, use an adhesive remover.
>Press Yes to activate a new Pod.
>Follow the steps on pages 11 and 12 to fill a new Pod
with insulin. As you proceed, if the PDM screen
times out, press and hold the Home/power button
to turn it back on.
Talk with the individual’s healthcare provider if you have questions or concerns about
the operation of the system.
If the PDM screen times out during the process, press and hold the Home/power button to continue.
4.
3.
NOTES

10 OmniPod®Caregiver Guide
The Pod may be placed over subcutaneous tissue most places one would deliver an insulin injection.
Please note the recommended positioning for each body area. The individual’s Diabetes Management
Plan or healthcare provider should indicate any preferred sites.
POD PLACEMENT OPTIONS
How to change the Pod
arm
back
buttocks
leg
abdomen
leg
FRONT BACK
POD POSITIONING
Arm and Leg:
Position the Pod vertically or at a slight angle.
Back, Abdomen and Buttocks:
Position the Pod horizontally or at a
slight angle.
SITE SELECTION
Change the site location each time you apply
a new Pod; improper site rotation can reduce
insulin absorption. The new site should be at
least 2.5 cm away from the previous site,
5 cm away from the navel, and not over a
mole or scar.
OPTIMAL ADHESION
Always clean the site thoroughly with an
alcohol swab to remove all body oils and
lotions, which may impact the Pod’s adhesive.
Let the site air dry completely; do not blow on
the site to dry it.

11
ACTIVATE A NEW POD
>Assemble the following supplies:
• Vial of insulin at room temperature
(U-100, rapid-acting). See User Guide for insulins
approved for use with the OmniPod®System.
• One sealed Pod
• PDM
• Alcohol prep swab
>Wash your hands.
>Remove the Pod from its sterile packaging.
>Use the alcohol prep swab to clean the top
of the insulin vial.
>Assemble the fill syringe by twisting the needle
onto the syringe.
>Remove the protective cap.
If the PDM screen times out during the process, press and hold the Home/power button to continue.
1.1
1.2
CAUTION: Do not use any other type of needle
or filling device besides the syringe provided with
each Pod. The appearance of the provided syringe
may vary from what is shown.
STEP : FILL THE POD

12 OmniPod®Caregiver Guide
>Draw air into the fill syringe equal to the amount
of insulin required by the individual as indicated in
the individual’s Diabetes Management Plan.
>Depress air into the vial of insulin.
>Turn the vial and syringe upside down.
>Slowly withdraw insulin from the vial and fill the
syringe with the amount of insulin indicated in the
individual’s Diabetes Management Plan; fill at least
to the MIN line. Do not fill the syringe past
200 units.
>Remove any air bubbles from the syringe.
To ensure proper communication between the
Pod and PDM, place the Pod back in the original
packaging tray and put it to the right of and
touching the PDM.
>Insert the needle straight down into the fill port on
the underside of the Pod. To ensure proper fill, do
not insert fill syringe at an angle into the fill port.
>Completely empty the syringe into the Pod.
>The Pod will beep twice, indicating that the System
is ready to proceed.
How to change the Pod
WARNING: NEVER inject air into the fill port.
Doing so may result in unintended or interrupted insulin delivery.
WARNING: NEVER use a Pod if you hear a crackling noise or feel resistance
when you depress the plunger. These conditions can result in underdelivery
of insulin.
CAUTION
WARNING
TIP
NOTE:
CAUTION
WARNING
TIP
NOTE:
CAUTION
CAUTION
WARNING
WARNING
CAUTION
WARNING
TIP
NOTE:
CAUTION
WARNING
TIP
NOTE:
CAUTION
CAUTION
WARNING
WARNING
1.3
1.4

13
Fill a new pod with
insulin.
After filling pod, listen
for 2 beeps, then press
“Next.”
NOTE: Do not remove
needle cap at this time.
Cancel
Discard
Prepare infusion site.
Remove pod’s needle
cap and adhesive
backing.
If cannula sticks out
press “Discard.”
If pod OK, apply to site.
>Select the infusion site, being careful to avoid areas
where the Pod will be aected by folds of skin. The
new site should be at least 2.5 cm away from the
previous site, 5 cm away from the navel, and not over
a mole or scar. Refer to the figures on page 10 for
recommended sites and placement tips.
>Return to the PDM. If the PDM screen times out,
press and hold the Home/power button to turn it
back on.
>Press Next.
>The PDM establishes a one-to-one relationship
with the Pod, which will not allow it to
communicate with any other Pod while this Pod
is active. Once the Pod successfully completes its
priming and safety checks, the PDM will beep.
>Always wash your hands thoroughly to prepare the
infusion site before applying a Pod.
>To reduce the possibility of infection, and for
optimal adhesion, always clean the site thoroughly
with soap and water, and use an alcohol swab
to disinfect the infusion site. Let the site air dry
completely; do not blow on the site to dry it.
STEP : APPLY THE POD
If the PDM screen times out during the process, press and hold the Home/power button to continue.
1.5
2.1
2.2

14 OmniPod®Caregiver Guide
>Remove the Pod’s needle cap.
>Using the pull tabs, remove and discard the white
paper backing from the adhesive.
>Apply the Pod to the selected site.
>Do not apply a Pod to any area of the skin with
an active infection. If you are unsure whether to
use a specific site, ask the individual’s healthcare
provider.
>Run your finger around the adhesive to secure it.
>Press Next on the PDM.
>To facilitate insertion, place one hand over the
Pod and make a wide pinch around the skin
surrounding the viewing window; this step is critical
if the insertion site does not have much fatty
tissue. Release the skin after the cannula inserts.
How to change the Pod
2.5
2.4
2.3

15
3:00p 2/11
Press “Start” to insert
cannula and begin basal
delivery.
Start
Pink Slide Insert
If the PDM screen times out during the process, press and hold the Home/power button to continue.
3:00p 2/11
Pod is active.
“basal 1” has been
programmed.
Check infusion site and
cannula.
Is cannula properly
inserted?
No Yes
3.2
3.1
STEP : PRESS START
>Press Start. The Pod automatically inserts the
cannula and delivers a prime bolus to fill the
cannula with insulin. It takes a few seconds to
complete this process.
>Once complete, the PDM indicates that the Pod is active
and asks you to check the infusion site.
>Look through the Pod’s viewing window to check that the
cannula is properly inserted. Also check for the pink slide
insert on top of the Pod’s housing, which means the cannula
has deployed (see image below).
>Press Yes if you can see that the cannula is properly inserted.
>Press No if you see a problem with the cannula and follow
the instructions on the PDM.
WARNINGS: NEVER inject insulin (or anything else) into the fill
port while the Pod is on the individual’s body. Doing so may result in
unintended or interrupted insulin delivery.
If you observe blood in the cannula, check the individual’s blood glucose
more frequently to ensure insulin delivery has not been aected. If you
observe unexpected elevated blood glucose levels, change the Pod.
Check the infusion site after insertion to ensure that the cannula was
properly inserted. The individual should check their blood glucose 1.5 to
2 hours after each Pod change and check the infusion site periodically.
If the cannula is not properly inserted, hyperglycemia may result. Verify
there is no wetness or scent of insulin, which may indicate the cannula
has dislodged.
At least once a day, use the Pod’s viewing window to check the site for
signs of infection and to confirm that the soft cannula is securely in place.
Be aware of the signs of infection, including pain, swelling, redness,
discharge, or heat at the site. If you suspect an infection, immediately
remove the Pod and apply a new one in a dierent location. Then call the
individual’s healthcare provider.
CAUTION
WARNING
TIP
NOTE:
CAUTION
WARNING
TIP
NOTE:
CAUTION
CAUTION
WARNING
WARNING

16 OmniPod®Caregiver Guide
Status Select
3:00p 2/11
Bolus
More actions
Temp basal
My records
Settings
Suspend
Enter
Enter temp basal
change.
Back
+25%
This will temporarily
increase your basal rate.
3:00p 2/11
The basal rate refers to the steady dose of insulin the individual receives at all times.
You may need to:
>Temporarily increase the basal rate in response to high blood sugar, if, for instance, the individual is ill
or insulin delivery has been interrupted.
>Temporarily decrease the basal rate prior to increased physical activity (physical education or
organized sports) or in response to low blood sugar that does not respond to oral carbohydrates
or other eorts.
The individual’s Diabetes Management Plan or healthcare provider should provide the
appropriate temp basal rates.
>Turn on the PDM.
>Press the Home/power button,
then select Temp basal.
>If temporary basal rates are not part of the
individual’s Diabetes Management Plan, the Temp
basal option will not appear on the screen.
>Enter % change (or temp basal rate), then press
Enter (Shown here is an example of a temporary
basal increase. In this example, 25% MORE
insulin will be delivered).
How to enter a temporary basal rate.
1.
2.

17
Enter
Enter duration for temp
basal.
Change: +25%
Back
0.5 hr
3:00p 2/11
Confirm
Start temp basal
increase?
Back
+25%
0.5 hr
3:00p 2/11
3:00p 2/11
Last BG 12 mmol/L
12:28p today
Last bolus 1.00U
12:28p today
Temp basal
+25%0:30 remains
Home
Pod exp 6:28a 2/14
50+U
>Enter the length of time the temp basal should
be delivered (in half-hour increments), then press
Enter.
>Press Confirm to start the temporary basal rate
shown on the screen (In this example, 25% more
basal insulin will be delivered for 0.5 hours). The
Pod beeps to indicate that the temporary basal
rate is running.
>The Status screen indicates the temp basal rate
and the remaining delivery time.
3.
4.
5.

18 OmniPod®Caregiver Guide
If the individual has severe low blood sugar you may need to suspend insulin delivery.
Never ignore the signs of low blood sugar (no matter how mild). Any time the individual’s
blood glucose is low, treat immediately. Check it every 15 minutes while you are treating,
to make sure you don’t cause blood glucose levels to rise too high. If left untreated, severe
hypoglycemia can cause seizures or lead to unconsciousness.
Symptoms of hypoglycemia. Never ignore these symptoms:
Status Select
3:00p 2/11
Bolus
More actions
Temp basal
My records
Settings
Suspend
Suspend insulin delivery.
Enter duration:
Back Enter
0.5 hr
3:00p 2/11
How to suspend insulin delivery.
>Enter the length of time the suspension should last
(minimum 0.5 hour, maximum 2.0 hours), then
press Enter.
>Turn on the PDM.
>Press the Home/power button,
then select Suspend.
1.
2.
>Shakiness
>Fatigue
>Unexplained sweating
>Cold, clammy skin
>Weakness
>Blurred vision or a headache
>Sudden hunger
>Rapid heart rate
>Confusion
>Tingling in the lips or tongue
>Anxiety
Table of contents
Other OmniPod Medical Equipment manuals

OmniPod
OmniPod 5 User manual

OmniPod
OmniPod Pod User manual

OmniPod
OmniPod DASH SYSTEM PODDER Firmware update

OmniPod
OmniPod 5 User manual

OmniPod
OmniPod PODDER Firmware update

OmniPod
OmniPod PDM Series Firmware update

OmniPod
OmniPod PODDER Firmware update

OmniPod
OmniPod ENT450 User manual

OmniPod
OmniPod DASH System User manual

OmniPod
OmniPod DASH System User manual
Popular Medical Equipment manuals by other brands

MinXray
MinXray PowerPlus HF120HPPWV Service manual

Brainlab
Brainlab ExacTrac Planning Manual

RR Mechatronics
RR Mechatronics Starrsed ST Service manual

GE
GE Optima CT680 Series installation manual

Drive DeVilbiss Healthcare
Drive DeVilbiss Healthcare Phase III user guide

Medivators
Medivators DSD EDGE quick start guide