Orbegozo DS 48160 B IN User manual

CAMPANADECORATIVA- MANUALDEINSTRUCCIONES
COOKER HOOD-INSTRUCTIONMANUAL
HOTTEDECUISINE-MANUELD’INSTRUCTIONS
EXAUSTOR-MANUALDEINSTRUÇÕES
DS 48160/70/90 B IN
Sonifer,S.A.
AvenidadeSantiago,86
30007 Murcia
España
E-mail: sonifer@sonifer.es
MadeinP.R.C.
Leaatentamenteestemanual antes deutilizaresteaparatoyguárdeloparafut
urasconsultas. Sóloasí podráobtener los mejoresresultados ylamáximaseguridad deuso.
Read thismanual carefullybefore running thisapplianceand save it for referenceinorder toobtainthe
best resultsand ensure safeuse.
Veuillezlire attentivement cemanuel avant d’utiliser cet appareil et conservez-lepour touteconsultation
future. C’est laseulefaçond’obtenirles meilleurs résultatset une sécuritéoptimaled’utilisation.
Leiaestemanualcuidadosamenteantes deutilizaresteaparelho eguarde-oparaconsultafutura.Só assim,
poderáobter os melhoresresultados eamáximasegurançanautilização.

DS48160/70/90 BIN
2
ESPAÑOL
ADVERTENCIASDE SEGURIDAD
1.Esteaparatopuedenutilizarloniñosconedadde 8años
ysuperior ypersonasconcapacidadesfísicas,sensoriales
omentalesreducidasofaltade experienciay
conocimiento,siseleshadadolasupervisióno
formaciónapropiadasrespectoalusodel aparatode una
manerasegura ycomprendenlospeligrosqueimplica.
Losniñosnodebenjugarconel aparato.Lalimpiezayel
mantenimientoarealizar por el usuarionodeben
realizarlolosniños sinsupervisión.
2.Sedeberá supervisar alosniñospara asegurarsede que
nojueganconesteaparato.
3.Mantengael aparatoysucable fuera del alcancedelos
niños menores de 8años.
4.PRECAUCIÓN:Para laseguridadde susniñosnodeje
materialde embalaje (bolsasde plástico,cartón,
polietilenoetc.)asualcance.
5.Siel cable de alimentaciónestádañado,debe ser
sustituidopor el fabricante, el serviciotécnicoo
cualquierotroprofesionalcualificadoconel finde evitar
unpeligro.
6.No desconectenuncatirandodel cable.
7.No lopongaenfuncionamientosiel cable oelenchufe
estándañadososiobserva queel aparatonofunciona
correctamente.
8.No manipule el aparatoconlasmanos mojadas.

DS48160/70/90 BIN
3
9.No sumergirel aparatoenaguaocualquierotrolíquido.
10.Antesde sulimpiezaobservequeel aparatoestá
desconectado.
11.El aparatodebe instalarsede acuerdoconla
reglamentaciónnacionalpara instalaciones eléctricas.
12.Esteaparatoes sólopara usodoméstico.
13.Encasodenecesitar unacopiadel manualde
instrucciones,puede solicitarlapor correoelectrónicoa
través de sonifer@sonifer.es
14.ADVERTENCIA:En casodemalautilización,existeriesgo
de posibles heridas.
•Soliciteauntécnico querealiceel montaje.
•Para asegurarun funcionamientocorrecto,lacampanay
el filtro debenlimpiarseconregularidad.
•No manipular el filtro conlacampanaenmarcha.
•No obstruirel tubode descarga
•No tocarlalámpara osuproteccióndespuésde un uso
prologadodelaparato.
•Sedeclinatodaresponsabilidadpor daños
eventualmenteprovocadospor nohaberobservadolas
citadas advertencias.
•Cuandosefríenlosalimentossedebe tenercuidadode
queel aceitenosecalienteenexcesoy seincendie
•Debe estar previstaunaventilaciónconvenientede la
habitaciónsiseutilizansimultáneamenteunacampana
extractora decocinayaparatosalimentadospor gasu

DS48160/70/90 BIN
4
otrocombustible.
•Existeriesgode incendioencasode quelalimpiezano
seefectúeconformealas instrucciones.
•No flamearbajolacampanaextractora.
•ATENCIÓN:Laspartesaccesiblespuedencalentarse
cuandoseutilizaconaparatos de cocción.
•El aireevacuadonodebe serenviadopor conductosque
seutilicenpara evacuarloshumosde aparatos
alimentadospor gasuotrocombustible.
•Ladistanciamínimaentreloselementosde cocciónyla
parteinferiorde lacampanadebe sercomomínimode
65cmsilacampanaestáinstaladasobreunelementode
cocciónagas.SIlasinstruccionesde instalaciónde
elementode cocciónagasindicanunadistancia
superior,sedebentenerencuenta.Ladistanciade 65cm
nopuede reducirse.
•Losreglamentosrespectoalaevacuacióndel airehande
serrespetados.
INFORMACIÓN GENERAL
1.Graciaspor elegirnuestracampanaextractora.Antes deutilizarla,leaatentamenteestemanualde
instrucciones.
2.Lainstalación debe llevarlaacabo un instaladorcualificadoycompetente.
3.Elfabricantedeclinatodaresponsabilidadpor cualquier daño materialopersonalderivadodel
incumplimientodelasinstrucciones deinstalación contenidasen estemanual.
Estacampanaextractorase hadiseñadoparasu utilización con 220-240V~50Hz.
CARACTERÍSTICAS
1.Estacampanaextractorautilizamateriales dealtacalidad ytiene un diseñoaerodinámico.
2.Elpolvo disperso se absorbe en unperiododetiempo muybreve, debido altúnelespecialparaelaire y
al diseño del colector deaceite.

DS48160/70/90 BIN
5
3.Estacampanaextractoracuentacon un silencioso motor eléctricodegranpotenciayunacarcasa
centrífuga,proporcionaunagransucción, emitepocoruido, también dispone deun filtro anti-grasayse
limpiafácilmente.
INSTALACIÓN
1. Paraobtenerun mejorresultado,lascampanasextractorasdeben instalarse
aunadistanciade65-75cmsobre laencimera.Silaencimeraes degas, la
distanciamínimaseráde750mm ysieseléctrica,ladistanciamínimaseráde
650mm.
2. Lacampanaestádotadacon tacos defijación adecuados alamayorparte
deparedes. Decualquier modo, conviene consultaraun técnicocalificadoparatener lacertezadeque los
materiales son adecuadosasu pared.Lapareddebe ser losuficientementefuerteparasostener elpeso de
lacampana.
3. Conexión eléctrica:Lacorrientedelareddebe corresponder alacorrienteseñaladaen laetiquetadelas
característicassituadaen elinterior delacampana.Sicontiene un enchufeconectelacampanaaunatoma
decorrienteconformealasnormasvigentes situadaen unazonaaccesible. Sicontiene un enchufe
(conexión directaalared,aplique un interruptorbipolaranormacon unadistanciadelos contactos en
aberturano inferior a3mm (accesible.).
4. Parainstalarlaenlapared,realice3orificios de8mm dediámetro horizontales cada100 mm en unlugar
adecuadoen líneacon elgancho delacampanaaunaalturaadecuada(750mm por encimadela
encimera).
5. Introduzcalos tacos enlos orificios.
6. Fijeel gancho en lapared (figura2).
7. Coloque laválvulasinretorno con los tornillos que se acompañan, añadael reductor, el conductopara
el hollínylachimeneadecorativa.
8. Colgaren lapared (figura4).
9. Calculelaalturafinal delasección en formadeU (chimeneadecorativa).Paraellotire del interior dela
sección en formadeU (chimeneadecorativa) hastalaalturaapropiada(figura5).

DS48160/70/90 BIN
6
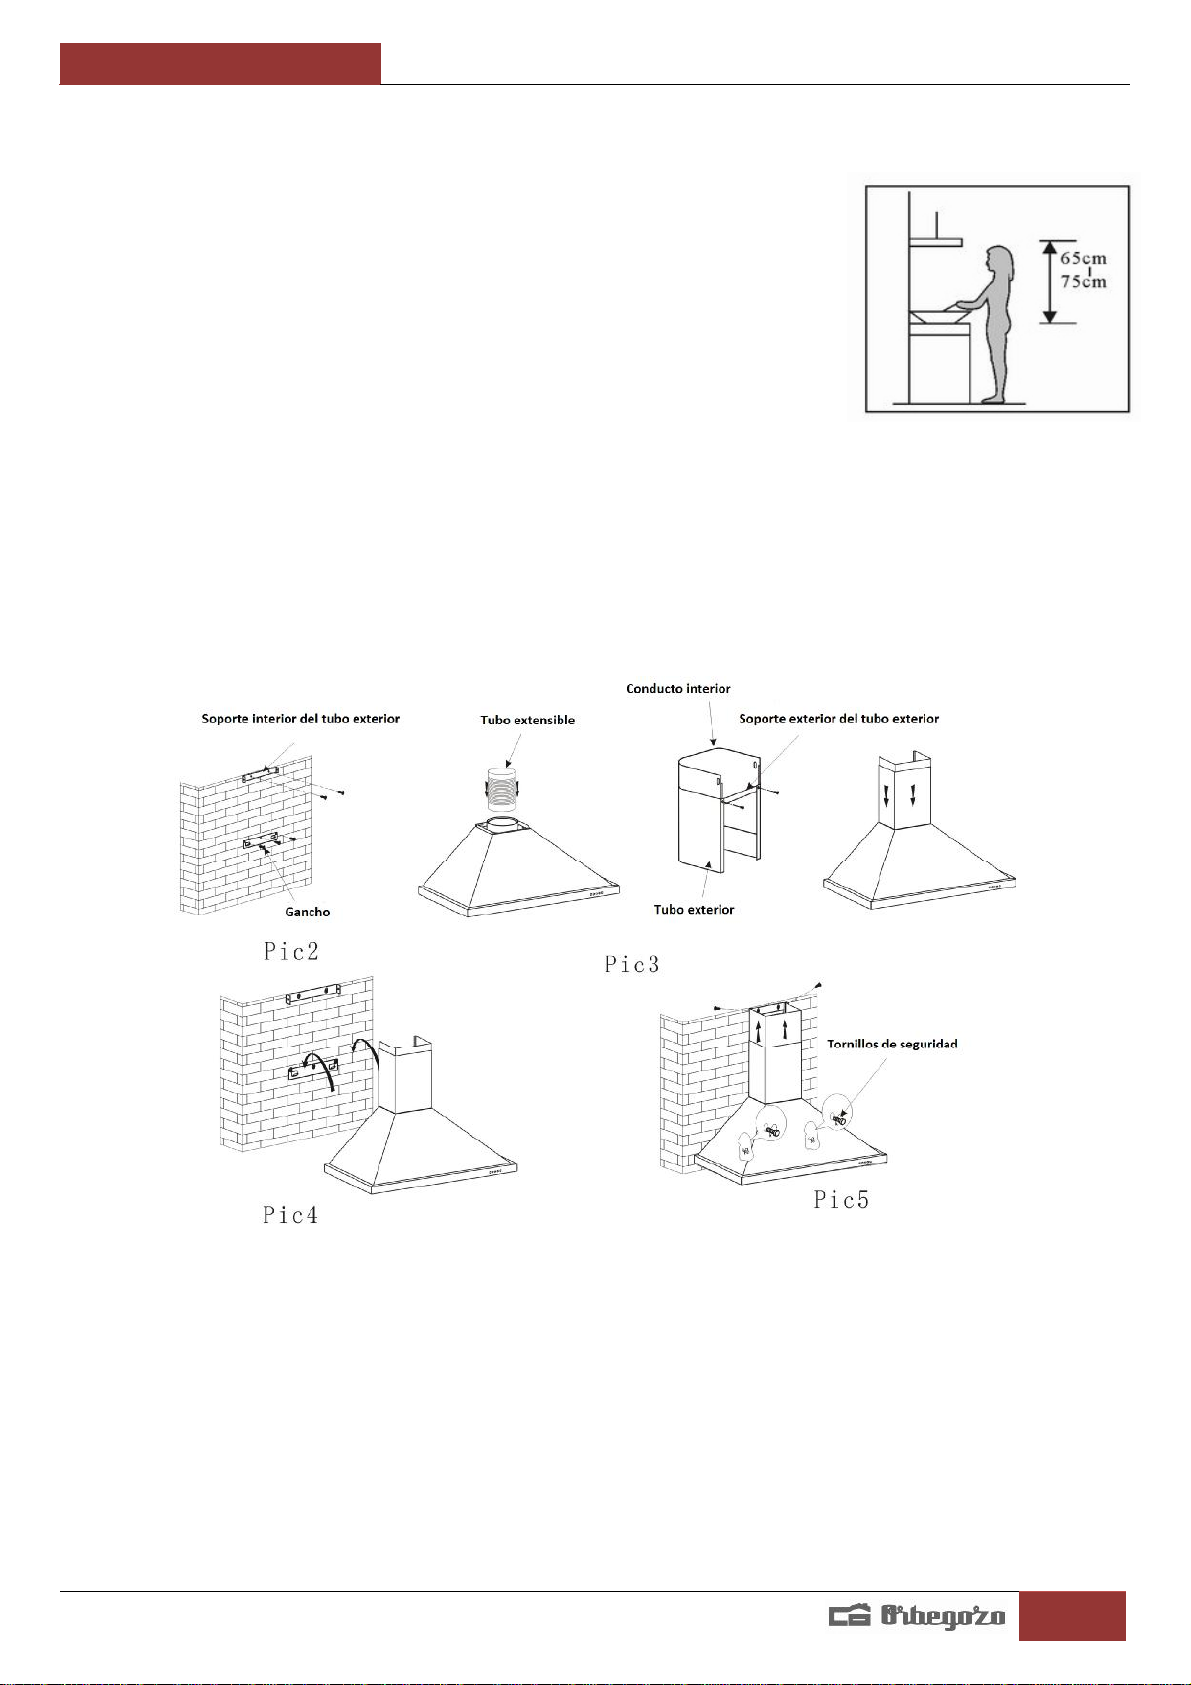
10. Enel tubo inferior colocarel soportecon los tornillos que se acompañan(soporteconductoexterior en
figura3)yseguidamentemarcaryrealizardos orificios en lapared de8mm dediámetro parafijarla
chimeneasuperior (soportedel conductointerior en figura2).
11. Finalmente, taladre 2orificios de8mm dediámetro en un lugaradecuadoen líneacon lasegunda
placa(soporteconductointerior en figura2),yaprietelos dos tornillos.
12. Instalelos tubos en lapared con los tornillos que se adjuntanmediantelos soportes depared.
13. El aire evacuadono debe ser enviadopor conductos que se utilicen paraevacuarlos humos deaparatos
alimentados por gasuotro combustible.
14. Ladistanciamínimaentre los elementos decocción ylaparteinferior delacampanadebe ser como
mínimode65cm si lacampanaestáinstaladasobre un elementodecocción agas. SIlasinstrucciones de
instalación deelementodecocción agasindicanunadistanciasuperior, sedeben tener en cuenta.La
distanciade65cm no puedereducirse.
15. Los reglamentos respectoalaevacuación del aire handeser respetados.
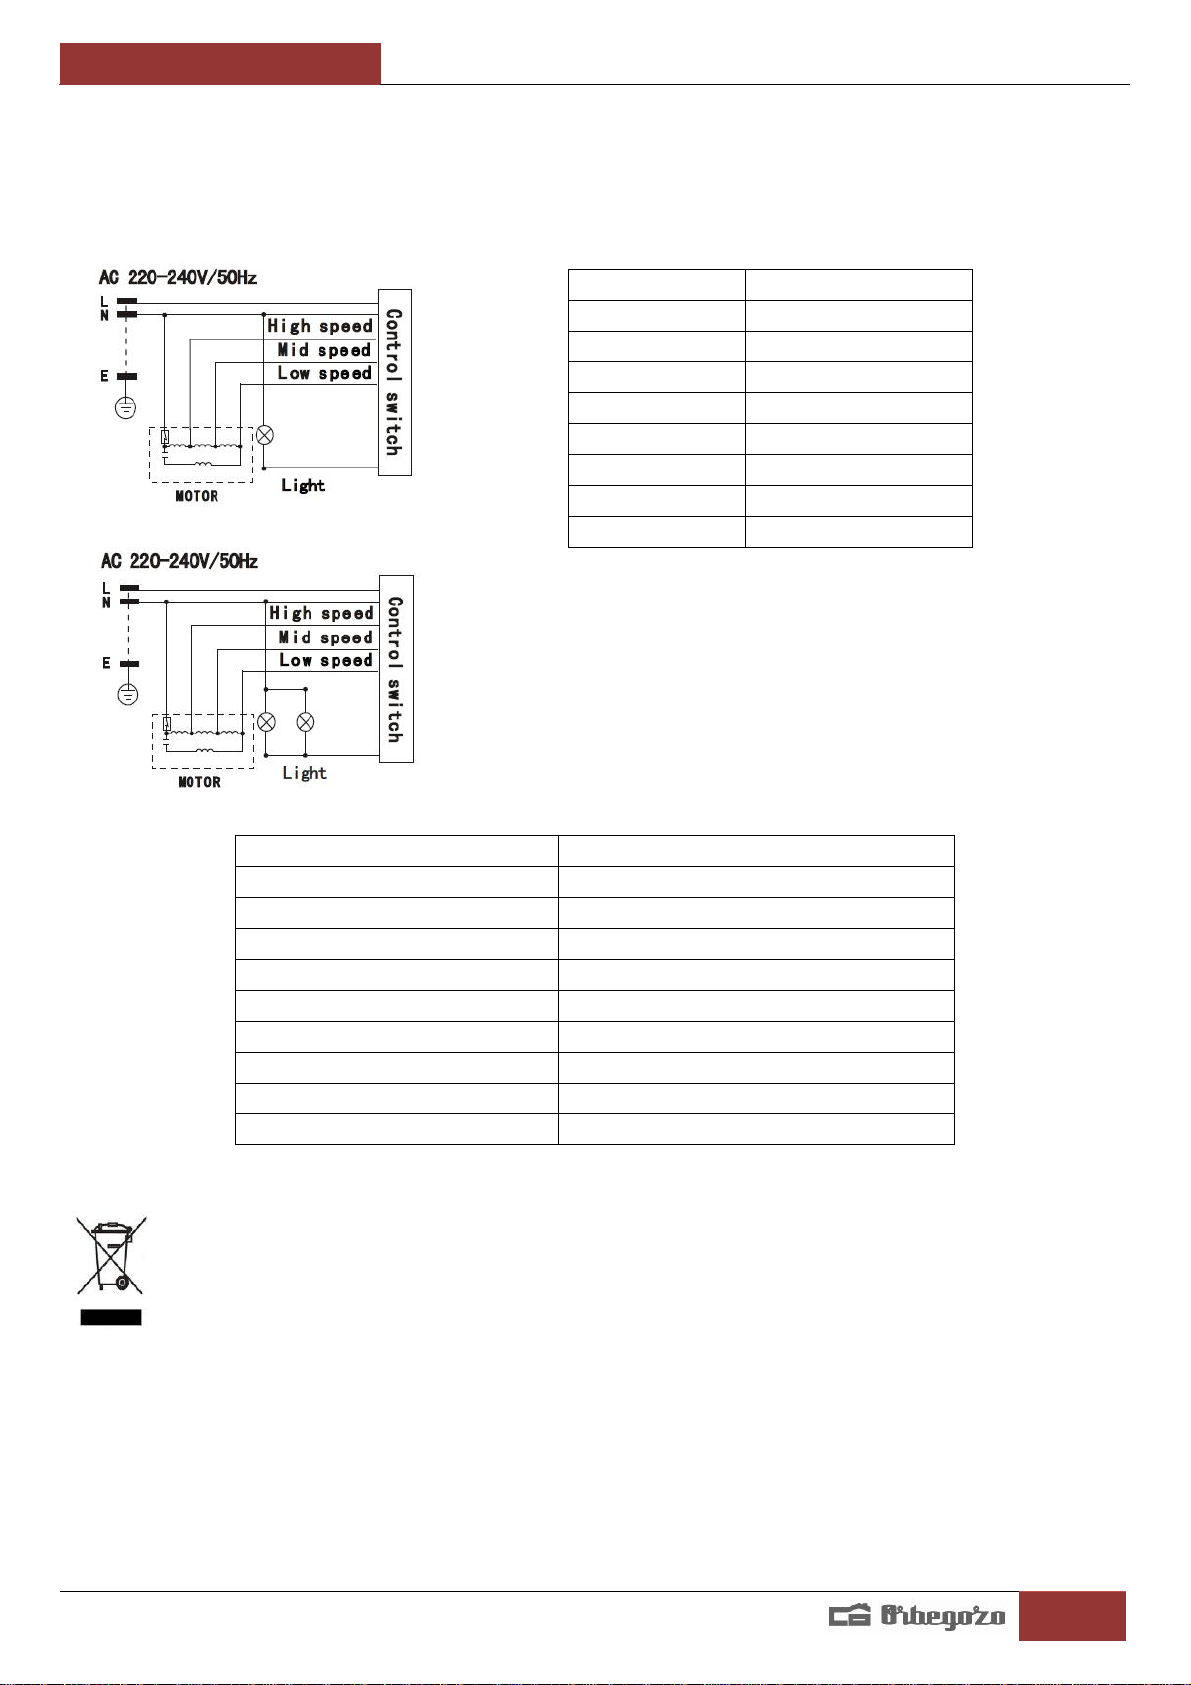
EL APARATO DECLASE1SEDEBECONECTARA TIERRA
Laconexión se debe realizardelasiguienteforma:
MARRÓN=L (línea)
AZUL=N(neutro)
AMARILLO/VERDE=(tierra)
EL APARATO DECLASE2NO SEDEBE CONECTARA TIERRA.
Paralos aparatos de2ªclase que poseen en laetiquetadecaracterísticasel símbolodel doblecuadrado.
Laconexión se debe realizardelasiguienteforma:
MARRÓN=L (línea)
AZUL=N(neutro)
ADVERTENCIAS SOBREDELAINSTALACIÓN
•El aparatodebe instalarsedeacuerdocon lareglamentación nacional parainstalaciones eléctricas.
•Sielcableestádañadodebe ser reemplazadopor elfabricante, un serviciotécnicoautorizadoopor
personal cualificado.
•Antes delainstalación, asegúrese siempre deque lazonaestélimpiaparaasíevitarlasucción derestos
deastillasdemaderaypolvo.
•Nose puedeutilizarelmismoconductodeventilación paraotros dispositivos comopor ejemplo, salida
degas, conductodelacalderaoconductodeairecaliente.
•Lacurvaturadelconductodeventilación deberíaser 120°,paralelaosobre elpuntodecomienzoy
deberíaestarconectadaalapared exterior.
•Unavezrealizadalainstalación, asegúrese dequeelextractor esténiveladoparaevitarque se acumule
grasaen uno delos lados.

DS48160/70/90 BIN
7
UTILIZACIÓN
Ajuste delavelocidad. Consulte las figuras.
Botones
1. Paradetener el motor, pulse el botón Stop (parada).
2. Pulse elbotón Low(velocidadbaja),eldispositivo emitiráun zumbidoyelmotor funcionaráavelocidad
baja.
3. Pulse elbotón Mid (velocidadmedia),eldispositivo emitiráun zumbidoyelmotor funcionaráa
velocidad media.
4. Pulse elbotón High(velocidadalta),eldispositivoemitiráun zumbidoyelmotor funcionaráavelocidad
alta.
5. Pulse elbotóndelalámparayse encenderánlasdos lámparas. Paraapagarlaluz,pulse elbotón de
nuevo.
pic6C
Low
Mid
High
Light
Stop
pic6C
Low
Mid
High
Light
Stop
pic6C
Low
Mid
High
Light
Stop
Usarunapotenciadeaspiración mayor en caso deunaparticularconcentración devapores delacocina.
Aconsejamos encender laaspiración 5minutos antes decocinarydejarlaen funcionamientopor otros
15 minutos aproximadamente.
MANTENIMIENTO
1. Limpiezadelfiltroanti-grasa.
Lamalladelfiltroestáfabricadadeacero inoxidabledealtadensidad.Noutilicenuncaundetergente
corrosivo paralimpiarlo. Simantiene estefiltro limpio, lacampanafuncionarácorrectamente. Por favor, siga
estrictamentelassiguientes instrucciones:
Parasacarelfiltro metálico(ver lasiguienteimagen)se desmontarautilizandolos dos topes,tirando
primeramentehacialapartetraserayextraerlopor debajo.
Método1:Coloque elfiltro en 40-50cldeagualimpia,añadadetergenteysumérjalodurante2-3minutos.
Utiliceguantes ylímpielocon un cepillosuave.Noaplique demasiadapresión yaque lamallaes un
productodelicadoyse puededañarfácilmente.
Método2:Lamallase puedecolocaren un lavaplatos. Ajustelatemperaturaaaproximadamente60ºC.
Existeriesgodeincendioen caso deque lalimpiezano se efectúe conformealasinstrucciones.
Noflamearbajolacampanaextractora.
ATENCIÓN:Laspartes accesibles pueden calentarse cuandose utilizacon aparatos decocción.
Right Correcto
Wrong Incorrecto

DS48160/70/90 BIN
8
Oil sooot filter mesh Malladel filtro deaceite
2. Aspectos atener encuentaen lalimpiezadelacampanaextractora
A. Antes delimpiarlacampana,recuerdesiempre desconectarlaelectricidad.
B. Paraproteger elcuerpo principaldelacorrosión alargoplazo, lacampanase debe limpiarconagua
calienteydetergentesuave cadados meses.
C. Noutilicenuncaun detergenteabrasivo yaque estodañaríael cuerpo.
D. Nopermitaque el motoryotraspiezasentren en contactocon el agua,yaque éstadañaráel aparato.
E. El filtro decarbón no debe exponerse al calor directo.
F. Nodesmontelabarrafijaque rodeaal filtro decarbón.
G. Sielenchufeoelcableestándañados, póngase en contactocon un serviciopostventaautorizadopara
que losustituya.
SUSTITUCIONDEBOMBILLAS
Nota:Siexistebombilladefectuosacambiar inmediatamente.
1.Desconecteel aparatodelared eléctrica
2.Sacarfiltro metálico
3.Cambiarbombilla
4.Volver acolocarfiltro metálico
LAMPARA LEDDE 2.5WMax
MONTAJEYCAMBIODEFILTROALCARBÓNACTIVO
Se recurreaestesistemaenlocales dondenoexistalatuberíadeexpulsión ocuandono seaposible
instalarla.
Desconecteel aparatodelared eléctrica
A. Quitelos filtros metálicos
B. (Filtros circulares –ver siguienteimagen)se encuentranen los extremos delMotor,porlotantogire los
filtros carbón en sentidocontrarioalasagujasdel reloj hastaque se desenganchen
C. Paramontarlos filtros al carbón realicelaoperación al revés

DS48160/70/90 BIN
9
Advertencia:El filtroalcarbónactivonosepuedelavarnireciclar,hayquecambiarloporlomenos
cada4meses.
ESQUEMADECONEXIONESELÉCTRICAS
PARÁMETROSPRINCIPALES
Eliminacióndelelectrodomésticoviejo.
Enbase alaNormaeuropea2002/96/CEdeResiduos deaparatosEléctricos yElectrónicos (RAEE),
los electrodomésticos viejos nopuedenserarrojados en los contenedores municipales
habituales; tienen que serrecogidos selectivamenteparaoptimizarlarecuperación yrecicladode
los componentes ymateriales que los constituyen, yreducirelimpactoen lasaludhumanayel
medioambiente. Elsímbolodelcubo debasuratachadose marcasobre todos los productos pararecordar
al consumidor laobligación desepararlos paralarecogidaselectiva.
Elconsumidor debe contactarcon laautoridadlocalocon elvendedor parainformarse en relación ala
correctaeliminación desu electrodomésticoviejo.
DECLARACIÓNDECONFORMIDAD:Este dispositivocumpleconlos requisitos delaDirectivadeBaja
Tensión2014/35/UEylos requisitos deladirectivadeCompatibilidadElectromagnética2014/30/UE.
LED light LámparaLED
Highspeed Velocidad alta
Mid speed Velocidad media
Lowspeed Velocidad baja
Motor Motor
Transformer Transformador
Light Lámpara
Electrical outletSalidaeléctrica
Control switch Interruptor decontrol
Tensión nominal 220V-240V, 50Hz
Potencianominal 192W/194W
Potenciadeiluminación 2WX1/2WX2
Potenciadel motor 190W
Mododeaccionamiento Motor único
Velocidad Velocidad IVelocidad IIVelocidad III
Diámetro del conductodeaire 150mm
Salidadeaire 630m
3
/h
Presión del aire 250Pa
Ruido ≤70 Db(A)

DS48160/70/90 BIN
10
ENGLISH
SAFETYWARNING
1.This appliancecanbeused by childrenaged from 8
years andaboveandpersonswithreduced physical,
sensory ormentalcapabilities or lackofexperienceand
knowledge if theyhavebeengivensupervisionor
instructionconcerninguseoftheapplianceinasafe way
andunderstandthehazards involved. Childrenmust
neverplaywiththeappliance. Cleaninganduser
maintenancemustneverbecarried outby children
withoutsupervision.
2.Childrenshould be supervised toensurethatthey do
not playwiththeappliance.
3.Keep theapplianceandthecable cordoutofthereach
ofchildrenless than8years old.
4.WARNING:Inordertoensureyourchildren‘s safety,
pleasekeep all packaging(plasticbags,boxes,
polystyreneetc.)outoftheirreach.
5.If thesupplycordis damaged it mustberepaired bythe
Authorized ServiceAgentinordertoavoid hazards.
6.Neverpull onthecordwhenunplugging.
7.Do notusetheunitwithadamaged cordor plug, or ifit
is notworking properly.
8.Do nothandletheappliancewithwethands.
9.Neverimmersetheappliancein wateror anyother
liquid.

DS48160/70/90 BIN
11
10. Makesuretheappliancehas beenunplugged before
cleaning.
11. This appliancemust beinstalled followingthenational
regulations forelectricalinstallations.
12. This applianceis for household useonly.
13. Incasethatyouneed acopy oftheinstructionmanual,
youcanaskfor itwritinganemail to sonifer@sonifer.es.
14. WARNING:Incaseofmisuse, thereis ariskofpossible
injury.
•Pleaseaskthetechnicalpersontodotheassembling.
•Thecookerhoodanditsfiltermeshshould be clean
regularly inordertokeep ingoodworkingorder.
•Do notattempt tocheck thefilters while thehoodis in
operation.
•Do notobstructtheventilationslots fordischargingthe
air.
•Do nottouchthelampsor thelampdiffusersafter
prolonged useofthehood.
•Themanufacturerwill notbeheld liable for damages
caused by failuretofollow theforegoinginstructions.
•Whenfoodis fried careshould be takenthattheoil does
not overheat andcatchfire.
•Ventilationshould be provided convenienttotheroom if
used simultaneouslyasuckerfor kitchenandappliances
powered bygas orotherfuel.

DS48160/70/90 BIN
12
•Riskoffireif thecleaningisnot carried outaccordingto
instructions.
•Do notflambéunderthehood.
•CAUTION:Accessible partsmaybecomehotwhenused
withcookingappliances.
•Exhaust airshould notbe sent by conductorsusedto
evacuatefumes from equipmentpowered by gasor
otherfuel.
•Theminimumdistancebetweenelements ofcookingand
thebottom ofthehoodmustbe at least 65cm if the
hoodis installed onagascookingelement.If the
instructionsfor installationofgascookingelement to
indicateagreaterdistance, should be takenintoaccount.
Thedistanceof65cmcannot be reduced.
•Theregulations regardingairevacuationmust be
respected.
NOTICE
1.Thankyou forchoosingour cooker hood.Please read the instruction manual carefullybefore use.
2.The installation workmust be undertaken byaqualified and competent fitter.
3.The manufacturer disclaimsall liabilityfor anydamageor injurycausedasaresult ofnot following
instructions for installationcontained inthe following text.
The cooker hood isusedon 220-240V~50Hz.
FEATURE
1. The cooker hood uses highqualitymaterials, and ismadewithastreamlined design.
2. Equipped withalargepower lownoise electricmotor and centrifugal leaf,it produces strong suction, low
noise, non stickgrease filter and easytoclean.
3. Special wind tunnel construction and oil collector design, free dirt will be
absorbed inasecond.
INSTALLATION
1. For optimumperformancethe extractor hoodshould be installed

DS48160/70/90 BIN
13
approximately65-75 cmabove the worktop.
2. The hoodissuppliedwithscrewsandrawlplugswhichare suitablefor mosttypes ofwall andceiling.
However it isadvisabletoconsult aqualifiedtechniciantoensure thatthe materialsare rightfor your wall
or ceiling.The wall or ceiling must be strong enoughtosupport the weight ofthe hood.
3. Electricalconnection: The mainscurrentmustmatchthecurrentstatedonthe characteristicslabel
situatedinsidethe Hood.Ifthe plugincludediscorrect,connectthe hoodtoasocketwhichmeetssafety
requirementsinanaccessiblelocation. Ifthe hoodincludes adirectmains connection, use adoublepole
switchwithaminimum distancebetween open contactsof3mm (accessible).
4. For wall installation drill three 8mm holes every100mm inline withthe hookofthe hood.
5. Adjust the height oftheinsidechimneytothe position ofthe insidechimneybracketand fix on it by
screw,after adjusting theposition, fix the bodywithsafetyscrew.See Pic5.
Note: The twosafetyventsare positioned on the backcasing,withdiameter of6mm.
6. Insert the rawplugs.
7. Fix the hooktothe wall and install the plate.
8. Fix the one-wayvalvewiththe screwssupplied,add the reductor andthe soottube,anddrawit
outwards.
9. Placeon the wall (Figure 4).
10. Calculatethe finalheightofthe U-shapedsection andpull the insideofthe U-shapedsection up tothe
correct height.
11. Securethe templateinthe lower tube usingthe screwssuppliedtomarkoutanddrill two8mmholes
inthe wall (Figure 2).
12. Finally,drill two8mm holes inasuitableplaceinline withthe secondplate(Figure E)andtighten the
twoscrews.
THECLASS 1HOODMUST BE EARTHED
The connection should be madeasfollows;
BROWN=L (live)
BLUE=N(neutral)
YELLOW/GREEN=Earth
THECLASS 2HOODMUST NOT BE EARTHED

DS48160/70/90 BIN
14
Second class hoodswiththe characteristicslabel containing the doublesquare symbol.
The connection should be madeasfollows;
BROWN=L (live)
BLUE=N(neutral)
NOTICEOFINSTALLATION
•Before installation, pleaseensure the areaiscleantoavoid suction ofthe remaining bitsofbroken wood
and dust.
•It cannot share the sameairventilation tube withother appliancesuchasgastube, warmer tube, and
hot wind tube.
•The bending ofventilationtube should be 120°,parallel or above the start point and should be
connected tothe external wall.
•After installation, makesure that the extractor islevel toavoid grease collection at one end.
USE
Speedadjustment .See pictures
Push button
1.Pushstop button, andthe motor will stop.
2.Pushthe Lowbutton, the buzzerwill buzz once,and the motor runs at lowspeed.
3.Pushthe highbutton, the buzzerwill buzz once,and the motor runs at mid speed.
4.Pushthe Highbutton, the buzzerwill buzz once,and the motor runs at highspeed.
5.Pushthe light button and the twolightswill comeon. Push it againandthe light willturn off.
pic6C
Low
Mid
High
Light
Stop
pic6C
Low
Mid
High
Light
Stop
pic6C
Low
Mid
High
Light
Stop
MAINTENANCE
1Thecleaningof thecarbongreasefilter mesh
The filter mesh ismadeofhigh-densitystainless steel.Please donot usethe corrosive detergent on it.
Keeping thisfilter cleanwill keep the appliancerunning correctly.Pleasestrictlyfollowthe guidelines below.
Method1:Put the meshinto40-50ccleanwater, pour on detergent,and soak for 2-3mins. Weargloves
and cleanwithasoft brush. Please donot applytoo muchpressure, asthemesh isdelicateand willdamage
easy.
Method2:Ifinstructed todoso, it canbe put intoadishwasher, set the temperature at around60degrees.

DS48160/70/90 BIN
15
2Noticeof cleaningcooker hood.
A. Toprotect the mainbodyfrom corrosion over along period oftime, the cooker hood should be cleaned
withhot water plus non corrosive detergent everytwomonths.
B. Please donot use abrasive detergent for it will damagethe body.
C. Keep the motor and otherspare partsfree from water, asthiswill cause damagetothe appliance.
D. Before cleaning the applianceplease remember tocut off power
E. The carbon filter shouldn’t be exposed toheat.
F. Please don’t tearopen thefixed bararound the carbon filter
G. Ifthe plug or cord isdamaged,please call anauthorised after sales servicetoreplaceit.
BULB REPLACEMENT
Note:if thebulb is faulty,replaceimmediately.
1.Disconnect from the mains.
2.Remove aluminium filter.
3.Replaceburnt out bulb(s).
4.ReplaceAluminium Filter.
LED2.5W MAX
SETTING UPAND CHANGING THEACTIVECARBON FILTER
Thissystemisusedinlocations withoutductingtothe outsideor when it isnotpossibletoinstall such
ducting.
Disconnect the machine from the mains.
A. Remove metal filters.
B. The circularfilters (Figure 2)are locatedateither endofthe motor. Turn the carbon filters anti-clockwise
until theyare unscrewed.

DS48160/70/90 BIN
16
C. Applyreverse procedure toinstall the carbon filter.
Warning: theactivecarbonfiltercannotbewashedorrecycled. Itshould bechangedatleastevery
four months.
ELECTRICALDIAGRAM.
MAINPARAMETERS
Rated Input 220V-240V, 50Hz
Rated Power 192W/194W
Lighting Power 2WX1/2WX2
Motor Power 190W
Drive Mode SingleMotor
Speed Speed ISpeed II Speed III
Airtube diameter 150MM
Airoutput 630m3/h
Airpressure 250Pa
Noise ≤70Db(A)
Disposalof old electricalappliances.
The Europeandirective2002/96/ECon WasteElectricalandElectronicEquipment(WEEE),
requires thatold household electricalappliances mustnotbe disposedofinthe normalunsorted
municipalwastestream.Oldappliances mustbecollectedseparatelyinorder tooptimizethe
recoveryandrecyclingofthe materialstheycontain, andreducethe impacton humanhealthandthe
environment.
The crossedout“wheeledbin”symbolon the productremindsyou ofyour obligation, thatwhen you
dispose ofthe appliance,it must be separatelycollected.
Consumersshould contacttheirlocalauthorityorretailer for informationconcerningthe correctdisposalof
theirold appliance.
DECLARATIONOFCONFORMITY: This devicecomplies with therequirements of theLow Voltage
Directive2014/35/EUandtherequirements of theEMC directive2014/30/EU.

DS48160/70/90 BIN
17
FRANÇAIS
AVISDE SÉCURITÉ
1.Cet appareil peut êtreutilisépar des enfants8ansou
plus etdes personnes présentantunhandicapphysique,
sensoriel,mentaloumoteurvoirenedisposantpas des
connaissances et de l'expériencenécessaires encasde
surveillanceoud'instructionssurl'usagede cet appareil
entoutesécuritéet de compréhensiondes risques
impliqués.Les enfantsnedoivent pas joueravec
l'appareil. Lenettoyage et lamaintenancenedoivent
pas très effectuéspar des enfantssans surveillance.
2.Les enfants doivent êtresurveillés afinde s'assurerqu'ils
nejouent pasaveccetappareil.
3.Gardez l’appareil et le câble àlaportée des enfantsde
moinsde 8ans.
4.ATTENTION:Par mesuredesécuritévis-à-vis des
enfants,nelaissezpas les emballages (sacenplastique,
carton,polystyrène) aleurportée.
5.Sile cordond’alimentationest endommagé, adressez-
vousàunservicetechnique agréé afind’éviterun
danger.
6.Nedébranchezjamaisentirant ducordon.
7.Nejamais le fairefonctionnersile cordonoulafiche
sont aomesousivous remarquezquel´appareil ne
fonctionnepas correctement.
8.Nepasmanipulerl´appareil, les mains mouillées.

DS48160/70/90 BIN
18
9.Nejamais placerl´appareil près dans l´eauouautre
liquide.
10. Avant de nettoyerl´appareil, vérifiezs´il est bien
débranché.
11. L´appareil doit êtreinstallé suivant lesnormesnationaux
pourles installations électriques.
12. Cet appareil est seulementaptepouruneutilisation
domestique.
13. Encasquivous avezbesoind'unecopiedumanuel
d'instructions,vous pouvezle demanderàl'adressee-
mail sonifer@sonifer.es
14. AVERTISSEMENT:Encasde mauvaiseutilisationde
l'appareil, ily aunrisquedeblessure.
•Veuillezdemanderàuntechnicienderéaliser
l’assemblage.
•Lahotteet sonfiltredoivent êtrenettoyés régulièrement
afind’enassurerle bonfonctionnement.
•N´essayezpas de contrôlerles filtres quandlahotteest
enservice
•Nepasobstruerle tuyaud’évacuation.
•Nebouchezpar aux lampes ouaucouvrelampes après
unusage prolongée l´appareil.
•Nous déclinonstouteresponsabilitéencas de
dommagesdus àl´inobservationdes recommandations
susindiquées.

DS48160/70/90 BIN
19
•Lorsquelanourritureestfrit il faut prendresoinque
l’huile nesurchauffe pas etprendrefeu.
•Laventilationdoit êtrefournie commodede lachambre
siutilisés simultanémentuneventousepourlacuisine et
les appareils fonctionnantaugazouautrecombustible.
•Risqued'incendie sile nettoyage n'est pas effectuéselon
les instructions.
•Nepas flambersous le capot.
•ATTENTION:Les parties accessibles peuventchauffer
lorsqu'elles sontutilisées avecdes appareils de cuisson.
•L'airvicié nedoit pas êtreenvoyépar des conducteurs
utilisés pourévacuerles fumées provenantd'appareils
fonctionnant augazouautrecombustible.
•Ladistanceminimale entreles élémentsde cuissonetle
fondde lahottedoit êtred'aumoins65 cm lorsquele
capot est installé surunélémentde cuissonaugaz.Siles
instructionspourl'installationde l'élémentde cuissonà
gazpourindiqueruneplusgrande distance, doiventêtre
pris encompte. Ladistancede 65cmnepeut pas être
réduite.
•Laréglementationenmatièred'évacuationd'airdoit être
respectée.
AVERTISSEMENT
1.Merci d’avoirchoisi notrehotte. Veuillezlire attentivement cemoded’emploi avant touteutilisation.
2.L’installation doit être effectuée parun installateurqualifiéet compétent.
3.Lefabricant décline touteresponsabilitéen casdedommages ou blessuresdufait dunon-respect des
instructions d’installation suivantes.
Lahottedecuisine s’utilise sur du220-240V~50Hz.

DS48160/70/90 BIN
20
CARACTÉRISTIQUES
1. Lahottedecuisine est constituée dematériaux dehautequalitéet est pourvue d’un profil
aérodynamique.
2. Équipée d’un moteur électrique silencieux et puissant et d’une carcasse centrifuge, elleproduit uneforte
aspiration presque inaudible. Ellepossèdeégalement un filtre àgraisse anti-adhésifet facileànettoyer.
3. Grâceautunnel spécial pour l’airet aumodèleduréservoird’huile, lapoussière volanteseraabsorbée
en une seconde.
INSTALLATION
1. Afind’obtenirun résultatoptimal,il convientd’installer les hottes
aspirantes à65-75cm au-dessus delasurfacedecuisson.
2. Lahotteaspiranteestdotée dechevilles defixation adaptées àla
majoritédes murs/plafonds. Detoutefaçon, il est recommandédeconsulter
un technicien qualifiéafindes’assurer que lesmatériauxsontadéquats
pour votremur/plafond.Lemur/ leplafonddoiventêtre suffisammentsolides poursupporter lepoidsdela
hotte.
3. Connexion électrique:Lecourantdusecteur doit correspondre aucourantindiqué sur l’étiquettedes
caractéristiques située àl’intérieur delahotte. Silahottepossèdeuneprise, veuillezlabrancher àune prise
decourantconformeauxnormes en vigueuretsituée dans un endroit accessible. Siellepossèdeune prise
(connexion directeausecteur, veuillezinstaller un interrupteur bipolaire auxnormes, avecune distance
entre les contactsouvertsd’aumoins 3mm (accessible)).
Note: Les deux conduitsd’aération d’un diamètre de6mm se trouvent audos ducorps.
4. Pour fixer lahottesurlemur, veuillezfaire 3trous de8mm dediamètre tous les100mm,dans un
endroit adéquat et alignéaveclecrochet delahotte.
5. Veuillezintroduire les chevilles dans les trous.
6. Fixezlecrochet aumuret placezlegabarit (ImageNº 2).
7. Placezleclapetanti-retour avecles visquisontjointes; ajoutezleréducteur etensuiteleconduit de
fumée et emmenez-levers l’extérieur.
This manual suits for next models
2
Table of contents
Languages:
Other Orbegozo Ventilation Hood manuals

Orbegozo
Orbegozo DS 61190 IN User manual

Orbegozo
Orbegozo TL 06260 A IN User manual

Orbegozo
Orbegozo DS 57190 B IN User manual

Orbegozo
Orbegozo DS 76190 BL User manual

Orbegozo
Orbegozo DS 63190 IN User manual

Orbegozo
Orbegozo CA 09160 BL User manual

Orbegozo
Orbegozo CA 07260 A IN User manual

Orbegozo
Orbegozo TL 07160 BL User manual

Orbegozo
Orbegozo DS 62190 User manual

Orbegozo
Orbegozo DS 58190 B IN User manual