Orbis NEXU User manual

NEXU / NEXU IN
CRONOTERMOSTATO DIGITAL WIFI
MANUAL DE USO
DESCRIPCIÓN
El cronotermostato NEXU es un termostato de ambiente digital, con programación semanal que
permite controlar el sistema de calefacción en múltiples niveles de temperatura. La comunicación
WiFi integrada permite controlar el cronotermostato de forma remota a través de un
Smartphone/Tablet, con una aplicación específica. Para controlar el termostato programable, debe
conectarlo a la red WiFi de su hogar.
Mediante APP es posible:
•
Programar 4 o 6 escenarios diarios.
• Configurar hasta 6 niveles de temperatura diarios con 6 escenarios.
• Configurar hasta 4 niveles de temperatura diarios con 4 escenarios.
• Asignar programas distintos para los 7 días de la semana.
• Copiar un programa diario para otros días de la semana con la función COPIAR.
• Seleccionar el modo de funcionamiento: Automático, Manual temporal, o Manual permanente
(termostato).
• Ajustar la temperatura de +5 ºC a +35 ºC.
• Extender el tiempo de escenario actual hasta 3 horas.
• Encender o apagar el cronotermostato.
• Apagar el cronotermostato durante un período de vacaciones. (Modo APAGADO o temperatura
antihielo)
• Activar y administrar la función de geolocalización para optimizar el consumo en
relación con los viajes fuera del hogar.
• Compartir la gestión del termostato programable con otros usuarios.
• Administrar múltiples cronotermostatos instalados en la misma casa o en diferentes
lugares.
• Corregir la medida de la temperatura ambiente desde -3.5 °C hasta +3.5 °C.
• Establecer el nombre del dispositivo controlado.
Como alternativa a la gestión remota a través de APP, es posible actuar directamente en el
termostato programable para:
• Encender y apagar el cronotermostato.
• Ajuste la temperatura en el modo MANUAL TEMPORAL
• Ajuste la temperatura en el modo PERMANENTE MANUAL (Termostato)
• Ajuste la temperatura de Antihielo
• Establecer el diferencial
• Ver el escenario elegido, año, mes, día y hora actual
• Establecer el año, mes, día, hora actual y cambio automático del horario de verano
• Restablecer el dispositivo
DURANTE LA INSTALACIÓN Y FUNCIONAMIENTO DEL PRODUCTO, ES NECESARIO
RESPETAR LAS SIGUIENTES INDICACIONES:!
!
BEWFSUFODJBT!EF!TFHVSJEBE!
!
Lea atentamente las instrucciones de este manual.
El producto debe ser instalado por un instalador autorizado.
Antes de acceder a los terminales de conexión, asegúrese de que los cables a
conectar o ya conectados al instrumento no tengan tensión.
No alimente ni conecte el producto si alguna parte está dañada.
El producto debe instalarse y ponerse en funcionamiento de conformidad con las
normas vigentes.
Conecte el producto de acuerdo con los diagramas descritos en este manual y en
el aparato.
El producto está protegido internamente contra interferencias.
Proteja la línea de alimentación del producto con dispositivos de protección
contra sobrecorrientes.
Después de la instalación, verifique que no haya accesibilidad directa a los
terminales de conexión (sin el uso de una herramienta especial)
CONEXIÓN:
Instalar Según el siguiente esquema:
MONTAJE
Dispositivo de control electrónico de montaje independiente sobre pared o caja de mecanismos.
Se recomienda instalar el cronotermostato a una altura mínima de 1,5 m, en un área de la pared
libre de obstáculos que podrían afectar al funcionamiento y lejos de fuentes de calor (calentadores,
sol, ventanas, etc...).
Cronotermostato NEXU (versión de pared): El dispositivo se puede montar en la pared
mediante los dos tornillos suministrados, o sobre una caja de mecanismos empotrada.
Desenganche la base de fijación del dispositivo, como se muestra en la figura. Fije la base a la
pared con los tornillos suministrados. Desatornille los tornillos de la tapa de bornes ubicada en la
base de fijación, retírela y conecte el dispositivo de acuerdo con el esquema anterior. Vuelva a
apretar la tapa de bornes y vuelva a colocar el dispositivo en la base.
NEXU IN cronotermostato (versión empotrable): El dispositivo se puede montar mediante los dos
tornillos suministrados directamente en una caja de mecanismos empotrada.
Desenganche la base de fijación como se muestra en la figura. Haga las conexiones y fije la base
a la caja de mecanismos con los tornillos suministrados. Vuelva a colocar el dispositivo en la base.
PUESTA EN MARCHA Y CONFIGURACIÓN
Como ya se indicó en la introducción, el cronotermostato NEXU ha sido diseñado para ser
gestionado a través de WiFi, a través de un smartphone o tableta mediante una APP dedicada:
DESCARGAR APP
Proceda con la descarga de la aplicación "Termostato programable WiFi NEXU ORBIS" desde
Apple Store o Google Play. La aplicación dedicada se puede descargar de forma gratuita y está
disponible para dispositivos ANDROID 4.4 (o superior) compatibles con Bluetooth 4.0 LE, iOS con
iPhone 4s y superior y iPad 3 o superior.
Como alternativa, puede descargar la aplicación leyendo directamente el código QR que se indica
a continuación e iniciar la aplicación.
Modo de
extensión de
tiempo activo
Bloqueo de
teclado activo
Activación del
sistema de
calefacción
Selección visualización Hora / Día de la
semana / Tipo de programación diaria
en 4 o 6 períodos (P4 O P6)
Cronotermostato
apagado
Incrementar /
Avanzar
ON / OFF
Decrementar /
Retroceder
Accionamiento
manual
Funcionamient
o automático
Temperatura
ambiente
Periodo de
programación
diario
Indicador
Wi Fi
activo
Funcionamiento
manual
activo
Modalidad
VACACIONES
activa
Regulación
diferencial
activa
Regulación
temperatura
activa

CREACIÓN DE CUENTA
Después de abrir la aplicación, siga el procedimiento para crear una nueva cuenta, toque el icono
"CREAR NUEVA CUENTA" y en la pantalla que se abre, seleccione "REGISTRO"
En primer lugar leer los "Términos y condiciones" del servicio de administración remota y el aviso
de "Política de privacidad", marque para aceptar las condiciones de uso expresadas en los
documentos adjuntos y toque el icono "CREAR". En la pantalla Registro, ingrese sus datos, la
contraseña correspondiente y toque el icono "CREAR". Después de completar el procedimiento de
registro, confirme y toque el icono "SALIDA". Recibirá un correo electrónico de confirmación de
cuenta en la dirección indicada durante el registro.
Salga de la aplicación "Termostato programable WiFi NEXU ORBIS" y abra el correo electrónico
directamente desde el mismo teléfono inteligente o tableta en el que se instaló la aplicación. Copie
el "Código de confirmación" y vuelva a abrir la aplicación directamente desde el enlace del correo
electrónico.
Como alternativa, en la aplicación seleccione "CREAR NUEVA CUENTA" y luego siga
"INTRODUCIR CÓDIGO DE CONFIRMACIÓN".
En ambos casos, ingrese el "Código de confirmación" proporcionado mediante email y espere la
notificación emergente de que el registro se realizó correctamente y presione OK.
Para iniciar sesión ingrese el "nombre de usuario y contraseña" previamente registrado y toque el
icono "INICIAR SESIÓN".
Una vez que el inicio de sesión se haya completado con éxito, aparecerá la pantalla que permite la
asociación del cronotermostato NEXU a la aplicación.
CONEXIÓN WiFi
Para asociar el cronotermostato NEXU a la app es necesario que el teléfono inteligente o tableta
en el que se instaló la aplicación esté conectado a la red WiFi de su hogar. Abra la aplicación e inicie
sesión con su cuenta de usuario.
Para sistema operativo Android:
1. Presione el icono de búsqueda.
2. Seleccione el cronotermostato NEXU que se conectará.
Identificado con el MAC del equipo.
3. Seleccione la red WiFi local de su hogar.
4. Ingrese la contraseña de WiFi local y confirme con OK.
ATENCIÓN solo para S.O. ANDROID: No conectar directamente el Smartphone/Tablet a la
red WiFi del cronotermostato NEXU. La conexión a la red WiFi local de su hogar debe hacerse a
través de la APP.
En el caso de una conexión imprevista con la red WiFi del cronotermostato NEXU, vaya a
AJUSTES DE WiFi, conéctese a la red local de su hogar y repita la operación a través de la APP.
Sólo en este caso, si no logra conectar el cronotermostato a través de la APP vaya a AJUSTES
DE WiFi y en la opción GESTIONAR REDES GUARDADAS elimine la red WiFi del
cronotermostato NEXU y repita la operación a través de la APP.
Para sistema operativo iOS:
1. Presione el icono de búsqueda. Aparecerá un aviso de
“DISPOSITIVO NO CONECTADO”. Confirmar con
OK.
2. Sin salir de la aplicación, vaya a la configuración de
red WiFi de su dispositivo iOS, y seleccione la red
temporal que el cronotermostato crea para conectarse.
Fácilmente identificable con el MAC que se muestra
en el equipo.
3. A continuación, aparecerán dos pantallas temporales,
una que informa sobre la redirección y la otra de las
redes disponibles, presione la palabra “Finalizar” en la
última y regrese a la aplicación.
4. Seguidamente en la APP utilice el mismo procedimiento
descrito para sistema Android:
Presione el icono de búsqueda.
Seleccione el cronotermostato NEXU que
se conectará.
Identificado con el MAC del equipo.
Seleccione la red WiFi local de su hogar.
Ingrese la contraseña de WiFi local y confirme con OK.
PÁGINA PRINCIPAL
Número del
escenario actual
Extensión de
tiempo
Temperatura
ambiente
Ajuste de
temperatura en
modo Manual
Temporal
Nombre del
dispositivo
verificado
Activación de
calefacción
Para ambos sistemas operativos:
Espere a que aparezca la siguiente página con el
dispositivo conectado que muestra el valor de la
temperatura.
En este punto es posible controlar el cronotermostato a
través de su Smartphone/Tablet.
Seleccione el icono del dispositivo conectado que
muestra el valor de la temperatura y aparecerá la
página "PRINCIPAL".
Conexión WiFi del
Cronotermostato
con Internet
Menú
retráctil
Temperatura
establecida
Botón ON / OFF
❷
❶
❸

Desde la página principal del cronotermostato podrá acceder a toda la programación y funciones
del dispositivo conectado.
Además de los iconos de las "teclas" para acceder a las principales funciones del dispositivo, la
pantalla principal también muestra una serie de informaciones: la temperatura ambiente, la
conexión WiFi del cronotermostato a la red de Internet, la "llama" para para indicar el encendido
del sistema de calefacción, el número del escenario actual y la temperatura establecida en ese
intervalo de tiempo.
ON/OFF CRONOTERMOSTATO
Para encender o apagar el cronotermostato, pulse el icono de la casa con el símbolo de stand-by.
PROGRAMACIÓN DE ESCENARIOS
Para acceder al modo de programación, presione el ícono del menú emergente y seleccione el
ícono “PROGRAMAS”
Seleccione el escenario más acorde a sus necesidades (4 o 6 periodos) y continúe con la
programación diaria.
Seleccione el día de la semana a programar.
Seleccione el periodo del día a programar.
Seleccione la hora de inicio del período elegido y la temperatura deseada, actuando directamente
en los dos cursores
Cuando se mueve el cursor de tiempo, el tiempo aumenta/disminuye con un paso mínimo de 10
minutos, mientras que cuando se mueve el cursor de temperatura, aumenta/disminuye con un
paso mínimo de 0,5 °C.
Repita la operación para todos los otros períodos del día. Cuando se haya configurado todo el día,
presione OK para confirmar o CANCELAR o para salir de la programación.
Si se confirma la programación diaria y desea repetir la misma configuración para otros días de la
semana, simplemente presione COPIAR, seleccione los días de interés y presione OK para
confirmar.
En el momento en que se presiona la tecla OK, toda la programación confirmada se transfiere al
cronotermostato.
AMPLIACIÓN HORARIA
Cuando el funcionamiento automático está activo (según la programación establecida), para
prolongar el escenario actual unas horas (máximo 3), basta con pulsar el icono +h, seleccionar
una de las tres extensiones posibles 1 hora, 2 horas o 3 horas y confirmar pulsando el botón OK o
para salir de la programación.
FUNCIONAMENTO MANUAL TEMPORAL
Cuando el funcionamiento automático está activo (según la programación establecida), la
temperatura prevista para el escenario actual se puede cambiar momentáneamente. La operación
manual temporal se desactiva automáticamente en el siguiente cambio de escenario. Para
seleccionar este modo, presione el ícono Manual Temporal y ajuste la temperatura deseada
presionando + o - y presione OK para confirmar o para salir de la programación.
Cuando la función MANUAL TEMPORAL está activa, aparece un icono en la parte superior
derecha de la página "Principal". Para desactivarla, simplemente presione este icono y el equipo
volverá a seguir el programa establecido para ese momento.
FUNCIONAMENTO MANUAL PERMANENTE (TERMOSTATO)
Cuando el funcionamiento automático está activo (según la programación establecida), es posible
cambiar al modo TERMOSTATO, sin programación de tiempo y con la activación/desactivación
del sistema de calefacción en función de la temperatura programada. Para seleccionar este modo,
pulse el icono del menú emergente y seleccione el icono Manual permanente y ajuste la
temperatura deseada utilizando
+o -y pulse OK para confirmar o para volver a la página "Principal".
Cuando la función MANUAL PERMANENTE está activa, aparece un icono en la parte superior
derecha de la página "Principal".
Para desactivarla, presione este icono y el equipo volverá a
seguir el programa establecido para ese momento.
MODO DE VACACIONES
Seleccionando esta función, el cronotermostato se puede configurar en OFF o ANTIHIELO
(temperatura fija a 5 ° C) por un período establecido.
Simplemente ingrese la fecha y hora de inicio y finalización del período y seleccione uno de los
dos estados siguientes:
Cronotermostato apagado OFF
Cronotermostato con función Antilhielo
y confirmar pulsando la tecla OK.
La aplicación permite la programación de
temperaturas en diferentes momentos del día a
través de escenarios que pueden ser de 6 o 4
períodos:
6 escenarios diarios (P6):
Me levanto Salgo por la mañana Vuelvo a
almorzar Salgo por la tarde Vuelvo por la
noche Me voy a la cama
4 escenarios diarios (P4):
Me levanto Salgo por la mañana Vuelvo por la
noche Me voy a la cama
Cuando se activa la función
AMPLIACIÓN HORARIA,
aparece un icono +h en la
parte superior derecha de la
página "Principal".
Para desactivar la función
simplemente presione este
icono y el equipo volverá a
seguir el programa establecido
para ese momento.

Cuando la función VACACIONES está activa, aparece un icono en la parte superior derecha de la
página "Principal". Para desactivarla, simplemente presione este icono y el equipo volverá a seguir
el programa establecido para ese momento.
AJUSTES
Para acceder seleccione el ícono indicado con la llave inglesa. Aparecerá la pantalla AJUSTES:
Nombre del dispositivo
Para identificar el cronotermostato NEXU más fácilmente, es aconsejable nombrar el dispositivo
vinculándolo al sitio de instalación, por ejemplo: salón, dormitorio, sitio 01, cocina,...
Seleccione el icono indicado para ingresar el nombre para asignar al dispositivo. Ingrese el
nombre y confirme presionando la tecla OK o CANCELAR para regresar a la página "Ajustes".
Corregir la medida de la temperatura ambiente
Para corregir la lectura de la sonda de temperatura del NEXU desde un mínimo de -3.5 °C hasta
un máximo de + 3.5 °C, presione el icono indicado y seleccione el valor deseado en una escala
con un paso de 0,5 ºC.
Confirme presionando la tecla OK o CANCELAR para volver a la página "Ajustes". Cuando se
confirma la operación, el valor de temperatura que se muestra en la pantalla del NEXU y la APP se
actualiza automáticamente.
Geolocalización
Con el fin de flexibilizar el programa diario ante situaciones ajenas al escenario, como una salida o
un regreso anticipado, es posible activar la Geolocalización, y hacer que el dispositivo tenga en
cuenta nuestra posición respecto al lugar de instalación y así desde allí modificar temporalmente la
programación.
Ejemplo 1: Una salida antes de la hora de desconexión programada del sistema de calefacción.
Por encima de una cierta distancia de su casa (que puede ser programada) conduce al envío de
una “notificación emergente” al usuario que le avisa de la posibilidad de bajar la temperatura
desde el nivel de Confort hasta el nivel de Ahorro y así desactivar el sistema por adelantado. Si la
respuesta es positiva, la temperatura desciende hasta el valor de ahorro, por el contrario, la
situación permanece inalterada.
Ejemplo 2: Una vuelta antes de la hora de encendido programada del sistema de calefacción. Por
debajo de una cierta distancia de su casa (que puede ser programada) conduce al envío de una
“notificación” al usuario que le avisa, de la posibilidad de subir la temperatura desde el nivel de
Ahorro hasta el nivel de Confort y así activar el sistema por adelantado.
La operación descrita anteriormente se activa sólo si el cronotermostato está en modo
Automático, si por alguna razón se encuentra en modo Manual Permanente/Manual Temporal,
la función de Geolocalización no tendrá ningún efecto.
Si la administración remota se ha habilitado en múltiples dispositivos móviles, es recomendable
activar la Geolocalización solo en uno de estos, para evitar que varios usuarios puedan
proporcionar indicaciones que se contradigan entre sí.
En cualquier caso, el cronotermostato siempre ejecutará solo el último comando enviado de forma
remota o directamente al dispositivo.
Para acceder a la página de Geolocalización seleccione el icono indicado. Primero debe ingresar
el lugar de instalación del termostato programable, al tocar el ícono GEO aparecerá
automáticamente la dirección de nuestra posición y, si coincide con la del punto de instalación,
podemos confirmar presionando la tecla OK o cambiar las coordenadas ingresando la dirección
correspondiente.
El siguiente paso es establecer si desea activar el servicio de geolocalización de SALIDA y/o de
RETORNO:
Servicio de geolocalización de salida: La función mide la distancia de nuestra posición con
respecto al lugar de instalación del cronotermostato, y si esta supera el límite establecido con el
control deslizante "Distancia de activación de salida", el usuario recibe una NOTIFICACIÓN
preguntando si desea reducir la temperatura desde el nivel de Confort hasta el nivel de Ahorro por
adelantado.
Servicio de geolocalización de retorno: La función mide la distancia de nuestra posición con
respecto al lugar de instalación del cronotermostato, y si esta está por debajo del límite establecido
con el cursor de "Distancia de activación de retorno", el usuario recibe una NOTIFICACIÓN
preguntando si desea aumentar la temperatura por adelantado desde el nivel de Ahorro hasta el
nivel de Confort.
Puede ajustar las distancias de activación de salida y de retorno moviendo los respectivos
controles deslizantes.
Active los servicios de geolocalización salientes y entrantes seleccionando los iconos respectivos.
Después de completar la configuración, confirme con el botón OK o CANCELAR para volver a la
página "Ajustes".
Para evitar recibir numerosas notificaciones le recomendamos que elija distancias no demasiado
cercanas al lugar de instalación, para que los movimientos en las proximidades de su casa no
activen el mecanismo descrito anteriormente.
ATENCIÓN El servicio de Geolocalización sólo puede activarse si usted ha dado su
consentimiento, dentro de la sección "Mi Cuenta" (ver más abajo), para la detección de su posición
con respecto al lugar de instalación del cronotermostato. En cualquier momento, usted puede
decidir no consentir el rastreo de su ubicación desactivando su consentimiento dentro de la
sección "Mi Cuenta".
Compartir dispositivo
Para compartir la gestión remota del cronotermostato con más de un usuario, toque el icono
indicado para abrir la página "COMPARTIR EL DISPOSITIVO" y seleccione el símbolo +para
introducir la dirección de correo electrónico del usuario que desea añadir.
El destinatario recibirá un correo electrónico con un mensaje confirmando que usted lo ha
compartido. A partir de este momento el usuario añadido también puede gestionar de forma
remota el cronotermostato NEXU mediante la APP.
En la página "COMPARTIR EL DISPOSITIVO" aparecerá la etiqueta del usuario añadido. Pulse
para volver a la página "Ajustes".
Para eliminar un usuario compartido, vuelva a la página de dispositivos compartidos, pulse el icono
del usuario hasta que aparezca una ventana emergente pidiéndonos que confirmemos nuestra
voluntad de eliminar al usuario seleccionado. Pulse OK para confirmar o CANCELAR para volver
a la página de compartir dispositivos.
Mi Cuenta
Para gestionar su cuenta debe pulsar sobre el icono indicado. A continuación se abrirá la página
principal de Gestión:
Contraseña Olvidada y Cambio de Contraseña
Por razones de seguridad, la contraseña validada en el registro de cuenta no se puede recuperar.
El sistema puede enviar automáticamente un correo electrónico con la información necesaria para
obtener una nueva contraseña.
Toque el icono "CONTRASEÑA OLVIDADA" o "CAMBIAR CONTRASEÑA" para acceder a la
página correspondiente.
Ingrese la dirección de correo electrónico de su cuenta registrada para recibir un correo electrónico
con el Código de confirmación que deberá insertar en la página Cambiar contraseña que
aparece después.
Para acceder a las
funciones de la
Geolocalización es
necesario dar su
consentimiento a las dos
NOTIFICACIONES
mostradas en el área de
fondo azul.
Alternativamente en su
smartphone puede ir a
ajustes de aplicaciones
instaladas y activar las
notificaciones de
Geolocalización.
❷
❶

Por razones de seguridad, introduzca siempre un mínimo de 8 caracteres, con al menos un
número o carácter especial, una letra mayúscula y una minúscula.
Para confirmar el cambio de contraseña pulse sobre el icono CAMBIA, un aviso confirmará que el
cambio de contraseña se ha realizado correctamente.
Cancelar Cuenta
Cuando desee eliminar permanentemente su cuenta, toque el icono "CANCELAR CUENTA" para
acceder a la página.
ATENCIÓN:
La cancelación de la cuenta cancela la posibilidad de administrar el cronotermostato NEXU de
forma remota a través de la aplicación.
Ingrese la dirección de correo electrónico y la contraseña previamente registradas y confirme con
el botón OK, un aviso confirmará que la cancelación de su cuenta ha sido exitosa.
ASISTENCIA TÉCNICA
Seleccione el icono de ASISTENCIA TÉCNICA indicado con el signo de interrogación para
acceder a la sección, primero debe dar su consentimiento para el procesamiento de sus datos con
fines de asistencia técnica.
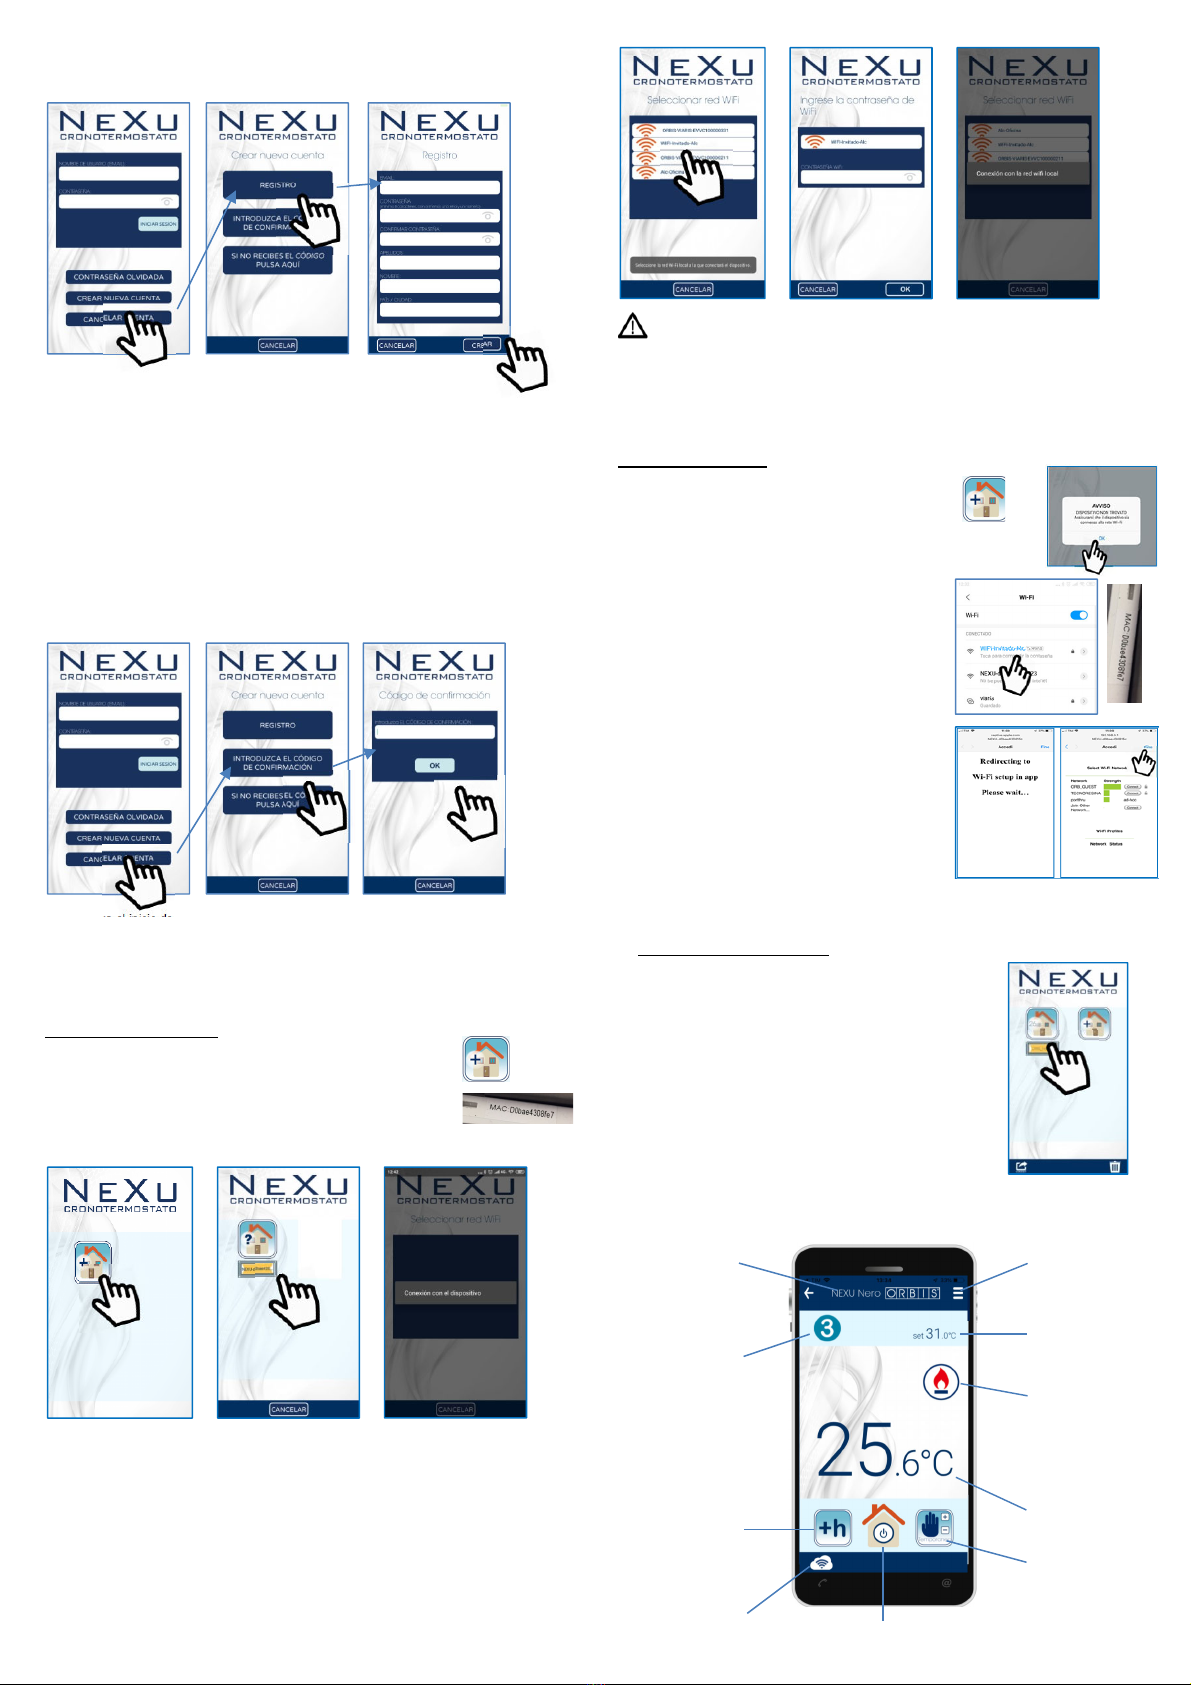
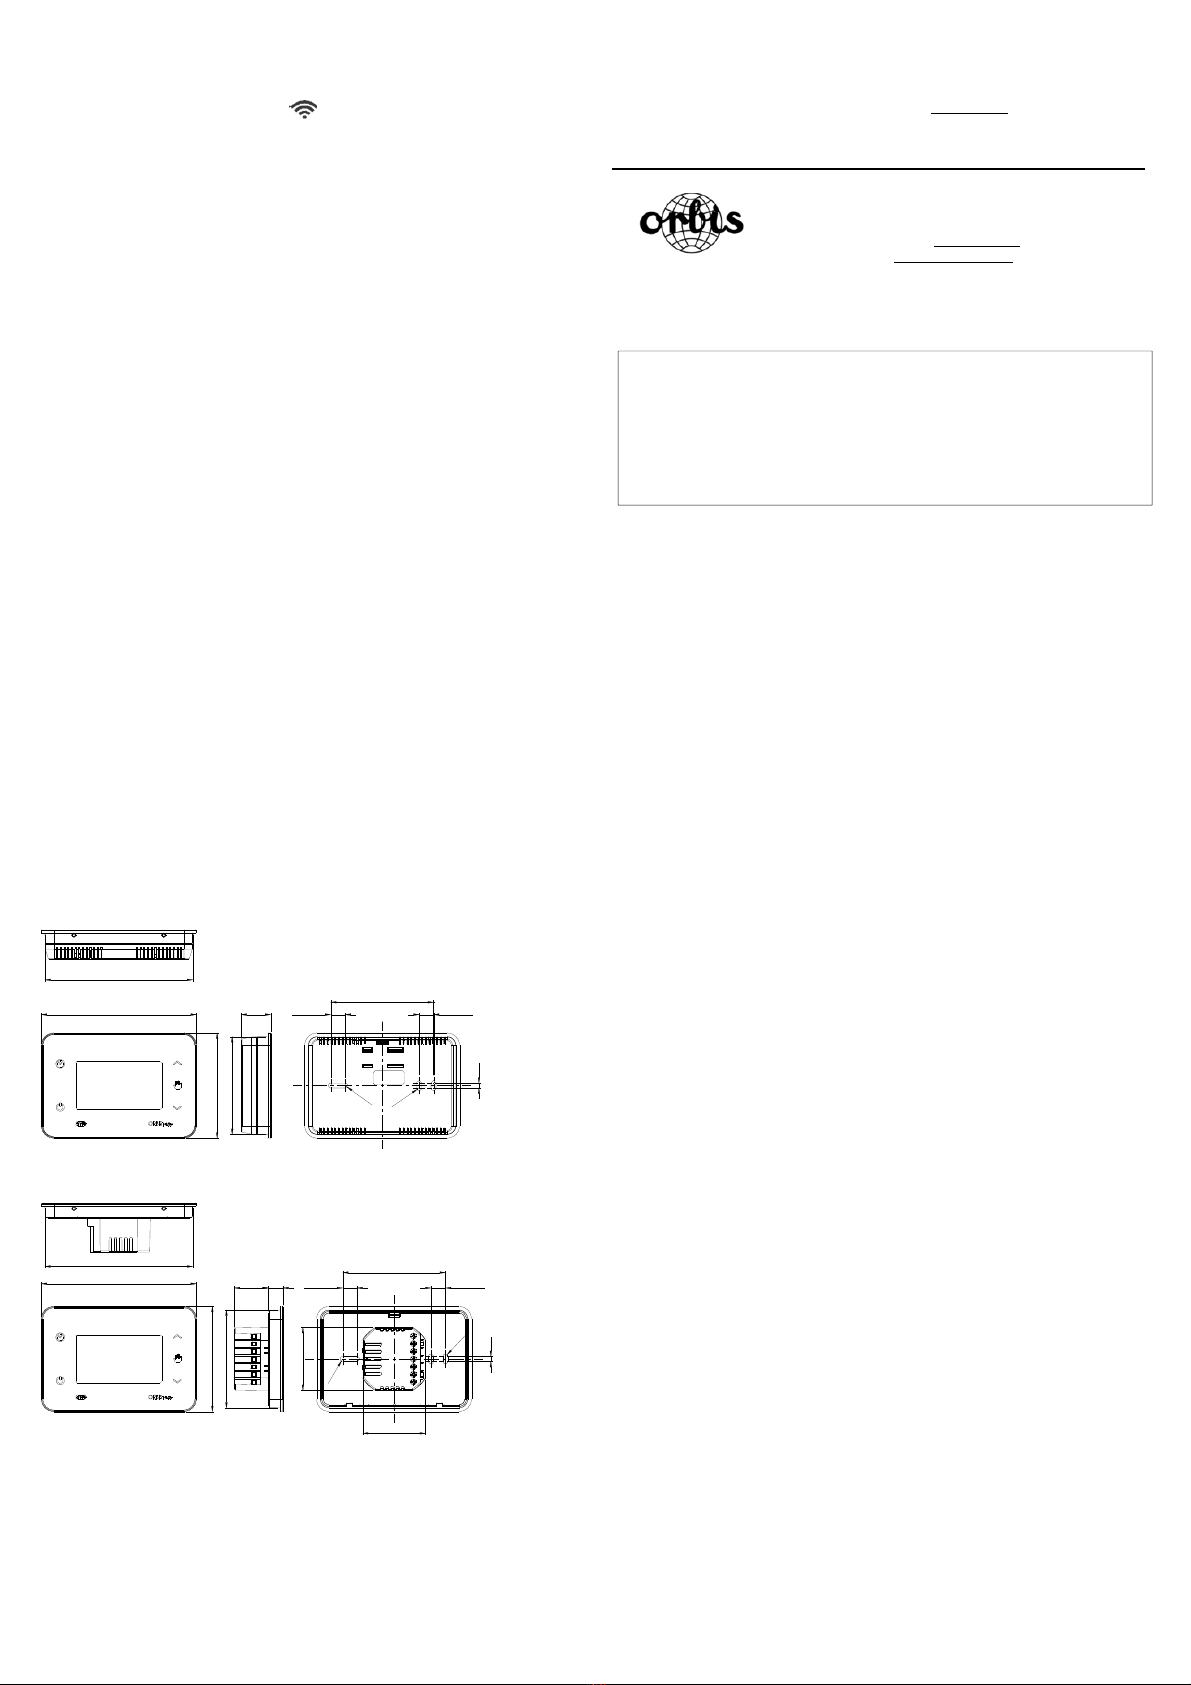
GESTIÓN DEL CRONOTERMOSTATO
El cronotermostato NEXU puede asumir uno de los siguientes cuatro estados de funcionamiento:
Automático, según el programa establecido con el mecanismo de los escenarios, a través del
APP "ORBIS NEXU WiFi Cronotermostato". La pantalla muestra el icono combinado con
el número correspondiente de la escena actual, por ejemplo, para escenas de 6 períodos:
P1 (me levanto) P2 (salgo por la mañana) P3 (vuelvo a almorzar) P4 (salgo por la
tarde) P5 (vuelvo por la noche) P6 (me acuesto)
O para escenas de 4 periodos:
P1 (me levanto) P2 (salgo por la mañana) P3 (vuelvo por la noche) P4 (me acuesto)
Funcionamiento manual temporal: aparece en la pantalla el símbolo parpadeante
Funcionamiento manual permanente: aparece en la pantalla el símbolo fijo
OFF no se realiza ninguna operación, aparece en la pantalla el símbolo
A continuación se muestran las operaciones que pueden realizarse directamente en el
cronotermostato NEXU:
ON/OFF CRONOTERMOSTATO
Toque el símbolo para encender/apagar el cronotermostato. Cuando está en OFF, el icono
aparece en la pantalla.
CONEXIÓN WIFI
Cuando el cronotermostato está conectado a la red WiFi de la casa, el símbolo aparece
encima de la palabra WiFi.
VISUALIZACIÓN DE LA HORA / TIPO DE ESCENARIO
Toque el símbolo para visualizar el HORARIO ACTUAL, el tipo de escenario programado con la
indicación P4 (escenario de 4 períodos) o P6 (escenario de 6 períodos) y el número del día de la
semana (d01 para indicar lunes, d04 para jueves,...).
Para cambiar la hora y la fecha (año, mes y día), pulse simultáneamente los símbolos /
durante 5 segundos y hasta que aparezca Diff. Set en la pantalla, pulse el símbolo y aparecerá
secuencialmente en pantalla: Año, mes, día, hora, minutos y cambio de horario de verano (AUTO:
ON – OFF). Para cambiar los valores, pulse sobre los símbolos /y confirme con .
ATENCIÓN: El tipo de escenario programado no se puede cambiar desde el cronotermostato
NEXU. Esta operación solo se puede realizar desde el teléfono inteligente / tableta a través de la
APP “ORBIS NEXU Cronotermostato WiFi”.
FUNCIONAMENTO MANUAL TEMPORAL
Cuando el funcionamiento automático está activo (según la programación establecida), es posible
cambiar momentáneamente la temperatura esperada para el escenario actual. La operación
manual temporal caducará automáticamente la próxima vez que se cambie la escena. Para activar
este modo, toque cualquiera de los símbolos /para aumentar/disminuir el valor de
temperatura.
El ajuste siempre se inicia a partir del valor de temperatura programado para ese tiempo. Durante
la selección de la temperatura, el símbolo parpadeante aparece en la pantalla junto con la
palabra Set Temp, que desaparece unos segundos después de finalizar el ajuste. Cuando el
funcionamiento manual temporal está activado, el símbolo parpadea en la pantalla. Para salir
de esta condición simplemente toque el símbolo dos veces .
FUNCIONAMIENTO MANUAL PERMANENTE (TERMOSTATO)
Cuando el funcionamiento automático está activo (según la programación programada), es posible
cambiar al modo TERMOSTATO, sin programación de tiempo y con la activación/desactivación del
sistema en función de la temperatura programada. Para activarlo, toque el símbolo y ajuste la
temperatura tocando /para aumentar/disminuir el valor de temperatura. El ajuste siempre
comienza a partir del último valor de temperatura ajustado.
Durante la selección de la temperatura aparece en la pantalla el símbolo combinado con la
palabra Set Temp, desaparece a los pocos segundos del final del ajuste. Cuando la función está
activa, el símbolo aparece en la pantalla. Para salir de esta condición simplemente toque el
símbolo una vez.
VARIACIÓN DEL DIFERENCIAL
Para cambiar el valor diferencial (por defecto 0,2 °C), toque los símbolos /simultáneamente
durante 5 segundos y hasta que aparezca Diff en la pantalla. Los valores disponibles son 0,2-0,4-
0,6-0,8 y 1°C. Una vez seleccionado el valor deseado, espere unos segundos y el nuevo
diferencial se almacenará automáticamente.
VARIACIÓN DE LA TEMPERATURA ANTIHIELO
Para cambiar el valor de la temperatura de antihielo (Por defecto +5 °C), toque el símbolo
durante 10 segundos y hasta que la pantalla muestre la palabra AI. Ajuste el valor de 1 °C a 9 °C
tocando los símbolos /para aumentar/disminuir el valor de temperatura. Una vez seleccionado
el valor deseado, espere unos segundos y la nueva temperatura antihielo se almacenará
automáticamente.
BLOQUEO DEL TECLADO
Para evitar manipulaciones no deseadas del cronotermostato, puede bloquear la accesibilidad
pulsando simultáneamente sobre los símbolos y hasta que aparezca el símbolo del candado
en la pantalla . El bloqueo del teclado del cronotermostato no impide el funcionamiento a través
del Smartphone/Tablet.
Para desbloquear el teclado, haga la misma operación.
RESET
Para volver a la configuración de fábrica, pulse al mismo tiempo y durante aprox. 5
segundos y hasta que aparezca "dEL" en la pantalla. La programación y los ajustes vuelven a sus
valores predeterminados, excepto el "nombre del dispositivo".
Con esta operación se cancela la configuración WiFi del cronotermostato, desaparece el símbolo
de señal sobre la palabra WiFi. Además el icono del cronotermostato en la App no se
oscurece. Tenga en cuenta que, como el icono del cronotermostato no se ha movido al cubo de
basura de APP, el termostato sigue vinculado a su cuenta, no es necesario repetir el
procedimiento de asociación. Para restablecer la conexión WiFi anterior o nueva, proceda como se
indica al principio en el párrafo "CONEXIÓN WiFi".
Alternativamente, es posible reiniciar el cronotermostato NEXU pulsando el botón RESET con una
punta en el agujero para borrar todos los ajustes programados. El orificio está situado en la parte
inferior del dispositivo.
Esta operación permite resolver cualquier anomalía presente en el microprocesador. Después de
un restablecimiento, la pantalla mostrará todos los segmentos por un corto tiempo y luego estará
lista para recibir los nuevos ajustes.
La operación Reset permite reiniciar el programa, esto no afecta a la conexión WiFi, al pulsar el
botón Reset no se desconecta el termostato de la red WiFi existente.
Si toca este icono, puede ponerse en contacto con la Asistencia Técnica de
ORBIS por teléfono para obtener información, apoyo y asistencia sobre el
cronotermostato NeXU/APP.
El servicio está disponible de lunes a viernes de 7:00 a 15:30
Tocando este icono puede consultar directamente estas instrucciones de uso del
cronotermostato / APP
Toque este icono para enviar un correo electrónico directamente al Servicio de
Asistencia Técnica para obtener información, soporte y asistencia sobre el
cronotermostato NeXU / APP.
Tocando este icono puede enviar directamente un mensaje Whatsapp al Servicio
de Asistencia Técnica para obtener información, apoyo y asistencia sobre el
cronotermostato NeXU / APP. El servicio está disponible de lunes a viernes de
07:00 a 15:30.

Después del Reset, NEXU se reconectará automáticamente al router WiFi, ya que las
configuraciones permanecen almacenadas.
CAMBIO DE RED WIFI
Cuando el cronotermostato deja de estar conectado a la red WiFi doméstica previamente
configurada, desaparece el símbolo de señal sobre la palabra WiFi. Para cambiar la red WiFi
a la que está conectado el cronotermostato, por ejemplo en caso de desplazamiento o cambio de
operador, proceda como se indica al principio en el apartado "CONEXIÓN WiFi".
FALLO DE ALIMENTACIÓN
En caso de corte de corriente, cuando se restablece el suministro de energía, el cronotermostato
NEXU se vuelve a conectar automáticamente al router WiFi, ya que los ajustes permanecen
almacenados. La situación de apagón no causa la pérdida de los ajustes/programas realizados.
CARACTERÍSTICAS TÉCNICAS
Alimentación: 230 V50 - 60 Hz
Poder de ruptura: 5 (2) A / 250 V
Consumo propio: 4,3 VA (1,3 W)
Tipo de contacto: NA
Banda de frecuencia Wi-Fi: 2,4 GHz IEEE 802.11 b/g/n
Máxima potencia de transmisión RF: 15 dBm
Display: LCD retroiluminado
Teclado: Retroiluminado, sensible al tacto, sonoro
Modos de funcionamiento: Automático, Manual temporal,
Manual permanente, Apagado
Programación: Semanal con 4 o 6 escenarios diarios
Tiempo mínimo de programación diaria: 10 minutos
Temperaturas configurables: 4 niveles con 4 escenarios diarios
6 niveles con 6 escenarios diarios
Cambio automático horario de verano: Automático predefinido.
Configurable ON-OFF
Rango de medida de temperatura: De 0 ºC a +50 ºC
Resolución de medida de la temperatura: 0,1 ºC
Precisión medida de la temperatura: 1,0 C
Actualización de medición: cada 60 segundos
Regulación temperatura: De +5 ºC a +35 ºC
Tipo de regulación: ON-OFF con diferencial regulable
De 0,2 ºC a 1,0 °C (0,2 ºC predefinido)
Resolución ajuste temperatura de control: 0,5 ºC
Regulación temperatura Antihielo: De 1 ºC a 9 °C (5 ºC predefinido)
Tipo de acción: 1B, 1S, 1T, 1U
Precisión de marcha / Reserva de marcha: Mediante conexión a red Wi-Fi
Precisión de maniobra: cada 60 segundos
Temperatura de funcionamiento: De 0 ºC a +50 ºC
Temperatura de almacenamiento: De -10 ºC a +60 ºC
Situación de contaminación: 2
Grado de protección de la envolvente: IP20 según EN 60529
Clase de protección: II en condiciones de montaje correctas
Tensión transitoria de impulso: 2,5 kV
Temperatura para el ensayo de la bola: 85ºC (21.2.5); 105ºC (21.2.6)
Conexión: Bornes de tornillo para conductores de
sección máxima 1,5 mm
2
Par máximo de apriete de tornillos: 0,5 Nm
DIMENSIONES (mm)
ORBIS TECNOLOGÍA ELÉCTRICA, S.A. Declara que NeXu / NeXu IN son equipos radioeléctricos
conformes con la Directiva 2014/53/UE. El texto completo de la declaración UE de conformidad
está disponible en la dirección Internet siguiente: http://www.orbis.es/descargas/declaraciones-de-
conformidad
Sujeto a cambios técnicos – información adicional en: www.orbis.es
A026.32.58756 00/01.2019
ORBIS TECNOLOGÍA ELÉCTRICA S.A.
Lérida, 61 E-28020 MADRID
Tel.: + 34 91 567 22 77
http://www.orbis.es
Para todos los logotipos que se muestran en la portada de este manual y en el
embalaje de este producto:
Apple, el logotipo de Apple, iPhone y iPad son marcas comerciales de Apple Inc.,
registradas en los EE. UU. y otros países. App Store es una marca de servicio de
Apple Inc.
Google Play, el logotipo de Google Play y Android son marcas comerciales de
Google Inc.
125.9
85.1
12
27.6 11.75
83.5
11.75
4
R2
R2
51
51
79.1
119.9
11.75
83.5
11.75
4
24
125.9
85.1
R2
R2
79.1
119.9
NeXu
NeXu IN

NEXU / NEXU IN
DIGITAL WIFI CHRONOTHERMOSTAT
USER’S MANUAL
DESCRIPTION
The NEXU thermostat is a digital ambient thermostat with weekly programming that allows you to
control the heating system at several different temperature levels. Built-in Wi-Fi communication
makes it possible to control the chronothermostat remotely via a smartphone/tablet, using a
specific application. To control the programmable thermostat, it must be connected to your home
Wi-Fi network.
Using the app, it is possible to:
•
Program 4 or 6 daily scenarios.
• Configure up to 6 daily temperature levels with 6 scenarios.
• Configure up to 4 daily temperature levels with 4 scenarios.
• Assign different programs for each day of the week.
• Copy a daily program to other days of the week using the COPY function.
• Select the operating mode: Automatic, Temporary manual or Permanent manual (thermostat).
• Set the temperature between+5 ºC and +35 ºC.
• Extend the time of the current scenario by up to 3 hours.
• Turn on or off the chronothermostat.
• Turn off the chronothermostat during a holiday period. (OFF mode or anti-freezing temperature)
• Activate and manage the geolocation function to optimise consumption for trips away from home.
• Share the programmable thermostat management with other users.
• Manage multiple chronothermostats installed in the same house or different locations.
• Correct the measurement of the ambient temperature from -3.5 °C to +3.5 °C.
• Set the name of the controlled device.
As an alternative to remote management via the app, it is possible to act on the
programmable thermostat directly to:
• Turn on and off the chronothermostat.
• Set the temperature in MANUAL TEMPORARY mode.
• Set the temperature in PERMANENT TEMPORARY (Thermostat). mode.
• Set the Anti-freeze temperature.
• Set the differential.
• View the chosen scenario, and current year, month, day and time.
• Set the year, month, day and current time and automatic change for daylight savings time.
• Reset the device.
FOLLOW THESE INSTRUCTIONS WHEN INSTALLING AND OPERATING THE EQUIPMENT:!
!
TBGFUZ!XBSOJOHT!
!
Read the instructions in this manually carefully.
The product must be installed by an authorised installer.
Before accessing the connection terminals, make sure that the cables to be
connected or already connected to the instrument are not energised.
Do not power or connect the product if any part is damaged.
The product must be installed and put into operation in accordance with current
regulations.
Connect the product according to the diagrams described in this manual and on
the device.
The product is protected internally against interferences.
Protect the power supply line to the product with surge protectors.
After installation, make sure that there is no direct accessibility to the connection
terminals (without the use of a special tool).
CONNECTION:
Install according to the following diagram:
INSTALLATION
Electronic control device installed separately on the wall or mechanism housing. It’s recommended
to install the chronothermostat at a minimum height of 1,5 m in an area of the wall free of obstacles
that could affect its operation and away from heat sources (heaters, sunlight, windows, etc.).
NEXU chronothermostat (wall version): The device can be mounted on the wall using the
supplied screws, or on a built-in mechanism housing.
Release the fixing base from the device as shown in the figure. Attach the base to the wall using
the supplied screws. Loosen the screws from the terminal cover on the fixing base, remove it and
connect the device according to the diagram above. Retighten the terminal cover and replace the
device on the base.
NEXU IN chronothermostat (built-in version): The device can be mounted using the supplied
screws directly in a built-in mechanism housing.
Release the fixing base as shown in the figure. Establish the connections and attach the base to
mechanism housing using the supplied screws. Replace the device on the base.
START-UP AND CONFIGURATION
As indicated in the introduction, the NEXU chronothermostat has been designed to be managed via
Wi-Fi, a smartphone or table, using a dedicated app:
DOWNLOAD THE app
Download the "Wi-Fi NEXU ORBIS programmable thermostat" application from the Apple Store
or Google Play. The dedicated application can be download free of charge and is available for
ANDROID 4.4 (or later) devices compatible with Bluetooth 4.0 LE, iOS with iPhone 4s or later and
iPad 3 or later.
Alternatively, the application can be downloaded by reading the QR code indicated below and
when starting the application.
Time
extension
mode active
Keypad lock
active
Heating system
activation
Display selection: Time / Day of the week
/ Daily programming type in 4 or 6
periods (P4 OR P6).
Chronothermostat
off
Increase /
Next
ON / OFF
Decrease / Back
Manual
activation
Automatic
operation
Ambient
tem
p
erature
Programming
period:
daily
Wi-Fi
indicator
active
Manual
operation
active
HOLIDAY
mode active Differential
control
active
Temperature
control active

CREATING AN ACCOUNT
After opening the application, follow the procedure to create a new account, press the "CREATE A
NEW ACCOUNT" icon and on the screen that opens, select "REGISTRATION".
First read the "Terms and conditions" of the remote management service and the "Privacy policy”
notice, mark the checkbox to accept the conditions for use set out in the attached documents and
press the icon "CREATE". On the Registration screen, enter your details, the corresponding
password and press the icon "CREATE". After completing the registration procedure, confirm and
press the icon "EXIT". You will receive an email confirmation in the account of the address you
indicated when registering.
Exit the "Wi-Fi NEXU ORBIS programmable thermostat" application and open the email directly
on the same smart telephone or tablet where the application was installed. Copy the "Confirmation
code" and reopen the application directly from the link in the email.
As an alternative, in the application, select "CREATE A NEW ACCOUNT" and then "ENTER
YOUR CONFIRMATION CODE".
In both cases, enter the "Confirmation code" sent by email and wait for the pop-up notification
that the registration has been completed correctly and press OK.
To log in, enter the "user name and password" previously registered and press the icon "LOG IN".
Once you have successfully logged in, the screen will appear that lets you pair the NEXU
chronothermostat with the application.
Wi-Fi CONNECTION
To pair the NEXU chronothermostat with the app, the smartphone or tablet on which the app is
installed must be connected to your home Wi-Fi network. Open the app and log in to your user
account.
For Android operating systems:
1. Press the search icon.
2. Select the NEXU chronothermostat to be connected.
It is identified by the MAC address of the device.
3. Select your local home Wi-Fi network.
4. Enter the local Wi-Fi password and confirm it by pressing OK.
ATTENTION: only for ANDROID OS: Do not connect the smartphone/tablet directly to the
Wi-Fi network of the NEXU chronothermostat. The connection to your local home Wi-Fi network
must be made through the app.
If you accidentally connect to the Wi-Fi network of the NEXU chronothermostat, go to Wi-Fi
SETTINGS and connect to your local home network and repeat the operation via the app. Only in
this case. if you are not able to connect the chronothermostat via the app, go to Wi-Fi SETTINGS
and in the option MANAGE SAVED NETWORKS, delete the Wi-Fi network of the NEXU
chronothermostat and repeat the operation via the app.
For iOS operating systems:
1. Press the search icon. A “DEVICE NOT
CONNECTED” notification will appear. Confirm by
pressing OK.
2. Without leaving the app, go to the Wi-Fi network
configuration of your iOS device and select the
temporary network that the chronothermostat
creates to connect. It is easy to identify with the
MAC address shown on the device.
3. Next, two temporary screens will appear, one that
tells you that you are being redirected and another
displaying the available networks. Press the word
“End” on the last screen and return to the app.
4. Then in the app, use the same procedure described
for Android systems:
Press the search icon.
Select the NEXU chronothermostat to be
connected.
It is identified by the MAC address of
the device.
Select your local home Wi-Fi network.
Enter the local Wi-Fi password and confirm it by pressing OK.
MAIN PAGE
Current
scenario
numbe
r
Time extension Ambient temperature
Set the
temperature in
Manual
Temporary
mode.
Name of the
verified device
Heating
activation
Wi-Fi connection
of the
chronothermostat
to the Internet
For both operating systems:
Wait for the following page to appear with the connected
device showing the temperature value.
At this point, it is possible to control the
chronothermostat via your smartphone/tablet.
Select the icon for the connected device displaying the
temperature value and the “MAIN” page will appear.
Drop-down
menu
Set temperature
ON / OFF button

From the main page of the chronothermostat, you can access all the programming and functions of
the connected device.
Besides the "key" icons to access the main device functions, the main screen also displays a series
of information: the ambient temperature, the Wi-Fi of the chronothermostat to the Internet network,
the "flame" to indicate the heating system is turned on, the current scenario number and the
temperature set in that time interval.
CHRONOTHERMOSTAT ON/OFF
To turn on or off the chronothermostat, press the house icon with the stand-by symbol.
SCENARIO PROGRAMMING
To access the programming mode, press the pop-up menu icon and select the “PROGRAMS”
icon.
Select the scenario that best matches your needs (4 or 6 periods) and continue with the daily
programming.
Select the day of the week to program.
Select the period of the day to program.
Select the start time of the selected period and the desired temperature, acting directly on the two
cursors.
When the time cursor is moved, the time increases/decreases by a minimum of 10 minutes, and
when the temperature cursor is moved, it increases/decreases by a minimum of 0.5 °C.
Repeat the operation for every other period of the day. Once the entire day has been configured,
press OK to confirm or CANCEL or to exit the programming mode.
If the daily programming is confirmed and you wish to repeat the same configuration for other days
of the week, simply press COPY, select the days you want and press OK to confirm.
Once the OK button is pressed, all the confirmed programming is transferred to the
chronothermostat.
SCHEDULE EXTENSION
When the automatic operation is active (according to the set program), to prolong the current
scenario for a few more hours (maximum of 3), simply press the +h icon, select one of the three
possible extensions (1 hour, 2 hours or 3 hours) and confirm by pressing the OK button or to
exit the programming mode.
TEMPORARY MANUAL OPERATION
When the automatic operation is active (according to the set program), the scheduled temperature
for the current scenario can be temporarily changed. The temporary manual operation is
automatically deactivated at the next scenario change. To select this mode, press the Temporary
Manual icon and set the desired temperature by pressing + or - and then press OK to confirm or
to exit the programming mode.
When the TEMPORARY MANUAL function is active, the icon appears in the top right corner of the
"Main” page. To deactivate it, simply press this icon and the device will return to the set program for
that moment.
PERMANENT MANUAL OPERATION (THERMOSTAT)
When automatic operation is active (according to the set program), it is possible to change to
THERMOSTAT MODE, without programming the time and with the activation/deactivation of the
heating system according to the programmed temperature. To select this mode, press the pop-up
menu icon and select the Permanent manual icon and set the desired temperature using
+or -and then press OK to confirm or to return to the "Main page".
When the PERMANENT MANUAL function is active, an icon appears in the top right corner of the
"Main” page.To deactivate it, press this icon and the device will return to the set program for that
moment.
HOLIDAY MODE
Selecting this function, the chronothermostat can be set to OFF or ANTI-FREEZING (steady
temperature at 5 ºC) for a set period of time.
Simply enter the start and end date and time for the period and select one of the following two
statuses:
Chronothermostat turned OFF
Chronothermostat with Anti-freezing function
and confirm by pressing the OK button.
The app permits programming temperatures at
different times through the scenarios, which can be
for 6 or 4 periods:
6 daily scenarios (P6):
I get up I leave in the morning I come home for
lunch I leave in the afternoon I come home at
night I go to bed
4 daily scenarios (P4):
I get up I leave in the morning I come home at
night I go to bed
When the SCHEDULE
EXTENSION function is active,
the +h icon appears in the top
right corner of the "Main”
page.
To deactivate the function,
simply press this icon and the
device will return to the set
program for that moment.

When the HOLIDAY function is active, an icon appears in the top right corner of the "Main” page.
To deactivate it, simply press this icon and the device will return to the set program for that
moment.
SETTINGS
To access the settings, select the spanner icon. The SETTINGS screen will appear:
Name of the device
To make it easier to identify the NEXU chronothermostat, it is recommended to name the device,
associating it with the place where it is installed, for example: living room, bedroom, place 01,
kitchen, etc.
Select the indicated icon to enter the name to assign to the device. Enter the name and confirm by
pressing the OK button or CANCEL to return to the "Settings” page.
Correct the ambient temperature measurement
To correct the reading of the NEXU temperature probe from a minimum of -3.5 °C to a maximum of
+ 3.5 °C, press the indicated icon and select the desired value on a scale with an interval of 0.5 ºC.
Confirm by pressing the OK button or CANCEL to return to the "Settings” page. Once the operation
has been confirmed, the temperature value is displayed on the NEXU screen and the app is
updated automatically.
Geolocation
In order to make the daily schedule more flexible in the event of situations outside the scenario,
such as leaving or returning home early, it is possible to activate the Geolocation and the device
will take into consideration our position as compared to the place where it is installed and thus
temporarily modify the program.
Example 1: Leaving home before the time scheduled for the heating system to turn off. Beyond a
certain distance from your house (which can be programmed), an “outgoing notification” is sent to
the user, advising of the option to lower the temperature from the Comfort level to the Energy
Saving level, deactivating the system ahead of time. If the answer is yes, the temperature is
lowered to the energy saving value; otherwise, the situation remains unchanged.
Example 2: Returning home before the time scheduled for the heating system to turn on. Within a
certain distance from your house (which can be programmed), a “notification” is sent to the user,
advising of the option to raise the temperature from the Energy Savings level to the Comfort level,
activating the system ahead of time.
The operation described above is activated only if the chronothermostat is in Automatic mode. If
for any reason it is in Permanent Manual/Temporary Manual mode, the Geolocation function will
have no effect.
If the remote management has been activated on multiple mobile devices, it is recommended to
activate the Geolocation on only one of them to prevent several users from giving contradictory
instructions.
In any case, the chronothermostat will always perform only the last commend sent remotely or
directly to the device.
To access the Geolocation page, select the indicated icon. You must first enter the location of the
installation of the programmable thermostat. When the GEO is pressed, the address of our position
will automatically appear and if it matches the installation point, we can confirm it by pressing the
OK button or change the coordinates by entering the corresponding address.
The following step is to set whether you wish to activate the geolocation service for your
DEPARTURE and/or RETURN:
Departure geolocation service: The function measures the distance of our position with regard to
the place where the chronothermostat is installed, and if this exceeds the limit set with the sliding
"Departure activation distance” control, the user receives a NOTIFICATION asking whether they
want to lower the temperature from the Comfort level to the Energy Savings level ahead of time.
Return geolocation service: The function measures the distance of our position with regard to the
place where the chronothermostat is installed, and if this is less than the limit set with the sliding
"Departure activation distance” control, the user receives a NOTIFICATION asking whether they
want to raise the temperature from the Energy Savings level to the Comfort level ahead of time.
You can set the departure and return activation distances by moving the respective sliding controls.
Activate the outgoing and incoming geolocation services by selecting the respective icons. After
completing the configuration, confirm with the OK button or CANCEL to return to the "Settings”
page.
To avoid receiving numerous notifications, we recommend that you select distances that are not
too close to the place of installation, so that movement around your house do not activate the
aforementioned mechanism.
ATTENTION The Geolocation service can only be activated if you have given your consent in the
"My Account" section (see below), for the detection of your position relative to the place where the
chronothermostat is installed. You can decide at any time not to consent to the tracking of your
location by deactivating your consent in the "My Account” section.
Device sharing
To share the remote management of the chronothermostat with more than one user, press the
indicated icon to open the "SHARE THE DEVICE” page and select the +symbol to add the email
address of the user you wish to add.
The recipient will receive an email with a message confirming that you have shared it. From then
on, the added user can also remotely manage the NEXU chronothermostat via the app.
The label for the added user will appear on the "DEVICE SHARING" page. Press to return to the
"Settings” page.
To delete a shared user, return to the device sharing page, press the user icon until a pop-up
window appears, asking us to confirm our wish to delete the selected user. Press OK to confirm or
CANCEL to return to the device sharing page.
My Account
To manage your account, press the indicated icon. The main Management page will then open:
Forgotten Password and Password Change
For security reasons, the password validated in the account registration cannot be recovered. The
system can automatically send an email with the information you need to obtain a new password.
Press the "I FORGOT MY PASSWORD" or "CHANGE MY PASSWORD" icon to access the
corresponding page.
Enter the email address of your registered account to receive an email with the Confirmation code
that you must enter on the Password change page shown below.
To access the Geolocation
functions, you must give
your consent to the two
NOTIFICATIONS shown in
the area with the blue
background.
Alternatively, on your
smartphone you can go to
the installed applications
settings and activate the
Geolocation notifications.

For security reasons, always enter a minimum of 8 characters, with at least one number or special
character, one lower-case letter and one upper-case letter.
To confirm the password change, press the CHANGE icon and a notification will confirm that the
password change has been made correctly.
Cancel Account
When you wish to permanently delete your account, press the “CANCEL ACCOUNT” icon to
access the corresponding page.
ATTENTION:
Cancelling your account eliminates the option to manage the NEXU chronothermostat remotely via
the application.
Enter the email address and password previously registered and confirm with the OK button. A
notification will confirm that your account has been successfully cancelled.
TECHNICAL ASSISTANCE
Select the TECHNICAL ASSISTANCE icon indicated by the question mark to access the section.
You must first give consent to the processing of your details for the purposes of technical
assistance.
CHRONOTHERMOSTAT MANAGEMENT
The NEXU chronothermostat can be operated in one of the following four operating modes:
Automatic, according to the program set through the scenario mechanism, via the "ORBIS
NEXU Wi-Fi Chronothermostat” app. The screen displays the icon, along with the number
corresponding to the current scenario, for example, for scenarios with 6 periods:
P1 (I get up) P2 (I leave in the morning) P3 (I come home for lunch) P4 (I leave in the
afternoon) P5 (I come home at night) P6 (I go to bed)
Or for scenarios with 4 periods:
P1 (I get up) P2 (I leave in the morning) P3 (I come home at night) P4 (I go to bed)
Temporary manual operation: the symbol blinks on screen.
Permanent manual operation: the symbol appears unblinking on screen.
OFF no operation is carried out and this symbol appears on screen.
Below are the operations that can be carried out directly on the NEXU chronothermostat:
CHRONOTHERMOSTAT ON/OFF
Press the symbol to turn on/off the chronothermostat. When it is turned OFF, the icon
appears on screen.
Wi-Fi CONNECTION
When the chronothermostat is connected to the home Wi-Fi network, the symbol appears
above the word Wi-Fi.
DISPLAYING THE TIME / TYPE OF SCENARIO
Press the symbol to display the CURRENT SCHEDULE, the type of scenario programmed with
either the indication P4 (scenario with 4 periods) or P6 (scenario with 6 periods) and the number of
the day of the week (d01 to indicate Monday, d04 to indicate Thursday, etc.).
To change the time and date (year, month and day), press both symbols /together at the same
time for 5 seconds, until Diff. Set appears on screen. Press the symbol and the following will
appear sequentially on screen: Year, month, day, hour, minutes and change for daylight savings
time (AUTO: ON – OFF). To change the values, press the symbols /and confirm with .
ATTENTION: The type of scenario programmed cannot be changed from the NEXU
chronothermostat. This operation can only be carried out from a smartphone / tablet, using the
“ORBIS NEXU Wi-Fi Chronothermostat” app.
TEMPORARY MANUAL OPERATION
While the automatic operation is active (according to the set program), it is possible to temporarily
change the expected temperature for the current scenario. The temporary manual operation will
automatically expire the next time the scenario is changed. To activate this mode, press either /
to increase/decrease the temperature value.
The setting always starts from the temperature value programmed for that time. During the
temperature selection, the symbol blinks on screen, next to the word Set Temp, which
disappears a few seconds after the setting is completed. Whenthetemporarymanualoperationis
active,thesymbol blinksonscreen. Toleavethiscondition,simplytouchthesymboltwice .
PERMANENT MANUAL OPERATION (THERMOSTAT)
When automatic operation is active (according to the set program), it is possible to change to
THERMOSTAT MODE, without programming the time and with the activation/deactivation of the
system according to the programmed temperature. Toactivateit,touchthesymbol and set the
temperature by pressing /to increase/decrease the temperature value. The setting always
starts with the last temperature value set.
During the temperature selection, the symbol appear on screen, along with the words Set
Temp. This disappears a few seconds after the setting is completed. Whenthefunctionisactive,the
symbolappearsonscreen. Toleavethiscondition,simplytouchthe symbolonce.
DIFFERENTIAL VARIATION
To change the differential value (by default, 0.2 °C), press the /symbols at the same time for 5
seconds, until Diff appears on screen. The available values are 0.2-0.4-0.6-0.8 and 1°C. Once the
desired value has been selected, wait a few seconds and the new differential will be stored
automatically.
ANTI-FREEZING TEMPERATURE VARIATION
To change the value of the anti-freezing temperature (by default, +5 °C), press the symbol for
10 seconds until the screen displays the word AI. Set the value between 1 °C and 9 °C by pressing
the symbols /to increase/decrease the temperature value. Once the desired value has been
selected, wait a few seconds and the new anti-freezing temperature will be automatically stored.
KEYPAD LOCK
To prevent tampering of the chronothermostat, the keypad can be locked by pressing the symbols
and together at the same time until the lock symbol appears on screen . Locking the
keypad does not prevent operations via a smartphone/tablet.
To unlock the keypad, follow the same procedure.
RESET
To return to the original factory settings, press and at the same time for approximately 5
seconds and until "dEL" appears on screen. All the programs and settings will return to their default
values, except for the “device name”.
This operation cancels the Wi-Fi configuration of the chronothermostat, and the signal symbol
disappears above the Wi-Fi word. The chronothermostat icon on the APP does not turn dark.
Bear in mind that since the chronothermostat icon has not moved to the app rubbish bin, the
thermostat is still linked to your account. It is not necessary to repeat the pairing procedure. To
reset the previous Wi-Fi connection or set a new one, proceed as indicated at the start of the "Wi-
Fi CONNECTION” paragraph.
Alternatively, it is possible to restart the NEXU chronothermostat pressing the RESET button with a
pin in the hole to erase all the programmed settings. The hole is located on the bottom of the
device.
This operation makes it possible to resolve any malfunction that occurs in the microprocessor. After
a reset, the screen will show all the segments for a short time and then it will be ready to receive
the new settings.
The Reset operation allows you to reset the program. It will not affect the Wi-Fi, connection.
Pressing the Reset button does not disconnect the thermostat from the existing Wi-Fi network.
If you press this icon, you can contact the ORBIS Technical Assistance service by
telephone to obtain information, support and assistance with the NeXU
chronothermostat/app.
The service is available Monday-Friday, from 7:00 am to 3:30 pm.
Touch this icon to consult these instructions for using the chronothermostat / app
directly.
Touch this icon to send an email directly to the Technical Assistance Service to
obtain information, support and assistance with the NeXU chronothermostat / app.
Touch this icon to send a WhatsApp message directly to the Technical Assistance
Service to obtain information, support and assistance with the NeXU
chronothermostat / app. The service is available Monday-Friday, from 7:00 am to
3:30 pm.

After the Reset, NEXU will automatically reconnect to the Wi-Fi router, since the configurations
remain saved.
CHANGING THE WI-FI NETWORK
When the chronothermostat is no longer connected to the previously configured home Wi-Fi
network, the signal symbol disappears from above the word Wi-Fi. To change the Wi-Fi
network to which the chronothermostat is connected, for example, in the case of moving or
changing operator, proceed as indicated at the start of the "Wi-Fi CONNECTION” section.
POWER FAILURE
In the case of a power outage, when the power comes back on, the NEXU chronothermostat
automatically reconnects to the Wi-Fi router, since the settings remain saved. The power outage
does not cause the settings/programs to be lost.
TECHNICAL DATA SHEET
Power: 230 V50 - 60 Hz
Breaking capacity: 5 (2) A / 250 V
Own consumption: 4.3 VA (1.3 W)
Type of contact: N/A
Wi-Fi frequency band: 2.4 GHz IEEE 802.11 b/g/n
Maximum RF transmission power: 15 dBm
Display: Backlit LCD
Keypad: Backlit, touch sensitive, audible feedback
Operating modes: Automatic, Temporary manual,
Permanent manual, Off
Programming: Weekly, with 4 or 6 daily scenarios
Minimum daily programming time: 10 minutes
Temperature settings: 4 levels, with 4 daily scenarios
6 levels, with 6 daily scenarios
Automatic daylight savings time change: Preset automatic.
ON- OFF setting:
Temperature measurement range: 0 ºC to +50 ºC
Temperature measurement resolution: 0.1 ºC
Temperature measurement precision: 1.0 C
Measurement update: Every 60 seconds
Temperature control: +5 ºC to +35 ºC
Type of control: ON-OFF with adjustable differential
0.2 ºC to 1.0 °C (0.2 ºC preset)
Temperature control setting resolution: 0.5 ºC
Anti-freezing temperature control: 1 ºC to 9 °C (5 ºC preset)
Type of action: 1B, 1S, 1T, 1U
Power precision / Power reserve Via connection to the Wi-Fi network
Manoeuvre precision: Every 60 seconds
Operating temperature: 0 ºC to +50 ºC
Storage temperature: -10 ºC to +60 ºC
Pollution status: 2
Level of protection of the housing: IP20 in accordance with EN 60529
Protection class: II in correct mounting conditions
Transient pulse voltage: 2.5 kV
Temperature for the ball test: 85ºC (21.2.5); 105ºC (21.2.6)
Connection: Screw terminals for conductors with
a maximum cross-section of 1.5 mm
2
Maximum screw tightening torque: 0.5 Nm
DIMENSIONS (mm)
ORBIS TECNOLOGÍA ELÉCTRICA, S.A. Declares that NeXu / NeXu IN are radio devices in
accordance with Directive 2014/53/EU. The complete text of the EU declaration of conformity is
available at the following Internet address: http://www.orbis.es/descargas/declaraciones-de-
conformidad
Subject to technical changes – additional information at:
www.orbis.es
A026.32.58756 00/01.2019
ORBIS TECNOLOGÍA ELÉCTRICA, S.A.
Lérida, 61 E-28020 MADRID
Tel.: + 34 91 567 22 77
http://www.orbis.es
For all logos shown on the cover of this manual and on the packaging of this
product:
Apple, the Apple logo, iPhone and iPad are trademarks of Apple Inc., registered in
the USA and other countries. App Store is a service mark of Apple Inc.
Google Play, the Google Play logo and Android are trademarks of Google Inc.
125.9
85.1
12
27.6 11.75
83.5
11.75
4
R2
R2
51
51
79.1
119.9
11.75
83.5
11.75
4
24
125.9
85.1
R2
R2
79.1
119.9
NeXu
NeXu IN
This manual suits for next models
1
Table of contents
Languages:
Other Orbis Thermostat manuals