VELUS TOUCH
1
765
2
4
8
17
1
1
1
2
3
138
86
29
86
18 11
6
4
4
33.4
16
15
13
12 14
3
11
10 9
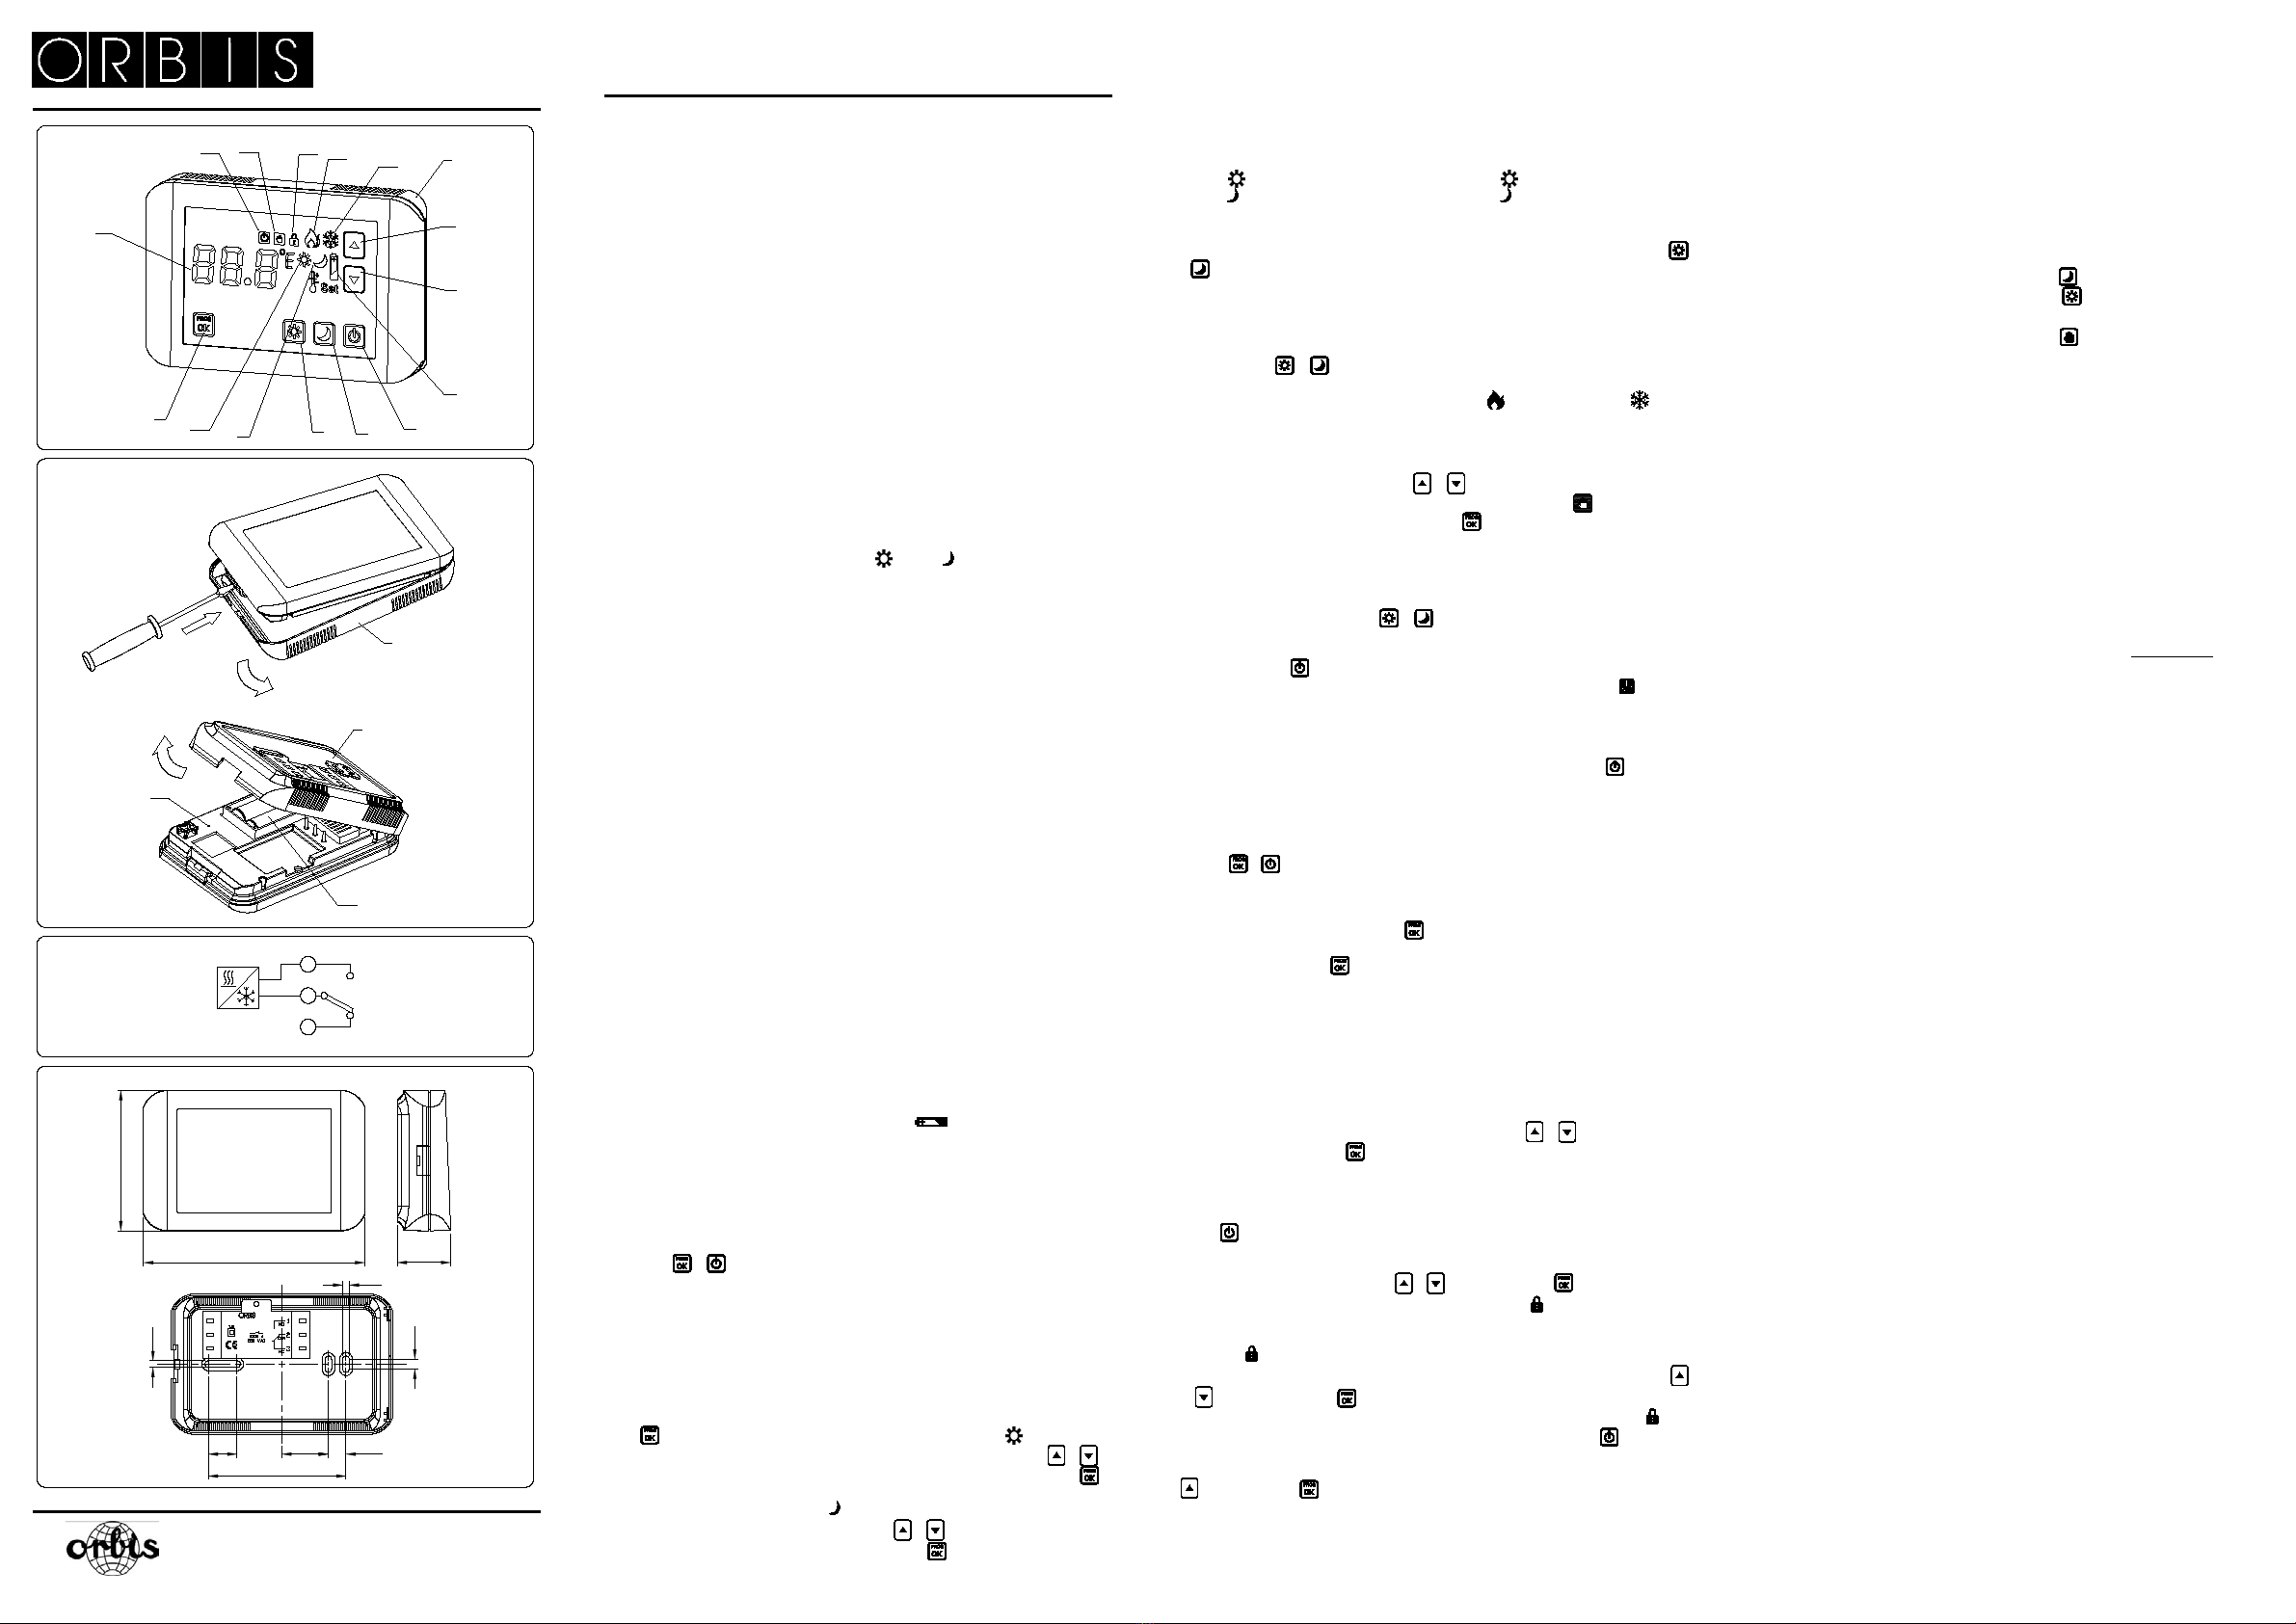
FIG.1
FIG.2
FIG.3
FIG.4
18
ORBIS TECNOLOGÍA ELÉCTRICA, S.A.
Lérida, 61 E – 28020 MADRID
Telefon: + 34 91 5672277; Fax: +34 91 5714006
Webseite: http://www.orbis.es
DEU
THERMOSTAT
BEDIENUNGSANLEITUNG
FIG. 1 / FIG. 2
37. Grundlage für die Befestigung 38. Erhöhen / fortsetzen
39. Reduzieren / Zurückgehen
40. Symbol für das niedrige Niveau der
Batterie
41. Ikone für die Einschaltung /
Ausschaltung
42. Ikone für die Auswahl der Temperatur
zwecks Einsparung von Energie
43. Ikone für die Auswahl der bequemen
Temperatur
44. Ikone für die Programmierung /
Bestätigung
45. Symbol der aktivierten Temperatur
zwecks Einsparung von Energie
46. Symbol der aktivierten, bequemen
Temperatur
47. Umgebungstemperatur
48. Symbol des ausgemachten
Thermostats
49. Symbol für den manuellen Betrieb
50. Symbol der Sperrung des taktilen
Bildschirms
51. Symbol für den Betrieb der Heizung
52. Symbol der Funktionsweise der
Klimaanlage
53. 2 x Batterien des Typs AA 1,5V 54. RESET-Knopf
BESCHREIBUNG
Der Thermostat Modell VELUS TOUCH ist ein programmierbares elektronisches Gerät,
das für die Einschaltung und Ausschaltung einer Heiz- oder Belüftungsanlage verwendet
wird. Es versetzt in die Lage, drei Typen programmierbarer Temperaturen
(Komforttemperatur, Temperatur im Einsparmodus und Frostschutztemperatur)
einzustellen.
Allgemeine Eigenschaften:
•Taktiler Bildschirm (TOUCH SCREEN) einer großen Dimension mit
Hintergrundbeleuchtung.
•3 einstellbare Temperaturniveaus: Komfort , Einsparmodus und Frostschutz .
•Einstellung der Temperatur von +5 ºC bis +35 ºC (Frostschutz von +1 ºC bis +10 ºC).
•Bequeme Programmierung außerhalbdes Grundbereichs der Anlage.
MONTAGE:
ACHTUNG. Die Installation und Montage der elektrischen Vorrichtungen muss durch
einen zugelassenen Monteur erfolgen.
VOR DER DURCHFÜHRUNG DER VERBINDUNG MUSS MAN SICH DESSEN
VERSICHERN, DASS DIE ZU VERBINDENDEN KABEL NICHT UNTER SPANNUNG
STEHEN.
Das Gerät besitzt einen internen Schutz gegen die Interferenzen.
MONTAGE:
Elektronische Vorrichtung für die Steuerung der Montage, unabhängig davon ob diese an
der Wand oder am Gehäuse der Mechanismen erfolgt.
Man empfiehlt die Montage der Vorrichtung auf einer Mindesthöhe von 1,5 m. Die
Montage des Chronothermostats muss unabhängig sein und so erfolgen, dass sie frei von
Hindernissen ist und nicht durch andere Vorrichtungen oder Wärmequellen beeinflusst
wird (Sonne, Heizkörper, Fenster, usw.).
Sei es zwecks Befestigung der Vorrichtung an die Wand als auch für den Austausch der
Batterien muss die Vorrichtung von ihrem Befestigungssockel losgelöst werden, indem
man mit Hilfe eines Schraubenziehers Druck auf den vorhandenen Spurkranz auf der
linken Seite ausübt (FIG. 2).
Die Montageplakette an der Wand oder am Gehäuse befestigen, indem man sich der im
Lieferumfang enthaltenen Schrauben bedient.
VERBINDUNG:
Den Deckel des Anschlusses mit Hilfe eines Schraubenziehers entfernen und die
Verbindung in Übereinstimmung mitdemSchema von FIG. 3 herstellen.
Um die Anlagen mit Hilfe der Verbindungsstücke zu steuern, ist es empfehlenswert, einen
passenden Wertkondensator parallel zur Spule zu positionieren (0,1 μF 275 V~).
EINFÜHRUNG UND AUSTAUSCH DER BATTERIEN:
Die Vorrichtung wird mit 2 alkalischen Batterien des Typs LR6 (AA) zu 1,5 V (nicht im
Lieferumfang enthalten). Die angeführte Polarität im Batteriefach einhalten. Die ungefähre
Lebensdauer der Batterien beträgt 1 Jahr.
Bei der ersten Einführung der Batterien aktiviert sich der Bildschirm und es beleuchten sich
alle Segmente des Bildschirms. Nach einigen Sekunden wird das Thermostat in Betrieb
genommen.
Wenn die Batterien einen niedrigen Ladestatus aufweisen und ersetzt werden müssen, so
wird auf dem unteren Bereich des Bildschirms das folgendeSymbol angezeigt:
Um die aktuelle Konfigurierung nicht zu verlieren, ist es angemessen, die Batterie
innerhalb von weniger als 15 Sekunden zu ersetzen.
Vor dem Ersatz der Batterien wird empfohlen, den Thermostat in den Modus OFF zu
versetzen.
Geben Sie die gebrauchten Batterien in den dazu vorgesehenen Behälter. Schützen Sie
die Umwelt.
TAKTILER BILDSCHIRM
Um mit dem Thermostat zu interagieren, ist es notwendig, mit dem Finger eine der 6
taktilen Ikonen zu berühren, die auf dem Bildschirm angezeigt werden (keine
Kugelschreiber oder andere spitze Gegenstände verwenden). Die Ikonen und ihre
mehrfache Funktion nehmen verschiedene Funktionalitäten an, je nach dem, welcher
Knopf (kurz oder länger) betätigt wird.
BELEUCHTUNG AUF DEM HINTERGRUND
Jedes Mal, wenn man eine Ikone auf dem taktilen Bildschirm betätigt, geht die
Beleuchtung auf dem Hintergrund des Bildschirms an, um den Benutzer in die Lage zu
versetzen, alles korrekt anzuzeigen, und dies einschließlich unter Bedingungen schwacher
Beleuchtung. Eine Beleuchtung auf dem Hintergrund geht automatisch aus, wenn nach
der letzten Betätigung 10 Sekunden vergangen sind.
PROGRAMMIERUNG DER TEMPERATUR
Um die Werte der Komforttemperaturen und der Werte im Sparmodus festzulegen, muss
man die Ikone des Bildschirms betätigen. Dann wird auf dem Bildschirm das Symbol
angezeigt. Das Symbol Set blinkt zusammen mit der zu ändernden
Komforttemperatur. Mit Hilfe der Ikonen oder wird dieser Wert erhöht oder
vermindert. Nach der Auswahl bestätigen wir diese mit Hilfe der Ikone (oder
automatisch 10 Sekunden nach der letzten Betätigung). Daraufhin wird aufdemBildschirm
das Symbol angezeigt, und es blinkt das Symbol et in Verbindung mit der zu
ändernden Temperatur im Einsparmodus. Mit Hilfe der Ikonen oder wird dieser
Wert erhöht oder vermindert. Nach der Auswahl bestätigen wir diese mit Hilfe der Ikone
(oder automatisch 10 Sekunden nach der letzten Betätigung). Und dann verlassen wir
die Programmierung der Temperatur.
Für die Einstellung der Temperatur für den Frostschutz siehe hier im Folgenden den
Abschnitt mit dem Titel Fortgeschrittene Programmierung.
VOREINGESTELLTE TEMPERATUREN
Die im Werk voreingestellten Temperaturen sind:
WINTER (Heizung) SOMMER (Belüftung)
Komfort : 20 ºC Komfort : 23 ºC
Sparmodus : 17 ºC Sparmodus : 28 ºC
Frostschutz : 5 ºC Frostschutz : -
Um den Wert der eingestellten Temperaturen zu kennen, ist es notwendig, die Ikonen
oder zu betätigen.
AUTOMATISCHE FUNKTIONSWEISE
Das Thermostat schaltet die Heizung / Belüftung ein oder aus. Dies erfolgt auf der
Grundlage der eingestellten Temperatur.
Um die Komfort- oder Frostschutztemperaturen zu aktivieren, drücken wir auf die
entsprechende Ikone oder .Dann erscheint auf dem Bildschirm das Symbol in
Verbindung mit der Temperatur, die imLaufe von zwei Sekunden eingestellt wird.
Im Falle einer Betätigung wird auch das Symbol (Modus der Heizung) oder (Modus
der Klimaanlage) angezeigt.
MANUELLER BETRIEB
Wenn wir uns im automatischen Betrieb befinden, können wir zeitweilig den Wert der
programmierten Temperatur ändern, indem wir oder betätigen. Während wir die
Temperatur ändern, erscheint diese auf dem Bildschirm und blinkt zusammen mit den
Symbolen Set und .
Nach der Auswahl bestätigen wir mit der Ikone (oder automatisch innerhalb von 10
Sekunden nach der letzten Betätigung).
WICHTIGER HINWEIS: Wenn man im Abschnitt Fortgeschrittene Programmierung die
Grenzen der oberen Temperatur (SP:HI) bzw. der unteren Temperatur (SP:LO) eingestellt
hat, so wird die manuelle Einstellung der Temperatur auf diesen Temperaturbereich
begrenzt.
Um dieses Fenster zu verlassen und auf den automatischen Betrieb zurückzukehren,
muss man eine der Ikonen der Auswahl des Temperaturmodus oder betätigen.
FUNKTIONSWEISE OFF - AUSGESCHALTET
Wenn wir den Knopf betätigen, geht das Gerät, falls es eingeschaltet ist, auf den
ausgeschalteten Modus über, schaltet sich nicht mehr ein und versetzt auch den Nutzer
nicht in die Lage, die Temperatur zu ändern. In diesem Falle wird auf dem Bildschirm der
Knopf angezeigt. In diesem Modus misst das Gerät die Temperatur der Umgebung. Es
führt aber keine seiner Funktionen aus, es sei denn es ist die niedrige Temperatur des
Frostschutzes programmiert. In diesem letzteren Falle aktiviert sich das
Frostschutzprogramm und führt dann zu einer Einschaltung, um zu vermeiden, dass es
zur Bildung von Frost kommt.
Um diesen Modus zu verlassen und das Gerät einzuschalten, betätigen wir erneut den
Knopf .
RESET
Es wird ein RESET durchgeführt, wenn man die Einstellung des Werkes (Werte,
Temperaturen, Programme, usw.) wiederherstellen möchte, nachdem sich ein Fehler
ereignet hat.
Um diese Operationen durchzuführen, müssen Sie die Knöpfe und gleichzeitig
über einen Zeitraum von 5 Sekunden gedrückt halten.
Nach der Durchführung des RESETS muss das Gerät dann erneut programmiert werden.
FORTGESCHRITTENE PROGRAMMIERUNG
Mit der aktivierten Tastatur den Knopf über einen Zeitraum von 5 Sekunden gedrückt
halten. Dann wird im oberen Bereich links des Bildschirms H-C angezeigt und auf der
rechten Seite blinkt die Anzeige „Set“.
Durch die erneute Betätigung des Knopfs werden wir dann in die Lage versetzt, die
folgenden Parameter zu ändern:
•H-C – Betrieb „FLA“der Heizung im Winter / „ICE“Klimaanlage im Sommer.
•ANTI – einstellbare Frostschutztemperatur von 1 ºC bis 10 ºC.
•DIF – einstellbares Differential zwischen 0,1 ºC und 1 ºC.
•SP:HI – einstellbare, obere Grenze der Temperatur im manuellen Betrieb (zwischen 15
ºC und 35 ºC).
•SP:LO – einstellbare, untere Grenze der Temperatur im manuellen Betrieb (zwischen 5
ºC und 25 ºC).
•CONT – Einstellung des Kontrastes des Bildschirms vom Wert 1 bis 5, zwecks
Verbesserung der Sichtbarkeit des Bildschirms je nach der Höhe der Montage. Durch
die Betätigung der Knöpfe oder den gewünschten Wert auswählen und diesen
mit Hilfe des Knopfs bestätigen oder in Alternative dazu 10 Sekunden lang warten,
damit die Änderungen automatisch gespeichert werden.
SPERRUNG DES BILDSCHIRMS
Um unerwünschte Handhabungen zu vermeiden, kann man den taktilen Bildschirm
sperren. Zu diesem Zwecke muss man den Knopf mehr als 10 Sekunden lang
betätigen, bis das Symbol Set auf dem Bildschirm angezeigt wird und im oberen Bereich
links des Bildschirms die Schrift LOC erscheint. Auf diese Weise können wir ein
nummerisches Kennwort zwischen 000 und 999 eingeben, indem man jede einzelne Ziffer
mit Hilfe der Knöpfe oder festlegt und diese mit bestätigt.
Wenn der taktile Bildschirm gesperrt ist, wird das Symbol angezeigt.
Um den taktilen Bildschirm zu entsperren, jegliche Ikone des Bildschirms betätigen. Dann
wird auf dem Bildschirm das Symbol angezeigt. Das Symbol Set blinkt. Im oberen
Bereich links des Bildschirms wird die Schrift LOC angezeigt. Dann können wir das
nummerische Kennwort mit Hilfe der Knöpfe oder eingehen und es mit der
Betätigung der Taste bestätigen. Dies erlaubt uns nicht, Änderungen an den
Einstellungen des Thermostats vorzunehmen. Dies gilt über einen Zeitraum von 30
Sekunden, während dessen das Symbol blinkt. Und falls man die Sperrung des taktilen
Bildschirms aufheben möchte, muss man über einen längeren Zeitraum von mehr als 10
Sekunden die Taste betätigen, bis auf dem Bildschirm das blinkende Wort Set und auf
der oberen Seite links des Bildschirms die Schrift LOC angezeigt werden. Dann müssen
wir mit Hilfe des Knopfs “---” und mit der Taste bestätigen.
Falls man das Kennwort vergessen hat, kann man das Gerät entsperren, indem man die
Batterien entfernt oder mit einer Spitze in die Öffnung des RESET-Knopfs eindringt (FIG. 2
- 18), der sich an der Seite des Batteriefaches befindet.
REINIGUNG DES BILDSCHIRMS
Den Bildschirm mit einem weichen und feuchten Tuch reinigen. Keine Reinigungs- oder
Scheuermittel verwenden.
TECHNISCHE EIGENSCHAFTEN
Versorgung: 2 alkalische Batterien des Typs LR6/AA von
1,5 V (nicht im Lieferumfang enthalten)
Unterbrechungskapazität: µ 10 (3) A 250 V~
Kontakt: Schaltung AgNi 90/10
Lebensdauer der Batterien: Ungefähr 1 Jahr
Genauigkeit der Messung der Temperatur: ±0,5 °C
Aktualisierung der Temperatur: Jede 60 Sekunden.
Auflösung: 0,1 °C.
Messbereich und LCD: zwischen 0 ºC und 50 ºC
Aktionstyp: 1B
Aktualisierung des Ausgangsrelais: jede 60 Sekunden
Einstellung der Steuertemperaturen: Sparmodus : von +5 ºC bis +25 ºC
Komfort : von +15 ºC bis +35 ºC
Frostschutz : von +1ºC bis +10 ºC
Manuell : von +5 ºC bis +35 ºC
Einstellungstyp: ON-OFF mit einstellbarer Hysterese von
0,1 ºC bis 1 ºC (Abweichung von 0,2 ºC).
Sperrung der Tastatur: wird durch das Kennwort aktiviert /
deaktiviert
Einstellung des Kontrastes des Bildschirms: von 1 bis 5 (mit einer Abweichung
gegenüber 5)
Betriebstemperatur: von 0 ºC bis +50 ºC
Transport- und Lagertemperatur: von -10 ºC bis +60 ºC
Schutzkategorie: II mit der korrekten Montage
Schutzniveau: IP40 gemäß EN 60529, korrekt installiert
Verschmutzungssituation: 2
Impulsstoßspannung: 2,5 kV
Temperatur für Kugelprüfung: 75 ºC (21.2.5); 105 ºC (21.2.6)
Verbindung: mit Schraubenschelle für Leitungen mit
einem höchsten Querschnitt von 2,5 mm².
WICHTIGER HINWEIS: Sobald die Ladung die zulässige Stromstärke überschreitet, ist es
notwendig, Schaltschützen zu verwenden.
Unterliegt technischen Änderungen – Zusätzliche Informationen hierzu finden Sie
hier: www.orbis.es