Orient SY(KFF) User manual

1
ENGLISH
ENGLISH
ANALOGUE QUARTZ WATCH
1/5 sec. CHRONOGRAPH WITH COUNTDOWN TIMER
<SY(KFF)>
INSTRUCTION MANUAL
Thank you for choosing our product. To ensure prolonged use and optimum
performance, please read this instruction manual carefully and familiarize
your-self with the terms of the guarantee.
Please keep this Instruction Manual handy for future reference.
SAFETY PRECAUTIONS
Make absolutely sure to observe the demarcated contents indicated below to
prevent any possible physical danger and property damage to you as well as
other people concerned.
... A demarcation with this symbol represents the contents
assuming possibility for death or serious injury
when the product is used in any manner different from
given instructions.
... A demarcation with this symbol represents the contents
assuming possibility of causing human injury or
material damage only when a product is used in any
manner different from given instructions.
WARNING
!
WARNING
!
CAUTION
!
CAUTION
!
2
ENGLISH
IN HANDLING THE WATCH
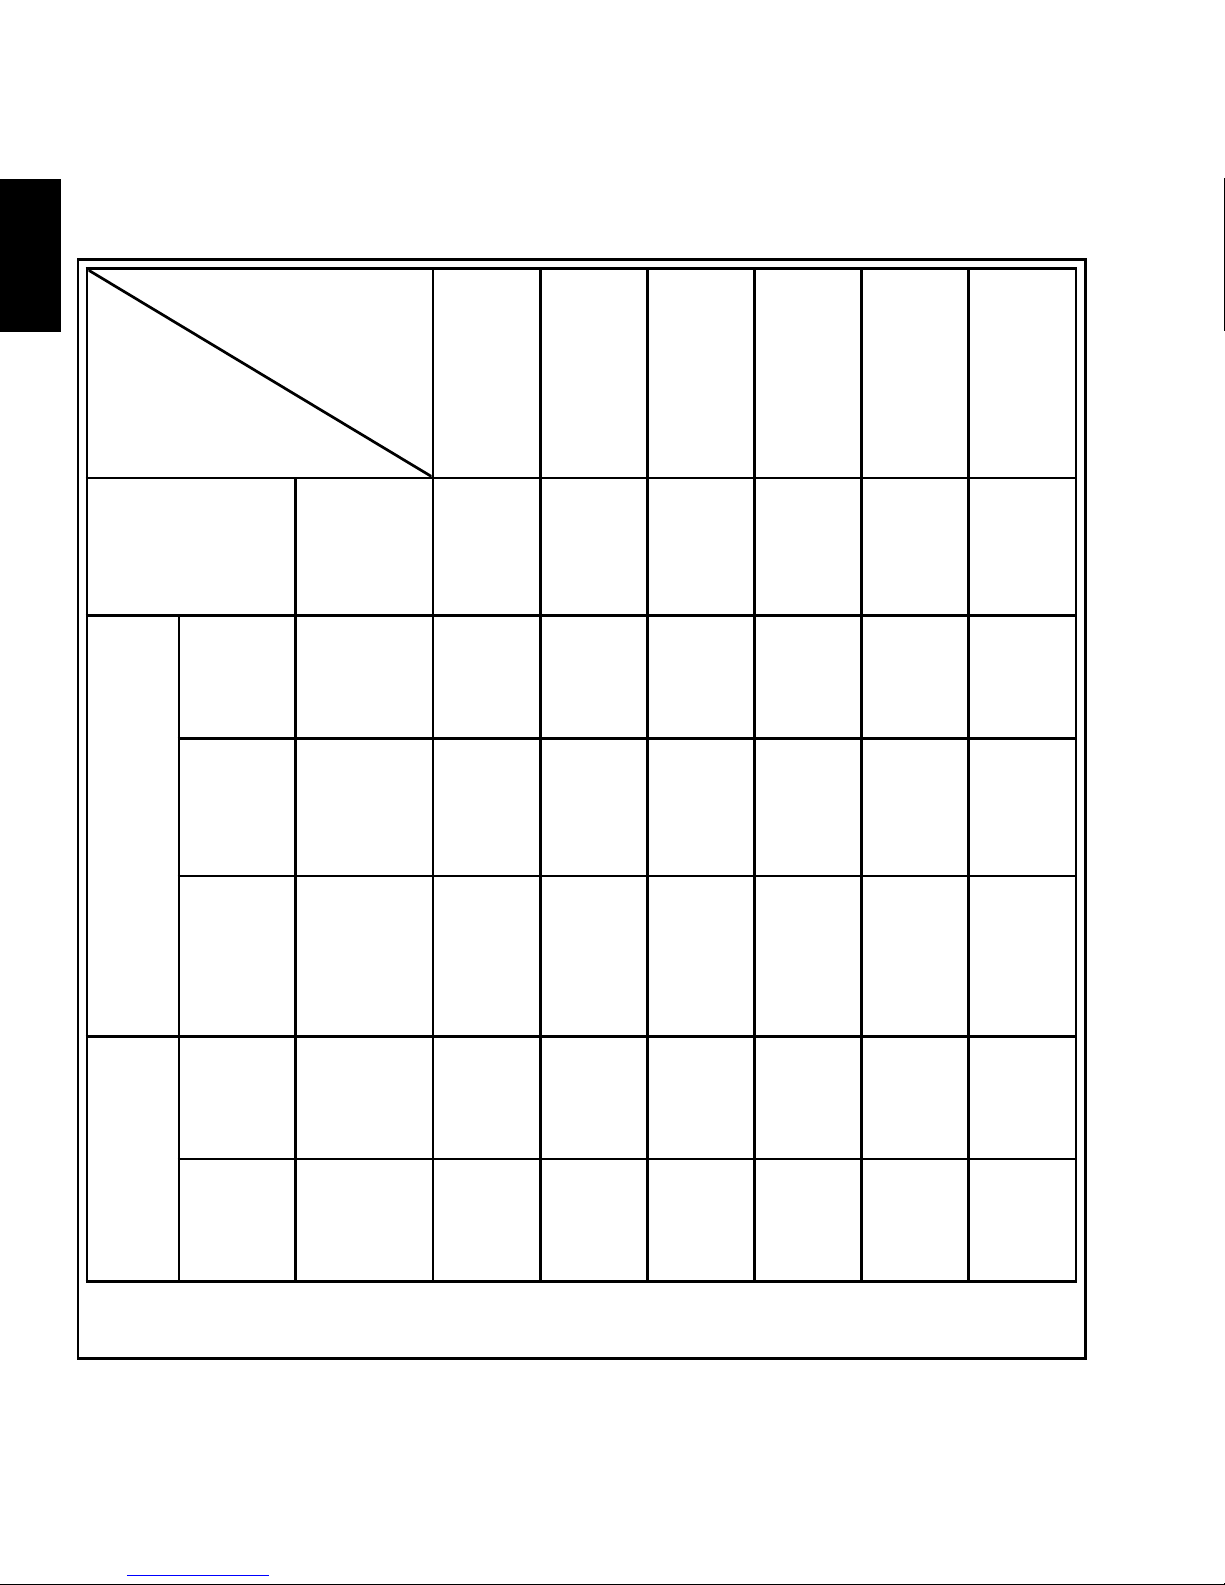
(1) Water-resistance
Conditions
of use
Type
Underwater
operation of
crown and
operation
of crown
with drops
of water
on it
Exposure
to small
amounts
of water
(face-
washing,
rain, etc.)
Water sports
(swimming,
etc.),
frequent
contact with
water (car-
washing,
etc.)
Skin diving
(air tanks
are not
used)
Scuba
diving
(air tanks
are used)
Mixed-gas
Diving
(using
helium
gas)
Non water resistant
Without
WATER
RESISTANT
(WATER
RESIST)
××××××
Water
resistant
watches
Water
resistant for
daily life
WATER
RESISTANT
(WATER
RESIST) ×××××
Reinforced
water
resistance
for daily
life I
WATER
RESISTANT
(WATER
RESIST)
50m (5bar)
× ×××
Reinforced
water
resistance
for daily
life II
WATER
RESISTANT
(WATER
RESIST)
100m (10bar)
200m (20bar)
×× ×
Diver’s
watches
Diver’s
watch for Air
Diving
AIR DIVER’S
100m / 150m
200m ××
Diver’s
watch for
Mixed-gas
Diving
He-GAS
DIVER’S
200m / 300m /...
×
* It is recommended that you use the watch correctly following the above-mentioned scope of usage
after ascertaining water resistance precautions marked on the dial or caseback.

3
ENGLISH
1A watch with water resistance for daily life 30m (3 bar) can be used during
face-washing, etc. but cannot be used in an environment in which it will be
submerged in water.
2A watch with reinforced water resistance for daily life I 50m (5 bar) can be
used while swimming, etc. but cannot be used during any type of diving
including skin diving.
3A watch with reinforced water resistance for daily life II 100m or 200m (10
or 20 bar) can be used while skin diving, but cannot be used while scuba
diving using oxygen tanks or saturation diving using helium gas, etc.
4Keep the crown pushed in at all times (in the normal position) while using
the watch. If the crown is the screwed-down type, check that it is securely
screwed down.
5Do not operate the crown underwater, or while the watch is wet. Water
may enter the interior of the watch and defeat the water resistance.
6If your watch is non-water resistant, beware of splashes of water (during
face washing, rain, etc.) and sweat. If the watch becomes wet from water
or sweat, wipe the moisture off with a dry, soft cloth.
7Even with a water resistant watch for everyday use, avoid directing strong
jets of mains water onto the watch. Water pressure above the limit can
apply, which may defeat the water resistance.
8With a water resistant watch for everyday use, rinse sea water off the case
after exposure, then wipe it thoroughly to avoid corrosion and other effects.
9The interior of the watch contains some amount of moisture, which may
cause fogging on the inside of the glass when the outside air is cooler than
the internal temperature of the watch. If the fogging is temporary it causes
no harm inside the watch, but if prolonged, or if water enters the watch,
consult your place of purchase and do not leave the problem untreated.
CAUTION
!
WARNING
!
4
ENGLISH
(2) Handling the Battery
1Store the battery out of the reach of infants and other young children. Should
the battery be accidentally ingested, contact a doctor immediately.
2Do not remove the battery from the watch. Contact the place of purchase
of the watch or your nearest ORIENT authorized service center for
assistance when wanting to remove the battery.
3The battery used in this watch is not a rechargeable battery, so it cannot be
recharged and used again. Do not attempt to charge the battery as doing
so could cause it to overheat or explode.
4A skin rash or other symptom may develop if leaking battery fluid comes
into contact with skin. Do not leave depleted batteries sitting around for
long periods of time.
(3) Replacing the Battery
1Depleted batteries that are left sitting in the watch for long periods of time
may begin to leak battery acid, which could lead to malfunction. Be sure to
replace depleted batteries as soon as possible.
2Replace the watch battery only with the specified battery type.
3Battery replacement requires special-purpose tools, techniques, etc.
Reversing the polarities when inserting the battery may cause the battery
to overheat or explode. Contact the place of purchase or your nearest
ORIENT authorized service center for assistance when wanting to replace
the battery.
4The watch comes equipped with a battery end of life indicator.
If the small second hand begins to advance two tick marks for every
movement, it means that the battery is nearing the end of its life and will
need to be replaced.
Contact the place of purchase or your nearest ORIENT authorized service
center immediately for assistance with battery replacement.
WARNING
!
CAUTION
!
5
ENGLISH
5Steps to be taken after the battery is replaced
After you have the battery replaced, be sure to set the time and set the
stopwatch hands to the “0” position.
(Refer to SETTING THE TIME AND ADJUSTING THE STOPWATCH
HAND POSITION (Hands for time display and stopwatch hands) for more
information.)
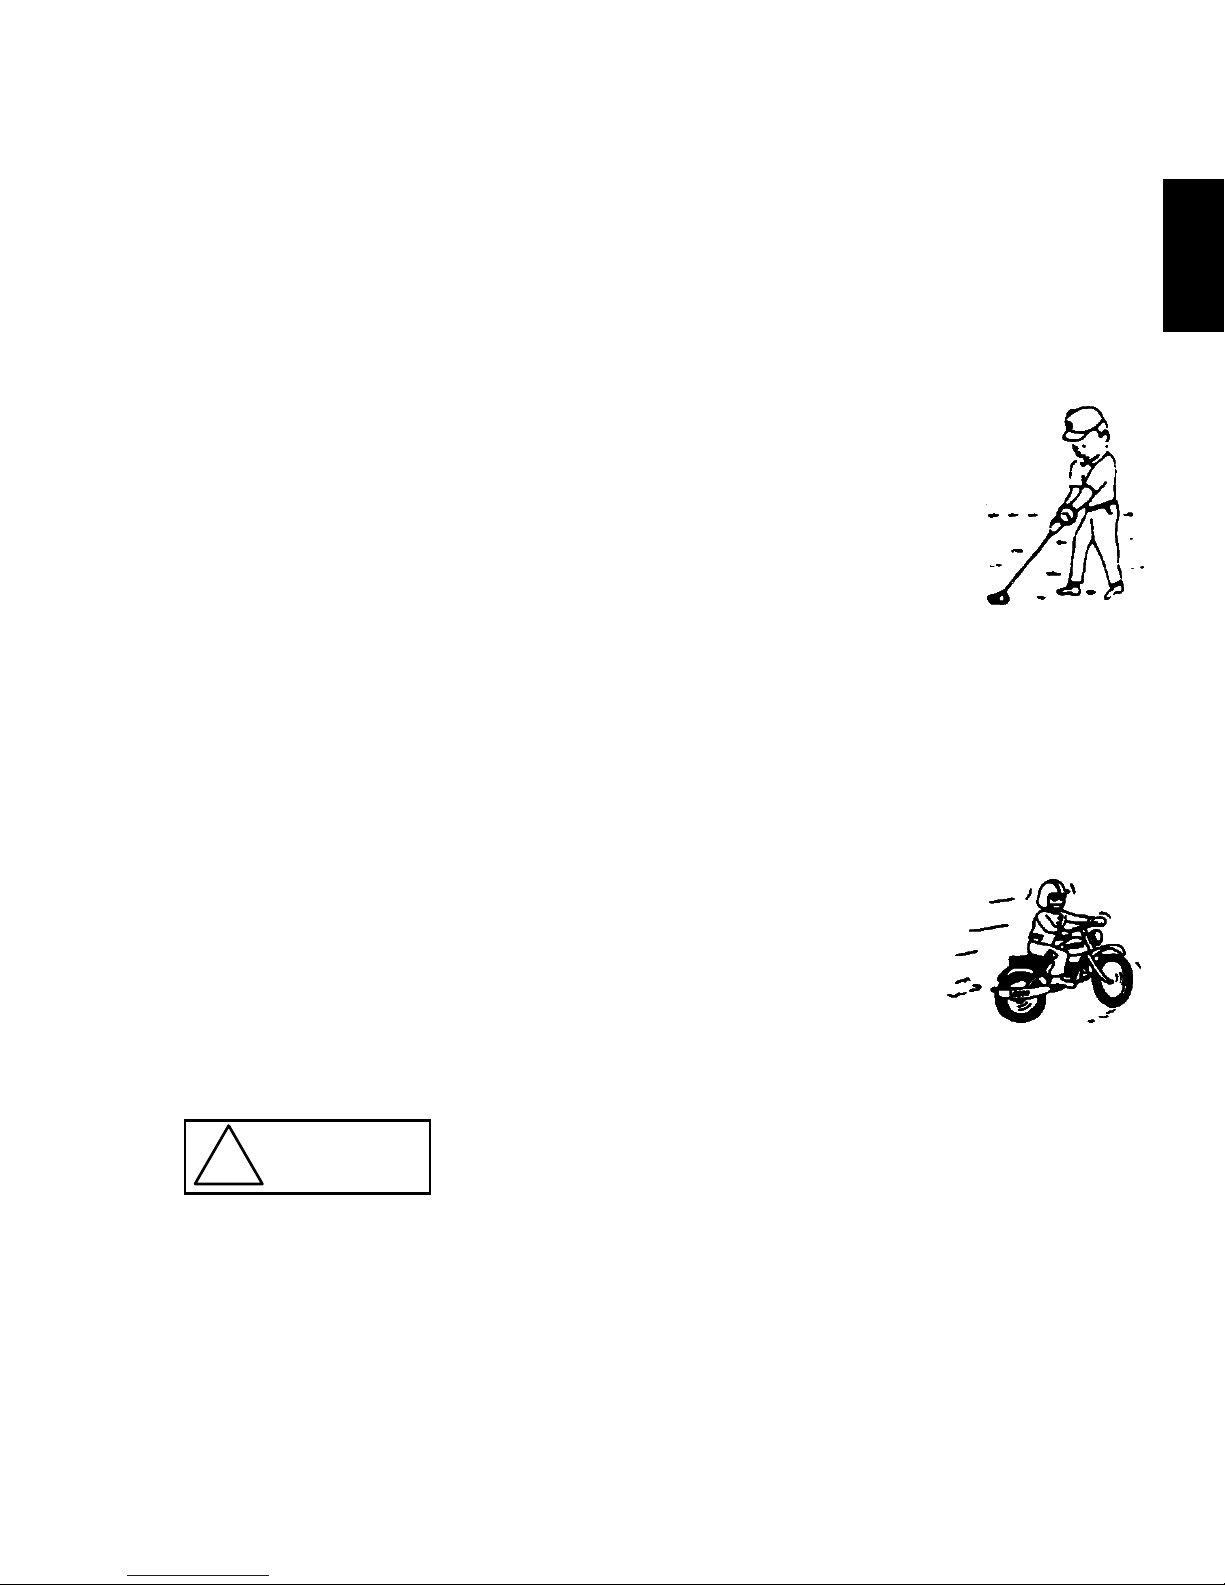
(4) Shock
1Be sure not to carry the watch when you engage in strenuous
sports, whereas playing such light sports as golf, etc., will not
adversely influence the watch.
2Avoid a violent shock such as dropping the watch on the
floor.
(5) Magnetism
1If the watch is left at a location with strong magnetism for an extended
period of time, the components may be magnetized, resulting in
malfunction. Be careful.
2The watch may temporarily speed up or slow down when exposed to
magnetism. Precision is restored when placed away from magnetism. In
such a case, reset the time.
(6) Vibration
The watch may lose precision if subjected to strong
vibrations such as from riding motorcycles, using
jackhammers, chain saws, etc.
(7) Temperature
In the environment below and above the normal temperatures <5°C~35°C>,
the watch may malfunction and stop.
CAUTION
!
Do not use the watch at high temperatures, such as in a sauna. The watch
may heat and cause burns.

6
ENGLISH
(8) Chemicals, Gases, etc.
Utmost caution must be exercised when coming into contact with gases,
mercury, chemicals (paint thinner, gasoline, various solvents, detergents
containing such components, adhesives, paint, drugs, perfumes,
cosmetics, etc.), and so forth. Such may cause discoloration of the
watchcase, watchband, and dial face. Discoloration, deformation, and
damage to various resin-based component parts may also occur.
(9) About accessory parts
CAUTION
!
Do not attempt to disassemble or modify the watch.
WARNING
!
Store the bracelet/strap pin and other small parts out of the reach of
children.
If any small parts are swallowed, immediately contact a doctor.
(10)Allergic reactions
CAUTION
!
If you develop a skin rash or your skin becomes abnormally irritated due to
contact with the watch or strap, stop wearing the watch immediately and
consult a doctor.

7
ENGLISH
(11) About “luminous light”
Some models have luminous light on the hands and dial.
The luminous light is a safe paint that stores sunlight and artificial light
without using any radioactive material, and emits that light in a dark
setting. As the paint discharges the stored light, it will become dimmer
over time. The amount of light emitted and the time that light is emitted
depends on various factors when the light is stored, such as the shape
of the glass, the thickness of the paint, surrounding brightness level, the
distance from the watch to the light source, and the light absorption level.
Please note that when not enough light energy is stored, the watch may
emit weak light or emit light for only a short time.
(12)Water resistant watchband
Some models employ leather and nylon bands on which a special
treatment to resist perspiration and water absorption have been applied.
Please understand that the water resisting effect of this watchband can be
lost depending on the period and conditions of use.

8
ENGLISH
FEATURES
(1) This is an analog crystal oscillator watch.
(2) The current time is indicated by the hour, minute, and small second
hands.
(3) The watch also comes with a calendar function (date) and stopwatch
function (measures up to 45 min. in 1/5 sec. increments) in addition to the
time display.
(4) The stopwatch function also records split times (the amount of time that
elapses from when the stopwatch is started until a certain point, while the
watch continues to record total time elapsed).
(5) When the battery life begins to run out, the small second hand starts to
move in 2-sec. intervals to warn that the battery is getting low. (Battery End
Of Life indicator)
SPECIFICATIONS
(1) Crystal oscillator frequency: 32,768 Hz (Hz = Oscillations per second)
(2) Wrist-worn accuracy: Mean monthly rate: ±20sec.
(at normal temperature <5°C ~ 35°C>)
(3) Operating temperature range: –5°C ~ +50°C
(4) Drive system: Step motor
(5) Display system:
[Time function]
Hour and minute hands with a small second hand that moves at one-
second intervals.
[Stopwatch function]
Stopwatch minute hand turns a full circle in 45 minutes at one-minute
intervals.
Stopwatch second hand turns a full circle in 60 seconds at 1/5 sec.
intervals.
[Countdown timer function]
Stopwatch minute hand (one-minute intervals, 45 minutes/circle)
Stopwatch second hand (one-second intervals, 60 seconds/circle)
9
ENGLISH
(6) Additional function: Second hand halt mechanism, reset switch,
accumulated elapsed time counter, split time function, timer buzzer,
battery end of life indicator
(7) Battery: SR927W; 1 piece
(8) Battery life: Approx. 3 years if the stopwatch is used for less than 45
minutes, the countdown timer for less than 45 minutes, and the timer
buzzer for less than 5 seconds a day.
*
The above specifications are subject to change without notice for improvement.
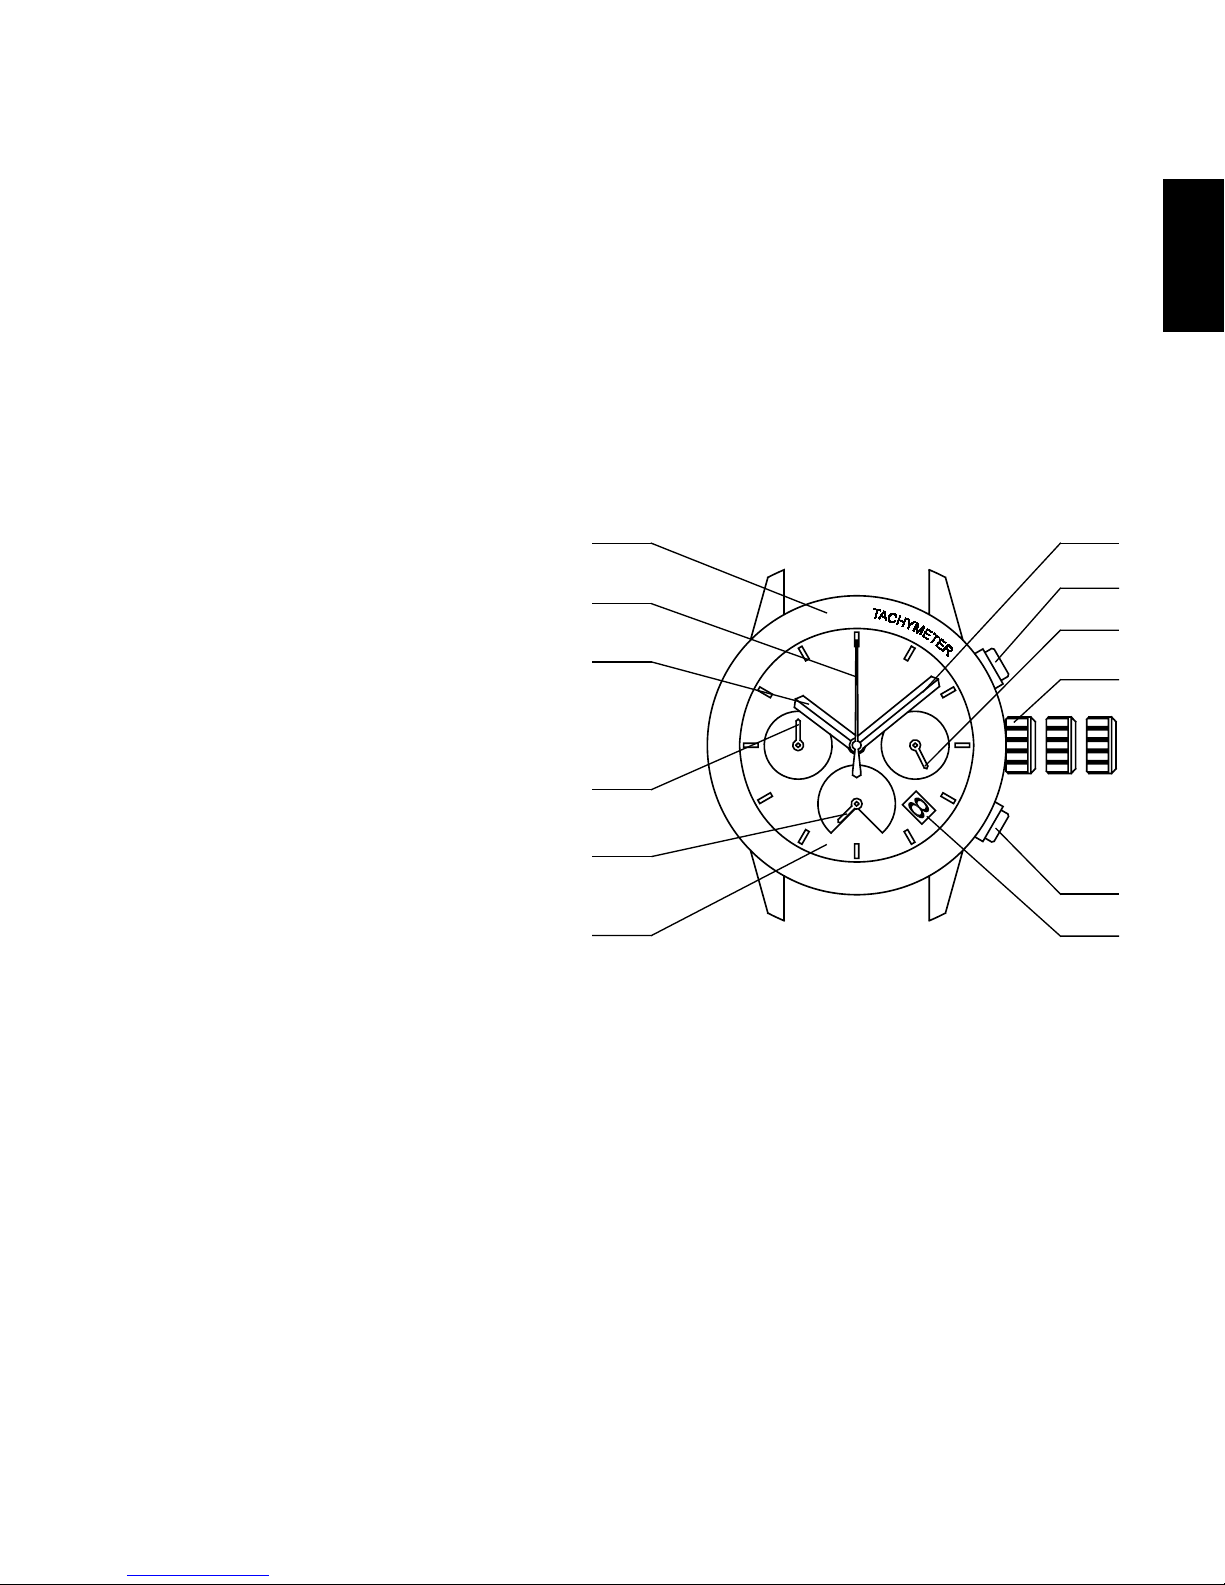
NAMES AND FUNCTIONS OF INDIVIDUAL COMPONENT PARTS
㪏㪇
㪋㪇㪇
㪊㪇㪇
㪉㪌㪇
㪍㪇
㪉㪇㪇
㪍㪌
㪎㪇
㪎㪌
㪏㪌
㪈㪋㪇
㪈㪍㪇
㪈㪏㪇
㪈㪉㪇
㪈㪈㪇
㪈㪇㪇
㪐㪇
A
F
D
H
K
I
J
C
L
E
B
G
1 2 3
A: Tachymeter scale
B: Hour hand
C: Minute hand
D: Small second hand
E: Stopwatch minute hand
F: Stopwatch second hand
G: 24-hour hand
H: Date
I: Crown
J: Button A
K: Button B
L: Dial
1 : Normal position
2 : First click : Date setting
Setting the countdown time
3 : Second click : Time setting (The second hand stops)
Resetting the stopwatch
* Some models may not come with tachymeter scales.
* The position of the date indicator may vary on some models.

10
ENGLISH
MODELS WITH SCREWED-DOWN CROWN
Depending on the model, you may not be able to pull the crown out without
unscrewing it (models with screwed-down crown).
Operate this type of watch as follows:
(1) Before setting the date and time, first turn the crown to the left to loosen
the screw lock.
(2) After setting the date and time, turn the crown to the right while pressing
in, until it stops turning to securely tighten the screw.
MODELS WITH A SCREWED-DOWN BUTTON RING
Some models may have a configuration that allows the button ring (ring on the
outer periphery) to be locked (fixed) into place by being screwed down.
Use the following operating method for this type of watch.
(1) When wanting to use the buttons, first turn the button ring to the left, and
then loosen it until the screw stops.
* The buttons may not be able to be used if the button ring cannot be
loosened enough. Do not turn it more forcefully than necessary.
(2) After finishing using the buttons, turn the button ring to the right, and firmly
tighten it until the screw stops.
* Do not tighten it more forcefully than necessary.
Table of contents
Languages:
Other Orient Watch manuals

Orient
Orient XC User manual
 Manual")
Orient
Orient TT(KFB) Manual

Orient
Orient DM 48Y User manual

Orient
Orient UG1R002B User manual
 User manual")
Orient
Orient DD (48C) User manual

Orient
Orient VS75 User manual

Orient
Orient GNA User manual

Orient
Orient BEM5L003 User manual

Orient
Orient ES 46C User manual

Orient
Orient FUN8G001 User manual

Orient
Orient cem65001b User manual

Orient
Orient EMAM80 User manual

Orient
Orient AA F69 User manual

Orient
Orient FFT00001W0 User manual
 User manual")
Orient
Orient TV(KFC) User manual
 User manual")
Orient
Orient KFA (TD) User manual

Orient
Orient CFA02001B User manual

Orient
Orient M14 User manual
 User manual")
Orient
Orient TT(KFB) User manual

Orient
Orient KFB TT User manual


 User manual")


