osann Oreo360 User manual

- 1 -
Oreo360
ECE R129/03 - i-Size
40-105 cm
DE
EN
FR
IT
NL

- 2 -
DE
Danke, dass Sie sich für unseren Oreo360 Kinderautositz entschieden haben. Falls Sie zu diesem
Produkt Unterstützung benötigten, wenden Sie sich bitte an unseren Kundendienst.
ANWENDUNG
• Dieses Produkt ist geeignet für Kinder mit einer Körpergröße von 40 bis 105 cm und max. 19 kg
Körpergewicht.
• Einbau rückwärts gerichtet von 40 bis 105 cm Körpergröße: Der Kinderautositz für Babys wird
mithilfe der Isox-Verbindungsstücke und dem Standfuß rückwärts gerichtet eingebaut. Das
Kind wird mit dem Fünfpunktgurt des Kinderautositzes angeschnallt.
• Einbau vorwärtsgerichtet von 76 bis 105 cm Körpergröße: Der Kinderautositz für Babys wird
mithilfe der Isox-Verbindungsstücke und dem Standfuß vorwärtsgerichtet eingebaut. Das Kind
wird mit dem Fünf-Punkt-Gurt des Kinderautositzes angeschnallt.
• Es wird empfohlen, den Kinderautositz auf dem Rücksitz des Fahrzeugs anzubringen. Bei rück-
wärts gerichteter Ausrichtung befestigen Sie den Kinderautositz NICHT auf dem Beifahrersitz,
wenn es für diesen einen Airbag gibt, der nicht deaktiviert werden kann. Weitere Informationen
nden Sie in der Betriebsanleitung Ihres Fahrzeugs.
• Dieser Kinderautositz ist nur für Fahrzeuge geeignet, die mit Isox-Verbindungsstücken gemäß
ECE R16 oder vergleichbaren Normen ausgestattet sind.
WARNUNG
Es handelt sich um ein Kinderrückhaltesystem der Kategorie „i-Size“. Dieses ist nach der ECE-
Regelung Nr. 129 für die Verwendung in i-Size-kompatiblen Fahrzeugsitz-Positionen gemäß
den Angaben der Fahrzeughersteller in der Bedienungsanleitung des Fahrzeugs genehmigt.
Wenden Sie sich im Zweifelsfall entweder an den Hersteller des Kinderrückhaltesystems oder
an den Einzelhändler.
WICHTIG
VERWENDEN SIE DEN KINDERAUTOSITZ NICHT IN FAHRTRICHTUNG, BEVOR DAS ALTER DES
KINDES 15 MONATE NICHT ÜBERSCHRITTEN HAT.
EXTREME GEFAHR!
WENN SIE DEN KINDERAUTOSITZ AUF DEM BEIFAHRERSITZ EINBAUEN MÜSSEN, STELLEN SIE
BITTE SICHER, DASS EIN EVENTUELLER AIRBAG DEAKTIVIERT IST!
(?1) Nur wenn der Airbag deaktiviert werden
kann, Isox-Konnektoren vorhanden sind und
der Sitzplatz im Pkw-Handbuch als i-Size-
kompatibel anerkannt ist
(?2) Nur wenn Isox-Konnektoren vorhanden
sind und der Sitzplatz im Pkw-Handbuch als
i-Size-kompatibel anerkannt ist

- 3 - DE
WARNUNG
• Bitte lesen Sie die Anleitung vor der Verwendung sorgfältig durch und bewahren Sie diese zum
späteren Nachschlagen auf, um die Sicherheit Ihres Kindes zu gewährleisten. Die Nichtbeachtung
der Anweisungen in diesem Handbuch kann zu schweren Verletzungen Ihres Kindes führen.
• Der Kinderautositz darf nur mit dem zugehörigen Fünf-Punkt-Gurtsystem für Kinder unter
einem Körpergewicht von 19 kg (40-105 cm Körpergröße) verwendet werden.
• Der Kinderautositz kann nicht mit einem Fünf-Punkt-Gurtsystem für Kinder, die 19 kg oder
mehr wiegen (über 105 cm Körpergröße), verwendet werden.
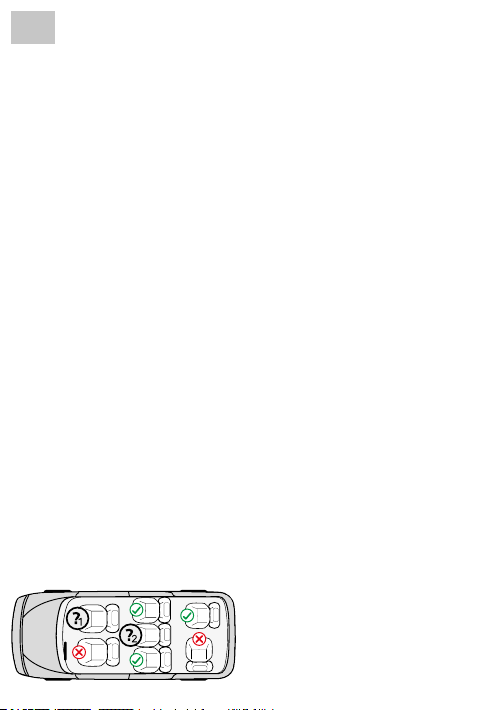
• Der Kinderautositz kann mit dem Isox-Befestigungssystem vorwärts- und rückwärts gerichtet
eingebaut werden.
Wichtig: VERWENDEN SIE DEN KINDERAUTOSITZ NICHT IN FAHRTRICHTUNG, BEVOR DAS
ALTER DES KINDES 15 MONATE NICHT ÜBERSCHRITTEN HAT (SIEHE BEDIENUNGSANLEITUNG).
• Für den Isox-Einbau: Lesen Sie unbedingt das Handbuch des Autoherstellers.
•
Verwenden Sie keine anderen tragenden Berührungspunkte als diejenigen, die in der Anleitung
beschrieben und in dem Kinderrückhaltesystem gekennzeichnet sind.
• Verwenden Sie diesen Kinderautositz nicht zu Hause. Er wurde nicht für den Gebrauch zu
Hause konzipiert und sollte nur in Ihrem Auto verwendet werden.
• Lassen Sie Ihr Kind niemals unbeaufsichtigt in dem Sitz.
• Stellen Sie den rückwärts gerichteten Kinderautositz nicht auf Vordersitze mit Airbag. Dies
kann zu schweren Verletzungen und sogar zum Tod führen.
• Der Kinderautositz sollte ausgetauscht werden, wenn er bei einem Unfall starken Belastungen
ausgesetzt war.
• Aus Sicherheitsgründen muss der Kinderautositz im Fahrzeug auch dann befestigt sein,
wenn Ihr Kind gerade nicht im Kinderautositz sitzt.
• Stellen Sie stets sicher, dass alle Verbindungssysteme, mit denen der Kinderautositz im Fahrzeug
befestigt ist, und die Gurte, die das Kind zurückhalten, an den Körper des Kindes angepasst
wurden. Vergewissern Sie sich auch, dass die Gurte nicht verdreht sind.
• Gepäckstücke oder andere Gegenstände, die im Falle eines Zusammenstoßes Verletzungen
verursachen können, müssen ordnungsgemäß gesichert werden.
•
Die starren Komponenten und Kunststoteile eines Kinderrückhaltesystems müssen so platziert
und installiert sein, dass sie im alltäglichen Gebrauch nicht von einem beweglichen Sitz oder
einer Fahrzeugtür eingeklemmt werden können.
• Es ist wichtig, den Bauchgurt ordnungsgemäß zu sichern. Ihr Kind sollte immer angeschnallt
sein, um die Gefahr zu vermeiden, dass es herausfällt.
• Es ist gefährlich, ohne Zustimmung der zuständigen Behörde Änderungen oder Anbauten an
der Vorrichtung vorzunehmen. Die Nichtbeachtung der Installationsanweisungen des Her-
stellers des Kinderrückhaltesystems birgt ebenfalls Gefahren.
• Dieser Kinderautositz wurde für Neugeborene und Kinder mit einem Gewicht bis zu 19 kg
konzipiert. Überlasten Sie den Kinderautositz niemals, indem Sie darin mehr als ein Kind oder
zusätzliche Lasten transportieren.
• Die Kinderrückhalteeinrichtung darf nicht ohne den Sitzbezug verwendet werden.
• Der Sitzbezug darf nur durch vom Hersteller empfohlene andere Sitzbezüge ersetzt werden,
da der Sitzbezug ein wichtiges Element der Rückhalteleistung ist.

- 4 -
DE
KOMPONENTEN DES KINDERAUTOSITZES
Frontalansicht
Rückansicht
Verstellbare
Kopfstütze
Komforteinsatz
Gurtschloss
Gurtverstellung
Drehhebel
Schulterpolster-Bügel
Isox-
Verbindungsstück
Sitzschale
Schulterpolster
Schultergurt
Hebel zum Verstellen
des Winkels
Kopfteilverstellung
Schultergurt
Isox-Konnektorknöpfe
zur Längenverstellung
und zum lösen
Gurtpolster
Seitenschutz
Standfuß
Standfuß-Anzeige
Knopf zur Längen-
verstellung des
Standfußes
Einführhilfen für Isox-
Verbindungsstücke

- 5 - DE
GEBRAUCH DES KINDERAUTOSITZES
Neigungswinkel des Autositzes
verstellen
•
Bedienen Sie mit einer Hand den Hebel zum Verstel-
len des Winkels unter der Vorderseite der Sitzschale.
• Halten Sie mit der anderen Hand die Rückseite der
Sitzschale nach hinten und stellen Sie den Winkel ein.
• Wird der Kinderautositz rückwärts gerichtet ein-
gesetzt, stellen Sie ihn bitte stets in die maximale
Liegeposition. (Position 4)
• In vorwärtsgerichteter Position (76-105 cm Körper-
größe) kann jeder der drei Neigungswinkel (Position
1 + 2 + 3), die der Kinderautositz bietet, gewählt
werden.
Drehen des Autositzes
• Ziehen Sie mit einer Hand am Hebel vorn am Sitz
und drehen Sie mit der anderen Hand die Sitzschale
.
Beim Drehen der Sitzschale kann der Hebel losge-
lassen werden.
• Der Sitz bietet vier Arretierstellungen: bei 90, 180,
270 und 0 von 360 Grad zum Unterteil. Die Sitz-
schale rastet hörbar ein, wenn sie auf eine dieser
Positionen bewegt wird.
• Die Positionen 1 + 2 + 3 sind nur für den Gebrauch
in Fahrtrichung vorgesehen. Die Position 4 ist aus-
schließlich für den Gebrauch entgegen der Fahrt-
richtung. Die Position 4 entsteht automatisch,
wenn der Kinderautositz in Fahrtrichtung in Position
1 gestellt und dann um 180 Grad rotiert wird.
Nur vorwärtsgerichtet Nur rückwärts gerichtet
90°270°
0/360°
180°
4, 3 2 1

- 6 -
DE
Einstellen des Gurtes
• Um den Gurt zu lösen, drücken Sie mit einer Hand
den Knopf zur Gurtverstellung im vorderen Sitz-
bereich.
• Greifen Sie mit der anderen Hand das Gurtschloss
mit den Gurten und lösen Sie es.
• Wenn Ihr Kind angeschnallt ist, ziehen Sie an der
Einstelllasche, um den Gurt zu straen.
Bitte achten Sie stets darauf, die Gurte so einzustellen,
dass sie auf den Schultern des Kindes auiegen.
Einstellen der Kopfstütze
• Lösen Sie den Gurt und ziehen Sie am Hebel vorne
an der Kopfstütze, bis sich diese in der gewünschten
Höhe bendet.
• Lassen Sie den Hebel los und vergewissern Sie
sich, dass die Kopfstütze arretiert ist.
Önen/Schließen des Gurtes
• Um den Gurt zu lösen, drücken Sie den roten
Knopf auf dem Gurtschloss und trennen Sie die
beiden Schlosszungen.
• Um den Gurt zu schließen, führen Sie zunächst die
beiden Schlosszungen zusammen und schieben
diese dann gemeinsam in das Gurtschloss.

- 7 - DE
Isox-Verbindungsstücke
• Schieben Sie die roten Einführhilfen durch den
Schlitz in der Polsterung zwischen Rückenlehne
und Sitz und in die Isox-Halterungen.
• Die ache Seite muss dabei nach unten zeigen.
Dieser Schritt ist nicht erforderlich, falls das Fahr-
zeug über fest installierte Einführhilfen verfügt.
• Drücken Sie die Knöpfe der Isox-Verbindungs-
stücke auf beiden Seiten, um diese zu verlängern.
• Schieben Sie die Isox-Verbindungsstücke in die
Einführhilfen und drücken Sie sie hinein, bis sie
hörbar einrasten.
• Die Anzeigen auf beiden Seiten werden erst grün,
wenn die Verbindungen hergestellt sind. Drücken
Sie den Kinderautositz gegen die Rückenlehne, bis
er fest sitzt.
Standfuß
• Klappen Sie den Standfuß unterhalb des Kinder-
autositzes heraus.
• Drücken Sie den Knopf zur Höhenverstellung des
Standfußes und achten Sie darauf, dass dieser
vollständig im Fußraum Ihres Pkws auiegt.
• Achten Sie darauf, dass die Anzeige am Standfuß
grün anzeigt.
2

- 8 -
DE
EINBAU DES KINDERAUTOSITZES
1) Rückwärts gerichtet 40-105 cm, max. 19 kg
1. Drücken Sie beide seitlichen Isox-Konnektorknöpfe, um die Isox-Konnektoren in der Länge
auszufahren.
2. Klappen Sie den Standfuß heraus.
3. Führen Sie die Isox-Konnektoren zu den Isox-Verbindungsstücken am Pkw-Autositz und
lassen Sie diese einrasten.
4. Schieben Sie den Kinderautositz fest an die Rückenlehne des Autositzes. Achten Sie darauf,
dass beide Isox-Anzeigen auf Grün sind.
5. Drücken Sie den Knopf zur Höhenverstellung des Standfußes und achten Sie darauf, dass
dieser vollständig im Fußraum Ihres Pkws auiegt.
6. Achten Sie darauf, dass die Anzeige am Standfuß Grün anzeigt.
7. Stellen Sie den Kinderautositz auf die maximale Liegeposition ein und drehen Sie ihn, sodass
er in rückwärts gerichteter Ausrichtung auf die Sitzposition 4 zeigt.
8. Zum bequemen Einsetzen Ihres Kindes drehen Sie den Kinderautositz zur Autotür.
9. Lösen Sie die Gurtschnalle des Kinderautositzes und legen Sie die Gurte auf die Außenseite
des Sitzes.
10. Setzen Sie Ihr Kind in den Kinderautositz.
11. Stellen Sie die Höhe der Kopfstütze so ein, dass der Schultergurt frei bleibt.
12. Schließen Sie die Gurtschnalle wieder, bis ein Klicken zu hören ist.
13. Ziehen Sie an der vorderen Einstelllasche, um die Gurte stra zu ziehen. Achten Sie darauf,
dass die Riemen nicht verdreht sind.
14. Drehen Sie den Sitz in die rückwärts gerichtete Position. Überprüfen Sie, ob der Kinderauto-
sitz in dieser Position eingerastet ist.

- 9 - DE
2) Vorwärtsgerichtet 76-105 cm, max. 19 kg
Mindestalter: 15 Monate
1. Drücken Sie beide seitlichen Isox-Konnektorknöpfe, um die Isox-Konnektoren in der Länge
auszufahren.
2. Klappen Sie den Standfuß heraus.
3. Führen Sie die Isox-Konnektoren zu den Isox-Verbindungsstücken am Pkw-Autositz und
lassen Sie diese einrasten.
4. Schieben Sie den Kinderautositz fest an die Rückenlehne des Autositzes. Achten Sie darauf,
dass beide Isox-Anzeigen auf Grün sind.
5. Drücken Sie den Knopf zur Höhenverstellung des Standfußes und achten Sie darauf, dass
dieser vollständig im Fußraum Ihres Pkws auiegt.
6. Achten Sie darauf, dass die Anzeige am Standfuß Grün anzeigt.
7. Der Kinderautositz verfügt in Fahrtrichtung über drei einstellbare Sitzpositionen.
8. Zum bequemen Einsetzen Ihres Kindes drehen Sie den Kinderautositz zur Autotür.
9. Lösen Sie die Gurtschnalle des Kinderautositzes und legen Sie die Gurte auf die Außenseite
des Sitzes.
10. Setzen Sie Ihr Kind in den Kinderautositz.
11. Stellen Sie die Höhe der Kopfstütze so ein, dass der Schultergurt frei bleibt.
12. Schließen Sie die Gurtschnalle wieder, bis ein Klicken zu hören ist.
13. Ziehen Sie an der vorderen Einstelllasche, um die Gurte stra zu ziehen. Achten Sie darauf,
dass die Riemen nicht verdreht sind.
14. Drehen Sie den Sitz in die vorwärtsgerichtete Position. Überprüfen Sie, ob der Kinderauto-
sitz in dieser Position eingerastet ist.
WICHTIG: VERWENDEN SIE DEN KINDERAUTOSITZ NICHT IN FAHRTRICHTUNG, BEVOR DAS
ALTER DES KINDES 15 MONATE NICHT ÜBERSCHRITTEN HAT.

- 10 -
DE
REINIGUNG
Bei der Entwicklung dieses Produkts wurde auf Sicherheit, Komfort und Funktionalität geachtet.
Bitte nehmen Sie sich die Zeit, diese Bedienungsanleitung gründlich zu studieren, ehe Sie das
Produkt in Gebrauch nehmen, und bewahren Sie die Anleitung für spätere Einsichtnahme auf.
Damit Ihr Kinderautositz lange gut erhalten bleibt, reinigen Sie ihn bitte nicht mit Lösungsmitteln,
Scheuermitteln oder aggressiven Reinigern. Überprüfen Sie Sto und Nähte nach dem Waschen
stets auf Unversehrtheit. Bitte waschen Sie den Bezug stets exakt so wie auf dem Etikett (siehe
unten) angegeben.
PFLEGE
Bitte überprüfen Sie das Produkt regelmäßig auf mögliche Beschädigungen. Verwenden Sie
ein beschädigtes Produkt nicht und bewahren Sie es für Kinder unzugänglich auf.
Falls Sie weitere Fragen haben, wenden Sie sich bitte an den Osann Kundendienst unter der
Rufnummer +49 (0) 7731/970077.
NICHT bleichen
Bei niedriger Temperatur
im Trockner trocknen
Bei 30°C
im Schonwaschgang
waschen
NICHT bügeln
NICHT chemisch reinigen
30
30
30
30
30

- 11 -

- 12 -
Thank you for choosing our Oreo360 child car seat. If you require any support with this product,
please contact our customer service team.
USE
• This product is suitable for children with a height of between 40 and 105 cm and weighing
a maximum of 19 kg.
• Rear-facing installation for children between 40 and 105 cm in height: The child car seat
for babies is installed in a rear-facing position using the Isox connectors and the support leg.
The child is fastened in using the ve-point belt of the child car seat.
• Forward-facing installation for children with a height of between 76 and 105 cm: The child
car seat for babies is installed in a forward-facing position using the Isox connectors and the
support leg. The child is fastened in using the ve-point belt of the child car seat.
• We recommend installing the child car seat on the rear seat of the vehicle. If the child car
seat is rear-facing, do NOT secure the child car seat on the front passenger seat if this seat
has an airbag which cannot be deactivated. You can nd additional information in the user
manual for your vehicle.
• This child car seat is only suitable for vehicles that feature Isox connectors in accordance
with ECE R16 or other equivalent standards.
WARNING
This is a child restraint system in the “i-Size” category. This is approved for use in accordance with ECE
Regulation No. 129 in i-Size-compatible vehicle seat positions according to the information pro-
vided by the vehicle manufacturer in the vehicle user manual. In case of doubt, please contact
the manufacturer of the child restraint system or the retailer.
IMPORTANT
DO NOT USE THE CHILD CAR SEAT FACING IN THE DIRECTION OF TRAVEL UNTIL THE CHILD
HAS REACHED THE AGE OF 15 MONTHS.
EXTREME DANGER!
IF YOU MUST INSTALL THE CHILD CAR SEAT ON THE FRONT PASSENGER SEAT, PLEASE ENSURE
THAT ANY AIRBAGS ARE DEACTIVATED!
(?1) Only if the airbag can be deactivated, Isox
connectors are available and the seat is
recognised as i-Size-compatible in the vehicle
manual
(?2) Only if Isox connectors are available
and
the seat is recognised as i-Size-compatible
in
the vehicle manual
EN

- 13 -
WARNING
• Please read through the instructions carefully before use and retain them for subsequent
reference in order to guarantee the safety of your child. Non-compliance with the instructions
in this manual can result in serious injuries to your child.
•
The child car seat must only be used with the accompanying ve-point belt system for children
who weigh under 19 kg (with a height of 40 - 105 cm).
• The child car seat cannot be used with a ve-point belt system for children who weigh 19 kg
or more (over 105 cm in height).
• The child car seat can be installed with the Isox fastening system for both forward-facing and
rear-facing positions.
Important: DO NOT USE THE CHILD CAR SEAT FACING IN THE DIRECTION OF TRAVEL UNTIL
THE CHILD HAS REACHED THE AGE OF 15 MONTHS (SEE INSTRUCTIONS FOR USE).
• For the Isox installation: You must read the manual provided by the car manufacturer.
• Do not use any supporting contact points other than those that are described in the instructions
and are marked on the child restraint system.
• Do not use this child car seat at home. It has not been designed for use at home and should
only be used in your car.
• Do not leave your child unsupervised in the seat at any time.
• Do not place the rear-facing child car seat on front seats with an airbag. This could lead to
serious injuries or even death.
• The child car seat should be replaced if it is exposed to heavy impact during an accident.
• For safety reasons, the child car seat must also be secured in place in the vehicle when your
child is not sitting in the child car seat.
• Always make sure that all connection systems that secure the child car seat in the vehicle
and the belts that restrain the child are adjusted to the child’s body. Also make sure that the
belts are not twisted.
• Items of luggage or other objects that could cause injury in the event of a collision must be
properly secured.
• The rigid components and plastic parts of a child restraint system must be positioned and
installed so that they cannot get caught by a movable seat or a vehicle door during everyday
use.
• It is important to secure the abdominal belt correctly. Your child should always be fastened in
to prevent the risk of them falling out.
• It is dangerous to make changes or additions to the device without approval from the responsible
authority. Non-compliance with the installation instructions provided by the manufacturer of
the child restraint system is also associated with risks.
• This child car seat was designed for newborns and children weighing up to 19 kg. Never overload
the child car seat by transporting more than one child or additional loads in it.
• The child restraint system must not be used without the seat cover.
• The seat cover may only be replaced by other seat covers that have been recommended by
the manufacturer as the seat cover is an important component of the restraint performance.
EN

- 14 -
COMPONENTS OF THE CHILD CAR SEAT
Front view
Back view
Adjustable
head support
Comfort insert
Belt lock
Belt adjustment
Twist lever
Shoulder pad frame
Isox
connector
Seat bucket
Shoulder pad
Shoulder belt
Angle adjustment lever
Head section
adjustment
Shoulder belt
Isox connector buttons
for adjusting the length
and releasing
Belt pad
Side protection
Support leg
Support leg indicator
Button for adjusting
the length of the
support leg
Insertion aids for Isox
connectors
EN

- 15 -
USING THE CHILD CAR SEAT
Adjusting the tilt angle of
the car seat
• With one hand, use the lever on the lower front
side of the seat bucket to adjust the tilt.
• Hold the back of the seat bucket back with your
other hand and set the tilt.
• If the child car seat is used in a rear-facing position,
please always have it set to the maximum reclining
position. (Position 4)
• In a front-facing position (for a height of 76 - 105 cm)
,
you can select any of the three tilt angles (position
1 + 2 + 3) oered by the child car seat.
Turning the car seat
• Use one hand to pull the lever at the front of the
seat and use your other hand to turn the seat
bucket. The lever can be released when turning
the seat bucket.
• The seat oers four locking positions: at 90, 180,
270 and 0 out of 360 degrees to the base. The seat
bucket makes an audible click when it is moved
into one of these positions.
• Positions 1 + 2 + 3 are only suitable for use in the
direction of travel. Position 4 is exclusively for use
facing away from the direction of travel. Position 4
is achieved automatically when the child car seat
is
placed in position 1 and then rotated by 180 degrees.
Only forward-facing Only rear-facing
90°270°
0/360°
180°
4, 3 2 1
EN

- 16 -
Adjusting the belt
•
To loosen the belt, press the belt adjustment button
at the front of the seat with one hand.
• Use your other hand to hold the belt lock with the
belts and loosen it.
• If your child is fastened in, pull on the front adjust-
ment tab to tighten the belt.
Please always ensure that the belts are adjusted in
such a way that they rest on the child’s shoulders.
Adjusting the head support
• Loosen the belt and pull the lever on the front of
the head support until it is set to the desired height.
•
Release the lever and ensure that the head support
is locked in place.
Opening/closing the belt
• To release the belt, press the red button on the
belt lock and separate the two belt tongues.
• To close the belt, rst pull together the two belt
tongues and slide these into the belt lock together.
EN

- 17 -
Isox connectors
• Insert the red insertion aids through the slit in the
cushion between the backrest and seat and into
the Isox holders.
• When doing this, the at side must be facing
downward. This step is not necessary if the vehicle
already has rmly installed insertion aids.
• Press the buttons on the Isox connectors on both
sides to extend these.
• Slide the Isox connectors into the insertion aids
and press them in untilyou hear them lock in place.
• The indicators on both sides only show green
when the connections are in place. Press the child
car seat against the backrest until it is securely in
position.
Support leg
• Fold out the support leg underneath the child car
seat.
• Press the button to adjust the height of the support
leg and ensure that this is fully in contact with the
footwell of your vehicle.
• Ensure that the indicator on the support leg is
showing green.
2
EN

- 18 -
INSTALLING THE CHILD CAR SEAT
1) Rear-facing 40-105 cm, max. 19 kg
1. Press the two lateral Isox connector buttons in order to extend the length of the Isox
connectors.
2. Fold out the support leg.
3. Guide the Isox connectors to the Isox connector pieces on the seat of the vehicle and
ensure that they lock in position.
4. Slide the child car seat until it rests securely against the backrest of the car seat. Please
ensure that both Isox indicators are showing green.
5. Press the button to adjust the height of the support leg and ensure that this is fully in contact
with the footwell of your vehicle.
6. Please ensure that the indicator on the support leg is showing green.
7. Set the child car seat to the maximum reclining position and turn it until it is in rear-facing
seat position 4.
8. When placing your child in the child car seat, turn the car seat towards the car door for
convenience.
9. Loosen the belt buckle on the child car seat and place the belts on the outer side of the seat.
10. Put your child in the child car seat.
11. Adjust the height of the head support so that the shoulder belt remains free.
12. Close the belt buckle again until you hear a click.
13. Pull the front adjustment tab in order to tighten the belts. Please ensure that the straps are
not twisted.
14. Turn the seat into the rear-facing position. Check whether the child car seat is locked in
this position.
EN

- 19 -
2) Forward-facing 76-105 cm, max. 19 kg
Minimum age: 15 months
1. Press the two lateral Isox connector buttons in order to extend the length of the Isox
connectors.
2. Fold out the support leg.
3. Guide the Isox connectors to the Isox connector pieces on the seat of the vehicle and
ensure that they lock in position.
4. Slide the child car seat until it rests securely against the backrest of the car seat. Please
ensure that both Isox indicators are showing green.
5. Press the button to adjust the height of the support leg and ensure that this is fully in contact
with the footwell of your vehicle.
6. Please ensure that the indicator on the support leg is showing green.
7. When facing in the direction of travel, the child car seat oers three adjustable seat positions.
8. When placing your child in the child car seat, turn the car seat towards the car door for
convenience.
9. Loosen the belt buckle on the child car seat and place the belts on the outer side of the seat.
10. Put your child in the child car seat.
11. Adjust the height of the head support so that the shoulder belt remains free.
12. Close the belt buckle again until you hear a click.
13. Pull the front adjustment tab in order to tighten the belts. Please ensure that the straps are
not twisted.
14. Turn the seat into the forward-facing position. Check whether the child car seat is locked
in this position.
IMPORTANT:
DO NOT USE THE CHILD CAR SEAT FACING IN THE DIRECTION OF TRAVEL UNTIL THE
CHILD HAS REACHED THE AGE OF 15 MONTHS.
EN

- 20 -
EN
CLEANING
This product has been developed taking into account safety, comfort and functionality. Please
take the time to read these instructions carefully before using the product and retain these
instructions for future reference.
To ensure that your child car seat remains in a good condition for a long time, please refrain
from using solvents or abrasive or aggressive cleaning products to clean it. After washing, always
check that the fabric and stitching is not damaged. Please only ever wash the cover in accordance
with the instructions on the label (see below).
CARE
Please check the product for any possible damage regularly. Do not use a damaged product
and keep it out of the reach of children.
If you have any questions, please contact the Osann customer service team on
+49 (0) 7731/970077.
Do NOT bleach
Tumble dry at a low
temperature
Wash at 30°C
on a delicate cycle Do NOT iron
Do NOT dry clean
30
30
30
30
30
This manual suits for next models
1
Table of contents
Languages:
Other osann Car Seat manuals

osann
osann SWIFT360 User manual

osann
osann Eno360 SL User manual

osann
osann Marty Isofix User manual

osann
osann LUPO ISOFIX User manual

osann
osann Neo360 SL User manual

osann
osann Flame360 User manual

osann
osann Eno 360 User manual

osann
osann Flux Isofi x eXT User manual

osann
osann PLUTO User manual

osann
osann JUNIOR ISOFIX User manual