PAC AP4-TY12 User manual

© 2017 AAMP Global. All rights reserved. PAC is a Power Brand of AAMP Global.
PAC-audio.com
P ifi A C ti
Page 1
Rev. 111317
$GYDQFHG$PSOL¿HU,QWHUIDFH
IRU6HOHFW7R\RWD/H[XV9HKLFOHV
AP4-TY12
The AP4-TY12 provides a 6-channel pre-amp output for use with aftermarket audio equipment. Using the full range,
¿[HGOHYHOKHDGXQLWRXWSXWLQFRQMXQFWLRQZLWKGDWDEXVPHVVDJHVWKH$37<GHOLYHUVDYDULDEOHY506SUH
DPSRXWSXWZLWKIDGLQJEDODQFHHTXDOL]DWLRQDQGOHYHOFRQWUROFDSDELOLWLHV7KHPRGXOHDOVRUHWDLQVDXGLRIURP
other vehicle features such as factory navigation prompts, Bluetooth and Voice Activation. An accessory controlled
UHPRWHDPSOL¿HUWXUQRQZLUHLVDOVRSURYLGHGE\WKH$37<:KHQXVHGLQFRQMXQFWLRQZLWKWKH$3$726VROG
VHSDUDWHO\WKHPRGXOHFDQSURYLGHDYDULDEOHFKDQQHO¿EHURSWLFGLJLWDODXGLRRXWSXW726/,1.
Introduction and Features
Important Notes
1. Only compatible in vehicles equipped with a data bus controlled premium sound system. To verify compatibility in Toyota,
look for a JBL logo on the radio. In Lexus, compatible applications will have a center channel or factory subwoofer.
2. The AP4-TY12 does not support retention of the Easy Speak function.
3. Toyota Safety Connect and Lexus Enform (SOS) can easily be retained. See the Tech Brief "AP4-TY12 SOS Retention" at
PAC-audio.com for detailed instructions.
4. The factory radio's speed controlled volume, DSP, and surround sound mode are not supported by the AP4 outputs.
5. 7KHIDFWRU\DPSOL¿HUPXVWUHPDLQFRQQHFWHGDQGLQWKHYHKLFOHDIWHUWKH$PS352KDVEHHQLQVWDOOHG
6. Prior to testing, cycle the ignition off and back on again to properly initilize the AP4-TY12.
7. The radio's beep setting must be enabled on the factory radio in order to hear the audible tones when making selections
through the radio.
8. Initially, if the beep through the AP4-TY12 does not match the on / off selection through the radio, cycle the beep to the
opposite setting and back, then test again.
9. The radio's beep volume and minimum volume levels are set to 0 dB by default. If you are happy with this level in your
SDUWLFXODUDSSOLFDWLRQDGGLWLRQDODGMXVWPHQWLVQRWUHTXLUHG3OHDVHUHIHUWRWKH6HWXSDQG&RQ¿JXUDWLRQVHFWLRQRQSDJH
for more details.
10. The Radio's Nav / VR Voice, incoming E-mail tone, Ringtone, In-Call, Incoming SMS / MMS tone and Incoming SMS Voice
volumes can be adjusted through the radio's settings menu as they were prior to installation of the AP4-TY12.
11. The remote output is rated at 2A of current. If more current is needed, an external relay must be used.
12. Channels 5 and 6 are non-fading outputs. The output level of channels 5 and 6 can be controlled using the supplied level
control knob.
13. The level control knob must be connected in order to manually adjust the beep volume and minimum volume settings.
14. No adjustments can be made manually using the programming button when the module is connected to a PC.
15. Due to variations between various OEM radios and even between radio modes, the radio output voltage may vary slightly
from the selected 5 volt (or 4 volt when DIP switch 2 is down) output.
Wiring Connection Chart
To Aftermarket
Amplier
Non-FadingRearFront
1(L) 2(R) 4(R) 5(L) 6(R)3(L)
Remote Turn On Output
2A Max Output
To Radio
Non-Fading
Level Control
Knob
To Vehicle
Harness
28 - Pin
6 - Pin
10 - Pin
AP4-TY12-HAR
Remote Turn On Output (2A Max)
Mute Input From Navigation *
Mute Input From Telematics *
* See Page 2 Installation Notes 11 and 12 for further details regarding the Mute Input leads.

© 2017 AAMP Global. All rights reserved. PAC is a Power Brand of AAMP Global.
PAC-audio.com
P ifi A C ti
Page 2
Rev. 111317
$GYDQFHG$PSOL¿HU,QWHUIDFH
IRU6HOHFW7R\RWD/H[XV9HKLFOHV
AP4-TY12
6HWXSDQG&RQ¿JXUDWLRQ
1. Turn the ignition on. LED 1 on the interface will turn on and the +12v remote output will turn on.
2. Set the amp gain(s) to the desired level. We recommend using an oscilliscope and test tones to set the amp gain(s). Please
refer to the MECP Advanced study guide (p. 360) if you are unfamiliar with this process.
3. Check volume, balance, fade and EQ settings.
4. If you would like to adjust the radio's beep volume or minimum volume, do so using one of the methods outlined below. If
you are happy with the default levels, no adjustments are necessary.
0DQXDOO\6HWWLQJWKH5DGLRV%HHS9ROXPH
You can manually set the level of the factory radio beeps using the programming button on the side of the interface. If you would
like to set the beep volume using the PC app please proceed to the PC App section.
3/($6(127(/HYHOFRQWURONQREPXVWEHFRQQHFWHGWRWKHPRGXOHLQRUGHUWRVHWWKH5DGLRV%HHS9ROXPH
Installation
1. Remove factory radio.
2. Disconnect the 28-pin harness, the 10-pin harness and the 6-pin harness from the radio.
3. Connect AmpPRO harnesses to vehicle harnesses.
4. Connect AmpPRO harnesses to factory radio.
5. Set any feature DIP switches that apply to your install.
a. DIP switch 1 is used for two channel mode. In this mode, both the TOSLINK and front RCA outputs (1 and 2) become
non-fading outputs.
b. Set DIP switch 2 on (down) to lower the RCA output voltage to 4v. Leave DIP switch 2 off (up) to keep the RCA output
voltage at 5v. See troubleshooting section on page 5 for more details.
c. DIP switches 3 and 4 are not used and should remain off (up).
6. If you are using the APA-TOS1 (sold separately) refer to the instructions included with that product for its installation.
7. Connect the AmpPRO harness to the module.
8. Connect the level control knob to the module and install in an accessible location.
9. &RQQHFWWKHVLJQDOFDEOHVDQGUHPRWHLQSXWIURPWKHDIWHUPDUNHWDPSOL¿HU
10. Initially, if the beep through the AP4-TY12 does not match the on / off selection through the radio, cycle the beep to the
opposite setting and back, then test again.
11. The Yellow / Black "Mute Input from Telematics" wire will be used in conjunction with the Safety Connect / Lexus Enform
(SOS) Retention. See the Tech Brief "AP4-TY12 SOS Retention" at PAC-audio.com for detailed instructions.
12. The Brown "Mute Input From Navigation" is a spare mute lead that can be used for custom applications. The audio will be
muted whenever the Brown wire is supplied a ground.
DIP
1234
ON
Two Channel Mode 5v / 4v Preout Not Used Not Used
12 3 4
6HW',3VZLWFKHVWRWKH21SRVLWLRQWRDFWLYDWHWKHFRUUHVSRQGLQJIHDWXUHV
6HW',3VZLWFKHVWRWKH2))SRVLWLRQIRUDQ\IHDWXUHVWKDWDUHQRWGHVLUHG
Module Layout
LED 1
Interface Connector 1
Expansion Port
TOSLINK Output
(APA-TOS1 sold separately)
Programming Button
Feature Select
DIP switches
Front Output
Ch. 1(L) and 2(R)
Non-Fading Level Control
Knob Connection
USB Connection Rear Output
Ch. 3(L) and 4(R)
Non-Fading Output
Ch. 5(L) and 6(R)
LED 2

© 2017 AAMP Global. All rights reserved. PAC is a Power Brand of AAMP Global.
PAC-audio.com
P ifi A C ti
Page 3
Rev. 111317
$GYDQFHG$PSOL¿HU,QWHUIDFH
IRU6HOHFW7R\RWD/H[XV9HKLFOHV
AP4-TY12
6HWXSDQG&RQ¿JXUDWLRQFRQW
6HWWLQJWKHUDGLRVEHHSYROXPHXVLQJWKHSURJUDPPLQJEXWWRQ
1. Start with the level control knob turned all the way down (counter-clockwise).
2. Press the programming button on the side of the interface.
3. LED 1 will turn green and beeps will begin continuously sounding.
4. Turn the level control knob clockwise until the desired beep volume level is reached.
5. You can now either press the programming button twice or wait ten seconds to exit the settings.
0DQXDOO\6HWWLQJWKH0LQLPXP9ROXPH
If the minimum volume of the radio (factory radio volume level 1) is too loud, you can manually set the level of the minimum
volume using either the programming button on the side of the interface or the factory SWC. If you would like to set the
minimum volume using the AmpPRO app, please proceed to the AmpPRO App section.
3/($6(127(/HYHOFRQWURONQREPXVWEHFRQQHFWHGWRWKHPRGXOHLQRUGHUWRVHWWKH0LQLPXP9ROXPH.
6HWWLQJWKHPLQLPXPYROXPHXVLQJWKHSURJUDPPLQJEXWWRQ
1. Start with the level control knob turned all the way down (counter-clockwise).
2. Set the amp gains to the desired level.
3. Set the volume on the factory radio to 1.
4. Press the programming button on the side of the interface twice.
5. /('ZLOOWXUQDPEHUDQGWKHFKLPHVZLOOEHJLQVRXQGLQJHYHU\¿YHVHFRQGV
6. Turn the level control knob clockwise until the desired minimum volume level is reached.
7. You can now either press the programming button once or wait ten seconds to exit the settings.
8VHRIWKH$PS352$SSDOORZV
\RXWRGRWKHIROORZLQJ
• &RQ¿JXUH8VHU,QWHUIDFH2SWLRQVVXFK
as:
• Minimum Volume Level
• Chime (Radio Beeps) Volume Level
• Enable / Disable AP4 Chimes (Radio
Beeps)
• Enable / Disable factory EQ
• Bass / Mid / Treble boost frequencies
and Q factor
• Update Product Firmware
• Read Firmware / Hardware Versions
• You can download the Amp PRO app at :
KWWSDDPSJOREDOFRPDSSGRZQORDGV
AmpPRO App

© 2017 AAMP Global. All rights reserved. PAC is a Power Brand of AAMP Global.
PAC-audio.com
P ifi A C ti
Page 4
Rev. 111317
$GYDQFHG$PSOL¿HU,QWHUIDFH
IRU6HOHFW7R\RWD/H[XV9HKLFOHV
AP4-TY12
AmpPRO App (cont.)
3/($6(127(7KHVHVHWWLQJVFDQEHDGMXVWHGZLWKWKHPRGXOHLQVWDOOHGLQWKHYHKLFOHRURQWKHEHQFK+RZHYHULW
LVUHFRPPHQGHGWRPDNHWKHDGMXVWPHQWVZLWKWKHPRGXOHLQVWDOOHGDQGWKHIDFWRU\UDGLRRQVRWKDWWKHFKDQJHVFDQ
EHKHDUG
0LQLPXP9ROXPH/HYHOThis allows you to set the minimum volume level of the factory radio (factory radio volume level 1).
&KLPH9ROXPH/HYHOThis allows you to set the volume of the radio beeps that are heard through the AP4.
&KLPHV(QDEOHGThis allows you to enable / disable AP4 radio beeps (ie: tone that is heard when pressing radio buttons).
This is used when mixing factory and aftermarket speakers. It is also possible to turn the beeps off altogether using the radio's
factory settings menu.
%DQG(4(QDEOHG This allows you to enable / disable the 3 band factory EQ.
%DVV0LG7UHEOH)UHT4)DFWRU This allows you to set the center frequency that will be adjusted when setting the 3 band
factory EQ, as well as the Q Factor for each frequency. The Q Factor determines how many of the adjacent frequencies will be
affected when adjusting the selected frequency. The lower the Q Factor, the more frequencies will be affected.
60HZ 500HZ 7.5KHZ
80HZ 1KHZ 10KHZ
100HZ 1.5KHZ 12.5KHZ
120HZ 2.5KHZ 15KHZ
0.50 0.75
1.00 1.00
1.50 1.25
2.00 1.50
Bass Frequency Mid Frequency Treble Frequency
Available Frequencies and Q Factors
Bass Q Factor Mid Q Factor Treble Q Factor 0.75
1.25
)LUPZDUH8SGDWHV
7KH$PS352DSSZLOODOVRDOORZ\RXWRXSGDWHWKHLQWHUIDFHZLWKQHZ¿UPZDUHDVLWEHFRPHVDYDLODEOH3OHDVHYLVLW
ZZZSDFDXGLRFRPRUFRQWDFWRXUWHFKVXSSRUWGHSDUWPHQWWRVHHLIWKHUHLVD¿UPZDUHXSGDWHIRU\RXULQWHUIDFH
Connect the interface to your PC and select "Firmware", then “Update Firmware”. Now select “Select File”. Finally, browse to
WKHSODFHZKHUH\RXVDYHGWKH¿OHDQGVHOHFWLW7KLVZLOOEHJLQWKHXSGDWLQJSURFHVV2QFH¿QLVKHGGLVFRQQHFWWKHLQWHUIDFH
from the PC and resume normal operation.

© 2017 AAMP Global. All rights reserved. PAC is a Power Brand of AAMP Global.
PAC-audio.com
P ifi A C ti
Page 5
Rev. 111317
$GYDQFHG$PSOL¿HU,QWHUIDFH
IRU6HOHFW7R\RWD/H[XV9HKLFOHV
AP4-TY12
Restoring Factory Settings
You can restore the interface to factory default settings by pressing and holding the programming button on the side of the
module until the status LEDs start blinking red. Once the LEDs start blinking red, release the button.
This reset will restore the following settings to their factory defaults:
• Radio Beeps volume level
• Enable / Disable Factory Beeps
• Minimum volume level
• Enable / Disable factory EQ
• Factory EQ frequency
• Factory EQ Q factor
Troubleshooting
1. No audio - Check to see if LED 1 is illuminated. If not, cycle the ignition off and back on.
2. Hiss at high amp gain - Set feature DIP switch 2 to the on (down) position to lower the output voltage of the AP4 to 4v. If you
still hear the hiss, lower your amp gains until the hiss is gone.
3. Cannot hear beeps when pressing buttons on the radio - Go to the Beep On / Off setting in the radio's settings menu and
make sure it is set to ON. If it is, set it to OFF and back to ON and test for beeps again. Next, set the beep volume using
SURFHVVRXWOLQHGLQ6HWXSDQG&RQ¿JXUDWLRQRUXVLQJWKH$PS352DSSOLFDWLRQ,I\RXVWLOOGRQRWKHDUEHHSVEHVXUHWKDW
\RXDUHXVLQJWKHUHPRWHRXWSXWIURPWKH$3WRWXUQRQ\RXUDIWHUPDUNHWDPSOL¿HU
4. /RZYROXPHVHWWLQJRQUDGLRLVWRRORXG6HWPLQLPXPYROXPHXVLQJSURFHVVRXWOLQHGLQ6HWXSDQG&RQ¿JXUDWLRQRUXVLQJ
the AmpPRO application.
5. Drastic volume difference between radio sources - The radio stores the volume of the radio source from the last time that
source was used. Readjust the volume of the individual sources to the same output level.
Action / Color During Normal Operation
Solid Red Module Active
Solid Green Chime Volume Adjustment Mode
Solid Amber Minimum Volume Adjustment Mode
Rapid Blink Any Color DSP Activity
LED2 Blink Amber USB Connection Detected
Both LEDs Alternate Blinking Red Performing Memory Reset
LED Legend
LED 1

© 2017 AAMP Global. All rights reserved. PAC is a Power Brand of AAMP Global.
PAC-audio.com
P ifi A C ti
Page 1
Rev. 122017
Lexus / Toyota Amp PRO
Retention of SOS
(Safety Connect / Lexus Enform)
Technical Bulletin
Overview:
Safety Connect (SOS) is a subscription based service provided for select Lexus / Toyota models. Verify
the vehicle is equipped with Safety Connect / Lexus Enform (there will be an SOS button in the overhead
console) and that it is an active account, and that retention of SOS is a concern prior to proceeding.
,Q7R\RWD/H[XVYHKLFOHVHTXLSSHGZLWK6DIHW\&RQQHFW/H[XV(QIRUPDQGDGLJLWDODPSOL¿HUWKHIURQW
ULJKWRXWSXWRIWKHIDFWRU\DPSOL¿HUVRPHWLPHVWZHHWHUVRPHWLPHVGRRUZRRIHUVRPHWLPHVERWKJRHV
through the factory SOS telematics module. This telematics module is what creates the audio for the SOS
system (Voice Prompts, etc). There is an analog mute wire that runs from the SOS module to the factory
amp, and when the SOS is triggered by the user, the SOS module sends a ground signal on this wire to
PXWHWKHDXGLRFRPLQJIURPWKHIDFWRU\DPSOL¿HU:KHQWKLVKDSSHQVWKHDXGLRWRWKH626VSHDNHURU
VSHDNHUVLVPXWHGDQGWKH626PRGXOHLQWHUQDOO\VZLWFKHVWKHIURQWULJKWVSHDNHUWRQRZSDVVDXGLRIURP
WKHWHOHPDWLFVPRGXOHLQVWHDGRIWKHDPSOL¿HU
APPS
CAR
AUDIO
^
SEEK
TRACK SETUP
PWR VOL TUNE SCROLL
I
I
^
Safety
Connect
Module
Amp Inputs Safety Connect Inputs
Rear Left Outputs
Front Left
Speakers
Front Right
Speakers
Rear Right
Sk
Rear Left
Sk
Front Right Outputs to Safety Connect
Front Left Outputs
Rear Right Outputs
Front Right Outputs to Speakers
SOS
Safety Connect
Button in Overhead Console
SOS Mute Trigger
Factory Amplifier
Example of Factory JBL system with SOS

© 2017 AAMP Global. All rights reserved. PAC is a Power Brand of AAMP Global.
PAC-audio.com
P ifi A C ti
Page 2
Rev. 122017
Lexus / Toyota Amp PRO
Retention of SOS
(Safety Connect / Lexus Enform)
Technical Bulletin
:KHQXVLQJWKH$PS352WRDGGDIWHUPDUNHWDPSOL¿HUVDQGUHWHQWLRQRIWKHIDFWRU\626V\VWHPLV
GHVLUHGWKHUHDUHDIHZLPSRUWDQWSRLQWVWRUHPHPEHU
• ,I\RXDUHQRWXVLQJDQDIWHUPDUNHWDPSOL¿HURQWKHIURQWVSHDNHUVDQG\RXZLVKWRPXWHDXGLRZKHQ
SOS is active, the factory mute wire mentioned in the overview must be found and connected to the
<HOORZ%ODFNZLUHRQWKH$37<KDUQHVVODEHOHG³0XWH,QSXW)URP7HOHPDWLFV´6HH0HWKRGLQ
the next section for further details.
• ,I\RXDUHXVLQJDQDIWHUPDUNHWDPSOL¿HURQWKHIURQWVSHDNHUVDQGGRQRWSODQRQUXQQLQJQHZVSHDNHU
ZLUHVWRHDFKVSHDNHU\RXUDIWHUPDUNHWDPSOL¿HUVIURQWULJKWRXWSXWZLOOEHSDVVHGWKURXJKWKHIDFWRU\
626PRGXOH7KHIDFWRU\626PRGXOHFDQQRWKDQGOHDQ\PRUHWKDWZ5067KHHQJLQHHUVDW
3$&KDYHWHVWHGUXQQLQJZ506WKURXJKD7R\RWD626PRGXOHIRUH[WHQGHGSHULRGVRIWLPH
ZLWKRXWLVVXH6HH0HWKRGLQWKHEHORZIRUIXUWKHUGHWDLOV
• ,I\RXDUHSODQQLQJRQUXQQLQJQHZVSHDNHUZLUHVWRHDFKVSHDNHUDQGZLVKWRUHWDLQWKH626V\VWHP
RUWKHDIWHUPDUNHWDPSOL¿HULVUDWHGDWKLJKHUWKDQZ506WRWKHIURQWVSHDNHUV\RXZLOOQHHGWR
IROORZWKHVWHSVRXWOLQHGDV0HWKRGRQSDJH
SOS Retention Methods:
3ULRUWRLQWHUUXSWLQJDQ\RIWKHZLUHVEHWZHHQWKHIDFWRU\DPSOL¿HUIDFWRU\WHOHPDWLFVPRGXOHRU
WKHVSHDNHUVDFWLYDWHWKH626DQGQRWHZKLFKVSHDNHURUVSHDNHUVSOD\WKH626DXGLRIRUODWHU
XVH)RULQVWDQFHLIRQO\WKHIURQWULJKWPLGLVSOD\LQJWKH626DXGLRDQGWKHUHDUHDGGLWLRQDO
IURQWULJKWVSHDNHUVLI\RXFRQQHFWWRWKHZLUHVIRUWKHIURQWULJKWWZHHWHUDWWKHDPSOL¿HUWKH626
DXGLRZLOOQRWEHUHWDLQHG7RUHWDLQWKH626LQWKLVLQVWDQFH\RXPXVWFRQQHFWWRWKHZLUHVIRU
the front right mid.
0HWKRGH[6XEZRRIHU2QO\,QVWDOO
0HWKRGLVXVHGLQFDVHVZKHUHWKHIDFWRU\DPSOL¿HUZLOOFRQWLQXHWRSRZHUWKHIURQWVSHDNHUVDQG\RX
ZLVKWRPXWHWKHDXGLRIURPWKHDIWHUPDUNHWDPSOL¿HUVZKHQ626LVDFWLYH
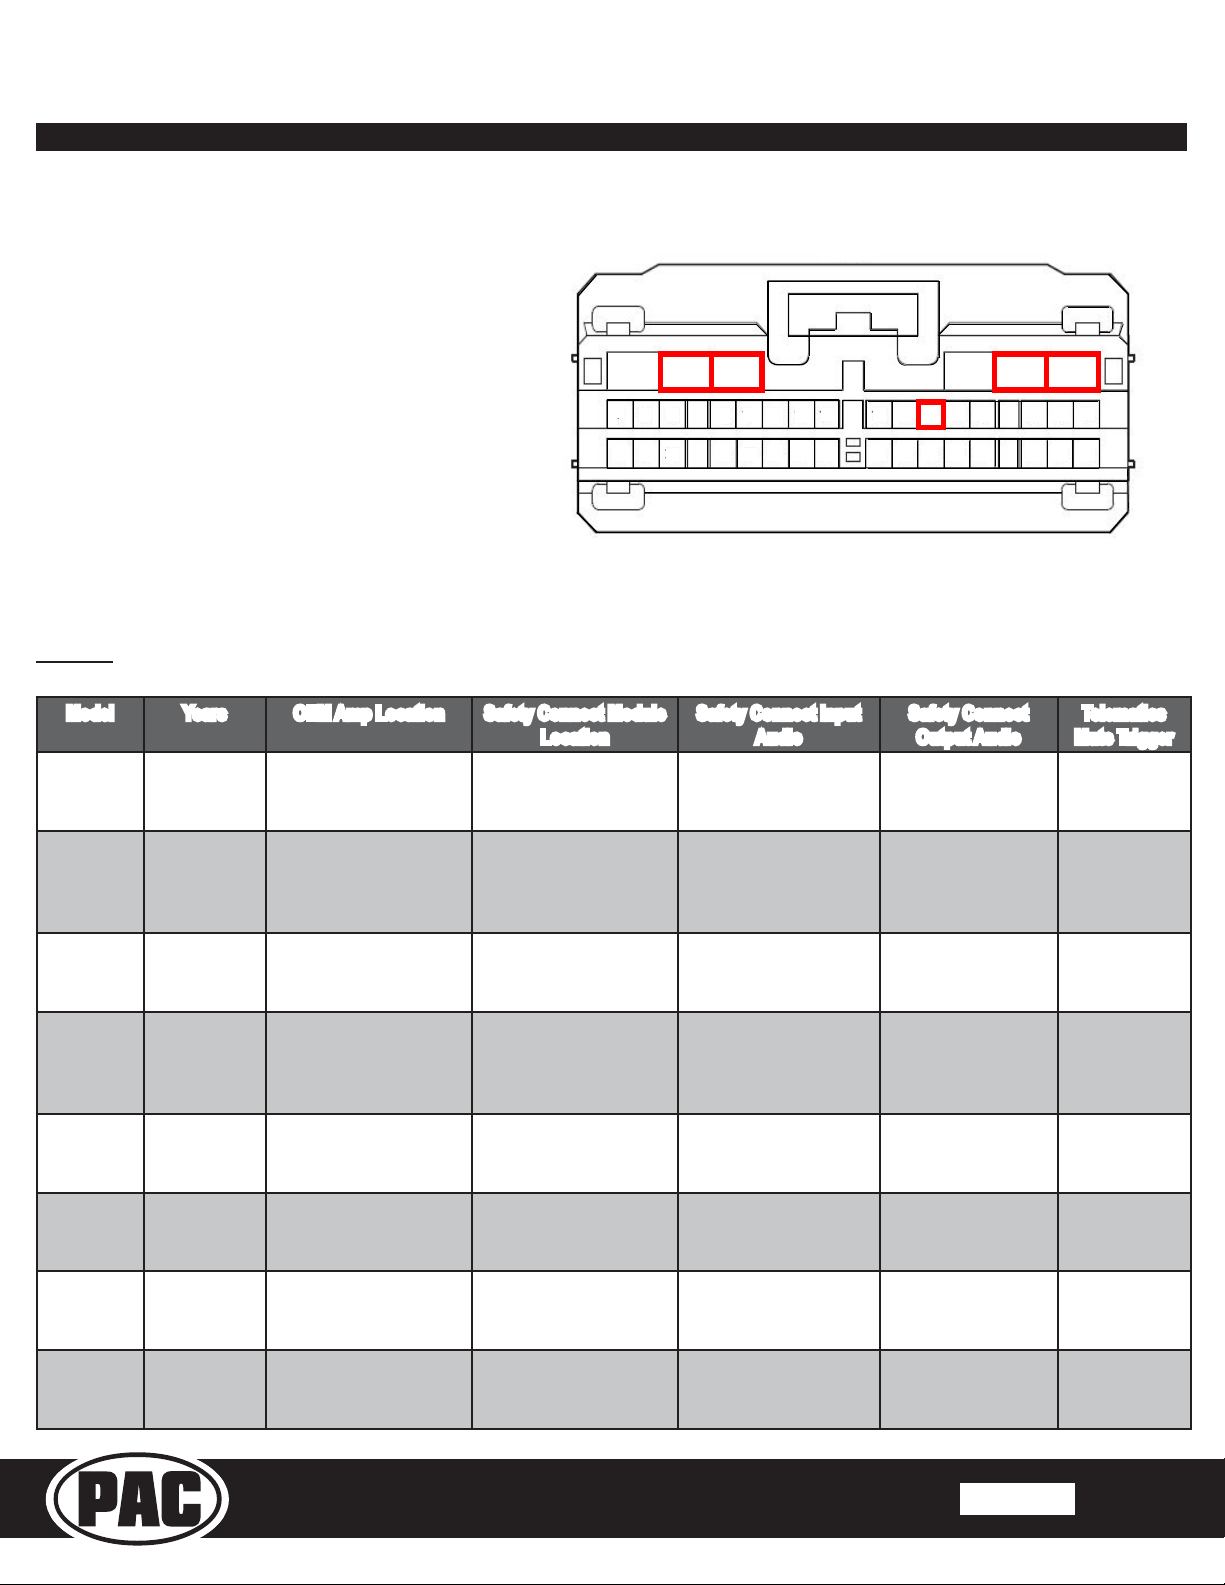
• ([WHQGDZLUHIURPWKH<HOORZ%ODFN0XWH,QSXW)URP7HOHPDWLFVZLUHWRWKH6260XWH7ULJJHUZLUH
DWWKHIDFWRU\6DIHW\&RQQHFW0RGXOH5HIHUWRWKH9HKLFOH&RQQHFWLRQVVHFWLRQIRUYHKLFOHVSHFL¿F
LQIRUPDWLRQSDJH
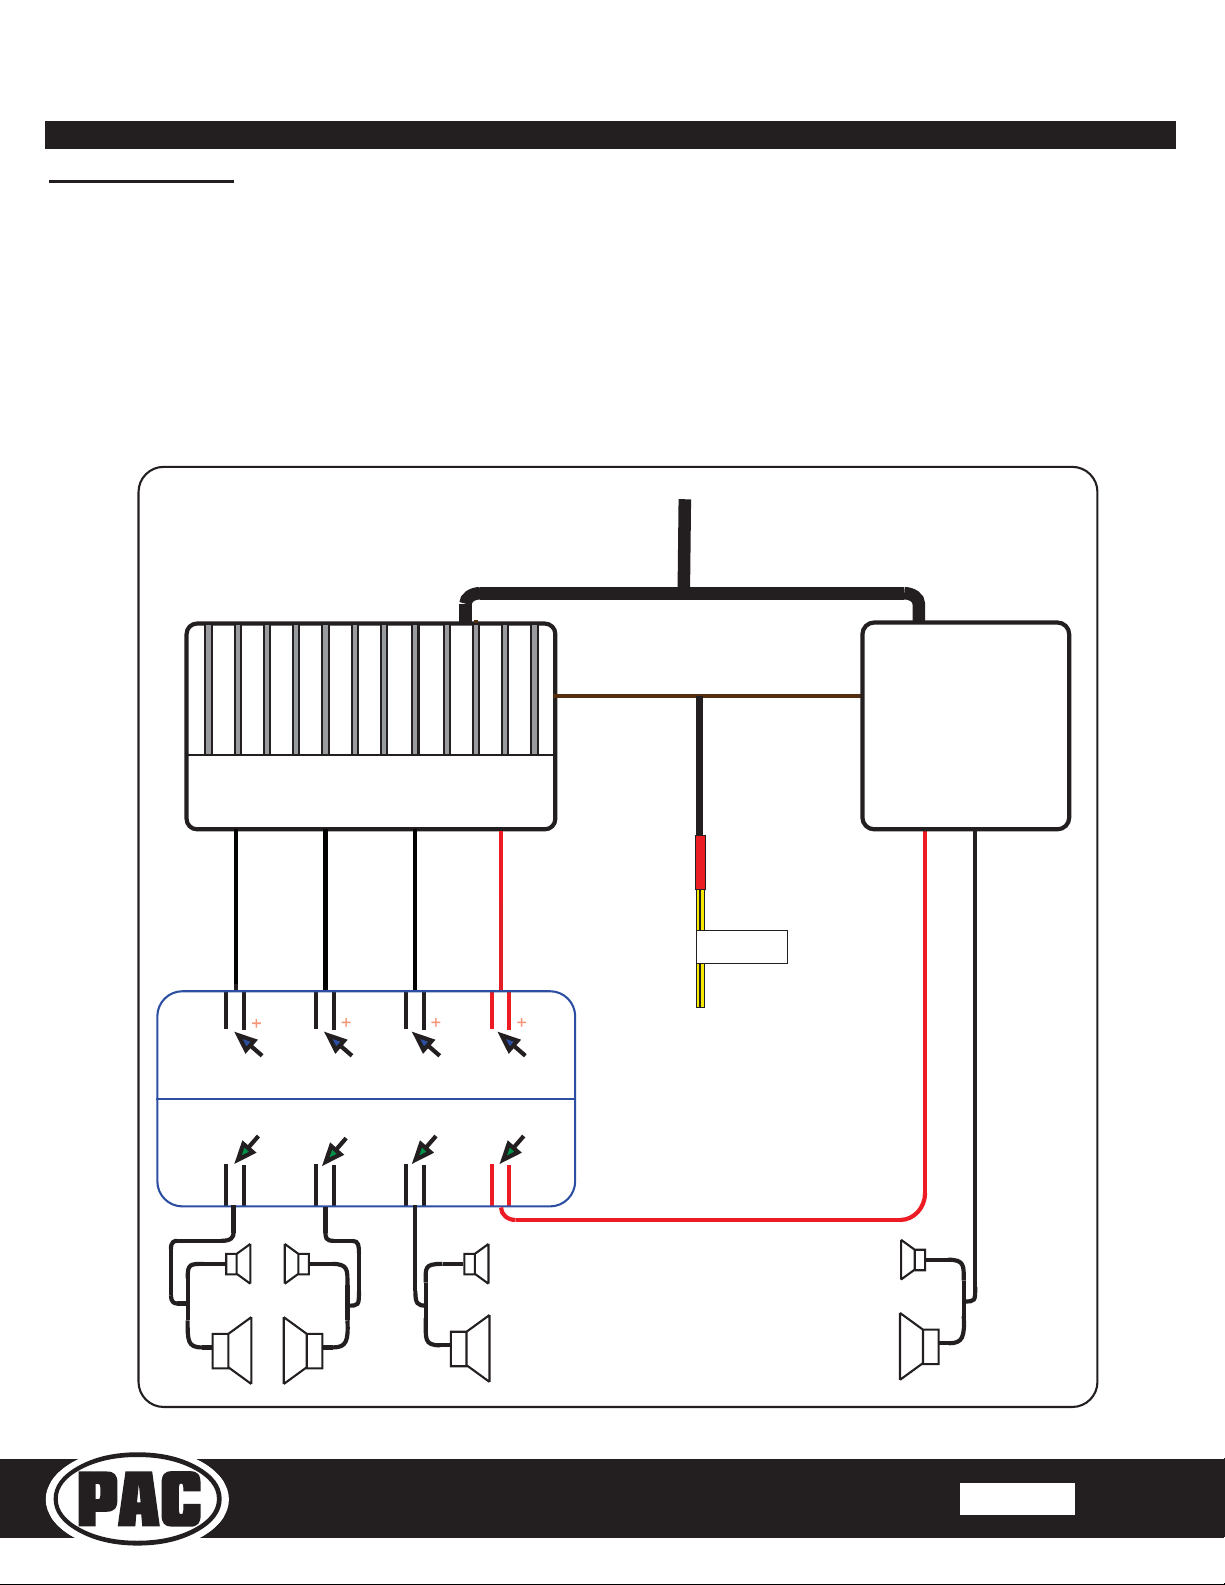
0HWKRG$PSOLI\LQJ&DELQ6SHDNHUV
0HWKRGLVXVHGZKHQZLULQJDQDIWHUPDUNHWDPSOL¿HUWRWKHIURQWVSHDNHURXWSXWVRIWKHIDFWRU\DPSOL¿HU
UDWKHUWKDQUXQQLQJQHZVSHDNHUZLUHVIURPWKHDIWHUPDUNHWDPSVWUDLJKWWRWKHIURQWVSHDNHUV One of
WKHIURQWULJKWVSHDNHURXWSXWVRIWKHDIWHUPDUNHWDPSOL¿HUSDVVHVWKURXJKWKH6DIHW\&RQQHFW0RGXOH
,WLVUHFRPPHQGHGWRXVHDQDPSOL¿HUWKDWSURYLGHVZDWWV506RUOHVVVRWKDWWKHIDFWRU\WHOHPDWLFV
PRGXOHLVQRWGDPDJHGGXHWRH[FHVVLYHKHDW,IWKHIURQWVSHDNHURXWSXWLVLQH[FHVVRIZDWWVXVH
0HWKRGLQVWHDGSDJH
• ,I\RXDUHZLULQJDQDIWHUPDUNHWDPSOL¿HUWRWKHIURQWVSHDNHUVWKURXJKWKH7HOHPDWLFV0RGXOHLW
ZLOOUHTXLUHUXQQLQJDZLUHIURPWKH$37<KDUQHVV<HOORZ%ODFNZLUHODEHOHG0XWH,QSXW)URP
7HOHPDWLFVWRDZLUHDWWKH6DIHW\&RQQHFW0RGXOH5HIHUWRWKH9HKLFOH&RQQHFWLRQVVHFWLRQIRU
YHKLFOHVSHFL¿FLQIRUPDWLRQSDJH1H[WFXWWKHIURQWVSHDNHURXWSXWVDQGUHDULIDSSOLFDEOHWR
WKHVSHDNHUZLUHRXWSXWVDWWKHIDFWRU\DPSOL¿HUDQGLQVXODWHWKHVLGHWKDWJRHVWRZDUGVWKHDPSOL¿HU
WKHVHZLUHVZLOOQRWEHXVHG:LUHWKHDIWHUPDUNHWDPSOL¿HURXWSXWVWRWKHDSSURSULDWHUHPDLQLQJ
VSHDNHUZLUHV6HHWKHH[DPSOH)LJRQWKHIROORZLQJSDJH

© 2017 AAMP Global. All rights reserved. PAC is a Power Brand of AAMP Global.
PAC-audio.com
P ifi A C ti
Page 3
Rev. 122017
Lexus / Toyota Amp PRO
Retention of SOS
(Safety Connect / Lexus Enform)
Technical Bulletin
Note:,QVRPHYHKLFOHVWKHUHZLOOEHPXOWLSOHVSHDNHUVRQWKHIURQWULJKWRXWSXWRIWKHIDFWRU\DPSOL¿HU
ZLWKRQO\RQHVSHDNHUSDVVLQJWKH626DXGLR,IWKDWLVWKHFDVHLWLVLPSRUWDQWWRXVHWKHH[DFWVSHDNHU
RXWSXWRIWKHIDFWRU\DPSWKDWFRUUHVSRQGVWRWKHVSHDNHUSOD\LQJWKH626DXGLRWRFRQQHFWWRWKHIURQW
ULJKWVSHDNHURXWSXWRIWKHDIWHUPDUNHWDPSOL¿HU,IWKHIURQWULJKWGDVKVSHDNHULVWKHRQO\VSHDNHUSOD\LQJ
WKH626DXGLRDQGQRZRQO\WKHGRRUVSHDNHUVDUHJRLQJWREHXVHGLWZRXOGEHQHFHVVDU\WRUXQWKH
DIWHUPDUNHWDPSOL¿HUVIURQWULJKWRXWSXWWRWKHIURQWULJKWGDVKVSHDNHUZLUHVWKHQXVHWKHIURQWULJKW
VSHDNHURXWSXWIURPWKH6DIHW\&RQQHFW0RGXOHWRFRQQHFWWRWKHGRRUVSHDNHUWKDWQHHGVWREHSRZHUHG
E\WKHDIWHUPDUNHWDPSOL¿HU0HWKRGFDQEHVXEVWLWXWHGIRUHDVHRI626UHWHQWLRQLIGHVLUHG5HIHUWRWKH
9HKLFOH&RQQHFWLRQVVHFWLRQRQSDJHIRUYHKLFOHVSHFL¿FLQIRUPDWLRQ
Factory Amplifier
Amp Inputs
Connect Yellow / Black
“Mute Input From Telematics”
to the SOS Mute Trigger
Safety
Connect
Module
Wires from Radio
Left Rear
Speaker Outputs
Right Rear
Speaker Outputs
Left Front
Speaker Outputs
Right Front
Speaker Outputs
+
+
+
____
+
_+++
___
*
Cut and Insulate Speaker Wires to Amp
Wire to Aftermarket Amp Speaker Outputs
Mute Input From
dĞůĞŵĂƟĐƐ
SOS Mute
Trigger
Telematics Inputs
Rear Speakers Front Left
Speakers
Front Right
Speakers
Front Right Speaker Amp Out
Input to Telematics
Front Right Speaker Telematics
Output to Front Right Speaker
(already wired from factory)
*Ima
g
e is zoomed in to show the individual
p
ositive and ne
g
ative s
p
eaker wires
)LJ
0HWKRGFRQW:

© 2017 AAMP Global. All rights reserved. PAC is a Power Brand of AAMP Global.
PAC-audio.com
P ifi A C ti
Page 4
Rev. 122017
Lexus / Toyota Amp PRO
Retention of SOS
(Safety Connect / Lexus Enform)
Technical Bulletin
0HWKRGXVLQJDVHSDUDWHVSHDNHU:
0HWKRGE\SDVVHVWKH6DIHW\&RQQHFW0RGXOHDQGXVHVDQH[WHUQDOVSHDNHUQRWVXSSOLHGWRSURYLGH
the SOS audio.
• 0HWKRGZLOOUHTXLUHUXQQLQJDZLUHIURPthe $PS352KDUQHVV<HOORZ%ODFNZLUHODEHOHG0XWH
,QSXW)URP7HOHPDWLFVWRDZLUHDWWKH6DIHW\&RQQHFW0RGXOH5HIHUWRWKH9HKLFOH&RQQHFWLRQV
VHFWLRQRQSDJHIRUYHKLFOHVSHFL¿FLQIRUPDWLRQ,WDOVRUHTXLUHVFXWWLQJWKHDXGLRLQSXWDQGRXWSXW
ZLUHVDWWKH6DIHW\&RQQHFW0RGXOHDQGLQVXODWLQJWKHLQSXWZLUHVWKDWOHDGEDFNWRWKHIDFWRU\DPSWR
SUHYHQWVKRUWLQJWKHPRXW([WHQGDVSHDNHUZLUHIURPWKH6DIHW\&RQQHFWDXGLRRXWSXWZLUHVWRDQ
H[WHUQDORKPVSHDNHUDQGKLGHLWLQDSODFHZKHUHLWZLOOEHDXGLEOHFRPPRQO\XQGHUWKHGDVKERDUG
RQWKHGULYHUVVLGHRIWKHYHKLFOHIDFLQJGRZQZDUG,IWKHYHKLFOHKDVDFHQWHUFKDQQHOVSHDNHUWKDW
LVQRORQJHUEHLQJXVHGLWLVSRVVLEOHWRUXQWKHVSHDNHUZLUHVWRWKLVVSHDNHUUDWKHUWKDQDGGLQJDQ
DGGLWLRQDOVSHDNHU6HH)LJ5HIHUWRWKH9HKLFOH&RQQHFWLRQVVHFWLRQRQSDJHIRULQIRUPDWLRQ
UHJDUGLQJZKHUHWKH6DIHW\&RQQHFW0RGXOHLVORFDWHGDQGZKDWZLUHWRH[WHQGWKH<HOORZ%ODFNZLUH
to.
Safety
Connect
Module
Factory Amplifier
Rear Left Speaker Outputs
Rear Right Speaker Outputs
Front Left Speaker Outputs
Front Right Speaker Outputs
Cut and Insulate Speaker Wires
Front Right SOS
Speaker Inputs
Center Channel
or External Speaker
(4 ohm)
Right Front Outputs
ZĞǁŝƌĞĚƚŽŝīĞƌĞŶƚ
Speaker
dĞůĞŵĂƟĐƐDƵƚĞ
Ground Out
Connect Yellow / Black
“Mute Input From Telematics”
to the SOS Mute Trigger
DƵƚĞ/ŶƉƵƚ&ƌŽŵ
dĞůĞŵĂƟĐƐ
)LJ

© 2017 AAMP Global. All rights reserved. PAC is a Power Brand of AAMP Global.
PAC-audio.com
P ifi A C ti
Page 5
Rev. 122017
Lexus / Toyota Amp PRO
Retention of SOS
(Safety Connect / Lexus Enform)
Technical Bulletin
7R\RWD
Model Years OEM Amp Location Safety Connect Module
Location
Safety Connect Input
Audio
Safety Connect
Output Audio
Telematics
Mute Trigger
4Runner 2010 - 2018 Behind Right Rear Side
Panel in Rear Cargo Area
Behind Glovebox Left
Side
38 Pin Connector
Pin 2 (+) Violet
Pin 3 (-) Pink
38 Pin Connector
Pin 5 (+) Lt Green
Pin 6 (-) Blue
38 Pin
Connector
Pin 17 Blue
Avalon 2013 - 2018 Under Front Left Seat Under Front Right Seat 38 Pin Connector
Pin 2 (+) White or Pink
Pin 3 (-) Red or Violet
38 Pin Connector
Pin 5 (+) Gray or Red
Pin 6 (-) Brown or
White
38 Pin
Connector
Pin 17 Lt Green
Camry 2012 - 2018 Under Front Left Seat Under Front Right Seat 38 Pin Connector
Pin 2 (+) Yellow
Pin 3 (-) Pink
38 Pin Connector
Pin 5 (+) Lt Green
Pin 6 (-) Blue
38 Pin
Connector
Pin 17 Red
Highlander 2014 - 2018 Under Front of Center
Console
Under Front of Center
Console
38 Pin Connector
Pin 2 (+) Lt Green
Pin 3 (-) Blue
38 Pin Connector
Pin 5 (+) White
or Lt Green
Pin 6 (-) Black or Blue
38 Pin
Connector
Pin 17 Lt Green
Prius 2010 - 2011 Under Front Right Seat In Dash Below Radio 38 Pin Connector
Pin 2 (+) Lt Green
Pin 3 (-) Blue
38 Pin Connector
Pin 5 (+) Lt Green
Pin 6 (-) Blue
38 Pin
Connector
Pin 17 Green
Prius 2016 - 2017 Under Front Right Seat In Dash Below Radio 38 Pin Connector
Pin 2 (+) Beige
Pin 3 (-) Green
38 Pin Connector
Pin 5 (+) Lt Green
Pin 6 (-) Blue
38 Pin
Connector
Pin 17 Lt Green
Sienna 2011 - 2014 Under Front Right Seat Behind Center Console 38 Pin Connector
Pin 2 (+) White
Pin 3 (-) Red
38 Pin Connector
Pin 5 (+) Blue
Pin 6 (-) Lt Green
38 Pin
Connector
Pin 17 Red
Sienna 2015 - 2017 Under Front Right Seat Behind Center Console 38 Pin Connector
Pin 2 (+) Blue
Pin 3 (-) Lt Green
38 Pin Connector
Pin 5 (+) Blue
Pin 6 (-) Lt Green
38 Pin
Connector
Pin 17 Red
Use the information contained in the chart
EHORZWRGHWHUPLQHWKHIDFWRU\$PSORFDWLRQ
6DIHW\&RQQHFW0RGXOHORFDWLRQDQGWKH3LQ
positions and colors for the wires necessary
IRUVSHFL¿FPHWKRGVRI626UHWHQWLRQ
The connector to the right represents the
6DIHWH\&RQQHFW0RGXOHFRQQHFWRUIRUDOORI
the Lexus / Toyota applications listed below.
7KH3LQSRVLWLRQVKLJKOLJKWHGLQ5HGDUH
indicative of the wire positions outlined in the
chart below.
1
14 15 16 17 18 19 20 21 2213121110987
65432
373635343332 3823 3130292827262524
Connector Viewed From Pin Side
38 - Pin Safety Connect Module Connector
Vehicle Connections

© 2017 AAMP Global. All rights reserved. PAC is a Power Brand of AAMP Global.
PAC-audio.com
P ifi A C ti
Page 6
Rev. 122017
Lexus / Toyota Amp PRO
Retention of SOS
(Safety Connect / Lexus Enform)
Technical Bulletin
Lexus
Model Years OEM Amp Location Safety Connect
Module Location
Safety Connect Module
Input Audio
Safety Connect
Module Output Audio
Telematics Mute
Trigger
CT200h 2011 - 2017 Under Front Right Seat In Dash Above Radio 38 Pin Connector
Pin 2 (+) Lt Green
Pin 3 (-) Blue
38 Pin Connector
Pin 5 (+) Green
Pin 6 (-) Brown
38 Pin Connector
Pin 17 Blue
ES300h 2013 - 2017 Under Front Left Seat Under Front Right Seat 38 Pin Connector
Pin 2 (+) Black
Pin 3 (-) Yellow
38 Pin Connector
Pin 5 (+) Black
Pin 6 (-) Yellow
38 Pin Connector
Pin 17 Black
ES350 2016 - 2017 Under Front Left Seat Under Front Right Seat 38 Pin Connector
Pin 2 (+) Black
Pin 3 (-) Yellow
38 Pin Connector
Pin 5 (+) Black
Pin 6 (-) Yellow
38 Pin Connector
Pin 17 Black
GX460 2010 - 2017 Under Front Right Seat In Dash to the Right of
Radio
38 Pin Connector
Pin 2 (+) Lt Green or Red
Pin 3 (-) Blue or White
38 Pin Connector
Pin 5 (+) Lt Green
Pin 6 (-) Blue
38 Pin Connector
Pin 17 Pink
HS250h 2010 - 2012 Under Front Right Seat In Dash Above Radio 38 Pin Connector
Pin 2 (+) Lt Green
Pin 3 (-) Blue
38 Pin Connector
Pin 5 (+) Lt Green
Pin 6 (-) Blue
38 Pin Connector
Pin 17 Gray
IS200T 2016 - 2017 Right Rear Side in Rear
Cargo Area
Behind Instrument
Cluster
38 Pin Connector
Pin 2 (+) Beige
Pin 3 (-) Pink
38 Pin Connector
Pin 5 (+) Beige
Pin 6 (-) Pink
38 Pin Connector
Pin 17 Black
IS250
IS350
2010 - 2013 Right Rear Side in Rear
Cargo Area
Right Side of Dash
Behind Glovebox
38 Pin Connector
Pin 2 (+) Blue
Pin 3 (-) Lt Green
38 Pin Connector
Pin 5 (+) Lt Green
Pin 6 (-) Red
38 Pin Connector
Pin 17 White
IS250
IS350
2014 - 2015 Right Rear Side in Rear
Cargo Area
Behind Instrument
Cluster
38 Pin Connector
Pin 2 (+) Beige
Pin 3 (-) Pink
38 Pin Connector
Pin 5 (+) Beige
Pin 6 (-) Pink
38 Pin Connector
Pin 17 Black
IS350 2016 - 2017 Right Rear Side in Rear
Cargo Area
Behind Instrument
Cluster
38 Pin Connector
Pin 2 (+) Beige
Pin 3 (-) Pink
38 Pin Connector
Pin 5 (+) Beige
Pin 6 (-) Pink
38 Pin Connector
Pin 17 Black
IS250C
IS350C
2010 - 2015 Right Rear Side in Rear
Cargo Area
Right Side of Dash
Behind Glovebox
38 Pin Connector
Pin 2 (+) Black
Pin 3 (-) Gray
38 Pin Connector
Pin 5 (+) Black
Pin 6 (-) Gray
38 Pin Connector
Pin 17 Pink
IS-F 2010 Right Rear Side in Rear
Cargo Area
Right Side of Dash
Behind Glovebox
38 Pin Connector
Pin 2 (+) Blue
Pin 3 (-) Lt Blue
38 Pin Connector
Pin 5 (+) Lt Green
Pin 6 (-) Red
38 Pin Connector
Pin 17 White
IS-F 2011 - 2014 Right Rear Side in Rear
Cargo Area
Right Side of Dash
Behind Glovebox
38 Pin Connector
Pin 2 (+) Blue
Pin 3 (-) Lt Green
38 Pin Connector
Pin 5 (+) Lt Green
Pin 6 (-) Red
38 Pin Connector
Pin 17 White
NX Series 2015 - 2018 Behind Right Rear Side
Panel in Rear Cargo
Area
In Dash Above Radio 38 Pin Connector
Pin 2 (+) Pink or White
Pin 3 (-) Red
38 Pin Connector
Pin 5 (+) Yellow or Red
Pin 6 (-) Black or White
38 Pin Connector
Pin 17 Black
RC Series 2015 - 2017 Right Rear Side in Rear
Cargo Area
Behind Instrument
Cluster
38 Pin Connector
Pin 2 (+) Beige
Pin 3 (-) Pink
38 Pin Connector
Pin 5 (+) Beige
Pin 6 (-) Pink
38 Pin Connector
Pin 17 Black
Vehicle Connections

© 2017 AAMP Global. All rights reserved. PAC is a Power Brand of AAMP Global.
PAC-audio.com
P ifi A C ti
Page 7
Rev. 122017
Lexus / Toyota Amp PRO
Retention of SOS
(Safety Connect / Lexus Enform)
Technical Bulletin
Model Years OEM Amp Location Safety Connect
Module Location
Safety Connect Module
Input Audio
Safety Connect
Module Output Audio
Telematics Mute
Trigger
RX Series 2010 - 2015 Under Floor Right
Front Side of Luggage
Compartment
On Floor Below Center
Console
38 Pin Connector
Pin 2 (+) Red
Pin 3 (-) Pink
38 Pin Connector
Pin 5 (+) Green
Pin 6 (-) Red
38 Pin Connector
Pin 17 Lt Green
RX Series 2016 - 2017 Behind Right Rear Side
Panel in Rear Cargo
Area
Center Console Below
Radio Controller Panel
38 Pin Connector
Pin 2 (+) Blue
Pin 3 (-) Violet
38 Pin Connector
Pin 5 (+) Blue
Pin 6 (-) Pink
38 Pin Connector
Pin 17 Beige
/H[XVFRQW
Vehicle Connections

AmpPRO
Advanced
Amplifier Interface
YOUR
FACTORY
SOUND
SYSTEM
UPGRADE
SOLUTION
AP4-TY12
For
Toyota
and
Lexus
Automobiles
Select
Models with 28-pin, 10-pin,
and
6-pin
Connectors
(IE
Bus)
• Simplifiesamplifierinstallation in data-bus controlled factorysound systems
• Provides variablevolume,fade, balance,
bass,
mid,and treble
audio
settings
• Retains warning chimes, navigation prompts, Bluetooth®,and telematic
audio
(ifequipped)
• Front, rear, and subpreamp
outputs
(5
volt)
• Plug-and-playinstallation
• Sub level controller (included)
• Optional optical
output
(sold separately)

Am
p
PRO
Advanced Amplifier Interface
YOUR
FACTORY
SOUND
SYSTEM
UPGRADE
SOLUTION
Today's
modern
car
audio
systems are becoming increasinglymoresophisticated and complex.
PAC
created
Amp
PRO
to
dramaticallysimplify
the
installation
of
upgraded amplifiers
in
these
data-bus controlled sound systems. AmpPRO allows
you
to
keep
the
original radio's fit, finish,
and features
while
giving
you
the
freedom
to
improve
the
audioperformance!
;-
/
High Performance
Amplifier
Sub Level Controller
~
rontAudio
AmpPRO I'
~
-----~~~~~~
-
.
~
.::::::;::-.
Rear
Audio
\_~
~
,
~
•
Included
plug
n play
!t.(·,
~~
2:._../
.
r.·
1
-==-
• S-ub• A•u-
di
_o
___
~
~
-~'<("'•
i
harness prov1des aud10
_.__
, ,
from
yow
factory
rad1o
~----------
~
\
.
~
-,
\
I
Original Factory
Amplifier
I • -•
.;...___;_
I
.....
_
.,.
[=
!!!!~!)
~
Optional
TOSUNK
output
for
other
..
I
DSP
processor
or
amplifieroptions
vw
Optional optical
output-
With
the
use
of
an
add-on
accessory,
APA-TOS1
(sold separately),
AmpPRO can providea pure digital audio
output
for
use
with
amplifiers
or
audio processors
equipped
with
a
TOSLINK
input.
NOTE
: Factory radioand amplifier
must
remain
in
the
car and beoperational in order
to
use
AmpPRO
in
your
vehicle.
Find vehicle applications, and
the
latestfirmware on PAC-audio.com
Patent#:
8014540
and
8184825
Designed and Engineered
in
the
USA·
Manufactured
in
China
~
.
~
© 2017 AAMP
Global·
PAC
is
a Power Brand
of
AAMP Global

6 I
t
.
lU~
JJ
!1111
t·
Other manuals for AP4-TY12
1
Table of contents
Other PAC Recording Equipment manuals