Parkside PLEM 50 C4 User manual

IAN 439550_2210
TÉLÉMÈTRE LASER
Mode d’emploi
LASER-ENTFERNUNGSMESSER
Bedienungsanleitung
LASER DISTANCE MEASURER
Operating instructions
LASERAFSTANDSMETER
Gebruiksaanwijzing
LASEROVÝ MĚŘIČ
VZDÁLENOSTI
Návod k obsluze
DALMIERZ LASEROWY
Instrukcja obsługi
MISURATORE DI DISTANZA
LASER
Istruzioni per l’uso
LASEROVÝ MERAČ
VZDIALENOSTI
Návod na obsluhu
LÉZERES TÁVOLSÁGMÉRŐ
Használati utasítás
LASERAFSTANDSMÅLER
Betjeningsvejledning
MEDIDOR LÁSER DE
DISTANCIAS
Instrucciones de uso
LASERSKI MERILNIK RAZDALJE
Navodila za uporabo
ЛАЗЕРНО ИЗМЕРВАТЕЛНО
УСТРОЙСТВО ЗА РАЗСТОЯНИЕ
Ръководство за експлоатация
TELEMETRU CU LASER
Instrucţiuni de utilizare
ΜΕΤΡΗΤΗΣ ΑΠΟΣΤΑΣΕΩΝ
ΛΕΪΖΕΡ
Οδηүίες χρήσης
LASERSKI MJERAČ
UDALJENOSTI
Upute za upotrebu
LASER DISTANCE MEASURER /
LASER-ENTFERNUNGSMESSER /
TÉLÉMÈTRE LASER PLEM 50 C4

GB/ IE Operating instructions Page 1
DE/AT/CH Bedienungsanleitung Seite 33
FR/BE Mode d’emploi Page 65
NL/BE Gebruiksaanwijzing Pagina 101
CZ Návod k obsluze Strana 133
PL Instrukcja obsługi Strona 165
SK Návod na obsluhu Strana 197
ES Instrucciones de uso Página 229
DK Betjeningsvejledning Side 261
IT Istruzioni per l‘uso Pagina 293
HU Használati utasítás Oldal 325
SI Navodila za uporabo Stran 357
HR Upute za upotrebu Stranica 387
RO Instrucţiuni de utilizare Pagina 419
BG Ръководство за експлоатация Cтраница 451
GR Οδηүίες χρήσης Σελίδα 485

A
B

PLEM 50 C4 GB│IE │ 1 ■
Contents
Introduction...................................3
Information about these operating instructions.................3
Proper use ............................................3
Warnings and symbols used ..............................4
Safety .......................................5
Basic safety instructions ..................................5
Safety instructions for handling batteries .....................7
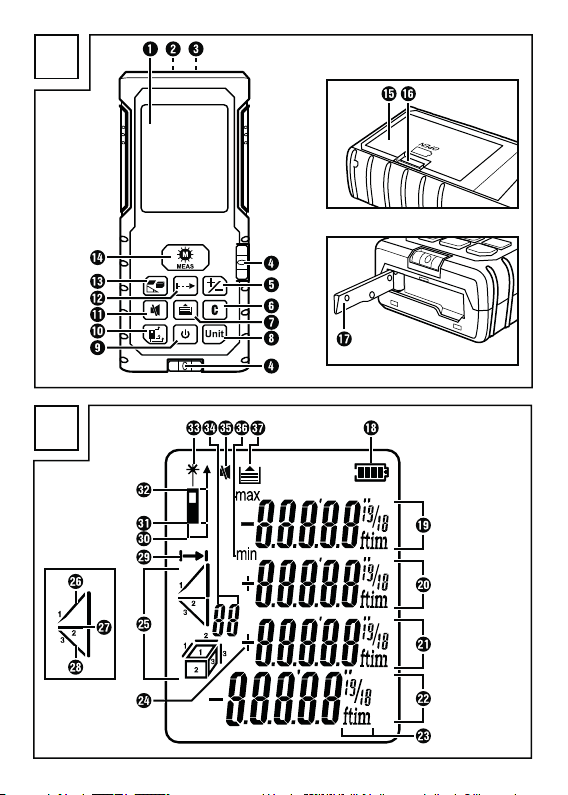
Operating elements / parts ......................9
Getting started ...............................11
Check package contents ................................11
Inserting/replacing the batteries ..........................11
Operation and use ............................12
Switching the device on/off ..............................12
Beeps ...............................................12
Main screen mode .....................................13
Selecting the length unit .................................13
Back/Clear...........................................13
Selecting the reference point .............................14
Measuring lengths ............................15
Single measurements ...................................15
Continuous measurement ................................16
Measured value functions ......................17
Area................................................17
Volume ..............................................18
Single Pythagoras......................................18
Double Pythagoras.....................................19
Addition (plus) ........................................20
Subtraction (minus).....................................21

PLEM 50 C4
■ 2 │ GB│IE
Measured value memory. . . . . . . . . . . . . . . . . . . . . . . 22
Loading measured values from the measured value memory.....22
Clearing an individual measured value from the measured value
memory .............................................23
Clearing all measured values from the measured value memory. .23
Leaving the measured value memory.......................23
Belt pouch ...................................23
Troubleshooting ..............................24
Cleaning. . . . . . . . . . . . . . . . . . . . . . . . . . . . . . . . . . . . . 25
Storage.....................................25
Disposal.....................................26
Disposal of the device ..................................26
Disposal of the packaging ...............................27
Disposal of batteries....................................28
Appendix....................................29
Technical data ........................................29
Kompernass Handels GmbH warranty .....................30
Service ..............................................32
Importer.............................................32

PLEM 50 C4 GB│IE │ 3 ■
Introduction
Information about these operating instructions
Congratulations on the purchase of your new device.
You have selected a high-quality device. The operating
instructions are part of this device. They contain important
information about safety, usage and disposal. Before using the
device, please familiarise yourself with all operating and safety
instructions. Use this device only as described and for the areas of
applications specified. Keep these operating instructions as a
reference and store them near the device. Please pass on all
documentation incl. these operating instructions to any future owner(s)
if you sell this device or give it away.
Proper use
The device is intended exclusively for measuring distances, lengths and
heights and for calculating the surface areas and volumes of indoor
spaces. Commercial or industrial use is not permitted. No liability will
be assumed in cases of improper use. No liability will be assumed for
damage caused by misuse or improper handling, the use of force or
unauthorised modification. The risk is borne solely by the user.

PLEM 50 C4
■ 4 │ GB│IE
Warnings and symbols used
The following warnings and symbols are used in these operating
instructions, on the packaging and on the device:
WARNING! A warning with this symbol and the signal
word "WARNING" indicates a potentially hazardous
situation which could result in death or serious injury if
not avoided.
ATTENTION! A warning with this symbol and the signal
word "ATTENTION" indicates a potential situation which
could result in property damage if not avoided.
Note: A note provides additional information that will
assist you in using the device.
Protect yourself from laser radiation!
Do not look into the laser beam!
DC current/voltage

PLEM 50 C4 GB│IE │ 5 ■
Safety
This section contains important safety instructions for handling the
device. This device complies with the statutory safety regulations.
Improper use may result in personal injury and property damage.
Basic safety instructions
To ensure safe operation of the device, follow the safety guidelines
set out below:
■ WARNING! Do not allow children to play with the packaging
material! Keep all packaging materials away from children.
■ This device may be used by children aged 8 years and above and
by persons with limited physical, sensory or mental capabilities or
lack of experience and knowledge, provided that they are under
supervision or have been told how to use the device safely and
are aware of the potential risks. Do not allow children to use the
device as a toy. Cleaning and user maintenance tasks may not be
carried out by children unless they are supervised.
■ WARNING! Do not use the device in locations where there
is a risk of fire or explosion, e.g. in the vicinity of inflammable
liquids or gases.
■ Check the device before every use to make sure it is in perfect
condition. Do not use the device if it is damaged in any way.
■ Do not leave the device unattended when switched on, and switch
the device off directly after use. Other people could be blinded by
the laser beam.
■ Protect the device from wetness or direct sunlight.

PLEM 50 C4
■ 6 │ GB│IE
■ Do not expose the device to any extremes of temperature or
temperature fluctuations. For example, do not leave it lying in a
car for extended periods. After exposure to large temperature
fluctuations, allow the device to acclimatise before using it again.
The precision of the device can be adversely affected by extreme
temperatures or temperature fluctuations.
■ Avoid hefty knocks or dropping the device.
■ WARNING! Switch the device off immediately and remove
the batteries from the device if you notice unusual noises, a
burning smell or smoke. Have the device checked by a qualified
specialist before using it again.
■ WARNING! Protect yourself from laser radiation!
— Laser radiation! Do not look into the beam!
Class 2 laser!
LASER RADIATION
DO NOT STARE INTO BEAM
630-670nm / Power < 1mw
CLASS 2 LASER PRODUCT
EN 60825-1:2014 /A11:2021
CAUTION
— Never look directly into the laser beam output opening.
— Looking at a laser beam through optical instruments (e.g. mag-
nifying glasses or similar) can cause eye injuries.

PLEM 50 C4 GB│IE │ 7 ■
— If operating and adjustment equipment or procedures other
than those specified here are used, this may result in hazardous
radiation exposure.
— Never aim the laser beam at reflective surfaces, people or
animals. Even brief visual contact with a laser beam can result
in eye injuries.
Safety instructions for handling batteries
WARNING! Mishandling the batteries can cause fires, explo-
sions, leakages or other hazards!
■ Keep batteries out of the reach of children.
■ Make sure that no one can swallow the batteries.
■ If a battery is swallowed, seek medical assistance immediately.
■ Always use the stated battery type.
■ Never try to recharge non-rechargeable batteries.
■ Remove rechargeable batteries from the device before recharging
them.
■ Do not throw batteries into a fire or water.
■ Never expose batteries to high temperatures or direct sunlight.
■ Never open or deform batteries.
■ Do not short-circuit the terminals.
■ Remove depleted batteries from the device and dispose of them
safely.
■ Do not use different types of batteries together or mix new
batteries with used batteries.

PLEM 50 C4
■ 8 │ GB│IE
■ Always ensure that the batteries are installed in the device
with the correctly aligned polarity.
■ If you do not intend to use the device for an extended period,
remove the batteries.
■ Check the condition of the batteries at regular intervals. Leaking
batteries can cause injuries as well as damage to the device.
■ Always use protective gloves when handling leaking batteries!
Clean the battery and device contacts with a dry cloth. Do not
let the chemicals get into contact with your skin and mucous
membranes, especially your eyes. In case of contact with chemicals,
wash the affected area with plenty of water and immediately seek
medical attention.

PLEM 50 C4 GB│IE │ 9 ■
Operating elements / parts
(See fold-out page for illustrations)
1Display
2Receiver lens
3Laser beam output opening
4Spirit level
5Add/Subtract button
6Back/Clear button
7Save button
8Unit button
9ON/OFF button
0Reference Point button
qSound button
wContinuous Measurement button
eFunction Selection button
rMEAS button
tBattery compartment cover
zTab of battery compartment cover
uEnd piece at the reference point (folding)
iBattery charge indicator
oMeasured value line 1
pMeasured value line 2
aMeasured value line 3
sResult line

PLEM 50 C4
■ 10 │ GB│IE
dMeasurement units
fAddition/subtraction
gMeasurement mode indicator symbols
hLeft hypotenuse (greatest distance to left)
jLeg (shortest distance to measured surface)
kRight hypotenuse (greatest distance to right)
lLength measurement mode symbol
yReference point (end piece)
xReference point (bottom side)
cReference point (top side)
vLaser active symbol
bMemory location line
nSound off symbol
mMax./min. values
MMemory symbol

PLEM 50 C4 GB│IE │ 11 ■
Getting started
Check package contents
▯ 1× laser distance meter
▯ 1× belt pouch
▯ 2× 1.5V alkaline batteries of type AAA/Micro/LR03
▯ These operating instructions
♦ Remove all components from the packaging. Remove all packaging
materials and the protective film from the display 1.
Note: Check the package for completeness and signs of visible
damage. If the delivery is incomplete or damage has occurred
as a result of defective packaging or during transport, contact the
service hotline (see the section Service).
Inserting/replacing the batteries
The device is delivered and operated with two 1.5V alkaline batter-
ies, type AAA/Micro/LR03. When the battery charge indicator ifirst
shows the battery symbol on the display 1, there is still enough
power for a few measurements. When the battery symbol appears,
you must replace the batteries. Measurements are no longer possible.
♦ Press the tab of the battery compartment cover zdown and
remove the battery compartment cover t.
♦ Remove any depleted batteries and insert two new type AAA/
Micro/LR03 batteries into the battery compartment. Make sure that
the polarity is correct, as indicated in the battery compartment.
♦ Place the battery compartment cover tback on the battery
compartment.

PLEM 50 C4
■ 12 │ GB│IE
Operation and use
Switching the device on/off
♦ Press the ON/OFF button 9to start the device.
♦ Hold the ON/OFF button 9pressed until the display 1
switches off. The device is switched off.
Note: (1) If no button is pressed for 30 seconds, the laser beam
and the back lighting of the display 1automatically switch off.
(2) If no button is pressed for 3 minutes, the device automatically
switches off. (3) Successful measurements are retained after the
automatic shut-off.
Beeps
■ Each press of a button and every function executed without errors
is confirmed by a short beep.
■ A longer beep is heard in the event of a fault and when switching
off.
■ In continuous measurement mode, a fast sequence of short beeps
can be heard, and in the event of an error, the fast sequence of
double beeps slows down.
♦ Press the Sound button qto enable or disable the beep in
every mode. The sound off symbol nis shown on the display 1,
when the beep is disabled.

PLEM 50 C4 GB│IE │ 13 ■
Main screen mode
♦ Press the ON/OFF button 9in any mode to return to the main
screen mode.
In the main screen mode, no data are visible on the display 1and
you can press any button to switch to the corresponding mode.
Selecting the length unit
♦ Press the Unit button 8to switch to a different unit. You can
set the following length units in this order:
Length Area Volume
0.000m 0.000 m² 0.000 m³
0.00 ft 0.00 ft² 0.00 ft³
0 ¹⁄₁₆ in 0.00 ft² 0.00 ft³
0’00’’ ¹⁄₁₆ 0.00 ft² 0.00 ft³
Back/Clear
♦ In any mode, press the Back/Clear button 6multiple times to
clear the last measured value and return to the previous value or
the previous mode.
♦ If necessary, press the Back/Clear button 6several times to
return to the main screen mode.
Note: Pressing the Back/Clear button 6while in continuous
measurement mode will stop the measurement.

PLEM 50 C4
■ 14 │ GB│IE
Selecting the reference point
The reference point (bottom side) x, the reference point (end piece) y
or the reference point (top side) con the device can be used as the
contact surface for all measurements. The reference point must be set
before performing the measurement. Otherwise, the result will differ
from the actual value. When the device is switched on, the reference
point (bottom side) xis set by default.
♦ Press the Reference Point button 0to switch the reference
point. The selected reference point is shown in the upper left
corner of the display 1.
End piece reference point
Use the reference point (end piece) yto measure from corners
(room diagonal) or hard-to-reach places. The reference point (end
piece) yis located on the bottom side of the device.
♦ Fold out the end piece at the reference point (folding) uas
shown in Fig. A.
♦ When finished, fold the end piece at the reference point (folding) u
back in.

PLEM 50 C4 GB│IE │ 15 ■
Measuring lengths
Single measurements
♦ Place or hold one of the reference points y/x/cof the device
on or against the base surface from which you would like to take
a length measurement.
♦ Check that the device is level using the spirit levels 4. To check
that a specific angle is level, make sure that the bubble is located
in the middle of the respective angle spirit level.
♦ Press the MEAS button rto activate the laser. If the laser
is active, this is indicated on the display 1by the laser active
symbol v.
♦ Now aim the laser at the target point.
♦ Press the MEAS button ragain to measure the length. If the
measurement is successful, the measurement result is shown in
the result line s. The previous measured values are then shifted
upwards.
Note: (1) Repeat the described steps to measure another length,
if necessary. (2) The length measurement mode symbol lremains
on while in single measurement mode (not flashing). (3) Up to
4 measured values can be shown on the display 1at the same
time. (4) If no button is pressed for 30 seconds, the laser beam
and the backlighting of the display 1automatically switch off.
(5) If no button is pressed for 3 minutes, the device automatically
switches off. (6) Successful measurements are retained after the
automatic shut-off.

PLEM 50 C4
■ 16 │ GB│IE
Continuous measurement
During the continuous measurement, a measurement series is
continuously sampled, and the max./min. values mof the series are
displayed. To do this, move the device along a base surface or an
edge from which you want to the measure lengths. For example, you
can measure how parallel two opposite walls are or measure the
extreme (max./min.) values while using a function.
♦ Press the continuous measurement button wto start the
continuous measurement. After a short time, the measured value
appears on the display 1.
♦ Press the continuous measurement button wagain to end the
continuous measurement. Pressing the MEAS button ror the
Back/Clear button 6will also end the continuous measurement.
The max./min. values mare now shown on the display 1along
with the most recently measured value.
Note: (1) Repeat the described steps to take another measurement,
if necessary. (2) The length measurement mode symbol lflashes
during the measurement in continuous measurement mode.
(3) Addition, subtraction, area and volume measurements cannot
be performed in this mode. (4) If no button is pressed for 30 seconds,
the laser beam and the backlighting of the display 1automatically
switch off. (5) If no button is pressed for 3 minutes, the device au-
tomatically switches off. (6) Successful measurements are retained
after the automatic shut-off.

PLEM 50 C4 GB│IE │ 17 ■
Measured value functions
To make it easier to process measurement results, the device offers a
number of integrated functions.
♦ Press the Function Selection button eonce or multiple times
to activate the following functions:
area, volume, single Pythagoras, double Pythagoras.
Note: The desired function must be selected once before the
measurement. After taking a measurement in the selected function,
the last selected function is reactivated.
Area
♦ Press the Function Selection button euntil the area symbol
gappears on the display 1.
♦ Press the MEAS button rrepeatedly to determine the length
and width of the area being measured (see also the section "Sin-
gle measurements").
The corresponding line in the area symbol g flashes for the indi-
vidual measured values. Immediately after the second measurement,
the calculated area is shown in the result line sof the display 1
and the corresponding line of the area symbol g stops flashing.
The length, width and circumference are shown in sequence in the top
three lines of the display 1.
This manual suits for next models
1
Table of contents
Languages:
Other Parkside Analytical Instrument manuals

Parkside
Parkside PLEM 20 A1 User manual

Parkside
Parkside PLEM 50 A1 User manual

Parkside
Parkside PKIK 4.3 A1 Product information sheet

Parkside
Parkside PLEM 20 A1 User manual

Parkside
Parkside 20 M PLEM 20 A4 User manual

Parkside
Parkside PLEM 50 C3 User manual

Parkside
Parkside PLEM 20 A1 User manual

Parkside
Parkside PMML 5 A1 User manual

Parkside
Parkside PLEM 20 A3 User manual

Parkside
Parkside 20 M PLEM 20 A4 User manual