manuals.online logo
Brands
  1. Home
  2. •
  3. Brands
  4. •
  5. PELI
  6. •
  7. Flashlight
  8. •
  9. PELI 7600 User manual

PELI 7600 User manual

c/ Provença, 388, Planta 7 • 08025 • Barcelona, Spain Tel: +34 934 674 999 • Fax: +34 934 877 393
007063-3110-000E 5-16968 REV A © 2016 Peli Products MR/16
All trademarks are registered and/or unregistered trademarks of Pelican Products, Inc.,
a U.S. corporation, its subsidiaries and/or affiliates.
TM
Cat. #7600
INTRODUCTION
This compact Torche produces an ultra bright light beam by using a LED powered by a
Lithium Ion battery. The 7600 Torche is designed for easy use with one hand operation and
has a dual-switch mode for constant-on and momentary-on. The 7600 Torche body is made
by high precision CNC machines from aircraft-grade aluminum alloy for the most durable
construction. The 7600 Torche is water resistant.
OPERATION
To select a program, partially depress the button (momentary press, do not click) as indicated
in the table below and hold until the 7600 flashes in acknowledgment.
The light will flash to let you know that a new program has successfully been selected.
The number of flashes indicates the program number.
To change the mode within a program, depress the button (momentary, do not click)
once for each step in the program. Presses need to be within .5 second.
Press the tail button to turn OFF.
To Change the color of the light, rotate the selector ring on the light head to:
I = white LED
II = red LED
III = green LED
TO CHARGE:
1. Rotate the collar to expose the micro-USB charge port.
2. Plug the USB cable (included) in the light and into either a USB port on a computer or any
USB AC adapter.
Light will charge in under 6 hours.
The small LED indicator between the collar and the head shows the charging status:
Flashing red = charging
Solid green = fully charged
When fully charged, unplug the cable and rotate the collar to close and protect the micro-USB port.
The 7600 has a full-time battery status indicator built in. The small LED between the collar and
the head indicates the battery status when the light is turned on:
Green = 100% > 75%
Amber = 75% > 50%
Red = 50% > 25%
Flashing red = < 25%
To use CR123s in the 7600, unscrew the tail cap and remove the Peli Li-Ion battery pack.
Install two CR123 batteries into the plastic battery tray (included) and install into the light with
the positive end facing towards the head. Replace the tail cap and hand tighten.
The 7600 will not charge with CR123 batteries installed.
When using a rechargeable battery, we recommend that only Peli Li-Ion battery packs be used
in the 7600. Other brands will not charge and were not designed to be used with this light.
GENERAL CARE AND MAINTENANCE
1. Clean o-rings with a soft clean cloth to insure that sealing area is free of dirt that could
destroy the o-ring seal.
2. Apply a light coat of clear silicone grease on the o-rings occasionally if turning action
becomes too difficult.
3. Remove the tail cap and wipe the rear threads of the 7600 Torche body and inside of
the tail cap with a soft clean cloth occasionally to avoid intermittent Torche operation.
CAUTION
To prevent the 7600 torch coming on accidentally when the torch is stored, remove the
battery. If the 7600 torch is turned on while it is in a container, the torch can overheat
and damage the torch or the material of the surrounding area.
SPECIFICATIONS
BULB: LED
BATTERY: Peli Li-Ion battery pack or (2) CR123 Lithium batteries
O-RING MAINTENANCE
Check closely for cuts, scratches, or otherwise damaged o-ring or mating lens lip surface.
Remove any dirt or foreign matter from o-ring sealing surfaces. Keep threads, o-ring groove
and inside lip of lens lubricated with silicone grease.
Battery Safety Information
WARNING: HANDLE AND STORE BATTERIES PROPERLY TO AVOID INJURY OR DAMAGE.
BATTERIES CAN BE DANGEROUS!
Most battery issues arise from improper handling of batteries, and particularly from the use of
damaged or counterfeit batteries. Please review the information below to avoid serious injury
and/or damage to your property.
Rechargeable Batteries
1. Hazardous location safety approvals for explosive environments are only valid for the
Peli battery pack that is supplied with the light.
2. For replacement battery packs only use the approved Peli battery pack for the model of the
light that you are using. The use of other battery packs will invalidate the safety approval.
3. Lights should only be charged in a non-hazardous location.
4. Lights should only be charged using the Peli charger base that is supplied with the light.
5. Lights should be charged and operated between the temperatures shown:
Charge Temperature: 0°C to 45°C (32°F to 113°F)
Operating Temperature: -20°C to 60°C (-4°F to 140°F)
6. Do not charge with alkaline batteries installed in the light. Attempting this can cause internal
gas or heat generation resulting in venting, explosion or possibly re.
7. Deep discharge of the rechargeable battery may cause batteries to vent potentially dangerous
gasses and electrolytes.
Always dispose of all batteries properly at an approved battery recycling center.
PELI LEGENDARY GUARANTEE OF EXCELLENCE
Peli Products, S.L.U. guarantees its lights against breakage or defects in workmanship. This guarantee
does not cover the lamp or batteries (rechargeable or alkaline).
Peli will either repair or replace any defective product, at our sole option. THE REMEDIES HEREBY
PROVIDED SHALL BE THE EXCLUSIVE AND SOLE REMEDY OF THE PURCHASER.
TO THE EXTENT PERMITTED BY LAW, IN NO EVENT SHALL PELI BE LIABLE FOR ANY INDIRECT,
PUNITIVE, INCIDENTAL OR CONSEQUENTIAL DAMAGES, OR SPECIAL DAMAGES,
REGARDLESS OF WHETHER A CLAIM FOR SUCH DAMAGES IS BASED ON WARRANTY,
CONTRACT, NEGLIGENCE OR OTHERWISE. In no event shall Peli’s liability to the purchaser for
damages hereunder exceed the purchase price of the product in respect of which damages are claimed.
All warranty claims of any nature are barred if the light has been altered, damaged or in any way physically
changed, or subjected to abuse, misuse, negligence or accident.
Some states do not allow the exclusion or limitation of incidental or consequential damages, so the above
limitation or exclusion may not apply to you. This warranty gives you specic legal rights, and you may
have other rights which vary from state to state.
TO MAKE A WARRANTY CLAIM WITH PELI PRODUCTS S.L.U. IN EUROPE, AFRICA AND/OR THE
MIDDLE EAST PLEASE PROCEED AS FOLLOWS:
To make a warranty claim for a Torche, the purchaser must contact the Authorized Dealer - point of
purchase. Any warranty claim shall be made by the purchaser as soon as practicable. The purchaser
will inform about the defects to the Authorized Dealer. If the defect is accepted, the Authorized Dealer will
inform the customer if the defect is repairable or on the contrary a new Torche will need to be supplied. In
the event that Peli Products determines that any returned Torche to the Authorized Dealer is not defective
within the terms of this warranty, the purchaser shall incur all costs of handling, transportation and repair
service at Peli Products’ prevailing rates.
Peli Legendary Guarantee does not cover Roto Moulded or RALS products.
Refer to http://www.peli.com/en/content/peli-warranty for full details.
BEDIENUNGSANLEITUNG
Diese kompakte Taschenlampe erzeugt einen extrem hellen Lichtstrahl mit Hilfe eines LED angetrieben von
einem Lithium-Ionen-Akku. Die Taschenlampe 7600 ist für die einfache Verwendung im Einhandbetrieb
konzipiert und besitzt einen Betriebsumschalter für permanent an oder kurzzeitiges Einschalten. Das Gehäuse
der 7600 Taschenlampe wird mit extrem präzisen, computergesteuerten Maschinen aus für Flugzeuge
geeignetem Aluminium hergestellt, um eine besonders widerstandsfähige Konstruktion zu erreichen.
Die 7600-Taschenlampe ist wasserdicht.
BEDIENUNG
Um ein Programm zu wählen, die teilweise die Taste drücken (Taster drücken, klicken Sie nicht), wie in
der folgenden Tabelle angegeben und halten, bis der 7600 in Anerkennung blinkt.
Die Lampe blinkt und zeigt damit an, dass ein neues Programm erfolgreich gewählt wurde. Die Anzahl
des Blinkens zeigt die Programmnummer an.
Um den Modus innerhalb eines Programms zu ändern, drücken Sie die Taste (nur kurz, nicht klicken)
einmal für jeden Programmschritt. Das Drücken muss innerhalb von 0,5 Sekunden stattnden.
Druckschalter am Lampenende drucken, um die Lampe AUS zu schalten
Um die Farbe der Lampe zu ändern, drehen Sie den Wahlring am Lampenkopf auf:
I = weißes LED
II = rotes LED
III = grüne LED
Aufladen:
1. Drehen Sie die Manschette, um Zugang zu dem Micro-USB-Ladeanschluss zu erhalten.
2. Stecken Sie das USB-Kabel (im Lieferumfang enthalten) in die Lampe und wahlweise in den
USB-Anschluss eines Computers oder einen sonstigen USB-Ladeadapter ein.
Die Lampe lädt in weniger als 6 Stunden auf.
Die kleine LED-Anzeige zwischen der Manschette und dem Kopf zeigt den Ladestatus an:
Rot blinkend = der Ladevorgang läuft
Beständig Grün = vollständig aufgeladen
Ziehen Sie das Kabel nach dem vollständigen Laden ab und drehen Sie die Manschette, um den
Micro-USB-Anschluss zu verschließen und zu schützen.
Die 7600 verfügt über eine integrierte Batteriestatusanzeige. Die kleine LED zwischen der Manschette und
dem Kopf zeigt den Batterieladezustand an, wenn die Lampe eingeschaltet wird:
Grün = 100 % > 75 %
Gelb = 75 % > 50 %
Rot = 50 % > 25 %
Rot blinkend = < 25 %
Um die CR123 in der 7600 zu verwenden, schrauben Sie die Endkappe ab und nehmen den Peli
Li-Ionen-Akku heraus. Legen Sie zwei CR123 Batterien in das Kunststofffach (enthalten) und installieren
sie in der Lampe, wobei das positive Ende zum Kopf hin zeigt. Setzen Sie die Endkappe wieder auf und
schrauben sie handfest zu.
Die 7600 lädt nicht bei eingelegten CR123 Batterien auf.
Wir empfehlen bei der Verwendung einer wiederaufladbaren Batterie, ausschließlich Peli Li-Ionen-Akkus für
die 7600 zu verwenden. Andere Marken werden nicht aufladen und wurden nicht für die Verwendung mit
dieser Lampe konzipiert.
ALLGEMEINE PFLEGE UN WARTUNG
1. Reinigen Sie die O-Ringe mit einem weichen und sauberen Tuch, um sicherzustellen, dass der Bereich
frei von Schmutz ist, der die O-Ring-Dichtung beschädigen könnte.
2. Tragen Sie gelegentlich eine dünne Schicht sauberes Silikonfett auf die O-Ringe, sobald die
Drehbewegung nicht mehr leicht geht.
3. Nehmen Sie den Deckel am Gehäuseende ab und wischen Sie gelegentlich das hintere Gewinde des
Gehäuses der 7600 -Taschenlampe und das Innere des Deckels am Gehäuseende mit einem weichen
und sauberen Tuch ab, um zu vermieden dass die Taschenlampe intermittierend arbeitet.
VORSICHT
Um zu verhindern, dass die 7600 Taschenlampe während der Aufbewahrung versehentlich eingeschaltet
wird, nehmen Sie die Batterie heraus. Wenn die 7600 Taschenlampe in einem Behälter angeschaltet wird,
kann sie überhitzt werden und die Taschenlampe oder das Material der Umgebung beschädigen.
WARTUNG DES O-RINGS
Überprüfen Sie den O-Ring und die Dicht-fläche des Linsenrandes genau auf Schnitte, Kratzer oder andere
Beschädigungen. Schmutz oder Fremdstoffe müssen von den O-Ring-Dichtflächen entfernt werden. Die
Gewinde, die Nut des O-Rings und der Innenrand der Linse müssen mit Silikonfett eingefettet werden.
TECHNISCHE DATEN
BIRNE: LED
BATTERIEN: Peli Li-Ionen-Akku oder (2) CR123 Lithium-Batterien
Sicherheitsmerkblatt für Batterien
WARNUNG: VERWENDEN UND LAGERN SIE BATTERIEN ORDNUNGSGEMÄSS, UM
VERLETZUNGEN ODER SCHÄDEN ZU UMGEHEN BATTERIEN KÖNNEN GEFÄHRLICH SEIN!
Die meisten Vorfälle in Verbindung mit Batterien treten aufgrund von unsachgemäßem Umgang mit Batterien
auf und insbesondere aufgrund von beschädigten oder gefälschten Batterien. Lesen Sie bitte die
nachfolgenden Informationen, um ernste Verletzungen und/oder Sachschäden zu vermeiden.
Akkus
1. Ex-Schutz-Sicherheitszulassungen für explosionsgefährdete Bereiche sind nur für den Peli Akku gültig, der mit der Lampe
geliefert wurde.
2. Verwenden Sie als Ersatz-Akku nur den zugelassenen Peli Akku für das Lampenmodell, das Sie verwenden. Die Verwendung
anderer Akkus kann die Sicherheitszulasssung ungültig werden lassen.
3. Taschenlampen sollten nur in Zonen aufgeladen werden, in denen keine Explosionsgefahr vorliegt.
4. Lampen sollten nur mit der Ladestation von Peli aufgeladen werden, die mit der Lampe geliefert wurde.
5. Beleuchtung sollte aufgeladen und betrieben werden zwischen den angegebenen Temperaturen:
Ladungstemperatur : 0°C to 45°C (32°F to 113°F)
Betriebstemperatur: -20°C to 60°C (-4°F to 140°F)
6. Laden Sie die Lampe nicht mit eingelegten Alkaline-Batterien auf. Ein solcher Versuch kann eine interne Gas- oder
Wärmeansammlung verursachen, die zu einem Ausgasen, einer Explosion oder einem möglichen Brand führen kann.
7. Eine Tiefenentladung des Akkus kann zu einem Ausgasen potentiell gefährlicher Gase und Elektrolyte führen.
Entsorgen Sie alle Batterien stets in einem zugelassenen Recyclingcenter für Batterien.
DIE LEGENDÄRE PELI-QUALITÄTSGARANTIE
Peli Products, S.L.U. gewährt Garantie auf Bruch und Verarbeitungsmängel seiner Taschenlampen. Diese
Garantie erstreckt sich nicht auf die Lampe oder ihre Batterien (seien es Akkus oder Alkalibatterien).
Peli wird in alleinigem Ermessen defekte Produkte reparieren oder wahlweise austauschen. DIE HIERMIT
BEREITGESTELLTEN ABHILFEMASSNAHMEN STELLEN DAS EXKLUSIVE UND ALLEINIGE
RECHTSMITTEL DES KÄUFERS DAR.
SOWEIT GESETZLICH ZULÄSSIG, WIRD PELI IN KEINEN FALL HAFTBAR SEIN FÜR JEGLICHE
INDIREKTE, VERSEHENTLICHE ODER NACHFOLGENDE SCHÄDEN ODER SCHADENSERSATZ
ODER BESONDERE UND ZUSÄTZLICHE SCHADENSANSPRÜCHE, UNGEACHTET DESSEN, OB EIN
ANSPRUCH FÜR SOLCHE SCHÄDEN AUF GARANTIE, EINEM VERTRAG, FAHRLÄSSIGKEIT ODER
ANDERWEITIG BASIERT. In keinem Fall wird Peli dem Käufer gegenüber haftbar für Schadensersatz sein,
der den Kaufpreis des Produkts, für das der Schadensersatz geltend gemacht werden, überschreitet.
Alle Garantieansprüche jeglicher Art werden abgelehnt, wenn die Lampe verändert, beschädigt oder auf
andere Art physikalisch verändert wurde oder Gegenstand von Missbrauch, Zweckentfremdung,
Fahrlässigkeit oder einem Unfall war.
Einige Staaten lassen den Ausschluss oder die Einschränkung der Garantie bei versehentlichen oder
folgerichtig aufgetretenen Schäden nicht zu. Daher treffen die obige Beschränkung oder der Ausschluss
möglicherweise nicht auf Sie zu. Diese Garantie gewährt Ihnen spezische gesetzliche Rechte und Sie
haben möglicherweise weitere Rechte, die von Land zu Land abweichen können.
ZUR GELTENDMACHUNG EINES GARANTIEANSPRUCHS BEI PELI PRODUCTS S.L.U. IN EUROPA,
AFRIKA UND/ODER IN NAHOST GEHEN SIE BITTE WIE FOLGT VOR:
Um einen Garantieanspruch für eine Taschenlampe geltend zu machen, muss der Käufer den autorisierten
Händler - den Verkaufspunkt - kontaktieren. Jegliche Garantieansprüche sollten vom Käufer so umgehend
wie möglich gestellt werden. Der Käufer wird dem autorisierten Händler die Defekte mitteilen. Wenn der
Defekt akzeptiert wird, informiert der autorisierte Händler den Kunden dazu, ob die Beschädigung repariert
werden kann oder ob eine neue Taschenlampe geliefert werden muss. Sollte Peli Products feststellen, dass
eine an den Fachhändler zurückgesendete Taschenlampe nicht gemäß den Bedingungen dieser Garantie
defekt ist, wird der Käufer jegliche Kosten für Handhabung, Transport und Reparaturen auf der Grundlage der
geltenden Preise von Peli Products tragen.
Die legendäre Peli-Qualitätsgarantie deckt keine rotationsgegossenen oder RALS Produkte ab.
Für vollständige Angaben zur Garantie siehe bitte http://www.peli.com/en/content/peli-warranty.
7600
Programm 1 (Standard) Hoch > Blinken > Mittel > Niedrig 8 *
Programm 2 Nur hoch 10 **
Programm 3 Hoch > Mittel > Niedrig 12 ***
Programm 4 Niedrig > Mittel > Hoch 14 ****
Programm 5 Hoch > Niedrig 16 *****
Kurz
drücken Bestätigung
blinkt
Program 1 (default) High > Strobe > Medium > Low 8 *
Program 2 High Only 10 **
Program 3 High > Medium > Low 12 ***
Program 4 Low > Medium > High 14 ****
Program 5 High > Low 16 *****
Momentary
presses
Conrmation
ashes
MANUEL D’INSTRUCTIONS
Cette torche compacte produit un rayon très puissant grâce à une LED alimenté par une batterie au
lithium-ion. La torche 7600 est conçue pour pouvoir être tenue facilement d’une seule main et dispose d’un
mode d’allumage double pour obtenir un éclairage constant ou momentané. Le corps de la torche 7600 est
fabriqué sur des machines CNC de très grande précision en alliage d’aluminium d’avionnerie pour une
meilleure résistance. La torche 7600 est étanche.
MODE DE FONCTIONNEMENT
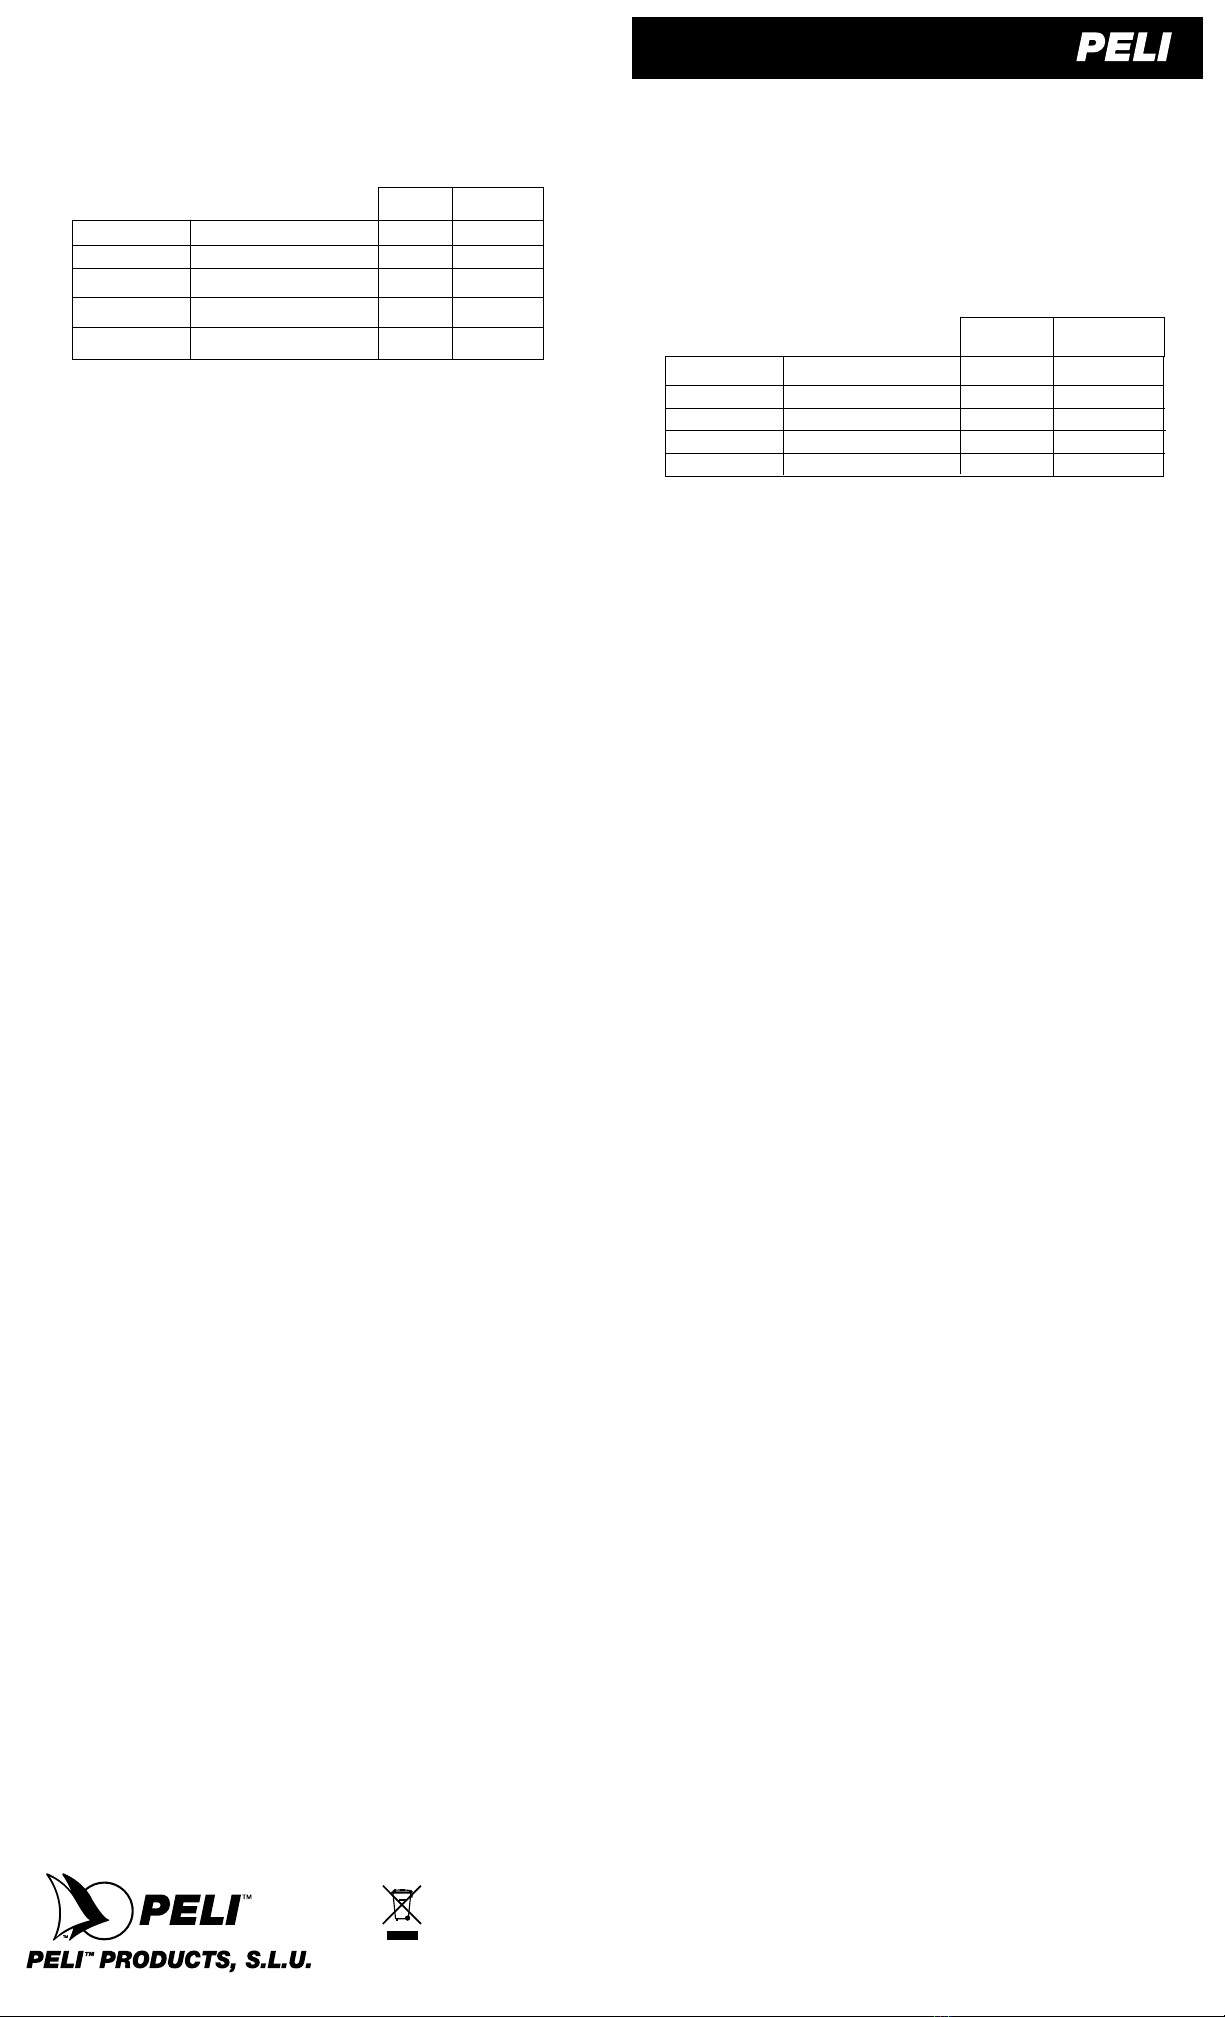
Pour sélectionner un programme, enfoncez partiellement le bouton (appuyez momentanée, ne cliquez pas)
comme indiqué dans le tableau ci-dessous et maintenez jusqu’à ce que les 7600 clignote dans la
reconnaissance.
La lampe clignote, pour vous indiquer qu’un nouveau programme a bien été sélectionné. Le nombre de
clignotements indique le numéro de programme.
Pour changer de mode dans un programme, appuyez une fois sur le bouton (temporairement, ne cliquez
pas dessus) à chaque étape du programme. Vous devez appuyer sur le bouton dans la limite de 0,5
seconde.
Appuyez sur l’interrupteur arrière pour éteindre la torche.
Pour modifier la couleur de la lampe, tourner l’anneau de sélection de la tête d’éclairage vers :
I = LED blanche
II = LED rouge
III = LED verte
Pour charger :
1. Tournez le collier pour exposer le port de charge micro-USB.
2. Branchez le câble USB (inclus) sur la lampe et sur un port USB d’un ordinateur ou sur un
adaptateur CA USB.
La charge de la lampe prend moins de 6 heures.
Le petit témoin LED entre le collier et la tête indique l’état de charge :
Rouge clignotant = charge en cours
Vert permanent = charge complète
Lorsque la lampe est entièrement chargée, débranchez le câble et tournez le collier pour fermer et
protéger le port micro-USB.
Un témoin, intégré à la lampe 7600, indique en permanence l’autonomie de la batterie. Le petit
témoin LED entre le collier et la tête indique l’état de la batterie lorsque la lampe est allumée :
Vert = 100 % > 75 %
Orange = 75 % > 50 %
Rouge = 50 % > 25 %
Rouge clignotant = < 25 %
Pour utiliser des piles CR123 dans la lampe 7600, dévissez le capuchon de la queue et retirez le
bloc-piles Li-Ion Peli. Installez deux piles CR123 dans le compartiment à piles en plastique (inclus)
et placez-le dans la lampe, pôle positif orienté vers la tête. Replacez le capuchon de la queue et
serrez-le à la main.
Si des piles CR123 sont installées, la lampe 7600 ne peut pas être chargée.
Si vous utilisez des piles rechargeables dans la lampe 7600, nous vous recommandons d’utiliser
uniquement des blocs-piles Li-Ion Peli. Les autres marques ne peuvent pas être chargées et n’ont
pas été conçues pour être utilisées avec cette lampe.
ENTRETIEN GÉNÉRAL ET MAINTENANCE
1. Nettoyez les joints toriques à l’aide d’un chiffon doux et propre pour vérifier que les parties de
fermeture ne contiennent pas de poussière qui pourrait abîmer le joint torique.
2. Appliquez une fine couche de graisse de silicone de temps en temps sur les joints toriques si
vous notez qu’il devient difficile de faire tourner la torche.
3. Enlevez le couvercle et essuyez les filetages arrières du corps de la lampe torche 7600 et
l’intérieur du couvercle de temps en temps à l’aide d’un chiffon doux et propre pour éviter un
fonctionnement inopiné de la torche.
AVERTISSEMENT
Pour éviter que la torche 7600 ne s’allume inopinément lorsqu’elle est rangée, retirez les pile.
Si la torche 7600 s’allume alors qu’elle est rangée, elle peut chauffer de manière exagérée
et être endommagée ou endommager le matériau dans lequel elle est rangée.
SPÉCIFICATIONS
AMPOULE : LED
DURÉE DE VIE PILES : Peli batterie Li-Ion ou (2) piles CR123 lithium
MAINTENANCE DU JOINT TORIQUE
Examiner attentivement le joint torique ou la superficie de la lèvre de contact de la lentille afin de
détecter les éventuelles fissures, griffes ou autre type de dommage. Éliminer les impuretés ou tout
corps étranger des surfaces d’étanchéité du joint torique. Conserver les filets, la rainure du joint
torique et la lèvre interne de la lentille bien huilés avec de la graisse de silicone. Consulter dans la
Garantie les informations concernant le remplacement du joint torique.
Informations relatives à la sécurité des piles
AVERTISSEMENT : MANIPULER ET RANGER CORRECTEMENT LES PILES, AFIN D’ÉVITER TOUT RISQUE
DE LÉSION CORPORELLE OU DE DOMMAGE MATÉRIEL LES PILES PEUVENT ÊTRE DANGEREUSES !
La plupart des problèmes liés aux piles sont dus à une manipulation incorrecte, en particulier à l’utilisation de piles endommagées ou
contrefaites. Lire attentivement les informations ci-dessous, an d’éviter tout risque de lésion corporelle et/ou de dommage
matériel de vos produits.
Piles rechargeables
1. Les agréments de sécurité de sites dangereux pour les
environnements explosifs sont valables uniquement pour le bloc-piles Peli fourni avec le système d’éclairage.
2. Pour remplacer le bloc-piles, utiliser uniquement un bloc-piles Peli homologué pour le modèle du système d’éclairage utilisé.
L’utilisation d’autres piles risque d’invalider l’agrément de sécurité.
3. Le système d’éclairage doit être rechargé uniquement dans un site non dangereux.
4. Le système d’éclairage doit être rechargé uniquement à l’aide de la base-chargeur Peli fournie avec le système d’éclairage.
5. Les torches doivent être chargées et utilisées dans la plage des températures:
Température de charge: 0°C to 45°C (32°F to 113°F)
Température d’utilisation: -20°C to 60°C (-4°F to 140°F)
6. Ne pas recharger lorsque des piles alcalines sont installées dans le système d’éclairage. Dans le cas contraire, cela pourrait
entraîner une production interne de gaz ou de chaleur, provoquant un dégazage, une explosion ou éventuellement un incendie.
7. Un déchargement important des piles rechargeables peut provoquer un dégazage potentiellement dangereux et une fuite de l’électrolyte.
Toujours mettre au rebut toutes les piles correctement dans un centre de recyclage des piles agréé.
LA GARANTIE D’EXCELLENCE LÉGENDAIRE DE PELI
Les éclairages de Peli Products S.L.U. sont garantis contre la casse et les défauts de fabrication. Cette garantie
ne couvre pas les ampoules, ni les piles (alcalines ou rechargeables).
Peli réparera ou remplacera tout produit défectueux, à sa seule discrétion. LES RECOURS
MENTIONNÉS ICI CONSTITUENT LES SEULS RECOURS DE L’ACHETEUR.
DANS LA MESURE PERMISE PAR LA LOI, EN AUCUN CAS PELI NE SERA TENU
RESPONSABLE D’AUCUN DOMMAGE IMMATÉRIEL, PUNITIF, ACCESSOIRE OU INDIRECT NI D’AUCUN
DOMMAGE PARTICULIER, QU’UNE RÉCLAMATION POUR DE TELS DOMMAGES SE BASE OU NON
SUR UNE GARANTIE, UN CONTRAT, UNE NÉGLIGENCE OU AUTRE. En aucun cas la responsabilité de
Peli envers l’acheteur en cas de dommages ne sera supérieure au prix d’achat du produit pour laquelle des
dommages et intérêts sont réclamés.
Toute demande de prise en charge sous garantie, de quelque nature que ce soit, sera refusée si le système
d’éclairage a été modié, endommagé ou physiquement transformé d’une façon ou d’une autre, ou encore sujet
à un traitement abusif, une mauvaise utilisation, une négligence ou un accident.
Certains États n’autorisent pas l’exclusion ou la limitation des dommages accessoires ou indirects, de telle
sorte que la limitation ou l’exclusion mentionnée ci-dessus peut ne pas s’appliquer dans votre cas. La présente
garantie vous donne des droits légaux spéciques et vous pouvez bénécier d’autres droits, variables d’un État
à l’autre.
POUR DÉPOSER UNE DEMANDE DE PRISE EN CHARGE SOUS GARANTIE AUPRÈS DE PELI
PRODUCTS S.L.U. EN EUROPE, EN AFRIQUE ET/OU AU MOYEN-ORIENT, PROCÉDEZ COMME SUIT :
Pour déposer une demande de prise en charge sous garantie pour une torche, l’acheteur doit contacter le
distributeur agréé ou le point d’achat. Toute demande de prise en charge sous garantie sera déposée par
l’acheteur dès que possible. L’acheteur informera le distributeur agréé des défauts constatés. Si les défauts sont
reconnus, le distributeur agréé indiquera au client si les défauts sont réparables ou si, au contraire, une nouvelle
torche devra lui être fournie. Au cas où Peli Products
considérerait qu’une torche retournée au distributeur agréé n’est pas défectueuse, conformément aux conditions
de la présente garantie, l’acheteur remboursera tous les frais de manipulation, transport et réparation aux taux
en vigueur de Peli Products.
La garantie légendaire de Peli ne couvre pas les produits rotomoulés ni les produits RALS.
Pour obtenir des informations détaillées, reportez-vous à l’adresse http://www.peli.com/en/content/peli-warranty.
MANUAL DE INSTRUCCIONES
Esta linterna compacta produce un haz de luz muy brillante gracias a su LED alimentado por una batería de
iones de litio. La linterna 7600 ha sido diseñada para ser usada de manera sencilla con una sola mano y
dispone de un interruptor con dos posiciones para un funcionamiento continuo o momentáneo. El armazón
de la linterna 7600 ha sido fabricado por máquinas CNC con una aleación de aluminio extruido similar al
utilizado en los aviones, para garantizar la máxima duración. Además, la 7600 es resistente al agua.
FUNCIONAMIENTO
Para seleccionar un programa, presione parcialmente el botón (pulsación momentánea, no haga clic)
como se indica en la tabla de abajo y manténgala presionada hasta que parpadee en 7600 el
reconocimiento.
La luz parpadeará para indicar que el nuevo programa se ha seleccionado con éxito. El número de
destellos se corresponde con el número del programa.
Para cambiar el modo en un programa, pulsar el botón (brevemente, sin que llegue a hacer clic) una vez
por cada paso del programa. Las pulsaciones deben durar menos de medio segundo.
Pulsar el botón trasero para apagar la linterna.
Para cambiar el color de la luz, gira el selector situado en el cabezal de la linterna:
I = LED blanco
II = LED rojo
III = LED verde
Cargar la linterna:
1. Gira el anillo para ver el puerto de carga microUSB.
2. Enchufa el cable USB (incluido) a la linterna y al puerto USB del ordenador o a un adaptador
USB para CA.
La linterna tarda 6 horas en cargarse.
Consulta el indicador LED que está entre el anillo y el cabezal para ver el estado de la carga:
Rojo intermitente: cargando
Verde fijo: cargada
Una vez cargada del todo, desenchufa el cable y gira el anillo para proteger el puerto microUSB.
La linterna 7600 tiene un indicador de estado de la batería. El pequeño LED que se encuentra
entre el anillo y el cabezal indica el estado de la batería cuando está encendida:
Verde: 100% > 75%
Ámbar: 75% > 50%
Rojo: 50% > 25%
Rojo intermitente: < 25%
Si quieres usar pilas CR123 en la 7600, desatornilla la tapa y saca el paquete de pilas de
ion-litio de Peli. Introduce dos pilas CR123 en la bandeja de plástico (incluida) y métela en la
linterna con el polo positivo mirando hacia el cabezal. Vuelve a poner la tapa y asegúrala a mano.
Recuerda que la linterna 7600 no se cargará con las pilas CR123 dentro.
Si prefieres usar pilas recargables, te recomendamos usar únicamente los paquetes de pilas de
ion-litio de Peli. La linterna no se cargará si usas otras marcas, ya que no están diseñadas
específicamente para este modelo.
CUIDADO GENERAL Y MANTENIMIENTO
1. Limpie las juntas tóricas con un trapo suave y limpio para asegurarse de que en la zona de
cierre no queda suciedad que pueda estropear las juntas.
2. Aplique ocasionalmente una pequeña capa de grasa de silicona pura en las juntas tóricas, en
caso de que sea demasiado difícil girar la linterna.
3. Saque de vez en cuando la tapa posterior y limpie la rosca de la linterna y la parte interior de la
tapa con un trapo limpio y suave, para evitar que la linterna funcione de manera intermitente.
ATENCIÓN
Para evitar que la linterna 7600 se encienda accidentalmente cuando está guardada, retire las
pila. Si la linterna 7600 se enciende cuando está dentro de una caja, podría calentarse en exceso
y quedar dañada o estropear los materiales cercanos a la misma.
ESPECIFICACIONES
BOMBILLA: LED
PILAS: Peli batería Li-Ion o (2) baterías de litio CR123
MANTENIMIENTO DE LA JUNTA TÓRICA
Inspeccione atentamente la junta tórica y la superficie del labio de contacto de la lente en busca
de cortes, arañazos u otro tipo de daños. Limpie cualquier suciedad o cuerpo extraño de las
superficies de contacto de la junta tórica. Mantenga las roscas, la ranura de la junta tórica y el
labio interior de la lente lubricados con grasa de silicona.
Información sobre seguridad de las pilas
AVISO: MANIPULAR Y GUARDAR LAS PILAS CON PRECAUCIÓN PARA EVITAR DAÑOS LAS PILAS
PUEDEN SER PELIGROSAS.
La mayoría de los problemas relacionados con las pilas surgen al utilizarlas incorrectamente y, sobre todo, al emplear pilas falsas o
en mal estado. Consultar la información siguiente para evitar daños personales o en el producto.
Pilas recargables
1. Los certicados de seguridad para zonas peligrosas en entornos explosivos solo se aplican al paquete de pilas Peli que se
suministra con la linterna.
2. Para cambiar los paquetes de pilas utilizar únicamente las pilas Peli homologadas para el modelo de linterna
correspondiente. El uso de otros paquetes de pilas anulará el certicado de seguridad.
3. No cargar la linterna en zonas peligrosas.
4. Cargar la linterna únicamente en la base de cargador Peli que se suministra con la linterna.
5. Las linternas deben cargarse y utilizarse en el rango de temperaturas que aparece:
Temperatura de carga: 0°C to 45°C (32°F to 113°F)
Temperatura de funcionamiento: -20°C to 60°C (-4°F to 140°F)
6. No cargar la linterna con las pilas alcalinas dentro; podría generarse gas o calor en el interior, que podría emanar y provocar
una explosión o un incendio.
7. Si las pilas recargables se descargan demasiado rápido pueden originarse fugas de gases peligrosos y electrolitos.
Desechar las pilas en un centro de reciclado homologado.
LA LEGENDARIA GARANTÍA DE EXCELENCIA DE PELI
Peli Products S.L.U. garantiza sus luces contra roturas o defectos de fabricación. Esta garantía no cubre la
lámpara ni las pilas (recargables o alcalinas).
Peli reparará o sustituirá los productos defectuosos a su entera discreción. LOS RECURSOS OFRECIDOS
POR LA PRESENTE CONSTITUIRÁN EL ÚNICO Y EXCLUSIVO RECURSO DEL COMPRADOR.
EN LA MEDIDA EN QUE LA LEY LO PERMITA, EN NINGÚN CASO PELI SERÁ
RESPONSABLE DE NINGÚN DAÑO INDIRECTO, PUNITIVO, INCIDENTAL, CONSECUENTE O
ESPECIAL, INDEPENDIENTEMENTE DE SI LA RECLAMACIÓN POR TALES DAÑOS SE BASA EN
GARANTÍA, CONTRATO, NEGLIGENCIA O CUALQUIER OTRO MEDIO. En caso de reclamación por
daños, en ningún caso la responsabilidad de Peli para con el comprador excederá el precio de compra del
producto objeto de la reclamación.
Las reclamaciones de garantía de cualquier clase se considerarán nulas en caso de que la linterna haya
sufrido alteraciones, daños o modicaciones físicas de cualquier tipo, o bien haya sido objeto de un mal uso,
un uso abusivo, o de negligencias o accidentes.
La exclusión o limitación anterior puede no aplicarse en su caso dado que algunos estados no
contemplan la exclusión o la limitación de daños consecuentes o incidentales. La presente garantía le
conere derechos legales especícos, pero puede tener otros derechos, que variarán según el estado.
PARA PRESENTAR UNA RECLAMACIÓN DE GARANTÍA A PELI PRODUCTS S.L.U. EN
EUROPA, ÁFRICA U ORIENTE MEDIO, PROCEDA DE LA SIGUIENTE MANERA:
Para realizar una reclamación de garantía sobre una linterna, el comprador debe ponerse en contacto con
el proveedor autorizado, es decir, el establecimiento de venta. El comprador deberá formular la reclamación
de garantía lo antes posible. El comprador comunicará cualquier defecto al distribuidor autorizado. Si el
defecto es reconocido, el distribuidor autorizado comunicará al cliente si es reparable o si por el contrario se
le deberá entregar una linterna nueva. En el caso de que Peli Products determine que una linterna devuelta
al distribuidor autorizado no está defectuosa, en virtud de los términos estipulados en la presente garantía,
el comprador deberá abonar a Peli Products todos los costes correspondientes a manipulación, transporte y
reparaciones, según las tarifas vigentes de Peli Products.
La legendaria garantía de Peli no cubre los productos rotomoldeados o del RALS.
Más información en http://www.peli.com/en/content/peli-warranty.
Programa 1
(
predeterminado
)
Alta intensidad > Intermitente > Intensidad media > Baja intensidad
8 *
Programa 2 Solo alta intensidad 10 **
Programa 3
Alta intensidad > Intensidad media > Baja intensidad
12 ***
Programa 4
Baja intensidad > Intensidad media > Alta intensidad
14 ****
Programa 5
Alta intensidad > Baja intensidad
16 *****
Pulsaciones
breves
Destellos de
conrmación
Programme 1
(par défaut) Élevé > Stroboscopique
> Intermédiaire
>
Faible
8 *
Programme 2 Élevé uniquement 10 **
Programme 3 Élevé > Intermédiaire > Faible
12 ***
Programme 4 Faible > Intermédiaire > Élevé
14 ****
Programme 5 Élevé > Faible
16 *****
Pression
temporaire
Clignotements de
conrmation

Other PELI Flashlight manuals

PELI 9050 User manual

PELI

PELI 9050 User manual

PELI MityLite 1975 LED Zone 0 User manual

PELI

PELI MityLite 1975 LED Zone 0 User manual

PELI 7600 User manual

PELI

PELI 7600 User manual

PELI Little ED Recoil LED 3610 User manual

PELI

PELI Little ED Recoil LED 3610 User manual

PELI 5000 User manual

PELI

PELI 5000 User manual

PELI L1 1930 Zone 0 User manual

PELI

PELI L1 1930 Zone 0 User manual

PELI MityLite 1975 LED Zone 1 User manual

PELI

PELI MityLite 1975 LED Zone 1 User manual

PELI 2710 User manual

PELI

PELI 2710 User manual

PELI Mitylite 1900 Zone 1 User manual

PELI

PELI Mitylite 1900 Zone 1 User manual

PELI 9455 User manual

PELI

PELI 9455 User manual

PELI 3315R Z1 User manual

PELI

PELI 3315R Z1 User manual

PELI 3410M User manual

PELI

PELI 3410M User manual

PELI Little Ed Recoil LED 3660 Series User manual

PELI

PELI Little Ed Recoil LED 3660 Series User manual

PELI 7000 User manual

PELI

PELI 7000 User manual

PELI MityLite 1965 LED Zone 0 User manual

PELI

PELI MityLite 1965 LED Zone 0 User manual

PELI 3315 Zone 0 User manual

PELI

PELI 3315 Zone 0 User manual

PELI StealthLite 2410 LED User manual

PELI

PELI StealthLite 2410 LED User manual

PELI MityLite 1965 LED Zone 0 User manual

PELI

PELI MityLite 1965 LED Zone 0 User manual

PELI 7070R User manual

PELI

PELI 7070R User manual

PELI 3410PL User manual

PELI

PELI 3410PL User manual

PELI StealthLite 2400 Zone 1 User manual

PELI

PELI StealthLite 2400 Zone 1 User manual

PELI 3415 Zone 0 User manual

PELI

PELI 3415 Zone 0 User manual

PELI 1920 User manual

PELI

PELI 1920 User manual

PELI 9410L LED User manual

PELI

PELI 9410L LED User manual

Popular Flashlight manuals by other brands

Strauss FL2 Instructions and information

Strauss

Strauss FL2 Instructions and information

XanLite FR120 quick guide

XanLite

XanLite FR120 quick guide

Armytek Optoelectronics Predator Cree XP-G2 R5 user manual

Armytek Optoelectronics

Armytek Optoelectronics Predator Cree XP-G2 R5 user manual

Avacom AVACOM Ain user manual

Avacom

Avacom AVACOM Ain user manual

FALCON EYE FBR0112 quick start guide

FALCON EYE

FALCON EYE FBR0112 quick start guide

StreamLight strion operating instructions

StreamLight

StreamLight strion operating instructions

Superfire GUARDIAN DBR user manual

Superfire

Superfire GUARDIAN DBR user manual

RIB SPARK ACG7061 quick start guide

RIB

RIB SPARK ACG7061 quick start guide

Nitecore MT10C user manual

Nitecore

Nitecore MT10C user manual

Coleman WideBeam 5306 How to use and enjoy

Coleman

Coleman WideBeam 5306 How to use and enjoy

Black & Decker VPX1401 manual

Black & Decker

Black & Decker VPX1401 manual

Black & Decker SnakeLight SLB1MQ manual

Black & Decker

Black & Decker SnakeLight SLB1MQ manual

Pelican 7070R user manual

Pelican

Pelican 7070R user manual

NEBO Slyde Z 6267 user manual

NEBO

NEBO Slyde Z 6267 user manual

Uni-bond E-916 Series installation manual

Uni-bond

Uni-bond E-916 Series installation manual

Bayco NIGHTSTICK FORTEM XPP-5466 instruction manual

Bayco

Bayco NIGHTSTICK FORTEM XPP-5466 instruction manual

Lite Tracker 2016A manual

Lite Tracker

Lite Tracker 2016A manual

Makita LXLM03 manual

Makita

Makita LXLM03 manual

manuals.online logo
manuals.online logoBrands
  • About & Mission
  • Contact us
  • Privacy Policy
  • Terms and Conditions

Copyright 2025 Manuals.Online. All Rights Reserved.