Phoenix Contact THERMOMARK ROLL 2.0 User manual

User manual
Operating the THERMOMARK ROLL 2.0
thermal transfer printer

2019-02-15
PHOENIX CONTACT GmbH & Co. KG • Flachsmarktstraße 8 • 32825 Blomberg • Germany
phoenixcontact.com
108716_en_01
Operating the THERMOMARK ROLL 2.0 thermal transfer printer
Designation Revision Order No.
THERMOMARK ROLL 2.0 1085260
User manual
This user manual is valid for:
UM EN THERMOMARK ROLL 2.0, Revision 01

Table of contents
108716_en_01 PHOENIX CONTACT 3 / 52
Table of contents
1 For your safety ...........................................................................................................................5
1.1 Identification of warning notes ...............................................................................5
1.2 Qualification of users .............................................................................................5
1.3 Field of application of the product ..........................................................................6
1.4 Safety notes...........................................................................................................6
2 Starting up the printer .................................................................................................................8
2.1 Unpacking and setup.............................................................................................8
2.2 Overview of the device ..........................................................................................9
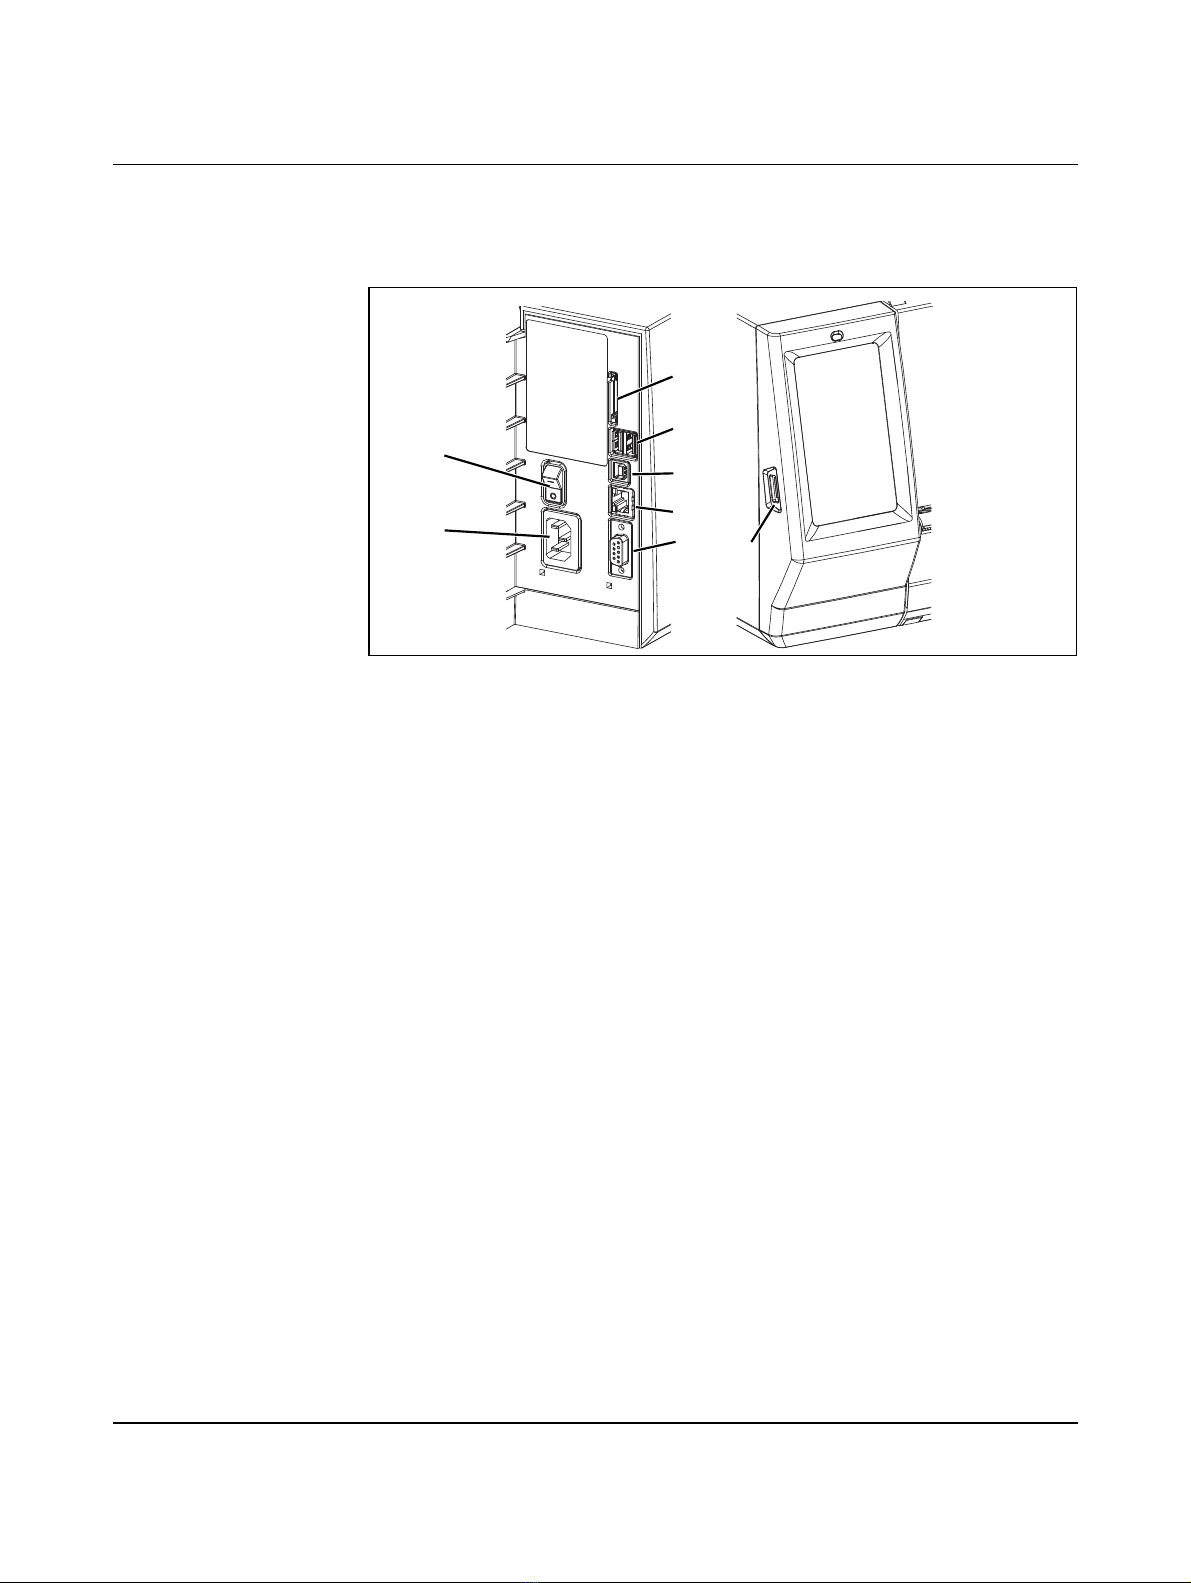
2.3 Connecting the device .........................................................................................10
2.3.1 Connecting the mains cable .................................................................10
2.3.2 Connecting the printer via USB ............................................................11
2.3.3 Connecting a printer via WLAN ............................................................12
2.3.4 Connecting a printer via Ethernet .........................................................12
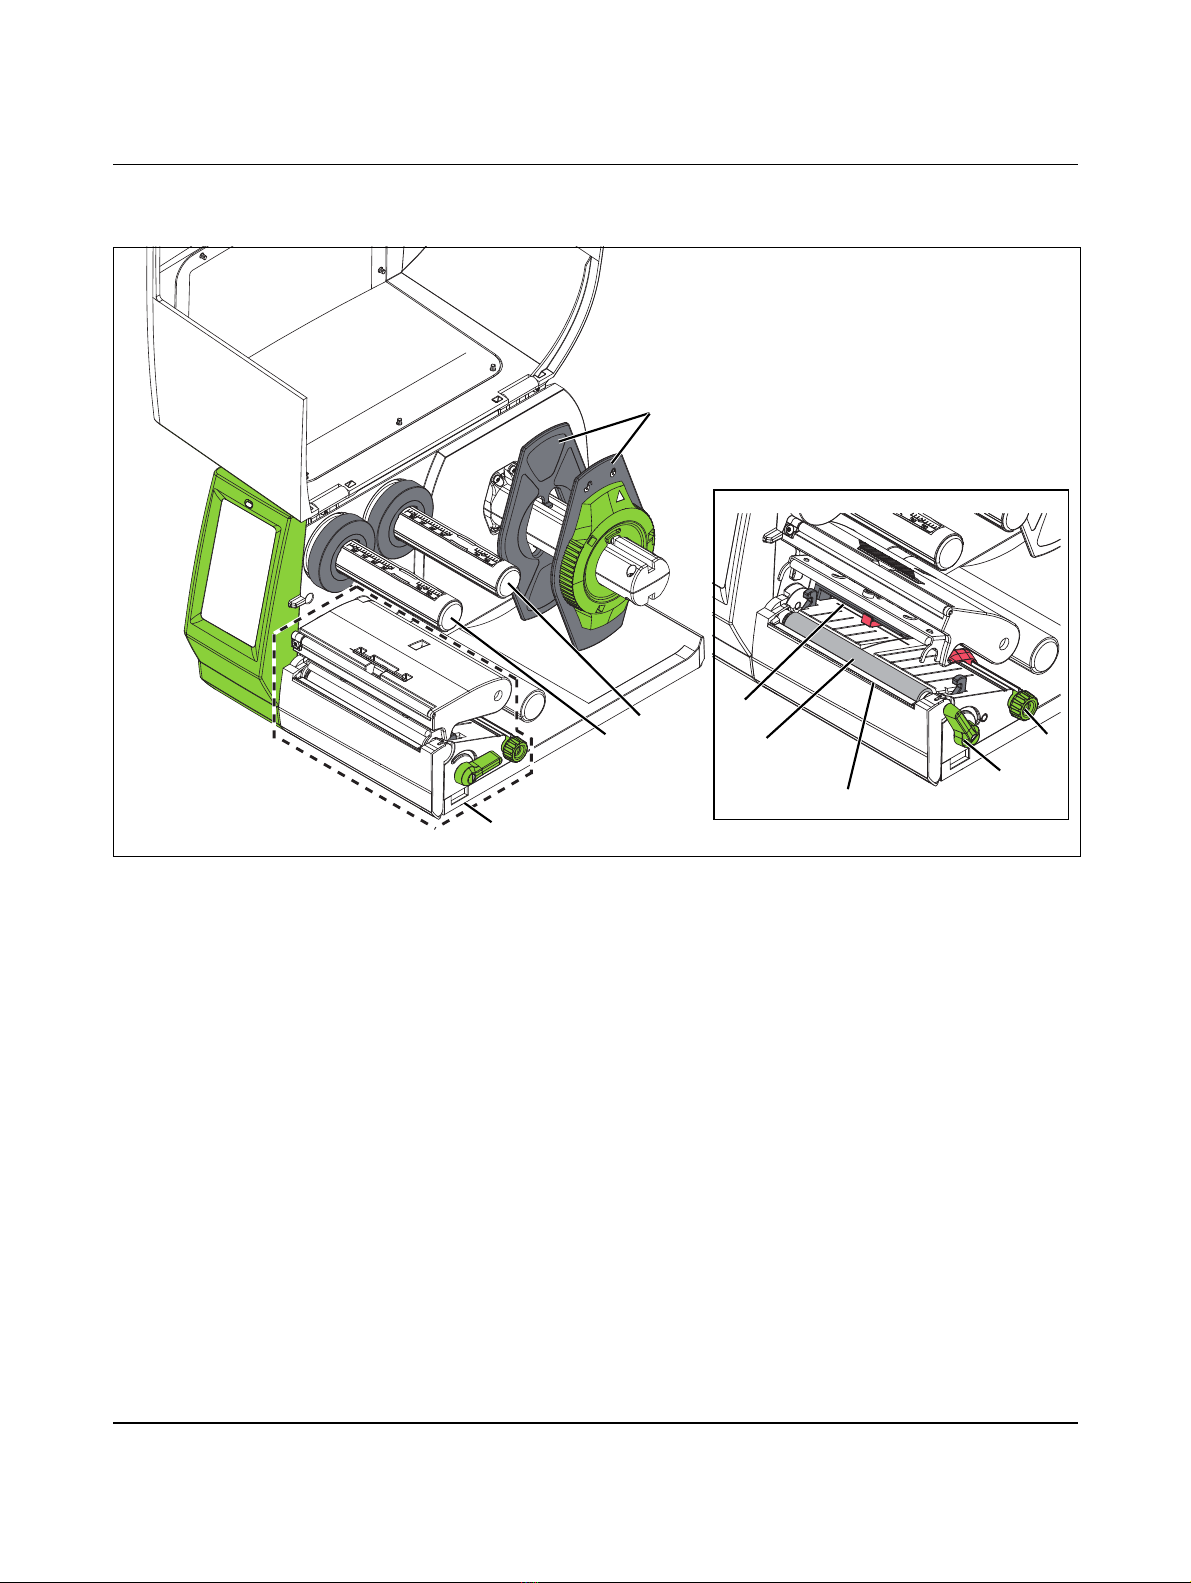
2.4 Inserting the material and printing........................................................................13
2.4.1 Inserting the material ............................................................................13
2.4.2 Inserting Leporello labels .....................................................................14
2.4.3 Inserting the ink ribbon .........................................................................15
2.4.4 Printing .................................................................................................16
2.4.5 Creating print jobs ................................................................................16
3 Operating the printer ................................................................................................................17
3.1 Touch screen display...........................................................................................17
3.1.1 Operating the display ...........................................................................17
3.1.2 Changing the language ........................................................................17
3.1.3 Start page ............................................................................................18
3.2 Operation via the menu........................................................................................19
3.3 Configuration via the website...............................................................................27
3.4 Printing via FTP ...................................................................................................28
3.4.1 FTP login ..............................................................................................28
3.4.2 Sending print data via FTP ...................................................................28
3.4.3 FTP access to storage media ...............................................................29
3.4.4 FTP firmware update ............................................................................29
4 Mounting accessories ..............................................................................................................30
4.1 Cutter or perforator ..............................................................................................30
4.2 Mounting the external media hub.........................................................................34

THERMOMARK ROLL 2.0
4 / 52 PHOENIX CONTACT 108716_en_01
5 Maintenance and troubleshooting ............................................................................................35
5.1 Cleaning the device .............................................................................................35
5.2 Cleaning the printhead.........................................................................................36
5.3 Cleaning and replacing the pressure roller ..........................................................37
5.4 Troubleshooting...................................................................................................38
5.5 Error messages ...................................................................................................39
5.6 Repairs ................................................................................................................40
5.7 Storage and disposal...........................................................................................40
A Appendix ..................................................................................................................................41
A 1 Ordering data.......................................................................................................41
A 2 Technical data .....................................................................................................44
A 3 Approvals and declarations .................................................................................46
A 4 Declaration of conformity.....................................................................................47
A 5 Index....................................................................................................................49

For your safety
108716_en_01 PHOENIX CONTACT 5 / 52
1 For your safety
Read this user manual carefully and keep it for future reference.
1.1 Identification of warning notes
1.2 Qualification of users
This user manual is addressed to persons, who are familiar with the relevant safety con-
cepts for handling electrical machines. The persons must be able to recognize dangers.
This symbol indicates hazards that could lead to personal injury.
There are three signal words indicating the severity of a potential injury.
DANGER
Indicates a hazard with a high risk level. If this hazardous situation is not
avoided, it will result in death or serious injury.
WARNING
Indicates a hazard with a medium risk level. If this hazardous situation is not
avoided, it could result in death or serious injury.
CAUTION
Indicates a hazard with a low risk level. If this hazardous situation is not avoided,
it could result in minor or moderate injury.
This symbol together with the NOTE signal word warns the reader of actions
that might cause property damage or a malfunction.
Here you will find additional information or detailed sources of information.

THERMOMARK ROLL 2.0
6 / 52 PHOENIX CONTACT 108716_en_01
1.3 Field of application of the product
The THERMOMARK ROLL 2.0 is a thermal transfer printer and thermal direct printer for the
industrial sector. With this printer, you can print continuous material such as labels and
shrink sleeves.
With thermal transfer printing, heat causes the color layer of an ink ribbon to be transferred
onto the print medium.
The result of the print depends essentially on the suitable combination of material and ink
ribbon. A low-quality ink ribbon can lead to premature wear on the printhead and result in a
poor print image. Use only print materials from Phoenix Contact.
With thermal direct printing, the printer prints directly onto thermally sensitive paper. An ink
ribbon is not required.
You may only use the printer with Phoenix Contact materials which are intended for the
THERMOMARK ROLL 2.0. The use of other materials can result in damage to the unit.
Do not use the device at locations where children may be present.
1.4 Safety notes
Life-threatening danger from mains voltage
Never open the housing of the device.
Risk of injury
If you operate the device with the cover open, rotating parts are exposed. The moving parts
can catch on loose clothing, jewelry or hair.
The device has openings that are large enough for a child's finger to fit through. Do not use
the device at locations where children may be present.
Danger of crushing from cover
Make sure you do not crush yourself with the cover.
Risk of burns
During operation, the printhead can get hot. Allow the printhead to cool down before you
change the material or clean the printhead line.
Hazard to operational safety
Incorrect operation or modifications to the device can endanger your safety or damage the
device. Do not repair the device yourself. If the device is defective, please contact
Phoenix Contact.

For your safety
108716_en_01 PHOENIX CONTACT 7 / 52
Damage to the device
– Only operate the device in locations that are dust-free as far as possible, dry and pro-
tected against splashwater.
– Protect the device and materials from humidity, damp, and dirt.
– Do not expose the device to direct sunlight.
– The device is equipped with a wide range power supply unit for AC voltages between
100 V and 240 V. The electrical connection conditions must comply with the details on
the rating plate.
Radio interference
This is a Class A item of equipment (EN 55032). When using the equipment in residential
areas, it may cause radio interference. In this case, the operator is obligated to take appro-
priate measures.
Notes on the printhead
The printhead is the most sensitive part of your printer. Improper handling can damage the
printhead.
During printing, always make sure that there is no contamination on the material as this
could be pulled underneath the printhead. This can damage the printhead.
The ink ribbon must be at least 5 mm wider than the material. Direct contact between the
printhead and the material can lead to increased wear on the printhead.

THERMOMARK ROLL 2.0
8 / 52 PHOENIX CONTACT 108716_en_01
2 Starting up the printer
2.1 Unpacking and setup
Scope of supply
– Printer
– Mains cable
– USB cable
– Empty film core (possibly already mounted on the take-up hub)
– Label roll EML (20X8)R/TL
– THERMOMARK-RIBBON 110/50 ink ribbon
– Data carrier with download link for the driver. The data carrier also contains this user
manual in several languages.
– User manual in German and English
Unpacking
• Check the device for damage which may have occurred during transport.
• Retain the original packaging for subsequent transport.
Requirements for the installation location
• Place the device on a level surface.
When transporting the printer, you must remove the ink ribbon and the label material.
NOTE: Damage to the device
Only operate the device in locations that are dust-free as far as possible, dry and protect-
ed against splashwater. Protect the device and materials from humidity, damp, and dirt.
Do not expose the device to direct sunlight.

Starting up the printer
108716_en_01 PHOENIX CONTACT 9 / 52
2.2 Overview of the device
Figure 2-1 Overview
1 Printing unit
2 Take-up hub, for winding the ink ribbon
3 Supply hub, for supplying the ink ribbon
4 Margin stop, for securing the material roll
5 Photoelectric barrier, for label detection
6 Pressure roller
7 Tear-off plate
8 Lever, for locking the printhead
9 Rotary dial, for setting the material guide margin stop
8
3
4
29
7
6
1
5

THERMOMARK ROLL 2.0
10 / 52 PHOENIX CONTACT 108716_en_01
2.3 Connecting the device
Mains and computer connections
Figure 2-2 Connections on the rear of the device
1Power supply switch
2Mains socket
3SD card slot
4Two USB master interfaces for keyboard, scanner, USB memory device and WLAN
stick
5USB slave interface, full-speed, for connection to a computer
6Ethernet 10/100Base-T
7RS-232 interface
8USB master interface for keyboard, scanner, USB memory device, WLAN stick and
Bluetooth adapter
Errors can occur during operation due to insufficient or missing grounding. Make sure that
all devices and cables connected to the printer are grounded.
Before connecting or disconnecting devices or cables, switch off the printer and the con-
nected devices. USB connections can be established and disconnected when the printer is
switched on.
2.3.1 Connecting the mains cable
The THERMOMARK ROLL 2.0 is equipped with a wide range power supply unit for AC volt-
ages between 100 V and 240 V.
• Insert the mains cable into the socket of the device.
• Connect the mains cable to a socket.
1
3
2
4
5
6
78

Starting up the printer
108716_en_01 PHOENIX CONTACT 11 / 52
2.3.2 Connecting the printer via USB
A driver must be installed in order to operate the printer. The driver can be found on the In-
ternet at phoenixcontact.net/qr/1085260.
• Switch on the computer.
• Exit all programs that are currently running.
• Switch on the device.
• Connect the computer to the device using the supplied USB cable.
• Download and install the driver software.
Following successful installation, an icon for the THERMOMARK ROLL 2.0 appears in the
Windows “Devices and Printers” system folder.
• Open the marking software.
– CLIP PROJECT can be downloaded at phoenixcontact.net/qr/5146053.
– PROJECT complete can be downloaded at phoenixcontact.net/qr/1050453.
CLIP PROJECT marking • Open “File, Print setup...” and create a new device under “Thermo,
THERMOMARK ROLL 2.0”.
• Set up the device in the marking software.
You can find CLIP PROJECT marking instructions at phoenixcontact.net/qr/5146040.
PROJECT complete
marking
• Open “File, Printer Configurations” and select the THERMOMARK ROLL 2.0 printer in
the “New” field.
• Select the THERMOMARK ROLL 2.0 from the field with available printers.
• Set up the device in the marking software.
NOTE: Malfunctions during operation due to insufficient or missing shielding
Ensure that all the cables connected to the device are shielded.

THERMOMARK ROLL 2.0
12 / 52 PHOENIX CONTACT 108716_en_01
2.3.3 Connecting a printer via WLAN
Installing a WLAN stick
• Insert a WLAN stick into the USB interface to the left of the display.
Setting up the WLAN connection
• Activate the WLAN interface via the menu (see “Setting up WLAN” on page 22).
• Select Access Point. The search for available access points starts. The available ac-
cess points, including hidden access points, are shown on the display.
• Select the access point. To use a hidden access point, enter its SSID.
• Assign an IP address with subnet mask and gateway or select DHCP.
When you configure a WLAN connection via the website, do not change the “IP” and
“Gateway” parameters. Otherwise, the connection to the printer is interrupted.
• For protected networks, the network key is requested. Enter the network key. The con-
nection is established. The network name and IP address are displayed.
2.3.4 Connecting a printer via Ethernet
To connect a printer via the Ethernet interface, use a cable with RJ45 connectors and the
10Base-T or 100Base-T transmission standard. Use a shielded cable.
• Connect the printer to a network socket or a computer.
• Set up the Ethernet interface via the menu (see “Setting up Ethernet” on page 22).
When you configure a WLAN connection via the website, do not change the “IP” and “Gate-
way” parameters. Otherwise, the connection to the printer is interrupted.

Starting up the printer
108716_en_01 PHOENIX CONTACT 13 / 52
2.4 Inserting the material and printing
2.4.1 Inserting the material
Figure 2-3 Inserting material off the roll
Inserting the material roll • Open the cover.
• Release the margin stop (1). To do this, turn the green adjustable ring counterclockwise
until the arrow points to the symbol.
• Pull the margin stop off the media hub.
• Push the material roll onto the media hub in such a way that the material side to be print-
ed faces upwards.
• Put the margin stop back on. Push it until both margin stops are touching the material
roll. Here, a definite resistance can be felt when pushing.
• Clamp down the margin stop. To do this, turn the adjustable ring clockwise until the ar-
row points to the symbol.
• Unwind a lengthy strip of the material.
Inserting material in the
printhead
• To lift the printhead, turn the green lever (4) counterclockwise.
• Turn the green knurled screw (3) until the material fits between the red guides.
• Push the material below the guide roller (2) towards the printing unit. Guide the material
through below the label sensor (5).
• Move the guides close to the edges of the material. The material must not become
jammed.
• To close the printhead, turn the green lever clockwise.
4
3
1
2
5

THERMOMARK ROLL 2.0
14 / 52 PHOENIX CONTACT 108716_en_01
2.4.2 Inserting Leporello labels
Figure 2-4 Material feed path with Leporello labels
Inserting Leporello labels • Open the cover.
• Release the margin stop (1). To do this, turn the green adjustable ring counterclockwise
until the arrow points to the symbol.
• Position the margin stop in such a way that the material fits between the two margin
stops.
• Place the label stack behind the printer. Make sure that the material side to be printed
is facing upwards.
• Guide the Leporello labels over the holder for the material roll.
• Check the position of the margin stop. The material must make contact on both sides
but must not jam.
• Clamp down the margin stop. To do this, turn the adjustable ring clockwise until the ar-
row points to the symbol.
Inserting material in the
printhead
• To lift the printhead, turn the green lever (4) counterclockwise.
• Turn the green knurled screw (3) until the material fits between the red guides.
• Push the material below the guide roller (2) towards the printing unit. Guide the material
through below the label sensor (5).
• Move the guides close to the edges of the material. The material must not become
jammed.
• To close the printhead, turn the green lever clockwise.
3
4
1
2
5

Starting up the printer
108716_en_01 PHOENIX CONTACT 15 / 52
2.4.3 Inserting the ink ribbon
Figure 2-5 Feed path of the ink ribbon
The ink ribbon is only required for thermal transfer printing. Clean the printhead before
inserting the ink ribbon (see “Cleaning the printhead” on page 36).
Inserting the ink ribbon • To lift the printhead, turn the green lever (3) counterclockwise.
• Push the ink ribbon roll onto the supply hub (1) so that the color coating of the film faces
downwards during unwinding.
• The Phoenix Contact ink ribbon rolls for this printer have the color coating on the out-
side of the winding. Observe the unwinding direction shown in Figure 2-5. If the color
coating is positioned incorrectly, the film will stick to the printhead.
• Push the empty core of an ink ribbon roll onto the take-up hub (2).
• Guide the ink ribbon through the printing unit as shown in Figure 2-5. Guide the ink rib-
bon through above the label sensor.
• Secure the starting end of the ink ribbon centrally on the empty core of the ink ribbon
roll using adhesive tape. Observe the counterclockwise running direction of the take-up
hub.
• To tighten the feed path of the ink ribbon, turn the take-up hub counterclockwise.
• To close the printhead, turn the green lever clockwise.
3
21

THERMOMARK ROLL 2.0
16 / 52 PHOENIX CONTACT 108716_en_01
2.4.4 Printing
The THERMOMARK ROLL 2.0 is ready for operation once all connections have been es-
tablished, the material and ink ribbon have been inserted, and the printhead is locked.
Tear-off plate After printing, the material strips are detached by hand. The printer is equipped with a tear-
off plate for this purpose.
Cutter or perforator A cutter which automatically cuts off labels is available as an accessory
(THERMOMARK ROLL-CUTTER, 5146422).
A perforator is available for shrink sleeves (THERMOMARK ROLL-CUTTER/P, 5146435).
For installation see “Cutter or perforator” on page 30.
2.4.5 Creating print jobs
Create the print jobs using the CLIP PROJECT or PROJECT complete marking software.
The marking software can be used to create markings on the computer that are adapted to
the Phoenix Contact marking material.
Select the THERMOMARK ROLL 2.0 as the output device there. You will be provided with
a list of materials that are suitable for this device.
– CLIP PROJECT can be downloaded at phoenixcontact.net/qr/5146053.
– PROJECT complete can be downloaded at phoenixcontact.net/qr/1050453.

Operating the printer
108716_en_01 PHOENIX CONTACT 17 / 52
3 Operating the printer
3.1 Touch screen display
You can change the basic settings of the printer via the touch screen display, for example:
– Pause, continue or cancel print jobs
– Configure interfaces
– Set language and time
– Update the firmware
3.1.1 Operating the display
• To select a menu item, briefly touch the corresponding icon.
• Move your finger up and down the display to scroll through lists.
3.1.2 Changing the language
The language is set when the printer is started up. To select a different language later, pro-
ceed as follows:
Use only CLIP PROJECT or PROJECT complete software to modify print jobs.
• Touch this icon.
• Touch this icon.
• Touch this icon.
• Touch this icon.
• Touch the desired language.

Operating the printer
108716_en_01 PHOENIX CONTACT 19 / 52
3.2 Operation via the menu
Table 3-1 Menu structure
Menu Setting option Default
Printer information
Printer type, version number and firmware creation date, serial number of CPU, operating time, and
number of printed labels, printed length, IP and MAC addresses
–
Access to the storage medium
Can only be selected when an external storage medium is present
If a storage medium is inserted, the following directories are created on the storage medium: /fonts,
/images, /misc, /labels
–
Open saved print jobs from the /labels directory on the external storage medium
(SD card, USB stick) –
Create list of files available on an external storage medium (SD card, USB stick) –
Copy files between different storage media (SD card, USB stick) –
Select default storage medium
Specify storage medium to be accessed via the interfaces and FTP management.
For other functions, all storage media can be selected but the default storage me-
dium is suggested first.
External storage media
– USB memory device
– SD cards
USB mem-
ory device

THERMOMARK ROLL 2.0
20 / 52 PHOENIX CONTACT 108716_en_01
Settings
Changing printing parameters
Setting the heat level
If the printing quality is inadequate, you can change the value. We recommend in-
creasing or reducing the heat level via the marking software first.
– CLIP PROJECT: at “File, Print setup...”
– PROJECT complete: at “File, Printer Configurations”
You will find the “Printer parameters” under THERMOMARK ROLL 2.0.
Only change the settings in the printer after this has been done. This will result in
an additional increase or reduction.
0
Moving the print position horizontally
This can also be changed via the marking software.
– CLIP PROJECT: at “File, Print setup...”
– PROJECT complete: at “File, Printer Configurations”
You will find the “Printer parameters” under THERMOMARK ROLL 2.0.
The values from the printer and the marking software are added.
0.0 mm
Moving the print position vertically
This can also be changed via the marking software.
– CLIP PROJECT: at “File, Print setup...”
– PROJECT complete: at “File, Printer Configurations”
You will find the “Printer parameters” under THERMOMARK ROLL 2.0.
The values from the printer and the marking software are added. A negative value
is only possible via the printer.
0.0 mm
Printing on request
Off
Off: All labels of a print job are printed without interruption.
On: The next label will only be printed when the corresponding button is
pressed on the touch screen.
Repeating the print by pressing the button
There are several setting options. You can repeat the same print job or query the
data again before.
Edit
Table 3-1 Menu structure
Menu Setting option [...] Default
Table of contents
Other Phoenix Contact Printer manuals

Phoenix Contact
Phoenix Contact THERMOMARK CARD 2.0 User manual

Phoenix Contact
Phoenix Contact THERMOMARK PRIME User manual

Phoenix Contact
Phoenix Contact THERMOFOX User manual

Phoenix Contact
Phoenix Contact BLUEMARK ID User manual

Phoenix Contact
Phoenix Contact THERMOMARK CARD Series User manual

Phoenix Contact
Phoenix Contact THERMOMARK ROLLMASTER 600 User manual

Phoenix Contact
Phoenix Contact UM IA THERMOMARK X1.1 User manual

Phoenix Contact
Phoenix Contact THERMOMARK ROLL User manual

Phoenix Contact
Phoenix Contact THERMOMARK GO.K User manual

Phoenix Contact
Phoenix Contact Clipline Thermomark S1 Quick start guide