I- Dispositivo elettronico che permette di escludere eventuali limitazioni del segnale sul monitor di serie.
Ogni volta che la vettura viene spenta, il blocco verra’ automaticamente ripristinato e la scelta di sbloccare
le immagini in movimento è dipendente solo dalla volonta’ del conducente.
GB - This electronic device by-passes possible signal-barriers on the Original-monitor. Every time the car-
engine is switched off, the signal-barrier will automatically return into force, and the Activation/Deactivation
of the Video-Deblocking-Device will again depend on the driver’s decision.
F- Dispositif électronique permettant d’exclure les éventuels limitations du signal sur le monitor original.
Chaque fois que la voiture est éteinte, le blocage est automatiquement réinitialisé et le choix de débloquer
les images en mouvement dépend uniquement du chauffeur.
D- Diese elektronische Vorrichtung umgeht die evtl. vorhandenen Signal-Einschränkungen auf dem
Original-Bildschirm. Jedes Mal, wenn der Motor ausgeschaltet wird, tritt die Blockade automatisch wieder
in Kraft und die Aktivierung/Deaktivierung der Freischaltung wird erneut vom Fahrer bestimmt.
E-Dispositivo electrónico que permite excluir eventuales limitaciones de la señal de video en el monitor
de origen. Cada vez que se apaga el coche el bloqueo será restablecido automáticamente y la elección de
desbloquear las imágenes en movimientos depende exclusivamente de la voluntad del conductor.
COLLEGAMENTI • CONNECTIONS • CONNEXIONS • ANSCHLÜSSE • CONEXIONES
ATTIVAZIONE E DISATTIVAZIONE INTERFACCIA
INTERFACE-ACTIVATION/DEACTIVATION
ACTIVATION ET DÉSACTIVATION INTERFACE
AKTIVIERUNG / DEAKTIVIERUNG DER INTERFACE
ACTIVACIÓN Y DESACTIVACIÓN INTERFAZ
ALLOGGIAMENTO INTERFACCIA • INTERFACE-LOCATION
LOGEMENT INTERFACE • INTERFACE-EINBAU-POSITION
UBICACIÓN INTERFAZ
I
• Togliere la chiave dal quadro strumenti,
attendere 5 minuti poi scollegare il connettore
originale dal radio-navigatore.
• Slare il cavo in bra ottica e inserirlo nel
connettore presente nella dotazione.
• Inserire il cavo presente nella dotazione
al connettore originale.
• Alimentare il 5/988 e attendere 30 sec. per farlo
riconoscere al sistema operativo della vettura.
• Inserire la chiave ed effettuare un giro di prova
per verificarne il funzionamento.
GB
• Take the ignition-key off. After a waiting-time
of 5 minutes, detach the Original connecter from
the radio-navigation-unit.
• Extract the optical-fiber-cable and insert it into
the connector supplied with the package.
• Insert the cable, supplied with the package, into
the Original connector.
• Now activate the 5/988-power-supply and wait
for 30seconds, so that the 5/988-device can be
recognized by the car’s operation-system.
• Insert the ignition-key and effect a brief drive-test,
to see if the installation works correctly.
FR
•
Enlever la clé du cadre des instruments, attendre
5 minutes et ensuite débrancher le connecteur du
radionavigateur.
•
Enlever le câble en fibre optique et l’insérer dans
le connecteur présent dans la confection.
•
Insérer le câble présent dans la confection au
connecteur original.
•
Alimenter le 5/988 et attendre 30 sec. pour le faire
reconnaître par le système opératif de la voiture
•
Insérer la clé et effectuer un tour d’essaie pour
vérifier le fonctionnement.
D
• Zündschlüssel aus der Instrumententafel abziehen.
5 Minuten warten, dann Original-Verbinder vom
Radio-Navigationsgerät entfernen.
• Lichtfaser-Kabel herausnehmen und in den
mitgelieferten Verbinder einsetzen.
• Das mitgelieferte Kabel in den Original-Verbinder
einsetzen.
• Die Vorrichtung 5/988 mit Strom versorgen. Dann
30 Sekunden warten, damit die Vorrichtung 5/988
vom operativen System des Wagens erkannt
werden kann.
• Zündschlüssel wieder einstecken und eine
Probefahrt durchführen, um den korrekten Betrieb
zu testen.
E
• Quitar la llave del cuadro de los instrumentos,
esperar 5 minutos, después desconectar el
conector original del radio navegador.
• Deshilar el cable de bra óptica e introducirlo en el
conector en dotación.
• Introducir el cable en dotación en el conector
original.
• Alimentar el 5/988 y esperar 30 segundos para
que sea reconocido por el sistema operativo del
coche.
• Introducir la llave y efectuar una vuelta de prueba
para vericar el correcto funcionamiento.
Audi MMI 2G
• Dietro cassettino porta oggetti lato passeggero
• Behind the gloves-case, at the front passenger-seat.
• Derrière le tiroir porte-objet du coté passager.
• Hinter dem Handschuhfach, auf der Seite des Beifahrersitzes.
• Detrás de la guantera porta objetos lado pasajero.
Audi MMI 3G 4G
• Dietro unità di navigazione presente nel cassettino porta
oggetti lato passeggero.
• Behind the navigation-unit, situated in the gloves-case, near
the front passenger-seat.
• Derrière l’appareil de navigation présent dans le tiroir porte-
objet du coté passager.
• Hinter dem Navigationsgerät, im Handschuhfach, auf der
Seite des Beifahrersitzes.
• Detrás de la unidad de navegación presente en la guantera
porta objetos, lado pasajero.
BMW
• Dietro la centralina CIC
• Behind the CIC-Central-unit.
• Derrière la centrale CIC.
• Hinter der CIC-Zentraleinheit.
• Detras de la centralita CIC.
VW
• Dietro la unità di navigazione.
• Behind the navigation-unit.
• Derrière l’appareil de navigation.
• Hinter dem Navigationsgerät.
• Detrás de la unidad de navegación.
ATTENZIONE • IMPORTANT • ATTENTION • WICHTIG • ATENCIÓN
I Rispettare la direzione del raggio luminoso presente sui connettori dei cavi in fibra ottica.
GB Please maintain the direction of the light-ray indicated on the connectors of the optical-fiber-cables.
FR Respecter la direction du rayon lumineux présent sur les connecteurs des câbles en fibre optique.
D Die Richtung des Licht-Strahls, auf den Verbindern der Lichtfaser-Kabel, unbedingt einhalten.
E Respetar la dirección del rayo luminoso presente en los conectores de los cables de bras ópticas.
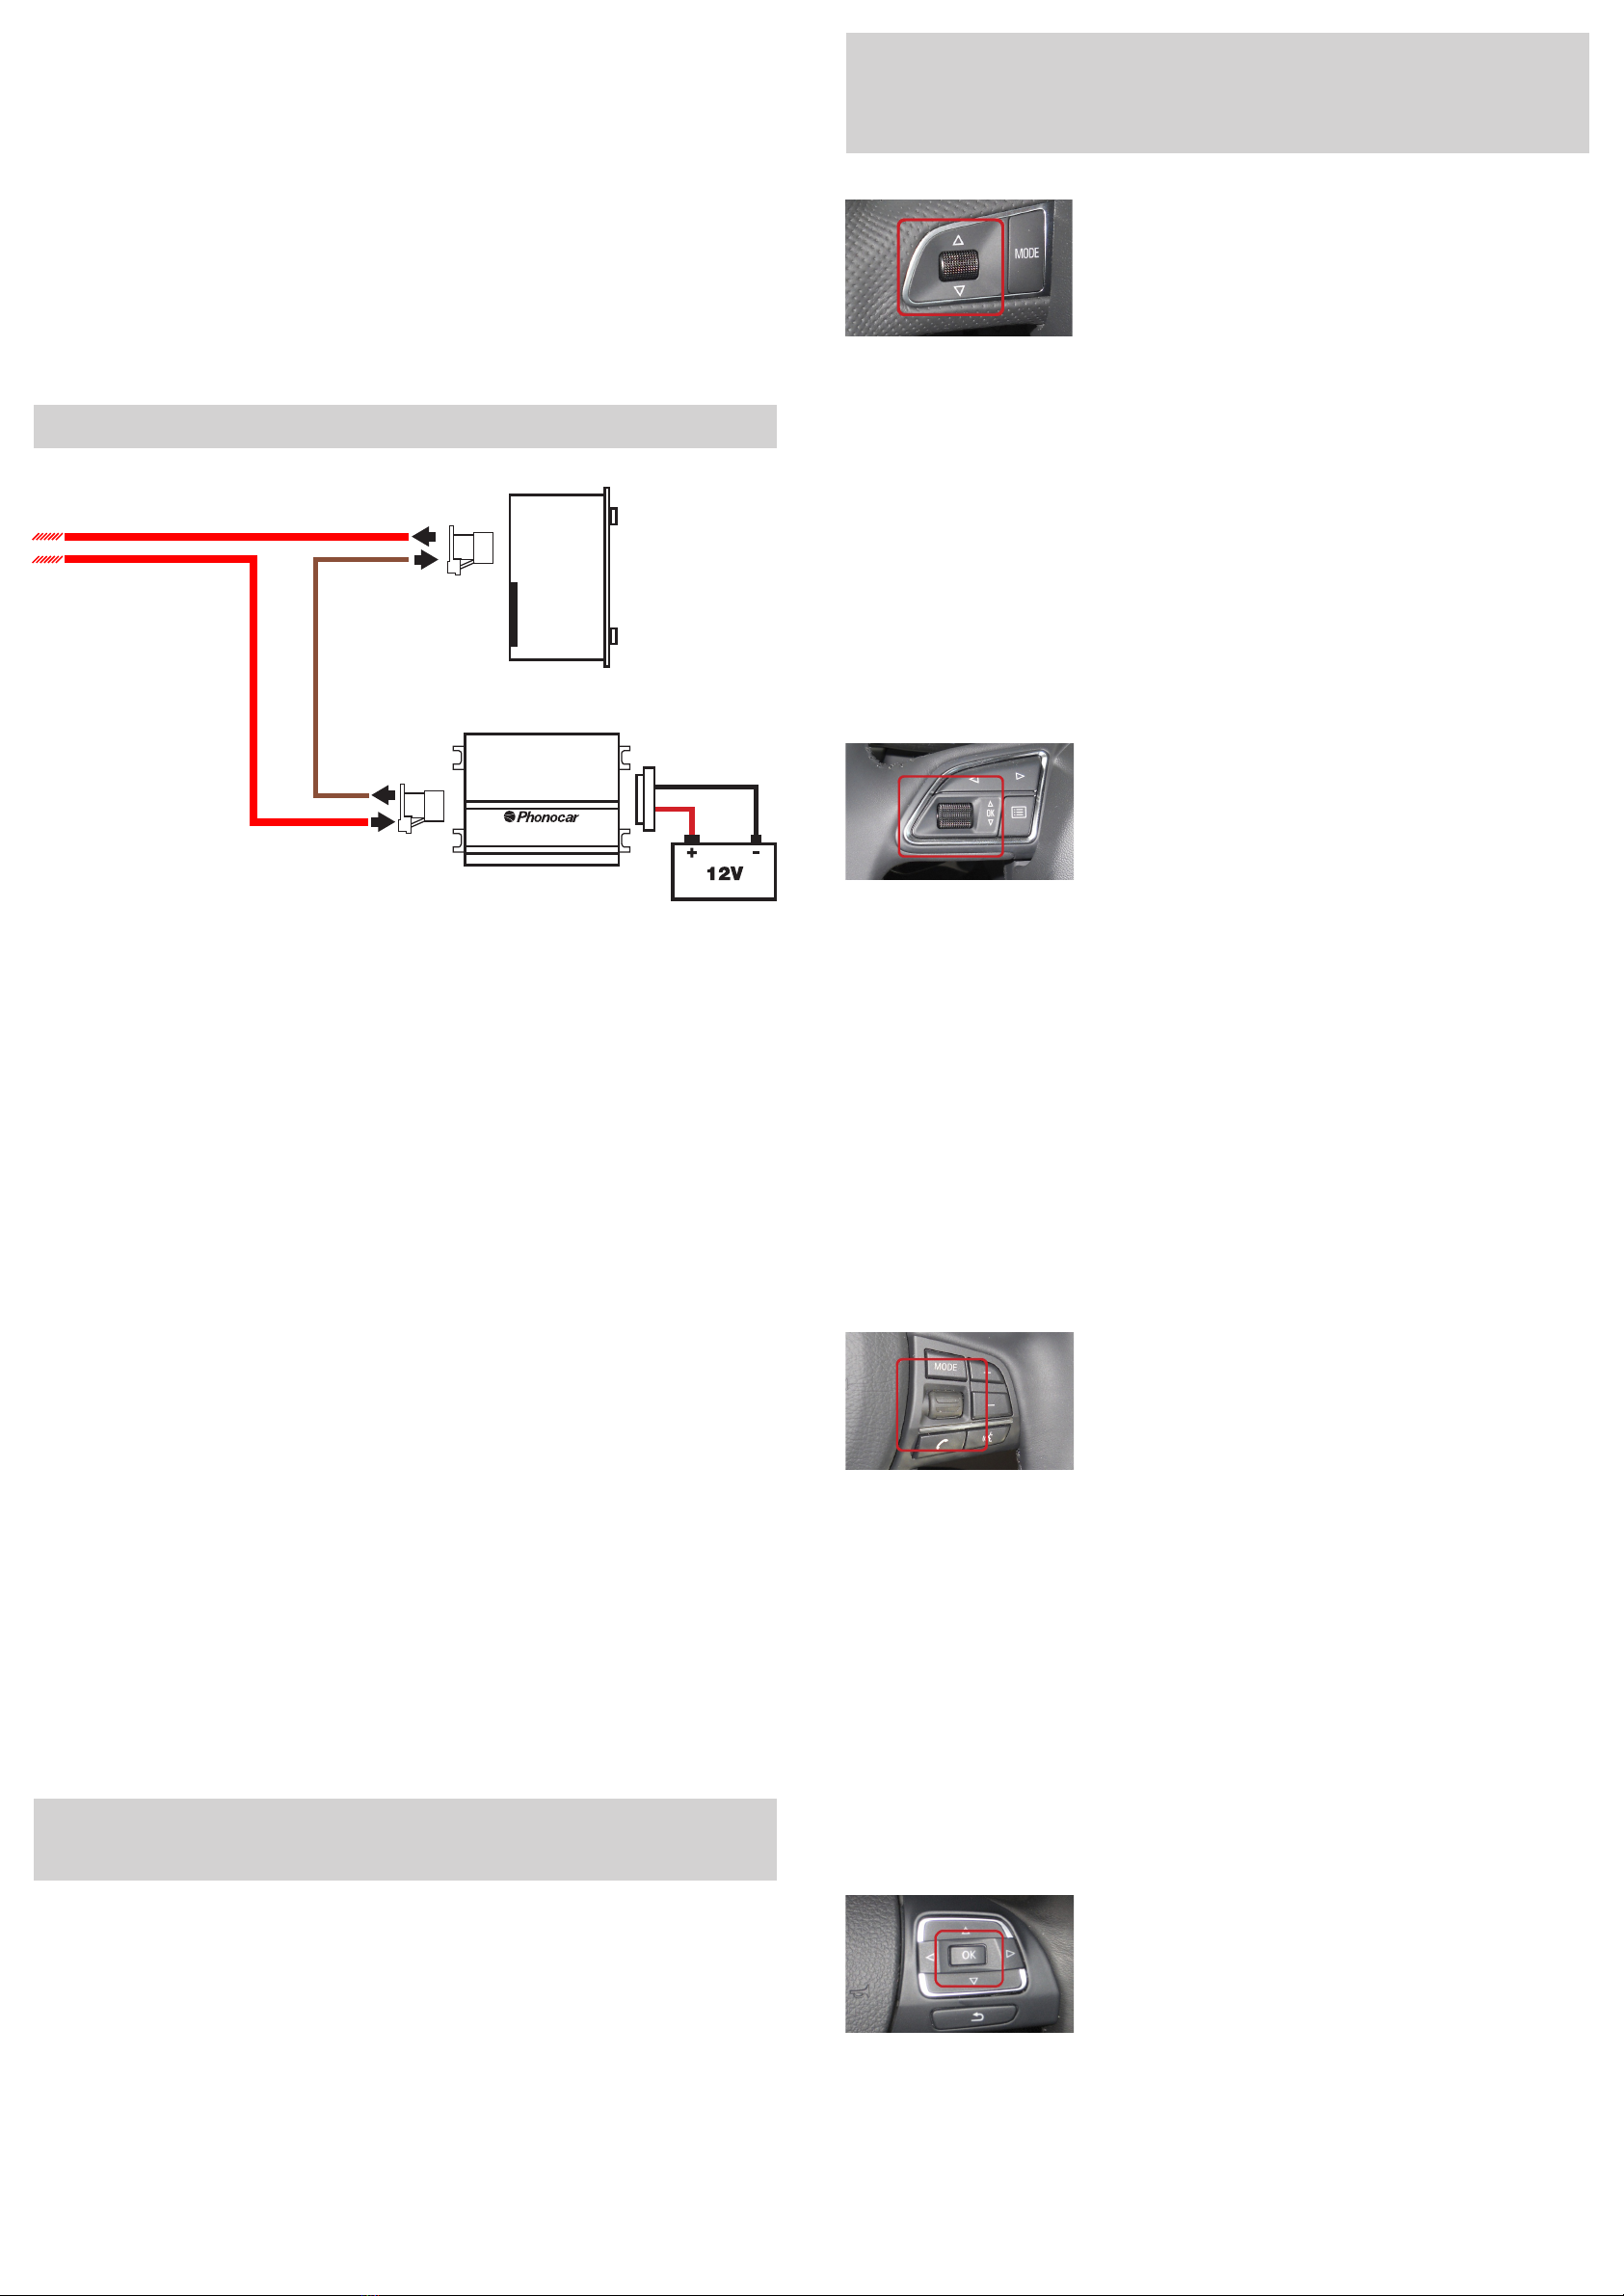
I • Attivazione: Tenere premuto per 4/5 secondi il potenziometro
rotativo di SX (quello utilizzato per scorrere l’elenco dei brani).
• Disattivazione: All’estrazione della chiave d’accensione oppure
tenendo premuto il pulsante MODE per 4/5 secondi.
GB • Activation: keep the left rotation-potentiometer pressed for 4 – 5
seconds (same knob is used also for the Tracks-listing).
• Deactivation: By taking off the ignition-key or by keeping the MODE-
key pressed for 4 – 5 seconds.
FR • Activation: faire pression pendant 4/5 secondes sur le
potentiomètre rotatif de gauche (celui utilisé pour parcourir la liste des
morceaux).
• Désactivation: à l’extraction de la clé de démarrage ou en faisant
pression sur la touche MODE pendant 4/5 secondes.
D • Aktivierung: linken Dreh-Potentiometer (der auch für die Auistung
der Musikstücke zuständig isat) 4 - 5 Sekunden lang drücken.
• Deaktivierung: durch Abziehen des Zündschlüssels oder durch
längeren Druck ( 4 – 5 Sekunden) auf die Taste MODE.
E • Activación: Tener presionado durante 4/5 segundos el
potenciómetro giratorio izq. (aquel utilizado para recorrer el listado de las
canciones).
• Desactivación: En el momento que se quita la llave de encendido o
bien teniendo presionado la tecla MODE durante 4/5 segundos.
I • Attivazione: premere 3-4 volte velocemente il potenziometro rotativo
di SX (quello utilizzato per scorrere l’elenco dei brani).
• Disattivazione: All’estrazione della chiave d’accensione oppure
tenendo premuto il potenziometro rotativo per 4/5 secondi.
GB • Activation: rapidly press the left rotation-potentiometer 3-4 times
(same knob is used also for the Tracks-listing).
• Deactivation: By taking off the ignition-key or by keeping the rotation-
potentiometer pressed for 4 – 5 seconds.
FR •Activation: Appuyer 3-4 fois rapidement le potentiomètre rotatif de
gauche (celui utilisé pour parcourir la liste des morceaux).
•Désactivation: à l’extraction de la clé de démarrage ou en faisant
pression sur le potentiomètre rotatif pendant 4/5 secondes.
D • Aktivierung: 3 – 4 Mal schnell auf den linken Dreh-Potentiometer
drücken (der auch für die Auistung der Musikstücke zuständig ist).
• Deaktivierung: durch Abziehen des Zündschlüssels oder durch
längeren Druck (4 – 5 Sekunden) auf den Dreh-Potentiometer.
E • Activación: presionar 3-4 veces rápidamente el potenciómetro
giratorio de izq. (aquel utilizado para recorrer el listado de las canciones).
• Desactivación: En el momento que si quita la llave de encendido
o bien teniendo presionado el potenciómetro giratorio durante 4/5
segundos.
I • Attivazione: Tenere premuto per 4/5 secondi il potenziometro rota-
tivo di DX (SEEK).
• Disattivazione: All’estrazione della chiave d’accensione oppure te-
nendo premuto per 4/5 secondi il potenziometro rotativo.
GB • Activation: keep the right rotation-potentiometer(SEEK) pressed
for 4 – 5 seconds.
• Deactivation: By taking off the ignition-key or by keeping the rotation-
potentiometer pressed for 4 – 5 seconds.
FR • Activation: faire pression pendant 4/5 secondes sur le poten-
tiomètre rotatif de Droite (SEEK).
• Désactivation: à l’extraction de la clé de démarrage ou en faisant pres-
sion pendant 4/5 secondes sur le potentiomètre rotatif.
D • Aktivierung: rechten Dreh-Potentiometer (SEEK) 4 – 5 Sekunden
gedrückt halten.
• Deaktivierung: durch Abziehen des Zündschlüssels oder durch länge-
ren Druck (4 – 5 Sekunden) auf den Dreh-Potentiometer.
E • Activación: Tener presionado durante 4/5 segundos el poten-
ciómetro giratorio de Derecha (SEEK).
• Desactivación: En el momento que se quita la llave de encendido,
o bien teniendo presionado el potenciómetro giratorio durante 4/5
segundos.
I • Attivazione: premere 4 volte velocemente il pulsante OK.
• Disattivazione: All’estrazione della chiave d’accensione oppure tenendo
premuto il pulsante OK per 4/5 secondi.
GB • Activation: rapidly press the OK-key 4 times.
• Deactivation: By taking off the ignition-key or by keeping the OK-key
pressed for 4 – 5 seconds.
FR • Activation: Appuyer 4 fois rapidement la touche OK.
• Désactivation: à l’extraction de la clé de démarrage ou en faisant
pression sur la touche OK pendant 4/5 secondes.
D • Aktivierung: rechten Dreh-Potentiometer (SEEK) 4 – 5 Sekunden
gedrückt halten.
• Deaktivierung: durch Abziehen des Zündschlüssels oder durch längeren
Druck (4 – 5 Sekunden) auf den Dreh-Potentiometer.
E • Activación: presionar 4 veces rápidamente la tecla OK.
• Desactivación: En el momento que se quita la llave de encendido o bien
teniendo presionado la tecla OK durante 4/5 segundos.
RADIO-NAVIGATORE
CAR RADIO NAVIGATOR
CAVO ORIGINALE IN FIBRA OTTICA
ORIGINAL OPTICAL-FIBER CABLE
CAVO ORIGINALE IN FIBRA OTTICA
ORIGINAL OPTICAL-FIBER CABLE
CAVO IN DOTAZIONE
CABLE INCLUDED IN PACKAGE
5/988
Electronic switch for Video Signal
AUDI MMI 2G / 3G
AUDI MMI 4G (A6 - A7 - A8 ‘11>)
BMW s.F Monitor 10” Navy CIC 2 - X3 (F25) ‘11> - GT (F07) - s.5 (F10-F11) - s.7 (F01)
VOLKSWAGEN Touareg (7p) ‘10>
• Comandi al volante
• Steeringwheel-Commands
• Commandes au volant
• Lenkrad-Steuerungen
• Mandos de Volante
• Comandi al volante
• Steeringwheel-Commands
• Commandes au volant
• Lenkrad-Steuerungen
• Mandos de Volante
• Comandi al volante
• Steeringwheel-Commands
• Commandes au volant
• Lenkrad-Steuerungen
• Mandos de Volante


