Phonocar VM496 User manual

FR
DE
EN
IT
ES
Videocamera per auto FULL HD 1080P, grandangolare 120°,
registrazione di emergenza, G-sensor, schermo LCD 2”.
FULL HD 1080P camera, 120° wide angle,
emergency recording, G-sensor, 2” LCD screen.
Manuale istruzioni
Instructions manual
Notice de montage et d’emploi
Gebrauchsanweisungen
Manual de instrucciones
VM496
FULL HD DASH CAM
06/2019
RoadCam
Compatible
with:

2
IT
Videocamera per auto e camper FHD 1080P, grandan-
golare 120°, registrazione di emergenza, G-sensor,
schermo LCD 2”.
Compatibile con l’applicazione Road-Cam.
La DashCam VM496 è una videocamera ad alta
definizione con registratore digitale multifunzione
da auto facilmente installabile nell’abitacolo grazie al
supporto con adesivo e all’alimentazione tramite presa
accendisigari.
Ha un angolo di visione di 120° e si attiva automatica-
mente all’accensione dell’auto registrando i filmati sulla
SD card (massima capacità 32 GB NON INCLUSA) e,
grazie alla registrazione in loop, quando la memoria è
piena sovrascrive automaticamente i vecchi filmati.
Registrazione di emergenza: dotata di G-sensor salva
i filmati registrati in caso di emergenza rendendoli
disponibili per eventuali rapporti su incidenti e richieste
di risarcimenti.
Manual Lock: protegge i file registrati in modo che non
vengano sovrascritti nei loop successivi.
Si collega al PC tramite presa microUSB ed è dotata di
funzione WI-FI per gestirla tramite APP su smartphone
(Road Cam).
Il design compatto permette di fissarla sul parabrezza
senza bloccare la visuale di guida e il monitor LCD da 2”
consente al guidatore di visualizzare video e immagini .
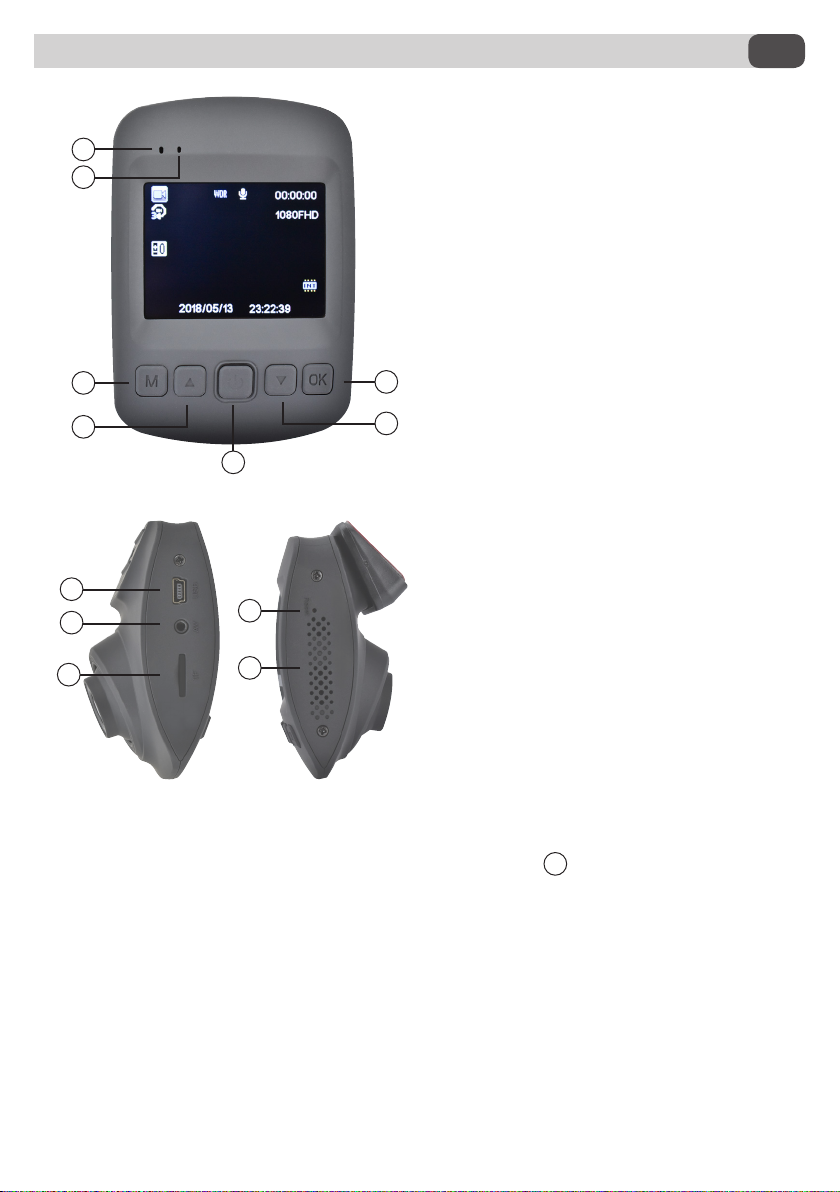
• Display 2” LCD
• Angolo di visione 120°
• Risoluzione registrazione video: 1080P
• Registrazione automatica all’accensione
• Registrazione di Emergenza
• Massima SD Card supportata: 32 GB
• Alimentazione presa accendisigari 12V
• WI-FI
• Fissaggio tramite adesivo
DOTAZIONE:
• Supporto ad incastro con adesivo.
• Caricabatteria da accendisigari 12 V > 5 V
Installazione
Speciche tecniche
VM496 HD DASH CAM
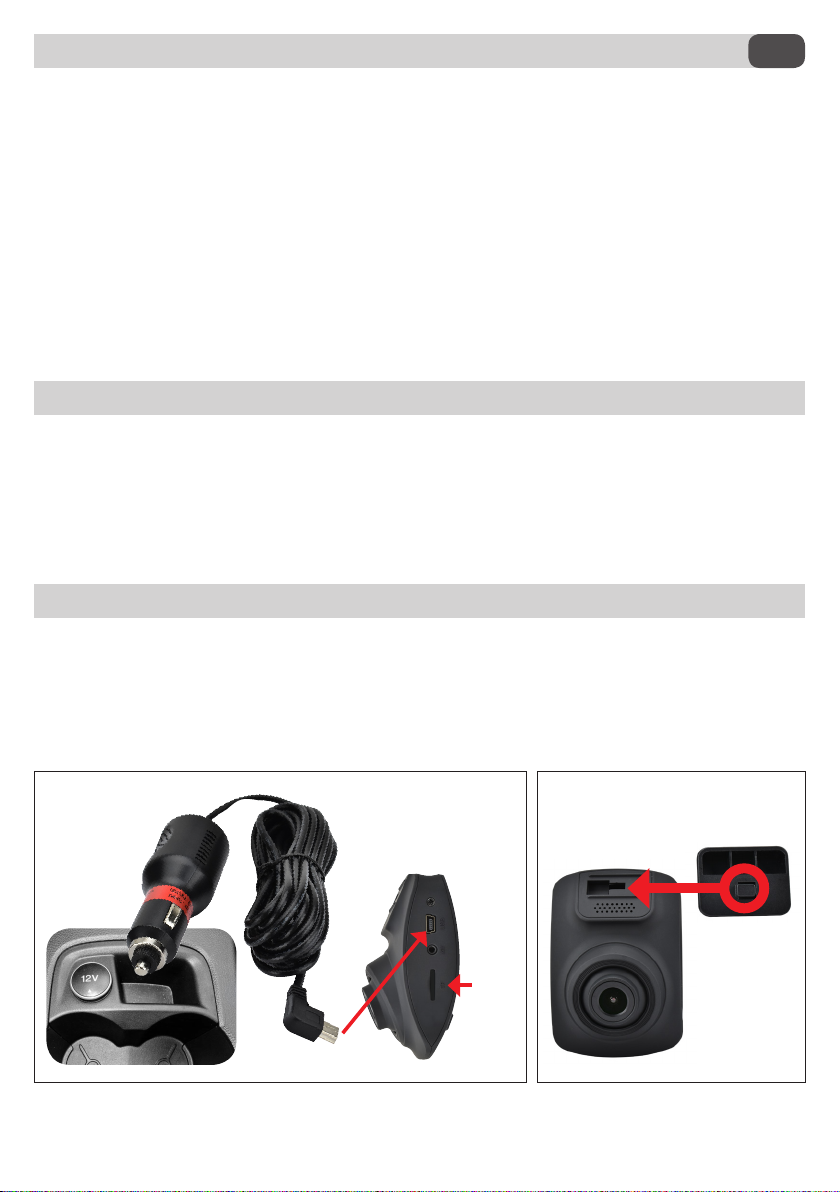
1) Inserire il caricabatteria (in dotazione) nella presa accendisigari del veicolo e la mini USB nello slot
del dispositivo (FIG. 1).
) Inserire SD CARD nel dispositivo e accendere il quadro del veicolo.
3) Agganciare il supporto al dispositivo (FIG. 2), togliere la pellicola protettiva dall’adesivo e installarlo nella
posizione desiderata, orientare la camera nella direzione di ripresa.
4) Accendere il veicolo e controllare il funzionamento del dispositivo.
FIG. 1 FIG. 2
SD
CARD

3
IT
ATTENZIONE:
- Il dispositivo all’accensione comincia a registrare automaticamente e il led 1lampeggia di colore azzurro, se si
interrompe l’alimentazione e il il dispositivo si spegne la registrazione in corso viene salvata.
- Durante la registrazione i menu sono disabilitati.
Funzioni
1
37
2
46
5
1Led registrazione
2Led accensione
3Tasto menu / Mode
4Sposta su
5Accensione/Spegnimento: premere 3 sec.
Standby/Riattivazione: premere brevemente
6Sposta giù
7Tasto conferma.
8Ingresso mini USB
9Ingresso retrocamera (NON ATTIVO)
10 Slot micro SD Card
11 Reset
12 Altoparlante
8
9
10
11
12

4
IT
Impostazioni di Sistema
- Premere 2 volta per accedere.
- Premere 1 volta per tornare al
menu precedente. Per confermare.
Per muoversi nei menu.
Attiva e disattiva il WI-FI.
Seleziona la lingua del dispositivo.
Riporta alle impostazioni predefinite.
Imposta lo spegnimento automatico.
Imposta spegnimento schermo.
Imposta data e ora.
Imposta i cicli di registrazione.
Formatta SD Card.
Imposta suono tasti.
N° di licenza.
Info sulla versione del dispositivo.

5
IT
Impostazioni Video
- Premere 1 volta per accedere.
- Premere 1 volta per tornare al
menu precedente.
Tenere premuto Il tasto M per
scorrere da funzione video a foto a
visualizzazione dell’immagine.
Per confermare.
Per muoversi nei 3 menu.
(VIDEO-FOTO-RIPRODUZIONE)
Imposta la qualità dell’immagine.
Opzione di compensazione
della luce, ON/OFF.
Attivazione registrazione
al movimento, ON/OFF.
Fissa la data e l’ora sul filmato
Non abilitato.
Imposta i cicli di registrazione.
Imposta la compensazione
di luminosità.
Registrazione audio, ON/OFF.
Regola sensibilità di attivazione e di
protezione all’urto.
Durante l’acquisizione del video, le
frecce su e giù fanno lo “zoom + /-”

6
IT
Impostazioni foto
- Premere 1 volta per accedere.
- Premere 1 volta per tornare al
menu precedente. Per confermare.
Per muoversi nei 3 menu.
(VIDEO-FOTO-RIPRODUZIONE)
Durante l’acquisizione delle foto, le
frecce su e giù fanno lo “zoom + /-” .
Imposta tempo di ritardo
dello scatto 0/2/5/10.
Scatta 2/3 foto consecutive
visualizzabili nella modalità di
riproduzione con le frecce su e giù.
Seleziona la qualità
dell’immagine (formato).
Imposta la qualità dell’immagine.
Imposta bilanciamento
del bianco.
Imposta sensibilità camera.
Imposta esposizione.
Imposta tempo di visualizzazione foto.
Regola nitidezza immagine.
Regola colore.
Imposta stabilizzazione.
Imprime data e ora sulla foto.

7
IT
Riproduzione
Collegamento al computer
Premere per entrare nei menu.
Play o Stop
riproduzione.
Per muoversi nei video realizzati.
Nella schermata principale le
frecce selezionano i file.
Se è in riproduzione un video
le frecce hanno le funzioni di
accelerare o decelerare il video.
Elimina il video corrente o tutti
Presentazione video e immagini.
Per utilizzare il dispositivo
come camera per il PC.
In questo caso, verificare nelle
impostazioni del computer l’effettiva
abilitazione al funzionamento.
Blocco/Sblocco dei video
correnti o tutti.
Utilizza una SD-Card
come memoria esterna.
Dispositivo solo in carica.
Imposta sensibilità camera.
Imposta esposizione.
Imposta tempo di visualizzazione foto.

8
EN
FHD 1080P camera for cars and campers, 120° wide
angle, emergency recording, G-sensor, 2” LCD screen.
Compatible with Road-Cam app.
The DashCam VM496 is a high-definition camera with
multifunction digital car recorder, user-friendly to install
in the passenger compartment, thanks to its sticker and
to the power supply via a cigarette lighter.
It has a viewing angle of 120° and it is automatically
activated when the car is turned on. Video recording
on the SD card is started (max. capacity 32 GB NOT
INCLUDED).
Moreover, thanks to the loop recording, when the
memory is full, it automatically overwrites older videos.
Emergency recording: equipped with G-sensor,
it saves the videos recorded in case of emergency,
making them available for any accident reports and
claims for damages
Manual Lock: Recorded files are protected so that they
do not are overwritten in the coming loops.
It connects to the PC via a micro USB port and it is
equipped with WI-FI function to manage it via APP on
smartphone (Road Cam).
The compact design allows it to be fixed to the
windscreen without blocking the driving view and the
2” LCD monitor allows the driver to display videos and
images.
• 2” LCD display
• Viewing angle 120°
• Video recording resolution: 1080P
• Automatic recording when turning on
• Emergency Recording
• Max. supported SD Card: 32 GB
• Power supply for cigarette lighter 12V
• WI-FI
• Adhesive fixing
EQUIPMENT:
• Adhesive interlocking support.
• Cigarette lighter charger 12 V > 5 V
Installation
Technical data
VM496 HD DASH CAM
1) Enter the battery charger (supplied) into the vehicle’s cigarette lighter and the mini USB into the slot of the
device (FIG. 1).
2) Enter the SD CARD into the device and turn on the vehicle ignition.
3) Fix the support to the device (FIG 2), remove the protective film from the sticker and install it in the position that
you prefer. Move the camera towards the filming direction.
4) Turn on the vehicle and check the functioning of the device.
FIG. 1 FIG. 2
SD
CARD

9
EN
WARNING:
- When the device is switched on, it starts recording automatically and LED 1flashes blue. If the power supply is
cut off and the device switches off, the ongoing recording is saved.
- During recording, menus are disabled.
Functions
1
37
2
46
5
1Recording LED
2Power on LED
3Menu / Mode key
4Move on
5Power On/Off: Press 3 sec.
Standby/Reactivation: Press briefly
6Move Down
7Confirmation key.
8Mini usb input
9Rear-camera input (not activated)
10 Micro sd card slot
11 Reset
12 Loudspeaker
8
9
10
11
12

10
EN
System settings
- Press twice to enter.
- Press once to return to the
previous menu.
To confirm.
For moving through menus.
Activate / deactivate WI-FI.
For selecting the language.
Back to default settings.
Automatic switch-off setting.
screen power off settings.
Date and time setting.
Recording loops settings.
For formatting SD Card.
Key sound setting.
License number.
Device version info.

11
EN
Video settings
- Press once to enter.
- Press once to return to the
previous menu.
Press and hold the M button to
scroll from video to photo
function to image display.
To confirm.
To move through the 3 menus.
(VIDEO-PHOTO-PLAYBACK)
Image quality setting.
Light balance option
ON/OFF.
Motion detection recording
ON/OFF.
Set date and time on the video.
Not enabled (parking monitor).
Recording loops setting.
Brightness balance setting.
Audio recording, ON/OFF.
For adjusting activation sensitivity
and collision protection.
While capturing the video,
up and down arrows zoom + and -.

12
EN
Impostazioni foto
- Press twice to enter.
- Press once to return to the
previous menu. To confirm.
To move through the 3 menus.
(VIDEO-PHOTO-PLAYBACK)
During the capture of the photos,
the up and down arrows zoom +/-.
Set delay time of the
0/2/5/10 shot.
Shoot 2/3 consecutive pictures that
can be displayed in playback mode
with the up and down arrows.
For selecting image quality (format).
Image quality setting.
White balance setting.
Camera sensitivity setting.
Exposure setting.
Sets the display time on the photo.
Image sharpness adjustment.
Color adjustment.
Anti-shaking setting.
Stamps the date and time
on the photo.

13
EN
Riproduzione
Computer connection
Press to enter menus.
Play or Stop
the Playback.
To move through
the videos made.
In the main screen the
arrows allow you to select the files.
During the video playback the
arrows can be used for accelerating
or decelerating the video.
Delete current video or all.
Slide show.
To use the device as
a camera for the PC.
In this case, check in the
computer settings,
is the functioning is enabled.
Lock/Unlock current or all videos.
To use an SD card as external
memory.
Device is charging.
Camera sensitivity setting.
Exposure setting.
Sets the display time on the photo.

14
FR
Caméra pour voitures et campeurs FHD 1080P, grand-
angle 120°, enregistrement d’urgence, G-sensor, écran
LCD 2”. Compatible avec l’application Road-Cam.
La DashCam VM496 est une caméra HD avec
enregistreur numérique multi-fonctionnel. celle-ci
peut etre facilement installé dans l’habitacle grace au
support autocollant et l’alimentation moyennant la
prise allume-cigares.
Elle a un angle de vision de 120° et s’active
automatiquement au démarrage du véhicule. Les
vidéos sont enregistrées sur une carte SD de maximum
32 GB (PAS INCLUSE); grace à l’enregistrement en
loop, lorsque la mémoire est pleine, celle-ci transcrit
automatique les vieilles vidéos.
Enregistrement d’urgence: intégré du G-sensor, elle
sauvegarde les vidéos enregistrées en cas d’urgence et
permet ainsi de les avoir à disposition en cas de besoin
(comme par exemple: rapport su un accident, demande
de dédommagement..)
Manual Lock: Permet de sécuriser les fichiers
enregistrés afin que ceux-ci ne soient pas transcrit dans
les loop suivants.
Elle se branche à l’ordinateur moyennant la prise micro
USB et est intégrée de la fonction WI-FI pour la gestion
sur smarthphone à travers l’APP (Road-Cam).
Le dessin compact permet la fixation sur la pare-brise
sans bloquer la vu au conducteur, l’écran LCD de 2”
permet au conducteur de visualiser vidéo et images.
• Afficheur 2” LCD
• Angle de vision 120°
• Résolution enregistrement vidéo: 1080P
• Enregistrement automatique à l’allumage
• Enregistrement d’Urgence
• Carte SD maximun: 32 GB
• Alimentation prise allume-cigares 12V
• WI-FI
• Fixation moyennant autocollant
OFFERTE DANS LA BOITE:
• Support à encastrement avec autocollant.
• Chargeur pour allume-cigares 12>5V
Installation
Caractéristiques Techniques
VM496 HD DASH CAM
1) Insérer le chargeur (offert) dans la prise allume-cigares de la voiture, et la prise mini USB dans le port du
dispositif (FIG.1)
2) Insérer la carte SD dans le dispositif et mettez le contact dans la voiture
3) Accrocher le support au dispositif (FIG.2), enlever le film de protection de l’autocollant et l’installer dans la
position désirée; orienter la caméra vers la direction à filmer / enregistrer
4) Allumer le véhicule pour controler le fonctionnement du dispositif.
FIG. 1 FIG. 2
SD
CARD

15
FR
ATTENTION:
- Le dispositif dès l’allumage commence automatiquement à enregistrer et le led 1clignote en bleu; si celui-ci
n’est plus alimenté et s’éteint, l’enregistrement en cours est suvegardé.
- Pendant l’enregistrement, les menus sont désactivés.
Fonctions
1
37
2
46
5
1Led d’enregistrement
2Led d’Allumage
3Touche menu / Mode
4Défile vers le haut
5Allumage/Extinction: appuyer 3 sec.
Standby/Ré-activation: appuyer brièvement
6Défile vers le bas
7Touche Validation
8Entrée mini USB
9Entrée caméra de recul (N’EST PAS ACTIVE)
10 Port micro Carte SD
11 Reset
12 Haut-Parleur
8
9
10
11
12

16
FR
Réglages de Système
- Appuyer 2 fois pour allumer
- Appuyer 1 fois pour revenir au
menu précédent. Pour valider.
Pour parcourir les menus.
Active et désactive le WI-FI.
Sélectionne la langue du dispositif.
Restaure les réglages d’origine.
Règle l’extinction automatique.
Règle l’extinction de l’écran.
Règle la date et l’heure.
Règle les cycles d’enregistrement.
Formatage Carte SD.
Règle le son des touches.
N° de licence.
Info sur la version du dispositif.

17
FR
Réglages Vidéo
- Appuyer 1 fois pour accéder
- Appuyer 1 fois pour revenir au
menu précédent
Faire pression sur la touche M
pour défiler de la fonction vidéo
à photo jusqu’à visualisation de
l’image.
Pour Valider.
Pour parcourir les 3 menus.
(VIDEO - PHOTO - REPRODUCTION)
Règle la qualité de l’image.
Option de compensation de
l’éclairage, ON / OFF.
Activation de l’enregistrement dès la
détection de mouvement, ON / OFF.
Fixe la date et l’heure sur la vidéo.
Pas activé .
Règle les cycles d’enregistrement.
Règle la compensation
de l’éclairage.
Enregistrement audio, ON / OFF.
Règle la sensibilité d’activation et la
protection contre les chocs.
Pendant l’acquisition de la vidéo, les
flèches haut et bas ont la fonction de
“zoom +/-”

18
FR
Réglages Photo
- Appuyer 1 fois pour accéder.
- Appuyer 1 fois pour revenir au
menu précédent. Appuyer pour Valider.
Appuyer pour parcourir les 3 menus.
(VIDEO-PHOTO-REPRODUCTION)
Pendant l’acquisition des photos, les flèches
haut et bas ont la fonction de “zoom +/-”.
Règle le temps de déclenchement
0/2/5/10.
Fait 2/3 photos consécutives visibles
dans la modalité de reproduction à
travers les flèches haut et bas.
Sélectionne la qualité de l’image
(Format).
Règle la qualité de l’image.
Règle l’équilibrage du blanc.
Règle la sensibilité de la caméra.
Règle l’exposition.
Règle le temps de visualisation
de la photo.
Règle la netteté de l’image.
Règle la couleur.
Règle la stabilisation.
Imprime date et heure sur la photo.

19
FR
Reproduction
Branchement à l’ordinateur
Appuyer pour entrer dans les
menus.
Appuyer pour
Play ou Stop
reproduction.
Appuyer pour parcourir
les vidéos réalisées.
Dans l’écran principal, les flèches
permettent de sélectionner les
fichiers.
Pendant la reproduction vidéo, les
flèches ont la fonction d’accélérer
ou ralentir la vidéo.
Efface la vidéo en cours
ou toutes les vidéos.
Slide show
Permet d’utiliser le dispositif comme
caméra pour l’ordinateur.
Dans ce cas, veuillez controller que
cette fonction soit active dans les
réglages de l’ordinateur.
Blocage /Déblocage des vidéos en
cours ou de toutes les vidéos.
Utiliser une Carte SD
pour mémoire Externe.
Dispositif en Charge.
Règle la sensibilité de la caméra.
Règle l’exposition.
Règle le temps de visualisation
de la photo.

20
DE
FHD 1080P Kamera für Autos und Wohnmobile, 120°
Weitwinkel,Notfallaufzeichnung, G-Sensor, 2” LCD-
Bildschirm. Kompatibel mit der Road-Cam-Anwendung.
Die DashCam VM496 ist eine hochauflösende Kamera
mit multifunktionalem digitalen Autorecorder
einfache Installation im Innenraum des Autos/ oder
Cockpit durch eine selbstklebende Halterung
Stromversorgung über den Zigarettenanzünder
Diese hat einen Betrachtungswinkel von 120° und wird
beim Einschalten des Autos automatisch aktiviert, in
dem Videoclips auf der SD-Karte aufgezeichnet werden
( Kapazität max. 32 GB NICHT INKLUSIVE).
Dank der Loop-Aufnahme werden bei vollem Speicher
alte Filme automatisch überschrieben .
Notfallaufzeichnung: Dank einem G-Sensor werden die
im Notfall aufgenommenen Filme gespeichert, sodass
sie Ihnen im Fall von Unfallberichten und Entschädi-
gungs-Anfragen zur Verfügung stehen
Manuelle Sperre: aufgenommenen Dateien werden
geschützt , sodass sie nicht Überschrieben werden.
Unser VM496 wird über einen micro USB-Anschluss an
Ihren PC angeschlossen. Dieses Produkt verfügt über
die WI-FI-Funktion zur Bedienung über APP direkt auf
dem Smartphone (Road Cam). Das kompakte Design
ermöglicht die Befestigung an der Windschutzscheibe,
ohne die Fahransicht einzuschränken. Der 2” LCD-
Monitor ermöglicht es dem Fahrer, Videos und Bilder
anzusehen.
• 2” LCD•Display
• Betrachtungswinkel 120°
• Videoaufzeichnungsauflösung: 1080P
• Automatische Aufnahme beim Einschalten
• Notfallaufzeichnung
• Max. unterstützte SD-Karte: 32 GB
• Netzteil für Zigarettenanzünder 12V
• WI-FI
• Klebebefestigung
IM LIEFERUMFANG ENTHALTEN:
• Halterung mit Klebstoff
• Zigarettenanzünder•Ladegerät 12 V > 5 V
Installation
Technische Daten
VM496 HD DASH CAM
1) Stecken Sie das mitgelieferte Ladegerät in den Zigarettenanzünder des Fahrzeugs und den Mini-USB in den
Steckplatz
der Vorrichtung (ABB 1).
2) Stecken Sie die SD-Karte in das Gerät und schalten Sie die Fahrzeugzündung ein.
3) Hängen Sie den Halter an das Gerät (ABB 2), entfernen Sie die Schutzfolie vom Aufkleber und montieren Sie ihn
in der Halterung. Positionieren Sie die Kamera in die gewünschte Richtung.
4) Schalten Sie das Fahrzeug ein und überprüfen Sie die Funktion der Vorrichtung.
FIG. 1 FIG. 2
SD
CARD
Table of contents
Languages:
Other Phonocar Dashcam manuals

Phonocar
Phonocar VM494 User manual

Phonocar
Phonocar VM262 User manual

Phonocar
Phonocar VM489 User manual

Phonocar
Phonocar VM 283 User manual

Phonocar
Phonocar VM260 User manual

Phonocar
Phonocar VM284 User manual

Phonocar
Phonocar VM 288 User manual

Phonocar
Phonocar VM498 User manual

Phonocar
Phonocar VM 287 User manual

Phonocar
Phonocar VM 285 User manual