Phonocar VM181 Installation guide

ISTRUZIONI DI MONTAGGIO
ASSEMBLING INSTRUCTIONS
INSTRUCTIONS DE MONTAGE
MONTAGEANLEITUNG
INSTRUCCIONES PARA EL MONTAJE
MONITOR
VM181

I
n° 01 Telecomando con batteria
n° 01 Piastra metallica per il ssaggio a tetto
n° 04 Viti 4x22
GB
01 pc Remote-control unit with battery
01 pc Metal-plate for installation on car-ceiling
05 pcs Hole-cover adesives
n° 04 Screws 4x22
F
01 pièce Télécommande avec batterie
01 pièce Plaque métallique de xage au ciel de la voiture
05 pièces Couvre-trou adhésif
n° 04 Vis 4x22
D
01 Stck. Fernsteuerung, mit Batterie
01 Stck. Metall-Halter für die Deckenmontage
05 Stck. Loch-Abdeckungen zum Aufkleben
n° 04 Schrauben 4x22
E
n. 01 Mando a distancia con batería
n. 01 Plancha metálica para la jación al techo.
n. 05 Pegatinas cubre hueco
n° 04 Tornillos 4x22
Accessori in dotazione
Accessories supplied in package • Accessoires en dotation
Zubehör im Lieferumfang enthalten • Accesorios en dotación
INDICE • CONTENTS • INDEX • INHALTSVERZEICHNIS
Precauzioni di sicurezza.................................................................... 6
Schema di collegamento . . . . . . . . . . . . . . . . . . . . . . . . . . . . . . . . . . . . . . . . . . . . . . . . . . . . . . . . . . . . . . . . . . . 8
Sistema antifurto ......................................................................... 9
Caricamento ed esplulsione del disco......................................................... 9
Identificazione comandi DVD ................................................................ 10
Identificazione comandi RADIO .............................................................. 11
Identificazione controlli telecomando ......................................................... 12
Utilizzo del telecomando ................................................................... 13
Manopola rotativa multifunzione ............................................................. 14
Funzione RDS (Radio Data System) .......................................................... 15
Riproduzione disco DVD/CD/VCD (Playback) ................................................... 16
Riproduzione MP3 / JPEG .................................................................. 18
Impostazioni di Setup ..................................................................... 19
Cause e rimedi a problemi di installzione ...................................................... 22
Caratteristiche tecncihe .................................................................... 95

IAllo scopo di operare in sicurezza osservare attentamente le seguenti precauzioni:
• Installare i dispositivi all’interno dell’auto in posizioni che non ostacolino le normali operazioni di guida e
che non interferiscano con i dispositivi di sicurezza del veicolo (ABS, Air-bag, etc.).
• Provare il sistema prima della sua installazione denitiva.
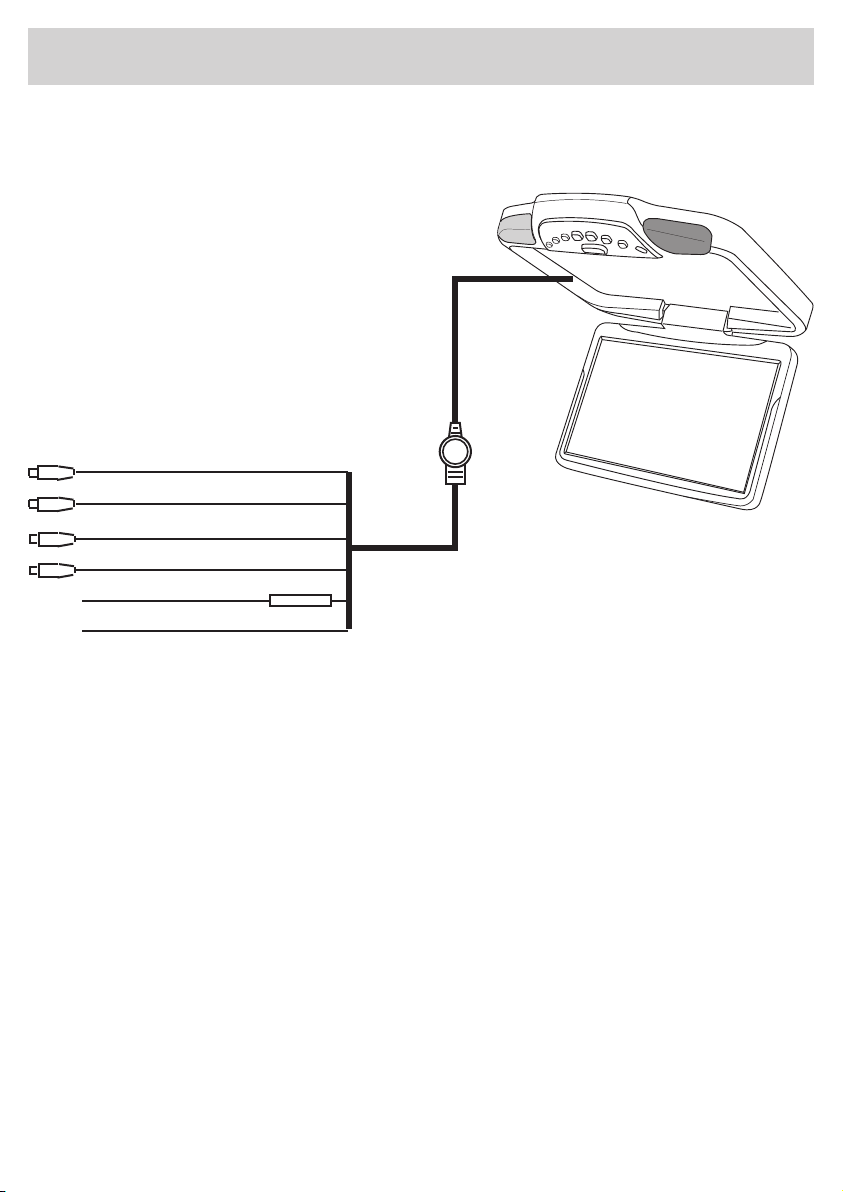
• Per ottenere le migliori condizioni operative, collegare i cavi come dagli schemi di seguito riportati.
• Effettuare le regolazioni del sistema a veicolo fermo.
• Evitare di toccare il display LCD
• La temperatura di utilizzo va da 0° a 60°C.
• Se la temperatura interna del veicolo é molto alta, é necessario un breve periodo di raffreddamento prima
dell’utilizzo.
• A basse temperature il display potrebbe risultare leggermente scuro alla sua accensione, ma tornerà alla
corretta luminosità dopo pochi minuti (situazione dovuta alle caratteristiche siche dei cristalli liquidi).
• In caso di condensa spegnere l’apparecchio e riaccenderlo solo dopo la sua scomparsa.
• In caso di rottura del display non toccare il uido dei cristalli liquidi, se viene a contatto con il corpo o gli
abiti, lavare immediatamente con acqua e sapone neutro.
• L’unità é completamente automatica, non cercare di regolare l’angolazione del display o di aprirlo o chiu-
derlo manualmente.
• Prima dell’installazione dell’unità, assicurarsi di rispettare le regolamentazioni del codice della strada.
• Il codice della strada vieta di guardare programmi televisivi durante la guida.
GB To operate under security, please carefully observe the following precautions:
• install the appliances inside the car, in a position leaving free space for the normal car-driving operations
and the security-devices situated within the car (ABS, Air-Bag etc.).
• Test the whole system, before giving way to its denite installation.
• Regulate the whole system while car is in stopped position.
• Never touch the LCD-Display.
• Use system at a temperature between 0 and +60°C.
• If the temperature inside the car is very high, a short cooling-down period has to be observed before using
the Appliance.
• At low temperatures, the display could be slightly dark after switch-on. The display will, in any case, come
to its normal brightness after a few minutes. This situation is normally due to the physical characteristics of
the liquid cristals.
• In the presence of condensing water, switch the Appliance OFF. When the condensing water has disappe-
ared, the Appliance can be switched on again.
• Never touch the liquid cristals in the case that they should run out from a broken display. Accidental stains
on your skin and clothes should be washed away immediately, using water and neutral soap.
• The Unit is fully automatic, so that the following operations should NOT be carried out: setting of the
display-angle; manual opening/closing of the Monitor.
• Before installing the Unit, please check that everything is in line with your Road Regulations.
• Remember that Trafc Security Rules do NOT allow watching TV while driving the car.
FAn d’opérer en pleine sécurité, veuillez observer les précautions suivantes:
• installer les dispositifs à l’intérieur de la voiture, dans une position qui n’obstacle pas les opérations nor-
males de guide et qui n’interfère pas avec les dispositifs de sécurité du véhicule (ABS, Air-bag, etc.).
• Essayer le système avant d’effectuer son installation dénitive.
• Pour obtenir les meilleures conditions opératives, brancher les câbles selon les schémas ci-après indi-
qués.
• Effectuer les réglages du système, à voiture arrêtée.
• Eviter de toucher l’écran LCD.
• La température d’exercice est de 0° à 60°.
• Quand la température à l’intérieur de la voiture est très élevée, il est nécessaire d’attendre un petit peu
avant l’utilisation de l’appareil, an de permettre son refroidissement.
• A basses températures, l’écran peut résulter légèrement foncé, au moment de l’allumage. La luminosité
correcte va, en tout cas, se rétablir après quelques minutes. (Ces circonstances sont liées aux caractéristi-
ques physiques des cristaux liquides).
Precauzioni di sicurezza
Safety information • Précautions de sécurité
Vorsichtsmaßnahmen • Precauciones de seguridad

• Éteindre l’appareil en cas de présence de l’eau de condensation, et rallumer uniquement quand la con-
densation sera disparue.
• En cas de rupture d’écran, ne pas toucher le liquide des cristaux. En cas de contacte, laver immédiate-
ment, peau ou vêtements, avec de l’eau et du savon neutre.
• L’unité est complètement automatique. N’essayer donc pas de régler l’angle ou d’ouvrir/fermer l’écran
manuellement
• Avant d’effectuer l’installation de l’unité, s’assurer que les opérations soient faites selon le Côde Routier.
• Le Code Routière ne permet pas de regarder des programmes TV pendant la guide.
DUm eine sichere Inbetriebnahme zu gewährleisten, bitten wir, folgendes unbedingt zu beachten:
• bei der Montage der Geräte in den Wageninnenraum darauf achten, dass die gewählte Position die Steue-
rung des Fahrzeugs und die darin bendlichen Sicherheitsvorrichtungen (ABS, Airbag etc.) nicht stört;
• das System testen, bevor Sie zur endgültigen Montage übergehen;
• die Einstellung des Systems bei stehendem Fahrzeug vornehmen;
• das LCD-Display nicht anfassen;
• die Raumtemperatur muß innerhalb 0° und +60° C liegen;
• Bei sehr hoher Temperatur, den Wageninnenraum erst etwas lüften und abkühlen lassen, bevor Sie das
Gerät benützen.
• bei geringer Raumtemperatur könnte das Display, unmittelbar nach dem Einschalten, etwas dunkel
ausfallen, jedoch sollte die normale Helligkeit nach wenigen Minuten eintreten (physisch bedingt durch die
Flüssig-Kristalle);
• bei Verletzung des Displays, die austretende Kristallüssigkeit nicht anfassen. Bei unbeabsichtigtem Kon-
takt mit Kleidung und Haut, sofort mittels Wasser und neutraler Seife entfernen.
• Bei anlaufenden Scheiben (Kondenswasser), Gerät sofort ausschalten und erst nach Verschwinden der
Feuchtigkeit wieder einschalten.
• Das Gerät ist vollautomatisch, deshalb bitte nicht versuchen, den Bildschirm manuell einzustellen bzw.
manuell zu öffnen oder zu schließen.
• Verkehrsvorschriften gut nachlesen und sicherstellen, dass die Installierung des Geräts diesen Vorschriften
entsprechend vorgenommen wird.
• das Verkehrsschutzgesetz verbietet das Fernsehen am Steuer.
EPara operar en condiciones de seguridad hay que seguir estas indicaciones:
• Instalar los dispositivos en una posición que no obstaculice la conducción y no interera con los dispositi-
vos de seguridad del vehículo (ABS, airbags, etc.)
• Probar el sistema antes de instalarlo.
• Conectar los cables como se indica en los esquemas eléctricos.
• Efectuar las regulaciones del sistema con el vehículo detenido.
• No tocar el display de cristal líquido.
• La temperatura de funcionamiento es de 0 a 60°C.
• Si la temperatura interna del vehículo es muy alta, es necesario un breve periodo de enfriamiento antes
de utilizar el monitor.
• Si la temperatura es muy baja el display puede quedar oscuro durante unos minutos después del encen-
dido.
• Si el display se rompe no hay que tocar el uido del cristal líquido. Si entra en contacto con el cuerpo o la
ropa hay que lavarlos inmediatamente con agua y jabón neutro.
• En caso de condensación, apagar el monitor y volver a encenderlo sólo después de que haya desapare-
cido.
• La unidad es completamente automática, no intentar ajustar el ángulo, ni intentar abrir ni cerrar la pantalla
manualmente.
• Antes de instalar denitivamente el monitor, asegurarse de respetar las reglamentaciones del código de
circulación.
• Las normas de circulación vial prohíben ver programas de televisión mientras se conduce.
Precauzioni di sicurezza
Safety information • Précautions de sécurité
Vorsichtsmaßnahmen • Precauciones de seguridad

Collegamenti • Connections • Connexions • Anschlüsse • Conexiones
Giallo/Yellow Video Input 1
Nero/Black Video Input 2
Blu/Blue Audio Input L
Bianco/White Audio Input R
+12V Rosso/Red
Massa/Ground Nero/Black

Installazione • Installation • Installation • Einbau • Instalación

Installazione • Installation • Installation • Einbau • Instalación
I
ATTENZIONE: Non installare l’unità in zone che possono ostacolare la visuale.
• Utilizzare esclusivamente le viti fornite nella dotazione.
• Fissare al tetto la piastra metallica, facente funzione da supporto all’unità, mediante le viti fornite
nella dotazione.
• Agganciare l’unità alla piastra ssata al tetto mediante le 4 viti fornite nella dotazione.
GB
ATTENTION: Do not install in areas which could compromise the driver’s visibility
• Do not use screws other than those supplied within the package
• Install the metal-plate, supposed to hold the Unit, on the car-ceiling, by means of the supplied
screws.
• Fix the monitor to the plate mounted on the ceiling, by using the 4 supplied screws.
F
ATTENTION: Eviter d’installer l’unité dans un endroit empêchant la bonne visibilité de conduite
• N’ utiliser que les vis fournies dans la confection
• Fixer la plaque métallique (agissant comme support de l’unité) au ciel de la voiture, au moyen des vis
fournies dans l’emballage.
• Fixer l’écran au support installé sur le plafond, en utilisant les 4 vis fournies dans la confection.
D
ACHTUNG: Gerät nicht an Stellen installieren, die die Fahrersicht behindern könnten.
• Die Befestigung ausschließlich mit den mitgelieferten Schrauben vornehmen.
• Metall-Halter, der das Gerät gut abstützt, am Dach, mittels beigelegten Schrauben, anbringen.
• Mittels den 4 beigelegten Schrauben, Bildschirm am Metallstück, auf dem Wagenhimmel, befestigen.
E
ATENCION: No instalar la unidad en un lugar que pueda obstaculizar la visión.
• Utilizar solo los tornillos que se suministran.
• Fijar al paño del techo la plancha metálica que hace de soporte para la unidad, a través de tornillos
que se suministran en dotación.
• Enganchar la unidad a la placa metálica jada en el techo a través de 4 tornillos que se suministran
en dotación.

Funzioni • Functions • Fonctions • Funktionen • Funciones
11
22
345 6 789
12
11
10
I
1Luce di cortesia
2 Trasmettitore IR (per cufe infrarossi)
3Ricevitore telecomando IR
4Tasto Reset
5-6 + / - aumenta/diminuisce i valori nel
MENU’ regolazioni
7 Accede al MENU’ di regolazioni
Luminosità/Contrasto/Colore/Lingua/
Formato immagine/Reset/Uscita
8 AV 2: seleziona l’ingresso Audio/Video 2
9 AV 1: seleziona l’ingresso Audio/Video 1
10 Power: accende / spegne il monitor
11 Tasto di sgancio monitor
12 Luce di cortesia ON/OFF

Funzioni • Functions • Fonctions • Funktionen • Funciones
GB
1 Monitor courtesy-light
2 IR-Transmitter (for Infrared Headphones)
3IR Remote-control Receiver
4 Reset-Key
5-6 +/- Increases/Decreases the values on the Regulation-Menu
7 To enter the Regulation-Menu for Brightness/Contrast/Colour/Language/Picture Format/Reset/Exit
8 Selection of Input Audio/Video 2
9 Selection of Input Audio/Video 1
10 Power: Monitor On/Off-switch
11 Key to detach the Monitor
12 Monitor courtesy-light ON/OFF
F
1Lumière de courtoisie
2 Transmetteur IR (pour casque infrarouges)
3Récepteur Télécommande IR
4Touche Reset
5-6 Pour augmenter/réduire les valeurs du Menu de Réglage
7 Pour entrer dans le Menu de Réglage pour: Luminosité/Contraste/Couleurs/Langue/Format images/
Reset/Sortie
8 Sélection Entrée Audio/Video 2
9 Sélection Entrée Audio/Video 1
10 Power: touche pour allumer/éteindre l’écran
11 Touche pour détacher l’écran
12 Lumière de courtoisie ON/OFF
D
1Monitor-Standlicht
2 IR-Sender (für Infrarot-Kopfhörer)
3 IR-Fernbedienungs-Empfänger
4Reset-Taste
5-6 -/+ Daten des Einstell-Menüs erhöhen/verringern
7 Zugang zum Einstell-Menü für Helligkeit/Kontrast/Farbe/Sprache/Bild-Format/Reset/Ausgang
8 Wahl Eingang Audio/Video 2
9 Wahl Eingang Audio/Video 1
10 Power: Monitor On/Off-Schalter11
12 ON/OFF-Schalter für Monitor-Standlicht
E
1Luces de cortesia
2 Transmisor por infrarrojos
3Receptor IR.
4Tecla de Reset
5-6 +/- Aumenta/Disminuye los valores en el Menù de ajustes.
7 Accede al Menù de ajustes de Brillo/Contraste / Color/Idioma/Formato Imagen/Reset/Salida.
8 AV2: selección l’entrada Audio/Video 2
9 AV1: selección l’entrada Audio/Video 1
10 POWER: monitor Encendido / Apagado.
11 Tecla de desenganche monitor
12 Luces de cortesia ON/OFF

Funzioni telecomando • Remote control functions • Fonctions
télécommande • Fernsteuerungs-Funktionen • Funciones mando a distancia
I 1. Non attivo
2. Regola la luminosità
3. Regola il contrasto
4. Regola il colore
5. Non attivo
6. Regola Luminosità/Contrasto/Colore
visualizzati sullo schermo
7. Accensione / Spegnimento
8. Seleziona mod. 4:3 16:9
9. Ruota immagine (destra/sinistra)
10. Ruota immagine (sopra/sotto)
11. Selezione Ingressi Video1 / Video 2
12. Accede al Menù regolazioni
1. Not active
2. Brightness-regulation
3. Contrast-regulation
4. Colour-regulation
5. Not active
6. Setting Brightness/Contrast/Colour
appearing on the screen
7. ON / OFF
8. Select mod. 4:3 16:9
9. Rotate picture (right/left)
10. Rotate picture (up/down)
11. Select entries for Video 1 / Video 2
12. Access to regulation-Menu
1. Pas actif
2. Réglage Luminosité
3. Réglage Contraste
4. Réglage Couleur
5. Pas actif
6. Réglage Luminosité/Contraste/Couleur
sur l’écran
7. Allumer / éteindre
8. Sélection mod. 4:3 16:9
9. Tourner l’image (droite/gauche)
10. Tourner l’image (en haut/en bas)
11. Sélection entrée Vidéo 1 / Vidéo 2
12. Entrée au Menu de Réglage
1. Unbesetzt
2. Einstellung der Helligkeit
3. Einstellung des Kontrastes
4. Einstellung der Farbe
5. Unbesetzt
6. Einstellung Helligkeit/Kontrast/Farbe
auf dem Bildschirm
7. Ein- / Ausschalten
8. Wahl 4:3 16:9
9. Bild drehen (rechts/links)
10. Bild drehen (oben/unten)
11. Wahl des Eingangs Video 1/Video 2
12. Zugang zum Einstellungs-Menü
1. No activo
2. Regula el brillo
3. Regula el contraste
4. Regula el color
5. No activo
6. Regula Brillo/Contraste/Color
visualizados en la pantalla
7. Encendido / Apagado
8. Seleciona mod. 4:3 16:9
9. Invierte la imagen (derecha/izquierda)
10. Invierte la imagen (encima/debajo)
11. Seleciona entrada Video1 / Video 2
12. Accede al Menù de ajuste
Sostituzione pila telecomando
Changing the reòote control battery
Remplacement batterie télécommande
Auswechseln der batterie der Fernbedienun
Sustitución bateria mando a distancia
CR 2025
1
2
3
4
5
6
7
9
8
12
11
10
GB
F
D
E

Problema Causa Rimedio
Non compare nessuna im-
magine sullo schermo. Il cavo di alimentazione non é con-
nesso correttamente o il fusibile é
guasto.
Vericare le connessioni del cavo
alimentazione o sostituire il fusibile.
Immagine sfocata sullo
schermo. I cavi del segnale A/V passano troppo
vicino a centraline elettroniche o cavi
che creano interferenze.
Il segnale video sarà migliore se
passerà fuori dalla portata dell’inter-
ferenza.
Il telecomando non intera-
gisce con il monitor.
Batteria scarica.
Ostacoli tra telecomando
e monitor.
Non é stata tolta la pellicola di isola-
mento della batteria nel telecomando
Sostituire la batteria.
Effettuare la pulizia dei sensori e con-
trollare che non vi siano oggetti che
interferiscono nella trasmissione.
Slare la pellicola.
L’immagine appare scura. Troppo freddo nell’abitacolo.
La regolazione della luminosità é
settata troppo bassa.
Attendere che si riscaldino i cristalli
liquidi.
Controllare la funzione “BRIGHT-
NESS”
Non si sente l’audio nelle
cufe.
La cufa é spenta oppure le batterie
sono scariche.
Ostacoli per il segnale
Trasmettitore troppo distante
Accendere la cufa oppure sostituire
le batterie
Rimuovere gli ostacoli.
Avvicinarsi al monitor.
CAUSE E RIMEDI AI PROBLEMI D’INSTALLAZIONE
Problem Cause Remedy
Display does not show
anything The current-supply cable may not
have been inserted correctly or the
fuse may be defect.
Consequently, check the current-
supply cable or replace the fuse
If the picture on the Monitor
appears out of focus. The AV-signal-.cables may be too
near to central boxes or the cables
may be causing interferences.
Consequently, put the cable beyond
the interference area, so that the
video-signal will be better.
If the remote-control-unit
does not interact with the
Monitor.
Remote-control battery is at.
There are obstacles between remote-
control and monitor.
The battery isolation-strip has not
been taken off.
Replace battery (as per instructions)
Clean the sensors and make sure
there are no objects capable of inter-
fering in transmission.
Consequently, take off the battery
isolation-strip.
The picture on the display
is rather dark. The in-car temperature is too low.
The luminosity-level is too low.
Wait a few seconds until the liquid
cristals get warm.
Control the “Brightness”-function.
There is no sound in the
head-phones.
The head-phones are Off or batteries
are empty
Objects may be hindering the recep-
tion of the signal.
You are beyond the transmitter’s
maximum action eld
Switch head-phones ON.Replace the
battery
Remove the obstacles placed before
the signal
Move nearer to the Screen.
GB CAUSES AND REMEDIES TO INSTALLATION PROBLEMS
I
GB

Problème Cause Solution
Pas d’image, quand l’écran
est bien allumé
Dans ce cas, le câble d’alimentation n’est
pas correctement branché ou le fusible est
cassé.
Vérier les connexions du câble d’alimen-
tation ou remplacer le fusible.
Image oue sur l’écran. Dans ce cas, les câbles de signal A/ se trou-
vent trop proche à des centrales électroniques
ou à des câbles causant des interférences.
Le signal vidéo sera mieux, une fois dépla-
cé au dehors du champs d’interférences.
La télécommande n’interagit
pas avec l’écran. Battérie du télécommande déchargée.
Présence d’obstacles entre télécommande
et écran.
Dans ce cas, vous avez oublié d’enlever
la pellicule d’isolement de la batterie de la
télécommande.
Remplaçer la battérie.
Effectuer le nettoyage des senseurs. Con-
trôler qu’il n’y a pas des objets interagis-
sant avec la transmission.
Par conséquent, enlever la pellicule d’iso-
lement de la batterie.
L’image est trop foncée Température trop froide dans l’habitacle.
La luminosité de l’écran est trop faible.
Attendre quelques instants pour que les
cristaux liquides se chauffent.
Régler la fonction « Brigtness » en choisis-
sant une luminosité plus élevée.
Il n’y a pas de son dans les
écouteurs.
Les écouteurs ne sont pas allumés ou les
batteries sont déchargées.
Il y des obstacles à la réception du signal
Vous êtes au dehors du champs maximum
de transmission.
Allumer les écouteurs et remplacer les
batteries
Eliminer les obstacles
Rapprocher l’écran
GB CAUSES ET SOLUTIONS AUX PROBLEMES D’INSTALLATION
F
URSACHEN UND ABHILFE BEI INSTALLATIONSPROBLEMEN
D
Problem Ursache Abhilfe
Kein Bild, bei eingeschalte-
tem Monitor.
Das Stromkabel ist nicht ordnungsgemäß
angeschlossen oder die Sicherung ist
fehlerhaft.
Stromkabel-Anschluss kontrollieren bzw.
Sicherung austauschen.
Bild ist unscharf. Die Kabel des A/V-Signals liegen zu nahe
an elektronischen Zentraleinheiten oder
die Kabel selbst verursachen Störungen.
Das Video-Signal dadurch verbessern,
indem Sie es außerhalb des Störungsfel-
des versetzen.
Fernsteuerungsgerät wirkt
nicht auf den Monitor ein.
Fernbedienungs-Batterie leer.
Bestehendes Hindernis zwischen Fernbe-
dienung u. Monitor.
Die Abdeckungsfolie der Fernbedienung-
sbatterie wurde nicht entfernt.
Neue Batterie einsetzen (siehe Anweisungen).
Sensoren reinigen. Etwaige Gegenstände
aus dem Empfangsraum entfernen.
Folie einfach entfernen.
Das TV-Bild ist zu dunkel Wageninnenraum ist unterkühlt.
Helligkeitsgrad ist zu schwach.
Abwarten, bis Flüssigkristalle sich anwär-
men.
Helligkeit durch den Knopf « Brightness »
verstärken.
Kein Ton in den Kopfhörern Kopfhörer sind abgeschaltet
Kopfhörer-Batterien sind leer
Signal-Empfang ist durch bestimmte
Gegenstände behindert.
Maximale Übertrager-Reichweite ist
überschritten
Kopfhörer einschalten.
Batterien ersetzen
Signal behindernde Gegenstände entfernen
Näher an den Monitor gehen

PROBLEMAS DE INSTALACIÓN: CAUSAS Y SOLUCIONES
E
Problemas Causas Soluciones
Si no aparece ninguna imagen
en la pantalla cuando el moni-
tor esté encendido.
Controlar que el cable de alimentación
esté correctamente conectado, y que el
fusible no esté interrumpido.
Controlar las conexiones del cable y o
substituir los fusibles.
Imagen desenfocada en la
pantalla. Los cables de la señal A/V pasan dema-
siado cerca de centralitas electrónicas y/o
cables que crean interferencias.
La señal de video mejorará si se cambia el
recorrido del cable.
El mando a distancia no inte-
racciona con el monitor.
La batería del control remoto está descar-
gada.
Hay obstáculos entre el control remoto y
el monitor.
No ha sido quitada la protección que aísla
la batería al mando a distancia.
Cambiar la batería (ver instrucciones).
Limpiar los sensores. Vericar si hay obje-
tos que intereren en la transmisión.
Quitar la protección de seguridad.
La imagen aparece oscura El habitáculo está demasiado frío.
El ajuste del brillo está jado demasiado
bajo.
Esperar unos instantes hasta que se
caliente el cristal líquido.
Controlar la función “Brightness” y ajustar
con un valor más alto.
No se oye el sonido en el
auricular.
El auricular está apagado
Las baterías del auricular están gastadas
Hay objetos que impiden la recepción de
la señal
Nos encontramos fuera del alcance máxi-
mo del transmisor.
Encender el auricular
Sustituir las baterías
Retirar los obstáculos
Acercarse al monitor.

GARANZIA • WARRANTY • GARANTIE • GARANTIE • GARANTÍA
I
Questi prodotti sono garantiti secondo le leggi vigenti. La garanzia da diritto alla riparazione gratuita dei
pezzi difettosi. Non sono coperti da garanzia i danni causati da: avarie da trasporto, errata installazione,
condizioni ambientali, incapacità d’uso o riparazioni effettuate da personale non autorizzato. Eventuali
componenti difettosi dovranno essere riconsegnati al rivenditore o inviati presso il centro assistenza
Phonocar, via F.lli Cervi, 167/C - 42100 Reggio Emilia - Tel. 0522.941621.
GB
All products contained in this catalogue have a warranty according to the law. When warranty is applica-
ble, the defect parts are repaired free of charge. Damage caused through transport, wrong installation,
climatic conditions, wrong use, unauthorized repairs, will not be covered by warranty. The defect parts
should be given to your local Dealer, who will forward to our Distributor for repair.
F
Tous les produits présents dans ce catalogue sont garantis selon les conditions de loi. La Garantie
donne droit à la reparation gratuite des pièces défectueuses. La Garantie ne couvre pas: les dommages
de transport, installation erronée, conditions environnementales, climatiques ou autres, les pannes cau-
sées par une négligence, une intervention incompétente, une incapacité d’utilisation ou des réparations
effectuées par du personnel non autorisé. Pour être remplacés ou réparés gratuitement, les éventuels
composants défectueux devront être retournés au revendeur.
D
Alle Produkte des vorliegenden Katalogs verfügen über die gesetzlich vorgesehene Garantie. Alle de-
fekten Teile werden, bei Garantieanspruch, KOSTENLOS durch uns repariert. Bei Schäden, die auf den
Transport, Installationsfehler, Klimaverhältnisse, unsachgemäße Anwendung, unbefugten Reparaturver-
such, zurückzuführen sind, besteht leider KEIN Anspruch auf Garantie. Defekte Teile bitten wir FREI, über
Ihren Händler, bei Phonocar einzureichen.
E
Todos los productos de este catálogo están garantizados según lo establecido por la ley. La garantía da
derecho a la reparación gratuita de piezas defectuosas, pero no cubre daños producidos durante el tran-
sporte o causados por errores de instalación, condiciones ambientales, usos incorrectos o reparaciones
efectuadas por personal no autorizado. Si el usuario comprueba la existencia de componentes defec-
tuosos, debe entregarlos al revendedor o enviarlos al centro de asistencia técnica, delegado comercial:
Sr. Verderese - Tel. 958 30 22 95 - Fax 958 30 24 70.

CARATTERISTICHE TECNICHE
TECHNICAL SPECIFICATIONS
CARACTERISTIQUES TECHNIQUES
TECHNISCHE MERKMALE
CARACTERÍSTICAS TÉCNICAS
Formato / Format ................................................................................. 16:9
Schermo / Screen................................................................................. 11” (diagonal)
Risoluzione / Resolution....................................................................... 800 (H) x 480 (V) 262K pixel
Luminosità / Brightness........................................................................ 400 cd/m2
Angolo di visione / Viewing angle......................................................... Horiz. 65°/65° - Vert. 65°/55°
Ingressi / Inputs ................................................................................... Audio 1 / Video 2
Regolazioni / Setting ............................................................................ color/brightness/contrast
Sistema / System ................................................................................. NTSC/PAL/AUTO
Telecomando / Remote control ............................................................ Infrared
Trasmettitore / Transmitter ................................................................... IR integrate
Funzioni / Functions ............................................................................. On Screen Display (OSD)
Temperatura d’esercizio / Working temperature .................................. 0 ÷ 60°C
Angolazione display / Angle display..................................................... 45° SWIEVEL
Assorbimento / Power consumption.................................................... 800 mA
Dimensioni / Dimensions ..................................................................... L 300 - D 287 - H 40 mm
ATTENZIONE: Tutti i componenti sono studiati per funzionare con una tensione di 12V.
IMPORTANT: All components are designed to operate with a 12V power supply.
ATTENTION: Tous les composants sont conçus pour fonctionner avec une tension de 12 V.
ACHTUNG: Alle Bauteile sind für einen Betrieb mit einer Spannung von 12V ausgelegt.
ATENCIÓN: Todos los componentes han sido diseñados para funcionar con una tensión de 12 V.

S.pA. - Via F.lli Cervi, 167/C - 42100 Reggio Emilia (Italy) - Tel. ++39 0522 941621 - Fax ++39 0522 942452
www.phonocar.com - e-mail:info@phonocar.it
FRANCE
Vente et Assistance assurées par le Fabricant italien Tél/Fax N° Vert 0800.90.43.99
www.phonocar.fr • e-mail:info@phonocar.it
DEUTSCHLAND
71711 - MURR - Rudolf Diesel Strasse, 13 - Tel. 07144 82302-0 / Fax 07144 282114
www.phonocar.de - e-mail:info@phonocar.de
ESPAÑA
Delegado Comercial Sr. VERDERESE DOMENICO
Tel. 958 302295 - Fax 958 302470 - Movil 607592406
e-mail: info@phonocar.es
Table of contents
Other Phonocar Media Player manuals

Phonocar
Phonocar VM183 User manual

Phonocar
Phonocar VM 031 User manual

Phonocar
Phonocar VM197 User manual

Phonocar
Phonocar VM197B User manual

Phonocar
Phonocar VM185 Installation guide

Phonocar
Phonocar VM196 User manual

Phonocar
Phonocar VM190 User manual

Phonocar
Phonocar VM199 User manual

Phonocar
Phonocar VM194 User manual

Phonocar
Phonocar VM547 User manual