5
IT / GB / FR
FUNZIONI • FUNCTIONS • FONCTIONS USB/MMC/SD CARD
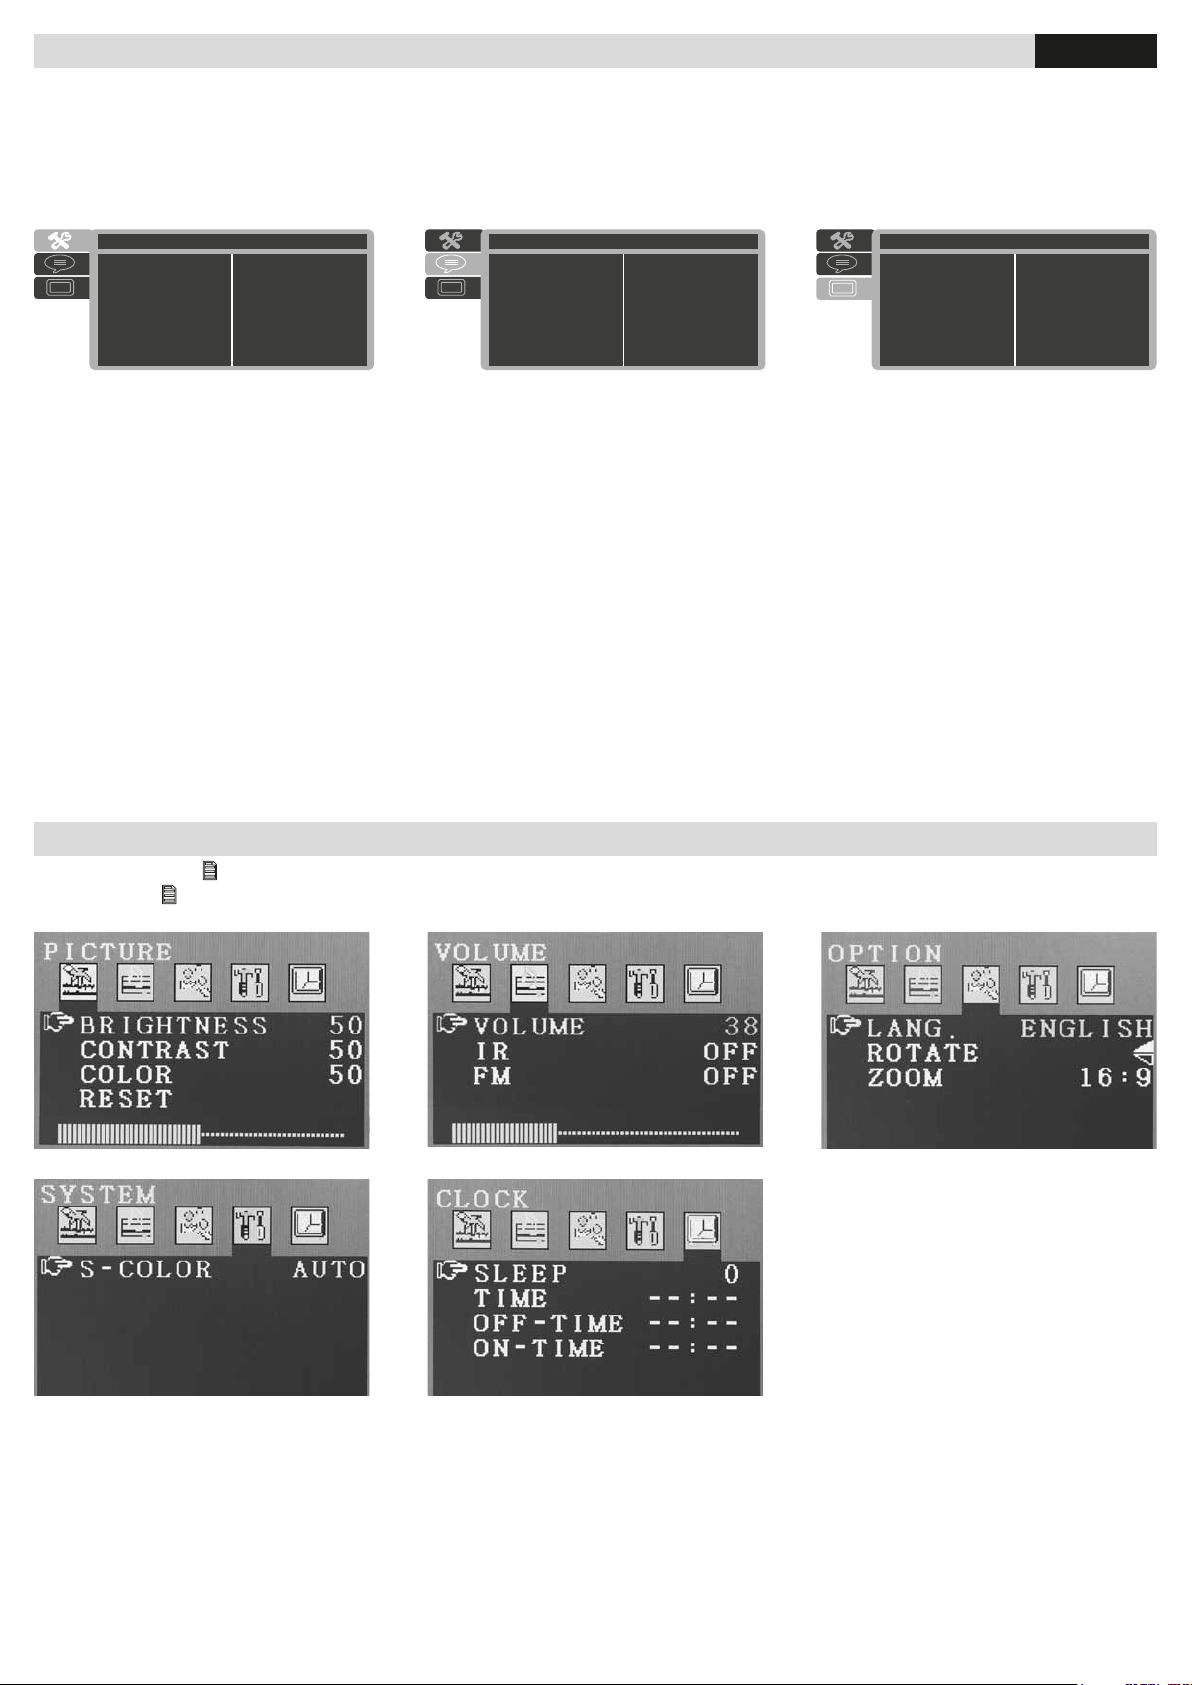
Mentre il DVD è in riproduzione premere il tasto SETUP sul telecomando. È possibile accedere alle seguenti impostazioni:
When disc is in playing, press the“SETUP” button on the remote controller to enter into the SETUP MENU,Pls check the picture showed as below:
Pendant la reproduction DVD, appuyer la touche SETUP sur la télécommande pour accéder aux réglages suivants:
SYSTEM SETUP Impostazioni di sistema / System settings / Réglages de système
LANGUAGE SETUP Cambia lingua dei menù e dell’audio dei DVD / Select DVD language, audio and menu.
Change la langue des menus et de l’audio des DVD
VIDEO Regolazioni Luminosità, Contrasto, Tinta, Colore, Nitidezza / Adjustments Brightness, Contrast, Tint, Colour, Sharpness.
Réglages luminosité, Contraste, Nuance, Couleur, Netteté
PICTURE: Réglez la Luminosité-Contraste-Couleur.
VOLUME: Ajuste Volume-IR (casque) -Radio.
OPTION: Définir la langue-Écran-Rotation-Zoom.
SYSTEM: Réglage manuel de la couleur.
CLOCK: Paramètres de l’horloge.
RIPRODUZIONE MP3/WMA/JPEG/AVI
Dopo aver inserito un supporto DISCO, SD CARD o USB, il lettore visualizzerà le cartelle automaticamente e inizierà la riproduzione.
In presenza di file AUDIO/VIDEO l’unità riprodurrà sempre i file musicali.
RIPRODUZIONE IMMAGINI JPEG
L’unità visualizza la prima immagine della prima cartella. Usare il tasto sul telecomando per selezionare il file da riprodurre.
In modalità Play/Pausa , premendo i tasti direzionali si cambia l’angolo di visione:
Ruota l’immagine verso l’alto. • Ruota l’immagine orizzontalmente. • Ruota di 90 gradi a sinistra.
Ruota di 90 gradi a destra.
RIPRODUZIONE MP3 E JPEG
Se l’utente vuole gestire le foto durante la riproduzione MP3, avviare la riproduzione musicale e successivamente premere i tasti direzionali sul
telecomando per muovere il cursore sulle immagini.
Premere ENTER per entrare nella gestione immagine e i tasti direzionali per entrare nel menu riproduzione.
Dopo aver selezionato un’immagine nel menu premere il tasto per riprodurre le immagini in ordine. Premendo i tasti si passa da MP3 a immagini.
RIPRODUZIONE DVD
All’inserimento di un disco formato DVD l’unità visualizzerà direttamente il menù titoli.
Muoversi con i tasti direzionali per selezionare la voce desiderata.
PLAYBACK OF MP3/WMA/JPEG/AVI
After having introduced a DISC, SD-CARD or USB-key, the Player will automatically visualize the Folders and start reproduction.
In the presence of AUDIO/VIDEO-files, the Player will always reproduce the musical Audio-files.
PICTURES-PLAYBACK JPEG
The unit will visualize the first Picture of the first Folder. Use key on the remote-control to select the File to be reproduced.
During Play/Pause-Mode , press direction-keys to change vision-angle:
Rotate picture upwards. • Rotate picture horizontally. • Rotate by 90° to the left.
Rotate by 90° to the right.
PLAYBACK OF MP3 AND JPEG
Should you wish to handle your photos, while MP3-reproduction is on the run, first of all start music-reproduction, then press direction-keys on the
remote-control, and set the cursor on the requested pictures.
Press ENTER, to activate the pictures handling-section. Use direction-keys to enter the Reproduction-Menu. After having chosen the requested
picture, press key from the Menu, to reproduce the pictures in a row. By pressing the keys , you will switch from MP3 to pictures.
PLAYBACK OF DVD’s
When introducing a DVD-disc, the unit will directly show the Titles-Menu.
Use direction-keys to choose the requested function.
REPRODUCTION MP3/WMA/JPEG/AVI
Après avoir inséré un support DISQUE, CARTE SD ou USB, le lecteur visualise automatiquement les dossiers et commence la reproduction.
En présence de fichier AUDIO/VIDEO l’appareil reproduit toujours les fichiers musicaux.
REPRODUCTION IMAGES JPEG
L’appareil visualise la première image du premier dossier. Utiliser la touche sur la télécommande pour sélectionner le fichier à reproduire.
En modalité Play/Pausa , en appuyant les touches directionnelles, on change l’angle de vision:
Tourne l’image vers le haut. • Tourne l’image horizontalement. • Tourne de 90 degrés à gauche.
Tourne de 90 degrés à droite.
REPRODUCTION MP3 ET JPEG
Si l’utilisateur veut gérer les photos pendant la reproduction MP3, commencer la reproduction musicale et ensuite appuyer les touches directionnelles
sur la télécommande pour parcourir les images.
Appuyer ENTER pour entrer dans la gestion image et les touches directionnelles pour entrer dans le menu reproduction.
Après avoir sélectionné une image dans le menu, appuyer la touche pour reproduire les images en ordre. En appuyant les touches , on passe de
MP3 à images.
REPRODUCTION DVD
A l’insertion d’un disque format DVD l’appareil visualisera directement le menu des titres.
Parcourir avec les touches directionnelles pour sélectionner le point désiré.