Pregis Easypack coiler-lite User manual
Operating Manual (EN)
52-OM216-1
English
Easypack®

2
www.pregis.com 52-OM216-1
Safety Information
Description and Purpose of Machine
Specification and Maintenance
Set Up
Controls
Pre-start checks
Operation
Paper Jam
Troubleshooting
EC Declaration of Conformity
3
4
5
6
8
10
11
13
14
15
Contents

3
www.pregis.com 52-OM216-1
Always switch off the machine from the mains supply before
freeing paper jams, lifting the top cover or cleaning.
• Never damage or remove factory installed safety stickers. If a safety sticker is
lost, damaged, or becomes illegible, report this condition to a supervisor and
obtain a replacement sticker from Pregis.
• When moving the Coiler ensure that the power lead and the flying lead con-
necting the Coiler to the Packmaster™ pro are disconnected.
• Keep the work area clean and uncluttered. Walkways and access/egress routes
should always be free of packing material and debris to prevent a slipping or
tripping hazard.
• Ensure that all covers, guards and other safety devices are in place. NEVER
disable a safety device for any reason.
• Never leave the equipment unattended while operating. Turn the machine off if
you must leave the work area.
• Keep body parts and clothing away from moving components.
• DO NOT operate equipment if you are under the influence of alcohol, drugs
or medications that can make you less alert or affect your judgment.
The machine can be stopped at any time by pressing the red (0) switch. This cuts all
supply to the control panel and motors.
THIS MACHINE MUST BE EARTHED
The wires in the mains cable are coloured as such:
GREEN/YELLOW
BLUE
BROWN
EARTH
NEUTRAL
LIVE
• It is important that this machine is installed, maintained and used
correctly to avoid the risk of injury.
• This machine contains dangerous voltages and rotating mechanical parts.
• Use the machine only for the purposes described in the Operating Manual.
• This machine is to be used only by trained personnel.
• The machine is to be serviced or repaired only by Pregis.
Safety Information
•The machine uses a 120/230V(±10%), 50/60Hz, single-phase AC supply.
•To protect against electrical shock, do not immerse the plug or mains cable in
water or spray with liquids.
•Unplug from the electrical supply when not in use.
•Do not operate this machine with a damaged mains cable or plug.
•To disconnect from electrical supply, grip the plug - do not pull on the mains
cable.

4
www.pregis.com 52-OM216-1
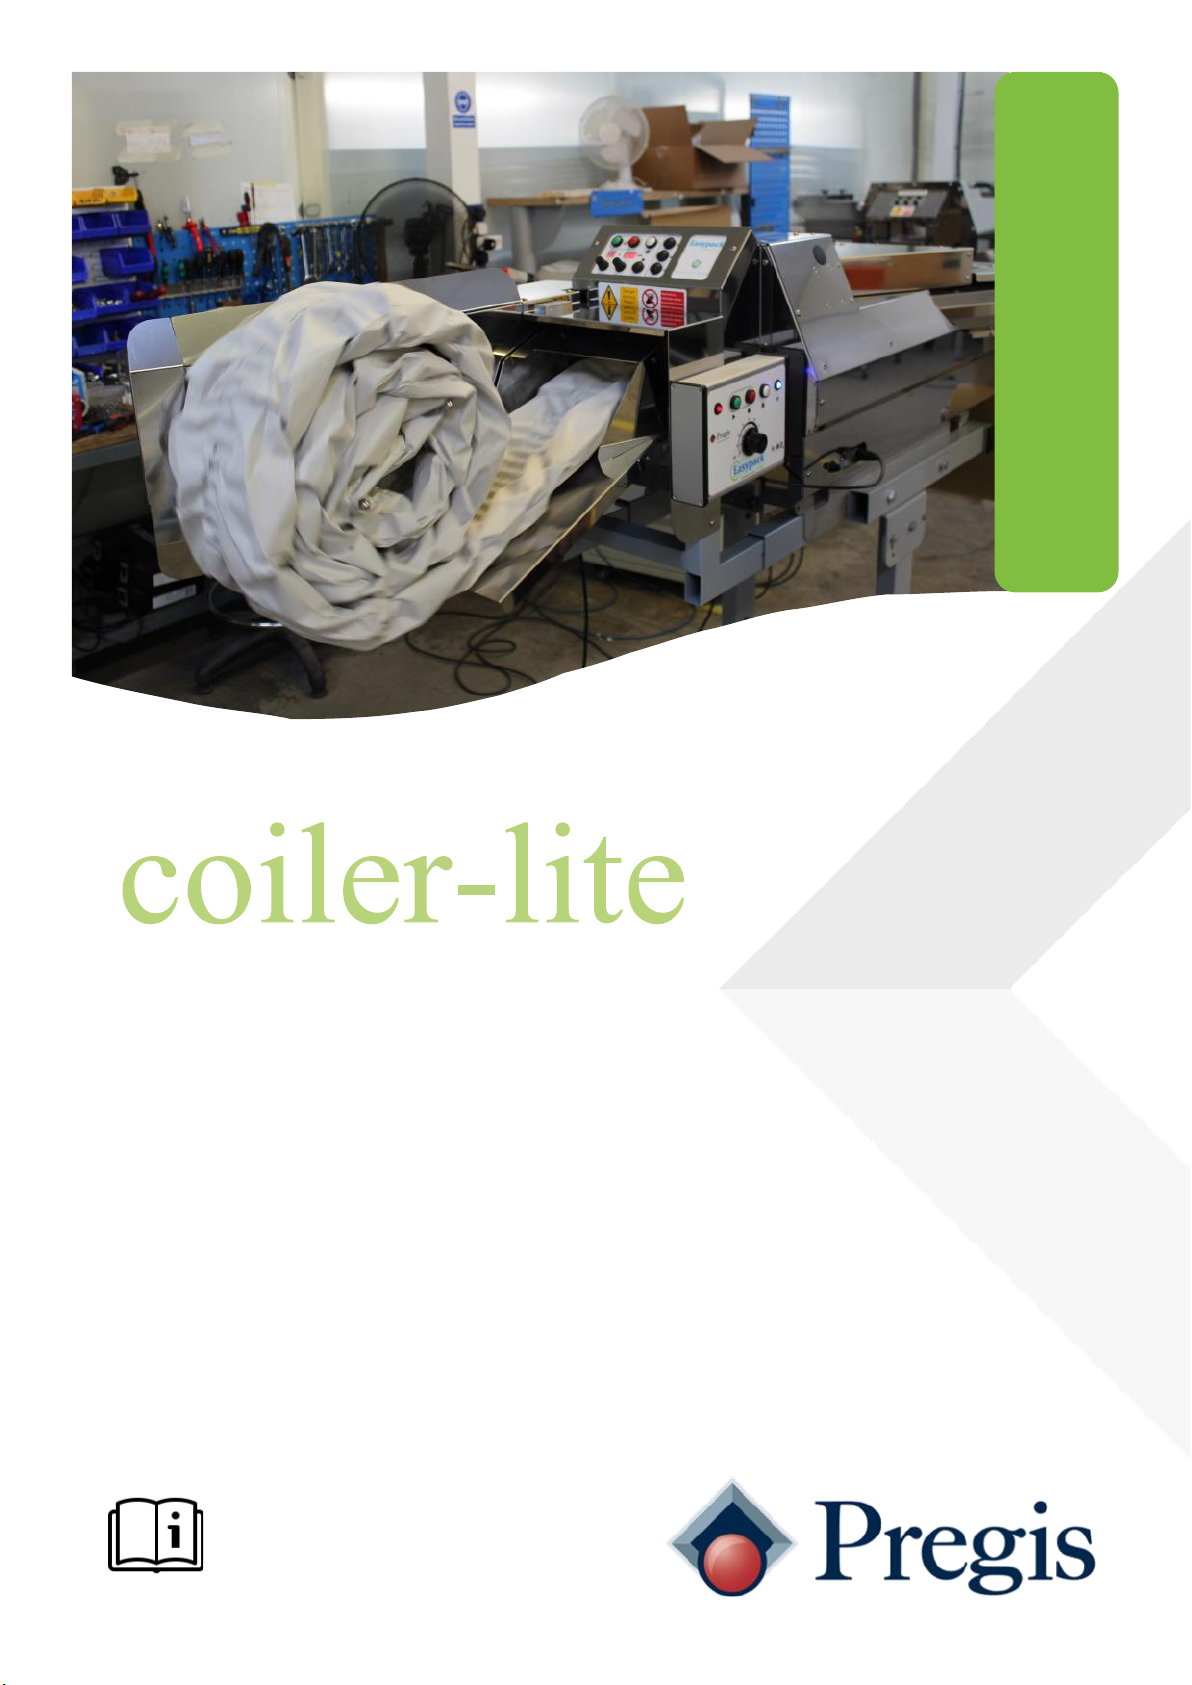
The Pregis Coiler-lite produces large quantities of paper coil cushions when used in con-
junction with the Pregis Packmaster™ pro. Paper coil cushions provide light, strong pack-
aging options which mould to the shape of the items to be protected and are manufac-
tured using 100% recycled materials.
Paper coils can be made using 52/90gsm and 70gsm white or brown paper. The coils can be
produced at sizes ranging from 30cm to 70cm diameter. All of our paper is 100% recycled,
100% recyclable and 100% biodegradable.
These coils can be produced quickly either for immediate use or to store for later use. The
Coiler is simple to use providing a hands-free repeat option which allows production to con-
tinue. Advanced safety features ensure safe operation at all times.
The Machine is of rugged design and construction and is quickly wiped over for cleaning
purposes.
The Machine is designed to meet EC safety standards and requires connection only to a
suitable electrical supply.
Tine (part of the
winding head)
Description and Purpose of Machine
Coiler-lite
Control
Console
Sensors
Holding arms

5
www.pregis.com 52-OM216-1
Specification
Maintenance
Specification and Maintenance
Machine Weight (Coiler-lite only) 30 kg
Machine dimensions (mm)
With/ without Packmaster™ pro
(L) 1910 / 1510
(W) 840 / 520
(H) 885—1285 / 510
Coil diameter From 300mm – 700mm (approx.)
Coil depth 200mm Nominal
Average output speed 26 m/min (Automatically matched to
Packmaster™ Pro)
Ideal usage On demand
Supply 120V/230V AC, 50/60 Hz
Max power input 350W
Compatible with all Packmaster™ Pro paper grades. Single ply or twin
-ply grades from 70gsm to 52/90gsm. White and brown paper options
• Always unplug the Machine before clearing a jam or cleaning the
Machine.
• Activity around the machine should not put the mains supply cable and
foot switch line in danger of sustaining damage or being a trip hazard.
• If in doubt, unplug the Machine and contact your local Pregis office.
• Do not allow water or other liquids to drip on or into the Machine.
• If the Machine fails to operate, check the Troubleshooting Guide.
• Clean the Coiler using a lint free cloth.
• Clean the paper contact surfaces with a silicone based furnish polish
• Ensure the two sensors (just to the left of the winding head) are free of
dust (TAKE CARE - THESE ARE FRAGILE)
• If the Machine still fails to operate after checking against the Guide,
contact Pregis.
• There are no user serviceable parts inside the Machine.
• Refer to the ‘Troubleshooting’ Guide for operational issues.

6
www.pregis.com 52-OM216-1
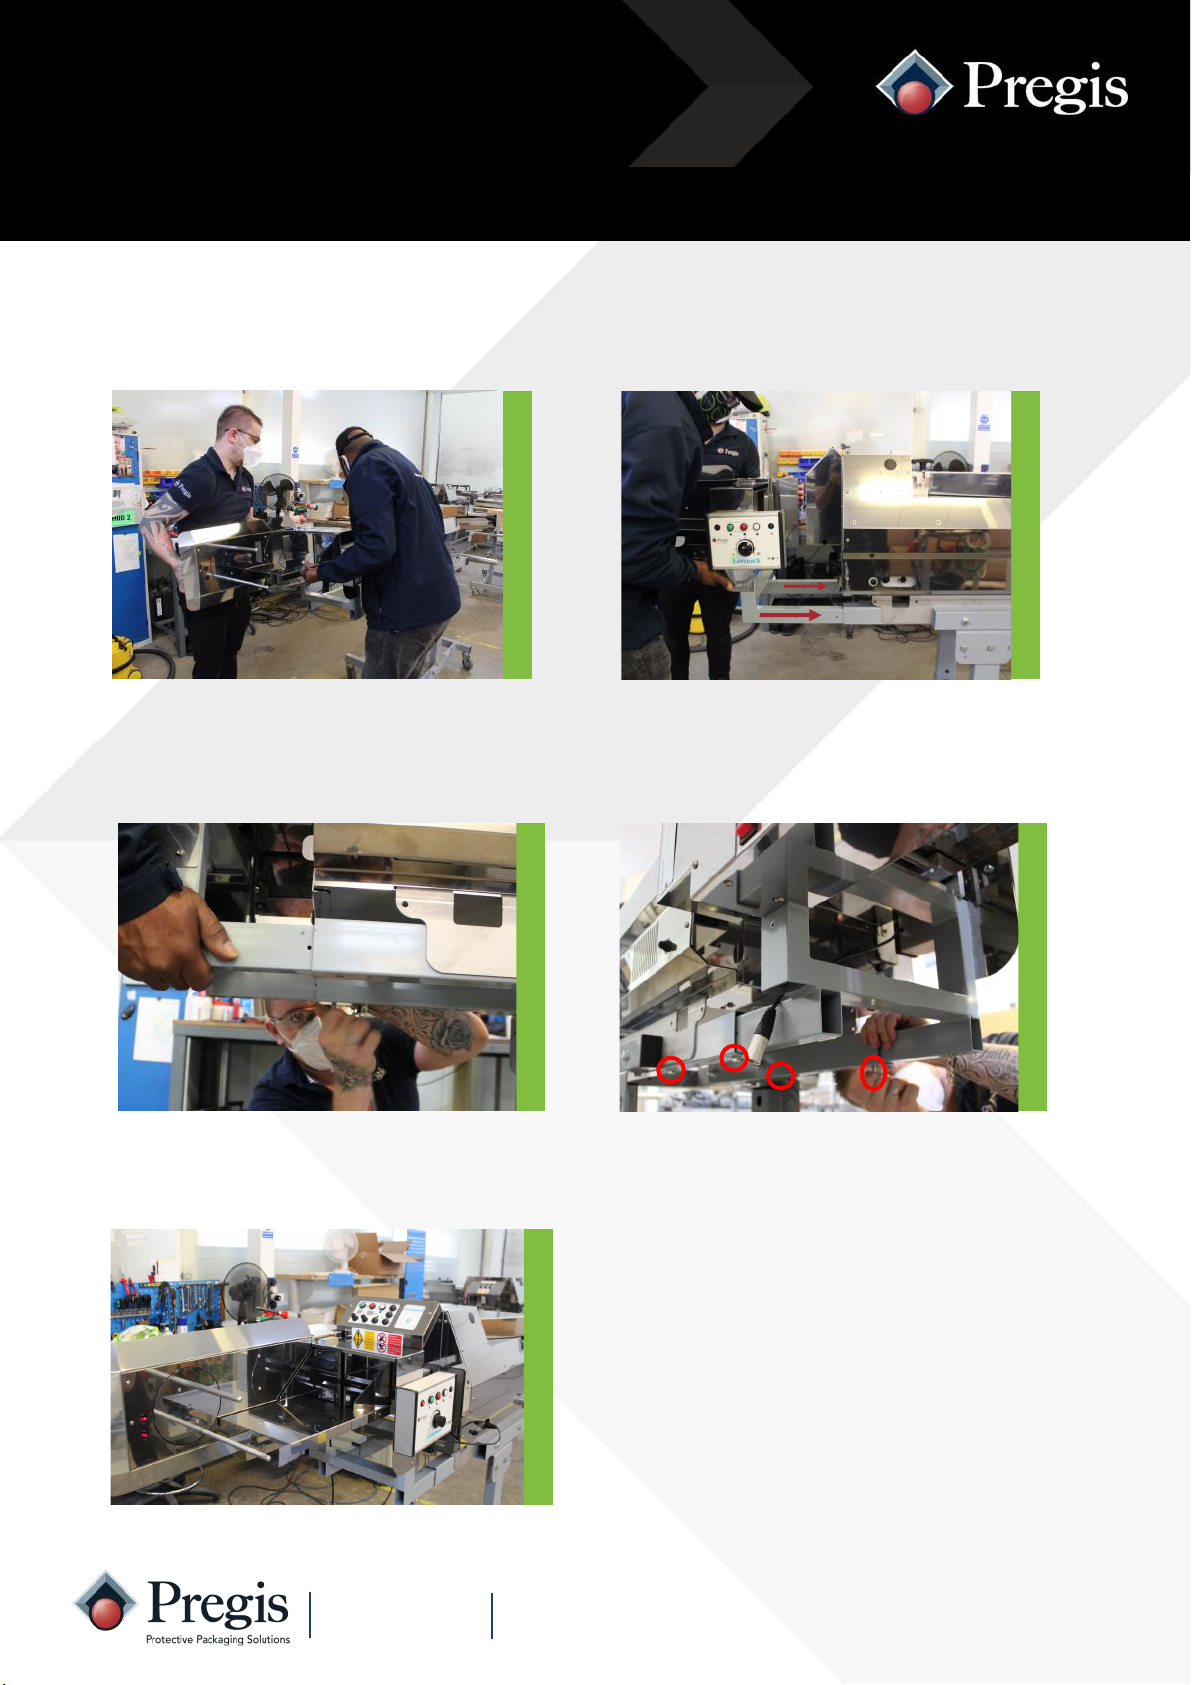
Set Up
1. Using a hoist, lift and align the
Packmaster™ Pro to its frame.
2. Remove the existing bolts on
either side and replace with M12 x
110mm bolts.
4. Secure with nuts and tighten.
3. Align additional holding bars to the
newly added bolts.
Setting up the Packmaster™ Pro for the Coiler-lite
5. The machine should look like this.
The Coiler-lite, Packmaster™ Pro and the frame arrive detached from each other and will
require assembly. NOTE: This should be done only by Pregis engineers.
7
www.pregis.com 52-OM216-1
Set Up
1. Two people to lift the Coiler-lite
and align with the front of the
Packmaster™ Pro.
2. Align and connect the holding arms
from the Coiler-lite into the newly
added holding arms of the
Packmaster™ Pro.
4. Once all four bolts are in, tighten and
secure.
3. With one person navigating the
Coiler-lite for alignment, loosely
screw in the bolts to hold into place.
Attaching the Coiler-lite to the Packmaster™ Pro
NOTE: This should be done only by Pregis.

8
www.pregis.com 52-OM216-1
Controls
Location of controls
Mains Power Switch Switch illuminates when switched on.
Control box Refer to the next page for an explanation of the Control Console
functions.
Coiler-lite Control Console
Packmaster Pro
Control Console
Power switch on reverse
side of Coiler-lite
9
www.pregis.com 52-OM216-1
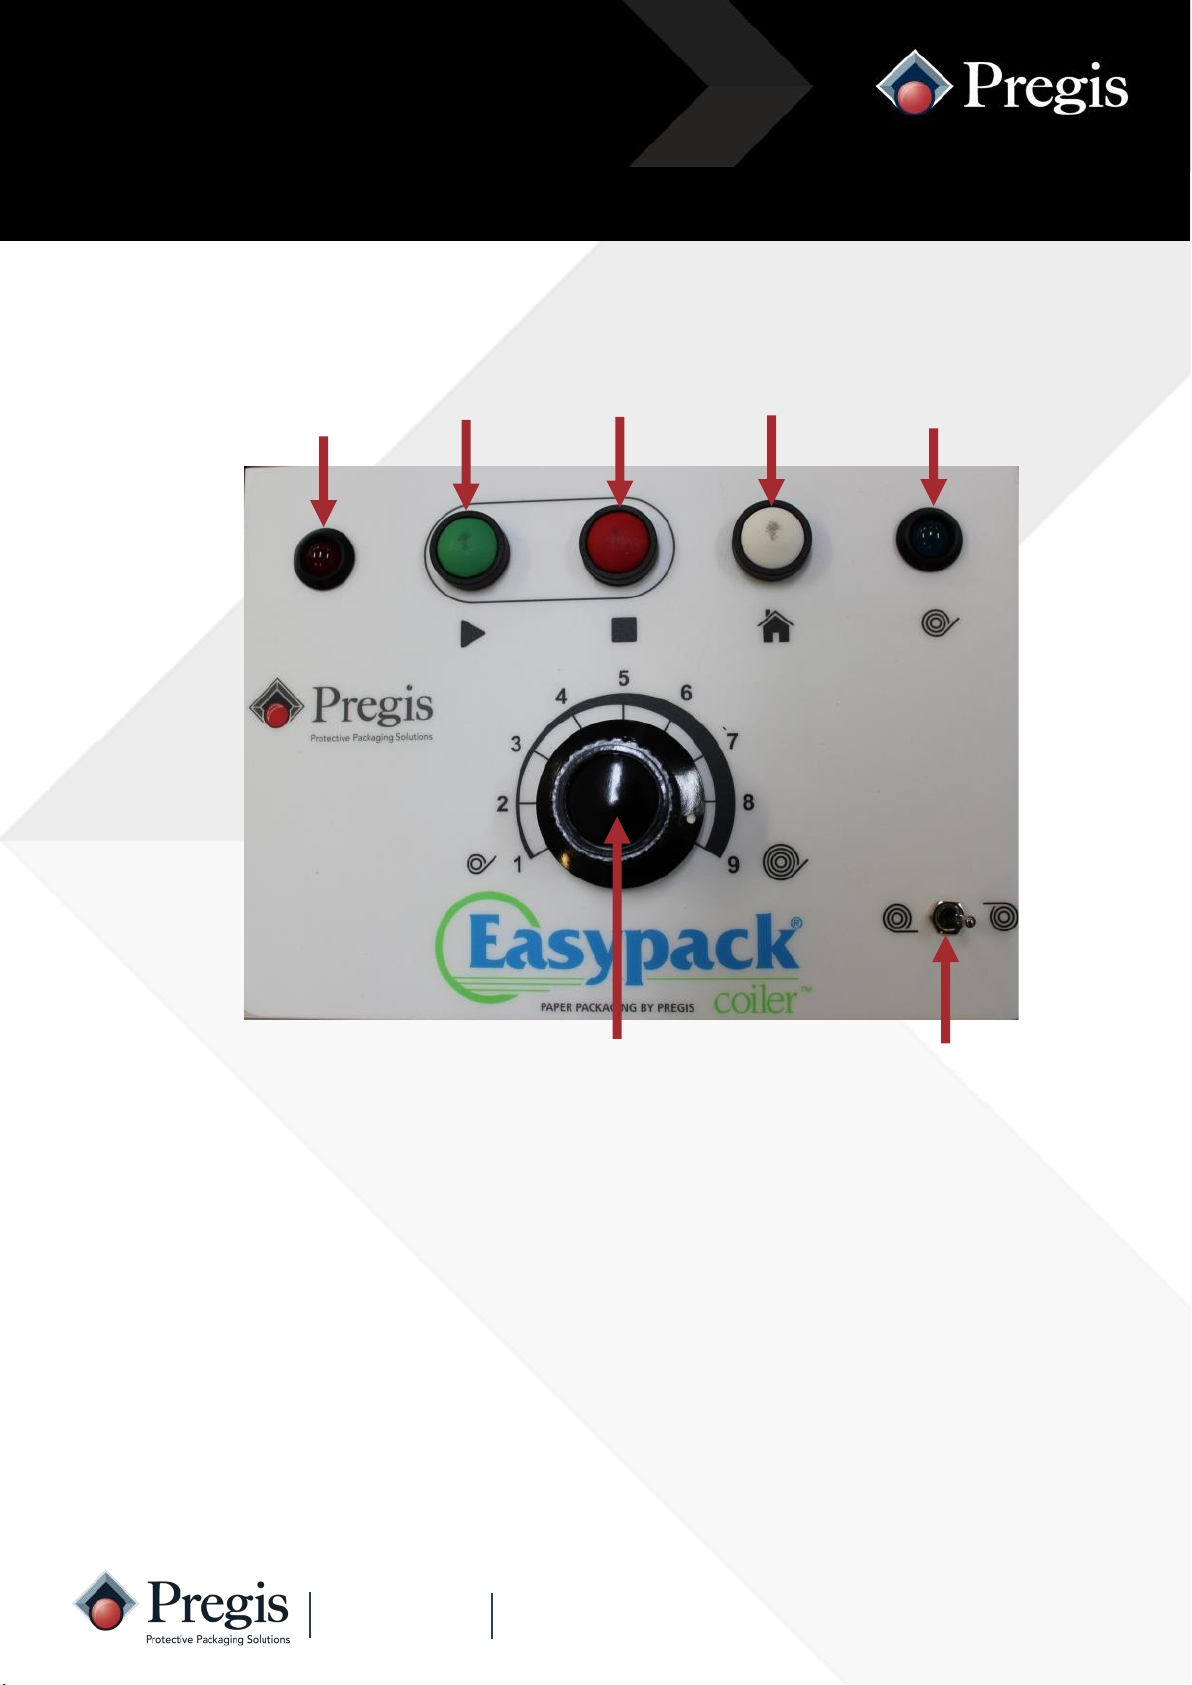
Controls
Control console functions
‘Stop’
Button
‘Home’
Button
‘Start’
Button
Power
Indicator
Coil
Indicator
Tail switch
position
Coil size
control
Power Indicator Illuminates when the Coiler-lite is switched on
Start Button Press the green ‘Start’ button to start the Coiler-lite.
Stop Button Press the red ‘Stop’ button to prematurely stop the Coiler-lite mid-cycle.
Home Button Resets the Coiler-lite, if an error has occurred.
Coil Indicator Illuminates whilst making a coil and flashes when the coil is completed and
requires removal.
Coil Size Control Selects the required coil size. The coil size will vary with different grades of
paper.
Tail Position
Switch
This selects the position of the ‘tail’ of the coil.
Switch to left (normal position) - coil is completed with the tail in the bottom
position which keeps the tail in position until the coil is removed.
Switch to the right - coil is completed with the tail in the top position allowing

10
www.pregis.com 52-OM216-1
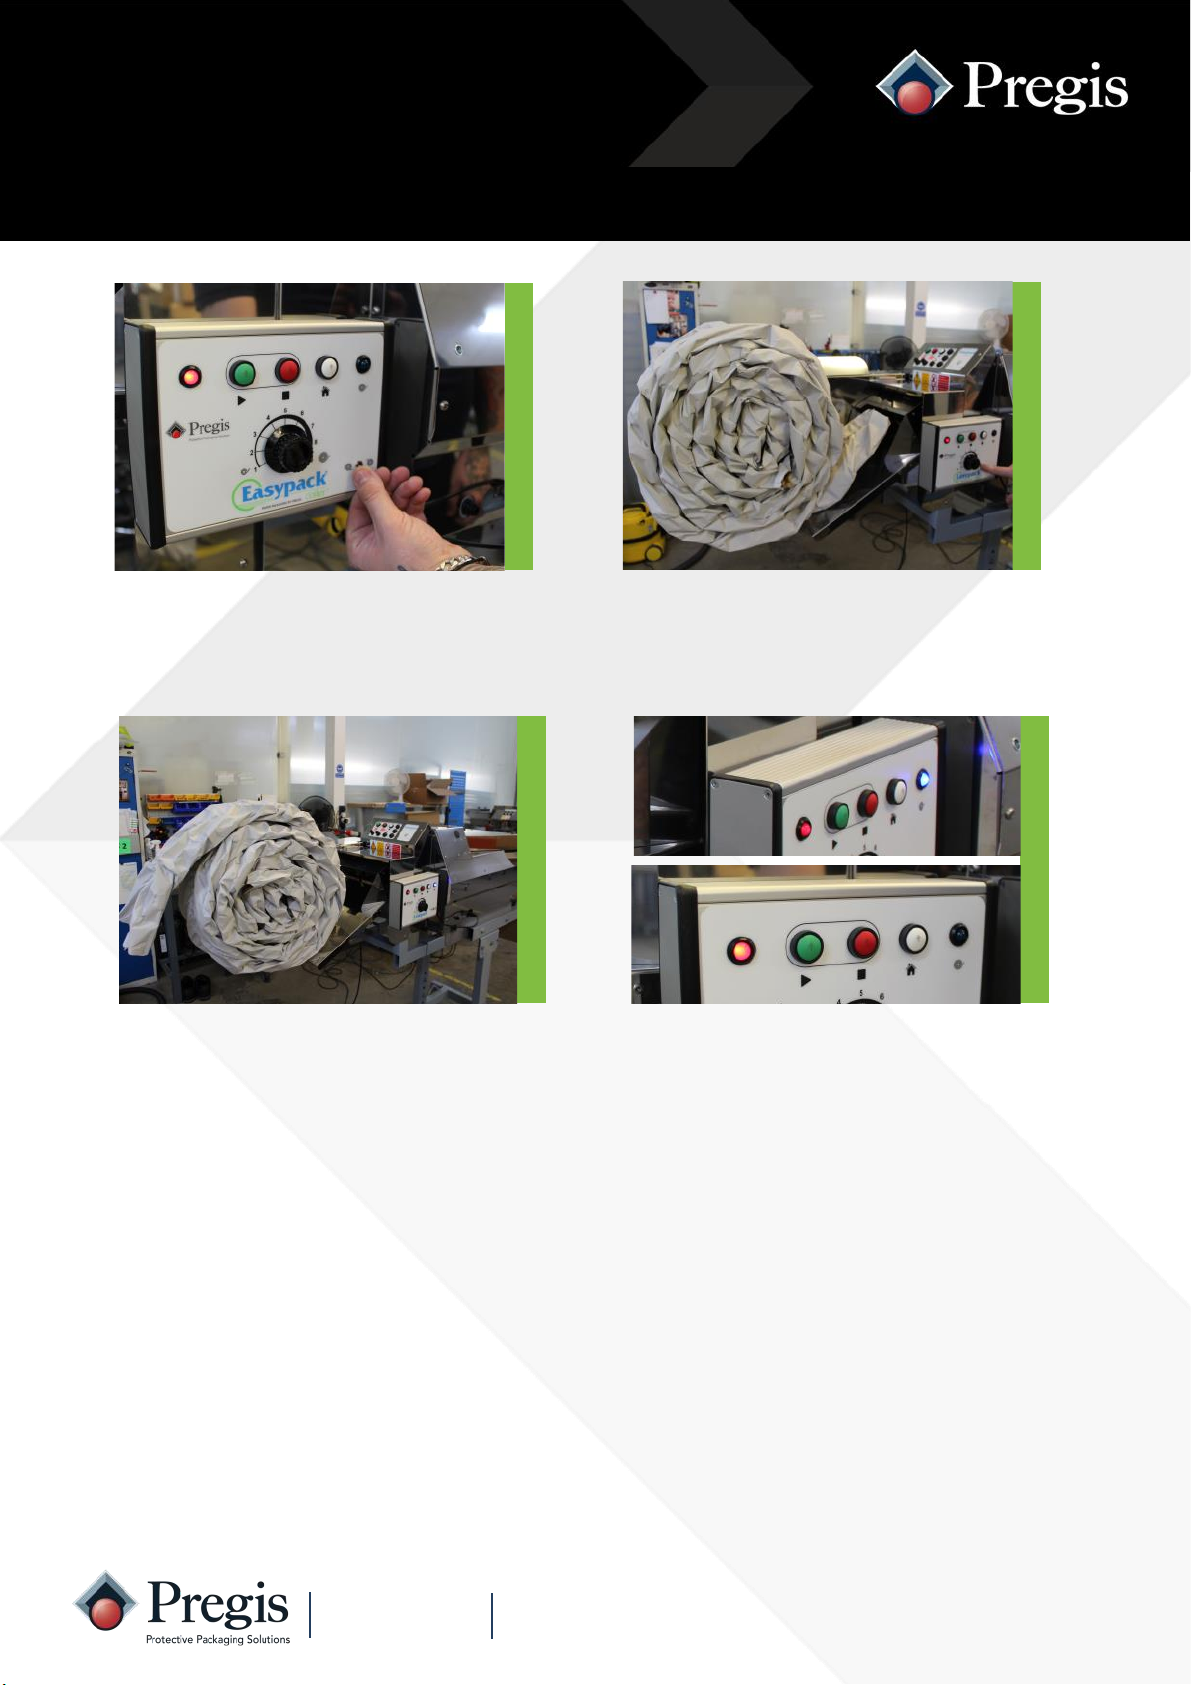
Pre-start checks
1. Plug in the 5WAY XLR plug as shown.
2. Plug in mains and switch ON the
Packmaster™ Pro and check switch
is illuminated.
3. Plug in mains and switch ON
the Coiler-lite and check switch
is illuminated.
4. Ensure the sensor lights, control console light and dots on the
Packmaster Pro console are displayed.

11
www.pregis.com 52-OM216-1
Operation
1. Press the green ‘Start’ button on the
Packmaster™ Pro.
3. Press the green ‘Start’ button on the
Coiler-lite. 4. A ‘loading’ pack will be generated
automatically; remove this from the
Coiler-lite.
Load the Packmaster™ Pro with paper in accordance to the Packmaster™ Pro manual.
2. Press the blue ‘Feed’ button on the
Packmaster™ Pro.
5. Select the required coil size using
the Coil Size Selection Knob.
NOTE: The coil size will vary with
different grades of paper.
12
www.pregis.com 52-OM216-1
Operation
1. Select the tail position using Tail
Position Switch.
3. Switch to the right: Coil is completed
with the tail in the top position allow-
ing access for manual taping of the
coil end.
4. When the coil is complete and wound
to the selected tail position, the Coil
Indicator will start to flash denoting
operator action is required to remove
the coil.
Once the coil is removed, the Coil Indi-
cator will extinguish, and the Coiler-lite
is ready for the next coil to be produced.
2. Switch to left (normal position): Coil
is completed with the tail in the bot-
tom position which keeps the tail in
position until the coil is removed.
Coil production can be stopped at any point during the winding process by pressing the Red
‘Stop’ button. This will immediately stop the pack being produced by the Packmaster™ pro
and will result in a smaller incomplete coil.
This may place the Coiler-lite into a temporary ‘fault’ mode and the Coil Indicator will start
to flash denoting operator action is required to remove the coil. To exit the ‘fault’ mode
remove the coil and press the White ‘Home’ Button once. The Coil Indicator extinguishes
and the machine is ready to run again.
13
www.pregis.com 52-OM216-1
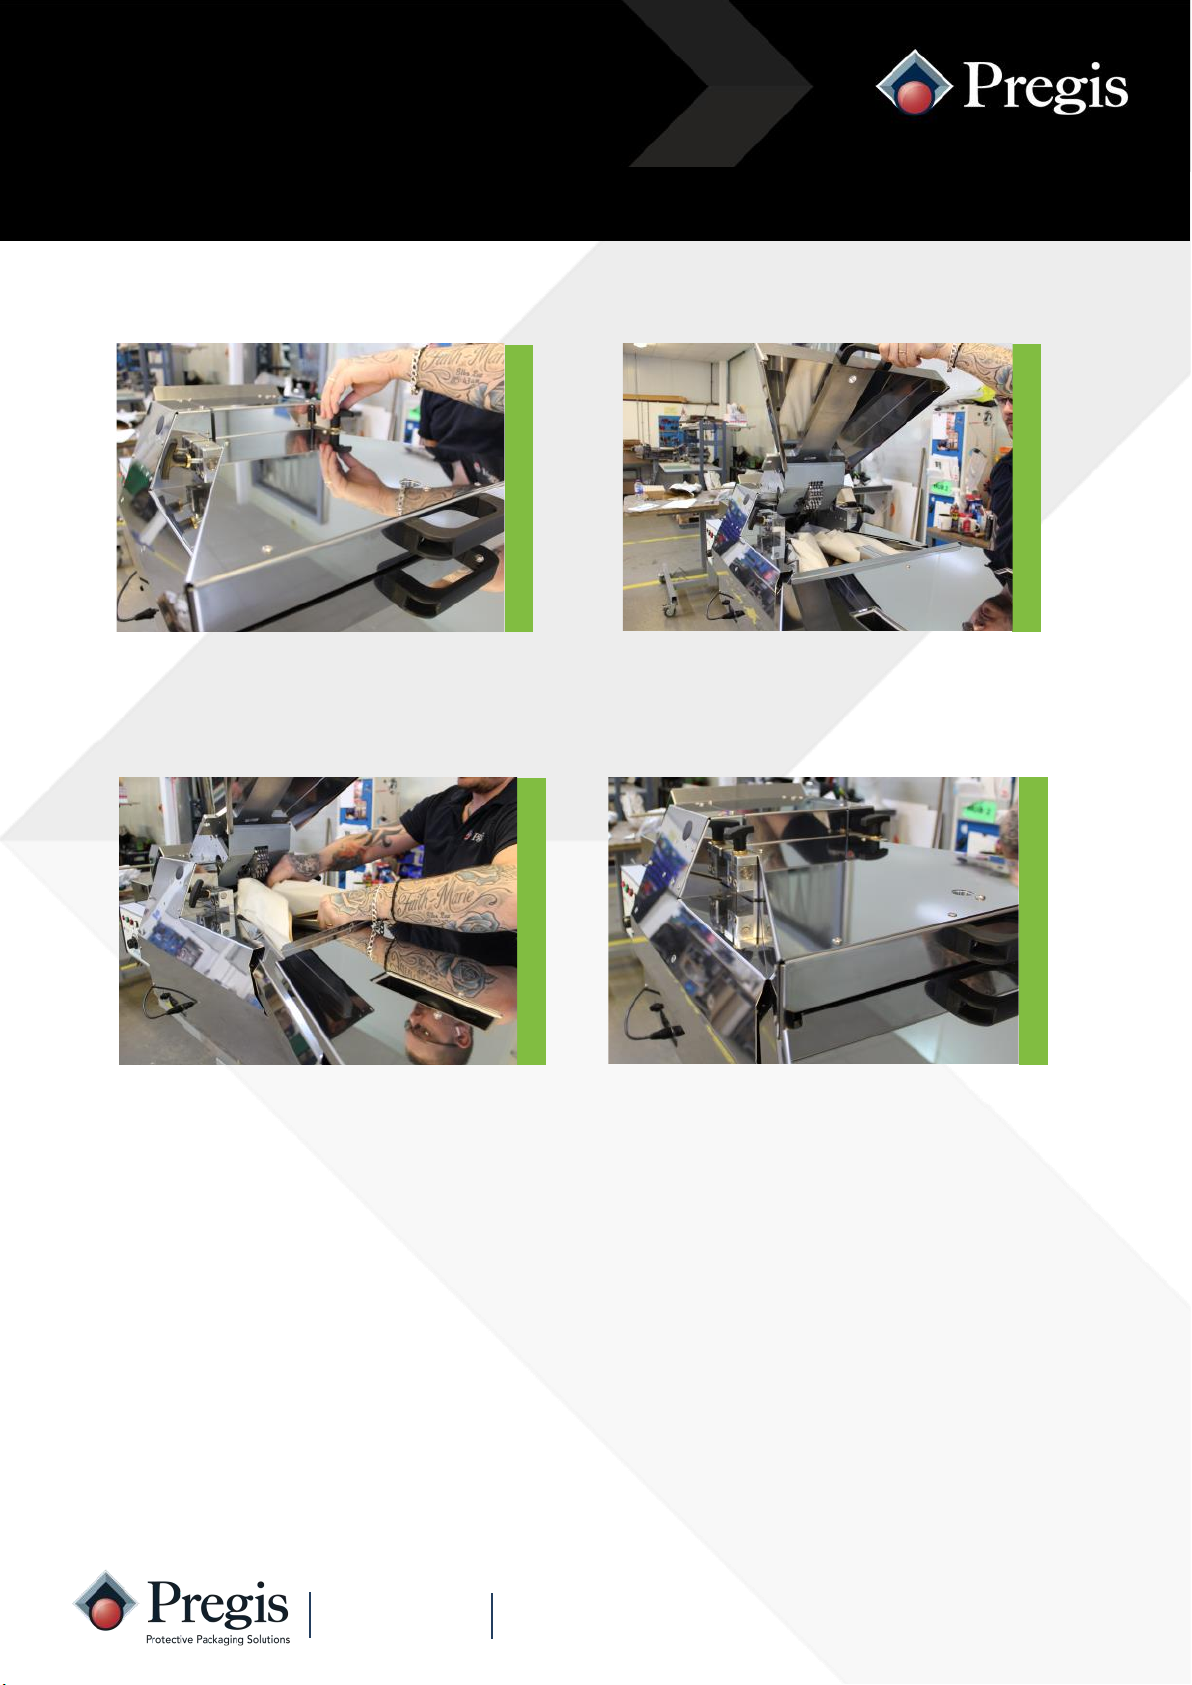
Paper jam
1. If there is a paper jam, turn ma-
chine OFF, and unscrew the ‘T’ han-
dles.
3. Carefully remove the jammed paper 4. Once paper jam has been cleared,
lower and secure the top gear and
operate as normal.
2. Lift the top gear to reveal the
jammed paper.

14
www.pregis.com 52-OM216-1
Troubleshooting
If the above information does not clear the fault, contact
Pregis for further assistance on 00800 888 888 44.
Please have the serial number of the machine available.
This can be found on the back of the machine, on the far
left.
Fault Check
Machine will not produce a
coil even though the Blue In-
dicator Light is not flashing
• Machine needs to be reset
• Press the Home button
Power indicator not lit on
mains switch of machine
• Machine is connected to the mains
supply
• Mains supply is switched on
• Fuse in machine is okay
• Fuse in mains plug is okay
Machine will not switch on
(control panel)
• Power indicator is lit
Troubleshooting

15
www.pregis.com 52-OM216-1
EC Declaration of Conformity
EC Declaration of Conformity
We declare that the following machinery complies with the essential
health and safety requirements of the Machinery Directive 2006/42/EC,
the Low Voltage Directive (LVD) 2014/35/EC and the Electromagnetic
Compatibility Directive 2014/30/EC.
Manufacturer: Pregis Ltd
Address:
Unit 1, The Io Centre, Whittle Way,
Arlington Business Park, Stevenage,
Hertfordshire, SG1 2BD, England
Description of Product: Coiler-lite
Model No. & Serial No. : 52
The following transposed harmonized European Standards have been
used:
EN 12100: 2010 Safety of Machinery - Basic concepts, general
principles for design.
EN 13857: 2008
Safety of Machinery - Safety distances to prevent
hazard zones being reached by upper and lower
limbs.
EN 60204-1: 2006 Safety of Machinery - Electrical equipment of
machines - General requirements.
EN 61000: 2007 (part 6-1) Generic standards - Immunity for
light-industrial environments.
EN 61000: 2007 (part 6-3) Generic standards -Emission standard for
light-industrial environments.
Jason Cox
Operations Director
13/10/2020
Signed on behalf of the manufacturer

Table of contents
Other Pregis Packaging Equipment manuals

Pregis
Pregis packmaster pro 383 User manual

Pregis
Pregis Easypack Coiler User manual

Pregis
Pregis SHARP MAX-PRO User manual

Pregis
Pregis SHARP MAX 1143 User manual

Pregis
Pregis EASYPACK QUANTUM Series User manual

Pregis
Pregis AirSpeed SMART Installation and operating manual

Pregis
Pregis SHARP MAX PRO 18 User manual

Pregis
Pregis SHARP SX GO User manual

Pregis
Pregis Quantum Pro 4068969 User manual

Pregis
Pregis Easypack Quantum XT User manual


