L1
R2
R1
B2
B1
F2
F1
PT
T1 T2
G
PT1
{ 4 } stainless steel cups
(short cups for Playtop)
touch-up
paint & brush
{ 2 } sets of hardware for
tray handles
{ 2 } wood dowel perches
(long dowel for cage;
short dowel for Playtop)
{ 1 } grille safe-clip
{ 4 } cup holders
{ 4 } rolling casters
{ 4 } short hex screws
{ 8 } short hex screw &
nut pairs for seed guard
{ 8 } long hex screws
{ 1 } allen wrench
SG3
SG4
SG2
SG1
KEY:
PT = Playtop
L = Left panels
F = Front panel
R = Right panels
B = Back panel
G = Grille
T = Tray
G = eed Guards
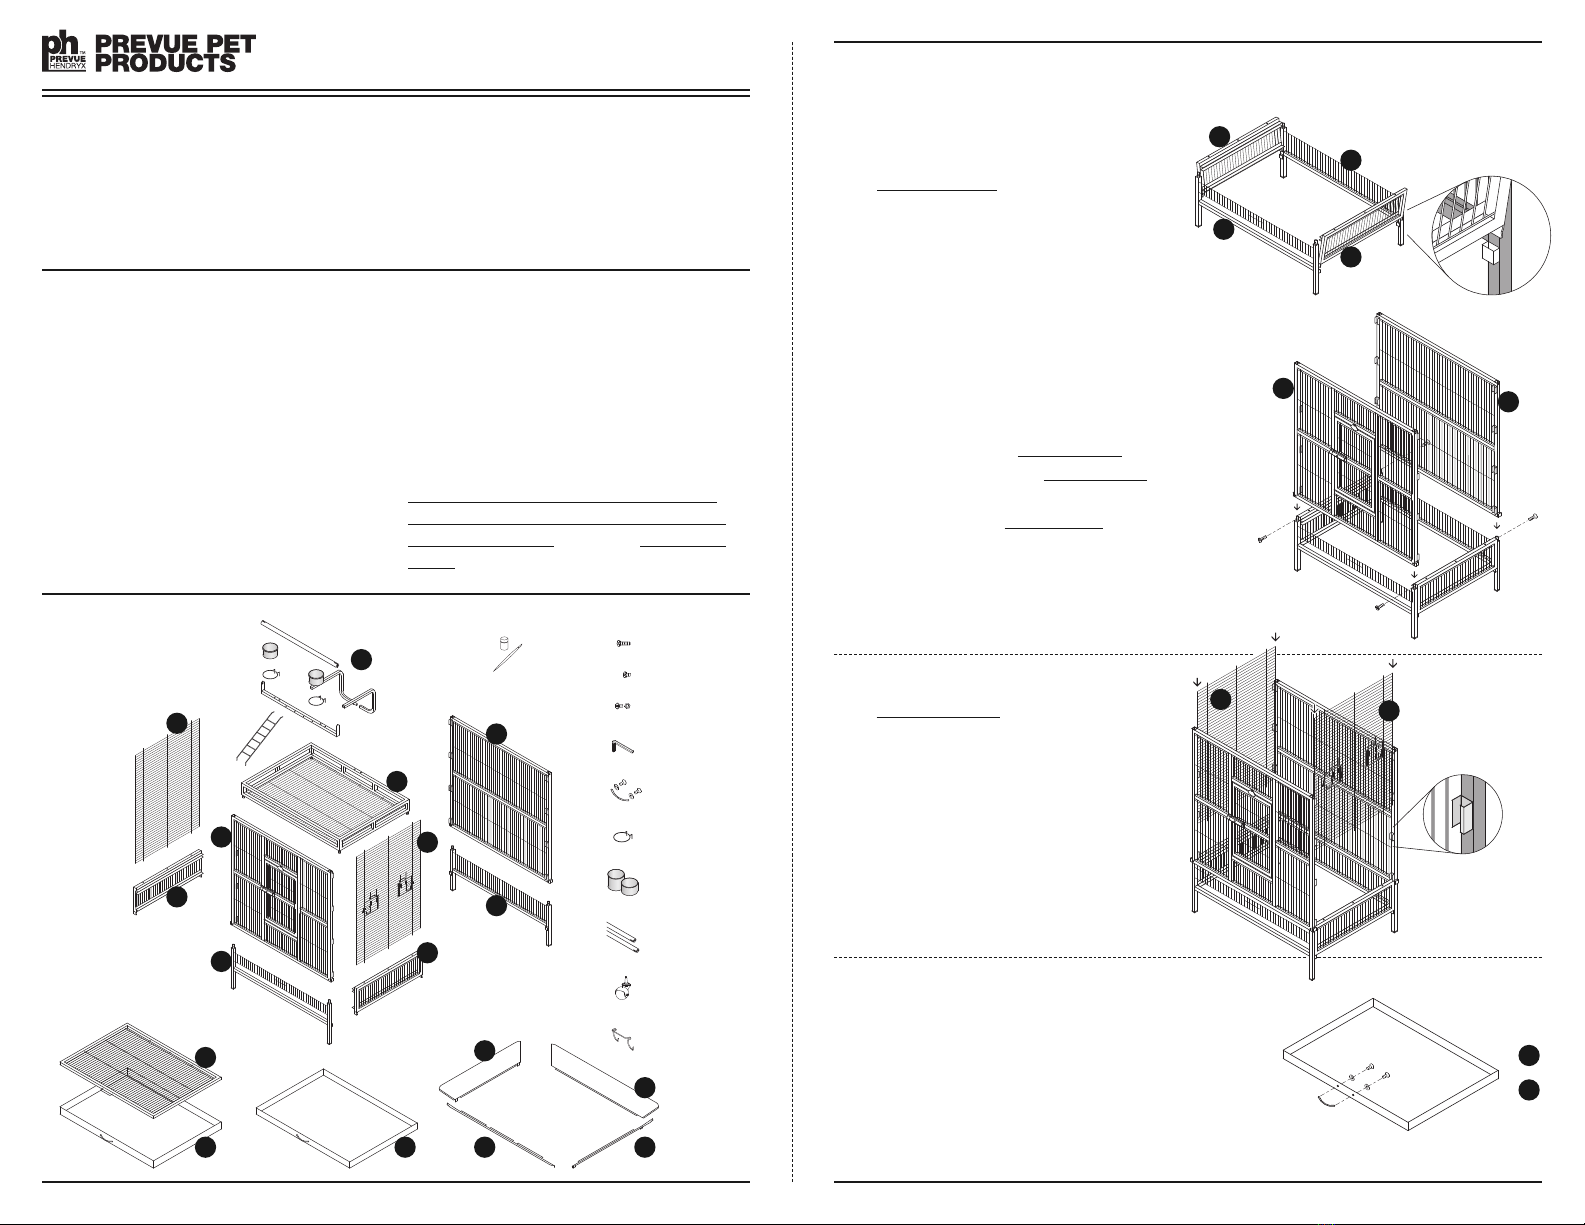
cageassemblyinstructions
Select Cage
Model: # 3154
Ha ertone Models
exterior: 35⅜"L × 23½"W × 67"H (floor to playtop perch)
w/seed guards: 43¾"L × 32"W
interior: 34½"L × 22¾"W × 36½"H
wire: [gauge] 9 & 9 [spacing] ¾"
getting started!
READ THESE NOTES FIRST:
• Enlist A Friend: While this large cage may be assembled
by one person, the assembly would be made easier with two
people.
• Count Hardware: Extra screws may be included. If the
screw count is sho t, please contact Prevue Customer ervice.
• Review All Parts: If wires are bent during shipping,
they may be straightened with needle nose pliers. For seriously
damaged pieces, please contact Prevue Customer ervice.
•Tools: An allen wrench is included. You will need a small-head
slotorphillipsscrewdriver.Youmayneedneedle nosepliersto remove
slugs or straighten wires.You may use your own hand tools, but we
DO NOT recommend power tools! Parts can be over-tightened
and damaged. Prevue is not responsible for this type of damage.
Review these instructions thoroughly before attempting to
assemble the cage. If you require assistance, please contact
Prevue Customer ervice at 800.243.3624 or through links
online at prevuepet.com
parts
steps
L2
1a
Assemble the base: Insert the tabs on side
lower (L1 & R1) panels into the sleeves on the
legs of front lower (F1) &bac lower (B1) frame
panels (see detail). The tray/grille channels on
the side panels should face the inside of the cage.
1b
Insert the front upper (F2) panel over the corner
posts of the front lower frame.
ecure the front panel with a long hex screw
in each lower corner. The hex screw will pass
through the hole in the front upper panel frame
leg, through the hole in the front lower panel
corner post, and to the threaded receiving hole
in the opening of the side lower panel.
Follow the same procedure for the back. Insert
the bac upper (B2) panel over the corner posts
of the back lower frame, align the side frames
and secure the corners with the long hex screws.
2Assemble the sides: lide the right side upper
(R2) panel down through the channel guides along
the inner front & back panel frame legs. The third
channel guide down is hooked for an extra level of
stability (see detail).
Three heavy vertical wires on the side panel
extend below lowest horizontal wire. Align the
extended wires with the corresponding holes
along top surface of the side lower panel.
Repeat for the left side upper (L2) panel.
3a
If you have someone helping you, have them
assemble the playtop tray (T2) and bottom
tray (T1) handles.
Put a washer on the small slothead screw, poke
the washer/screw combo through the hole from tray
inside, align it with the handle, and tighten snuggly.
F1
F2
L1
B2
R1
L2 R2
B1
T1
T2
NOTE: Side uppe panels may
be switched R to L—just
make su e cup doo s and
heavy ve tical wi es on eithe
side panel swing/face out.


