manuals.online logo
Brands
  1. Home
  2. •
  3. Brands
  4. •
  5. PulseTech
  6. •
  7. Batteries Charger
  8. •
  9. PulseTech SP-3 User manual

PulseTech SP-3 User manual

Installation Manual
For Models
SP-3, SP-7,
SP-12 & SP-25
GETTING STARTED
What SolarPulse Can Do For You
SolarPulse is one of the most effective methods available for charging your 12-volt lead-acid batteries. Besides
charging, it also uses our patented Pulse Technology®to remove and prevent the buildup of lead-sulfate deposits
on your battery plates. By keeping the plates clean, your battery recharges faster, accepts a full charge and
releases all its stored energy.
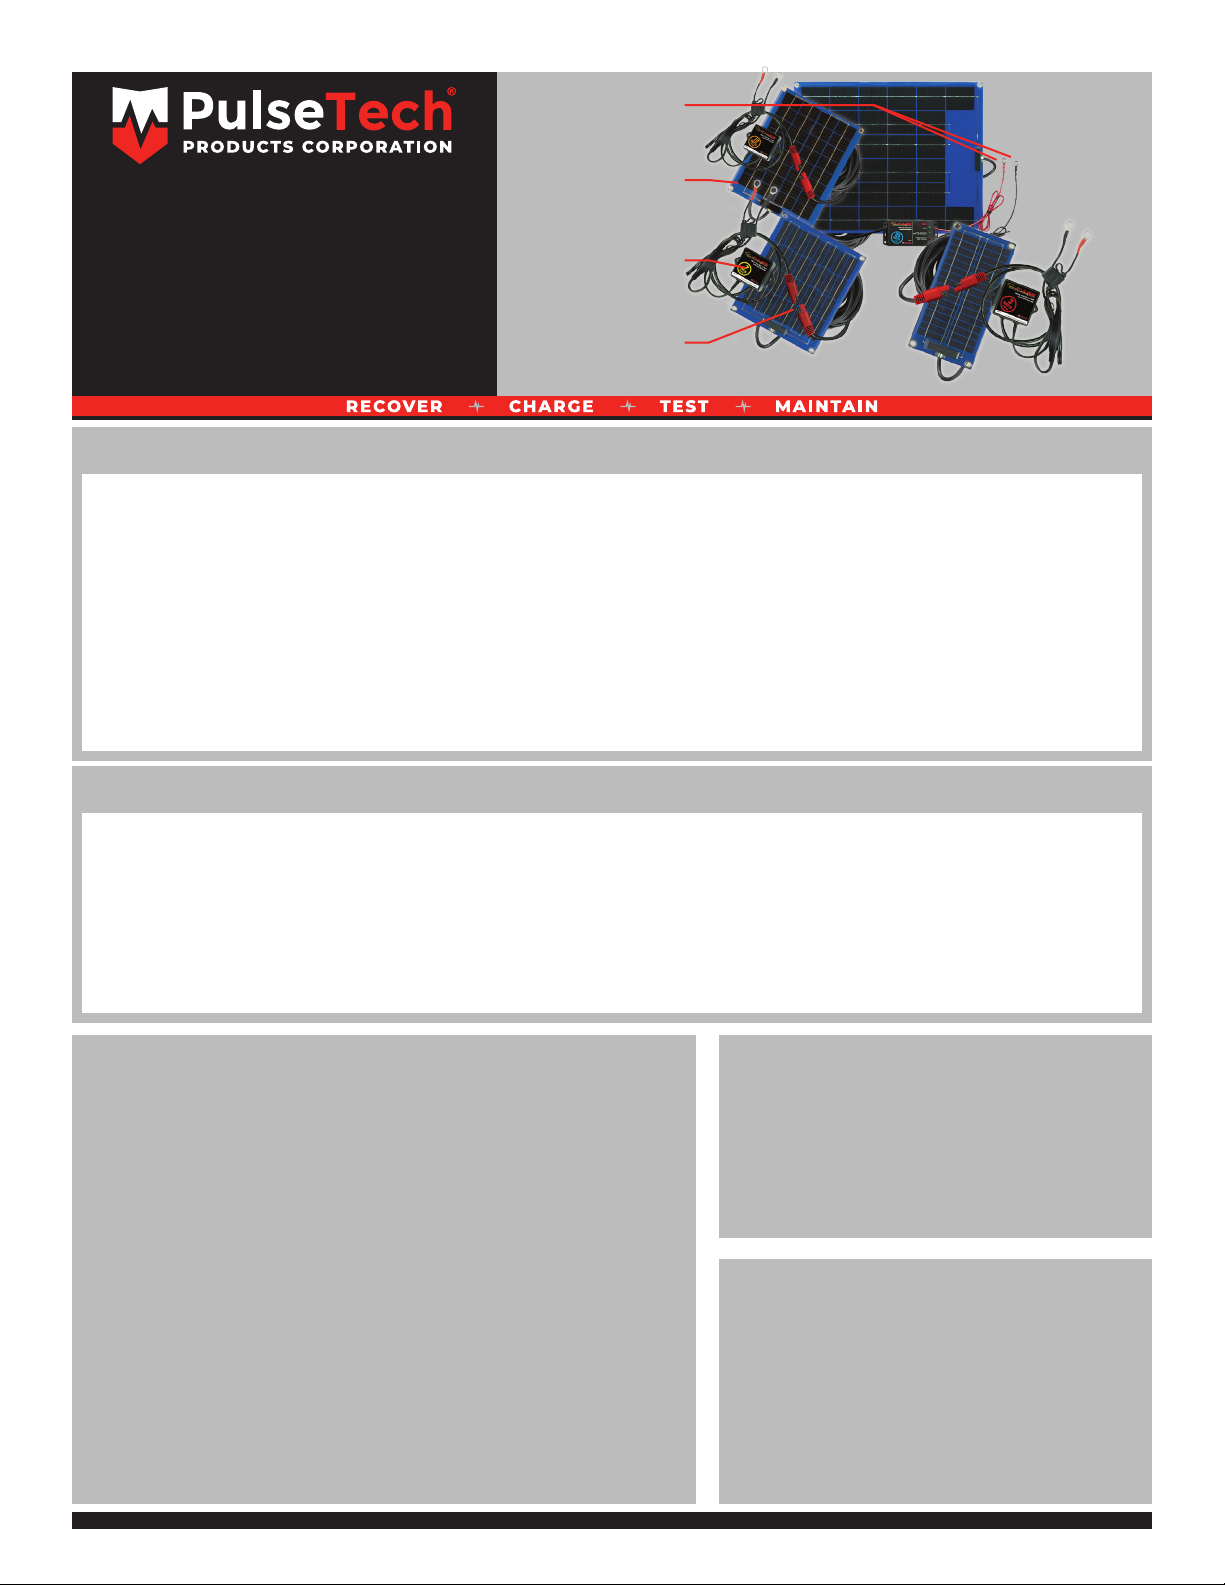
All of these SolarPulse unit have three components:
• Solar Panel with quick disconnect for easier installation
• Circuit Box housing our exclusive Pulse Technology
• Positive and Negative Lugs for connecting to the battery
Installation is quick and easy. Just follow the steps inside.
WARNING: Because of the possibility of personal injury, always use extreme caution when working with batteries.
SPECIFICATIONS
WARRANTY AND WARNINGS
10-Year Limited Warranty
What Does This Warranty Cover? The warranty covers any defects in workmanship or materials in the
circuit board in the SolarPulse™ product under normal use and service. How Long Does The Coverage
Last? This warranty runs for ten (10) years from the date of purchase. What Will PulseTech Do? PulseTech
will, at its option, replace or repair any defective circuit board with a new or rebuilt circuit board at no
charge. What Does This Warranty Not Cover? This warranty does not cover any parts other than the circuit
board. In addition, PulseTech will not be responsible under this warranty if PulseTech determines that (1)
upon examination that the circuit board failure was (A) caused by misuse, neglect, accident, alteration, or
abnormal condition of operating or handling (including the failure to install the product in accordance with
PulseTech’s instructions and observe the warnings on the product and the instruction manual), or other
conditions beyond the control of PulseTech or (B) damaged in transit to PulseTech, or (2) the owner is not
the original purchaser that purchased the product through an authorized PulseTech dealer or distributer.
IN NO EVENT SHALL PULSETECH BE LIABLE FOR ANY DIRECT, SPECIAL, INDIRECT, CONSEQUENTIAL,
INCIDENTAL, PUNITIVE OR EXEMPLARY DAMAGES, EXPENSES, LOST SAVINGS OR LOST PROFITS OR ANY
OTHER DAMAGES OF ANY KIND FROM ANY BREECH OF THIS WARRANTY OR OTHERWISE. Some states,
provinces or countries do not allow the exclusion or limitation of incidental or consequential damages, so
the above limitation may not apply to you. How To Get Service? Send the product postage prepaid with
proof of purchase (sales receipt) within the warranty period to the authorized reseller where the product was
purchased or contact PulseTech directly by calling (800) 580-7554. How Does State, Province or Country Law
Apply? This warranty gives you specic legal rights, and you may also have other rights which vary from state
to state, province to province or country to country.
THIS WARRANTY IS THE SOLE AND EXCLUSIVE REMEDY AND IS IN LIEU OF ALL OTHER WARRANTIES
EXPRESS OR IMPLIED, INCLUDING BUT NOT LIMITED TO ANY IMPLIED WARRANTY OF MERCHANTABILITY
FOR FITNESS FOR A PARTICULAR PURPOSE.
WARNING
The pulsating DC current produced by this
product may interfere with the correct
operation of some electronic devices when
the unit is placed near the antenna. In order
to ensure no interference, the circuit box
should be placed away from the antenna.
BASIC CLEANING & MAINTENANCE
• Be sure to keep the solar panel clean of
dirt and dust so that it has optimum access
to sunlight.
• The circuit box has no moving parts so
maintenance is unnecessary.
• Periodically check to make sure the positive
and negative wires are securely fastened to
the battery terminals.
Circuit Box
Quick Disconnect
Positive &
Negative Lugs
Solar Panel
SP-3
Max Charge Current: 240 mA
Maximum Output Voltage: 16.5 V
Solar Panel Dimensions:
4.7" L x 9.45" W x 0.25" H
Circuit Box Dimensions:
3.4" L x 2.25" W x 1.5" H
Main Cable Length: 17'
Lug Cable Length: 3'
Quick Disconnect At Battery
LED Pulse/Charge Indicator
SP-7
Max Charge Current: 450 mA
Maximum Output Voltage: 16.5 V
Solar Panel Dimensions:
10.25" L x 8.85" W x 0.25" H
Circuit Box Dimensions:
3.4" L x 2.4" W x 1.5" H
Main Cable Length: 17'
Lug Cable Length: 3'
Quick Disconnect At Battery
LED Pulse/Charge Indicator
SP-12
Max Charge Current: 750 mA
Maximum Output Voltage: 16.5 V
Solar Panel Dimensions:
12.41" L x 9.85" W x 0.25" H
Circuit Box Dimensions:
3.4" L x 2.4" W x 1.5" H
Main Cable Length: 17'
Lug Cable Length: 3'
Quick Disconnect At Battery
LED Pulse/Charge Indicator
SP-25
Max Charge Current: 1.6 A
Maximum Output Voltage: 16.5 V
Solar Panel Dimensions:
16.13" L x 18.69" W x 0.25" H
Circuit Box Dimensions:
5.5" L x 2.5" W x 1.2" H
Main Cable Length: 17'
Lug Cable Length: 3'
Quick Disconnect At Battery
LED Pulse/Charge Indicator
4
WARNING: Do not hold the positive and negative
lugs at the same time while the unit is active (receiv-
ing sunlight). It may cause a slight electric shock.
The SolarPulse unit is now ready. Once the panel is exposed to
sunlight, SolarPulse will begin charging your battery and pre-
venting/removing the buildup of lead-sulfate deposits on the
battery plates. Note: For the most effective results, we suggest
you install SolarPulse permanently. However, if your vehicle or
equipment does not allow for a permanent install, a temporary
placement will not affect the performance of SolarPulse.
(800) 580-7554www.pulsetech.net
998XM000 07/20
The circuit box can be mounted using any of the
following methods: Two round-head screws, industrial
adhesive, heavy-duty dual lock or double-sided tape
(not included). After cleaning the install area, mount
the box close to the battery so that the lugs can reach
the terminals. DO NOT attach it to the battery itself.
Also make sure the box is located in a location where
it won’t be disturbed and the LED is visible.
Circuit box includes an LED on top. LED will light
when lugs are attached to the battery terminals
and solar panel is installed and receiving
sunlight. It shines steady in full sunlight and dims
in indirect sunlight.
Connect the positive (+) wire to the positive (+)
battery terminal. After removing the nut from
the bolt securing the battery clamp to the posi-
tive terminal, slip the round metal lug at the end
of the positive red SolarPulse wire onto the bolt
until it sits next to the clamp.
Slip a round washer (not included) onto the bolt
until it sits next to the lug. Replace the nut onto the
bolt and tighten it until it secures the lug and wash-
er against the clamp. Do not over tighten. Repeat
steps 4-5 above to connect the negative (-) black
SolarPulse wire to the negative (-) battery terminal.
Feed the solar panel cable through any existing
opening in the vehicle or equipment into the
battery compartment. Connect the quick discon-
nect plugs on the solar panel and the circuit box
cables.
Mount the solar panel using any of the following
methods: Four round-head screws, industrial
adhesive, heavy-duty dual lock or double-sided
tape (not included). It should be mounted where
it will have direct sunlight.
If needed, use plastic cable ties (not included) to
secure the circuit box wires to the battery cable
or other secure area near the battery. This will
keep the wires from being damaged or interfer-
ing with any moving engine parts.
WARNING: Any solvents that may be harmful to
plastic should not be used on or near the unit.
Installation Instructions For Models SP-3, SP-7, SP-12 & SP-25
1 2
3
5 6
7

This manual suits for next models

3

Other PulseTech Batteries Charger manuals

PulseTech 746X810 User manual

PulseTech

PulseTech 746X810 User manual

PulseTech Xtreme Charge XC100-P Mounting instructions

PulseTech

PulseTech Xtreme Charge XC100-P Mounting instructions

PulseTech Xtreme SC-12 User manual

PulseTech

PulseTech Xtreme SC-12 User manual

PulseTech Xtreme Charge QuadLink XC-QL4 Operating manual

PulseTech

PulseTech Xtreme Charge QuadLink XC-QL4 Operating manual

PulseTech SP-12-OBD-T User manual

PulseTech

PulseTech SP-12-OBD-T User manual

PulseTech SolarPulse SP-2 User manual

PulseTech

PulseTech SolarPulse SP-2 User manual

PulseTech SC-2 User manual

PulseTech

PulseTech SC-2 User manual

PulseTech SP-7-OBD-A User manual

PulseTech

PulseTech SP-7-OBD-A User manual

PulseTech XTREME CHARGE XC400 User manual

PulseTech

PulseTech XTREME CHARGE XC400 User manual

PulseTech PRO-HD 12V/24V User manual

PulseTech

PulseTech PRO-HD 12V/24V User manual

PulseTech RediPulse Pro-12 PRO-12-RP User manual

PulseTech

PulseTech RediPulse Pro-12 PRO-12-RP User manual

PulseTech SP-7-OBD-T User manual

PulseTech

PulseTech SP-7-OBD-T User manual

PulseTech 777P-PT User manual

PulseTech

PulseTech 777P-PT User manual

PulseTech XtremeCharge XC100-P Operating manual

PulseTech

PulseTech XtremeCharge XC100-P Operating manual

PulseTech RediPulse Pro-10 User manual

PulseTech

PulseTech RediPulse Pro-10 User manual

PulseTech 746X816 User manual

PulseTech

PulseTech 746X816 User manual

PulseTech SC-6 User manual

PulseTech

PulseTech SC-6 User manual

PulseTech XC-QL4-K1 User manual

PulseTech

PulseTech XC-QL4-K1 User manual

PulseTech 12V ERV UNIT User manual

PulseTech

PulseTech 12V ERV UNIT User manual

PulseTech Xtreme Recovery User manual

PulseTech

PulseTech Xtreme Recovery User manual

PulseTech SP-12-OBD-A User manual

PulseTech

PulseTech SP-12-OBD-A User manual

PulseTech QuadLink X2-QL4-K2 User manual

PulseTech

PulseTech QuadLink X2-QL4-K2 User manual

Popular Batteries Charger manuals by other brands

NewNow NN-Bamboo user manual

NewNow

NewNow NN-Bamboo user manual

Mission Critical Purkeys SOLAR DART installation guide

Mission Critical

Mission Critical Purkeys SOLAR DART installation guide

Thunder TDR02010 installation instructions

Thunder

Thunder TDR02010 installation instructions

Shimano Steps EC-E6000 user manual

Shimano Steps

Shimano Steps EC-E6000 user manual

Loxit 6200 instructions

Loxit

Loxit 6200 instructions

Jamara X-Peak 80 BAL V2 Instruction

Jamara

Jamara X-Peak 80 BAL V2 Instruction

Dynamite VISION PEAK ULTRA user manual

Dynamite

Dynamite VISION PEAK ULTRA user manual

Balt 27541 Assembly instructions

Balt

Balt 27541 Assembly instructions

Karlik DCUSBBO-7 user manual

Karlik

Karlik DCUSBBO-7 user manual

HindlePower ATevo Series Operations

HindlePower

HindlePower ATevo Series Operations

Mercedes-Benz 3W72M2 installation manual

Mercedes-Benz

Mercedes-Benz 3W72M2 installation manual

Malmbergs Q3-4U2Q instruction manual

Malmbergs

Malmbergs Q3-4U2Q instruction manual

TME Xtrema BALANCER quick start

TME

TME Xtrema BALANCER quick start

ABB A170-L37 Operation manual

ABB

ABB A170-L37 Operation manual

AKG CU 400 User instructions

AKG

AKG CU 400 User instructions

Intermec AC20 supplementary guide

Intermec

Intermec AC20 supplementary guide

Fullwat FU-CLI1000 quick start guide

Fullwat

Fullwat FU-CLI1000 quick start guide

Solarc e.GO! FUN Operating instructions and technical information

Solarc

Solarc e.GO! FUN Operating instructions and technical information

manuals.online logo
manuals.online logoBrands
  • About & Mission
  • Contact us
  • Privacy Policy
  • Terms and Conditions

Copyright 2025 Manuals.Online. All Rights Reserved.