manuals.online logo
Brands
  1. Home
  2. •
  3. Brands
  4. •
  5. PulseTech
  6. •
  7. Batteries Charger
  8. •
  9. PulseTech Xtreme Charge QuadLink XC-QL4 Operating manual

PulseTech Xtreme Charge QuadLink XC-QL4 Operating manual

FEATURE AND USE GUIDE
Scan the QR code to download the
manual and register your product
for warranty coverage.
Charge Multiple Batteries with a Single Charger
100X004
Quadlink_Manual_Feb2022.indd 1Quadlink_Manual_Feb2022.indd 1 2/15/22 9:31 AM2/15/22 9:31 AM
Model XC-QL4 Feature and Use Guide
Table of Contents
Features.......................................................................Inside front cover
User Guide....................................................................................... 1 – 3
Specifications ....................................................................................... 3
Battery Charger Use .............................................................................. 3
FAQs .....................................................................................................4
5-Year Limited Warranty...............................................Inside back cover
Xtreme Charge®Products and Accessories ...........................Back cover
Features
Thank you for your purchase of the Xtreme Charge®QuadLink®from
PulseTech®Products Corporation.
PulseTech®Products Corporation (www.PulseTech.net) is nationally recog-
nized for its innovative technologies specifically designed to improve 6/12V
battery performance, trim replacement costs by extending battery life cycles
and contributing to the nation’s environmental movement to think and act
Green by keeping batteries healthy and out of the waste stream, landfills and
smelters.
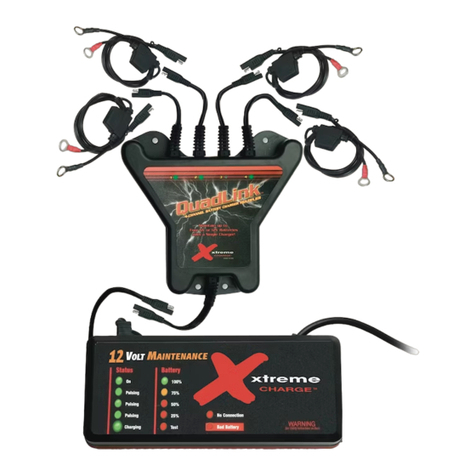
With the development of the QuadLink, Xtreme Charge®has multiplied this
useful application by four times—turning any 6V or 12V dc battery charger
(using the standard SAE 2-prong output connector) into a 4-station mainte-
nance charger.
There’s no more need to spend time or to remember to switch back and forth
between vehicles or batteries in storage. Utilizing a simple, plug and play sys-
tem, QuadLink automatically splits and distributes 15-minute charge segments
to up to four batteries.
Applications include a wide variety of vehicles and equipment, including auto-
mobiles, light trucks, SUVs, motorcycles, motor homes, small boats and wa-
tercraft, lawn mowers and equipment, ATVs and even golf carts. When mated
with a typical maintenance charger (see User Guide) the QuadLink’s micropro-
cessor automatically adapts to the number of batteries actually connected.
Included with your QuadLink purchase:
1 – QuadLink 4-station charger multiplier
4 - Eyelet lug adaptor cables
4 - 5' extension leads
(Additional 5' and 25' lead extensions available separately)
Quadlink_Manual_Feb2022.indd 2Quadlink_Manual_Feb2022.indd 2 2/15/22 9:31 AM2/15/22 9:31 AM
User Guide
1
Do not operate without first reading these important safety notices and use
instructions.
Additionally, do not use this without first reading important safety notices
and use instructions that come with your battery charger/maintainer and your
battery.
NOTE: As part of good safety routine, this product is designed for use only with automati-
cally controlled charger maintainers and is optimized for use with the Xtreme Charge
family of products. It is not suggested for use with automatic chargers with switched on
or off or mode selections, or manual maintenance chargers that cannot be used without
constant supervision.
1. Inspect all cable leads and connections to be sure that they are all in good
working condition. Never use cable leads or clips that are worn, damaged or
frayed in any way. Replace worn or damaged leads prior to use. Do not alter
or otherwise modify cables as this could cause an unsafe condition possibly
resulting in personal injury, explosion or fire.
2. Connect the output of your battery
charger/maintainer to the input of
the QuadLink.
Note: The charger must have the same
industry standard SAE 2-prong connector
to mate properly with the QuadLink.
3. Connect the extension leads that come with the QuadLink to either the
standard attached battery eyelet connector on each vehicle battery and/or
to the charging clip set that comes with your charger. Be sure to first con-
nect the red battery clip to the positive (+) battery terminal. Then connect
the black battery clip to the negative
(-) battery terminal. Also, be sure to
double check that your attached eye-
let terminal cable sets are properly
polarized. Once you have connected
the cable leads to all batteries in
use, you can begin the battery main-
tenance process by plugging in your
charger to your ac power source.
4. What is happening:
A. Your battery charger is still in full control of the charging processes. Al-
ways refer to the battery charger manufacturer’s instructions or the user in-
terface on your charger to determine what state of charge your battery is in.
B. The QuadLink is almost transparent to the battery. It does not add to the
charging capabilities of your charger, just to the number of batteries being
maintained. Your charger is still the “brain” in the system.
Quadlink_Manual_Feb2022.indd 3Quadlink_Manual_Feb2022.indd 3 2/15/22 9:31 AM2/15/22 9:31 AM
2
C. A blinking green LED light will indicate the first
battery connected to the QuadLink. Once additional
batteries are connected, a solid glowing green LED
light will verify connection to all additional con-
nected stations. Once the charger is connected to
the QuadLink and plugged into the ac power source,
the charging cycle begins. From this point
forward, the station or battery that is currently “live”
or being charged is indicated by a blinking green LED light.
D. Every 15 minutes, the QuadLink will switch to the next battery in line.
If there is no battery connected to any given channel, the channel will be
skipped after a short qualification process.
E. Cycle rotation will continue indefinitely, maintain-
ing the charge of all 4 batteries for you automati-
cally. The QuadLink distributes your charger’s full
power, moving from battery to battery in 15-minute
increments.
F. If you would like to remove a battery from the
chain, it is always best to unplug the QuadLink from
the charger and the charger from the ac power
source first. Once the battery is disconnected and
the units are plugged back in, the QuadLink will reset
and recognize the batteries in the circuit and skip
any open channels after a circuit verification test.
G. If you replace or add a battery to an open channel, again it is always best
to unplug the QuadLink from the charger and the charger from the AC power
source first. Once you have connected the new battery to the circuit and
plugged the units back in, the QuadLink will reset and recognize the addi-
tional battery in the circuit and begin the process again.
Use Comments and Suggestions:
1. If you are putting a vehicle/battery away for an extended period, it is always
best to give the battery a good charge on its own for a few days and test it
prior to putting it away for a season or any extended period. This will assure
that proper storage maintenance will occur without a hitch.
2. If there is ever a power outage, it is likely that during the outage, the charger
may and the QuadLink will consume a small amount of power via LED light
indication of the batteries’ state of charge and channel indication. This is
common and will not cause noticeable discharge of the batteries in the cir-
cuit unless the power is out for an extended period of time.
Note: If either ac input power to the charger or dc power from the charger to
the QuadLink is purposely disconnected for any extended period for any rea-
son, disconnect the QuadLink from the batteries in the circuit until power is
restored. This will assure that the batteries are not unintentionally discharged.
Quadlink_Manual_Feb2022.indd 4Quadlink_Manual_Feb2022.indd 4 2/15/22 9:31 AM2/15/22 9:31 AM
3. If for any reason the QuadLink is not unplugged from the dc power source
and allowed to reset during removal of a battery, the LED channel indica-
tor will remain illuminated until the next cycle provides a circuit verification
test indicating an open circuit. The output previously associated with the
removed battery will then in turn be skipped.
4. For use more customized to your specific needs, including additional 5'
extension leads (part #100X805) and
25' extension leads (part #100X825),
please visit www.PulseTech.net.
Additional Functionality:
The QuadLink is also uniquely designed
to provide a very useful service of main-
taining the state of charge of multiple
6V or 12V batteries in 24, 36 and 48V
series connected configurations typi-
cally used in Golf Carts or similarly de-
signed vehicles or battery packs.
The user would simply connect each
output lead using the provided eyelet lug
connectors (up to 4) to each of the 6V
or 12V segments of the multiple battery
configurations and in doing so allow the
QuadLink to maintenance charge
each of the 6V or 12V segments of the
pack in 15-minute intervals. This will en-
sure that the entire pack is maintained
at the state of charge that they were left
at when stored or left unused for an ex-
tended period.
IMPORTANT: Please follow the use
and safety recommendations that
were included with the maintenance
charger that will be used with your
new QuadLink. This information
should provide explicit important
safety, operation and maintenance
instructions for the user, and, if ap-
plicable, with assembly, moving and
storage instructions. 3
24V
36V
48V
Specifications Battery
Charger Use
Description: 4-Channel 6/12V DC Charger
Multiplier
Input Voltage: 4 V dc to 18 V dc
Input Amperage: 8 A max
Functional Output Cable Length: 5'9"
(per channel) Note: Additional 5' and 25'
cable extensions available separately
Mounting: Yes, via 4 holes in housing (use
housing to mark holes on
mounting surface)
Quadlink_Manual_Feb2022.indd 5Quadlink_Manual_Feb2022.indd 5 2/15/22 9:31 AM2/15/22 9:31 AM
4
Frequently Asked Questions
1. Can the QuadLink be used with a Solar Charger? YES, if the Solar Charger uses the
same connector, is 6V or 12V DC and does not exceed 8 Amp output.
2. Is the QuadLink water resistant? YES, it is water resistant but not waterproof. It cannot
be submerged or left in pooled water or driving rain. Safety dictates that one should
never use an electrical product in wet conditions.
3. Does the “bad battery” function still work when using the QuadLink? The QuadLink is
not a charger but a charge conduit. If your charger has a “bad battery” indicator, it will
work through the QuadLink connection.
4. Will the QuadLink work if batteries are connected to first, second, and fourth outlet,
skipping the third position? YES, the QuadLink will sense the open circuit and skip it
after a few seconds.
5. Will the QuadLink work on multiple battery types and styles simultaneously? For
instance, AGM and Gel or Deep Cycle marine and small Motorcycle batteries all con-
nected to each of the 4 stations? YES, your charger is still the “brain” in the system. If
your charger has the ability to properly charge all of these battery types automatically,
the QuadLink will allow it. If your charger has to be manually switched to alternate set-
tings to enable proper charge output for these different battery types, the answer would
be NO. If this is your situation, we suggest using the Xtreme Charge to charge multiple
battery types automatically.
6. Knowing that the QuadLink is optimized for use with the Xtreme Charge battery char-
ger; does it also work with other brands of chargers? YES, as long as your charger is
fully automatic and utilizes the same DC connector.
7. When connected to Gel, maintenance free and AGM battery with a charger that requires
the use of a battery selection dial for charging different battery types, what happens?
We suggest that you do not use the QuadLink with this type of charger. Consider buying
an Xtreme Charge to properly charge all these types on the QuadLink automatically.
8. If there is no battery connected, is power flowing to the battery clips or eyelet connec-
tor? The answer is NO if you are using a fully automatic charger and it is functioning
properly. We suggest that a manual charger NOT BE USED with the QuadLink. Remem-
ber, the charger is always in control of the charge process, not the QuadLink.
9. Can I use this on my vehicle that has 4 batteries connected in parallel (in a 12V
system)? YES, as long as you are connecting only one station lead to this 12V pack.
Although it will cause no harm, we do not suggest the QuadLink be used in a parallel
connected multi battery scenario as there is no additional charging benefit when com-
pared to single station charging to the pack.
10. Can I start my vehicle with the QuadLink still attached? YES, as long as your charger
allows this capability. The QuadLink does not control the charge going into the battery;
it is only a conduit for the power going to each station.
11. Can I change the timing so that one battery charges longer before moving to the next
battery? NO, the microprocessor is not adjustable.
12. Can I connect two sets of leads to one battery so it will charge for an extended pe-
riod? YES, if you want to allow a certain battery to have more relative charge time
within the charge cycle, you can “double connect” a station to any given battery. This
will give that battery 15 additional minutes of charge time per cycle.
For answers to additional questions, please see your dealer or contact PulseTech
Products Corporation at 1-800-580-7554, 8 a.m. to 5 p.m. Monday through Friday
CST or go to www.PulseTech.net.
Quadlink_Manual_Feb2022.indd 6Quadlink_Manual_Feb2022.indd 6 2/15/22 9:31 AM2/15/22 9:31 AM
PULSETECH PRODUCTS CORPORATION
What Does This Warranty Cover? This warranty covers any defects in workmanship or
materials in the product under normal use and service.
How Long Does The Coverage Last? This warranty runs for five (5) years from the date
of purchase.
What Will PulseTech Do? PulseTech will, at its option, repair the unit or replace the unit
with a remanufactured unit at no charge.
What Does This Warranty Not Cover? This warranty applies only to the product and
does not cover any other equipment, static damage, water damage, overvoltage,
dropping of the unit or damage resulting from extraneous causes. The warranty is
void if the owner attempts to disassemble the unit or modify the cable assembly. In
addition, PulseTech will not be responsible under this warranty if PulseTech determines
that (1) upon examination that the unit’s failure was (A) caused by misuse, neglect,
accident, alteration, or abnormal condition of operating or handling (including the
failure to install the product in accordance with PulseTech’s instructions and observe
the warnings on the product and the instruction manual), or other conditions beyond
the control of PulseTech or (B) damaged in transit to PulseTech, or (2) the owner is not
the original purchaser that purchased the product from PulseTech directly or through
an authorized PulseTech dealer or distributor. IN NO EVENT SHALL PULSETECH
BE LIABLE FOR ANY DIRECT, SPECIAL, INDIRECT, CONSEQUENTIAL, INCIDENTAL,
PUNITIVE OR EXEMPLARY DAMAGES, EXPENSES, LOST SAVINGS OR LOST PROFITS
OR ANY OTHER DAMAGES OF ANY KIND FROM ANY BREACH OF THIS WARRANTY
OR OTHERWISE. Some states, provinces or countries do not allow the exclusion or
limitation of incidental or consequential damages, so the above limitation may not
apply to you.
How To Get Service? Send the product postage prepaid with proof of purchase (sales
receipt) within the warranty period to the authorized reseller where the product was
purchased or contact PulseTech directly by calling 1-800-580-7554.
How Does State, Province or Country Law Apply? This warranty gives you specific
legal rights, and you may also have other rights which vary from state to state, province
to province or country to country.
THIS WARRANTY IS THE SOLE AND EXCLUSIVE REMEDY AND IS IN LIEU OF ALL
OTHER WARRANTIES EXPRESS OR IMPLIED, INCLUDING BUT NOT LIMITED TO
ANY IMPLIED WARRANTY OF MERCHANTABILITY OR FITNESS FOR A PARTICULAR
PURPOSE.
5-Year Limited Warranty
Southlake, TX 76092
Patent Number 9287725
Model: XC-QL4 Part #: 100X004
Quadlink_Manual_Feb2022.indd 7Quadlink_Manual_Feb2022.indd 7 2/15/22 9:31 AM2/15/22 9:31 AM
12V 4 Amp Xtreme Charger
w/Pulse Maintenance
Ideally suited for AGM and Mainte-
nance-Free batteries. Increases the
duty and life cycle of all 12V batter-
ies up to three times longer.
Part #: 200X010
Model: XC400
PRODUCTS & ACCESSORIES
TO PURCHASE ANY OF THESE ITEMS, VISIT WWW.PULSETECH.NET
998XM104 02/22v1
QuadLink™ 4-Channel
Battery Charger Multiplier
Turns any 6/12V battery charger
(using the standard SAE 2-prong
output connector) into a 4-sta-
tion maintenance charger.
Part # 100X004
Model: XC-QL4
Battery Lead with Clips
This 7.5-amp fuse-protected
cable is supplied with a
quick-disconnect terminal.
Lead is 2 feet long.
Part #: 100X827
Model: XC-CLIPS
“Leave-On” Battery Lead with Lugs
Xtreme Charge®7.5-amp fuse-protected
cable comes with a quick-
disconnect terminal.
Lead is 2 feet long.
Part #: 100X830
Model: XC-LUGS
5' and 25' Extension Lead
Extend a standard lead by 5 or 25 feet
with these extensions. They feature
quick-disconnect terminals on both
ends. Lead is 5 feetor 25 feet long.
Part #: 100X805
Model: XC-EXT-5
Part #: 100X825
Model: XC-EXT-25
Quick Battery Tester
Assess your 12V battery’s state of
charge quickly with this pocket-
sized tester. It will be the most
used tester in shops, garages
and any areas where battery
checks are performed.
Part #: 100X822
Model: XC-822-TEST
Quadlink_Manual_Feb2022.indd 8Quadlink_Manual_Feb2022.indd 8 2/15/22 9:31 AM2/15/22 9:31 AM
This manual suits for next models

1

Other PulseTech Batteries Charger manuals

PulseTech SP-3 User manual

PulseTech

PulseTech SP-3 User manual

PulseTech SP-12-OBD-A User manual

PulseTech

PulseTech SP-12-OBD-A User manual

PulseTech 777P-PT User manual

PulseTech

PulseTech 777P-PT User manual

PulseTech Xtreme Charge XC100-P Mounting instructions

PulseTech

PulseTech Xtreme Charge XC100-P Mounting instructions

PulseTech SolarPulse SP-2 User manual

PulseTech

PulseTech SolarPulse SP-2 User manual

PulseTech SP-7-OBD-T User manual

PulseTech

PulseTech SP-7-OBD-T User manual

PulseTech XtremeCharge XC100-P Operating manual

PulseTech

PulseTech XtremeCharge XC100-P Operating manual

PulseTech SC-2 User manual

PulseTech

PulseTech SC-2 User manual

PulseTech XTREME CHARGE XC400 User manual

PulseTech

PulseTech XTREME CHARGE XC400 User manual

PulseTech 746X816 User manual

PulseTech

PulseTech 746X816 User manual

PulseTech 12V ERV UNIT User manual

PulseTech

PulseTech 12V ERV UNIT User manual

PulseTech Xtreme SC-12 User manual

PulseTech

PulseTech Xtreme SC-12 User manual

PulseTech RediPulse Pro-10 User manual

PulseTech

PulseTech RediPulse Pro-10 User manual

PulseTech SC-6 User manual

PulseTech

PulseTech SC-6 User manual

PulseTech QuadLink X2-QL4-K2 User manual

PulseTech

PulseTech QuadLink X2-QL4-K2 User manual

PulseTech SP-7-OBD-A User manual

PulseTech

PulseTech SP-7-OBD-A User manual

PulseTech RediPulse Pro-12 PRO-12-RP User manual

PulseTech

PulseTech RediPulse Pro-12 PRO-12-RP User manual

PulseTech PRO-HD 12V/24V User manual

PulseTech

PulseTech PRO-HD 12V/24V User manual

PulseTech SP-12-OBD-T User manual

PulseTech

PulseTech SP-12-OBD-T User manual

PulseTech Xtreme Recovery User manual

PulseTech

PulseTech Xtreme Recovery User manual

PulseTech XC-QL4-K1 User manual

PulseTech

PulseTech XC-QL4-K1 User manual

PulseTech 746X810 User manual

PulseTech

PulseTech 746X810 User manual

Popular Batteries Charger manuals by other brands

Manhattan 102391 instructions

Manhattan

Manhattan 102391 instructions

ChargeTech Y2-PPLV8 installation guide

ChargeTech

ChargeTech Y2-PPLV8 installation guide

ABB HT568725 Operation manual

ABB

ABB HT568725 Operation manual

Concorde Battery BC-8000 instruction manual

Concorde Battery

Concorde Battery BC-8000 instruction manual

Tenergy 01027 user manual

Tenergy

Tenergy 01027 user manual

alfen Eve Quick installation guide

alfen

alfen Eve Quick installation guide

Beta 1498/50A Instructions for use

Beta

Beta 1498/50A Instructions for use

Laser PW-3IN1SS-C user manual

Laser

Laser PW-3IN1SS-C user manual

Bosch AL 1860 CV user manual

Bosch

Bosch AL 1860 CV user manual

Hydra ECHO Installation and instruction manual

Hydra

Hydra ECHO Installation and instruction manual

Reya DOLPHIN.BB MARINE TECHNICAL NOTICE

Reya

Reya DOLPHIN.BB MARINE TECHNICAL NOTICE

EO Mini Pro 2 user manual

EO

EO Mini Pro 2 user manual

ABB A200-L Operation manual

ABB

ABB A200-L Operation manual

Bosch BPC3400 Original operating instructions

Bosch

Bosch BPC3400 Original operating instructions

Nitecore UMS2 manual

Nitecore

Nitecore UMS2 manual

BS Charger BA10 User manual and guide

BS Charger

BS Charger BA10 User manual and guide

Rubbermaid 2173520 owner's manual

Rubbermaid

Rubbermaid 2173520 owner's manual

Telwin DRIVE 9000 manual

Telwin

Telwin DRIVE 9000 manual

manuals.online logo
manuals.online logoBrands
  • About & Mission
  • Contact us
  • Privacy Policy
  • Terms and Conditions

Copyright 2025 Manuals.Online. All Rights Reserved.