QDI P6I440BX User manual

ManualforP6I440BX/BV
P6I440BX/BV
9
SETUPDELLASCHEDA SPEEDEASY
Proceduradiinstallazione:
1.InseriteilmicroprocessorePentium®II/Intel®CeleronTMcomedaistruzioni.
2.Modificatelaconfigurazionedelcomputereripristinateil sistema.
3.Premeteiltasto<Del>eaccendeteil computerperentrarenelsetupBIOS.
4.Entratenelmenu“SpeedEasyCPU*SETUP”perregolarelavelocit…del
microprocessore.1
Nota:se non regolatelavelocitàdelmicroprocessore,il sistemafunzionerà
con leregolazionistandard(Microprocessoreda200MHzcon velocitàdi
“hostbus”da100MHzemicroprocessoreda133MHzcon velocitàdi“host
bus”da66MHz).
5.SalvateeuscitedalSetupBIOS,efateripartireilcomputer.
*CPU=microprocessore

ManualforP6I440BX/BV
10
Spiegazionitecniche sulmicroprocesoreSpeedEasy
Menu delSetupdelMicroprocessoreSpeedEasy
Selezionare<SpeedEasy CPUSETUP>dalmenuprincipaleed entrarenelseguente
sottomenu:
Figure-1MenudelSetupdelMicroprocessoreSpeedEasy
I1sistemaBIOSViforniràunaseriedivaloribaseperlaselezione delmicroprocessoreal
postodellaregolazionejumper(dell’accoppiamento).Poteteselezionaremanualmentela
velocitàdelmicroprocessoresullaschermata“SpeedEasyCPUSETUP”.
Avvertenza:
nondoveteregolarelafrequenzadelmicroprocessorepialtadiquellapredisposa,
altrimentilacasaproduttricenon sifaràcaricodieventuali dannialmicorprocessore.

ManualforP6I440BX/BV
P6I440BX/BV
11
SpeedEasy ¿ìËÙ°²×°Ö¸ÄÏ
³ÌÐò:
1.ÕýÈ·µØ²åÈëPentium®II»òIntel®CeleronTMÖÐÑë´¦ÀíÆ÷¡£
2.²åÈëÆäËûÅäÖÃ,×é×°³ÉÍêÕûµÄ΢»úϵͳ.
3.¿ª¶¯ÏµÍ³µçÔ´²¢°´×¡<Del>¼ü£¬½øÈëBIOSÉèÖóÌÐò¡£
4.½øÈë¡°SpeedEasy CPUSETUP¡±µ¥£¬ÒÔµ÷½ÚÖÐÑë´¦ÀíÆ÷µÄËÙ¶È¡£
×¢Òâ:Èô²»µ÷½ÚÖÐÑë´¦ÀíÆ÷µÄËÙ¶È£¬ÏµÍ³½«ÒÔÔ¤É趨µÄËÙ¶ÈÔËÐУ¨¶ÔÓÚ×ÜÏ߯µÂÊΪ
100MHzµÄCPU, Ϊ200MHz£»¶ÔÓÚ×ÜÏ߯µÂÊΪ66MHzµÄCPU, Ϊ133MHz£©¡£
5. ´æ´¢É趨ֵ£¬Í˳öBIOS£¬ÏµÍ³¾Í¿ÉÒÔ°´ÄãÉ趨µÄËÙ¶ÈÔËÐÐÁË¡£

ManualforP6I440BX/BV
SpeedEasy·½Ê½½éÉÜ
12
SpeedEasyÖÐÑë´¦ÀíÆ÷É趨²Ëµ¥
´ÓÖ÷ÉèÖò˵¥ÖÐÑ¡Ôñ<SpeedEasyCPUSETUP>ÏȻáá½øÈë´Î²Ëµ¥£º
ͼ£-1 SpeedEasyÖÐÑë´¦ÀíÆ÷É趨ÏîÄ¿µ¥
BIOSΪÄãµÄÖÐÑë´¦ÀíÆ÷Ìṩһ×é»ù±¾Ñ¡ÏÒÔ´úÌæ´«Í³µÄÌøÏß(jumper)·½Ê½£¬Ê¹
Äã¿ÉÒÔÔÚ¡°SpeedEasyCPUSETUP¡±²Ëµ¥ÉÏ£¬ÎªÖÐÑë´¦ÀíÆ÷Ñ¡ÔñÕýÈ·µÄ¹¤×÷Ƶ
ÂÊ¡£
¾¯¸æ£º
ÇëÎð½«ÖÐÑë´¦ÀíÆ÷µÄƵÂʵ÷½ÚÖÁ¸ßì¶ÆäÕý³£¹¤×÷ƵÂÊ£¬·ñÔò±¾¹«Ë¾½«
²»»á¸ºÔðÓɴ˶ø²úÉúµÄÈκÎËð»Ù¡£

ManualforP6I440BX/BV
P6I440BX/BV
13
SpeedEasy¿ìËÙ°²×°Ö¸ÄÏ
³ÌÐò£º
1.ÕýÈ·µØ²åÈëPentium®II»òIntel®CeleronTMÖÐÑë´¦ÀíÆ÷¡£
2.²åÈëÆäËûÅäÖã¬×é×°³ÉÍêÕûµÄ΢»úϵͳ¡£
3.¿ªÆôϵͳµçÔ´£¬²¢ÇÒ°´×¡<Del>¼ü,½øÈëBIOSÉèÖóÌÐò¡£
4.½øÈë¡°SpeedEasy CPUSETUP¡±²Ëµ¥£¬ÒÔµ÷½ÚÖÐÑë´¦ÀíÆ÷µÄËÙ¶È¡£
×¢Ò⣺Èô²»µ÷½ÚÖÐÑë´¦ÀíÆ÷µÄËÙ¶È£¬ÏµÍ³½«ÒÔÔ¤ÉèµÄËÙ¶ÈÔËÐÐ(100Õ׺Õ×Ü
ÏßµÄCPU»áÒÔ•200Õ׺ÕÔËÐУ¬66Õ׺Õ×ÜÏßµÄCPU»áÒÔ133Õ׺ÕÔËÐÐ)¡£
5.´æ´¢É趨ֵ£¬Í˳öBIOS£¬ÏµÍ³¾Í¿ÉÒÔ°´ÄãÉ趨µÄËÙ¶ÈÔËÐÐÁË¡£

ManualforP6I440BX/BV
SpeedEasy·½Ê½½éÉÜ
14
SpeedEasyÖÐÑë´¦ÀíÆ÷É趨²Ëµ¥
´ÓÖ÷ÉèÖò˵¥ÖÐÑ¡Ôñ<SpeedEasy CPUSETUP>ÏȻáá½øÈë´Î²Ëµ¥£º
ͼ£-1 SpeedEasyÖÐÑë´¦ÀíÆ÷É趨ÏîÄ¿µ¥
BIOSΪÄãµÄÖÐÑë´¦ÀíÆ÷Ìṩһ×é»ù±¾Ñ¡ÏÒÔ´úÌæ´«Í³µÄÌøÏß(jumper)·½Ê½£¬Ê¹
Äã¿ÉÒÔÔÚ¡±SpeedEasyCPUSETUP”²Ëµ¥ÉÏ£¬ÎªÖÐÑë´¦ÀíÆ÷Ñ¡ÔñÕýÈ·µÄ¹¤×÷ƵÂÊ¡£
¾¯¸æ£º
ÇëÎð½«ÖÐÑë´¦ÀíÆ÷µÄƵÂʵ÷½ÚÖÁ¸ßì¶ÆäÕý³£¹¤×÷ƵÂÊ£¬·ñÔò±¾¹«Ë¾½«²»»á¸ºÔð
Óɴ˶ø²úÉúµÄÈκÎËð»Ù¡£

ManualforP6I440BX/BV
Chapter1
Introduction
Chapter1
Introduction
Overview
TheP6I440BX/BVisahigh-performance,cost-effective,microATXmotherboardwhichis
centeredon theIntel®440BXAGPset.Itprovides66MHzand100MHzsystembussupport
forallIntelPentium®IIandCeleronTMprocessors.Both66MHz/100MHzSDRAMand66MHz
EDODIMMsaresupported.Themaximummemorysizeis768MB.Italsoprovidesadvanced
featuressuchaswake-uponLAN,wake-upon internal/externalmodem,andkeyboard
passwordpower-on function.The greenfunctionisincompliancewiththe ACPIspecifica-
tion.ManageEasy,oursystemmanagementapplicationissuppliedtoenableremotemonitor-
ingandconfigurationofthesystem.TogetherwiththeSecurityEasyfunctionandintegrated
CreativeViBRA™16XVCT2511ISAaudio,yougetapowerfulstate-of-the-artsystem.
Key Features
Formfactor
microATXformfactorof244mmx200mm.
ProvidesbackwardcompatibilitywithstandardATX2.01 chassisforeasy integration.
Microprocessor
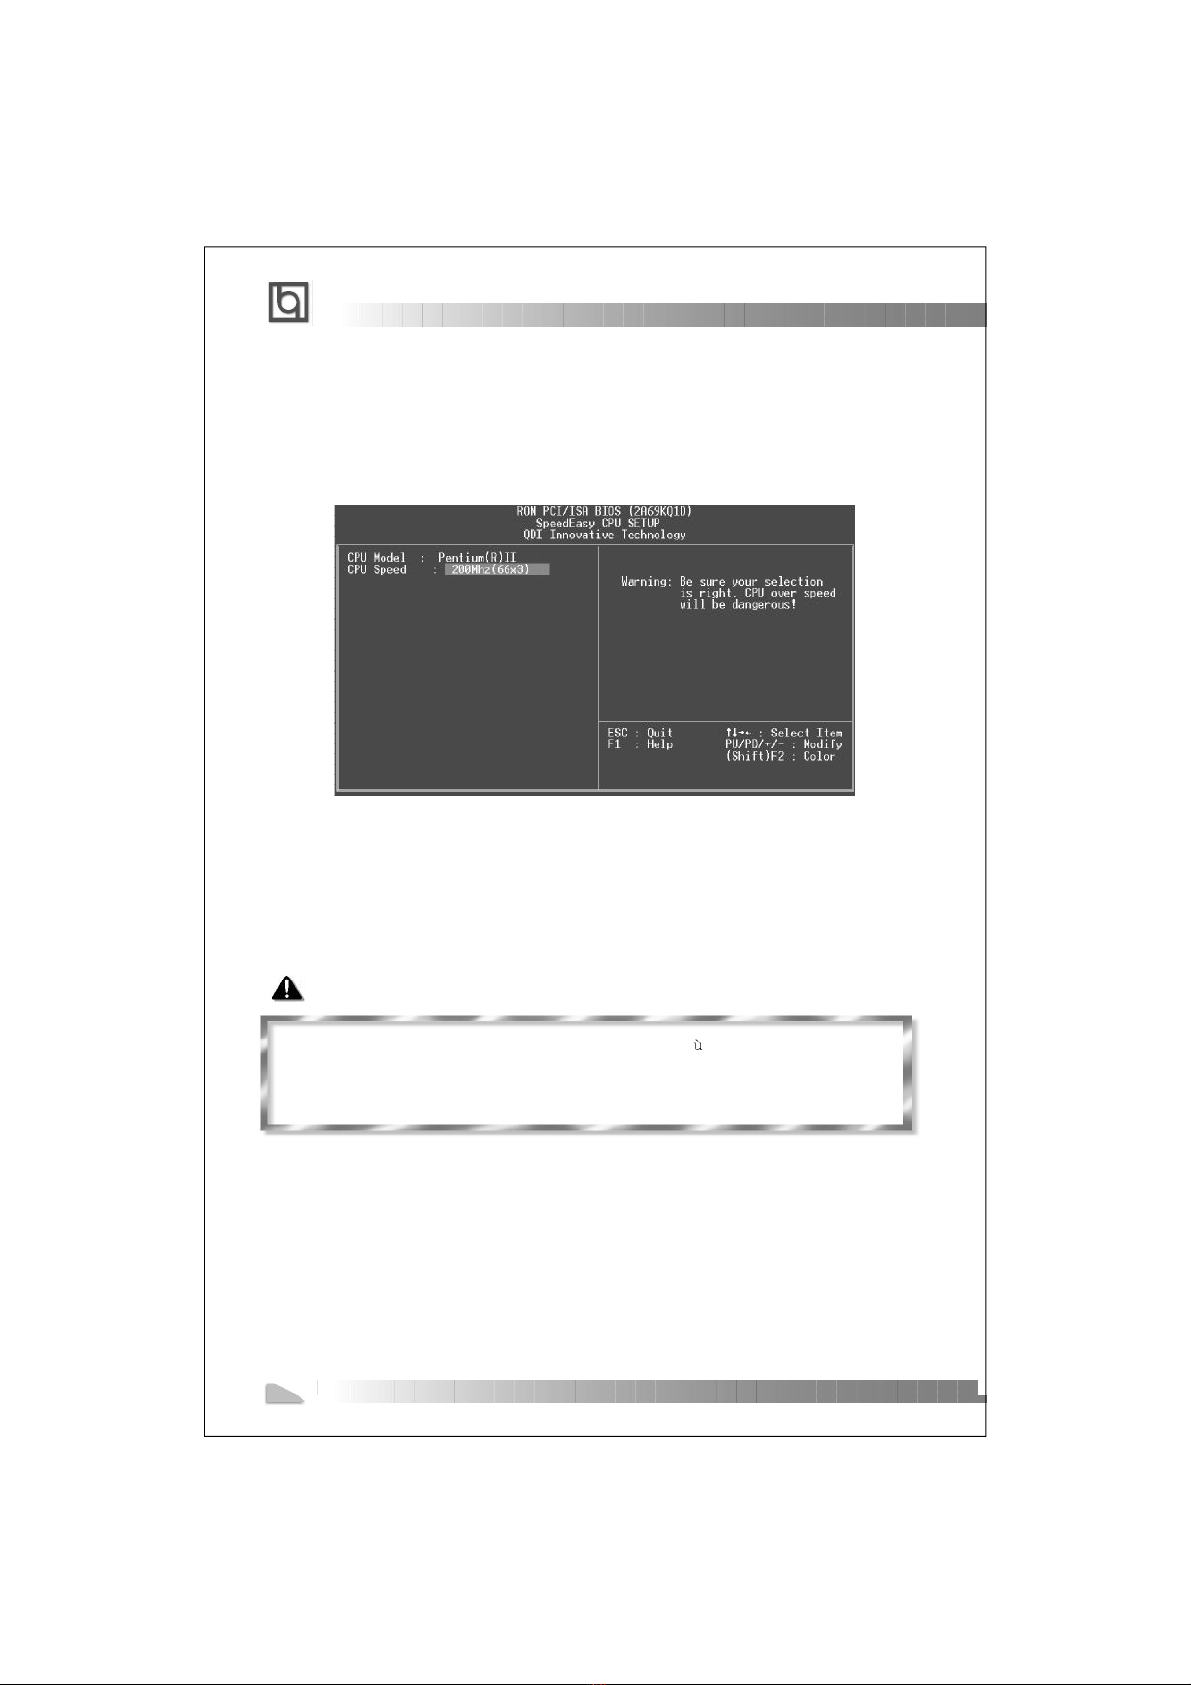
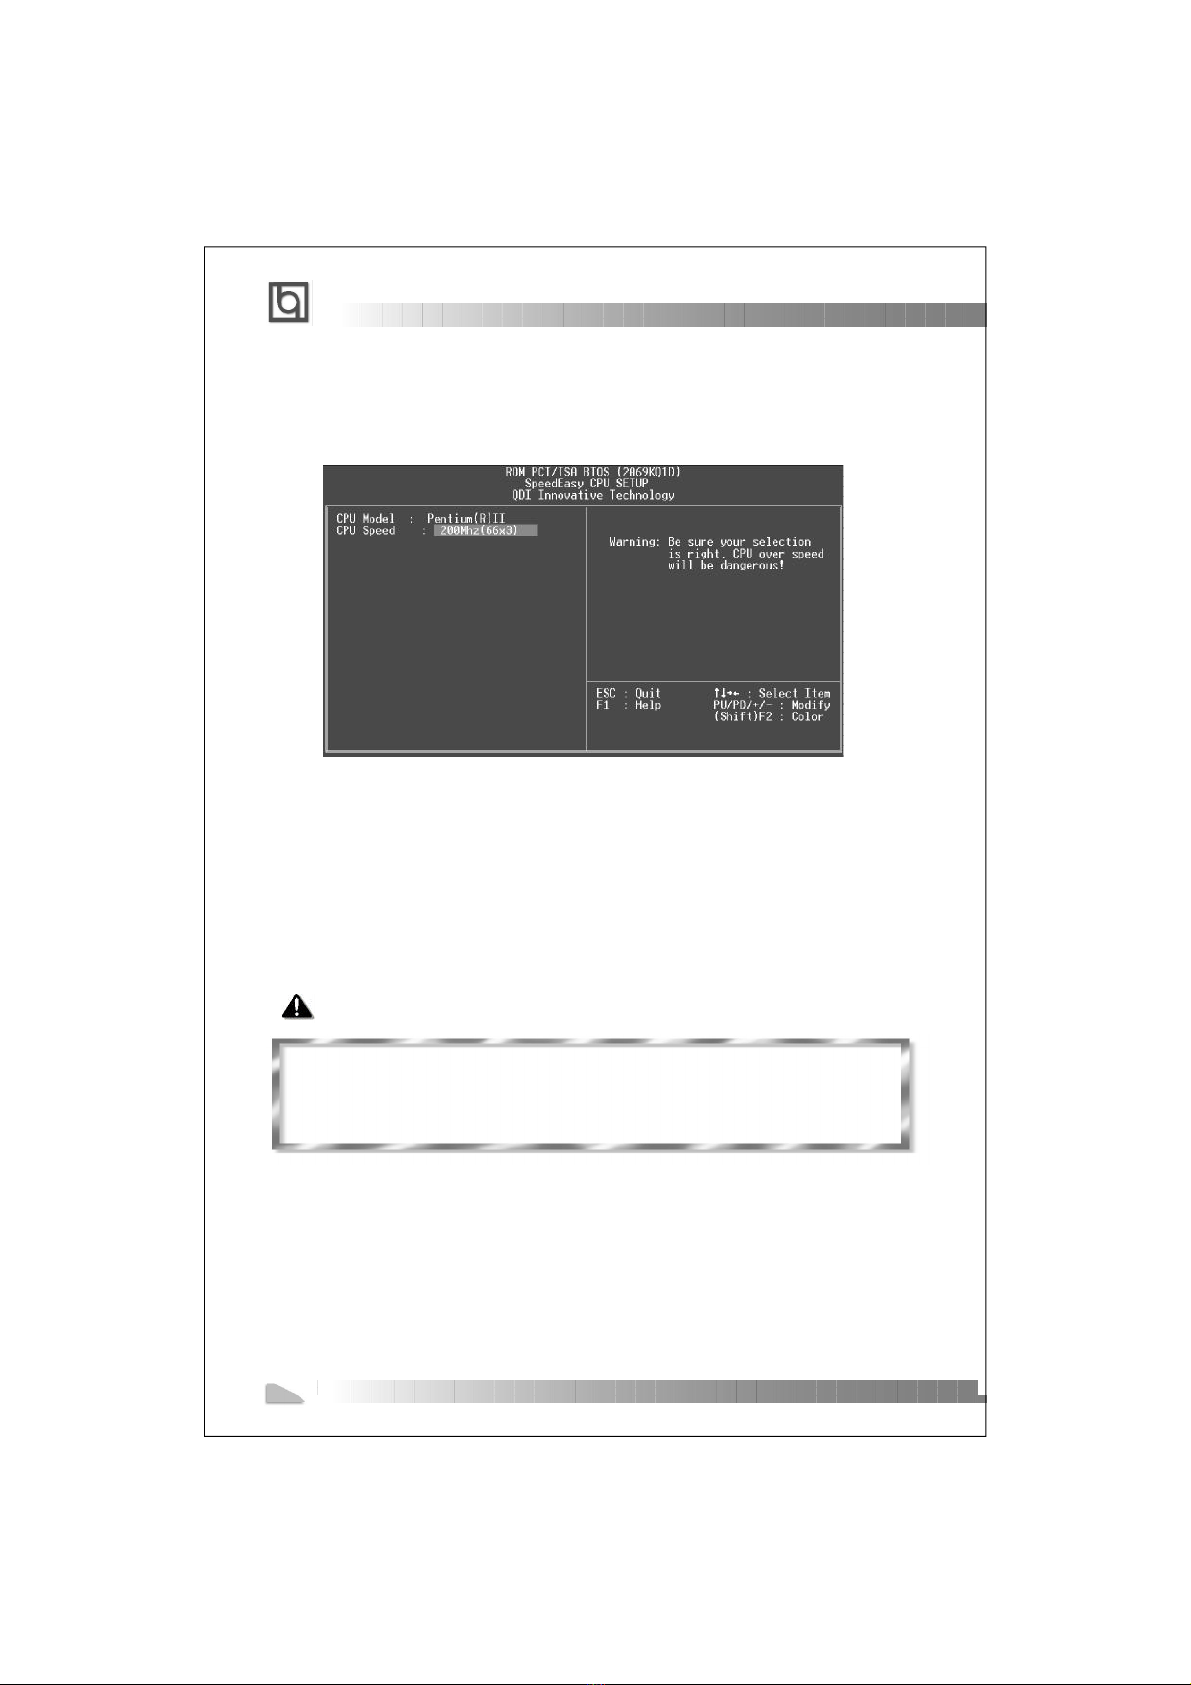
SupportsallIntelPentium®IIprocessorsat233/266/300/333MHzwith66MHzbus
speedandat350/400/450MHzwith100MHzbusspeed.
SupportsallIntel®CeleronTMprocessorsat266/300/333MHzwith66MHzbus
speed.
Supports66MHzand 100MHzhostbusspeed.
CPUcorefrequency=Busspeedx3,x3.5,x4,x4.5,x5,x5.5
CPUcoresupplyvoltageadjustablefrom1.3Vto3.5Vthroughon-boardswitching
voltageregulatorwithVID(VoltageID).
Chipset
Intel®440BXAGPset:82443BX,82371EB (PIIX4E)
Systemmemory
Providesthree168 pin3.3VunbufferedDIMMsockets.
Supportsboth66MHz/100MHzSDRAMand66MHzEDODIMMs.
Minimummemorysizeis8MB,maximummemorysizeis768MB.
SDRAM64bitdatainterfacewithECCsupport.
15
Chapter1

ManualforP6I440BX/BV
On-boardIDE
SupportstwoPCIPIOand busMasterIDEports.
SupportsuptoMode4Timing
Supports2FastIDEinterfacesforupto4IDEdevicesincludingIDEharddisksand
CDROMdrives.
Supports“UltraDMA/33”SynchronousDMAmodetransferringupto33Mbytes/sec.
Integrated16x32bitbufferforIDEPCIBurstTransfers.
On-boardI/O
UsesWinbondW83977EFsuperI/Ochip.
Onefloppyportsupportinguptotwo3.5”or5.25”floppydriveswith
360K/720K/1.2M/1.44M/2.88Mformat.
Twohighspeed16550fastcompatibleUARTs(COM1/COM2/COM3/COM4
selective)with16-bytesend/receiveFIFOs,supporting MIDImode.
OneenabledparallelportattheI/Oaddress378H/278H/3BCHwithadditional
bi-directionI/Ocapabilityandmulti-modeasSPP/EPP/ECP(IEEE1284compliant).
Circuitprotectionprovided,preventingdamagetotheparallelportwhena
connectedprinterispowereduporoperatesatahighervoltage.
SupportsLS-120floppydiskdrive.
AllI/Oportscanbeenabled/disabledintheBIOSsetup.
On-boardAudio
Basedonthe CreativeViBRA™16XVCT2511soundchip.
CompatiblewithSound Blaster™,SoundBlasterPro™and WindowsSound
System™.
Integrated CQM™MusicSynthesizer.
StereoEnhancementSupport.
Provideson-boardLine-inJack,Microphone-inJack,speaker/Line-outJackandMIDI/
JoystickConnector.
Advancedfeatures
ProvidesTrendChipAwayVirus®OnGuard.
Provideson-boardPS/2mouseandPS/2keyboardports.
TwoUSBportssupported.
Providesinfrared interface.
SupportsWindows95/98 softwarepower-down.
Introduction
16

ManualforP6I440BX/BV
Supportsexternalmodemringpower-on.
Supportswake-uponLANandwake-uponinternalmodem.
Supportsautofanoffwhenthesystementerssuspend mode.
On-boardW83782Dsupportssystemmonitoring(monitorstheCPU&system
temperature,systemvoltages,chassisintrusionandFANspeed)
(manufacturingoption).
ProvidesmanagementapplicationsuchasManageEasy,andLDCM(LANDeskClient
Manager)(manufacturingoption).
Supportskeyboardpasswordpower-on function.
SupportsSecurityEasyfunction(manufacturingoption)
SystemstatusresumesafterACpowerfailure.
BIOS
LicensedadvancedAWARDBIOS,supportsDIPflashROMBIOSwith2MB
memorysize,plugandplayready.
SupportsIDECD-ROMorSCSIbootup.
Greenfunction
SupportsACPI(AdvancedConfigurationandPowerInterface)and ODPM(OS
DirectedPowerManagement).
Supportsthree greenmodes:Doze,Standbyand Suspend.
Expansionslots
2PCIslotsand1ISA/PCIsharedslot.
1AGPSlot
17
Chapter1

ManualforP6I440BX/BV
18
--Thispageisintentionallyleftblank--

ManualforP6I440BX/BV
Chapter2
InstallationInstructions
Chapter2
InstallationInstructions
ThissectioncoversExternalConnectors,JumperSettings,and MemoryConfiguration.
Refertothemotherboardlayoutchartforlocationsofallthejumpers,externalconnec-
tors,slotsandI/Oports.Furthermore,thissectionlistsallnecessaryconnectorpins
assignmentforyourreference.Theparticularstateofthejumpers,connectorsandports
areillustratedinthefollowingfigures.Beforesettingthejumpersorinsertingthese
connectors,pleasepayattentiontothedirections.
ExternalConnectors
PS/2KeyboardConnector,PS/2Mouse Connector
PS/2keyboardconnectorisfortheusage ofPS/2keyboard.Ifyouchoosetousea
standardATsizekeyboard,anadaptershouldbeusedtofitthisconnector.PS/2mouse
connectorisfortheusageofPS/2mouse.
USB1,USB2
TwoUSBportsareavailableforconnectingUSBdevices.
ParallelPortConnectorandSerialPortConnector(UART1,UART2)
Theparallelportconnectorcanbeconnectedtoaparalleldevicesuchasaprinter,while
theserialportconnectorscanbeconnectedtoserialportdevicessuchasaserialport
mouse.Youcanenable/disablethemand choosetheIRQorI/Oaddressin“Integrated
Peripherals” fromAWARDBIOSSETUP.
PS/2MouseConnector
PS/2KeyboardConnector
USB1
USB2
ParallelPort
UART2
UART1
chapter2
19

ManualforP6I440BX/BV
Line-injack,Microphone-injack andLine/Speaker-outjack
MIDI/JoystickConnector
TheLine-injackcanbe connectedtodevicessuchasacassetteorMinidisc playerfor
playbackorrecording.
TheMicrophone-injack canbeconnectedtoamicrophoneforvoiceinput.
TheLine/Speaker-outjackiscontrolledbythejumperJP10&JP11(refertoJumperSet-
tingsbelowfordetails).If setasLine out, thisallowsyou tobypass the built-inpower
amplifiertoconnectpoweredspeakersoran externalamplifierforaudiooutput.Ifsetas
Speakerout,thisallowsyoutoconnectspeakersorheadphonesforaudiooutputfromthe
internalamplifier.
TheMIDI/Joystickconnectorallowsyoutoconnectagamejoystick oraMIDIdevice.
ATXPowerSupplyConnector&PowerSwitch(POWER)
ATX/SFXpowersupplycanbothbeusedonthissystem.Besuretoconnectthepower
supplyplugtothisconnectorinitsproperorientation.Thepowerswitch(POWER)should
beconnectedtoamomentaryswitch.Whenpoweringupyoursystem,firstturnonthe
mechanicalswitchofthepowersupplyifoneisprovided,thenpushoncethebuttonof
themomentaryswitch.Whenpoweringoffthe system,youneedn’tturnoffthemechani-
calswitch,justPushonce*thebuttonofthemomentaryswitch.
Note:*Ifyouchange“soft-off byPWR-BTTN”fromdefault“Instant-off”to“Delay
4Secs”inthe“POWERMANAGEMENTSETUP”section oftheBIOS,thepower
button shouldbepressedformorethan4secondsbeforethesystempowers
down.
MIDI/Joystick
Line out/SpeakeroutLineinMicrophonein
5V5V-5VGNDGNDGND PSONGND-12V3.3V
12V5VSBPS-OKGND5VGND5VGND3.3V3.3V
ATXPowerSupplyConnector
1
20
POWER
Installation Instruction
20

ManualforP6I440BX/BV
HardDiskLEDConnector(HD_LED)
Theconnectorconnectstothecase’sIDEindicatorLEDtoshowtheactivitystatusofIDE
harddisk.
ResetSwitch(RESET)
Theconnectorconnectstothecase’sresetswitch.Presstheswitchonce,the system
resets.
SpeakerConnector(SPEAKER)
Theconnectorcanbeconnectedtothespeakeronthecase.
PowerLEDConnector(PWR_LED)
TheindicatorLEDconnectedto“PWR_LED”willglowdimlywhenthesystemisinthesoft
power-downstatus.
Key-LockConnector(KEY_L)
Theconnectorcanbeconnectedtothekeyboardlockswitchonthecabinetforlocking
thekeyboard.
GreenLEDConnector(GREEN_LED)
TheLEDconnectedtothisheadershowsthestatusofthesystemasdescribedbelow:
LEDStatusSystemStatus
Off Nopowersupplyorthecurrentof5VSB is
notstrongenough.
OnThesystemisinpower-upstatus.
Flashingatafrequencyofabout1.5HzThesystemisinsoft power-downstatus.
Flashingatafrequencyofabout0.5HzThesystemisinGreenMode.
Flashingatafrequencyofabout1/6HzThesystemisinLockstatus.
HardwareGreenConnector(SLEEP)
IftheSecurityEasyfunctionisenabled,pushoncetheswitchconnectedtothisheader
andthesystemwillenterlockstatus.Ifthelockfunctionisdisabled,pushoncethe
switch,thesystementerssuspendmode.
chapter2
POWER
PWR_LED
KEY_L
GREEN_LED
21
HD_LED
RESET
SPEAKER
SLEEP
LED+
LED-
GND
RESET
SPKDATA
NC
GND
VCC
GND
POWER
LED+
LED-
LED-
KEYLOCK
GND
LED+
LED-
LED-
SLEEP
GND

ManualforP6I440BX/BV
InfraredHeader(IrDA)
Thisconnectorsupportswirelesstransmittingandreceiving.Ifusingthisfunction,set
“SerialPort2Mode”toIrDAorASKIRthen configurethesettingsinthe“INTEGRATED
PERIPHERALS”sectionoftheBIOS.
FanConnector(CPUFAN,CHSFAN)
Thesetwofansarecontrollable.Theywill be automaticallyturned off afterthesystem
enterssuspendmode.YoualsocanchoosenottoturntheCPUFANoffbysetting“CPUFAN
OffInSuspend”asDisabledinthe“POWERMANAGEMENTSETUP”sectionoftheBIOS.
Wake-UpOnLAN (WOL)
Through theWake-UpOnLANfunction,awakeeventoccurring fromthe networkcan
wakeup the system.If thisfunction istobe used,pleasebe surean ATX2.01 power
supplyofwhich5VSB line iscapableofdelivering 720mA,andaLANadapterwhich
supportsthisfunctionareused.Then connectthisheadertotherelevantconnectoronthe
LANadapter,set“WakeUpOnLAN”asEnabledinthe“POWERMANAGEMENTSETUP”
sectionoftheBIOS.Save&exit,thenboottheoperatingsystemoncetomakesurethis
functiontakeseffect.
VCC
NCIRRX
GND
IRTXVCC
Installation Instruction
22
1+5Vstandby
GND
Signalforwakingup(activehigh)
FANGND
CHSFAN
+12VTachometerSignal
FANGND(Controllable)
+12V
TachometerSignal
CPUFAN

ManualforP6I440BX/BV
Wake-UpOnInternalModem(WOM)
ThroughtheWake-UpOnInternalModemfunction,thesystemwhichisinthepower-off
statuscanbepoweredonbyaringsignalreceivedfromtheinternalmodem.Ifthisfunction
istobe used,besureaninternalmodemcardwhichsupportsthefunction isused.Then
connectthisheadertotherelevantconnectoronthemodemcard,set“ResumebyRing”to
Enabledinthe“POWERMANAGEMENTSETUP”sectionoftheBIOS.Save&exit,thenboot
theoperatingsystemoncetomakesurethisfunctiontakeseffect.
ChassisSecuritySwitch(CHSSEC)
Ifthe switchisoff, thisindicatesthechassisisclosed.Otherwise,itindicatesthe
chassisisopened.
DigitalAudioConnector(CDLIN,AUXIN)
CDLINisaCDaudioconnectorwhichcanbeconnectedtoaCD-ROMdrive(Sonystandard)
throughaCD audiocable.AUXINisanauxiliaryaudioconnector.Withthespeakerscon-
nectedtoLine/Speaker-outjack,youcanlistentoaudiofromtheCD-ROMdrive.
1+5Vstandby
GND
Signalforwakingup(activelow)
CDLIN(Sony)
AUXIN
CDRightChannel
GND
GND
CDLeftChannel
chapter2
23
Indicatesignal
GND
AUXRightChannel
GND
GND
AUXLeftChannel

ManualforP6I440BX/BV
Microphone-inand Line-inConnector(BLSND)(manufacturing option)
Thisconnectorallowsyoutoconnecttheaudiodevicesormicrophonewithcable.
FirstCOMPortConnector(1STCOM)(manufacturingoption)
Thisconnectorallowsyoutoconnectthe COMportdeviceinsidethe cabinet.If thisCOM
portisalreadyoccupied,notetheotherone locatedonthe back panel(UART1)can’tbe
used.
SoundConnector(PC-PCI)(manufacturingoption)
ThisconnectorisfortheusageofPCIsoundcard.
MicIn
GND
Linein(L)
GND
Linein(R)
GND
1
SERIALINTERRUPTREQUEST-6
1-PC/PCIDMAACKNOWLEDGE
GND-2
3-NC
5-GND
PC/PCIDMAREQUEST-4
Installation Instruction
24

ManualforP6I440BX/BV
Expansion Slots&I/OPortsdescription
Slot/PortDescription
ISA1ISAslot.
PCI1FirstPCIslot.
PCI2SecondPCIslot.
PCI3ThirdPCIslot.
IDE1PrimaryIDEport.
IDE2SecondaryIDEport.
FLOPPYFloppyDriverPort.
AGPAcceleratedGraphicsPort
JumperSettings
Therearesomejumpersonthemotherboard,theyrepresent,clearCMOSjumperJCC,
enablekeyboardpasswordpower-onfunctionjumperJP2and Speaker/Line-outselection
jumperJP10&JP11.Pin1foralljumpersarelocatedonthesidewithathickwhiteline(Pin1→
),referring tothe motherboard’s silkscreen.Jumperswiththree pinswillbe
shownastorepresentpin1&pin2connectedandtorepresentpin2&pin3
connected.
ClearCMOS(JCC)
Ifyou wanttoclearCMOS,unplug theACpowersupplyfirst, closeJCC(pin1&pin2)once,
setJCCbacktothenormalstatuswithpin2&pin3connected,thenpoweronthesystem.
Normalstatus:
ClearCMOS:
123
123
JCC
JCC
(UnplugtheACpowersupply)
chapter2
25

ManualforP6I440BX/BV
Enablekeyboardpasswordpower-on function (JP2)
Themotherboardprovidestheadvancedkeyboardpasswordpower-onfunction.When
wanting tousethisfunctionsetJP2withpin1&pin2closed.Otherwise,setJP2with
pin2&pin3shortenedfordisablingthisfunction.
Inordertoimplementthisfunction,set“POWERONFunction”toPasswordandenterthe
keyboardpower-onpasswordinthe“INTEGRATEDPERIPHERALS”sectionoftheBIOS.
Saveandexit, then poweroff yoursystem.Inthiscase,the powerbutton’s power-on
functionhasbeendisabled.Theonlywaytopowerupthe systemistoenterthecorrect
password.Ifyouforgetthe password,clearCMOSandsetitagain.RefertoBIOSdescrip-
tion on page46fordetailinformation.
Note:1.Ifwanting tousethisfunction,5VSBlineofthepowersupplyshouldbe
capableofdelivering 200mA,orthesystemcan’tbepoweredup.
2.Ifyou setJP2withpin2&pin3closed,set“POWERONFunction”to
BUTTONONLY,don’tsetittoPassword,orthiswill preventyou from
poweringupyoursystem.
3.Ifyouencounterproblemsabove,clearCMOSand setthejumperand
BIOSoptionproperlyagain.
Speaker/Lineoutselection (JP10,JP11)
Ifyou wanttosettheLine-out/Speaker-outjackasLineout,setJP10&JP11withpin2&pin3
closed.Otherwise,setJP10 &JP11withpin1&pin2 shortened forSpeakerout.
Disable
Enable
123JP2
JP2
Installation Instruction
26
SetasLine-out
SetasSpeaker-out
JP10 JP113
2
1
JP10 JP11
3
2
1
123
This manual suits for next models
1
Table of contents
Other QDI Motherboard manuals

QDI
QDI BrillianX 8V User manual

QDI
QDI Pentium P5I430TX/IIB TITANIUM IIB User manual

QDI
QDI PlatiniX 1D Series User manual

QDI
QDI PENTIUM II P6I440EX/ATX EXCELLENT 1 User manual

QDI
QDI P5I848P User manual

QDI
QDI P4I848P User manual

QDI
QDI PlatiniX 7B User manual

QDI
QDI PlatiniX 8 Series User manual

QDI
QDI Advance 6T User manual

QDI
QDI P6I440EX/MATX EXCELLENT II User manual