R&G BRG0015SS User manual

Page 1of 24 BRG0015SS
R&G Racing
Unit 1, Shelley’s Lane, East Worldham, Alton, Hampshire, GU34 3AQ
Tel: +44 (0)1420 89007 Fax: +44 (0)1420 87301 www.rg-racing.com Email: info@rg-racing.com
FITTING INSTRUCTIONS FOR BRG0015SS BRANDED RADIATOR GUARD
DUCATI HYPERMOTARD 950 2019-, MONSTER 1200 + 821 2014-,
SUPERSPORT 2017, SUPERSPORT 950 + S 2021-, DIAVEL 1260S 2019-2020
THIS KIT CONTAINS THE ITEMS PICTURED AND LABELLED OVER PAGE.
SOME PARTS MAY BE SHOWN FOR CLARITY OF INSTRUCTIONS ONLY.
DO NOT PROCEED UNTIL YOU ARE SURE ALL PARTS ARE PRESENT.
PLEASE READ ALL INSTRUCTIONS BEFORE PROCEEDING.
IF IN ANY DOUBT WHEN FITTING OUR PRODUCTS, CONSULT ONE OF OUR DEALERS
OR HAVE FITTED BY A QUALIFIED TECHNICIAN.
PLEASE NOTE THAT THE WAY THE KIT IS PACKED DOES NOT NECESSARILY REPRESENT THE WAY OF
MOUNTING TO THE BIKE.
IN THE EVENT OF RUBBER WASHERS BEING USED TO HOLD COMPONENTS ONTO BOLTS,
THESE RUBBER WASHERS CAN BE THROWN AWAY.
DIGITAL COPIES OF THESE INSTRUCTIONS ARE AVAILABLE FROM:
WWW.RG-RACING.COM

Page 2of 24 BRG0015SS
R&G Racing
Unit 1, Shelley’s Lane, East Worldham, Alton, Hampshire, GU34 3AQ
Tel: +44 (0)1420 89007 Fax: +44 (0)1420 87301 www.rg-racing.com Email: info@rg-racing.com
TOOLS REQUIRED
•Socket set to include 4mm and 8mm A/F socket &
wrench
•Set of metric Allen keys to include 3mm –8mm
•Cable cutters
GENERAL TORQUE SETTINGS
M4 BOLT = 8Nm
M5 BOLT = 12Nm
M6 BOLT = 15Nm
M8 BOLT = 20Nm
M10 BOLT = 40Nm
M12 BOLT = 40Nm
LEGEND
ITEM NO.
DESCRIPTION
QTY
ITEM 1
BRG0015SSCOMP BRANDED RADIATOR GUARD
1
ITEM 2
CT220 220mm LONG CABLE TIES
8
ITEM 3
100mm LENGTH OF SELF-ADHESIVE FOAM
2
ITEM 4
M5 x 12mm LONG BUTTON HEAD BOLTS
2
ITEM 5
M5 PENNY WASHERS
2
FITTING PICTURES
Picture 1
Picture 2

Page 6of 24 BRG0015SS
R&G Racing
Unit 1, Shelley’s Lane, East Worldham, Alton, Hampshire, GU34 3AQ
Tel: +44 (0)1420 89007 Fax: +44 (0)1420 87301 www.rg-racing.com Email: info@rg-racing.com
Picture 21
FITTING INSTRUCTIONS
If fitting to the Ducati Hypermotard 950 2019-, Monster 1200 + 821 2014-, Supersport
2017-
•To fit the radiator guard to the bike cut the foam strip provided into 10mm wide pieces and stick
them to the back of the radiator guard frame, so that they sit between the radiator guard and the
radiator.
•Remove the three 4mm A/F bolts on the right side of the bike that secure the plastic cowl in place
on the back of the radiator, as shown in (picture 1).
•Remove the plastic cowl from the radiator, as shown in (picture 2).
•On the left side of the bike, remove the radiator cap and pull the rubber cover over the neck of the
radiator filler, as shown in (pictures 3 & 4).
•Remove the three 4mm A/F bolts that secure the plastic cowl in place on the back of the radiator,
as shown in (picture 5).
•This plastic cowl cannot be fully removed from the bike, just pulled clear to gain access to the two
side bolts on the radiator, as shown in (picture 6).
•Remove the two bolts on both sides of the radiator that secure the plastic radiator surround to the
radiator, as shown in (pictures 6 & 7).
•Remove the remaining bolt that secures the plastic radiator surround in place that is located under
the headstock, as shown in (picture 8), before removing the plastic surround from the bike.
•Offer the R&G Radiator Guard roughly into place and locate one of the OEM bolts through a
mounting hole on the left side of the bike and tighten a few turns in the side of the radiator as
shown in (picture 9). This is to hold the radiator guard loosely in place whilst fitting the plastic
surround onto the other side of the bike.

Page 7of 24 BRG0015SS
R&G Racing
Unit 1, Shelley’s Lane, East Worldham, Alton, Hampshire, GU34 3AQ
Tel: +44 (0)1420 89007 Fax: +44 (0)1420 87301 www.rg-racing.com Email: info@rg-racing.com
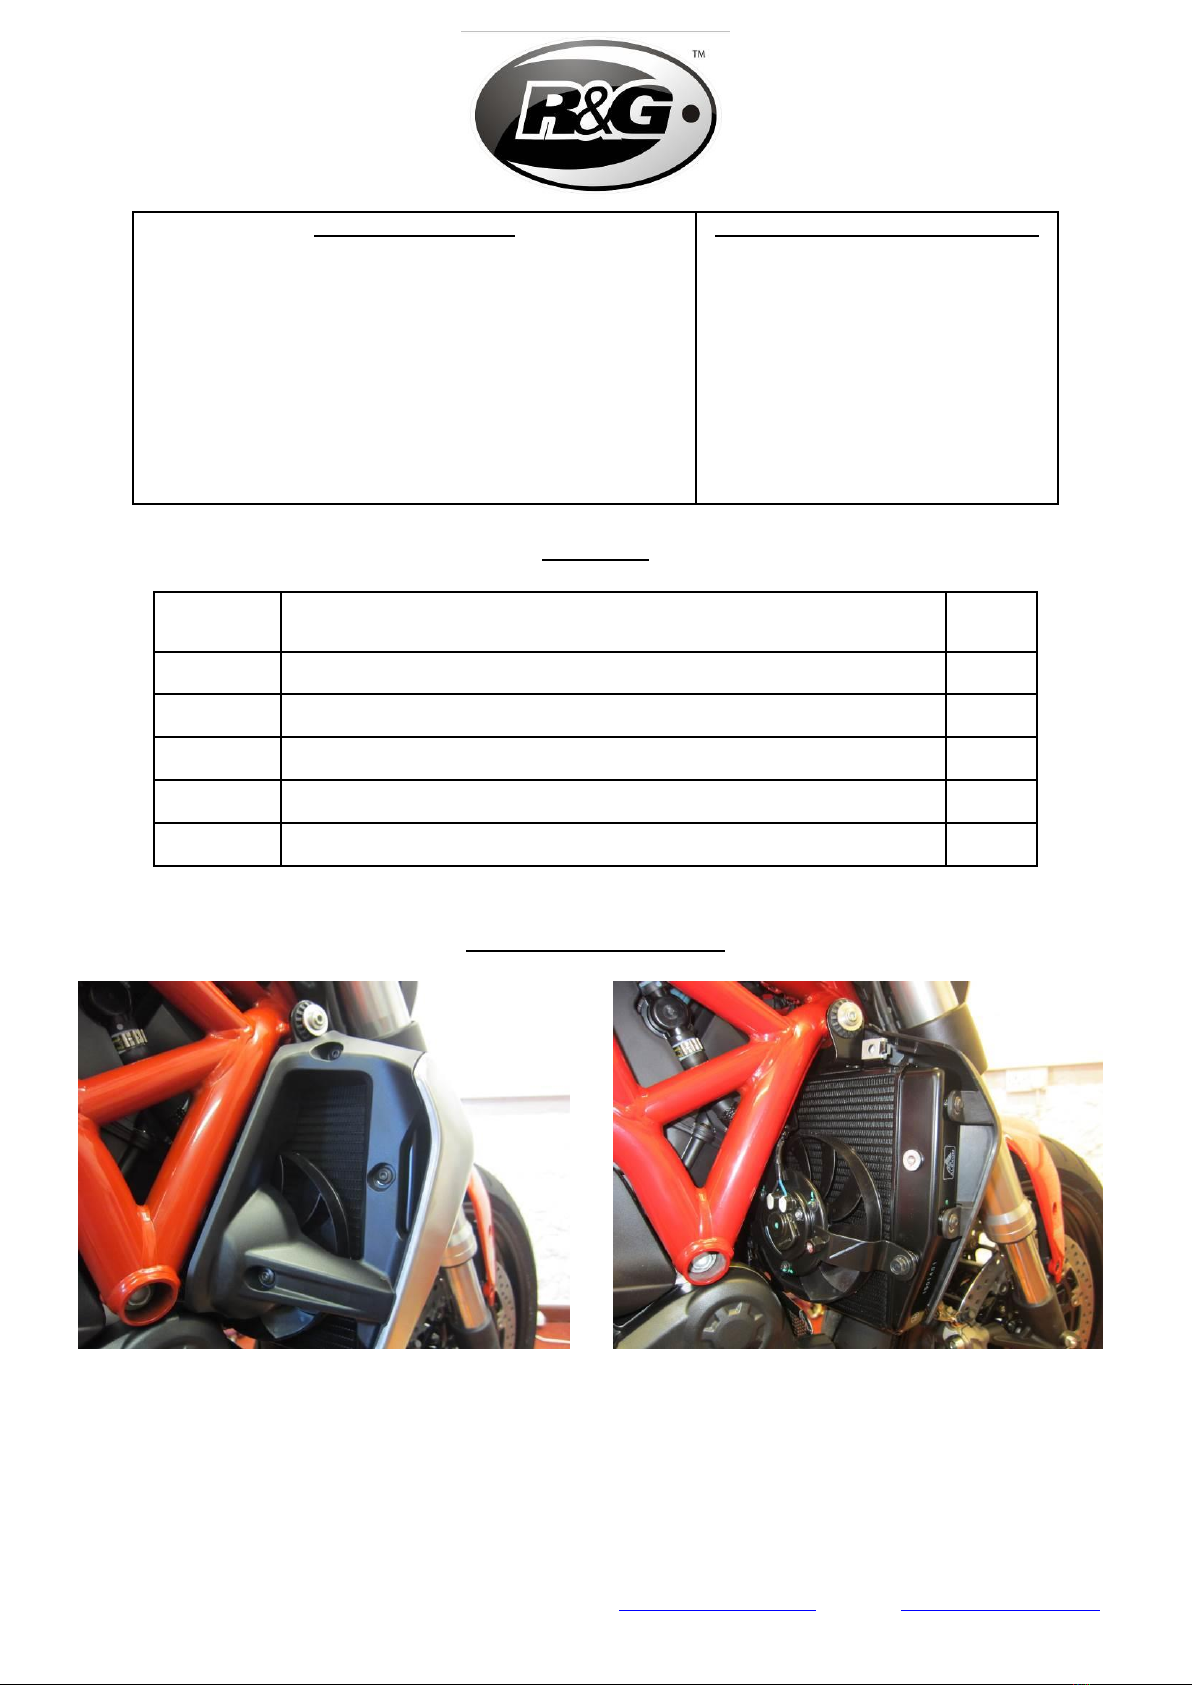
•On the right side of the bike, the radiator guard mounts should align roughly with the mounting
holes on the side of the radiator. Offer the plastic radiator surround back into position ensuring the
side mounts sit over the top of the radiator guard mounts, before refitting the OEM bolts through
the plastic surround, then through the radiator guard mounts and tighten into the radiator, as
shown in (pictures 10 & 11).
•On the left side of the bike, remove the previously fitted loose bolt, allow the plastic surround to sit
back against the radiator, ensure all the holes align and re-fit the two OEM bolts through the
radiator surround, then through the radiator guard and tighten into the side of the radiator, as
shown in (picture 12).
•Re-fit the OEM bolt that secures the centre of the radiator guard in place under the headstock,
before checking the radiator guard and surround are correctly mounted and tighten all five bolts.
•Re-fit the radiator plastic cowls on both sides of the bike and tighten the three bolts on both sides.
•Re-fit the rubber cover onto the radiator filler neck before re-fitting the radiator filler cap.
If fitting to the Ducati Supersport 950 + S 2021- (item 4 and 5 required)
•The radiator surrounds or fairing will need to be removed to access the radiator mount holes on
either side of the radiator as shown in (picture 15).
•To remove the fairing and radiator surround,
•Remove the 1 x bolt from the right-hand side of the radiator as arrowed in (picture 19).
•Loosen off 1 x bolt as arrowed in (picture 20) to allow the horn mount to pivot.
•Remove the 1 x bolt from the left-hand side of the radiator as arrowed in (picture 21).
•Offer the radiator guard up to the radiator and align the mounting holes with the bolt holes.
•Replace the OEM bolts along with the provided 2 x bolts and washers (items 4 and 5) into the 2
lower mounting points on both sides of the radiator as circled in (pictures 20 and 21).
•Make sure the retaining bolts are fully tightened before reassembling any radiator surrounds or
fairing.
•Check the tightness of all bolts and that all panels are secure before riding.
If fitting to the Ducati Diavel 1260S 2019-2020
•Remove the indicator side panels as per previous instructions, cutting the cable ties tidying the
indicator wiring in order to free the panels, as shown in (picture 13).
•Secure the radiator guard to the radiator using 4 of the included cable ties, as shown in (picture
14).
•Refit the side panels and re-tidy the indicator wiring using the 4 remaining cable ties.
•Check the tightness of all bolts and that all panels are secure before riding.

Page 8of 24 BRG0015SS
R&G Racing
Unit 1, Shelley’s Lane, East Worldham, Alton, Hampshire, GU34 3AQ
Tel: +44 (0)1420 89007 Fax: +44 (0)1420 87301 www.rg-racing.com Email: info@rg-racing.com
ISSUE 1 –12/10/2021 (AO)
CONSUMER NOTICE
The catalogue description and any exhibition of samples are only broad indications of the Products and R&G may make design
changes which do not diminish their performance or visual appeal and supplying them in such state shall conform to the order.
The Buyer acknowledges no representation or warranty (other than as to title) has been given or will apply to the Products other
than those in R&G’s order or confirmation and the Buyer confirms it has chosen the Products as being of merchantable quality
and suitable for its particular purposes. Where R&G fits the Products or undertakes other services it shall exercise reasonable
skill and care and rectify any fault free of charge unless the workmanship has been disturbed. The Buyer is responsible for
ensuring that the warranty on the motorcycle is not affected by the fitting of the Products. On return of any defective Products
R&G shall at its option either supply a replacement or refund the purchase money but shall not be liable if the Products have
been modified or used or maintained otherwise than in accordance with R&G’s or manufacturer’s instructions and good
engineering practice or if the defect arises from accident or neglect. Other than identified above and subject to R&G not limiting
its liability for causing death and personal injury, it shall not be liable for indirect or consequential loss and otherwise its liability
shall be limited to the amounts paid by the Buyer for the Products or the fitting or service concerned. These terms do not affect
the Buyer’s statutory rights.
R&G RACING RETURNS POLICY (NON-FAULTY GOODS)
Returns must be pre-authorised (if not pre-authorised the return will be rejected). Goods may only be returned direct to us if
they were purchased direct from us (customer must prove if necessary). Otherwise to be returned to original vendor. Goods
must be in re-sellable condition, in the opinion of R&G Racing. All returns are subject to a 25% restocking and handling fee (25%
of the gross value exc. P&P –at the prevailing price at time of purchase). The customer must pay any and all carriage charges.
No returns of discontinued products, unless within 14 days of purchase. This policy does not affect your statutory rights and does
not refer to faulty goods.

Page 9of 24 BRG0015SS
R&G Racing
Unit 1, Shelley’s Lane, East Worldham, Alton, Hampshire, GU34 3AQ
Tel: +44 (0)1420 89007 Fax: +44 (0)1420 87301 www.rg-racing.com Email: info@rg-racing.com
NOTICE DE MONTAGE BRG0015SS GRILLE DE PROTECTION RADIATEUR
DUCATI HYPERMOTARD 950 2019-, MONSTER 1200 + 821 2014-,
SUPERSPORT 2017, SUPERSPORT 950 + S 2021-, DIAVEL 1260S 2019-2020
CE KIT CONTIENT LES ARTICLES ILLUSTRES ET ETIQUETES SUR LA PAGE.
CERTAINES PARTIES PEUVENT ETRE PRESENTES UNIQUEMENT POUR LA CLARTE DES INSTRUCTIONS.
NE PAS PROCEDER AU MONTAGE TANT QUE VOUS N'ETES PAS SUR QUE TOUTES LES PIECES SOIENT
PRESENTES.
VEUILLEZ LIRE TOUTES LES INSTRUCTIONS AVANT DE CONTINUER.
EN CAS DE DOUTE LORS DU MONTAGE DE NOS PRODUITS, CONSULTEZ UN DE NOS
REVENDEURS OU FAITES APPEL A UN TECHNICIEN QUALIFIÉ.
VEUILLEZ NOTER QUE LA FAÇON DONT LE KIT EST EMBALLE NE REPRESENTE PAS NECESSAIREMENT LA
MANIERE DE LE MONTER SUR LA MOTO.
SI DES RONDELLES EN CAOUTCHOUC SONT UTILISEES POUR MAINTENIR LES COMPOSANTS SUR LES
BOULONS,ELLES PEUVENT ETRE JETEES.
NOTICE DISPONIBLE AU TELECHARGEMENT SUR :
WWW.RG-RACING.COM

Page 10 of 24 BRG0015SS
R&G Racing
Unit 1, Shelley’s Lane, East Worldham, Alton, Hampshire, GU34 3AQ
Tel: +44 (0)1420 89007 Fax: +44 (0)1420 87301 www.rg-racing.com Email: info@rg-racing.com
OUTILS REQUIS
•Clé à cliquet + douilles 4mm et 8mm
•Clés Allen 3mm –8mm
•Pince coupante
VALEURS DE SERRAGE
M4 BOULON = 8Nm
M5 BOULON = 12Nm
M6 BOULON = 15Nm
M8 BOULON = 20Nm
M10 BOULON = 40Nm
M12 BOULON = 40Nm
LÉGENDE
ARTICLE NO.
DESCRIPTION
QTÉ
ARTICLE 1
RAD0172 GRILLE DE PROTECTION RADIATEUR
1
ARTICLE 2
CT220 220mm COLLIERS DE SERRAGE
8
ARTICLE 3
100mm BANDEAU DE MOUSSE AUTOCOLLANT
2
ARTICLE 4
M5 x 12mm BOULONS
2
ARTICLE 5
M5 RONDELLES
2
FITTING PHOTOS
Photo 1
Photo 2

Page 14 of 24 BRG0015SS
R&G Racing
Unit 1, Shelley’s Lane, East Worldham, Alton, Hampshire, GU34 3AQ
Tel: +44 (0)1420 89007 Fax: +44 (0)1420 87301 www.rg-racing.com Email: info@rg-racing.com
Photo 21
NOTICE DE MONTAGE
S'adapte à la Ducati Hypermotard 950 2019-, Monster 1200 + 821 2014-, Supersport 2017--
•Pour installer la protection radiateur sur la moto, coupez la bande de mousse fournie en morceaux
de 10 mm de large et collez-les à l'arrière du cadre de la protection du radiateur, de sorte qu'ils
reposent entre la protection radiateur et le radiateur.
•Retirez les trois boulons A / F de 4 mm sur le côté droit de la moto qui maintiennent le capot en
plastique en place à l'arrière du radiateur, comme illustré sur la (photo 1).
•Retirez le capot en plastique du radiateur, comme indiqué sur la (photo 2).
•Du côté gauche de la moto, retirez le bouchon du radiateur et tirez le couvercle en caoutchouc sur
le col du remplisseur de radiateur, comme indiqué sur les (photos 3 et 4).
•Retirez les trois boulons A / F de 4 mm qui maintiennent le capot en plastique en place à l'arrière
du radiateur, comme indiqué sur la (photo 5).
•Ce capot en plastique ne peut pas être complètement retiré de la moto, il suffit de le tirer pour
accéder aux deux boulons latéraux du radiateur, comme indiqué sur la (photo 6).
•Retirez les deux boulons des deux côtés du radiateur qui fixent le contour en plastique du radiateur
au radiateur, comme illustré sur (photos 6 et 7).
•Retirez le boulon restant qui maintient le contour du radiateur en plastique en place qui est situé
sous la poupée, comme indiqué sur (photo 8), avant de retirer le contour en plastique de la moto.
•Mettez en place la protection radiateur R&G et placez l'un des boulons d’origine à travers un trou de
montage sur le côté gauche de la moto et serrez de quelques tours sur le côté du radiateur comme
indiqué sur (photo 9). Ceci permet de maintenir la protection radiateur en place tout en installant le
contour en plastique de l'autre côté de la moto.

Page 15 of 24 BRG0015SS
R&G Racing
Unit 1, Shelley’s Lane, East Worldham, Alton, Hampshire, GU34 3AQ
Tel: +44 (0)1420 89007 Fax: +44 (0)1420 87301 www.rg-racing.com Email: info@rg-racing.com
•Du côté droit de la moto, les supports de protection du radiateur doivent s'aligner
approximativement avec les trous de montage sur le côté du radiateur. Remettez le contour du
radiateur en plastique en place en vous assurant que les supports latéraux reposent sur le dessus
des supports de protection du radiateur, avant de remonter les boulons d’origine à travers le cadre
en plastique, puis à travers les supports de protection du radiateur et serrez dans le radiateur,
comme indiqué sur (photos 10). & 11).
•Du côté gauche de la moto, retirez le boulon desserré précédemment installé, laissez le contour en
plastique reposer contre le radiateur, assurez-vous que tous les trous soient alignés et réinsérez les
deux boulons d’origine à travers le contour du radiateur, puis à travers la protection radiateur et
serrez dans le côté du radiateur, comme indiqué sur (photo 12).
•Remontez le boulon d'origine qui fixe le centre de la protection de radiateur en place sous la
poupée, avant de vérifier que la protection et l'entourage de radiateur soient correctement montés
puis serrez les cinq boulons.
•Remontez les capots en plastique du radiateur des deux côtés de la moto et serrez les trois boulons
des deux côtés.
•Remontez le couvercle en caoutchouc sur le goulot de remplissage du radiateur avant de remonter
le bouchon de remplissage du radiateur.
Montage sur Ducati Supersport 950 + S 2021- (articles 4 et 5 requis)
•Les contours ou le carénage du radiateur devront être retirés pour accéder aux trous de montage
du radiateur de chaque côté du radiateur, comme indiqué sur la (photo 15).
•Pour retirer le carénage et le contour du radiateur,
•Retirez le boulon 1 x du côté droit du radiateur comme indiqué sur la flèche (photo 19).
•Desserrez 1 x boulon comme indiqué sur la flèche (photo 20) pour permettre au support du klaxon
de pivoter.
•Retirez le boulon 1 x du côté gauche du radiateur comme indiqué sur la flèche (photo 21).
•Présentez la protection du radiateur sur le radiateur et alignez les trous de montage avec les trous
de boulons.
•Replacez les boulons d'origine ainsi que les 2 boulons et rondelles fournis (articles 4 et 5) dans les
2 points de montage inférieurs des deux côtés du radiateur comme indiqué sur (photos 20 et 21).
•Assurez-vous que les boulons de fixation soient bien serrés avant de remonter les entourages ou le
carénage de radiateur.
•Vérifiez le serrage de tous les boulons et que tous les panneaux soient sécurisés avant de rouler.
Montage sur Ducati Diavel 1260S 2019-2020
•Retirez les panneaux latéraux de clignotants selon les instructions précédentes, en coupant les
attaches de câble pour ranger le câblage des clignotants afin de libérer les panneaux, comme
indiqué sur (photo 13).

Page 16 of 24 BRG0015SS
R&G Racing
Unit 1, Shelley’s Lane, East Worldham, Alton, Hampshire, GU34 3AQ
Tel: +44 (0)1420 89007 Fax: +44 (0)1420 87301 www.rg-racing.com Email: info@rg-racing.com
•Fixez la protection radiateur au radiateur à l'aide de 4 des colliers de serrage inclus, comme illustré
sur la (photo 14).
•Reposer les panneaux latéraux et remettre en ordre le câblage des clignotants à l'aide des 4 autres
colliers de serrage.
•Vérifiez le serrage de tous les boulons et que tous les panneaux soient sécurisés avant de rouler.
ISSUE 1 –12/10/2021 (AO)
CONSUMER NOTICE
The catalogue description and any exhibition of samples are only broad indications of the Products and R&G may make design
changes which do not diminish their performance or visual appeal and supplying them in such state shall conform to the order.
The Buyer acknowledges no representation or warranty (other than as to title) has been given or will apply to the Products other
than those in R&G’s order or confirmation and the Buyer confirms it has chosen the Products as being of merchantable quality
and suitable for its particular purposes. Where R&G fits the Products or undertakes other services it shall exercise reasonable
skill and care and rectify any fault free of charge unless the workmanship has been disturbed. The Buyer is responsible for
ensuring that the warranty on the motorcycle is not affected by the fitting of the Products. On return of any defective Products
R&G shall at its option either supply a replacement or refund the purchase money but shall not be liable if the Products have
been modified or used or maintained otherwise than in accordance with R&G’s or manufacturer’s instructions and good
engineering practice or if the defect arises from accident or neglect. Other than identified above and subject to R&G not limiting
its liability for causing death and personal injury, it shall not be liable for indirect or consequential loss and otherwise its liability
shall be limited to the amounts paid by the Buyer for the Products or the fitting or service concerned. These terms do not affect
the Buyer’s statutory rights.
R&G RACING RETURNS POLICY (NON-FAULTY GOODS)
Returns must be pre-authorised (if not pre-authorised the return will be rejected). Goods may only be returned direct to us if
they were purchased direct from us (customer must prove if necessary). Otherwise to be returned to original vendor. Goods
must be in re-sellable condition, in the opinion of R&G Racing. All returns are subject to a 25% restocking and handling fee (25%
of the gross value exc. P&P –at the prevailing price at time of purchase). The customer must pay any and all carriage charges.
No returns of discontinued products, unless within 14 days of purchase. This policy does not affect your statutory rights and does
not refer to faulty goods.

Page 17 of 24 BRG0015SS
R&G Racing
Unit 1, Shelley’s Lane, East Worldham, Alton, Hampshire, GU34 3AQ
Tel: +44 (0)1420 89007 Fax: +44 (0)1420 87301 www.rg-racing.com Email: info@rg-racing.com
MONTAGEANLEITUNG FÜR BRG0015SS KÜHLERSCHUTZ
DUCATI HYPERMOTARD 950 2019-, MONSTER 1200 + 821 2014-,
SUPERSPORT 2017, SUPERSPORT 950 + S 2021-, DIAVEL 1260S 2019-2020
ALLE KIT-TEILE SIND AUF DEN NACHFOLGENDEN SEITEN ABGEBILDET UND GEKENNZEICHNET.
DIE ABGEBILDETEN TEILE DIENEN LEDIGLICH ZUR ERKLÄRUNG.
ÜBERPRÜFEN SIE ZUERST,DASS ALLE TEILE VORHANDEN SIND.
LESEN SIE DIE MONTAGEANLEITUNG KOMPLETT DURCH,BEVOR SIE ANFANGEN.
WENN SIE BEI DER MONTAGE DIESES PRODUKTES UNSICHER SIND, BITTE EINEN
UNSERER HÄNDLER KONTAKTIEREN ODER DAS KIT VON EINEM QUALIFIZIERTEN
ZWEIRAD-MECHANIKER MONTIEREN LASSEN.
DIE VERPACKUNG DER TEILE STELLT NICHT DIE REIHENFOLGE DER MONTAGE DAR.
HINWEIS FÜR KITS MIT PLASTIKUNTERLEGSCHEIBEN AN DEN SCHRAUBEN –
DIESE PLASTIK-UNTERLEGSCHEIBEN WERDEN NICHT FÜR DEN EINBAU BENÖTIGT
EINE DIGITALE VERSION DIESER MONTAGEANLEITUNG KANN AUF
FOLGENDER SEITE HERUNTERGELADEN WERDEN:
WWW.RG-RACING.COM

Page 18 of 24 BRG0015SS
R&G Racing
Unit 1, Shelley’s Lane, East Worldham, Alton, Hampshire, GU34 3AQ
Tel: +44 (0)1420 89007 Fax: +44 (0)1420 87301 www.rg-racing.com Email: info@rg-racing.com
SIE BENÖTIGEN FOLGENDES WERKZEUG
• Steckschlüsselsatz inkl. 4mm and 8mm A/F
• Satz Inbusschlüssel inkl. 3mm –8mm
• Seitenschneider
ALLGEM. ANZUGSDREHMOMENT
M4 SCHRAUBE = 8Nm
M5 SCHRAUBE = 12Nm
M6 SCHRAUBE = 15Nm
M8 SCHRAUBE = 20Nm
M10 SCHRAUBE = 40Nm
M12 SCHRAUBE = 40Nm
LIEFERUMFANG
ARTIKEL
NR.
BESCHREIBUNG
MENGE
ARTIKEL 1
RAD0172 KÜHLERSCHUTZ
1
ARTIKEL 2
CT220 220mm KABELBINDER
8
ARTIKEL 3
100mm SELBSTKLEBENDER SCHAUMSTOFF
2
ARTIKEL 4
M5 x 12mm INBUSSCHRAUBE
2
ARTIKEL 5
M5 UNTERLEGSCHEIBE
2
MONTAGE - ABBILDUNGEN
Abbildung 1
Abbildung 2
Table of contents
Other R&G Motorcycle Accessories manuals