R&G AB0036 User manual

Page 1of 27 AB0036
R&G
Unit 1, Shelley’s Lane, East Worldham, Alton, Hampshire, GU34 3AQ
Tel: +44 (0)1420 89007 Fax: +44 (0)1420 87301 www.rg-racing.com Email: info@rg-racing.com
FITTING INSTRUCTIONS FOR AB0036 ADVENTURE BARS
KTM 790 DUKE 2018-
THIS KIT CONTAINS THE ITEMS PICTURED AND LABELLED BELOW.
DO NOT PROCEED UNTIL YOU ARE SURE ALL PARTS ARE PRESENT.
Please note that the way the kit is packed does not necessarily represent the way of
mounting to the bike.
THE PARTS SHOWN MAY BE REPRESENTATIVE ONLY (FOR CLARITY OF INSTRUCTIONS ONLY).
Please note that in cases where kits are packed with rubber washers holding the
components onto the bolt – the rubber washers should be thrown away!
Digital copies of these instructions are available to download from www.rg-racing.com

Page 4of 27 AB0036
R&G
Unit 1, Shelley’s Lane, East Worldham, Alton, Hampshire, GU34 3AQ
Tel: +44 (0)1420 89007 Fax: +44 (0)1420 87301 www.rg-racing.com Email: info@rg-racing.com
Central Connector Bar - Assembly Diagram 3
LEGEND
ITEM 1 - 1 x CB071 LHS CRASH BAR
ITEM 2 - 1 x CB072 RHS CRASH BAR
ITEM 3 - 1 x M0571 CENTRAL CONNECTOR BAR
ITEM 4 - 2 x F0036 FRAME EXPANDERS
ITEM 5 - 2 x H0047 FRAME INSERT/EXPANDER NUT
ITEM 6 - 2 x S1160 (UPPER FRAME SPACERS)
ITEM 7 - 2 x M8 x 1.25 x 35mm LONG BUTTON HEAD BOLT
ITEM 8 - 2 x M8 WASHER
ITEM 9 - 2 x M10 x 1.5 x 80MM HEX HEAD (UPPER FRAME MOUNT BOLTS)
ITEM 10 - 2 x M10 OD 25MM WASHER
ITEM 11 - 2 x M6 x 20mm BUTTON HEAD BOLT (CONNECTOR BAR FASTENERS)
ITEM 12 - 4 x O-RINGS 24mm ID & 3mm THICK (2 PER F0036)
ITEM 13 - 2 x NC0001 M10 HEX RUBBER CAP
TOOLS REQUIRED
•T45 TORX TOOL.
•RATCHET AND 17MM SOCKET
•5MM ALLEN KEY
•SMALL BLADE SCREWDRIVER
•LOCTITE
MAXIMUM TORQUE SETTINGS
•M4 BOLT = 8Nm
•M5 BOLT = 12Nm
•M6 BOLT = 15Nm
•M8 BOLT = 20Nm
•M10 BOLT = 40Nm

Page 8of 27 AB0036
R&G
Unit 1, Shelley’s Lane, East Worldham, Alton, Hampshire, GU34 3AQ
Tel: +44 (0)1420 89007 Fax: +44 (0)1420 87301 www.rg-racing.com Email: info@rg-racing.com
FITTING INSTRUCTIONS
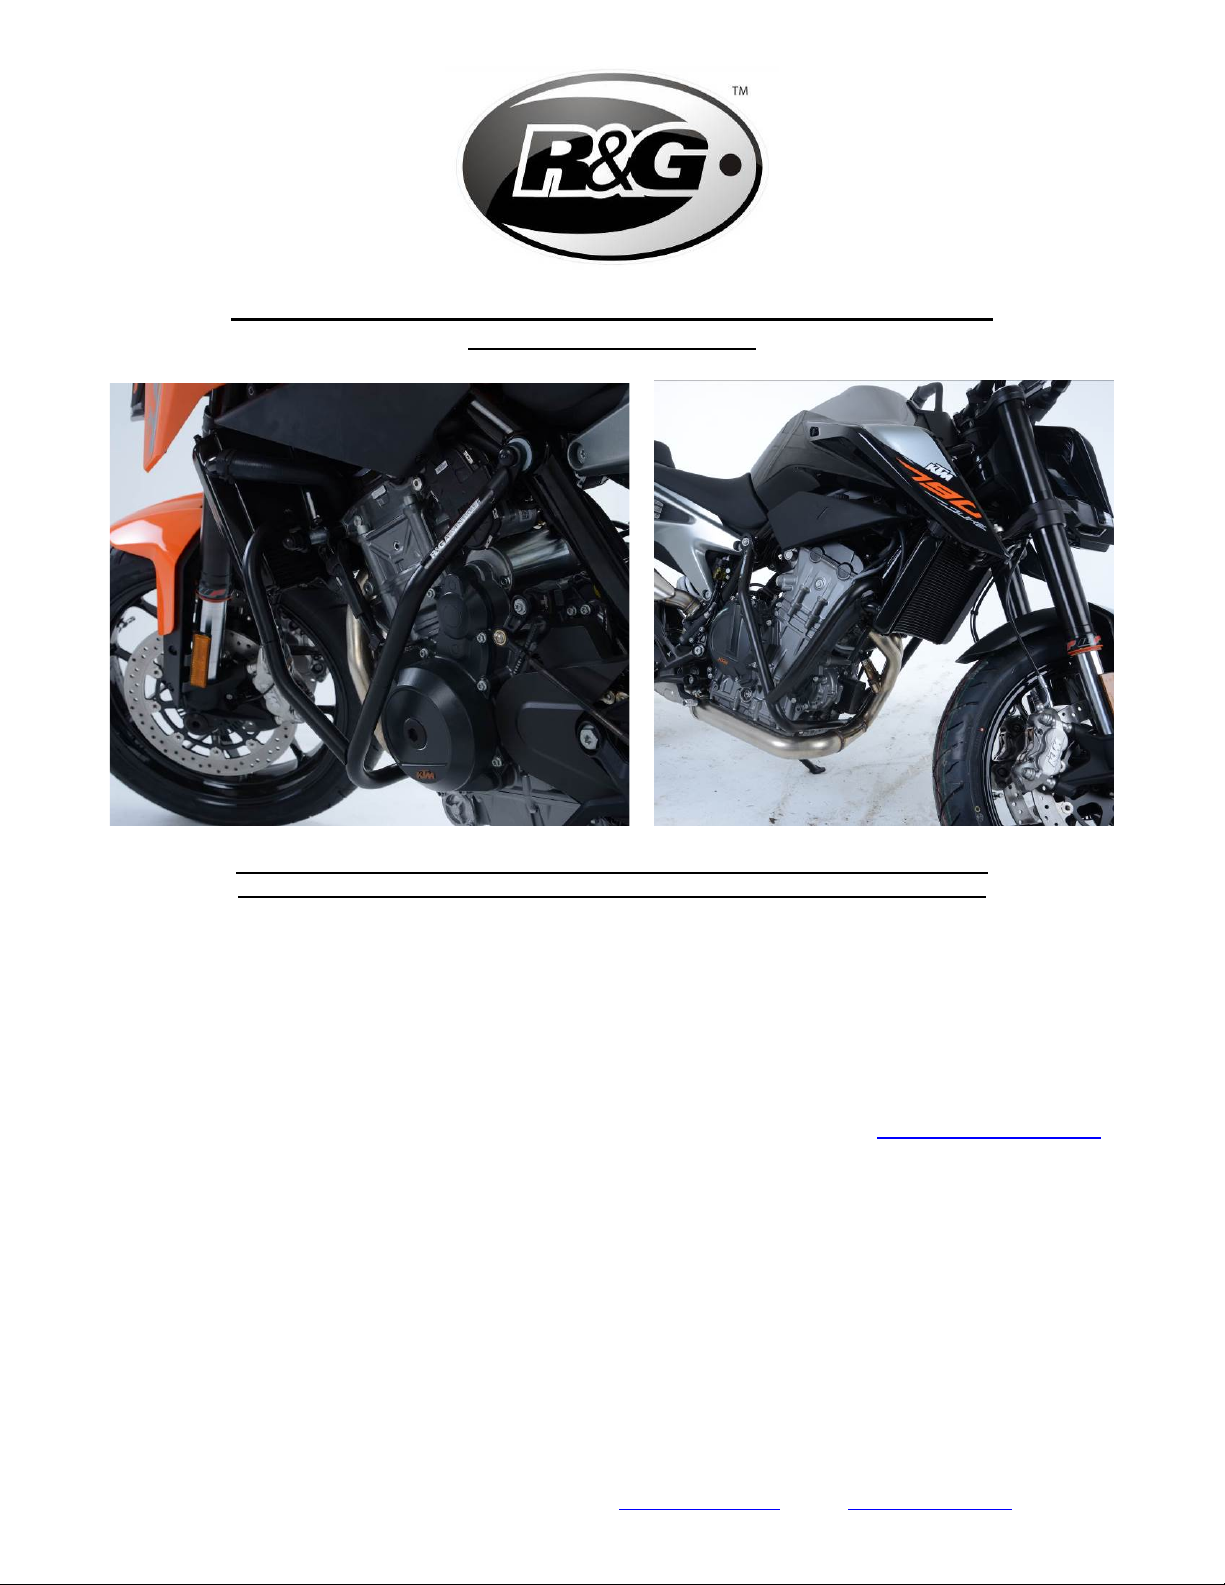
•To begin, loosely assemble both sides of the crash bar expander assembly on the rear
mount of each crash bar as seen in assembly diagrams 1 and 2 (pages 2 and 3).
•Stretch 2 ‘O’ Rings over the expanders and make sure they sit snugly in the grooves of the
expander.
•Ensure that the expander nut (Item 5) is fit securely into the recess of the expander (item
4) with the tapered face facing into the expander. Gently tighten so the expander nut grips
the insert, without enlarging the insert, this will ensure that later, when turning the bolt, it
will tighten correctly.
•Starting from the LHS of the bike, remove the cover cap from the frame below the seat, this
should pop out with a small amount of pressure from a small bladed screwdriver as seen in
picture 1.
•Remove the upper engine support Torx bolt from the frame using a T45 Torx head tool as
shown in picture 2. DO NOT REMOVE BOTH SIDES AT THE SAME TIME.
•Offer up the LHS bar assembly to the bike as shown in picture 3, ensuring the expander sits
neatly in the frame tube as seen in picture 4. Be careful to make sure the lower bar does
not contact the exhaust when fitting.
•While holding the crash bar assembly in position, pass one M10 Hex bolt (item 9) through
the M10 Washer (item 10), crash bar (item 1) and S1160 Spacer (item 6) with the larger
end facing outwards from the bike, and into the frame as shown in picture 5.
•Loosely fix the bolt to hold the bar in place but do not fully tighten this yet as adjustments
can be made to the bar position later.
•Connect the connector bar (item 3) to this assembly by passing one end between the
exhaust and engine and into the exposed end of the LHS crash bar. Rotate the bar and
secure in place using the 20mm button head (item 11) bolt as shown in picture 6. It is
recommended that you use a small amount of Loctite on the threads to secure the bolt.
•Repeat the initial steps for the RHS crash bar. When offering up the crash bar assembly
make sure to pass the end of the lower bar over the connector bar of the bike as seen in
picture 7. And secure the expander and top mounts in the same way as before using the
remaining fitting items as in picture 8.
•Insert the final M6 X 20mm button head bolt (item 11) to through the RHS engine bar and
into the central connector bar (item 3) using a small amount of Loctite as before.
•Adjust the adventure bars on the slotted mounts to give the maximum clearance available
between the engine and exhaust, as shown in picture 9. Do this for both sides and inspect
thoroughly before proceeding.
•Tighten both upper bolts to the correct torque as shown in picture 10 using your 17mm
socket.
•Ensuring the expander is fully inserted into the frame tube, carefully tighten the bolt to the
point which the insert cannot move, as shown in picture 11. The frame insert will expand
internally with the O-rings gripping the inside of the frame boss. DO NOT OVERTIGHTEN AS
THIS MAY CAUSE DAMAGE TO PAINT INSIDE THE FRAME TUBE.
•Fully tighten the lower connecter bar bolts with the specified torque using a 4mm allen key.
•Place the M10 hex rubber cap (item 13) over the head of the bolt as shown in picture 12

Page 9of 27 AB0036
R&G
Unit 1, Shelley’s Lane, East Worldham, Alton, Hampshire, GU34 3AQ
Tel: +44 (0)1420 89007 Fax: +44 (0)1420 87301 www.rg-racing.com Email: info@rg-racing.com
•At this point double check that the connector bar is secure and cannot contact the exhaust
or engine and all bolts are correctly torqued. Ride the bike and re-check the position of the
bars and bolt tightness, adjusting if necessary.
•Check all bolts regularly, e.g. when washing the bike, to ensure they remain tight and the
adventure bars remain in position.
ISSUE 1 18/02/2019 (DM)
CONSUMER NOTICE
The catalogue description and any exhibition of samples are only broad indications of the Products and R&G may make
design changes which do not diminish their performance or visual appeal and supplying them in such state shall conform to
the order. The Buyer acknowledges no representation or warranty (other than as to title) has been given or will apply to the
Products other than those in R&G’s order or confirmation and the Buyer confirms it has chosen the Products as being of
merchantable quality and suitable for its particular purposes. Where R&G fits the Products or undertakes other services it
shall exercise reasonable skill and care and rectify any fault free of charge unless the workmanship has been disturbed. The
Buyer is responsible for ensuring that the warranty on the motorcycle is not affected by the fitting of the Products. On
return of any defective Products R&G shall at its option either supply a replacement or refund the purchase money but shall
not be liable if the Products have been modified or used or maintained otherwise than in accordance with R&G’s or
manufacturer’s instructions and good engineering practice or if the defect arises from accident or neglect. Other than
identified above and subject to R&G not limiting its liability for causing death and personal injury, it shall not be liable for
indirect or consequential loss and otherwise its liability shall be limited to the amounts paid by the Buyer for the Products or
the fitting or service concerned. These terms do not affect the Buyer’s statutory rights.
R&G RETURNS POLICY (NON-FAULTY GOODS)
Returns must be pre-authorised (if not pre-authorised the return will be rejected). Goods may only be returned direct to us
if they were purchased direct from us (customer must prove if necessary). Otherwise to be returned to original vendor.
Goods must be in re-sellable condition, in the opinion of R&G. All returns are subject to a 25% restocking and handling fee
(25% of the gross value exc. P&P – at the prevailing price at time of purchase). The customer must pay any and all carriage
charges. No returns of discontinued products, unless within 14 days of purchase. This policy does not affect your statutory
rights and does not refer to faulty goods.

Page 10 of 27 AB0036
R&G
Unit 1, Shelley’s Lane, East Worldham, Alton, Hampshire, GU34 3AQ
Tel: +44 (0)1420 89007 Fax: +44 (0)1420 87301 www.rg-racing.com Email: info@rg-racing.com
NOTICE DE MONTAGE POUR AB0036 BARRES AVENTURE
KTM 790 DUKE 2018-
LE KIT CONTIENT LES ARTICLES EXPOSES CI-DESSOUS,VERIFIER QUE TOUTES LES PIECES SOIENT
PRESENTES AVANT DE PROCEDER AU MONTAGE.
LA FAÇON DONT LE KIT EST EMBALLE NE CORRESPOND PAS FORCEMENT A LA FAÇON DE MONTER LES
PIECES SUR LA MOTO.
LES PARTIES PRESENTÉES PEUVENT ETRE UNIQUEMENT REPRESENTATIVES (POUR LA CLARTÉ DES
INSTRUCTIONS UNIQUEMENT).
Notez que si les kits sont emballés avec des rondelles en caoutchouc servant à tenir les composants, ces rondelles
doivent être jetées !
Notice disponible au téléchargement sur www.rg-racing.com

Page 13 of 27 AB0036
R&G
Unit 1, Shelley’s Lane, East Worldham, Alton, Hampshire, GU34 3AQ
Tel: +44 (0)1420 89007 Fax: +44 (0)1420 87301 www.rg-racing.com Email: info@rg-racing.com
Barre de connexion centrale – Schéma d’assemblage 3
LÉGENDE
ARTICLE 1 - 1 x CB071 BARRE DE PROTECTION CÔTÉ GAUCHE
ARTICLE 2 - 1 x CB072 BARRE DE PROTECTION CÔTÉ DROIT
ARTICLE 3 - 1 x M0571 BARRE DE CONNEXION CENTRALE
ARTICLE 4 - 2 x F0036 EXPANSEURS DE CADRE
ARTICLE 5 - 2 x H0047 INSERT CADRE/ÉCROU D’EXPANSEUR
ARTICLE 6 - 2 x S1160 (ENTRETOISE DE CADRE SUPÉRIEUR)
ARTICLE 7 - 2 x M8 x 1.25 x 35mm BOULON
ARTICLE 8 - 2 x M8 RONDELLE
ARTICLE 9 - 2 x M10 x 1.5 x 80MM BOULON (BOULONS DE SUPPORT CADRE SUPÉRIEUR)
ARTICLE 10 - 2 x M10 OD 25MM RONDELLE
ARTICLE 11 - 2 x M6 x 20mm BOULON (ATTACHES DE BARRE DE CONNEXION)
ARTICLE 12 - 4 x O-BAGUES 24mm ID & 3mm D’ÉPAISSEUR (2 PAR F0036)
ARTICLE 13 - 2 x NC0001 M10 CAPUCHON EN CAOUTCHOUC
OUTILS REQUIS
•T45 OUTIL TORX.
•CLÉ À CLIQUET + DOUILLE DE 17MM
•CLÉ ALLEN 5MM
•PETIT TOURNEVIS PLAT
•COLLE LOCTITE
VALEURS DE SERRAGE RECOMMANDEES
M4 BOULON = 8Nm
M5 BOULON = 12Nm
M6 BOULON = 15Nm
M8 BOULON = 20Nm
M10 BOULON = 40Nm

Page 17 of 27 AB0036
R&G
Unit 1, Shelley’s Lane, East Worldham, Alton, Hampshire, GU34 3AQ
Tel: +44 (0)1420 89007 Fax: +44 (0)1420 87301 www.rg-racing.com Email: info@rg-racing.com
NOTICE DE MONTAGE
•Pour commencer, assemblez les 2 côtés de l’expanseur de barre de protection sur le support
arrière de chaque barre de protection, voir schémas 1 et 2 (pages 2 et 3).
•Passer les 2 bagues ‘O’ sur les expanseurs et veiller à ce qu’elles soient bien calées dans les
rainures de l’expanseur.
•Veiller à ce que l’écrou d’expanseur (article 5) soit correctement placé dans le creux de
l’expanseur (article 4) avec la face conique face à l’expanseur. Serrer légèrement de façon à
ce que l’écrou d’expanseur accroche l’insert, sans élargir l’insert. Cela permettra de serrer
correctement le boulon plus tard.
•En partant du côté gauche de la moto, enlever le cache bouchon du cadre sous le siège, il
se retirera à l’aide d’un petit tournevis plat, voir photo 1.
•Enlever le boulon Torx du support moteur supérieur du cadre en utilisant une clé Torx T45,
voir 2. NE PAS ENLEVER LES 2 CÔTÉS EN MÊME TEMPS.
•Monter l’assemblage du côté gauche de la moto, voir photo 3, en veillant à ce l’expanseur
se place correctement dans le tube de cadre, voir photo 4. Veiller à ce que la barre
inférieure ne touche par l’échappement lors du montage.
•Tout en tenant l’assemblage de protection crash en position, passer un boulon M10 (article
9) dans une rondelle M10 (article 10), la barre de crash (article 1) et l’entretoise S1160
(article 6) avec l’extrémité la plus large orientée vers l’extérieur de la moto, puis dans le
cadre, voir photo 5.
•Fixer le boulon pour tenir la barre en place mais ne pas serrer complètement pour le
moment, car des ajustements peuvent être nécessaires sur la barre un peu plus tard.
•Connecter la barre de connexion (article 3) sur cet ensemble en passant une extrémité
entre l’échappement et le moteur, puis dans l’extrémité visible de la barre de crash du côté
gauche. Tourner la barre puis fixez la en place en utilisant un boulon 20mm (article 11),
voir photo 6. Il est recommandé d’utiliser un peu de Loctite sur les filetages pour fixer le
boulon.
•Répéter les étapes précédentes pour la barre de protection crash du côté droit. Lorsque
vous installez l’assemblage de barre de protection crash, veillez à passer l’extrémité de la
barre inférieure sur la barre de connexion de la moto, voir photo 7. Ensuite, fixer
l’expanseur et les supports supérieurs de la même façon qu’auparavant, en utilisant les
articles restant, voir photo 8.
•Insérer le dernier boulon M6 X 20mm (article 11) à travers la barre moteur côté droit et
dans la barre de connexion centrale (article 3) en utilisant un peu de Loctite comme
auparavant.
•Ajuster les barres Aventure sur les supports, pour donner un maximum d’espace entre le
moteur et l’échappement, voir photo 9. Faire cela des 2 côtés puis inspectez soigneusement
avant de continuer.
•Serrer les 2 boulons supérieurs aux valeurs de serrage recommandées, voir photo 10 en
utilisant une clé à cliquet 17mm.
•Veiller à ce que l’expanseur soit complètement inséré dans le tube de cadre, serrer
délicatement le boulon jusqu’à ce que l’insert ne puisse plus bouger, voir photo 11. L’insert
de cadre s’écartera à l’intérieur avec les joints toriques accrochant l’intérieur du patron de
cadre. NE PAS TROP SERRER, CELA POURRAIT ENDOMMAGER LA PEINTURE À L’INTÉRIEUR
DU TUBE DE CADRE.

Page 18 of 27 AB0036
R&G
Unit 1, Shelley’s Lane, East Worldham, Alton, Hampshire, GU34 3AQ
Tel: +44 (0)1420 89007 Fax: +44 (0)1420 87301 www.rg-racing.com Email: info@rg-racing.com
•Serrer complètement les boulons de barre de connexion inférieur, aux valeurs de serrage
recommandées, en utilisant une clé Allen 4mm.
•Placer le bouchon en caoutchouc M10 (article 13) sur la tête du boulon, voir photo 12.
•A ce stade, vérifiez par 2 fois que la barre de connexion soit fixée et ne puisse pas toucher
l’échappement ou le moteur, et que les boulons soient correctement serrés. Faites un tour
avec la moto, puis revérifiez la position des barres et le serrage du boulon, puis ajustez si
nécessaire.
•Vérifiez régulièrement le serrage des boulons<, lors du nettoyage de la moto par exemple,
pour veiller à ce qu’ils restent correctement serrés, et que les Barres Aventure restent en
position.
ISSUE 1 18/02/2019 (DM)
CONSUMER NOTICE
The catalogue description and any exhibition of samples are only broad indications of the Products and R&G may make
design changes which do not diminish their performance or visual appeal and supplying them in such state shall conform to
the order. The Buyer acknowledges no representation or warranty (other than as to title) has been given or will apply to the
Products other than those in R&G’s order or confirmation and the Buyer confirms it has chosen the Products as being of
merchantable quality and suitable for its particular purposes. Where R&G fits the Products or undertakes other services it
shall exercise reasonable skill and care and rectify any fault free of charge unless the workmanship has been disturbed. The
Buyer is responsible for ensuring that the warranty on the motorcycle is not affected by the fitting of the Products. On
return of any defective Products R&G shall at its option either supply a replacement or refund the purchase money but shall
not be liable if the Products have been modified or used or maintained otherwise than in accordance with R&G’s or
manufacturer’s instructions and good engineering practice or if the defect arises from accident or neglect. Other than
identified above and subject to R&G not limiting its liability for causing death and personal injury, it shall not be liable for
indirect or consequential loss and otherwise its liability shall be limited to the amounts paid by the Buyer for the Products or
the fitting or service concerned. These terms do not affect the Buyer’s statutory rights.
R&G RETURNS POLICY (NON-FAULTY GOODS)
Returns must be pre-authorised (if not pre-authorised the return will be rejected). Goods may only be returned direct to us
if they were purchased direct from us (customer must prove if necessary). Otherwise to be returned to original vendor.
Goods must be in re-sellable condition, in the opinion of R&G. All returns are subject to a 25% restocking and handling fee
(25% of the gross value exc. P&P – at the prevailing price at time of purchase). The customer must pay any and all carriage
charges. No returns of discontinued products, unless within 14 days of purchase. This policy does not affect your statutory
rights and does not refer to faulty goods.

Page 19 of 27 AB0036
R&G
Unit 1, Shelley’s Lane, East Worldham, Alton, Hampshire, GU34 3AQ
Tel: +44 (0)1420 89007 Fax: +44 (0)1420 87301 www.rg-racing.com Email: info@rg-racing.com
MONTAGEANLEITUNG FÜR AB0036 ADVENTURE STURZBÜGEL
KTM 790 DUKE 2018-
ALLE TEILE SIND UNTEN ABGEBILDET UND GEKENNZEICHNET. BEVOR SIE MIT DER
MONTAGE BEGINNEN, ÜBERPRÜFEN SIE, DASS ALLE TEILE VORHANDEN SIND.
Hinweis: Die Verpackung der Teile stellt nicht die Reihenfolge der Montage dar.
DIE UNTEN ABGEBILDETEN TEILE DIENEN LEDIGLICH ZUR ERKLÄRUNG
Hinweis für Kits mit Plastikunterlegscheiben an den Schrauben – Diese
Plastikunterlegscheiben werden nicht für den Einbau benötigt!
Eine digitale Version dieser Montageanleitung kann auf folgender Seite heruntergeladen
werden: www.rg-racing.com
Table of contents
Other R&G Motorcycle Accessories manuals
Popular Motorcycle Accessories manuals by other brands

hepco & becker
hepco & becker Easyrack 6614536 01 05 manual

Kuryakyn
Kuryakyn MOMENTUM RAMBLER ROLL BAG quick start guide

hepco & becker
hepco & becker 6504547 00 05 Mounting instructions

Dynojet
Dynojet POWER COMMANDER III installation instructions

KTM
KTM 600.07.213.050 Mounting instructions

Trail Tech
Trail Tech ENDURANCE II quick start guide