Rath SmartPhone VI User manual

SmartPhone VI Detailed Programming
Installation & Operations Manual
N56W24720 N. Corporate Circle Sussex, WI 53089
800-451-1460 www.rathcommunications.com
RP8500SPEXP
Ver. 1
09/19
Made in the USA
3 Year Warranty

Thank you for purchasing a RATH®SmartPhone VI. We are the largest Emergency Communication
Manufacturer in North America and have been in business for over 35 years.
We take great pride in our products, service, and support. Our Emergency Products are of the highest
quality. Our experienced customer support teams are available to remotely assist with site preparation,
installation, and maintenance. It is our sincere hope that your experience with us has and will continue
to surpass your expectations.
Thank you for your business,
®
N56W24720 N. Corporate Circle Sussex, WI 53089
800-451-1460 www.rathcommunications.com
Table of Contents
Getting Started . . . . . . . . . . . . . . . . . . . . . . . . . . . . . .
Quick Set-Up . . . . . . . . . . . . . . . . . . . . . . . . . . . . . . . .
Detailed Programming . . . . . . . . . . . . . . . . . . . . . . . .
Consolidator Mode Programming . . . . . . . . . . . . . .
Volume Adjustment . . . . . . . . . . . . . . . . . . . . . . . . . .
Annunciator Board & 24v LED/Button . . . . . . . . . . .
Troubleshooting . . . . . . . . . . . . . . . . . . . . . . . . . . . . .
System Requirements . . . . . . . . . . . . . . . . . . . . . . . .
Page 3
Page 3
Page 4
Page 7
Page 7
Page 8
Page 8
Page 9

Carefully open the shipping box and remove contents. Inspect the phones for damage. If there is any damage, call
800-451-1460 immediately to arrange corrective action.
Page 3
SPEAKER
MICROPHONE
TELEPHONE
LINE
SYSTEM
ACTIVATION
RELAY
COMMUNICATION
FAILURE RELAY
LED
PUSH
BUTTON
BATTERY
EXTERNAL
POWER
PROGRAMMING
KEYPAD
Line Connection:
Connect a dedicated phone line to the RJ11 jack on the side of the SmartPhone board labeled TEL LINE using one
of the following recommended methods:
1. Crimp phone line on to a standard RJ11 jack and plug into LINE input on SmartPhone
2. Connect phone line to a female RJ11 jack and use a standard phone line cord to connect the female jack to
the LINE input on the SmartPhone
3. Connect incoming 2 or 4 wire phone line to biscuit jack (not included) terminal jacks and then the RATH® mod to
mod phone harnesses in the RJ11 jack on the phone and on the biscuit jack
RATH® phones use the center pins of the RJ11 (red and green) for the outside phone line. The phone is not polarity
sensitive. Do not cut end off phone line cord and splice phone line directly on to the line cord. If using with a
SmartRescue, also wire up to pins 1 and 4 (yellow and black) for the intercom pair.
It is recommended that the wiring used inside the traveling cable or horizontal cabling is a 20-22 AWG twisted
shielded pair with the shield grounded at the elevator controller end only. This will help reduce or eliminate
possible interference.
Power Connection:
Using the supplied wiring harness, connect 12vac/vdc or 24vac/vdc to the input power connector on the SmartPhone
board. The SmartPhone is labeled with the input power connector indicating if the board is a 12v or 24v model. The
SmartPhone is not polarity sensitive.
Note: Some elevator manufacturers may have power alternately wired. Follow their guidelines for connecting power
to the SmartPhone.
Plug the backup battery into the white BATTERY connector on the SmartPhone board.
Getting Started
Quick Set-Up
There are two ways to program the a RATH® SmartPhone. You can either program locally using the onboard keypad
or remotely by calling into the phone number that the SmartPhone is installed on (a landline is recommended for
remote programming). Local programming is preferred.

Page 4
Quick Set-Up from Onboard Keypad:
1. Program Number
a. Press ENTER
b. Press 1, ENTER, the number you want the
phone to dial, STOP
2. Program Message
a. Press 1, 3, Enter, 2 for message to play
twice
b. Press 6, RECORD, after the “beep” speak
message, press STOP when nished
3. Press 6, PLAY/PAUSE, message will
playback
4. Press and hold STOP for 3 seconds to exit
programming
Quick Set-Up using Remote Programming:
1. Program Number
a. Call the phone number that the SmartPhone is installed on
b. After the rst simulated ring, press #, # and wait for a
conrmation tone
c. Key in the security code (default is 1, 1, 1, 1) and wait for
a conrmation tone
d. Press 1, *, (phone number), *, # and wait for a
conrmation tone
2. Program Message
a. Press 1, 3, *, 2 for message to play twice and wait for a
conrmation tone
b. Press 6, *, after the “beep” speak location message, press
# and wait for a conrmation tone
3. Press 6, # to play message back
4. Press *, # , 0 to exit programming and wait for a conrmation
tone
5. Press *, # to hang up the phone
Programming Primary Phone Number
using Onboard Keypad:
1. Press ENTER on the keypad to begin
programming
2. Press 1, ENTER, the number you want the
phone to dial, STOP
3. Press and hold STOP for 3 seconds to
exit programming
Note: In situations where a delay is needed,
such as needing an 8 or 9 to dial out, use the
PLAY/PAUSE button on the keypad. The button
can be pressed multiple times for a longer delay.
One PAUSE = 1 second.
Programming Secondary Phone
Numbers using Onboard Keypad:
1. Press ENTER on the keypad to begin
programming
2. Press 2, ENTER, the number you want the
phone to dial, STOP
Note: SmartPhones can call up to 5 numbers.
Repeat the steps above for subsequent
numbers. Substitute 2 with 3, 4, or 5 depending
on the order you want the numbers to be dialed.
Example: For the third number to be dialed,
it would be 3, ENTER, phone number, STOP.
3. Press and hold STOP for 3 seconds to exit
programming
Detailed Programming
Programming Primary Phone Number using Remote
Programming:
1. Call the phone number that the SmartPhone is installed on
2. After the rst simulated ring, press #, # and wait for a
conrmation tone
3. Key in the security code (default is 1, 1, 1, 1) and wait for a
conrmation tone
4. Press 1, *, (phone number),* , # and wait for a conrmation
tone
5. Press *, #, 0 to exit programming and wait for conrmation tone
6. Press *, # to hang up the phone
Note: In situations where a delay is needed, such as needing an
8 or 9 to dial out, use #, * for a pause. #, * can be pressed
multiple times for a longer delay. One PAUSE = 1 second.
Programming Secondary Phone Numbers using Remote
Programming:
1. Call the phone number that the SmartPhone is installed on
2. After the rst simulated ring, press #, # and wait for a
conrmation tone
3. Key in the security code (default is 1, 1, 1, 1) and wait for a
conrmation tone
4. Press 2, *, (phone number), *, # and wait for a conrmation tone
Note: SmartPhones can call up to 5 numbers. Repeat the steps
above for subsequent numbers. Substitute 2 with 3, 4, or 5
depending on the order you want the numbers to be dialed.
Example: For the third number to be dialed, it would be 3, *,
phone number, *, #.
5. Press *, #, 0 to exit programming and wait for a conrmation tone
6. Press *, # to hang up the phone

Page 5
Programming for Ring Down Phone Lines using
Onboard Keypad:
In Ring Down Mode, the phone will not dial any
programmed numbers. The phone will go off-hook
and the phone line itself will connect to a monitoring
location. Programming phone to Ring Down Mode
will automatically set the Talk Time to 3 minutes.
1. Press ENTER on the keypad to begin programming
2. Press 1, 9, ENTER, 2
3. Press and hold STOP for 3 seconds to exit
programming
Note: If the phone is inadvertently put into Ring Down
Mode, press 1, 9, ENTER, 1 while in programming to
put the phone back into Standard Mode.
Programming Location Message using Onboard
Keypad:
SmartPhones can play a location message when the
call is answered. This feature is used when the phone
is calling a phone number that cannot identify where
the call is coming from by caller ID or needs more
location information than caller ID can provide. This
feature is turned on by default. Perform the steps
below to program the location message feature.
1. Press ENTER to begin programming
2. Press 1, 3, ENTER, (1, 2, or 3) (1 will play
message once, 2 will play twice, 3 will play
message on a loop until operator presses *)
3. Press 6, RECORD, wait for the “beep”, speak
location message, STOP
4. Press 6, PLAY/PAUSE to play message back
5. Press and hold STOP for 3 seconds to exit
programming
To turn location message off, press ENTER, 1, 3,
ENTER, 0, press and hold STOP for 3 seconds.
Note: Party can replay message by pressing *, *.
Programming for Ring Down Phone Lines using
Remote Programming:
1. Call the phone number that the SmartPhone is
installed on
2. After the rst simulated ring, press #, # and wait for a
conrmation tone
3. Key in the security code (default is 1, 1, 1, 1) and
wait for a conrmation tone
4. Press 1, 9, *, 2 and wait for a conrmation tone
5. Press *, #, 0 to exit programming and wait for a
conrmation tone
6. Press *, # to hang up the phone
Note: If the phone is inadvertently put into Ring Down Mode,
press 1, 9, *, 1 while in programming to put the phone back
into Standard Mode.
Programming Location Message using Remote
Programming:
1. Call the phone number that the SmartPhone is
installed on
2. After the rst simulated ring, press #, # and wait for a
conrmation tone
3. Key in the security code (default is 1, 1, 1, 1) and
wait for a conrmation tone
4. Press 1, 3, *, (1, 2, or 3) and wait for a
conrmation tone (1 will play message once, 2
will play message twice, 3 will play message on a
loop until operator presses *)
5. Press 6 , *, wait for the “beep”, speak location
message, #
6. Press 6, # to play message back
7. Press *, #, 0 to exit programming and wait for a
conrmation tone
8. Press *, # to hang up the phone
To turn off location message, press 1, 3, *, 0 while in
programming.
Note: Party can replay the message by pressing *, *.
Programming Phone Line Check:
SmartPhones have a built-in phone line check. When the phone detects either a loss of dial tone or operating voltage,
the line relay labeled “ALARM” on the phone will go from open to closed. This feature is turned on by default and set
to check the phone line every 10 minutes.
Note: If the phone is installed on a Ring Down style phone line, it may cause “ghost dials” due to the phone going off
hook to check the line. Please use one of the following options to modify this feature.

Change Frequency of Phone Line Check using
Onboard Keypad:
1. Press ENTER to begin programming
2. Press 3, 4, ENTER, 4 digit number in HH:MM
Example: 0020 = 20 minutes, 2300 = 23 hours
Note: The longest line check is once every 23
hours. The shortest is every 10 mins.
3. Press and hold STOP for 3 seconds to exit
programming
Turn Phone Line Check OFF using Onboard
Keypad:
1. Press ENTER to begin programming
2. Press 2, 3, ENTER, 3 (conrmation tone)
3. Press 2, 3, ENTER, 7, 2, 8, 4 (conrmation tone)
4. Press 1, 1, ENTER 2 (conrmation tone)
5. Press and hold STOP for 3 seconds
Note: If the phone line check is turned off on the
phone, the ALARM relay automatically turns off
and stays normally closed. If Communication
Failure is being used, the alarm and LED will
always be activated.
Turn Phone Line Check ON using Onboard
Keypad:
1. Press ENTER to begin programming
2. Press 2, 3, ENTER, 3 (conrmation tone)
3. Press 2, 3, ENTER, 7, 2, 8, 4 (conrmation tone)
4. Press 1, 1, ENTER, 1 (conrmation tone)
5. Press and hold STOP for 3 seconds
Change Frequency of Phone Line Check using
Remote Programming:
1. Call the phone number that the SmartPhone is installed on
2. After the rst simulated ring, press #, # and wait for a
conrmation tone
3. Key in the security code (default is 1, 1, 1, 1) and wait
for a conrmation tone
4. Press 3, 4, *, 4 digit number in HH:MM
Example: 0020 = 20 minutes, 2259 = 22 hours, 59 mins
Note: The longest line check can be set remotely is once
every 22 hours and 59 mins. The shortest is every 10 mins.
5. Press *, #, 0 to exit programming and wait for a
conrmation tone
6. Press *, # to hang up the phone
Turn Phone Line Check OFF using Remote Programming:
1. Call the phone number that the SmartPhone is installed on
2. After the rst simulated ring, press #, # and wait for a
conrmation tone
3. Key in the security code (default is 1, 1, 1, 1) and wait
for a conrmation tone
4. Press 2, 3, *, 3 and wait for a conrmation tone
5. Press 2, 3, *, 7, 2, 8, 4 and wait for a conrmation tone
6. Press 1, 1, *, 2 and wait for a conrmation tone
7. Press *, #, 0 to exit programming and wait for a
conrmation tone
8. Press *, # to hang up the phone
Turn Phone Line Check ON using Remote Programming:
1. Call the phone number that the SmartPhone is installed on
2. After the rst simulated ring, press #, # and wait for
a conrmation tone
3. Key in the security code (default is 1, 1, 1, 1) and wait
for a conrmation tone
4. Press 2, 3, *, 3 and wait for a conrmation tone
5. Press 2, 3, *, 7, 2, 8, 4 and wait for a conrmation tone
6. Press 1, 1, *, 1 and wait for a conrmation tone
7. Press *, #, 0 to exit programming and wait for a
conrmation tone
8. Press *, # to hang up the phone
Page 6
Reset:
SmartPhones can be reset by performing the following steps:
1. Press ENTER to begin programming
2. Press 2, 3, ENTER, 3 (conrmation tone)
3. Press 2, 3, ENTER, 7, 2, 8, 4 (conrmation tone)
4. Press 2, 0, ENTER, 1 (conrmation tone)
5. Press 1, 9, ENTER, 1 (conrmation tone)
6. Press and hold STOP for 3 seconds
Note: Reset will not clear any programmed numbers or messages.

Page 7
Change Frequency of Phone Line Check using
Remote Programming:
1. Call the phone number that the SmartPhone is installed on
2. After the rst simulated ring, press #, # and wait for a
conrmation tone
3. Key in the security code (default is 1, 1, 1, 1) and wait
for a conrmation tone
4. Press 3, 4, *, 4 digit number in HH:MM
Example: 0020 = 20 minutes, 2259 = 22 hours, 59 mins
Note: The longest line check can be set remotely is once
every 22 hours and 59 mins. The shortest is every 10 mins.
5. Press *, #, 0 to exit programming and wait for a
conrmation tone
6. Press *, # to hang up the phone
Turn Phone Line Check OFF using Remote Programming:
1. Call the phone number that the SmartPhone is installed on
2. After the rst simulated ring, press #, # and wait for a
conrmation tone
3. Key in the security code (default is 1, 1, 1, 1) and wait
for a conrmation tone
4. Press 2, 3, *, 3 and wait for a conrmation tone
5. Press 2, 3, *, 7, 2, 8, 4 and wait for a conrmation tone
6. Press 1, 1, *, 2 and wait for a conrmation tone
7. Press *, #, 0 to exit programming and wait for a
conrmation tone
8. Press *, # to hang up the phone
Turn Phone Line Check ON using Remote Programming:
1. Call the phone number that the SmartPhone is installed on
2. After the rst simulated ring, press #, # and wait for
a conrmation tone
3. Key in the security code (default is 1, 1, 1, 1) and wait
for a conrmation tone
4. Press 2, 3, *, 3 and wait for a conrmation tone
5. Press 2, 3, *, 7, 2, 8, 4 and wait for a conrmation tone
6. Press 1, 1, *, 1 and wait for a conrmation tone
7. Press *, #, 0 to exit programming and wait for a
conrmation tone
8. Press *, # to hang up the phone
Consolidator Mode:
SmartPhones have a built-in Consolidator Feature that allows up to 10 phones to be installed on a single phone
line. If multiple SmartPhones are sharing a single phone line, Consolidator Mode must be programmed on the
phones so the monitoring location can toggle between them from an outside call. This feature can only be
programmed locally using the onboard keypad.
1. Press ENTER to begin programming
2. Press 7, ENTER
3. Press *, 1-5 for corresponding elevator 1-5 (Car 1 = *, 1, Car 2 = *, 2, etc.)
4. Press 7, ENTER
5. Press #, 1-5 for corresponding elevator 6-10 (Car 6 = #, 1, Car 7 = #, 2, etc.)
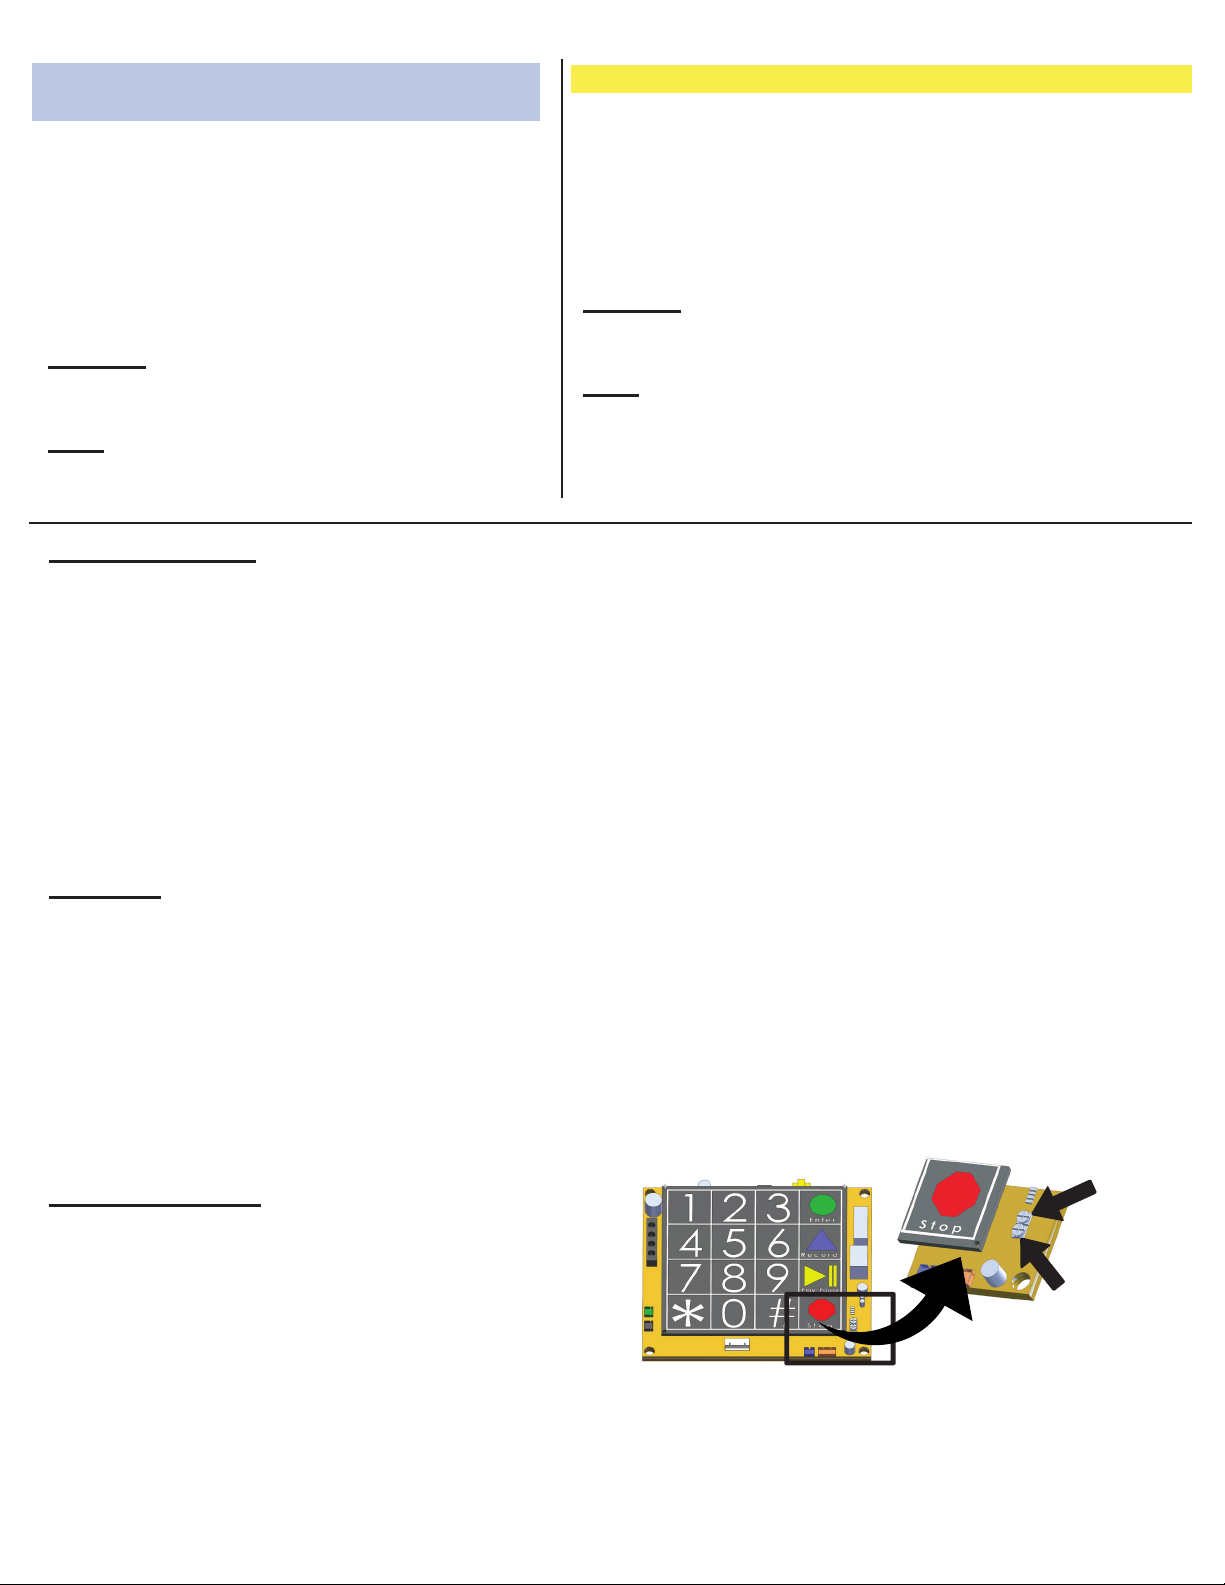
6. Press and hold STOP for 3 seconds to exit programming
Operation:
1. Dial the phone number connected to the SmartPhones and all phones will answer
2. Once all phones answer, individual calls can be selected by pressing one of the following:
*, 1 (Phone 1) #, 1 (Phone 6)
*, 2 (Phone 2) #, 2 (Phone 7)
*, 3 (Phone 3) #, 3 (Phone 8)
*, 4 (Phone 4) #, 4 (Phone 9)
*, 5 (Phone 5) #, 5 (Phone 10)
*, 0 (All Cars)
3. Press *, # to hang up all calls
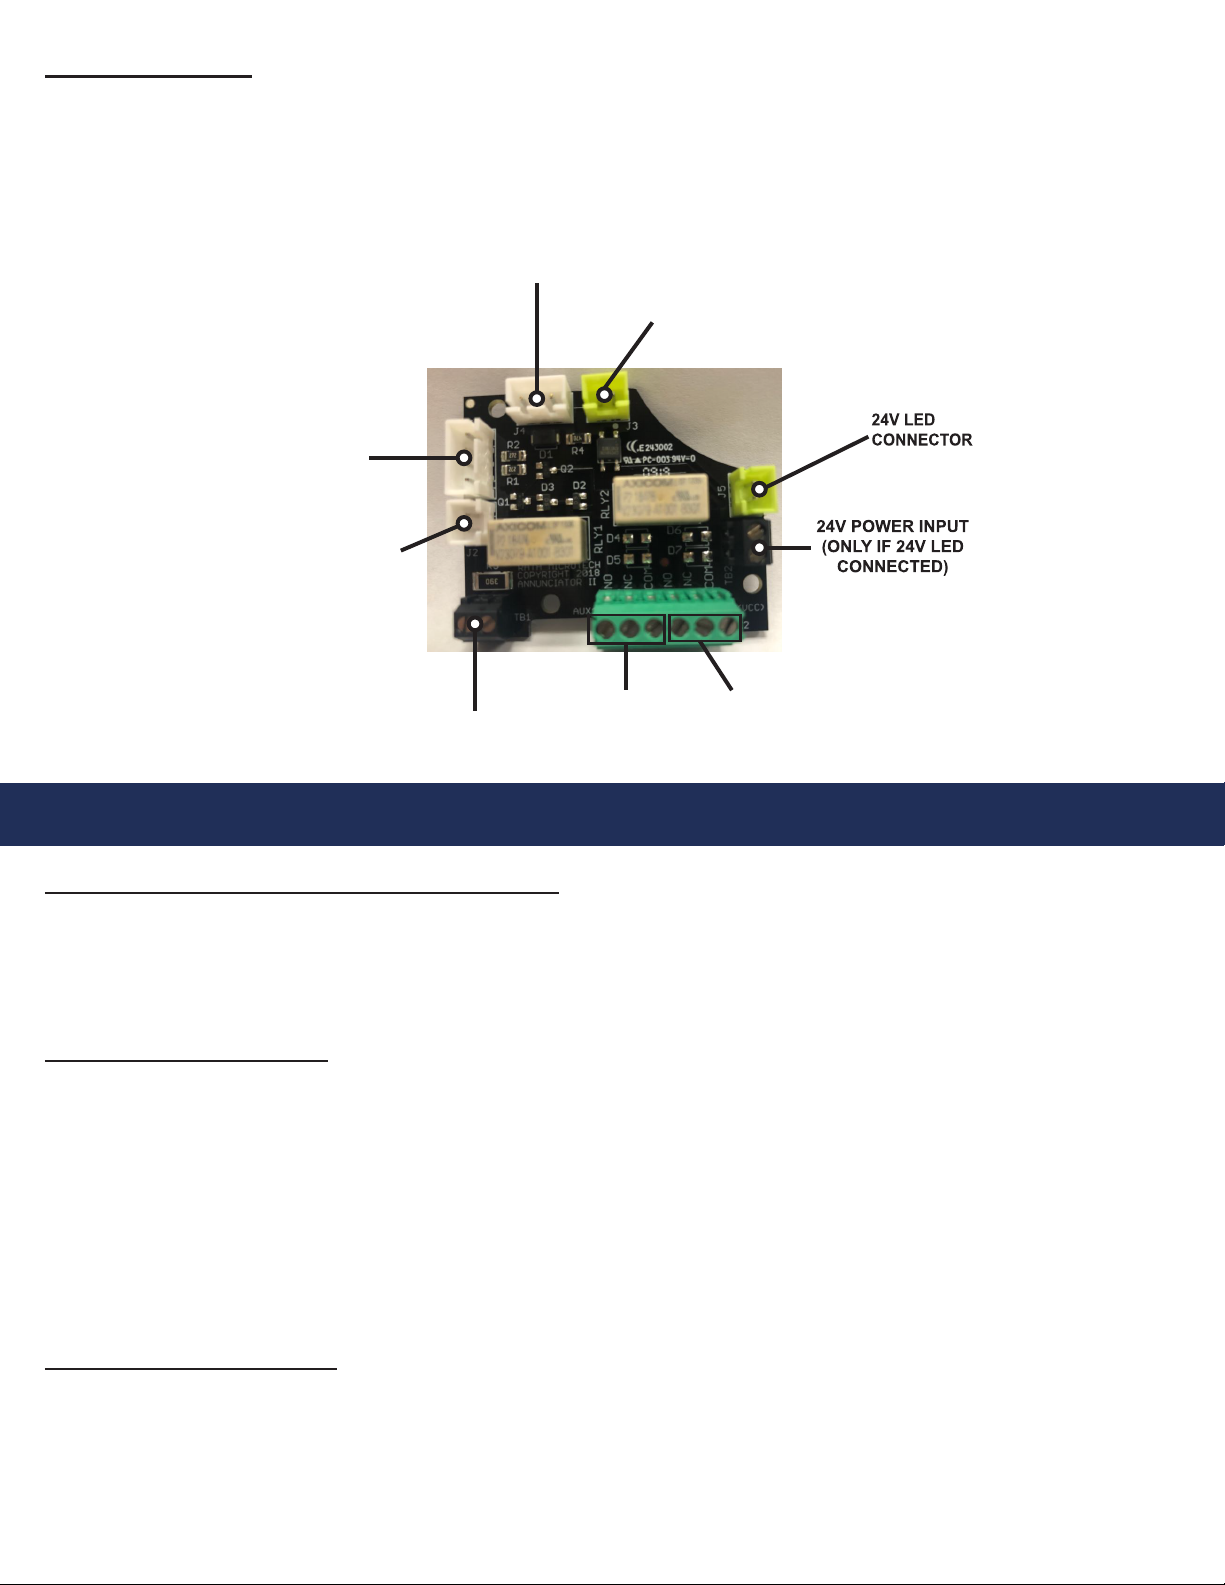
Volume Adjustment:
Adjusting the Speaker
If the voice of the person you call is not loud enough in
the phone speaker, increase the volume by adjusting VR1
clockwise (requires a small Phillips screwdriver). If volume
is too loud, speaker can be turned down by adjusting VR1
counterclockwise.
Adjusting the Microphone
If the person you are calling reports your voice is not loud enough, increase the Microphone Sensitivity by adjusting
VR2 clockwise (requires a small Phillips screwdriver). Microphone can be turned down by adjusting VR2
counterclockwise.
Programming Talk Timer using Onboard
Keypad:
“Talk Time” is the amount of time that two-way
communication will occur after a call is answered.
When Talk Time is about to expire, the phone will
prompt the called party to press “0” to extend the
time for 3 more minutes. The default Talk Time is
5 minutes.
1. Press ENTER to begin programming
2. Press 8, ENTER, 3 digit number in minutes
Example: 3 minutes = 003, 20 minutes = 020
3. Press and hold STOP for 3 seconds to exit
programming
Note: The shortest Talk Time can be is 1 minute.
The longest is 999 minutes.
Programming Talk Timer using Remote Programming:
1. Call the phone number that SmartPhone is installed on
2. After the rst simulated ring, press #, # and wait for a
conrmation tone
3. Key in the security code (default is 1, 1, 1, 1) and wait
for a conrmation tone
4. Press 8, *, 3 digit number in minutes and wait for a
conrmation tone
Example: 3 minutes = 003, 20 minutes = 020
5. Press *, #, 0 to exit programming and wait for a conrmation
tone
Note: The shortest Talk Time can be is 1 minute. The longest
is 999 minutes.
Volume Adjust VR1
Mic Sensitivity VR2
RATH® SmartPhone

Page 8
Troubleshooting
SmartPhone is dead. It won’t call out or program:
• Verify external power on the red connector plugged into the SmartPhone board. 24v boards must have 24v and 12v
boards must have 12v. See the “System Requirements” section for voltage thresholds.
• Verify phone line connected to the SmartPhone is not shorted out. If SmartPhone is stuck off-hook it will not operate
properly.
SmartPhone won’t call out:
• Verify voltage and dial tone on the phone line. Phone lines can have voltage but no dial tone. The SmartPhone
must have a dial tone or a valid ring down circuit to call out properly.
• Remove the push button from the black “SWITCH” connector on the circuit board. Use a small piece of wire or
small screwdriver to short 2 pins inside of the connector on the circuit board. If the phone calls out after shorting the
pins, there is a problem with the push button.
• Double check the number being programmed into the SmartPhone. Verify the phone line doesn’t require an access
digit such as an 8 or 9 to dial out or have any line restrictions like a long distance or toll restriction.
• Verify the phone line going into the SmartPhone is dedicated. SmartPhones cannot share a phone line with
anything other than another SmartPhone.
SmartPhone won’t hang up:
• SmartPhones require either a CPC or open-loop disconnect signal provided by the phone line to properly
disconnect. This is a setting on the phone line that the phone provider should be able to supply.
• Before the receiving party hangs up the call, they can press *, # to disconnect the SmartPhone.
• Shorten the “Talk Time” on the phone. This will not make the phone hang up instantly, but it will decrease the
amount of time the phone will stay off hook. See the “Detailed Programming” section for programming steps.
Annunciator Board:
The Annunciator Board is a supplementary board included with some SmartPhone models. There is no programming
needed. The Annunciator Board is used to:
1. Play an external audio source through the SmartPhone speaker
2. Drive a 24v LED or lighted push button
3. Provide additional system activation relays
24v LED
CONNECTOR
24v INPUT (ONLY
IF 24V LED
CONNECTED)
AUDIO
ANNUNCIATOR
INPUT
SPEAKER
JUMPER TO LED
CONNECTOR ON
SMARTPHONE
(ONLY IF USING
24V LED)
JUMPER TO SPEAKER
CONNECTOR ON
SMARTPHONE
JUMPER TO
PWB PORT ON
SMARTPHONE
EXTERNAL
RELAY 1
EXTERNAL
RELAY 2

Page 9
SmartPhone hangs up after the call is answered:
• SmartPhone may be in the wrong mode. Verify the phone is in Standard Mode. See the “Reset” section to reset
the phones.
• There may be excessive noise on the phone line. Connect an analog phone to the line and place a call. After
placing a call, listen for any interference (buzzing, humming, etc.). If interference is heard, the phone line must be
cleaned up.
• Verify the phone line going into the SmartPhone is dedicated. SmartPhones cannot share a phone line with
anything other than another SmartPhone.
SmartPhone doesn’t operate when the external elevator power is killed:
• Verify that the backup battery has at least 7.3vdc on it. When batteries are fully charged, they will have up to 9.2vdc.
• Check “Replace By” date on the sticker wrapped around the battery cord. Batteries should be replaced every 3 years.
SmartPhone has poor two-way communication:
• Speaker and mic may be turned up too high. Adjust VR1 and VR2 on the board counterclockwise to decrease.
• Speaker may not be aligned with the holes on the panel. Verify speaker is mounted so it lines up with the panel.
• Microphone may not be aligned with the holes on the panel. Verify microphone is mounted so that it lines up with
the panel. If using a SmartPhone where the microphone is mounted in a mounting bracket below the board, pull
microphone out so it doesn’t sit as far into the mounting bracket.
• Verify nothing is blocking or covering the holes on the panel.
SmartPhone starts buzzing as soon as input power is connected:
• Backup battery needs to be connected.
• Wrong input power is connected to the board. 24v boards will buzz when 12v is connected, 12v boards will buzz
when 24v is connected.
• Speaker and microphone may be feeding back into one another. VR1 and VR2 may need to be adjusted down.
See “Volume Adjustment” section for location of VR1 and VR2.
SmartPhone keeps “ghost dialing” the monitoring location:
• Phone may be installed on a Ring Down style phone line and the Line Check on the phone is turned on. See
“Detailed Programming” section to modify this feature.
• Call wasn’t hung up properly. Verify that the operator is pressing *, # when the call is complete or that there is a
disconnect signal on the phone line.
• Another device is sharing the phone line with the SmartPhone.
• The button connected to the phone may be shorted or wired incorrectly.
If you have any questions regarding installation or operation, call RATH® Technical Support at 800-451-1460,
7:30am-4:00pm CST, Monday-Friday.
TELCO Voltage: 23-27vdc on a PBX LINE or 48-52vdc on an analog/digital line with at least 25mA of line current
and valid dial tone or ring down circuit. Line must be dedicated for the SmartPhone.
EXTERNAL Voltage: 10.7-13.2vdc/vac for 12v boards or 22.2-27.5vdc/vac for 24v board isolated from earth ground.
System Requirements
Other manuals for SmartPhone VI
3
Table of contents
Other Rath Conference System manuals

Rath
Rath Command Center User manual

Rath
Rath Command Center User manual

Rath
Rath Janus SmartView Visual User manual

Rath
Rath Refuge Command Center User manual

Rath
Rath 2500 SPRVSR Series User manual

Rath
Rath Command Center User manual

Rath
Rath JANUS SmartView User manual

Rath
Rath Command Center User manual
Popular Conference System manuals by other brands

Paso
Paso PM2023-B Instructions for use

INIM Electronics
INIM Electronics SmartLink-P Installation and programming manual

LS ELECTRIC
LS ELECTRIC SV-iS7 Series user manual

Surefire
Surefire EarPro EA10-UAC-ST user manual

Power Dynamics
Power Dynamics TG40T instruction manual

Siemens
Siemens HiPath 3000 V3.0 or later Gigaset M1... user manual