DONNING
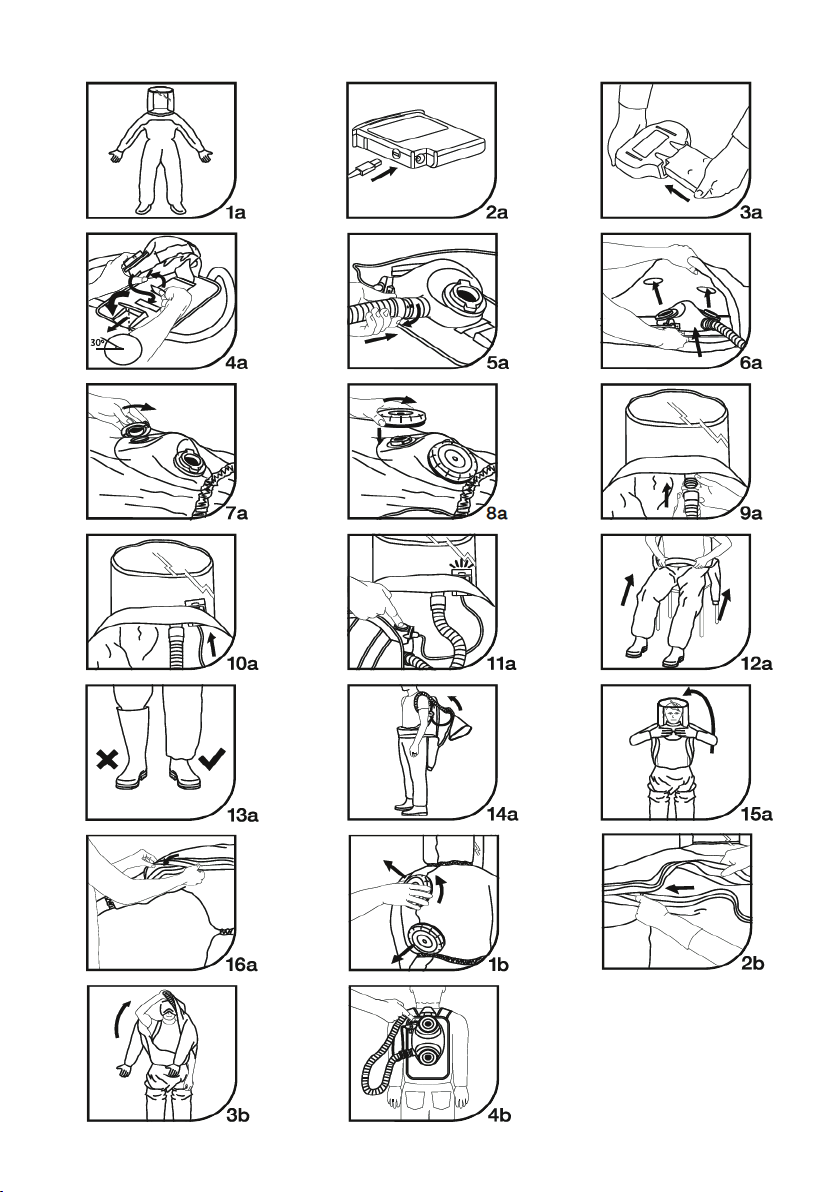
6). Open the zip ap by either undoing the re-sealable Velcro fastener, or simply lift the ap and undo the zip. Put the
Air Filter Unit and backpack into the suit, lining up the lter ports on the Air Filter Unit with the holes on the back
of the suit (Figure 6A).
7). Attach the lter adaptors to the outside of the suit. Take care not to tear the suit. The suit is now clamped between
the Air Filter Unit body and the lter adaptors (Figure 7A). There should be no gap around the lter adaptor. If there
is a gap, DO NOT DON THE SUIT- Reposition or obtain a new RJS suit.
8). Select approved lters. Fit the lters (Figure 8A). Screw the lters into the lter adaptors. Check that the lters
are adequately tightened. Ensure that a pair of identical lters are tted. Filter lids should be in place when the
lter is used. Incorrect tting of the lters will result in severely reduced product performance. Do not attempt
to attach the lters directly to the suit. They should be attached to the Air Filter Unit, using the lter adaptors as
described in the donning section.
Use the connection device and attach the breathing tube to the corresponding connector in the neck
seal. Slide the female end of the breathing tube over the neck seal breathing tube port, until you hear a
“click” (Figure 9A). Pull gently on the breathing tube to check a secure connection has been achieved.
If the breathing tube is not rmly attached, DO NOT DON THE SUIT. Check components and replace if
necessary. Take care to ensure the breathing tube is not twisted.
9). Push the Heads Up Display through the hole in the neck seal, so that the lights are visible to the wearer (Figure
10A). To reduce the risk of asphyxiation and suocation, do not use the system if the Heads Up Display is not
operational or it is not visible.
10). Turn on the Air Filter Unit, using the on/o button position on the Air Filter Unit body (Figure 11A). The Air Filter
Unit will make a brief sound, and the lights on the Heads Up Display will cycle for a few moments, then show a
green light. If a green light is not achieved, the battery may be at or the particulate lter may be clogged. To check
that the warning device is operational, block the breathing tube outlet by putting your hand into the headspace
and covering the open end of the tube with a at hand. Ensure that after a short time the buzzer begins to beep
and the red light begins to ash. Remove hand from the outlet. The red light will go out, all three lights cycle for a
short time then the green light will remain illuminated. Do not don the RJS suit until a green light is achieved.
11). Remove shoes, the integrated sock bootees are not designed to accommodate footwear. Sit down and put feet in
the suit and pull up to waist level (Figure 12A), fold the gaiters (splash guards) upwards. Don suitable safety boots
for the work environment. It is strongly recommended that you wear a larger size of boot than normal (ideally at
least one size bigger), not only to accommodate the surplus fabric of the integral sock bootee, but also to ease in
the donning process. Carefully fold down the gaiters of the suit over the exterior of the safety boots (Figure 13A),
channelling any contamination away from the wearer. Once folded down it is important to ensure that the seam
where the gaiter joins the suit is at and does not form a ‘channel’ where liquid could collect. Liquid will not be
able to enter the boots once the gaiters are fully folded down.
12). Put on back pack and position the breathing tube so that it travels up the front of the body, under the shoulder up
to the headspace, along with the heads-up display (Figure 14A).
13). Don the suit arms and put head through the neck seal. Push arms into the sleeves, and put hands into the gloves.
Push head through the knitted neck seal, so headspace is positioned over the head (Figure 15A). Reposition to
minimise wrinkles in the visor. A ow of air should be felt on the face. Position neck seal so that the air ows to
a convenient place in front of the mouth. Avoid directing the ow of air towards the eyes to prevent eye dryness.
14). Do up zip. Ensure that the zip is securely fastened. Seal the resealable Velcro fastener, ensuring a rm, secure
seal, without gaps. To maintain protection it is important to keep the suit zip and zip ap closed at all times.
15). The gloves attached to the RJS suit oer chemical protection against a range of common chemicals. Please
contact Respirex customer services for advice. The attached “integrated sock bootees” on the RJS suit are
designed to provide chemical protection to the foot area. Additional mechanical protection for the feet is required.
16). Before entering the work zone, recheck that the Heads Up Display is visible to the wearer. Workplace operating
procedures should recommend rechecking the display at regular intervals.
Decontamination Procedure
Refer to local operating procedures. Take extreme care not to transfer any contamination from the exterior of the
system on to the body. Preliminary showering at 30°C will remove most of the contaminant from the outer surface of the
RJS Suit. Do not remove the lter until after showering.
Do not allow water/contaminants to run into the Air Filtering Unit.


 User manual")