MSA AirMaXX classic User manual

Operating Manual
AirMaXX® classic
SCBA Basic Apparatus
Order N°. 10084770/05

MSA Europe GmbH
Schlüsselstrasse 12
8645 Rapperswil-Jona
Switzerland
Product of Germany
©MSA All rights reserved

MSA CONTENTS
AirMaXX classic 3
Contents
1. Safety Regulations ..................................................................................................5
1.1. Correct Use.....................................................................................................5
1.2. Liability Information .........................................................................................5
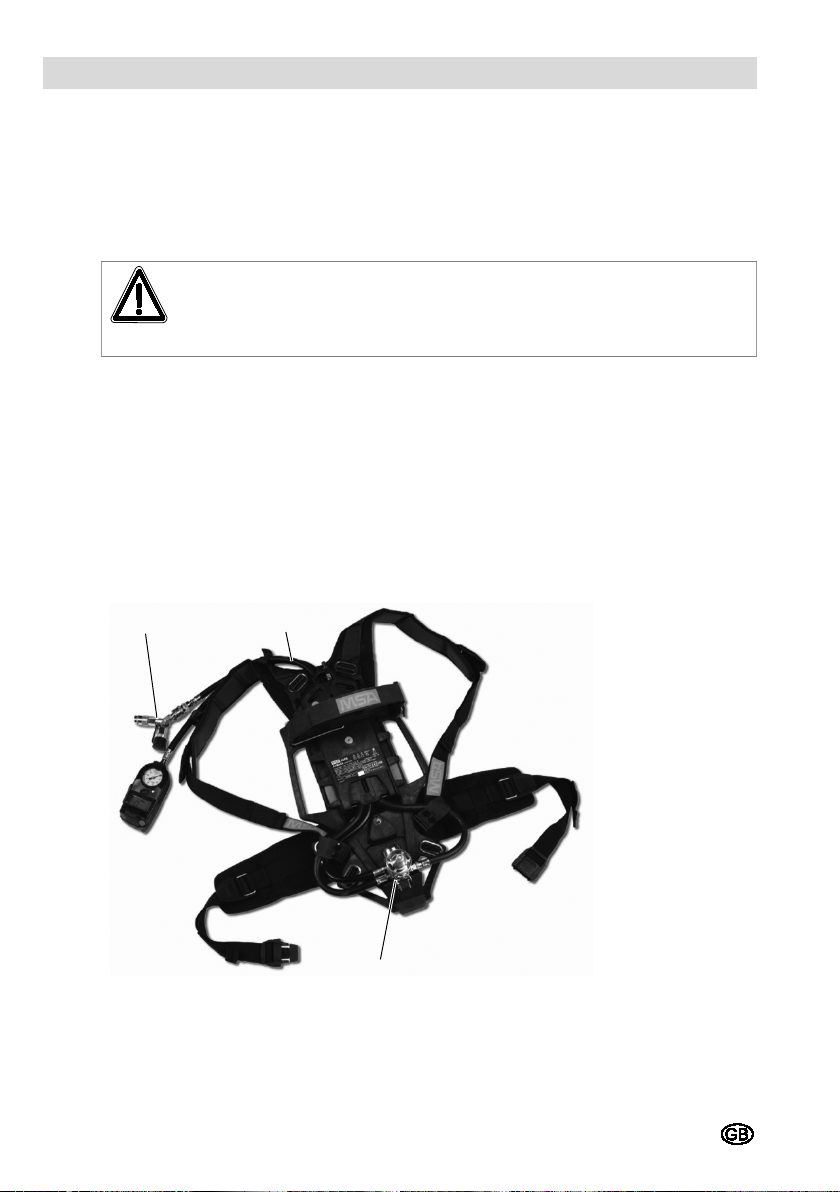
2. Description...............................................................................................................6
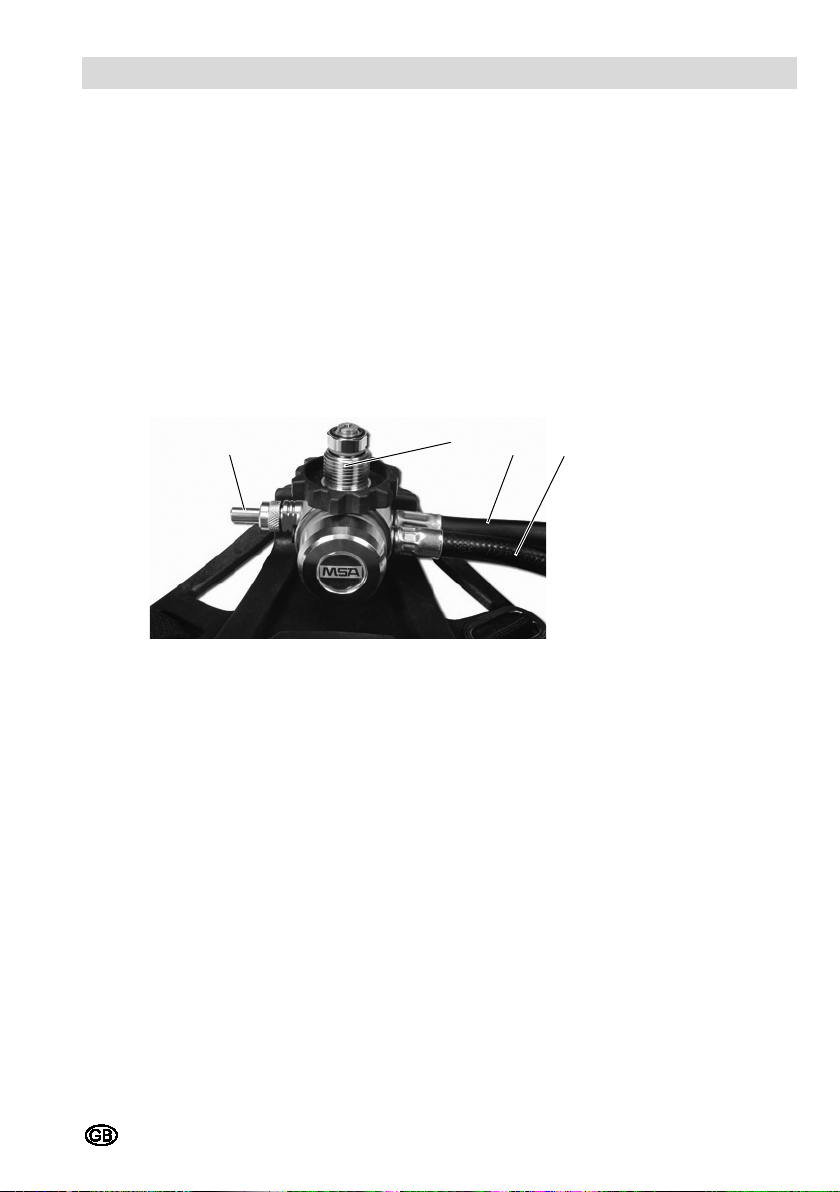
2.1. Standard Model (AirMaXX classic) .................................................................7
2.2. Model AirMaXX classic S ................................................................................9
2.3. Model AirMaXX classic Z .............................................................................. 10
2.4. Model AirMaXX classic-CLICK......................................................................11
2.4.1. alphaCLICK 2 Coupling 300 bar ......................................................12
2.4.2. alphaCLICK 2 Cylinder Adaptor 300 bar.......................................... 12
2.5. Model AirMaXX eXXtreme classic ................................................................13
2.6. AirMaXX classic Combinations .....................................................................13
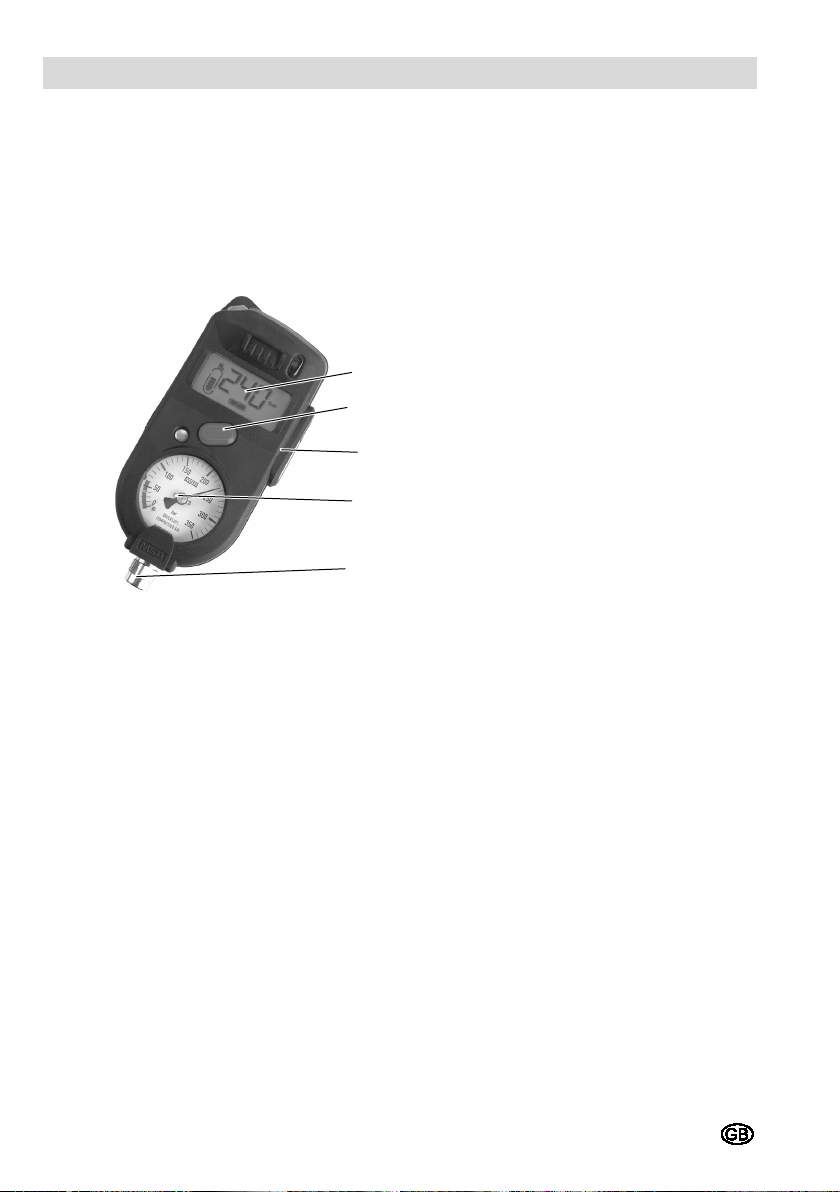
2.7. Technical Data ..............................................................................................14
3. Using the Compressed Air Breathing Apparatus ...............................................15
3.1. Prior to the First Use ..................................................................................... 15
3.2. Connecting One Compressed Air Cylinder ...................................................15
3.2.1. Pressure Reducer with Thread Connection .....................................16
3.2.1.1. Preparing the Apparatus for Use with One Compressed Air
Cylinder.........................................................................................16
3.2.1.2. Connecting One Compressed Air Cylinder ...................................16
3.2.2. Pressure Reducer with alphaCLICK 2 .............................................18
3.2.2.1. Installing Quick Connect Adaptor to Cylinder................................18
3.2.2.2. Connecting One Compressed Air Cylinder ...................................19
3.3. Connecting Two Compressed Air Cylinders..................................................20
3.3.1. Pressure Reducer with Thread Connection .....................................20
3.3.1.1. Preparing the Apparatus for Use with Two Compressed Air
Cylinders.......................................................................................20
3.3.1.2. Connecting Two Compressed Air Cylinders..................................20
3.3.2. Pressure Reducer with alphaCLICK 2 .............................................21
3.4. Adjusting the Back Plate ...............................................................................22
3.5. Condensed Check Prior to Use.....................................................................22
3.6. Donning the Compressed Air Breathing Apparatus ...................................... 22
3.7. Donning the Full-Face Mask .........................................................................23
3.8. During Use ....................................................................................................23
3.9. Using the Second Connection.......................................................................23
3.10. Removing the Compressed Air Breathing Apparatus....................................24
3.11. Removing the Compressed Air Cylinders .....................................................24
3.11.1. Pressure Reducer with Thread Connection ..................................... 24
3.11.2. Pressure Reducer with alphaCLICK 2 .............................................25

CONTENTS MSA
4 AirMaXX classic
4. Maintenance and Care of the SCBA..................................................................... 26
4.1. Maintenance Instructions .............................................................................. 26
4.2. Maintenance Intervals................................................................................... 27
4.3. Cleaning........................................................................................................ 27
4.3.1. Pre-cleaning..................................................................................... 27
4.3.2. Cleaning, light Soiling ...................................................................... 27
4.3.3. Cleaning, heavy Soiling ................................................................... 28
4.4. Instruction for Assembling the Pressure Reducer......................................... 29
4.5. Visual, Function and Tightness Check.......................................................... 29
4.6. Warning Device Check ................................................................................. 30
4.7. High Pressure O-ring Check ......................................................................... 30
4.8. Overhaul ....................................................................................................... 30
4.9. Storage ......................................................................................................... 30
4.10. Malfunctions.................................................................................................. 30
5. Compressed Air Cylinders with alphaCLICK 2 ................................................... 31
5.1. Changing of Compressed Air Cylinders to alphaCLICK 2............................. 31
5.2. Filling of Compressed Air Cylinders with alphaCLICK 2 ............................... 32
6. Accessories ........................................................................................................... 34
6.1. Compressed Air Cylinders ............................................................................ 34
6.1.1. Compressed Air Cylinders ............................................................... 34
6.1.2. Valves.............................................................................................. 34
6.1.3. T-Pieces .......................................................................................... 34
6.2. Lung Governed Demand Valve / Full Face Mask.......................................... 34
7. Ordering Information............................................................................................. 35
7.1. Compressed Air Cylinders ............................................................................ 35
7.2. Lung Governed Demand Valve..................................................................... 35
7.3. Compressed Air Cylinders ............................................................................ 36
7.4. Accessories................................................................................................... 37
7.5. Upgrading Options ........................................................................................ 38
7.6. Work Shop Accessories................................................................................ 39

MSA SAFETY REGULATIONS
AirMaXX classic 5
1. Safety Regulations
1.1. Correct Use
The MSA AirMaXX®classic (hereinafter referred to as compressed air breathing
apparatus) is a self-contained breathing apparatus operating independently of the
ambient air for use in accordance to EN 137.
In combination with a certified facepiece (full face mask) the device protects the
wearer against inhalation of hazardous substances and mixtures, harmful
biological agents and oxygen deficiency.
Breathable air is supplied to the user from (a) compressed air cylinder(s) via a
pressure reducer, a lung governed demand valve (see Instruction Manual for the
Lung Governed Demand Valve) and a facepiece (see Instruction Manual for the
Facepiece). The exhalation air is released directly into the ambient atmosphere.
It is imperative that this operating manual be read and observed when using the
compressed air breathing apparatus. In particular, the safety instructions, as well
as the information for the use and operation of the apparatus, must be carefully
read and observed. Furthermore, the national regulations applicable in the user's
country must be taken into account for a safe use.
Alternative use, or use outside this specifications will be considered as non-
compliance. This also applies especially to unauthorised alterations to the
apparatus and to commissioning work that has not been carried out by MSA or
authorised persons.
Danger!
This product supports life and health. Inappropriate use, maintenance
or servicing may affect the function of the device and thereby seriously
compromise the user’s life.
Before use, the product operability must be verified. The product must
not be used if the function test is unsuccessful, it is damaged, a
competent servicing/maintenance has not been made, genuine MSA
spare parts have not been used.
Danger!
This compressed air breathing apparatus is a pure gas protection
device. It is not suitable for underwater diving.
1.2. Liability Information
MSA accepts no liability in cases where the product has been used
inappropriately or not as intended. The selection and use of the product are the
exclusive responsibility of the individual operator.
Product liability claims, warranties also as guarantees made by MSA with respect
to the product are voided, if it is not used, serviced or maintained in accordance
with the instructions in this manual.

DESCRIPTION
MSA
6 AirMaXX classic
2. Description
There are different models of as compressed air breathing apparatuses. All
combinations of the below mentioned versions (standard, -S, -Z, CLICK) are
possible.
All combinations can also be equipped with the Integrated Control Unit ICU or
ICU-S (version with key) instead of the pressure gauge.
Retrofitting is possible through MSA or authorized service centres.
Fig. 1
AirMaXX classic compressed air breathing apparatus (all options)
1
Pressure gauge line
9
Catch clip
2
Shoulder strap
10
Push lock
3
Cylinder separator
11
Whistle
4
Cylinder retaining strap
12
Pressure reducer
5
Cylinder support
13
Medium pressure line
6
Tension clamp
14
Hip belt
7
Back plate
15
Pressure gauge
8
Handle
5
6
1
2
11
13
14
3
4
8
9
7
10
15
12

MSA DESCRIPTION
AirMaXX classic 7
2.1. Standard Model (AirMaXX classic)
The two-piece back plate of the compressed air breathing apparatus is adjustable
to three different lengths and should be adjusted to the user's height. The
pressure lines passes through the sliding upper part from the pressure reducer to
the pressure gauge and medium pressure coupling. They are fixed in special
receptacles and thus are always in the correct position.
The carrying belts and the hip belt are adjustable in length. The hip belt is fixed to
the back plate elastically. It will automatically return to the horizontal position on
installation.
One or two compressed air cylinders can be placed in the cylinder support. The
cylinder retaining strap is freely adjustable and after inserting the compressed air
cylinder(s), it is tightened and secured using the tension clamp.
Fig. 2 Pressure reducer
1
Warning device (signal whistle)
2
Compressed air cylinder connection
3
Pressure gauge line
4
Medium pressure line
The pressure reducer is mounted in the lower area of the back plate (Fig. 2).
On the pressure reducer, there is a relief valve, a warning device, the pressure
gauge line and the medium pressure line. The pressure reducer reduces the
cylinder pressure to approx. 7 bar and the relief valve activates on non-permitted
pressure rise to prevent damage insuring the continued supply of breathable air.
A water-tight encapsulated and shock-protected pressure gauge is connected to
the pressure reducer by the flexible pressure gauge line. The pressure gauge has
an easily readable, luminescent dial.
A lung governed demand valve or a full face mask is connected to the coupling
on the medium pressure line.
The acoustic warning device (signal whistle) triggers a continuous warning signal
when the cylinder pressure drops below 55 ±5 bar. It continues to sound
continuously, medium-pressure dosed until the usable air supply is nearly
exhausted. The warning device functions without an injector, meaning that no
ambient air is drawn in to produce the audible signal.
The breathing apparatus can be equipped with an Integrated Control Unit (ICU)
1
3
2
4

DESCRIPTION
MSA
8 AirMaXX classic
(Fig. 3). The ICU replaces the simple standard pressure gauge but incorpo-
rates a gauge in addition to the electronic features.
The ICU is used for the control and monitoring of the proper functioning of the
apparatus, the indication of operational data as well as indicating and signalling
hazardous conditions. It also warns when detecting motionlessness of the user
and offers the possibility of activating the alarm manually.
Please see for details the Instruction for Use of the ICU.
Fig. 3 Integrated Control Unit (ICU)
1
Pressure gauge line connection
2
Pressure gauge
3
RESET button
4
ALARM button
5
Display
5
1
2
3
4

MSA DESCRIPTION
AirMaXX classic 9
2.2. Model AirMaXX classic S
The compressed air breathing apparatus type AirMaXX classic S is equipped with
a signal line. The warning whistle is on a separate signal line near the ear of the
user where it can be heard well and easily identified as his own warning signal.
Fig. 4 Model AirMaXX classic S-Z with ICU
(Signal Line and additional medium pressure coupling)
1
Pressure reducer
2
Signal line
3
Warning device (signal whistle)
2
1
3

DESCRIPTION
MSA
10 AirMaXX classic
2.3. Model AirMaXX classic Z
The compressed air breathing apparatus type AirMaXX classic Z is equipped with
a second medium pressure connection. Thus is fitted on the left side of the
shoulder. It has a safety coupling which can be protected against dirt with a
stopper.
Attention!
When rescuing with the second connection the reduced service time
caused by the extra consumption of air by the person being rescued
must be considered.
Provided local regulations permit, the following are possible:
•To connect a second lung governed demand valve (emergency rescue of
another user of compressed air breathing apparatus).
•To connect a rescue set consisting of a lung governed demand valve and
full- face mask (Rescue Set Part No. D4075720).
•To connect to compressed air line system using the double nipple that is
available as accessory (Section 5), e.g. for decontamination after use.
According to the marking, connect the double nipple first with the short nipple side
to the second connection and then connect the long nipple side with the check
valve to the compressed air line.
Fig. 5 Model AirMaXX classic S-Z with ICU
(Signal Line and additional medium pressure coupling)
1
Additional coupling
2
Medium pressure line
3
Pressure reducer
3
1
2

MSA DESCRIPTION
AirMaXX classic 11
2.4. Model AirMaXX classic-CLICK
The difference between this model and the standard model is the modified
pressure reducer, the constituent part of the alphaCLICK 2 coupling system.
Fig. 6 Pressure reducer
1
alphaCLICK 2 coupling
alphaCLICK 2 permits the easy, quick and safe connection of the compressed air
cylinder to the pressure reducer. Time-consuming screwing-on of the cylinder is
no longer required since the cylinder is simply slotted into the pressure reducer.
alphaCLICK 2 is safer than the usual standard connection:
•alphaCLICK 2 cannot be disconnected when the system is pressurised.
•Two steps are required to disconnect it: the cylinder can only be removed
when the safety ring has been turned through 20 degrees and pushed
back.
•alphaCLICK 2 has no built-in flow restrictor.
•Moreover, alphaCLICK 2 has a flat face design which keeps the
components clean and operative.
alphaCLICK 2 fits all standard breathable air valve threads [EN 144-2].
alphaCLICK 2 is only available for 300 bar.
1

DESCRIPTION MSA
12 AirMaXX classic
2.4.1. alphaCLICK 2 Coupling 300 bar
Fig. 7 alphaCLICK 2 coupling 300 bar
1
alphaCLICK 2 coupling 300 bar
2
Indicator ring with arrow
2.4.2. alphaCLICK 2 Cylinder Adaptor 300 bar
Fig. 8 alphaCLICK 2 cylinder adaptor 300 bar
1
alphaCLICK 2 cylinder adaptor 300 bar
The cylinder adaptor has to be screwed into a cylinder valve with a
specific torque of 20-30 Nm.
1
2
1

MSA DESCRIPTION
AirMaXX classic 13
2.5. Model AirMaXX eXXtreme classic
This model is essentially distinguished from the standard model by a heatproof
harness, chrome-plated buckles and protecting channels for the lines on the
shoulder straps.
It is also available as the standard model and in the -S, -Z and all combinations
thereof.
2.6. AirMaXX classic Combinations
Of course all combinations of the above mentioned versions are possible.
Retrofitting is possible through MSA or authorized service centres.

DESCRIPTION MSA
14 AirMaXX classic
2.7. Technical Data
High pressure connection : 200 bar resp. 300 bar
Medium pressure : 6 bar to 8 bar
Operating temperature : -30 °C to +60 °C
Weight (approx.) : 3.7 kg
Dimensions
*)
:
Length
max. 575 mm
Width max. 300 mm
Height max. 135 mm
Approvals : The compressed air breathing apparatus
conforms to Directive 89/686 EEC or
Regulation (EU) 2016/425, respectively, and
Directive 2014/34/EU. It is a container unit with
compressed air in accordance with EN 137.
DEKRA EXAM GmbH,
Dinnendahlstr. 9, 44809 Bochum
(Germany), Notified Body Number:
0158.
ATEX
BVS 05 ATEX H 027 X
IM1
II 1 G IIC T6 -30 °C ≤Ta ≤+60 °C
II 1 D
The product complies with "Technical
Regulation on Safety of Maritime Transport”
(TP 620) of the Russian Federation.
OKP code: 641830 "Fire fighter Equipment -
self-contained breathing apparatus operated
on compressed air."
Dispose in accordance with the
recommendations of the ship manufacturer
together with the vessel, in accordance with a
unique technological process, taking into
consideration MANUFACTURER PRODUCT
DECLARATION, see appendix.
Type Approval Certificate of Russian
Maritime Register of Shipping
*) There are given maximum dimensions, which are possible.
The Declaration of Conformity can be found under the following link:
https://MSAsafety.com/DoC

MSA USING THE COMPRESSED AIR BREATHING APPARATUS
AirMaXX classic 15
3. Using the Compressed Air Breathing Apparatus
Warning!
The compressed air breathing apparatus may only be put into use in a
fully maintained and tested condition. If malfunctions or defects are
noticed prior to use, do not use the compressed air breathing apparatus
under any circumstances.
Get the apparatus checked and repaired by an authorised service
centre.
3.1. Prior to the First Use
Prior to the first use, the apparatus must be prepared for the number and types of
compressed air cylinders. Afterwards, when changing compressed air cylinders
(without attached bumpers) that have the same diameter, the closed loop of the
tension strap is increased or again tightened by opening or closing the tension
clamp. A readjustment of the length of the tension strap and a loosening of the
Velcro closure then is no longer required.
(1) Before installing the threaded handwheel, check that the O-ring inside the
handwheel high pressure socket is present and free of damage. If the O-ring
is damaged, it must be replaced before the SCBA is used.
(2) Thread the handwheel into the cylinder thread. The handwheel should be
hand-tight (no tools should be used).
3.2. Connecting One Compressed Air Cylinder
Fig. 9 SCBA apparatus with one compressed air cylinder

USING THE COMPRESSED AIR BREATHING APPARATUS MSA
16 AirMaXX classic
3.2.1. Pressure Reducer with Thread Connection
3.2.1.1. Preparing the Apparatus for Use with One Compressed Air Cylinder
(1) Hinge down the cylinder separator that is in the middle of the cylinder
support into a horizontal position until it catches
(2) If necessary, disconnect T-piece from high pressure socket of pressure
reducer.
Fig. 10 Compressed air breathing apparatus – details
1
Cylinder separator
3
Cylinder support
2
Cylinder retaining strap
4
Tension clamp
3.2.1.2. Connecting One Compressed Air Cylinder
(1) Place compressed air breathing apparatus horizontally so that the back face
is uppermost (Fig. 10).
(2) Bring cylinder separator (1) into a horizontal position opposite the tension
clamp (4) until it catches.
(3) Check gasket on pressure reducer high pressure socket for proper condition.
(4) Open tension clamp on cylinder strap eliminating any tension by extending
the strap to full length pulling the small bar at the tension clamp (Fig. 11).
Fig. 11 Opening the tension clamp

MSA USING THE COMPRESSED AIR BREATHING APPARATUS
AirMaXX classic 17
(5) Push compressed air cylinder through the cylinder strap (2) with the cylinder
valve toward the pressure reducer, so that it lies on the central support (3).
(6) Thread cylinder valve onto pressure reducer, if necessary, bring the
compressed air breathing apparatus with valve up into a vertical position.
(7) Put the SCBA back into the horizontal position. Check that the cylinder is
laying on the central support (3).
(8) Tighten cylinder strap (2) gently by pulling the free end.
Attention!
Do not overtighten the cylinder strap! Damage can occur when using
excessive force to close the tension clamp and the SCBA might not be
ready for use.
The final fastening tension will be achieved when closing the tension
clamp.
(9) Check position of compressed air cylinder, re-position if necessary.
(10) Hinge tension clamp gently and completely down over the centre until it
catches.
(11) If push force/tension is too high during hinging of the tension clamp, re-
adjust the strap length at the tension clamp. If the strap tension is too low,
re-adjust the strap length at the tension clamp (Fig. 12).
Fig. 12 Readjusting the strap length at the tension clamp
(12) Fasten end of the cylinder retaining strap onto Velcro strip.
(13) Briefly open cylinder valve and check for escaping air, retighten if necessary.

USING THE COMPRESSED AIR BREATHING APPARATUS MSA
18 AirMaXX classic
3.2.2. Pressure Reducer with alphaCLICK 2
3.2.2.1. Installing Quick Connect Adaptor to Cylinder
(1) Use only a fully charged cylinder and inspect the internal thread of the
cylinder valve to ensure it is not damaged and free of dirt and debris.
•The threaded connection of the cylinder valve must be undamaged and
free from dirt and debris.
•If the cylinder valve is damaged, remove from service and return it to a
MSA trained or certified repair technician.
(2) Inspect the external threads of the cylinder adaptor and the nipple of the
male connector on the pressure reducer to ensure they are not damaged and
free of dirt and debris.
•Ensure that the O-ring is installed on the cylinder adaptor and it is
undamaged and free of dirt and debris.
(3) Thread the adaptor with a specific torque of 20-30 Nm into the cylinder valve.
(4) Before installing ensure there is no dirt or debris on either the male or female
end of the coupling. Ensure the adaptor on the cylinder valve is tight.
(5) Push the quick connect coupling (using light force) onto the male adaptor of
the pressure reducer until an audible snap is heard. The handwheel will
rapidly rotate approx. 45° counter clockwise indicating that the valve is
connected to the pressure reducer.
(6) Grasp the handwheel firmly and pull on it to ensure the handwheel is fully
attached.
Fig. 13 Compressed air cylinder with alphaCLICK 2
1
Compressed air cylinder with alphaCLICK 2 cylinder adaptor
2
alphaCLICK 2 coupling
3
Pressure reducer
2
3
1

MSA USING THE COMPRESSED AIR BREATHING APPARATUS
AirMaXX classic 19
3.2.2.2. Connecting One Compressed Air Cylinder
(1) If necessary, thread the alphaCLICK 2 cylinder adaptor with a specific torque
of 20-30 Nm into the cylinder valve.
(2) Place compressed air breathing apparatus horizontally so that the back face
is uppermost (Fig. 10).
(3) Bring cylinder separator (1) into a horizontal position opposite the tension
clamp (4) until it catches.
When fitting the compressed air cylinder on the coupling of the pressure
reducer, it may tip down.
In this case, support the pressure reducer with
your hand.
(4) Open tension clamp on the cylinder strap eliminating any tension by
extending the strap to full length pulling the small bar at the tension clamp
(Fig. 11).
(5) Push compressed air cylinder through the cylinder strap (2) with the cylinder
valve toward the pressure reducer, so that it lies on the central support (3).
(6) Align the compressed air cylinder with the alphaCLICK 2 axially to the
coupling and fit on the alphaCLICK 2 coupling.
Attention!
Never push the coupling system together using excessive force.
(7) Close the coupling by pushing it together using a "small amount" of force
and checking that the arrow of the indicator ring is vertically aligned with the
back plate.
(8) Tighten cylinder strap gently by pulling the free end.
Attention!
Do not overtighten the cylinder strap! Damage can occur when using
excessive force to close the tension clamp and the SCBA might not be
ready for use.
The final fastening tension will be achieved when closing the tension
clamp.
(9) Check position of compressed air cylinder, re-position if necessary.
(10) Hinge tension clamp (4) gently and completely down over the centre until it
catches.
(11) If push force/tension is too high during hinging of the tension clamp, re-
adjust the strap length at the tension clamp. If the strap tension is too low,
re-adjust the strap length at the tension clamp (Fig. 12).
(12) Fasten end of the cylinder retaining strap onto Velcro strip.
(13) Briefly open cylinder valve and check for escaping air, re-tighten if
necessary.

USING THE COMPRESSED AIR BREATHING APPARATUS MSA
20 AirMaXX classic
3.3. Connecting Two Compressed Air Cylinders
3.3.1. Pressure Reducer with Thread Connection
Fig. 14 SCBA apparatus with two compressed air cylinders
3.3.1.1. Preparing the Apparatus for Use with Two Compressed Air Cylinders
(1) Hinge up the cylinder separator to a vertical position in the middle of the
cylinder support until it catches.
(2) Connect T-piece to high pressure socket of pressure reducer.
3.3.1.2. Connecting Two Compressed Air Cylinders
(1) Place compressed air breathing apparatus horizontally so that the back face
is uppermost (Fig. 10).
(2) Hinge cylinder separator (1) into a vertical position until it catches.
(3) If there is no T-piece connected to the pressure reducer, check gaskets on
the pressure reducer and T-piece and thread in T-piece loosely.
(4) Open tension clamp on cylinder strap eliminating any tension by extending the
strap to full length pulling the small bar at the tension clamp (Fig. 12).
(5) Push one compressed air cylinder through the cylinder retaining strap so that
the cylinder valve points to the T-piece, and lies on one of the outer supports.
(6) Loosely screw the cylinder valve onto the T-piece.
(7) Push a second compressed air cylinder through the cylinder retaining strap
so that the cylinder valve points to the T-piece, and lies on the other outer
support.
(8) Loosely thread the second cylinder valve onto the T-piece.
With right-angled T-piece, align the compressed air cylinders by hinging
the pressure reducer and pulling the cylinders together (see Operating
Manual for T-pieces).
(9) Tighten all three high pressure connection handwheels.
Table of contents
Other MSA Safety Equipment manuals

MSA
MSA PremAire System User manual

MSA
MSA SCBA Basic Apparatus AirGo User manual

MSA
MSA left/RIGHT User manual

MSA
MSA Workman SRL-R User manual

MSA
MSA FP Pro User manual

MSA
MSA 10110162 Operation instructions

MSA
MSA SingleLine SCOUT User manual

MSA
MSA FALL-RESCUE 10022050 User manual

MSA
MSA VAUTEX ELITE 3S-L User manual

MSA
MSA Sure-Climb 10036032 Manual

MSA
MSA ProtoAir FPA-W44 User manual

MSA
MSA G1 SCBA User manual

MSA
MSA NC-217 User manual

MSA
MSA 10016511 User manual

MSA
MSA OptimAir 6HC User manual

MSA
MSA PremAire Cadet Escape Respirator Setup guide

MSA
MSA Vautex Elite ET User manual

MSA
MSA OptimAir Mask-Mounted PAPR User manual

MSA
MSA AirFrame 10046846 Setup guide

MSA
MSA motionSCOUT User manual