Ricoh Aficio 480W User manual

Paper type: Wood Free 80g/m2, Paper Thickness=100 µm // Pages in book=120 // Print scale=81%
Gap (when printed at 81% scale) = Pages in book ×Paper thickness / 2 = 6.000000 mm
480W Operating Instructions Copy Reference
B1886700A
480W Operating Instructions Copy Reference
480W
Operating Instructions
Copy Reference
Read this manual carefully before you use this machine and keep it handy for future reference. For safe and correct use, be sure to read the Safety
Information in the "General Settings Guide" before using the machine.
Basics
Copying
Troubleshooting
User Tools (Copier / Document Server Features)
Specifications
Overseas Affiliates
USA
RICOH CORPORATION
5 Dedrick Place
West Caldwell, New Jersey 07006
Phone: +1-973-882-2000
The Netherlands
RICOH EUROPE B.V.
Prof.W.H. Keesomlaan 1,
NL-1183 DJ Amstelveen
P.O. Box 114, NL-1180 AC Amstelveen
Phone: +31-(0)20-5474111
United Kingdom
RICOH UK LTD.
Ricoh House,
1 Plane Tree Crescent, Feltham,
Middlesex, TW13 7HG
Phone: +44-(0)20-8261-4000
Germany
RICOH DEUTSCHLAND GmbH
Wilhelm-Fay-Strasse 51,
D-65936 Frankfurt am Main
Phone: +49-(0)69-7104250
France
RICOH FRANCE S.A.
383, Avenue du Général de Gaulle
BP 307-92143 Clamart Cedex
Phone: +33-(0)-821-01-74-26
Spain
RICOH ESPAÑA S.A.
Avda. Litoral Mar, 12-14,
Blue Building, Marina Village,
08005 Barcelona
Phone: +34-(0)93-295-7600
Italy
RICOH ITALIA SpA
Via della Metallurgia 12,
37139 Verona
Phone: +39-045-8181500
China
RICOH CHINA CO.,LTD.
17/F., Huamin Empire Plaza, No.728
Yan An West Road,
Shanghai P.C.:200050
Phone: +86-21-5238-0222
Singapore
RICOH ASIA PACIFIC PTE.LTD.
260 Orchard Road,
#15-01/02 The Heeren,
Singapore 238855
Phone: +65-6830-5888
Printed in the Netherlands
GB GB B188-6700A

Paper type: Wood Free 80g/m2, Paper Thickness=100 µm // Pages in book=120 // Print scale=81%
Gap (when printed at 81% scale) = Pages in book ×Paper thickness / 2 = 6.000000 mm
Declaration of Conformity
“The Product complies with the requirements of the EMC Directive 89/336/EEC and its amending di-
rectives and the Low Voltage Directive 73/23/EEC and its amending directives.”
In accordance with IEC 60417, this machine uses the following symbols for the main power switch:
a
aa
ameans POWER ON.
c
cc
cmeans STAND BY.
In accordance with IEC 60417, this machine uses the following symbols for the anti- humidity heater
switch:
a
aa
ameans POWER ON.
b
bb
bmeans POWER OFF.
Trademark
Acrobat®is a registered trademark of Adobe Systems Incorporated.
Introduction
This manual contains detailed instructions and notes on the operation and use of this machine. For your
safety and benefit, read this manual carefully before using the machine. Keep this manual in a handy
place for quick reference.
Important
Contents of this manual are subject to change without prior notice. In no event will the company be li-
able for direct, indirect, special, incidental, or consequential damages as a result of handling or oper-
ating the machine.
Notes:
Some illustrations in this manual might be slightly different from the machine.
Certain options might not be available in some countries. For details, please contact your local dealer.
Operator Safety
This machine contains LED Array in scanner and writing units.
The machine is considered a class 1 LED device, safe for both office and EDP use.
Notes:
Two kinds of size notation are employed in this manual. With this machine refer to the metric version.
For good copy quality, Ricoh recommends that you use genuine Ricoh toner.
Ricoh shall not be responsible for any damage or expense that might result from the use of parts other
than genuine Ricoh parts with your Ricoh office products.
Important
Do not copy or print any item for which reproduction is prohibited by law.
Copying or printing the following items is generally prohibited by local law:
bank notes, revenue stamps, bonds, stock certificates, bank drafts, checks, passports, driver's licens-
es.
The preceding list is meant as a guide only and is not inclusive. We assume no responsibility for its
completeness or accuracy. If you have any questions concerning the legality of copying or printing cer-
tain items, consult with your legal advisor.
Power Source
220 - 240V, 50Hz/60Hz, 10A or more
Please be sure to connect the power cord to a power source as above. For details about power source,
see “Power Connection”in General Settings Guide.
Copyright © 2005 Ricoh Co., Ltd.

i
Manuals for This Machine
The following manuals describe the operational procedures of this machine. For
particular functions, see the relevant parts of the manual.
Note
❒Manuals provided are specific to machine type.
❒Adobe Acrobat Reader / Adobe Reader is necessary to view the manuals as
a PDF file.
❒Two CD-ROMs are provided:
• CD-ROM 1 “Operating Instructions”
• CD-ROM 2 “Scanner Driver and Utilities”
❖
❖❖
❖General Settings Guide
Provides an overview of the machine and describes System Settings (such as
Tray Paper Settings), Document Server functions, and troubleshooting.
Refer to this manual for Address Book procedures such as registering e-mail
address, and user codes.
❖
❖❖
❖Security Reference
This manual is for administrators of this machine. It describes security func-
tions that the administrators can use to protect data from being tampered, or
prevent the machine from unauthorized use.
Also refer to this manual for the procedures for registering administrators, as
well as setting user and administrator authentication.
❖
❖❖
❖Network Guide (PDF file - CD-ROM1)
Provides information about configuring and operating the scanner (Type 480)
in a network environment.
For details about network settings of the scanner (RW480) and printer
(RW480), see the manual that comes with the related option.
❖
❖❖
❖Copy Reference (this manual)
Describes operations, functions, and troubleshooting for the machine's copier
function.
❖
❖❖
❖Scanner Reference(Scanner Unit Type 480) (PDF file - CD-ROM1)
Describes operations, functions, and troubleshooting for the machine's scan-
ner function.
DolphinC2_GBcopy_F_FM.book Page i Friday, February 4, 2005 3:32 PM

ii
❖
❖❖
❖Manuals for DeskTopBinder Lite
DeskTopBinder Lite is a utility included on the CD-ROM labeled “Scanner
Driver and Utilities”.
•DeskTopBinder Lite Setup Guide (PDF file - CD-ROM2)
Describes installation of, and the operating environment for DeskTop-
Binder Lite in detail. This guide can be displayed from the [Setup]display
when DeskTopBinder Lite is installed.
•DeskTopBinder Introduction Guide (PDF file - CD-ROM2)
Describes operations of DeskTopBinder Lite and provides an overview of
its functions. This guide is added to the [Start]menu when DeskTopBinder
Lite is installed.
•Auto Document Link Guide (PDF file - CD-ROM2)
Describes operations and functions of Auto Document Link installed with
DeskTopBinder Lite. This guide is added to the [Start]menu when Desk-
TopBinder Lite is installed.
❖
❖❖
❖Other manuals
•Manuals for Printer (RW480) function.
•Manuals for Scanner (RW480) function.
DolphinC2_GBcopy_F_FM.book Page ii Friday, February 4, 2005 3:32 PM

iii
What You Can Do with This Machine
AHD001S
DolphinC2_GBcopy_F_FM.book Page iii Friday, February 4, 2005 3:32 PM

iv
AHD002S
DolphinC2_GBcopy_F_FM.book Page iv Friday, February 4, 2005 3:32 PM

v
AHD003S
DolphinC2_GBcopy_F_FM.book Page v Friday, February 4, 2005 3:32 PM

vi
TABLE OF CONTENTS
Manuals for This Machine ......................................................................................i
What You Can Do with This Machine..................................................................iii
How to Read this Manual ......................................................................................1
Names of Major Options ............................................................................................2
Terms .........................................................................................................................2
Control Panel..........................................................................................................3
Display Panel..........................................................................................................5
1. Basics
Before Copying ......................................................................................................7
Original Output Locations...........................................................................................8
Adjusting the Original Tray.......................................................................................10
Copy Output Locations.............................................................................................10
Originals ...............................................................................................................12
Sizes and Weights of Recommended Originals.......................................................12
Placing Originals..................................................................................................15
Original Orientation ..................................................................................................16
Placing Custom Size Originals.................................................................................17
Wide Scan................................................................................................................17
Setting the Carrier Sheet..........................................................................................18
2. Copying
Basic Procedure...................................................................................................21
Original Counter/Reset.............................................................................................22
Auto Start .................................................................................................................23
Job Preset ................................................................................................................23
Interrupt Copy ..........................................................................................................24
Copying from the Paper Bypass ..............................................................................25
Copier Functions .................................................................................................27
Selecting Original Type Setting................................................................................27
Adjusting Copy Image Density.................................................................................28
Selecting Copy Paper ..............................................................................................29
Setting the Length of Copy Paper Cut .....................................................................30
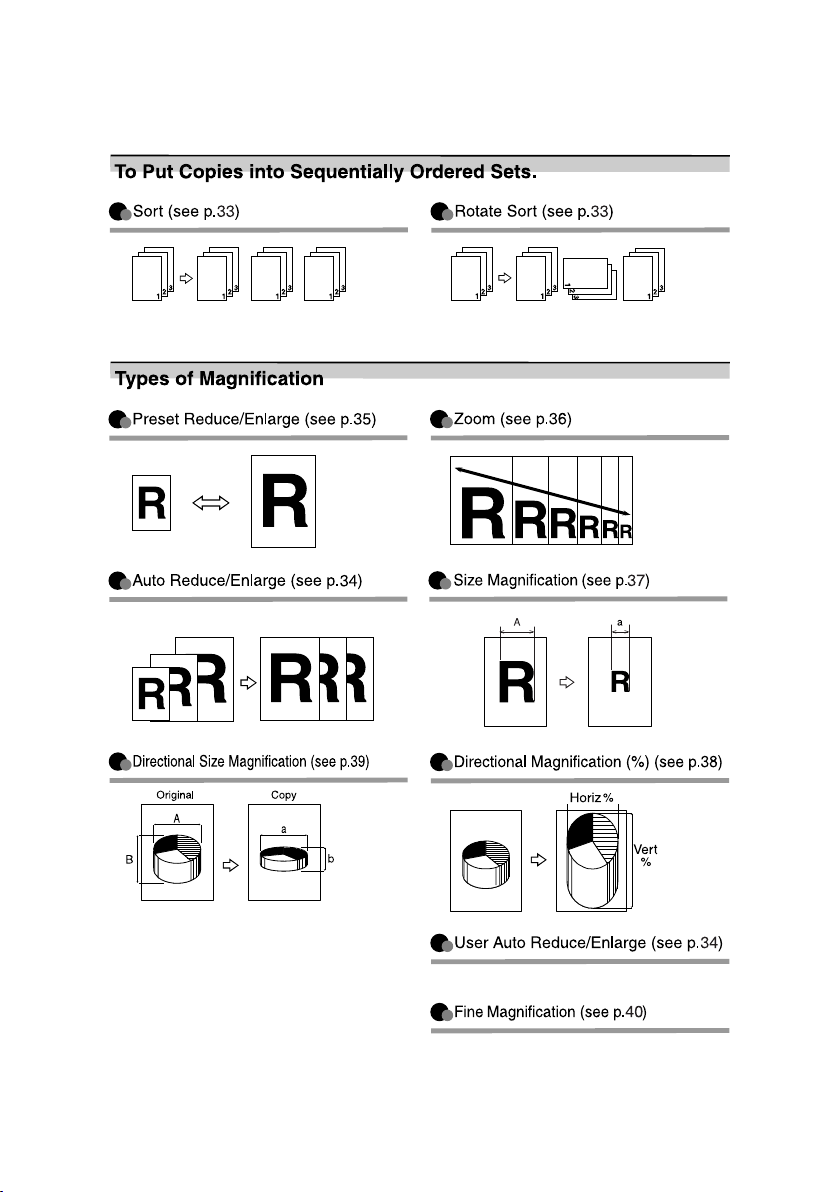
Sort/Rotate Sort .......................................................................................................33
Auto Reduce/Enlarge ...............................................................................................34
User Auto Reduce/Enlarge ......................................................................................34
Preset Reduce/Enlarge ............................................................................................35
Zoom ........................................................................................................................36
Size Magnification ....................................................................................................37
Directional Magnification (%) ...................................................................................38
Directional Size Magnification (mm).........................................................................39
Fine Magnification ....................................................................................................40
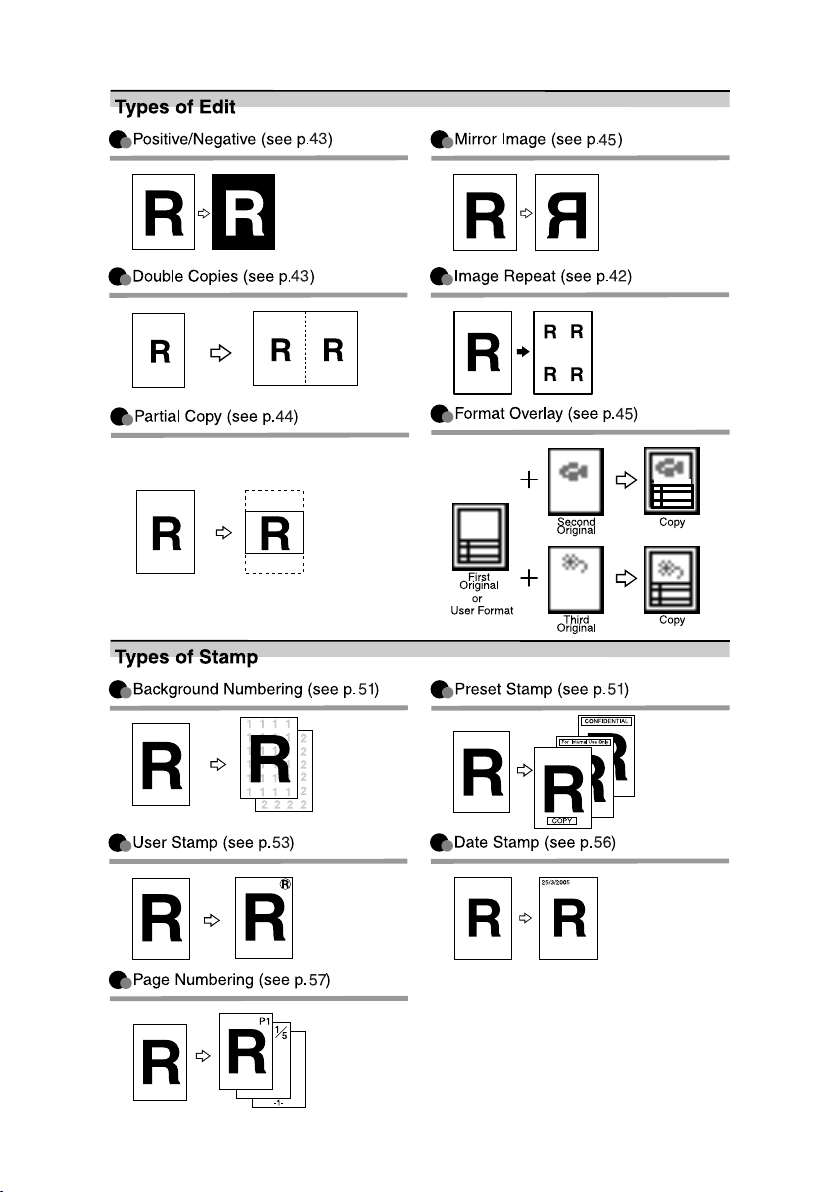
Combine...................................................................................................................41
Image Repeat...........................................................................................................42
Double Copies..........................................................................................................43
Positive/Negative .....................................................................................................43
Partial Copy..............................................................................................................44
Mirror Image.............................................................................................................45
DolphinC2_GBcopy_F_FM.book Page vi Friday, February 4, 2005 3:32 PM

vii
Format Overlay ........................................................................................................45
Erase Border ............................................................................................................47
Erase Inside .............................................................................................................48
Erase Outside ..........................................................................................................49
Margin Adjustment ...................................................................................................50
Background Numbering ...........................................................................................51
Preset Stamp ...........................................................................................................51
User Stamp ..............................................................................................................53
Date Stamp ..............................................................................................................56
Page Numbering ......................................................................................................57
Adjust Print Position .................................................................................................61
Storing Data in the Document Server ................................................................62
Programs ..............................................................................................................64
Storing a Program ....................................................................................................64
Changing a Stored Program ....................................................................................65
Changing a Stored Program Name..........................................................................65
Deleting a Program ..................................................................................................65
Recalling a Program.................................................................................................65
3. Troubleshooting
If Your Machine Does Not Operate As You Want..............................................67
When a Message Appears.......................................................................................67
Screen......................................................................................................................70
If You Cannot Make Clear Copies.......................................................................71
If You Cannot Make Copies As You Want .........................................................74
4. User Tools (Copier / Document Server Features)
User Tools Menu (Copier / Document Server Features) ..................................77
Accessing User Tools (Copier Features)........................................................... 82
Changing Default Settings .......................................................................................82
Exiting User Tools ....................................................................................................83
Settings You Can Change with User Tools .......................................................84
General Features .....................................................................................................84
Reproduction Ratio ..................................................................................................86
Edit ...........................................................................................................................87
Stamp.......................................................................................................................90
Input / Output ...........................................................................................................96
Administrator Tools ..................................................................................................96
5. Specifications
Combination Chart...............................................................................................97
Supplementary Information ................................................................................98
Scan Size Limitations, by Function..................................................................104
Settings Record Sheet.......................................................................................105
Magnification Ratio Chart.......................................................................................108
Measure Chart .......................................................................................................109
INDEX....................................................................................................... 110
DolphinC2_GBcopy_F_FM.book Page vii Friday, February 4, 2005 3:32 PM

viii
DolphinC2_GBcopy_F_FM.book Page viii Friday, February 4, 2005 3:32 PM

1
How to Read this Manual
Symbols
The following set of symbols is used in this manual.
R
WARNING:
This symbol indicates a potentially hazardous situation that might result in
death or serious injury when you misuse the machine without following the in-
structions under this symbol. Be sure to read the instructions, all of which are de-
scribed in the Safety Information section in the General Settings Guide.
R
CAUTION:
This symbol indicates a potentially hazardous situation that might result in mi-
nor or moderate injury or property damage that does not involve personal injury
when you misuse the machine without following the instructions under this
symbol. Be sure to read the instructions, all of which are described in the Safety
Information section in the General Settings Guide.
* The statements above are notes for your safety.
Important
If this instruction is not followed, paper might be misfed, originals might be
damaged, or data might be lost. Be sure to read this.
Preparation
This symbol indicates information or preparations required prior to operating.
Note
This symbol indicates precautions for operation, or actions to take after abnor-
mal operation.
Limitation
This symbol indicates numerical limits, functions that cannot be used together,
or conditions in which a particular function cannot be used.
Reference
This symbol indicates where further relevant information can be found.
[]
Keys that appear on the machine's display.
{}
Keys built into the machine's control panel.
DolphinC2_GBcopy_F_FM.book Page 1 Friday, February 4, 2005 3:32 PM

2
Names of Major Options
Major options for this machine are referred to as follows:
•Roll Holder Unit Type A→Roll holder
•Roll Feeder Type 480→Lower tray
•Paper Cassette Type 480 →Cut paper tray
•Original Tray Type G →Original tray
Terms
•Long length original/paper
Original/paper length longer than 1189 mm, 46.8".
DolphinC2_GBcopy_F_FM.book Page 2 Friday, February 4, 2005 3:32 PM

3
Control Panel
This illustration shows the control panel of a machine that has all options fully
installed.
1. Screen contrast knob
Adjusts the brightness of the screen.
2. Indicators
Show errors or machine status. For de-
tails, see “Control Panel”, General Settings
Guide.
m: Data In indicator
L: Service Call indicator
x: Misfeed indicator
M: Open Cover indicator
D: Add Toner indicator
3. {
{{
{User Tools/Counter}
}}
}key
•User Tools
Press to change the default settings
and operation conditions to match
your requirements. See p.77 “User
Tools (Copier / Document Server Fea-
tures)”.
•Counter
Press to check or print the counter val-
ue. For details, see “Counter”, General
Settings Guide.
4. {
{{
{Job List}
}}
}key
Shows the job list. See “Job List”, General
Settings Guide.
5. Display panel
Shows operation status, error messages,
and function menus.
6. {
{{
{Check Modes}
}}
}key
Press to check the entered copying set-
tings.
7. {
{{
{Program}
}}
}key
Press to store or select the program
mode. See p.64 “Programs”.
8. {
{{
{Clear Modes}
}}
}key
Press to clear a setting's contents. The
number of copies is cleared when you
press and hold down this key for three
seconds.
9. {
{{
{Energy Saver}
}}
}key
Press to switch to and from the Energy
Saver mode. For details, see “Saving En-
ergy”, General Settings Guide.
10. {
{{
{Interrupt}
}}
}key
Press to make interrupt copies during a
copy run. See p.24 “Interrupt Copy”.
11. Main power indicator/On indi-
cator
When the main power switch is turned
on, the main power indicator lights.
The On indicator lights when the opera-
tion switch is on.
Important
❒Do not turn the main power off
while the On indicator is flashing.
The hard disk may malfunction.
AHD004S
DolphinC2_GBcopy_F_FM.book Page 3 Friday, February 4, 2005 3:32 PM

4
12. Operation switch
Press this switch to turn the power on
(the On indicator goes on). To turn the
power off, press this switch again (the On
indicator goes off). See ”Turning On the
Power”, General Settings Guide.
13. {
{{
{Sample Copy}
}}
}key
Press to make a single sample copy be-
fore starting a long copy run. By checking
the sample copy and making any neces-
sary changes to the image quality settings
before you make multiple copies, you can
save time and paper. See p.33 “Sample
Copy”.
14. {
{{
{Start}
}}
}key
Press to start scanning originals or copy-
ing. Press to start scanning and printing
in Document Server mode.
15. {
{{
{Clear/Stop}
}}
}key
•Clear
Press to clear numbers entered.
•Stop
Press to stop a copy job in progress.
Press to stop scanning and printing in
Document Server mode.
16. {
{{
{#}
}}
}key
Press to confirm values entered.
17. Number keys
Press to enter a value, such as the number
of copies.
18. Function keys
Press to select the following functions:
•Copy:
•Document Server:
•Scanner:
19. Function Status indicator
These show the status of the above func-
tions:
•Yellow: selected
•Green: active
•Red: interrupted
DolphinC2_GBcopy_F_FM.book Page 4 Friday, February 4, 2005 3:32 PM

5
Display Panel
The function items displayed serve as selector keys. You can select or specify an
item by lightly pressing them.
When you select or specify an item on the display panel, it is highlighted like
this: . Keys appearing as cannot be used.
❖
❖❖
❖When the lower tray (paper roll tray) is installed
❖
❖❖
❖When the cut paper trays are installed
DolphinC2_GBcopy_F_FM.book Page 5 Friday, February 4, 2005 3:32 PM

6
DolphinC2_GBcopy_F_FM.book Page 6 Friday, February 4, 2005 3:32 PM

7
1. Basics
Before Copying
Before you start copying, specify the original and copy paper locations.
❖
❖❖
❖Paper Capacities For Each Original/Paper Output
Original output Capacities
Original Exit : Top A1 (D)Lor smaller: 50 sheets (plain paper)
20 sheets (translucent paper)
•Use originals that are the same size, and of medium or high qual-
ity paper.
•Do not use paper that is long length paper, thick, curled, film,
folded, or translucent paper that is less than 80 g/m2(21.3 lb) in
weight.
•Do not load more than 10 sheets during very hot or humid con-
ditions.
•
Output thick paper (104.7 g/m
2
(27.9 lb) or more) to Rear (Straight).
•Translucent paper: 80 g/m2(21.3 lb) or less, plain paper: 52.3
g/m2(13.9 lb) or less, and originals that are not stiff should be
output to Rear (Straight).
Original Exit : Rear
(Straight)
A0 (E) Kor smaller: 1 sheet (plain paper)
1 sheet (translucent paper)
1 sheet (film)
•When output originals of A1 (E)Kor larger, the ejected originals
may interfere with the copy paper and impede its progress. If this
happens, use the copy output (rear) auxiliary guide.
•When copying A0 (E) Ksize originals, remove them one by one.
Original Exit : Rear
(document roller)
A1 (D)Lor larger: 1 sheet (up to 6 m (236")) (plain
paper)
1 sheet (up to 3.6 m (141")) (trans-
lucent paper)
1 sheet (up to 3.6 m (141")) (film)
•Use face-curl originals.
•For roll originals, use originals with a diameter of roll Φ40 mm –
Φ110 mm (Φ1.6" –Φ4.3").
•Do not use the document roller when copying on originals of size
longer than the maximum length for each paper type. Use both
hands to roll the original.
DolphinC2_GBcopy_F_FM.book Page 7 Friday, February 4, 2005 3:32 PM

Basics
8
1
Important
❒The paper capacity indicated assumes the use of standard copier paper, and
should only be used as a guide. If the paper exceeds the upper limit, the cop-
ies may become folded or cause paper jams.
Original Output Locations
The following original output loca-
tions are available:
❖
❖❖
❖Top Original Exit
This is the basic original output lo-
cation. Originals are ejected onto
the upper output stacker.
❖
❖❖
❖Rear Original Exit (straight)
Originals are ejected onto the orig-
inal output supports. When copy-
ing thick or hard originals, select
this output location.
❖
❖❖
❖Rear Original Exit (document roller)
When copying rolled originals
such as long length originals, select
this output location so that origi-
nals can be rolled and stacked by
the document roller.
Note
❒Originals of 52.3 g/m2–104.7
g/m2(13.9 lb –27.9 lb) can be
used with the document roller.
❒Do not use the document roller
when copying originals that are
longer than the maximum
length for each paper type. Use
both hands to roll the original.
Copy output Capacities
CopyOutput:
Front
Roll paper Plain paper (at normal tem-
perature and humidity):
99 sheets
Plain paper (at high or low
temperature and humidity):
10 sheets (A1Lto A2)
99 sheets (smaller than A2)
Translucent paper(vellum): 10 sheets
Film: 1 sheet
Cut sheet paper
Plain paper, and translucent
paper (vellum):
10 sheets
Film: 1 sheet
•Same size copy paper
•Normal temperature = 23°C
Normal humidity = 65%
CopyOutput:
Rear
A1 (D)K, A0 (E): 10 sheets (plain paper)
1 sheet (translucent paper)
1 sheet (film)
•Same size copy paper
•When using A0 size copy paper, attach the copy output (rear) auxiliary
guide. See p.11 “Using the rear output to eject A0 (E) KPaper”.
DolphinC2_GBcopy_F_FM.book Page 8 Friday, February 4, 2005 3:32 PM

Before Copying
9
1
Important
❒When using the optional carrier
sheet, set the original output loca-
tion to rear original exit. If the orig-
inal output location is set to top
original exit, the original may be
damaged.
Top Original Exit
A
AA
APress [Original Exit].
B
BB
BPress [Top], and then press [OK].
Rear Original Exit (Straight)
A
AA
ACheck that the document roller is
raised.
B
BB
BPress [Original Exit].
C
CC
CPress [Rear ], and then press [OK].
Rear Original Exit (Document Roller)
A
AA
ALower the document roller.
B
BB
BPress [Original Exit].
C
CC
C
Press
[Rear ]
, and then press
[OK]
.
ZEDH140E
DolphinC2_GBcopy_F_FM.book Page 9 Friday, February 4, 2005 3:32 PM

Basics
10
1
D
DD
DAfter the original has been eject-
ed, pull the document roller for-
ward and remove the original.
Adjusting the Original Tray
When using the optional original
tray, adjust the hook position to the
size of the original.
Copy Output Locations
The following copy output locations
are available.
❖
❖❖
❖Front Output
When [Front]is selected, copies are
sent to the copy output tray at the
front of the machine. When copy-
ing sizes up to A1 (D)L, select
front output.
If the output copies are badly
curled, turn the paper loaded in
the cut paper trays upside down,
or remove the copies during the
copy run.
❖
❖❖
❖Rear Output
When [Rear]is selected, copies are
sent to the copy output tray at the
back of the machine.
When copying A1 (D)Kor A0
(E)K, select rear output.
Front output
A
AA
APress [Front]under Copy Output
Location.
Rear output
A
AA
APress [Rear]under Copy Output
Location.
Note
❒When copying onto thick paper,
the last sheet to be ejected may
remain in the exit area. If this
happens, remove it.
ZEDP071E
DolphinC2_GBcopy_F_FM.book Page 10 Friday, February 4, 2005 3:32 PM
Other manuals for Aficio 480W
5
Table of contents
Other Ricoh Copier manuals

Ricoh
Ricoh ST23 User manual

Ricoh
Ricoh DSc535 User instructions

Ricoh
Ricoh MP 2000LE User manual

Ricoh
Ricoh Pro C550EX User manual

Ricoh
Ricoh Aficio 1232C User manual

Ricoh
Ricoh D069 Quick start guide

Ricoh
Ricoh FT5034C User manual

Ricoh
Ricoh D127 Quick start guide

Ricoh
Ricoh FT8880 User manual

Ricoh
Ricoh SWALLOW 2 User manual

Ricoh
Ricoh M022 Installation instructions

Ricoh
Ricoh Di-C1.5a User manual

Ricoh
Ricoh LDD745 User manual

Ricoh
Ricoh Aficio 2045e User instructions

Ricoh
Ricoh Aficio FX10 User manual

Ricoh
Ricoh D037 User manual

Ricoh
Ricoh FT4215 User manual

Ricoh
Ricoh Di-C1 User manual

Ricoh
Ricoh FT5580 User manual

Ricoh
Ricoh SAVIN A741 User manual