Royal 240DX User manual

Instruction Manual
240DX Cash Register
ROYAL
®


1 Royal 240DX User’s Guide
Contents
1. Welcome ..................................................................................... 6
Before Starting............................................................................................. 6
Key Operation .......................................................................................... 6
What is in the Box? ..................................................................................... 7
Important Phone Numbers .......................................................................... 7
2. Getting Started .......................................................................... 8
Getting Started ............................................................................................ 8
Setting the Language ............................................................................. 10
Installing the Memory Backup Batteries ................................................. 10
Installing the Paper Roll ......................................................................... 11
Setting the Date And Time ..................................................................... 11
Programming the Sales Tax ................................................................... 12
PC-Based Software ................................................................................... 13
3. Getting To Know the Cash Register ...................................... 15
About the Displays .................................................................................... 15
Clerk Display.......................................................................................... 16
About the Menus on the Clerk Display ...................................................... 16
Using the Keyboard ................................................................................... 17

Royal 240DX User’s Guide 2
Using the Cash Drawer ............................................................................. 19
Using the Accessory Drawer ..................................................................... 21
4. Setting Up Your Cash Register – theBasics ........................ 22
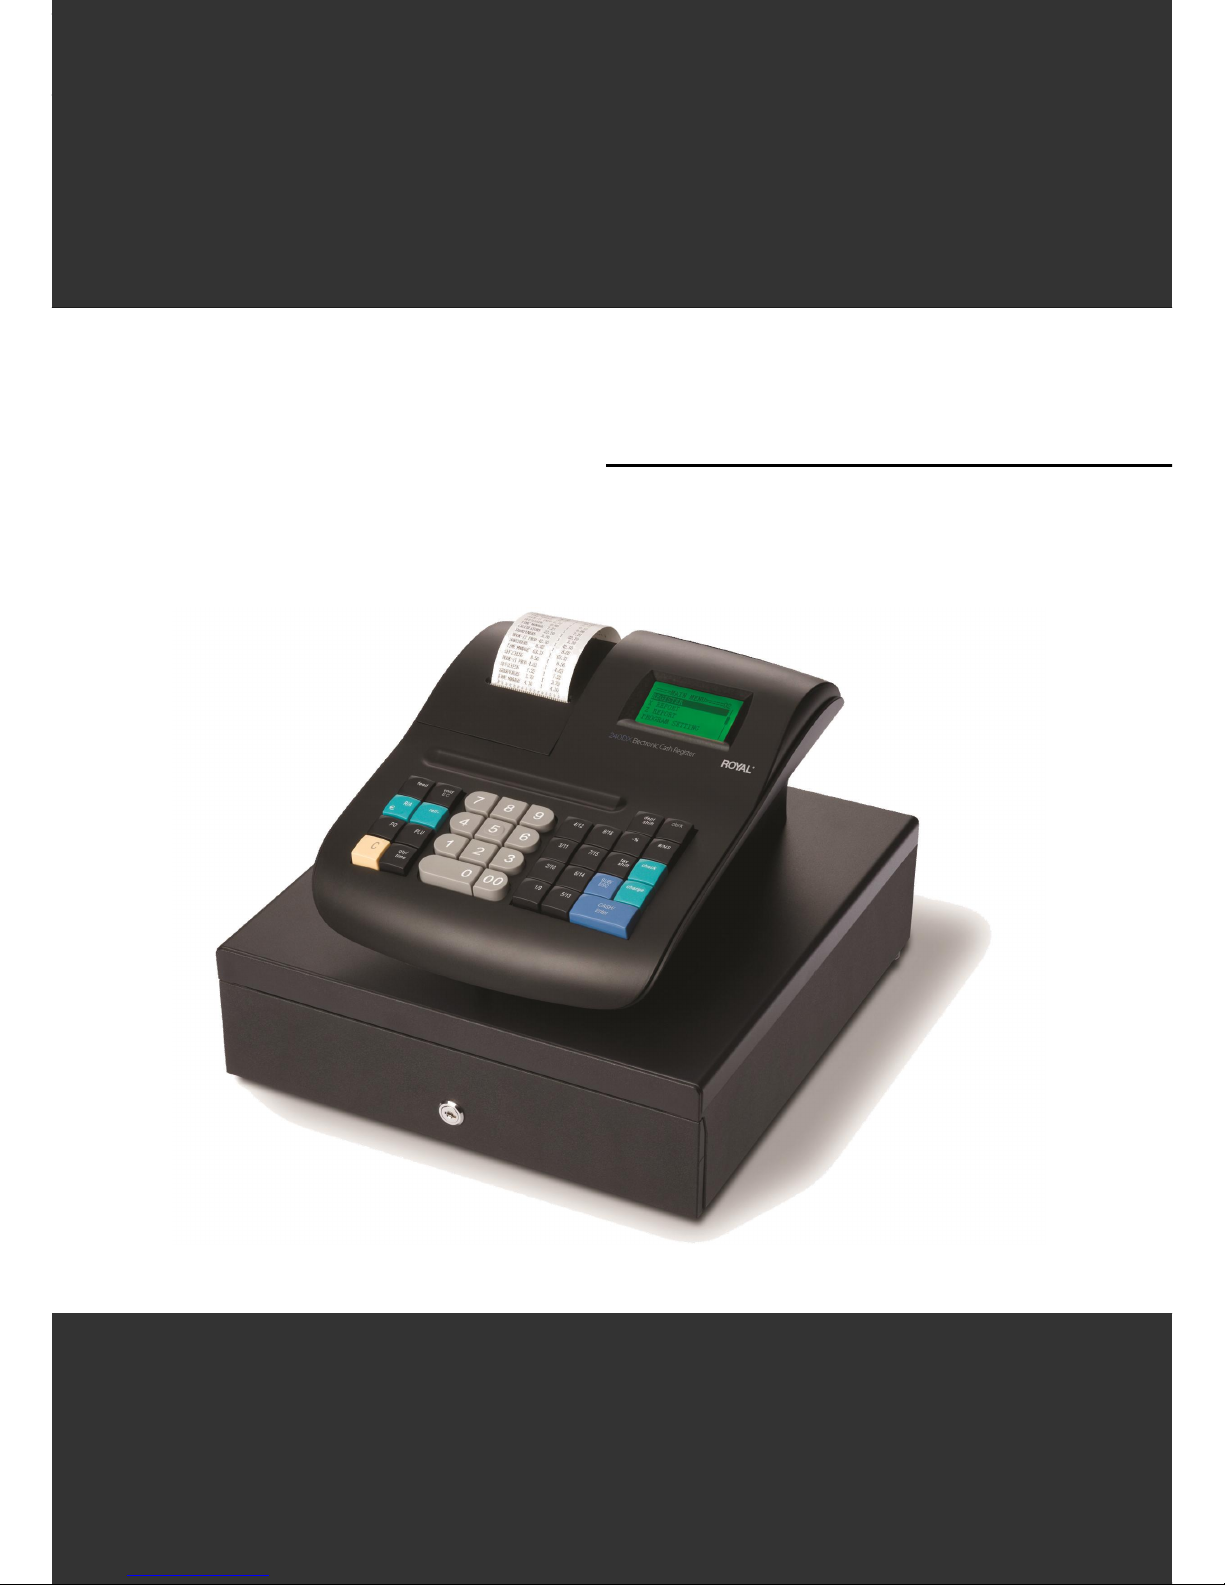
Using the Displays..................................................................................... 22
The Clerk Screen ................................................................................... 23
Navigating the Clerk Screen .................................................................. 23
Adjusting the Contrast on the Clerk Screen ........................................... 24
Adjusting the Backlight Time on the Clerk Screen ................................. 24
Setting Alphanumeric Descriptions............................................................ 25
Using Double Wide Characters.............................................................. 26
Setting Header Messages and Footer Messages ..................................... 26
Printing Options on Receipts ..................................................................... 28
Setting Clerk Numbers and Names ........................................................... 29
Using the Clerk System ............................................................................. 30
Setting Manager Passwords ..................................................................... 30
Setting the Machine Number ..................................................................... 31
Programming Department ......................................................................... 32
Programming Department Names ......................................................... 33
Programming Department Preset Price ................................................. 34
Programming Tax Status ....................................................................... 34
Programming PLU Descriptions ................................................................ 35
Programming PLUs without a Barcode Reader ..................................... 35
Programming PLUs with the Optional Barcode Reader ......................... 36
Printing the Program Confirmation Report ................................................ 37
Clearing an Error ................................................................................... 37
5. Setting up Your Cash Register Parameters ......................... 39
Print Parameters ....................................................................................... 39
1 Receipt ............................................................................................... 40
2 #/NS Information ................................................................................. 40
3 Dept# .................................................................................................. 40
4 Barcode .............................................................................................. 40
5 Receipt No. ......................................................................................... 40
6 Machine No......................................................................................... 40
7 Clerk ................................................................................................... 40
8 NRGT(Non-Resettable Grand Total) .................................................. 40
9 Auto Reprint Receipt ........................................................................... 40
10 Real Time ......................................................................................... 41
11 Bell Paper Out .................................................................................. 41
12 Color ................................................................................................. 41
13 Subtotal ............................................................................................ 41
14 Subtotal Amount ............................................................................... 41
15 Tax Amount ...................................................................................... 41
16 Double-Print ...................................................................................... 41
System Configuration ................................................................................ 42
Date Format ........................................................................................... 42
Time Format .......................................................................................... 42
Date/Time Setting .................................................................................. 42

3 Royal 240DX User’s Guide
Tax System ............................................................................................ 43
Machine No. .......................................................................................... 43
Receipt No. ............................................................................................ 43
Decimal .................................................................................................. 43
Backlight Time ....................................................................................... 43
Language ............................................................................................... 43
System Information ................................................................................ 44
System Options ......................................................................................... 44
Dept Group (Department Group) ........................................................... 44
-% Setting .............................................................................................. 44
Refund Setting ....................................................................................... 45
Payment Setting .................................................................................... 45
HALO ..................................................................................................... 46
Drawer Max ........................................................................................... 46
Dept Shift Num ...................................................................................... 46
Reprint Counter ..................................................................................... 46
Parameters ................................................................................................ 47
Compulsory Amount .............................................................................. 47
Zero Skip Report.................................................................................... 47
Reset Receipt Printer No. Daily Z .......................................................... 47
Bell Active .............................................................................................. 47
Warn Out of Stock ................................................................................. 47
Clear EJ (Full) ........................................................................................ 47
[00] Key Function ................................................................................... 47
Parameter Print ......................................................................................... 48
6. Ringing up Sales and Using Training Mode ......................... 49
Ringing up Sales ....................................................................................... 49
Ringing up Sales without a PLU Number ............................................... 50
Ringing up Sales with a PLU Number .................................................... 50
Ringing up Sales with the Optional Barcode Reader ............................. 51
Printing Receipts ....................................................................................... 51
Receipt on Demand ............................................................................... 52
Using Training Mode ................................................................................. 52
Entering and Exiting Training Mode ....................................................... 53
7. Programming Complex Tax Rates ........................................ 54
Selecting the Tax System .......................................................................... 54
Programming Straight Add-on Tax in the United States ............................ 56
Programming Table Tax in the United States ............................................ 56
Calculating Your Tax ............................................................................. 57
Example Tax Chart ................................................................................ 59
The Worksheet ...................................................................................... 60
Using VAT Tax Rates ................................................................................ 60
Printing a Confirmation Report .................................................................. 61
8. Running Report ....................................................................... 62
Running the Options Dump Report ........................................................... 62

Royal 240DX User’s Guide 4
Running the Department Confirmation Report .......................................... 63
Running the PLU Confirmation Report ...................................................... 64
Running the Clerk Confirmation Report ..................................................... 64
Running the Management Reports............................................................ 64
About X Reports .................................................................................... 65
About Z Reports ..................................................................................... 67
Running Reports ....................................................................................... 68
Financial Report Example ...................................................................... 68
Report Sample ....................................................................................... 70
More Information about the Electronic Journal (EJ) Reports ................. 72
9. Using SD Memory Card .......................................................... 75
Inserting and Removing ............................................................................ 75
Data Saving ............................................................................................... 76
Data Loading ............................................................................................. 78
10. Maintenance and Options .................................................... 79
Installing a New Paper Roll ....................................................................... 80
Using the Battery System .......................................................................... 81
About the Serial Port ................................................................................. 82
Connecting the Cash Register to a PC...................................................... 82
11. Troubleshooting .................................................................... 83
Paper End or Printer Errors ....................................................................... 83
No Receipt Printing ................................................................................... 84
No Printing on the Receipt ........................................................................ 84
Electronic Journal Memory Errors ............................................................. 84
The Cash Register Does Not Work at All .................................................. 85
Opening the Drawer When There is no Power .......................................... 85
Half System Clear ..................................................................................... 86
Full System Clear ...................................................................................... 86
12. Examples ................................................................................ 87
Transaction Codes .................................................................................... 88
Sample Receipt ..................................................................................... 89
Adding Tax to a Non-Taxable Department ................................................ 89
Cash Sale With Tendering Change ........................................................... 90
Cash Sale Without Tendering Change ...................................................... 90
Charge Sale .............................................................................................. 90
Check Sale ................................................................................................ 90
Dept Shift Key ........................................................................................... 91
Exempting Tax On An Item ....................................................................... 91
Minus Percentage Discount Sale .............................................................. 91
Plus Percentage Sale ................................................................................ 92
Multiplication of a Department Unit Price .................................................. 93
Multiplying By A Fraction ........................................................................... 93
No-Sale Function (Opening the Cash Drawer) .......................................... 94

5 Royal 240DX User’s Guide
Paid-Out Sale ............................................................................................ 94
PLU Sale ................................................................................................... 94
Received-On-Account Sale ....................................................................... 95
Registering A Department Unit Price......................................................... 95
Return Merchandise .................................................................................. 95
Refund operation ....................................................................................... 95
Split Tendering Sale .................................................................................. 96
Error-Correct a Department Preset Price .................................................. 96
Error-Correct a Department Preset with a Minus Percentage Discount .... 97
Error-Correct a Multiplication of a Department Preset Price ...................... 97
Error-Correct a PLU Sale .......................................................................... 98
Error-Correct a PLU Sale with a Minus Percentage Discount ................... 98
Error-Correct a PLU Sale with a Plus Percentage Rate ............................ 99
Error-Correct a Plus Percentage Sale ....................................................... 99
Voiding an Entire Sale before Finishing the Sale .................................... 100
13. Product Information ............................................................ 101
Specifications and Safety ........................................................................ 101
Safety and Legal Notices ........................................................................ 102
Software Licensing Agreement ............................................................... 103
Manufacturer’s Limited Warranty............................................................. 104
14. Ordering Supplies and Accessories ................................. 106

Royal 240DX User’s Guide 6
CHAPTER 1
Welcome
Congratulations on purchasing your new Royal cash register! This register is
designed to be easy to use so you can focus more on running your business.
Before Starting
Please read the following before you start to use the manual to set up and
customize the cash register.
Key Operation
When you need to press a key, you see a picture of the key you need to press and
the name of the key is in another font. For example:
1 If you are ringing up a clear, press the C key.
If you need to type something in the Number keys area, what you need to type is
shown in a special font. For example:
2 Using the Number keys, press444444and then press the
CASH/Enter key.

7 Royal 240DX User’s Guide
What is in the Box?
Cash Register
1 starter roll of standard thermal paper, Royal Reorder Number 013127 (2¼ inch
or 57.5 mm wide).
RegisterLinkTM software and DB9-RJ11 serial cable
1 set of keys, consisting of 2 Cash Drawer keys (515).
Operational Manual
Important Phone Numbers
If you need help or want to order additional supplies, use the following contact
information.
Customer Service: 1-800-272-6229 (USA)
1-888-266-9380 (Canada)
01-800-849-4826 (Mexico)
Ordering Supplies: 1-888-261-4555
Website: www.royal.com
To order items, see Ordering Supplies and Accessories on page 106.

Royal 240DX User’s Guide 8
CHAPTER 2
Getting Started
Setting up your cash register consists of the following steps:
1 Unpacking the cash register
2 Plugging the cash register into a power source
3 Setting the Language
4 Installing the Paper Roll
5 Setting the Date And Time
6 PROGRAM SETTING the Sales Tax
Follow the on screen prompts to program the cash register.
Proceed to chapter “Getting to Know the Cash Register, page 15” and “Setting Up
Your Cash Register-the Basics, page 22” to set up the basics of the cash register.
Getting Started
The Royal 240DX has a 5-Line LCD screen; setup is prompted through on screen
instructions after you plug power into the cash register. This chapter will further
explain the setup options.

9 Royal 240DX User’s Guide
If you make a mistake or enter a wrong setting during initial setup, just continue with
the rest of the initial setup. During initial setup, you cannot change settings after you
press the CASH/Enter key. When you complete the initial setup, you can correct
any setting by following the instructions listed in this manual.
Make sure that you plug the cash register into the electrical outlet before you put in
the batteries.
Caution
If you put the batteries in first, they can damage the cash register.
Do not use this cash register outdoors in the rain or near any source of
liquid.
After plugging power into the cash register, the 5-line LCD screen prompts you
through the rest of the set up. Use the Up and Down arrow keys to move through
the items on the screen.
Note
If you make a mistake while you are PROGRAM SETTING, press the C key.
To get the cash register ready to use
1 Remove the cash register and the parts from the box. Store the box and packing
material in a safe and dry place. The box may be reuse in the future while
moving to another location.
2 Remove any tape on the cash register. For example, there may be tape on
the Journal Compartment Cover.
Put the cash register on hard and stable service. Keep away from rain and
liquids. A stable service allows the cash drawer to go in and out smoothly.
Do not put the register on a porous surface. Do not place the register on any
valuable surface, such as antique or fine wood tables, desks, etc. Depending
on the surface or any cleaning solution used on the surface, the rubber feet may
leave marks on the surface.
3 Plug the cash register into a grounded three-hole electrical wall outlet. (8 volt,
60 hertz). Make sure the electrical cord is placed safely and will not cause
accidents such as the wire being trip over or accidentally pulled from the
electrical outlet.
Put the cash register on an electrical circuit with no other electrical device or
appliance. Other appliances can overload the circuit or cause electrical
interference with the cash register. It is best that you use a circuit without other
appliances already on it.
Now follow the prompts on the screen. The rest of this chapter explains the setup
options.

Royal 240DX User’s Guide 10
Setting the Language
At the prompt, you can select English, Spanish, or French. Changing the language
changes the factory programmed words you and the customer see on the displays.
However, changing the language does not translate any words you program in the
cash register, such as PLU descriptions, header information, and so on.
Note
If you start programming the cash register and then change the language
midway, you will lose all of your previous programming.
To set the language
1 When you first turn the register on, you are prompted through all setup options.
Setting the language is the first option.
2 Select the language you want and press the CASH/Enter key. The language your
cash register shows on the operator display is set.
Installing the Memory Backup Batteries
Your cash register uses 2 AA 1.5 volt batteries for the memory backup system. These
batteries did not come with your cash register and you must purchase them
additionally.
Caution
If you put the batteries in the cash register first, they can damage your cash
register. Put the batteries in when you are prompted.
1 At the prompt, open the Journal Compartment Cover.
Remove the Journal Compartment Cover and set aside.
2 Move the paper roller bar up and out of the way. Grab
the small handle on the right of the print roller bar. Push
the little handle towards the back of the cash register
and raise the paper roller bar
up. You see a slope down to the paper compartment. The battery cover is located
under the print roller bar, on the slope.
3 Remove the battery cover. Press the edge at the top of
the cover and push to the back. The cover pops off.
• Put the batteries in the slots. Make sure that the
positive and negative ends are in the right place. The
batteries have a little plus (positive) and minus
(negative) sign on each end to help you.
• Replace the battery cover. Slide the bottom tabs into
the long slit in the bottom position and snap the cover
into place. Do not put the tabs in the 2 holes in the
bottom of the compartment. The cover will not close
and you will break the tabs.

11 Royal 240DX User’s Guide
Installing the Paper Roll
Your cash register has a thermal printer that prints receipts for the customer or a
journal tape. Use 2¼ inch (57.5 mm) wide standard thermal register paper. Do not
use bond paper because the register does not use a ribbon or ink for printing.
Caution
Do not manually pull the receipt paper. Always use the Feed key to
remove or advance the paper. Do not use sharp or pointed instruments in
the printer area. This can seriously damage the printer.
1 At the prompt on the clerk display during set up, open the Journal Compartment
Cover. Remove the Journal Compartment Cover and set aside. Remove the tape
on the black Journal Tape spindle inside the printer compartment of the cash
register.
2 Grab the small handle
on the right of the print roller. Push
the little handle towards the back of
the cash register and raise the roller
bar up.
3 Lay the end of the paper across the
printer as shown. Move the print
roller down onto the paper and
snap into place. Make sure both
sides are snapped down.
4 Press the Feed key to move the paper
through the printer to make sure there is
no jam and the paper is properly installed
before continuing.
5 Follow the instructions on the clerk display.
Setting the Date and Time
The date changes every day and prints in the month-day-year format. You can
prevent the date from printing on the transaction receipts. The Date Format can also
be changed to print day-month-year/ year-month-day. For more information, see Date
Format on page42.
The time can print in either the 12 or 24 hour (military time) format. The default
setting is to print in the 24 hour format, which is normally used. To change to the 12
hour format, see Time Format on page42. You can set the cash register so that it does
not print the time on receipts. For more information, see Print Parameters on
page39.

Royal 240DX User’s Guide 12
To set the date
PROGRAM SYSTEM PARAMETER System Configuration
1 Press SUB/ESC to enter the Main Menu.
2 Press Arrow Down to select PROGRAM. Press CASH/Enter
3 Press Arrow Down to select SYSTEM PARAMETER. Press CASH/Enter.
4 Press CASH/Enter. Press Arrow Down to select Date/ Time Setting. Press
CASH/Enter.
5 Press CASH/Enter. Use the Number keys to enter the 6 digits of the
month-day-year. For example, 050113. Press CASH/Enter.
6 Press Arrow Down to select Current Time. Press the CASH/Enter. Use the
Number keys to enter the 6 digits of the month-day-year. For example, 0908.
Press the CASH/Enter key.
Using the information in this example, the date and time are set to 05-01-13
09:08am.
Programming the Sales Tax
Now you need to select and program the sales tax for your area. You can use 1 of 2
tax types in the US:
• Straight tax: The sales amount is multiplied by a flat percentage rate such as
5%. For example, on a $1.00 item, $.05 is added for tax.
• Table tax: The tax is charged based on a tax table you obtain from your local or
state government tax office.
Straight tax is the easiest and most commonly used tax rate. Most states and areas
use straight tax. To find out which sales tax type and percentage rate you should use,
contact your local government office.
This section explains setting simple sales tax in the United States. See
Selecting the Tax System on page 54 for other sales tax systems.
To set Straight USA (add-on tax)
PROGRAM TAX SETTING
1 Press the SUB/ESC key to enter the Main Menu.
2 Press Arrow Down key to select PROGRAM and Press CASH/Enter.
3 Press Arrow Down key to select TAX SETTING. Press CASH/Enter.
4 Tax1: Straight Tax and press the CASH/Enter key.
5 For straight tax, use the Number keys to enter the sales tax rate for your area. For
example, if your local sales tax rate is 10%, enter 10000. To program other tax
rates, press the following:

13 Royal 240DX User’s Guide
For this tax rate...
Press these keys...
7.75% 7750
5.5% 5500
10.5% 10500
6 Press the CASH/Enter key.
For tax tables and more advanced tax rate PROGRAM SETTING, see
Programming Complex Tax Rates on page 54.
For more information about the other features of your cash register, see Setting Up
Your Cash Register - the Basics on page 22 and Setting Up Your Cash Register
Parameters on page 39.
PC-Based Software
Your cash register includes:
• RegisterLink PC-based software.
This software allows you to connect the cash register to your PC to download
your sales information and transfer it to QuickBooks® Pro 2002 or later
accounting software.
Program your cash register from the PC - You can program clerk, PLUs,
departments, the header, the footer, and scrolling messages on your PC and
download these settings to your cash register.
Back-Up and Restore - Whether you programmed your cash register data on
the cash register or on your PC, you can back-up that PROGRAM SETTING
and store the data on your PC. Should you lose the memory in your cash
register, you can simply restore the data from your PC back to the cash
register without having to reprogram all the PLU's, Departments and other
data.
Additional Cash Registers - When you buy additional cash registers, you can
use the back-up-and-restore feature with multiple registers of the same model
number. Just program one register, back-up the data to your PC, and then
restore or download the data from your PC to the other registers, as long as
they are all the same model number. This saves you the time of having to
program each register individually.
Check the Royal web site for any new features and upgrades to
RegisterLink.
Using the RegisterLink software requires connecting your computer to the cash
register using the serial port. To connect your computer to the serial port, you need
to use the included null-modem serial cable. For technical details about the serial
connection, see About the Serial Port on page82.
For information for connecting the cash register to your PC, see
Connecting the Cash Register to a PC on page82.

Royal 240DX User’s Guide 14
The RegisterLink software is on a CD. Please install the software from this CD. Then
check for updates on the Royal web site (www.royal.com). If a later version of the
RegisterLink software is available on the web site, download it from the web site and
install it on your PC. It is important that the CD version of the software is already
installed on your PC before you download and install any updates.
RegisterLink software instructions are separate from this manual. The RegisterLink
instruction manual is on the CD that contains the software. An updated and revised
version of the instruction manual accompanies any newer version of the software that
is downloaded from our web site. Please refer to the RegisterLink instruction manual
for all software related operational instructions and assistance.

15 Royal 240DX User’s Guide
CHAPTER 3
Getting To Know the Cash
Register
This chapter shows you the basics of using your cash register after you set it up. If
you have not yet set up your cash register, see the Quick Start sheet that came in the
box with your cash register or Getting Started on page 8.
About the Displays
Your cash register has 2 displays.
Customer Display
Customers will be able to see their transaction being ringed up.
Your cash register has eight digits segment customer display. The digit display
shows 8 digits for sales dollar amounts.
Clerk screen
Your cash register has a 5 line LCD display.

Royal 240DX User’s Guide 16
Clerk Display
Your cash register has a 5 line display for the operator. All lines shows letters and
numbers (alphanumeric).
About the Menus on the Clerk Display
This cash register uses menus on the 5 line LCD clerk display to prompt you
through both PROGRAM SETTING and using the cash register. The 5 line LCD
clerk screen looks like:
The menu system prompts you through PROGRAM SETTING and sales. Always
follow the instructions on the screen. Refer to this manual for detailed information
about the options on the screen.
You may see a scroll bar on the right side of the screen. This means that there are
more options to see if you use the Arrow Up and Arrow Down keys.

17 Royal 240DX User’s Guide
Using the Keyboard
The keyboard on your cash register looks like the following:
Rounded number keys
Department keys
Amount Tend Total key
opens cash drawer
To use the keyboard, do the following:
• Plugging the cash register into a power source. Now
you can press the round Number keys and Department
keys to ring up a sale. For more information about
ringing up sales, see Runing up Sales and Using
Training Mode on page49.
• To program the cash register, press the SUB/ESC
key. Select PROGRAM SETTING and press the
CASH/Enter key. For more information about
PROGRAM SETTING the cash register, see Setting
Up Your Cash Register - the Basics on page 22 and
Setting up Your Cash Register Parameters on page 39.
The following identifies some of the keys on the keyboard and what you can use
them for

Royal 240DX User’s Guide 18
Navigating keyboard
Use this key... To do this...
feed paper through the printer
use Received On Account
use Cash Paid-Out
Clear an entry
void a line item in a sales
transaction(ERROR-CORRECT) or
ring an entire voided sale transaction
Return Merchandise
Refund
enter a PLU number manually
enter multiple quantities of a PLU or Department
during a sale
show the default date/time/status screen on the clerk
display between sales in the Sales Registration mode
switch the department increment
switch the alphanumeric input (Capital letter/
Lowercase letter/ Digits/ Symbol)
-% (Discount) operation
override the pre-programmed tax rate for an item with
a different tax rate or tax exempt a single item
go directly back to the Main menu from any point in
the cash register menus
exit the current screen and go back to the previous
screen
log on/off the clerk
Other manuals for 240DX
1
Table of contents
Other Royal Cash Register manuals

Royal
Royal ts1200mw User manual

Royal
Royal 580 User manual

Royal
Royal ALPHA9155SC User manual

Royal
Royal Alpha 9180sc User manual

Royal
Royal CMS-482 Plus Owner's manual

Royal
Royal 120dx User manual

Royal
Royal 220DX User manual

Royal
Royal 101cx User manual

Royal
Royal 425cx User manual

Royal
Royal CMS-487 Plus User manual

Royal
Royal 240DX User manual

Royal
Royal 482NT User manual

Royal
Royal 130cx User manual

Royal
Royal CMS-482 Plus User manual

Royal
Royal alpha 587 User manual

Royal
Royal alpha 6000ML User manual

Royal
Royal 225cx User manual

Royal
Royal TS4240 User manual

Royal
Royal 110cx Manual

Royal
Royal ALPHA lOOOML User manual